


Vue2尚硅谷后台管理系统自学笔记
一、SPU管理开发
1、主页
(1)展现效果:
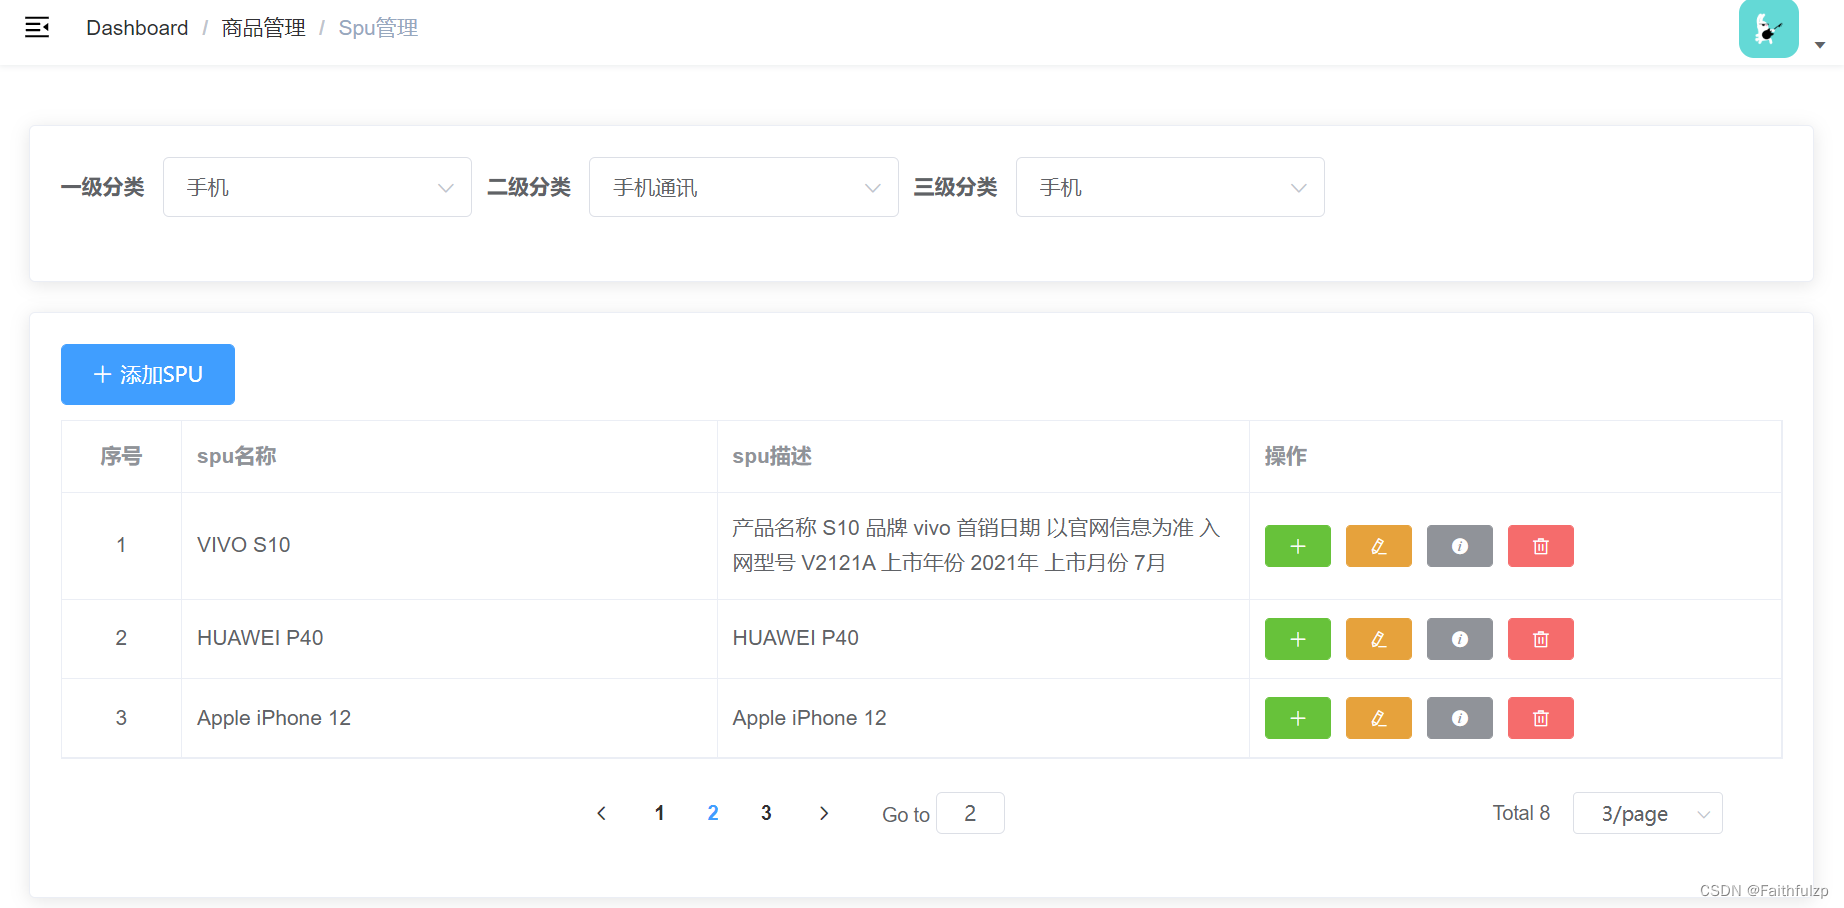
(2)用到ele-ui:el-card、el-table、el-pagination、el-button
(3)注意事项:prop中写了要展示的数据的话,就不能再写作用域插槽,prop和template slot-scope会冲突,导致内容不显示。
html:
<template>
  <div>
    <el-card style="margin: 20px 0">
      <CategorySelect
        @getCategoryId="getCategoryId"
        :show="scene != 0"
      ></CategorySelect>
    </el-card>
    <el-card>
      <!-- spu列表数据 -->
      <div v-show="scene == 0">
        <el-button
          type="primary"
          icon="el-icon-plus"
          style="margin-bottom: 10px"
          :disabled="!category3Id"
          @click="addSpu"
          >添加SPU</el-button
        >
        <!-- prop中写了要展示的数据的话,就不能再写作用域插槽,否则内容不会显示 -->
        <el-table :data="spuList" style="width: 100%" border>
          <el-table-column type="index" label="序号" width="80" align="center">
          </el-table-column>
          <el-table-column prop="spuName" label="spu名称" width="width">
          </el-table-column>
          <el-table-column prop="description" label="spu描述" width="width">
          </el-table-column>
          <el-table-column prop="prop" label="操作" width="width">
            <template slot-scope="{ row, $index }">
              <el-button
                type="success"
                icon="el-icon-plus"
                size="mini"
                title="添加sku"
              ></el-button>
              <el-button
                type="warning"
                icon="el-icon-edit"
                size="mini"
                title="修改spu"
                @click="updateSpu(row)"
              ></el-button>
              <el-button
                type="info"
                icon="el-icon-info"
                size="mini"
                title="查看当前spu全部sku列表"
              ></el-button>
              <el-popconfirm title="确定删除吗?" @onConfirm="deleteSpu(row)">
                <el-button
                  type="danger"
                  icon="el-icon-delete"
                  size="mini"
                  title="删除spu"
                  slot="reference"
                  style="margin-left: 10px"
                ></el-button>
              </el-popconfirm>
            </template>
          </el-table-column>
        </el-table>
        <el-pagination
          style="margin: 20px; text-align: center"
          :current-page="page"
          :pager-count="7"
          :page-sizes="[3, 5, 10]"
          :page-size="limit"
          :total="total"
          @size-change="handleSizeChange"
          @current-change="handleCurrentChange"
          layout=" prev, pager, next, jumper,->,total, sizes"
        >
        </el-pagination>
      </div>
      <!-- 添加修改Spu -->
      <SpuForm
        v-show="scene == 1"
        @changeScene="changeScene"
        ref="spu"
      ></SpuForm>
      <!-- 添加Sku -->
      <SkuForm v-show="scene == 2"></SkuForm>
    </el-card>
  </div>
(4)JS实现功能:
- 收集存储数据
  data() {

    return {

      category1Id: "",
      category2Id: "",
      category3Id: "",
      page: 1, // 初始化当前页码
      limit: 3, // 初始化每页显示数据量
      total: 0, // 存储数据总数
      spuList: [], // 存储spu数据
      scene: 0, // 0:代表战术SPU列表数据,1:添加SPU|修改SPU,2:添加SKU
      skuList: [], //保存sku数据
      spu: {
   }, //保存当前行的spu数据
      dialogTableVisible: false, // 控制sku列表窗口显示
      loading: true, //sku列表数据出现前的加载效果
    };
  },
- 获取三级分类的Id数据
- 这里用到的是之前封装过的全局子组件CategorySelect中的自定义事件
// 自定义事件的回调,修改id,最后发请求,携带三个id
    getCategoryId({
     categoryId, level }) {

      // 如果是一级分类的id
      if (level == 1) {

        this.category1Id = categoryId;
        // 清空后两类id
        this.category2Id = "";
        this.category3Id = "";
      } else if (level == 2) {

        this.category2Id = categoryId;
        // 清空后第三类id
        this.category3Id = "";
      } else {

        this.category3Id = categoryId;
        this.getSpuList();
      }
    },
- 获取spu数据
// 获取spu数据
    async getSpuList() {

      let {
    page, limit, category3Id } = this;
      let result = await this.$API.spu.reqSpuList(page, limit, category3Id);
      if (result.code == 200) {

        this.total = result.data.total;
        this.spuList = result.data.records;
      }
    },
- 分页器页码的回调
// 修改每页数量,重新请求数据
    handleSizeChange(limit) {

      this.limit = limit;
      this.getSpuList();
    },
// 修改页码,重新请求数据
    handleCurrentChange(page) {

      this.page = page;
      this.getSpuList();
    },
- 添加SPU的回调
- 调用了子组件spuForm的方法
// 添加SPU
    addSpu() {

      this.scene = 1;
      // 添加的时候需要初始化品牌列表和销售商品属性的数据
      this.$refs.spu.initAddSpuData(this.category3Id);
    },
- 修改SPU的回调
// 修改SPU,需要将当前行的spu数据传递给spuForm,通过id获取对应的spu数据
    updateSpu(row) {

      this.scene = 1;
      // ref设置在子组件标签上,可以获取子组件spuForm的方法等
      this.$refs.spu.initSpuData(row);
    },
- 修改scene的值,控制页面的切换
// 改变scene的值,自定义事件回调
    changeScene({
     scene, flag }) {

      this.scene = scene;
// 改变scene后,得判断flag是修改还是添加,如果是修改则留在当前页,如果是添加则返回第一页,重新请求数据
      if (flag == "添加") {

        this.page = 1;
        this.getSpuList();
      } else {

        this.getSpuList();
      }
    },
- 删除spu
// 删除spu
    async deleteSpu(row) {

      let result = await this.$API.spu.reqDeleteSpu(row.id);
      if (result.code == 200) {

        this.$message({

          type: "success",
          message: "删除成功",
        });
        // 如果当前页数据删光了,则调到上一页
        if (this.spuList.length > 1) {

          this.getSpuList();
        } else {

          this.page = this.page - 1;
          this.getSpuList();
        }
      }
    },
2、Spu编辑界面
(1)展现效果:
(2)用到ele-ui:el-form、el-select、el-upload(照片墙)、el-table、el-tag(小标签,可添加)等。
(3)注意事项:商品分类,添加销售属性按钮可操作(即有可用和不可用状态)。
html:
<template>
  <div>
    <el-form ref="form" label-width="80px" :model="spu">
      <el-form-item label="SPU名称">
        <el-input placeholder="SPU名称" v-model="spu.spuName"></el-input>
      </el-form-item>
      <el-form-item label="品牌">
        <el-select placeholder="请选择品牌" v-model="spu.tmId">
          <el-option
            v-for="(tm, index) in tradeMarkList"
            :key="tm.id"
            :label="tm.tmName"
            :value="tm.id"
          >
          </el-option>
        </el-select>
      </el-form-item>
      <el-form-item label="SPU描述">
        <el-input
          placeholder="SPU描述"
          type="textarea"
          rows="4"
          v-model="spu.description"
        ></el-input>
      </el-form-item>
      <el-form-item label="SPU图片">
        <!-- 上传图片:
          action:上传图片地址,
          list-type:文件列表的类型,
          on-preview:图片预览时触发
          on-remove:当删除图片时触发
          on-success:当图片上传成功后的回调
        -->
        <el-upload
          action="/dev-api/admin/product/fileUpload"
          list-type="picture-card"
          :on-preview="handlePictureCardPreview"
 最低0.47元/天 解锁文章


 7744
7744


 被折叠的 条评论
为什么被折叠?
被折叠的 条评论
为什么被折叠?
 到【灌水乐园】发言


