


文章目录
5 Nginx 反向代理
正向代理:代理客户端访问服务器,可以实现缓存,访问控制等功能;
反向代理:reverse proxy,指的是代理外面用户的请求到内部的指定的服务器,并将数据返回给用户的
一种方式,这是用的比较多的一种方式。
Nginx 除了可以在企业提供高性能的web服务之外,另外还可以将 nginx 本身不具备的请求通过某种预
定义的协议转发至其它服务器处理,不同的协议就是Nginx服务器与其他服务器进行通信的一种规范,
主要在不同的场景使用以下模块实现不同的功能
四层:根据IP 端口号等
七层:url路径,应用等
LVS和nginx的区别
![[外链图片转存失败,源站可能有防盗链机制,建议将图片保存下来直接上传(img-v4qQVZ3V-1655022872367)(C:\Users\78715\AppData\Roaming\Typora\typora-user-images\image-20220606154705879.png)]](https://img-blog.csdnimg.cn/cc2140b892094b2484fe9b2ebf04bead.png)
![[外链图片转存失败,源站可能有防盗链机制,建议将图片保存下来直接上传(img-8Ou2PqxV-1655022872369)(C:\Users\78715\AppData\Roaming\Typora\typora-user-images\image-20220606154722617.png)]](https://img-blog.csdnimg.cn/5ebbb2eaee6e489e8d7407a53e76be37.png)
工作层:LVS四层,Nginx七层
监听端口:LVS不监听,Nginx监听端口
后端服务器看到客户端地址:LVS可以,Nginx不可以
连接(三次握手):LVS 不参与连接,只负责转发,Nginx代替后端服务器和客户建立连接
5.1实现HTTP反向代理
Nginx 可以基于ngx_http_proxy_module模块提供http协议的反向代理服务
反向代理配置参数
proxy_pass;
#用来设置将客户端请求转发给的后端服务器的主机,可以是主机名(将转发至后端服务做为主机头首部)、IP地址:端口的方式
#也可以代理到预先设置的主机群组,需要模块ngx_http_upstream_module支持

#官方文档:https://nginx.org/en/docs/http/ngx_http_proxy_module.html#proxy_pass
Syntax: proxy_pass URL;
Default: —
Context: location, if in location, limit_except
#用来设置将客户端请求转发给的后端服务器的主机,可以是主机名(将转发至后端服务做为主机头首部)、
IP:port 方式
#说明: proxy_pass http://FQDN/ 中的FQDN决定转发至后端哪个虚拟主机,而与用户请求的URL无关
#如果转到后端的哪个服务器由用户请求决定,可以向后端服务转发请求的主机头实现
#示例: proxy_set_header Host $http_host;
#示例:
location /web {
 index index.html;
 proxy_pass http://10.0.0.18:8080; #8080后面无uri,即无 / 符号,需要将location后面
url 附加到proxy_pass指定的url后面,此行为类似于root
  #proxy_pass指定的uri不带斜线将访问的/web,等于访问后端服务器
http://10.0.0.18:8080/web/index.html,即后端服务器配置的站点根目录要有web目录才可以被访
问
  # http://nginx/web/index.html ==> http://10.0.0.18:8080/web/index.html
 proxy_pass http://10.0.0.18:8080/;  #8080后面有uri,即有 / 符号,相当于置换,即访
问/#proxy_pass指定的uri带斜线,等于访问后端服务器的http://10.0.0.18:8080/index.html
内容返回给客户端
}  # http://nginx/web/index.html ==> http://10.0.0.18:8080

#重启Nginx测试访问效果:
#curl -L http://www.ehuo.org/web.
proxy_pass_request_headers on | off;
#是否将客户端的请求头部转发给后端服务器,可以设置在http,server或location块,默认即为开启
proxy_set_header;
#可更改或添加客户端的请求头部信息内容并转发至后端服务器,比如在后端服务器想要获取客户端的真实IP
的时候,就要更改每一个报文的头部
#示例:
#proxy_set_header X-Forwarded-For $proxy_add_x_forwarded_for;
$proxy_add_x_forwarded_for
the “X-Forwarded-For” client request header field with the $remote_addr variable
appended to it, separated by a comma. If the “X-Forwarded-For” field is not
present in the client request header, the $proxy_add_x_forwarded_for variable is
equal to the $remote_addr variable.

proxy_set_header X-Real-IP  $remote_addr;
#添加HOST到报文头部,如果客户端为NAT上网那么其值为客户端的共用的公网IP地址,常用于在日之中记录客户端的真实IP地址。
#在后端httpd服务器修改配置,添加日志记录X-Forwarded-For字段
LogFormat "%h %l %u %t \"%r\" %>s %b \"%{Referer}i\" \"%{User-Agent}i\" \"%{X-
Real-IP}i\"" combined
#在后端服务器查看日志
[root@centos8 ~]#tail /var/log/httpd/access_log  -f
10.0.0.8 - - [09/Oct/2020:21:50:57 +0800] "HEAD /static/index.html HTTP/1.0" 200
- "-" "curl/7.29.0" "10.0.0.7"
proxy_connect_timeout time;

#配置nginx服务器与后端服务器尝试建立连接的超时时间,默认为60秒,用法如下:
proxy_connect_timeout 6s;

#60s为自定义nginx与后端服务器建立连接的超时时间,超时会返回客户端504响应码
proxy_read_timeout time;
#配置nginx服务器向后端服务器或服务器组发起read请求后,等待的超时时间,默认60s
proxy_send_timeout time;
#配置nginx项后端服务器或服务器组发起write请求后,等待的超时 时间,默认60s
proxy_http_version 1.0;
#用于设置nginx提供代理服务的HTTP协议的版本,默认http 1.0,建议修改1.1支持长连接
#注意:需要配合实现proxy_set_header Connection "" 实现长连接

proxy_ignore_client_abort off;
#当客户端网络中断请求时,nginx服务器中断其对后端服务器的请求。即如果此项设置为on开启,则服务器会忽略客户端中断并一直等着代理服务执行返回,如果设置为off,则客户端中断后Nginx也会中断客户端请求并立即记录499日志,默认为off。
proxy_headers_hash_bucket_size 128;
#当配置了 proxy_hide_header和proxy_set_header的时候,用于设置nginx保存HTTP报文头的hash表的上限
proxy_headers_hash_max_size 512;
#设置proxy_headers_hash_bucket_size的最大可用空间
server_namse_hash_bucket_size 512;
#server_name hash表申请空间大小
server_names_hash_max_size  512;
#设置服务器名称hash表的上限大小
proxy_next_upstream error | timeout | invalid_header | http_500 | http_502 |
http_503 | http_504;
#当一台后端朋务器出错,超时,无效首部,500等时,切换至下一个后端服务器提供服务
实战案例: 反向代理单台 web 服务器
将用户对域www.ehuo.org的请求转发后端服务器处理
[root@centos8 ~]# cat /apps/nginx/conf/conf.d/pc.conf
server {
listen 80;
server_name www.ehuo.org;
location / {
  proxy_pass http://10.0.0.18/; # http://10.0.0.18/ 最后的 / 可加或不加
  proxy_set_header Host  $http_host; #转发主机头至后端服务器
  proxy_connect_timeout 10s;
}
}
#重启Nginx 并访问测试
如果后端服务器无法连接((比如:iptables -AINPUT -s nginx_ip -j REJECT或者systemctl stop httpd),关
机(无后端服务器arp缓存)), 会出现下面提示
默认在1分钟内后端服务器无法响应(比如:iptables -AINPUT -s nginx_ip -j DROP或关机(有后端服务器
arp缓存)),会显示下面的504超时提示
500:服务器内部错误: 连接数据库错误,rewrite死循环;
502:后端停了出现 后端端口没有打开502 bad gateway 发过去是拒绝了(比如:iptables -AINPUT -s nginx_ip -j REJECT
503:服务不可用,临时服务器维护或过载,服务器无法请求处理,:超过连接数和连接频率
504:默认在1分钟内后端服务器无法响应(比如:iptables -AINPUT -s nginx_ip -j DROP或关机(有后端服务器
arp缓存)),会显示下面的504超时提示
对特定的资源实现代理
有/ 停止 无/ 就是追加!
实战案例: 指定 location 实现反向代理
针对指定的 location
server {
listen 80;
server_name www.ehuo.org;
location / {
 index index.html index.php;
 root /data/nginx/html/pc;
 }
location /static {
 #proxy_pass http://10.0.0.18:80/; #注意有后面的/, 表示置换
 proxy_pass http://10.0.0.18:80;  #后面没有 / , 表示附加
}
}
#后端web服务器必须要有相对于的访问URL
[root@centos8 ~]# mkdir /var/www/html/static
[root@centos8 ~]# echo "web1 page for apache" > /var/www/html/index.html
[root@centos8 ~]# echo "web2 page for apache" > /var/www/html/static/index.html
#重启Nginx并访问测试:
[root@centos8 ~]# curl -L http://www.wang.org/
pc web
[root@centos8 ~]# curl -L http://www.wang.org/static
web2 page for apache
#Apache的访问日志:
[root@centos8 ~]# tail -f /var/log/httpd/access_log
10.0.0.8 - - [04/Mar/2019:18:52:00 +0800] "GET /static/ HTTP/1.1" 200 21 "-"
"curl/7.29.0"


[root@centos8 ~]#vim /apps/nginx/conf/conf.d/pc.conf
server {
......
location ~ \.(jpe?g|png|bmp|gif)$ {
 proxy_pass http://10.0.0.18;   #如果加/ 语法出错

}
}
#如果 http://10.0.0.18/ 有 / 语法出错
[root@centos8 ~]#nginx -t
nginx: [emerg] "proxy_pass" cannot have URI part in location given by regular
expression, or inside named location, or inside "if" statement, or inside
"limit_except" block in /apps/nginx/conf/conf.d/pc.conf:19
nginx: configuration file /apps/nginx/conf/nginx.conf test failed
反向代理示例: 缓存功能
缓存功能默认关闭状态,需要先动配置才能启用
proxy_cache zone_name | off; 默认off
#指明调用的缓存,或关闭缓存机制;Context:http, server, location
#zone_name 表示缓存的名称.需要由proxy_cache_path事先定义


proxy_cache_path;
#定义可用于proxy功能的缓存;Context:http
proxy_cache_path path [levels=levels] [use_temp_path=on|off]
keys_zone=zone_name:size [inactive=time] [max_size=size] [manager_files=number]
[manager_sleep=time] [manager_threshold=time] [loader_files=number]
[loader_sleep=time] [loader_threshold=time] [purger=on|off]
[purger_files=number] [purger_sleep=time] [purger_threshold=time];
实现反向代理客户端 IP 透传
多级代理实现IP透传
#第一个代理服务器
[root@nginx1 ~]#vim /apps/nginx/conf/nginx.conf
#开启日志格式,记录x_forwarded_for
http {
 include    mime.types;
 default_type application/octet-stream;
 proxy_cache_path /data/nginx/proxycache  levels=1:1:1
 keys_zone=proxycache:20m inactive=120s  max_size=1g;
 log_format main  '$remote_addr - $remote_user [$time_local] "$request" '
           '$status $body_bytes_sent "$http_referer" '
           '"$http_user_agent" "$http_x_forwarded_for"';
 access_log logs/access.log main;
#定义反向代理
[root@nginx1 ~]#vim /apps/nginx/conf/conf.d/pc.conf
server {
 location / {
  proxy_pass http://10.0.0.18;
  proxy_set_header X-Forwarded-For $proxy_add_x_forwarded_for;
      }
 .......
}
#第二个代理服务器
[root@nginx2 ~]#vim /apps/nginx/conf/nginx.conf
#开启日志格式,记录x_forwarded_for
http {
 include    mime.types;
 default_type application/octet-stream;
 proxy_cache_path /data/nginx/proxycache  levels=1:1:1
 keys_zone=proxycache:20m inactive=120s  max_size=1g;
 log_format main  '$remote_addr - $remote_user [$time_local] "$request" '
           '$status $body_bytes_sent "$http_referer" '
           '"$http_user_agent" "$http_x_forwarded_for"';
 access_log logs/access.log main;
#定义反向代理
[root@nginx2 ~]#vim /etc/nginx/nginx.conf
server {
   location / {
    proxy_pass http://10.0.0.28;
    proxy_set_header X-Forwarded-For $proxy_add_x_forwarded_for;
    }
   .....
}
#在第一个proxy上面查看日志

[root@nginx1 ~]#tail /apps/nginx/logs/access.log -f
10.0.0.7 - - [11/Oct/2020:14:37:00 +0800] "GET /index.html HTTP/1.1" 200 11 "-"
"curl/7.58.0" "-"
#在第二个proxy上面查看日志
[root@nginx2 ~]#tail /apps/nginx/logs/access.log -f
10.0.0.8 - - [11/Oct/2020:14:37:00 +0800] "GET /index.html HTTP/1.0" 200 11 "-"
"curl/7.58.0" "10.0.0.7"
#后端服务器配置日志格式
[root@centos8 ~]#vim /etc/httpd/conf/httpd.conf
LogFormat "\"%{x-Forwarded-For}i\" %h %l %u %t \"%r\" %>s %b \"%{Referer}i\"
\"%{User-Agent}i\"" testlog
CustomLog "logs/access_log" testlog
#测试访问
[root@centos7 ~]#curl www.wang.org/index.html
<h1> web site on 10.0.0.28 </h1>
#后端服务器查看日志
[root@centos8 ~]#tail -f /var/log/httpd/access_log
"10.0.0.7, 10.0.0.8"  10.0.0.18 - - [11/Oct/2020:14:37:00 +0800] "GET
/index.html HTTP/1.0" 200 34 "-" "curl/7.29.0"
[root@rocky8 conf.d]# cat proxy.www.ehuo.org.conf
server{
    listen 80 ;
    server_name www.ehuo.org ;
    root /data/www/pc ;
     location / {
        proxy_pass http://10.0.0.15/ ;
        proxy_set_header Host  $http_host ;
        proxy_set_header X-Forwarded-For $proxy_add_x_forwarded_for ;
    }
}


[root@localhost ~]# cat /etc/nginx/conf.d/api.ehuo.org.conf
server{
    listen 80 ;
    server_name www.ehuo.org ;

    root  /data/www ;
    location / {
        proxy_pass  http://10.0.0.25 ;
        proxy_set_header host $http_host ;
         proxy_set_header X-Forwarded-For $proxy_add_x_forwarded_for ;
    }
}

#测试

root@centos ~]# curl -L http://www.ehuo.org
www.ehuo.org/index/web/index.html
10.0.0.25


[root@localhost ~]# tail -f /var/log/nginx/access.log
10.0.0.17 - - [10/Jun/2022:23:01:09 +0800] "GET / HTTP/1.1" 200 34 "-" "curl/7.29.0" "-"
10.0.0.17 - - [10/Jun/2022:23:40:35 +0800] "GET / HTTP/1.1" 200 3429 "-" "curl/7.29.0" "-"
10.0.0.17 - - [10/Jun/2022:23:40:45 +0800] "GET / HTTP/1.1" 200 34 "-" "curl/7.29.0" "-"
10.0.0.15 - - [11/Jun/2022:01:09:25 +0800] "GET / HTTP/1.0" 200 34 "-" "curl/7.29.0" "10.0.0.17, 10.0.0.68"
10.0.0.15 - - [11/Jun/2022:01:10:08 +0800] "GET / HTTP/1.0" 200 44 "-" "curl/7.29.0" "10.0.0.17, 10.0.0.68"
![[外链图片转存失败,源站可能有防盗链机制,建议将图片保存下来直接上传(img-ff3bmZQo-1655022872370)(C:\Users\78715\AppData\Roaming\Typora\typora-user-images\image-20220611011152498.png)]](https://img-blog.csdnimg.cn/aecdaf5a61f047f9b5ce09df11290b8c.png)
![[外链图片转存失败,源站可能有防盗链机制,建议将图片保存下来直接上传(img-gnWiqRPk-1655022872370)(C:\Users\78715\AppData\Roaming\Typora\typora-user-images\image-20220611011133163.png)]](https://img-blog.csdnimg.cn/a90253cec5204803a700a33fcd042905.png)
5.1.2 http 反向代理负载均衡
Nginx可以将客户端的请求转发至单台后端服务器但是无法转发至特定的一组的服务器,而且不能对后端服务器提供相应的服务器状态监测
Nginx 可以基于ngx_http_upstream_module模块提供服务器分组转发、权重分配、状态监测、调度算
法等高级功能
5.1.2.1 http upstream配置参数
#自定义一组服务器,配置在http块内
upstream name {
server .....
......
}
#示例
upstream backend {
 server backend1.example.com weight=5;
 server 127.0.0.1:8080  max_fails=3 fail_timeout=30s;
 server unix:/tmp/backend3;
 server backup1.example.com backup;
}
server address [parameters];
#配置一个后端web服务器,配置在upstream内,至少要有一个server服务器配置


#server支持的parameters如下:
weight=number #设置权重,默认为1,实现类似于LVS中的WRR,WLC等

max_conns=number  #给当前后端server设置最大活动链接数,默认为0表示没有限制

max_fails=number  #后端服务器的下线条件,当客户端访问时,对本次调度选中的后端服务器连续进行检测多少次,如果都失败就标记为不可用,默认为1次,当客户端访问时,才会利用TCP触发对探测后端服务器健康性检查,而非周期性的探测

fail_timeout=time #后端服务器的上线条件,对已经检测到处于不可用的后端服务器,每隔此时间间隔再次进行检测是否恢复可用,如果发现可用,则将后端服务器参与调度,默认为10秒

backup  #设置为备份服务器,当所有后端服务器不可用时,才会启用此备用服务器

down   #标记为down状态,可以平滑下线后端服务器,新用户不再调度到此主机,正在访问的旧用户不受影响
不主动探测,来的时候在探测后端服务器;
upstream webservers {
	server 10.0.0.15:80 ;
	server 10.0.0.25:80 ;
}
upstream appservers {
	server 10.0.0.16:80 ;
	server 10.0.0.26:80 ;
}
server {
	listen 80 ;
	server_name www.ehuo.org ;
	root /data/www/pc;
	location / {
	proxy_pass http://webservers ;
	proxy_set_header host $http_host ;
	}
}
server {
	listen 80 ;
	server_name www.ehuo.net ;
	root /data/www/mobile;
	location / {
	proxy_pass http://appservers ;
	proxy_set_header host $http_host ;
	}
}


#测试
[root@centos ~]# curl www.ehuo.org
www.ehuo.org/api/index.html
10.0.0.5
[root@centos ~]# curl www.ehuo.org
www.ehuo.org/index/web/index.html
10.0.0.25
[root@centos ~]#
版本迭代升级流程
1 修改反向代理,将要升级的第一台主机设为down

2 过一会儿,观察一下后端要升级的主机是否还有旧用户在连接,如果无,进入下一步,如果有,在等

3 升级第一台后端服务器,更新软链接
/data/app --> /data/app-v1.0


rm -rf  /data/app/    ------ 删除了文件
rm -f /data/app
4 修改反向代理,将要升级的第一台主机设为去掉down,上线,升级完成第一台主机
5 重复过程,不断升级其他主机
可以使用 Jenkins+gitlab 自动升级
for i in {1..10}; for echo test$i.html in 10.0.0.15 > test$i.html ; done
ip_hash;
#源地址hash调度方法,基于的客户端的remote_addr(源地址IPv4的前24位或整个IPv6地址)做hash计算,以实现会话保持,注意:如果是局域网可能会导致调度到同一台主机

#hash $remote_addr 则是对全部32bit的IPv4进行hash计算
least_conn;
#最少连接调度算法,优先将客户端请求调度到当前连接最少的后端服务器,相当于LVS中的WLC
hash KEY [consistent];
#基于指定请求报文中首部字段或者URI等key做hash计算,使用consistent参数,将使用ketama一致性hash算法,适用于后端是Cache服务器(如varnish)时使用,consistent定义使用一致性hash运算,一致性hash基于取模运算

#示例
hash $request_uri consistent; #基于用户请求的uri做hash,可以实现调度到后端缓存服务器功能

hash $remote_addr consistent; #则是对全部32bit的IPv4进行一致性hash计算

看浏览器地址:
如果本机坏了,会调到其他的主机,好的话还会再回来的。

hash $cookie_sessionid  #基于cookie中的sessionid这个key进行hash调度,实现会话绑定
upstream webservers {
	hash $remote_addr ; #基于用户请求的uri做hash,可以实现调度到后端缓存服务器功能
	server 10.0.0.15:80 ;
	server 10.0.0.25:80 ;
}

server {
	listen 80 ;
	server_name www.ehuo.org ;
	root /data/www/pc;
	location / {
	proxy_pass http://webservers ;
	proxy_set_header host $http_host ;
	}
基于 hash 的调度算法
减少后端服务器增加或减少的影响:
一致性hash算法
只是影响了附近的server ,大部分没有影响;
hash $request_usi consistent
调度算法:
nginx:四层和七层都支持,可以加上hash,监听检查应用层;
实战案例: 基于Cookie 实现会话绑定
http是短连接,通过cookie实现会话绑定,实现长连接;
[root@centos8 ~]#vim /apps/nginx/conf/nginx.conf
http {
upstream websrvs {
hash $cookie_hello;  #hello是cookie的key的名称
server 10.0.0.101:80 weight=2;
server 10.0.0.102:80 weight-1;
}
}
[root@centos8 ~]# vim /apps/nginx/conf/conf.d/pc.conf
server {
 location /{
#proxy_cache mycache;
proxy_pass http://websrvs;
 proxy_set_header Host  $http_host; #转发主机头至后端服务器
 }
}
#测试
[root@centos8 ~]#curl -b hello=wang http://www.wang.org/
[root@centos8 ~]#curl -b hello=mage http://www.wang.org/
实现https的负载均衡
外是https访问,但是内是http
[root@centos8 ~]#vim /apps/nginx/conf.d/proxy.conf
upstream websrvs {
	server 10.0.0.101:80 ;
	server 10.0.0.102:80 ;
	}
server {
	listen 80;
	server_name www.ehuo.org;
	return 302 https://$server_name$request_uri;
	}
server {
	listen 443 ssl http2;
	server_name www.ehuo.org;
	ssl_certificate  /apps/nginx/ssl/www.ehuo.org.pem;
	ssl_certificate_key /apps/nginx/ssl/www.ehuo.org.key;
	ssl_session_cache shared:sslcache:20m;#加缓存
	ssl_session_timeout 10m;
	location / {
		proxy_pass https://websrvs;
 		proxy_set_header Host  $http_host;
	}
}
nginx调度
weight
rr
wrr
least_conn
ip_hash;ipv4 24bit
hash key [consistent]
5.2 实现 Nginx 四层负载均衡
ginx在1.9.0版本开始支持tcp模式的负载均衡,在1.9.13版本开始支持udp协议的负载,udp主要用于DNS的域名解析,其配置方式和指令和http 代理类似,其基于ngx_stream_proxy_module模块实现tcp负载,另外基于模块ngx_stream_upstream_module实现后端服务器分组转发、权重分配、状态监
测、调度算法等高级功能。
如果编译安装,需要指定 --with-stream 选项才能支持ngx_stream_proxy_module模块
nginx相比于LVS 并非真正的四层,是伪四层代理。
5.2.1 TCP协议负载均衡配置参数
stream {
server {
    listen 127.0.0.1:12345;
    proxy_pass 127.0.0.1:8080;
}

server {
    listen 12345;
    proxy_connect_timeout 1s;
    proxy_timeout 1m;
    proxy_pass example.com:12345;
}

server {
    listen 53 udp reuseport;
    proxy_timeout 20s;
    proxy_pass dns.example.com:53;
}

server {
    listen [::1]:12345;
    proxy_pass unix:/tmp/stream.socket;
}

}
stream { #定义stream相关的服务;Context:main
 upstream backend { #定义后端服务器
   hash $remote_addr consistent; #定义调度算法
   server backend1.example.com:12345 weight=5; #定义具体server
   server 127.0.0.1:12345    max_fails=3 fail_timeout=30s;
   server unix:/tmp/backend3;
 }
 upstream dns {  #定义后端服务器
   server 10.0.0.1:53535;  #定义具体server
   server dns.example.com:53;
 }
 server { #定义server
   listen 12345; #监听IP:PORT
   proxy_connect_timeout 1s; #连接超时时间
   proxy_timeout 3s; #转发超时时间
   proxy_pass backend; #转发到具体服务器组
 }
 server {
   listen 127.0.0.1:53 udp reuseport;
   proxy_timeout 20s;
   proxy_pass dns;
 }
 server {
   listen [::1]:12345;
   proxy_pass unix:/tmp/stream.socket;
 }

 server {
 	listen 2222;
	 proxy 10.0.0.8:22; # 只实现四层代理,无负载均衡功能
 	}
}
5.2.3 负载均衡实例: MySQL
后端服务器安装MySQL
#先修改后端两个服务器的主机名,方便测试
[root@centos8 ~]#hostnamectl set-hostname mysql-server1.wang.org
[root@centos8 ~]#hostnamectl set-hostname mysql-server2.wang.org
#安装MySQL服务
[root@centos8 ~]# yum -y install mariadb-server
[root@centos8 ~]# systemctl enable --now mariadb
MariaDB [(none)]> create user wang@'10.0.0.%' identified by 'magedu';
MariaDB [(none)]> FLUSH PRIVILEGES;
MariaDB [(none)]> exit
nginx配置
[root@centos8 ~]# cat /apps/nginx/conf/tcp/tcp.conf
stream {
 upstream redis_server {
  server 10.0.0.18:6379 max_fails=3 fail_timeout=30s;
  server 10.0.0.28:6379 max_fails=3 fail_timeout=30s;
   #server 10.0.0.28:6379 max_fails=3 fail_timeout=30s backup;
 }
 upstream mysql_server {
  least_conn;
  server 10.0.0.18:3306 max_fails=3 fail_timeout=30s;
 }
###################################################################
server {
 listen 10.0.0.8:3306;
 proxy_connect_timeout 6s;
 proxy_timeout 15s;
 proxy_pass mysql_server;
 }
server {
 listen 10.0.0.8:6379;
 proxy_connect_timeout 3s;
 proxy_timeout 3s;
 proxy_pass redis_server;
 }
}

#重启nginx并访问测试:
[root@centos8 ~]# systemctl restart nginx
#测试通过nginx负载连接MySQL:
[root@centos8 ~]#mysql -uwang -pmagedu -h10.0.0.8 -e 'show variables like
"hostname"'
+---------------+-------------------------+
| Variable_name | Value          |
+---------------+-------------------------+
| hostname   | mysql-server1.wang.org |
+---------------+-------------------------+
[root@centos8 ~]#mysql -uwang -pmagedu -h10.0.0.8 -e 'show variables like
"hostname"'
+---------------+-------------------------+
| Variable_name | Value          |
+---------------+-------------------------+
| hostname   | mysql-server2.wang.org |
+---------------+-------------------------+
#在10.0.0.28停止MySQL服务
[root@centos8 ~]#systemctl stop mysqld
#再次测试访问,只会看到mysql-server1.wang.org进行响应
[root@centos8 ~]#mysql -uwang -pmagedu -h10.0.0.8 -e 'show variables like
"hostname"'
+---------------+-------------------------+
| Variable_name | Value          |
+---------------+-------------------------+
| hostname   | mysql-server1.wang.org |
+---------------+-------------------------+
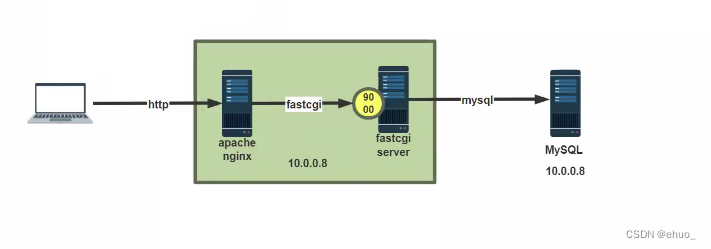
5.3 实现 FastCGI
CGI的由来:
最早的Web服务器只能简单地响应浏览器发来的HTTP请求,并将存储在服务器上的HTML文件返回给浏览器,也就是静态html文件,但是后期随着网站功能增多网站开发也越来越复杂,以至于出现动态技术,比如像php(1995年)、java(1995)、python(1991)语言开发的网站,但是nginx/apache服务器并不能直接运行 php、java这样的文件,apache实现的方式是打补丁,但是nginx缺通过与第三方基于协议
实现,即通过某种特定协议将客户端请求转发给第三方服务处理,第三方服务器会新建新的进程处理用户的请求,处理完成后返回数据给Nginx并回收进程,最后nginx在返回给客户端,那这个约定就是通用网关接口(common gateway interface,简称CGI),CGI(协议) 是web服务器和外部应用程序之间的接口标准,是cgi程序和web服务器之间传递信息的标准化接口。
为什么会有FastCGI?
CGI协议虽然解决了语言解析器和 Web Server 之间通讯的问题,但是它的效率很低,因为 Web Server每收到一个请求都会创建一个CGI进程,PHP解析器都会解析php.ini文件,初始化环境,请求结束的时候再关闭进程,对于每一个创建的CGI进程都会执行这些操作,所以效率很低,而FastCGI是用来提高CGI性能的,FastCGI每次处理完请求之后不会关闭掉进程,而是保留这个进程,使这个进程可以处理多个请求。这样的话每个请求都不用再重新创建一个进程了,大大提升了处理效率。
什么是PHP-FPM?
PHP-FPM(FastCGI Process Manager:FastCGI进程管理器)是一个实现了Fastcgi的程序,并且提供进程管理的功能。进程包括master进程和worker进程。master进程只有一个,负责监听端口,接受来自web server的请求。worker进程一般会有多个,每个进程中会嵌入一个PHP解析器,进行PHP代码的处理。
5.3.1 FastCGI配置指令
Nginx基于模块ngx_http_fastcgi_module实现通过fastcgi协议将指定的客户端请求转发至php-fpm处
理,其配置指令如下:
fastcgi_pass address;
#转发请求到后端服务器,address为后端的fastcgi server的地址,可用位置:location, if inlocation

#示例
fastcgi_pass localhost:9000;
fastcgi_pass unix:/tmp/fastcgi.socket;

fastcgi_index name;
#fastcgi默认的主页资源,示例:fastcgi_index index.php;
fastcgi_param parameter value [if_not_empty];
#设置传递给FastCGI服务器的参数值,可以是文本,变量或组合,可用于将Nginx的内置变量赋值给自定义key

fastcgi_param REMOTE_ADDR     $remote_addr; #客户端源IP
fastcgi_param REMOTE_PORT     $remote_port; #客户端源端口
fastcgi_param SERVER_ADDR     $server_addr; #请求的服务器IP地址
fastcgi_param SERVER_PORT     $server_port; #请求的服务器端口
fastcgi_param SERVER_NAME     $server_name; #请求的server name


基于yum安装的配置

Nginx默认配置示例:
 location ~ \.php$ {
  root      /scripts;
  fastcgi_pass  127.0.0.1:9000;
  fastcgi_index index.php;
  fastcgi_param SCRIPT_FILENAME  $document_root$fastcgi_script_name; #默认脚本路径

   #fastcgi_param SCRIPT_FILENAME /scripts$fastcgi_script_name; #此行写法不再需要上面的 root 指令
  fastcig_param HTTPS on;      #如果是前端代理采用https,当前后端http服务器需要加此项,否则会造成页面显示不正常
  include    fastcgi_params;   #此文件默认系统已提供,存放的相对路径为prefix/conf
 }
nginx与php-fpm一体

[root@rocky8 conf.d]# cat www.ehuo.org.conf
server {
    listen 80 ;
    server_name www.ehuo.org;
    root /data/www/php ;
     index index.php ;
    location ~ \.php$|/ping|/php-status {
        fastcgi_pass 127.0.0.1:9000 ;
        fastcgi_param SCRIPT_FILENAME $document_root$fastcgi_script_name ;
        include fastcgi_params ;

    }
}
LAMP
apache+php
apache(php.so) apache专职静态资源,兼职动态php

apache --->  php-fpm

apache MPM

nginx ----->php-fpm
专职代理     专职php
专职静态资源
php-fpm shopxo
[root@rocky8 ~]#yum install php-fpm php-json php-mysqlnd  php-gd php-pecl-zip php-xml

[root@rocky8 ~]#grep -v '^;' /etc/php-fpm.d/www.conf
[www]
listen = 9000
pm.status_path = /php-status
ping.path = /ping
ping.response = pongpong
access.log = /var/log/php-fpm/$pool.access.log


#修改文件大小和时区
vim /etc/php.ini
date.timezone = Asia/Shanghai
post_max_size = 80M
upload_max_filesize = 80M
server {
    listen 80;
    server_name www.wang.org;
    root /data/www/shopxo;
    index index.php;
    client_max_body_size 20m;
    location ~ \.php$|/ping|/php-status {
        fastcgi_pass 127.0.0.1:9000 ;
        fastcgi_param  SCRIPT_FILENAME  $document_root$fastcgi_script_name;
        #fastcgi_param  SCRIPT_FILENAME  /data/www$fastcgi_script_name;
        include fastcgi_params;
    }
}
5.3.2 FastCGI实战案例 : Nginx与php-fpm在同一服务器
php安装可以通过yum或者编译安装,使用yum安装相对比较简单,编译安装更方便自定义参数或选项。
nginx与php-fpm一体

[root@rocky8 conf.d]# cat www.ehuo.org.conf
server {
    listen 80 ;
    server_name www.ehuo.org;
    root /data/www/php ;
     index index.php ;
    location ~ \.php$|/ping|/php-status {
        fastcgi_pass 127.0.0.1:9000 ;
        fastcgi_param SCRIPT_FILENAME $document_root$fastcgi_script_name ;
        include fastcgi_params ;

    }
}
post_max_size = 80M
upload_max_filesize = 80M
server {
listen 80;
server_name www.wang.org;
root /data/www/shopxo;
index index.php;
client_max_body_size 20m;
location ~ .php$|/ping|/php-status {
fastcgi_pass 127.0.0.1:9000 ;
fastcgi_param SCRIPT_FILENAME
d
o
c
u
m
e
n
t
r
o
o
t
document_root
documentrootfastcgi_script_name;
#fastcgi_param SCRIPT_FILENAME /data/www$fastcgi_script_name;
include fastcgi_params;
}
}
#### 5.3.2 FastCGI实战案例 : Nginx与php-fpm在同一服务器

php安装可以通过yum或者编译安装,使用yum安装相对比较简单,编译安装更方便自定义参数或选项。
nginx与php-fpm一体```
在这里插入[root@rocky8 conf.d]# cat www.ehuo.org.conf
server {
    listen 80 ;
    server_name www.ehuo.org;
    root /data/www/php ;
     index index.php ;
    location ~ \.php$|/ping|/php-status {
        fastcgi_pass 127.0.0.1:9000 ;
        fastcgi_param SCRIPT_FILENAME $document_root$fastcgi_script_name ;
        include fastcgi_params ;
        }
   }
代码片


 1877
1877


 被折叠的 条评论
为什么被折叠?
被折叠的 条评论
为什么被折叠?
 到【灌水乐园】发言


