


SpringBoot2.7+使用swagger3
SpringBoot2.7+使用swagger3
1.依赖导入
<!-- https://mvnrepository.com/artifact/io.springfox/springfox-boot-starter -->
        <dependency>
            <groupId>io.springfox</groupId>
            <artifactId>springfox-boot-starter</artifactId>
            <version>3.0.0</version>
        </dependency>
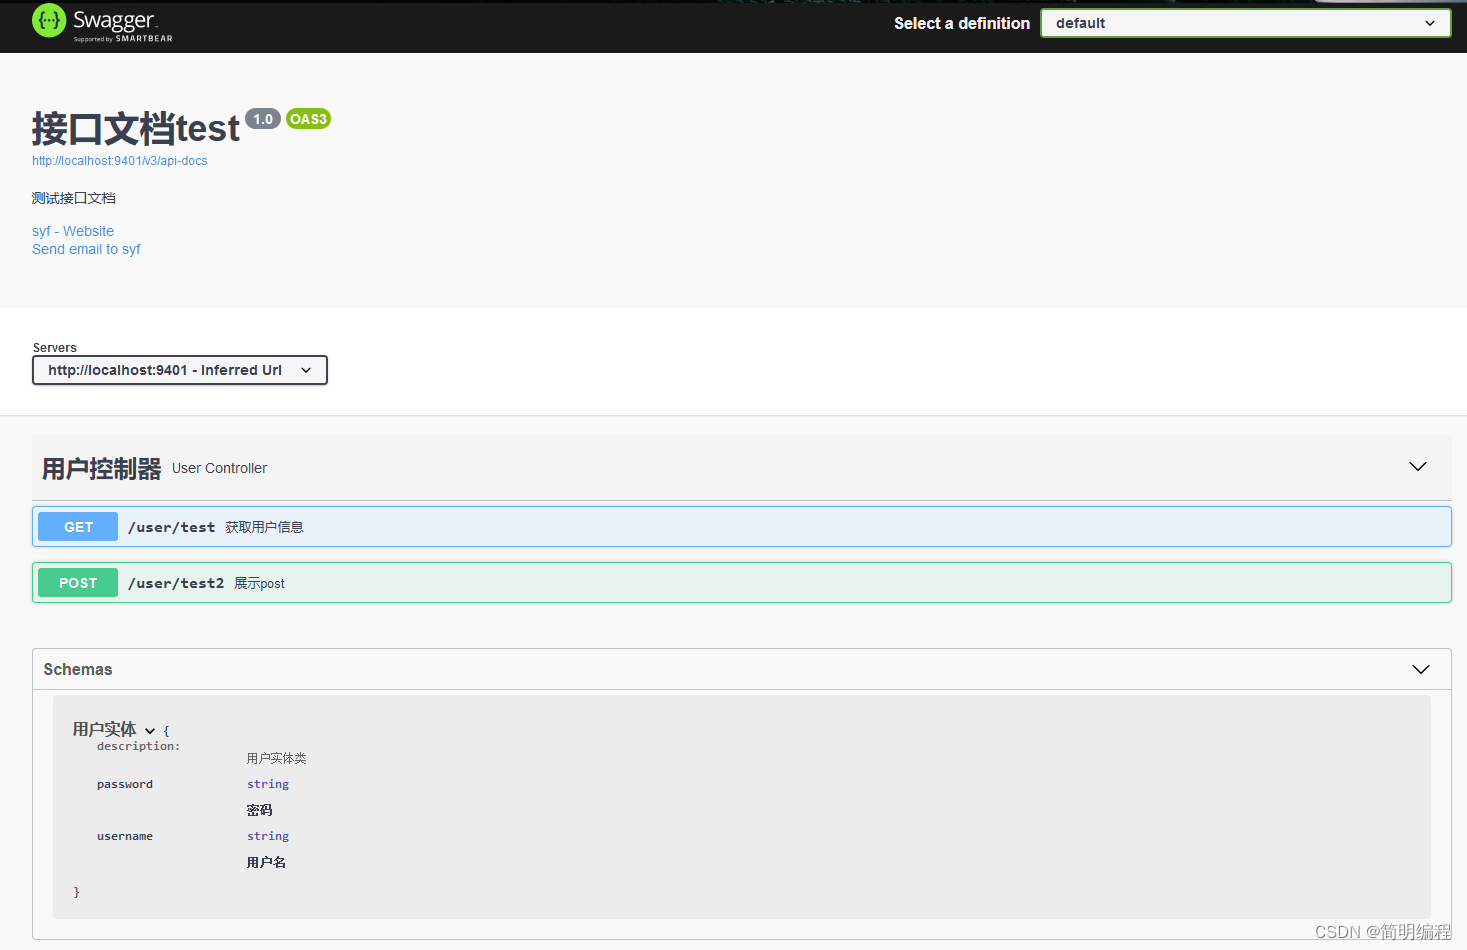
2.编写Controller配合Swagger注解
package com.example.swagger3.controller;

import com.example.swagger3.entity.User;
import io.swagger.annotations.Api;
import io.swagger.annotations.ApiOperation;
import org.springframework.web.bind.annotation.GetMapping;
import org.springframework.web.bind.annotation.PostMapping;
import org.springframework.web.bind.annotation.RequestMapping;
import org.springframework.web.bind.annotation.RestController;

@RestController
@RequestMapping("/user")
@Api(tags = "用户控制器")
public class UserController {

    @GetMapping("/test")
    @ApiOperation(value = "获取用户信息")
    public User getUser(){
        User user = new User();
        user.setUsername("zhangsan");
        user.setPassword("sjdakjd");
        return user;
    }

    @PostMapping("/test2")
    @ApiOperation(value = "展示post")
    public User show(){
        User user = new User();
        user.setUsername("lisi");
        user.setPassword("sasdsad");
        return user;
    }

}
3.编写swagger配置类
package com.example.swagger3.config;

import io.swagger.annotations.ApiOperation;
import org.springframework.context.annotation.Bean;
import org.springframework.context.annotation.Configuration;
import springfox.documentation.builders.ApiInfoBuilder;
import springfox.documentation.builders.PathSelectors;
import springfox.documentation.builders.RequestHandlerSelectors;
import springfox.documentation.service.ApiInfo;
import springfox.documentation.service.Contact;
import springfox.documentation.spi.DocumentationType;
import springfox.documentation.spring.web.plugins.Docket;

@Configuration
public class SwaggerAutoConfiguration {
    @Bean
    public Docket createRestApi(){
        return new Docket(DocumentationType.OAS_30)
                .apiInfo(apiInfo())
                //开启
                .enable(true)
                .select()
                //扫描路径下使用@Api的controller
                .apis(RequestHandlerSelectors.withMethodAnnotation(ApiOperation.class))
                .paths(PathSelectors.any())
                .build();

    }

    private ApiInfo apiInfo(){
        return new ApiInfoBuilder()
                .title("接口文档test")
                .description("测试接口文档")
                //设置作者信息
                .contact(new Contact("syf","http://syf.io/","xxxxxx7@qq.com"))
                .version("1.0")
                .build();
    }
}
使用分组
new Docket(DocumentationType.OAS_30).groupName("组名")
使用扫描包
.apis(RequestHandlerSelectors.basePackage("包路径"))
4.修改yaml
server:
  port: 9401

spring:
  mvc:
    pathmatch:
      matching-strategy: ant_path_matcher
5.测试访问http://localhost:9401/swagger-ui
注意点(必读)
@ConditionalOnProperty注解
这个注解是用来设置环境开启swagger文档访问的
仅建议在开发阶段使用。另外有时候我们自定义配置的时候最好把这个开关也加上,在发布的时候请改为false,当然如果是微服务直接关掉这个服务就行
@ConditionalOnProperty(value = "springfox.documentation.enabled", havingValue = "true", matchIfMissing = true)
@EnableOpenApi
swagger无需使用@EnableOpenApi注解标志自动开启,这个是默认的
安全放行(SpringSecurity 5.4+)
使用安全框架需要放开资源
@Bean
WebSecurityCustomizer swaggerWebSecurityCustomizer() {
    return (web) -> {
        web.ignoring().antMatchers(new String[]{"/swagger-ui.html", "/swagger-ui/**", "/swagger-resources/**", "/v2/api-docs", "/v3/api-docs", "/webjars/**"});
    };
}
或者你可以在过滤链配置中进行开放
swagger3注解
以下是所有注解
常用注解
@Api
用在请求的类上,表示对类的说明
参数:
- tags:说明该类的作用,可以在UI界面上看到的注解
- value:配置名称
@ApiOperation
用在请求的方法上,说明方法的用途、作用
参数:
- value:说明方法的用途、作用
- notes:方法的备注说明
@ApiImplicitParams
用在请求的方法上,表示一组参数说明
内部需要设置@ApiImplicitParam注解对具体参数进行说明
@ApiImplicitParam
用在@ApiImplicitParams注解中,指定一个请求参数的各个方面
参数:
- name:参数名
- value:参数的汉字说明、解释
- required:参数是否必须传
- paramType:参数放在哪个地方
- header :请求参数的获取:@RequestHeader
- query :请求参数的获取:@RequestParam
- path(用于restful接口): 请求参数的获取@PathVariable
- dataType:参数类型,默认String,其它值dataType=“Integer”
- defaultValue:参数的默认值
@ApiResponses
用在请求的方法上,表示一组响应
需要指定具体的@ApiResponse进行配置
@ApiResponse
用在@ApiResponses中,一般用于表达一个错误的响应信息
参数:
- code:数字,例如400
- message:信息,例如"请求参数没填好"
- response:抛出异常的类
@ApiModel
用于响应类上,表示一个返回响应数据的信息,一般用在post创建的时候,使用@RequestBody这样的场景,请求参数无法使用@ApiImplicitParam注解进行描述的时候
参数:
- value:设置名称
- description:描述
@ApiModelProperty
用在属性上,描述响应类的属性
@Info
Swagger 定义的高级元数据
参数:
- title:设置标题
- version:设置版本
- description:描述
- termsOfService:服务条款
- license:凭证信息
- contact:联系信息
- extensions:可选扩展列表
借助Knife4j增强
1.导入依赖
<dependency>
            <groupId>com.github.xiaoymin</groupId>
            <artifactId>knife4j-spring-boot-starter</artifactId>
            <version>3.0.3</version>
        </dependency>
2.编写Controller
请看yaml对应编写
3.编写配置属性类
package com.example.knife4j.config;

import lombok.AllArgsConstructor;
import lombok.Data;
import lombok.NoArgsConstructor;
import org.springframework.boot.context.properties.ConfigurationProperties;

import java.util.ArrayList;
import java.util.LinkedHashMap;
import java.util.List;
import java.util.Map;


@ConfigurationProperties(prefix = "swagger-define")
@Data
@AllArgsConstructor
@NoArgsConstructor
public class SwaggerConfigurationProperties {
    private String title = "文档";
    //组名
    private String group = "";
    private String desc="";
    private String version = "1.0";
    private Contact contact = new Contact();
    //解析的包路径
    private String basePackage = "";
    //解析的url规则
    private List<String> basePath = new ArrayList<>();
    //需要排除的url
    private List<String> excludePath = new ArrayList<>();
    //分组文档
    private Map<String,DocketInfo> docket = new LinkedHashMap<>();
    public String getGroup(){
        if (group==null||"".equals(group)){
            return title;
        }
        return group;
    }

    //子类,进行增强,但我现在想不到什么可以增强的
    @Data
    public static class DocketInfo extends SwaggerConfigurationProperties{

    }

    @Data
    public static class Contact{
        private String name = "syf";
        private String url = "";
        private String email="";
    }
}
3.编写自动配置类
package com.example.knife4j.config;


import org.springframework.beans.BeansException;
import org.springframework.beans.factory.BeanFactory;
import org.springframework.beans.factory.BeanFactoryAware;
import org.springframework.beans.factory.annotation.Autowired;
import org.springframework.beans.factory.config.ConfigurableBeanFactory;
import org.springframework.boot.autoconfigure.condition.ConditionalOnMissingBean;
import org.springframework.boot.autoconfigure.condition.ConditionalOnProperty;
import org.springframework.boot.context.properties.EnableConfigurationProperties;
import org.springframework.context.annotation.Bean;
import org.springframework.context.annotation.Configuration;
import springfox.documentation.builders.ApiInfoBuilder;
import springfox.documentation.builders.PathSelectors;
import springfox.documentation.builders.RequestHandlerSelectors;
import springfox.documentation.service.ApiInfo;
import springfox.documentation.service.Contact;
import springfox.documentation.spi.DocumentationType;
import springfox.documentation.spring.web.plugins.Docket;

import java.util.*;
import java.util.function.Predicate;


@Configuration
@ConditionalOnProperty(name = "swagger-define.enable",havingValue = "true",matchIfMissing = true)
@EnableConfigurationProperties(SwaggerConfigurationProperties.class)
public class KnifeAutoConfiguration implements BeanFactoryAware {

    @Autowired
    private SwaggerConfigurationProperties swaggerConfigurationProperties;
    private BeanFactory beanFactory;
    @Override
    public void setBeanFactory(BeanFactory beanFactory) throws BeansException {
        this.beanFactory = beanFactory;
    }
    @Bean
    @ConditionalOnMissingBean
    public List<Docket> createRestApi(){
        ConfigurableBeanFactory cBeanFactory = (ConfigurableBeanFactory) this.beanFactory;
        LinkedList<Docket> dockets = new LinkedList<>();
        //判断配置
        Map<String, SwaggerConfigurationProperties.DocketInfo> docketMap = swaggerConfigurationProperties.getDocket();
        if (docketMap.isEmpty()) {
            //空则未分组
            Docket docket = createDocket(swaggerConfigurationProperties);
            //设置为单例对象
            cBeanFactory.registerSingleton(swaggerConfigurationProperties.getTitle(), docket);
            dockets.add(docket);
        }else{
            //含有分组
            Set<String> keySet = swaggerConfigurationProperties.getDocket().keySet();
            for (String key : keySet) {
                SwaggerConfigurationProperties.DocketInfo docketInfo = swaggerConfigurationProperties.getDocket().get(key);
//                ApiInfo apiInfo = apiInfo(docketInfo);
                Docket docket = createDocket(docketInfo);
                //设置为单例对象
                cBeanFactory.registerSingleton(key, docket);
                dockets.add(docket);

            }

        }


        return dockets;
    }


    //createDocket方法
    //创建接口文档对象
    private Docket createDocket(SwaggerConfigurationProperties swaggerProperties) {
        //API 基础信息
        ApiInfo apiInfo = apiInfo(swaggerProperties);

        // base-path处理
        // 当没有配置任何path的时候,解析/**
        if (swaggerProperties.getBasePath().isEmpty()) {
            swaggerProperties.getBasePath().add("/**");
        }

        return new Docket(DocumentationType.OAS_30)
                .apiInfo(apiInfo)
                .groupName(swaggerProperties.getGroup())
                .select()
                .apis(RequestHandlerSelectors.basePackage(swaggerProperties.getBasePackage()))
                .paths(PathSelectors.any())
                .build();
    }


    private ApiInfo apiInfo(SwaggerConfigurationProperties properties){
        System.out.println(properties.getContact());
        return new ApiInfoBuilder()
                .title(properties.getTitle())
                .description(properties.getDesc())
                //设置作者信息
                .contact(new Contact(properties.getContact().getName(),properties.getContact().getUrl(),properties.getContact().getEmail()))
                .version(properties.getVersion())
                .build();
    }


}
4.编写yaml
server:
  port: 8989

swagger-define:
  enable: true
  title: Knife4jTest 文档
  desc: 这是一个测试文档
  version: 1.2
  docket:
    user:
      title: Knife4jTest内部用户文档
      desc: 这是一个测试文档2
      version: 1.0
      group: 用户模块
      basePackage: com.example.knife4j.controller.user
    show:
      title: show 文档
      desc: 这是一个测试文档-show
      version: 2.0
      group: show模块
      basePackage: com.example.knife4j.controller.show

spring:
  mvc:
    pathmatch:
      matching-strategy: ant_path_matcher
5.访问http://localhost:8989/doc.html

不足
我这里本来像借助代码做分组等一些事情,但是结果没弄出来
等我后面搞定出个视频讲一下关于微服务里使用Swagger3的,这里属于想优化没成功
查了一下也没找到问题到底出在哪里,只知道肯定是在docket设置的时候没有装配好导致的


 9444
9444


 被折叠的 条评论
为什么被折叠?
被折叠的 条评论
为什么被折叠?
 到【灌水乐园】发言


