


Layout
一.线性布局(LinearLayout)
LinearLayout一种非常常用的布局。正如它的名字所描述的一样,这个布局会将它所包含的控件在线性方向上依次排列。既然是线性排列,肯定就不仅只有一个方向,这里一般只有两个方向:水平方向和垂直方向。这里可以将其理解为一个存放其他控件的容器。
常用属性:
1、orientation
设置布局的方向水平或者垂直
水平布局:android:orientation="horizontal"
垂直布局:android:orientation="vertical"
2、layout_weight
该属性需要加在LinearLayout的子控件中,作用是分配线性布局中的剩余空间到该控件上
使用的时候,一般都是将layout_width或者layout_height设为0,方便按比例对空间进行分配,不然就是对空间剩余没有使用的空间进行分配
举个例子:
一个线性布局的宽度为400,控件1和控件2的宽度都为100,剩余200,如果在控件2上添加layout_weight=1,控件2的layout_weight,默认为0,两者对200的空间按比例进行分配,则控件2会将线性布局剩余的空间占满,即宽度会变为300
3、layout_width
设置布局的容器宽度android:layout_width:100dp
也可以是描述值:
android:layout_width:match_parent表示与父视图相等,当容器作为该XML布局文件的根节点时,则父视图指运行设备的屏幕
android:layout_width:match_content表示包围范围,即内容决定其长度
4、layout_height
设置布局的容器高度android:layout_height:100dp
dp是相对像素
match_parent,match_content和上面差不多
5、background
设置布局的背景,可选颜色,图片等android:background:
6、gravity
布局中子容器相对于父容器所在的位置
android:gravity="属性值"
属性值:
center(正中心),
center_verticalr(垂直方向的正中心),
center_horizontal(水平方向的正中心),
left,right,top,bottom
gravity和layout_gravity的区别
可以理解为前者是对自己的孩子,后者是对自己本身
android:gravity属性是对该view中内容的限定.比如一个button 上面的text. 你可以设置该text 相对于view的靠左,靠右等位置.
android:layout_gravity是用来设置该view相对与父view 的位置.比如一个button 在linearlayout里,你想把该button放在linearlayout里靠左、靠右等位置就可以通过该属性设置.
7、layout_margin
布局的外边距android:layout_margin:xxdp
8、layout_padding
布局的内边距android:layout_padding:xxdp
二.相对布局(RelativeLayout)
1.相对父布局定位
android:layout_alignParentLeft="true" 父容器左边
android:layout_alignParentRight="true" 父容器右边
android:layout_alignParentTop="true" 父容器顶部
android:layout_alignParentBottom="true" 父容器底部
android:layout_centerHorizontal="true" 水平方向居中
android:layout_centerVertical="true" 垂直方向居中
android:layout_centerInParent="true" 水平垂直都居中
两个布局还可以组合起来使用,这样我们就可以对类似于九宫格的九个方向进行定位
中左:
android:layout_alignParentLeft="true"
android:layout_centerVertical="true"
中右:
android:layout_alignParentRight="true"
android:layout_centerVertical="true"
中上:
android:layout_alignParentTop="true"
android:layout_centerHorizontal="true"
中下:
android:layout_alignParentBottom="true"
android:layout_centerInParent="true"
2.相对控件定位
添加一个属性只能定义一个维度上的方向,若要精准定位,需要添加两个属性
在控件的上方:android:layout_above="@id/控件id"
在控件的下方:android:layout_below="@id/控件id"
在控件的左方:android:layout_toLeftOf="@id/控件id"
在控件的右方:android:layout_toRightOf="@id/控件id
与控件左平齐:android:layout_alignLeft="@+id/控件id"
与控件右平齐:android:layout_alignRight="@+id/控件id"
与控件上平齐:android:layout_alignTop="@+id/控件id"
与控件下平齐:android:layout_alignBottom="@+id/控件id"
简单画了个图:
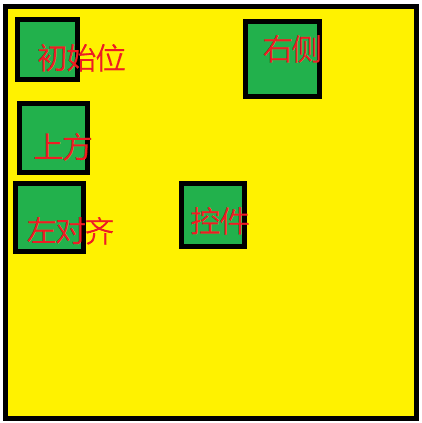
所以如果我们需要定位到控件的四周,需要添加两个属性
上:
在控件的上方:android:layout_above="@id/控件id"
与控件上平齐:android:layout_alignTop="@+id/控件id"
下:
在控件的下方:android:layout_below="@id/控件id"
与控件下平齐:android:layout_alignBottom="@+id/控件id"
左:
在控件的左方:android:layout_toLeftOf="@id/控件id"
与控件左平齐:android:layout_alignLeft="@+id/控件id"
右:
在控件的右方:android:layout_toRightOf="@id/控件id
与控件右平齐:android:layout_alignRight="@+id/控件id"
左上:
在控件的上方:android:layout_above="@id/控件id"
在控件的左方:android:layout_toLeftOf="@id/控件id"
右上:
在控件的上方:android:layout_above="@id/控件id"
在控件的右方:android:layout_toRightOf="@id/控件id
左下:
在控件的左方:android:layout_toLeftOf="@id/控件id"
在控件的下方:android:layout_below="@id/控件id"
右下:
在控件的右方:android:layout_toRightOf="@id/控件id
在控件的下方:android:layout_below="@id/控件id"
总结
课后总结,后续有问题会更改


 2170
2170


 被折叠的 条评论
为什么被折叠?
被折叠的 条评论
为什么被折叠?
 到【灌水乐园】发言


