


1.创建项目
利用python的包安装工具pip下载wheel
pip3 install flask
查看当前项目的环境
pip3 list
1.2 项目构造
- static
- templates
- app.py
mtv:
- model
- template
- view
1.3 完成app.py
app.py是启动项目的main方法,我们需要在里面声明flask的启动函数。
from flask import Flask
app=Flask(import_name)
@app.route("/")
def hello():
    return "hello world";
app.run()
1.4 wsgi
就是说python提供了很多web架构,但是这些架构没有统一的和web server进行连接的接口,而wsgi做的就是统一规则的接口,python代码根据wsgi接口将内容放到web server上。
1.5 config
app.config包含了flask的配置内容,他被存到一个集合当中。
Config {'ENV': 'development', 'DEBUG': True, 'TESTING': False, 'PROPAGATE_EXCEPTIONS': None, 'SECRET_KEY': None, 'PERMANENT_SESSION_LIFETIME': datetime.timedelta(days=31), 'USE_X_SENDFILE': False, 'SERVER_NAME': None, 'APPLICATION_ROOT': '/', 'SESSION_COOKIE_NAME': 'session', 'SESSION_COOKIE_DOMAIN': None, 'SESSION_COOKIE_PATH': None, 'SESSION_COOKIE_HTTPONLY': True, 'SESSION_COOKIE_SECURE': False, 'SESSION_COOKIE_SAMESITE': None, 'SESSION_REFRESH_EACH_REQUEST': True, 'MAX_CONTENT_LENGTH': None, 'SEND_FILE_MAX_AGE_DEFAULT': None, 'TRAP_BAD_REQUEST_ERRORS': None, 'TRAP_HTTP_EXCEPTIONS': False, 'EXPLAIN_TEMPLATE_LOADING': False, 'PREFERRED_URL_SCHEME': 'http', 'JSON_AS_ASCII': None, 'JSON_SORT_KEYS': None, 'JSONIFY_PRETTYPRINT_REGULAR': None, 'JSONIFY_MIMETYPE': None, 'TEMPLATES_AUTO_RELOAD': None, 'MAX_COOKIE_SIZE': 4093}>
我们可以直接在app.py里面改变他,但为了项目的解耦,我们要把他从主程序中拆离。
#settings file
ENV='development'
DEBUG=True
app.config.from_object(settings)
2.路由
route就像vue一样,规定路线。
@app.route("/")
def index(){
    return "首页";
}
@app.route("/book/{}")
def get(){
    return "book";
}
2.1 request
当我们在浏览器输入 {域名:端口/index},此时就会访问服务器,服务器会去寻找是否拥有index这个路由,有的话就执行路由匹配的函数。
请求行:网址
请求体:
| Accept | / |
|---|---|
| Accept-Encoding | gzip, deflate, br |
|---|---|
| Accept-Language | zh-CN,zh;q=0.8,zh-TW;q=0.7,zh-HK;q=0.5,en-US;q=0.3,en;q=0.2 |
| Connection | keep-alive |
| Cookie | BAIDUID=9AABC37B82F1D6576D21D03DA8C82C01:FG=1; BIDUPSID=9AABC37 |
| Host | passport.baidu.com |
| Referer | https://www.baidu.com/index.php?tn=monline_3_dg |
| Sec-Fetch-Dest | script |
| Sec-Fetch-Mode | no-cors |
| Sec-Fetch-Site | same-site |
| User-Agent | Mozilla/5.0 (Windows NT 6.1; Win64; x64; rv:109.0) Gecko/20100101 Firefox/111.0 |
请求头: get看不到
2.1.2 request使用
    print(request.path)
    print(request.base_url)
    print(request.url)
    print(request.endpoint)
获取请求体
#post
request.form[''] or request.form.get()
#get
request.args[''] or request.args.get()
2.2 response
响应行:状态码
- 200 成功
- 300 重定向
- 400 客户端错误,无法响应你的请求
- 500服务器错误,无法读取你需要的响应
响应头,就是服务器在收到你的请求后做出的响应。
HTTP/1.1 200 OK
Connection: keep-alive
Content-Type: application/x-javascript
Date: Wed, 12 Apr 2023 12:45:58 GMT
Etag: W/“643623bb-1ad1”
Last-Modified: Wed, 12 Apr 2023 03:21:31 GMT
Server: BWS
Strict-Transport-Security: max-age=31536000
Tracecode: 31616162650240030218041220
Vary: Accept-Encoding
Transfer-Encoding: chunked
响应体:就是你要收到的内容
flask里面的response类就是我们所返回的类型,我们将内容写好后,会传入一个response中进行打包返回给客户端。
2.3.1 make_response
我们可以自己新建一个response,他拥有和本身我们return所赋予的response一样,我们可以给响应头加东西,当我们想返回的时候还想加入返回头。
response=make_response(content)
response.headres['xxx']='xxx'
print(response.response)
print(response.headers)
return response
#这个返回的就是response instance
2.3 底层
app.route本质上还是实现了add_url_rule函数,在这里面包含route,view-func,options,endpoints参数。
def decorator(f: T_route) -> T_route:
    endpoint = options.pop("endpoint", None)
    self.add_url_rule(rule, endpoint, f, **options)
    return f
- route就是url映射规则。
- view_func是要配对的函数
- options就是你的一些设置
- endpoints
2.4 变量规则
可以利用,利用放入key,从data字典里面拿值。
data = {"a": "北京", "b": "上海", "c": "东京"}


@app.route("/city/<key>")
def getCity(key):
    return data.get(key)
请求可以规定类型:
string | (缺省值) 接受任何不包含斜杠的文本 |
|---|---|
int | 接受正整数 |
float | 接受正浮点数 |
path | 类似 string ,但可以包含斜杠 |
uuid | 接受 UUID 字符串 |
返回类型:
| string | 字符类型,text/html |
|---|---|
| dict | 字典,默认读取成application/json |
| tuple | unpack,内容,status code |
| response instance | response实例 |
| status | 状态类型,为int |
2.5 重定向
本质上就是将response的响应码使用重定向,在response的headers中加入location告诉客户端进行重定向。
#flask封装方法
redirect(location,code,response)

#利用定义实现
def show():
    response = make_response("sdfsdf")
    response.status_code = 302
    response.location = "http://localhost:8080/get"
    return response
2.6 url_for
url_for是放进去一个endpoint也就是方法名,他会获取到他的url表示,这样我们可以快速锁定到他的位置。
#意思是重定向到get这个函数的url上
def show():
    return redirect(app.url_for("get"))
3. 模板
flask使用的是jinjia模板,我们使用起来,遵照jinjia的模板使用方法。jinjia相比于java的thymeleaf,只能用臭来形容。
3.1 模板传值
将python的内容传送给template
#var就是放参数的地方,用命名参数的方法填写
render_template(template,user=user,cmc='shuaige')
3.2 控制块
for循环
{%for i in student%} #转义符
{endfor}
if循环
{%if statement%}
html
{%else%}
html
{%endif%}
3.3 loop
loop变量可以当index使用
{{loop.index}} #代表从1开始的序号,

{{loop.index0}} #代表从0开始
{{loop.revindex}} #降序倒着来
{{loop.revindex0}}#降序倒着来,到0
{{loop.first}} #是否是第一个 返回bool
{{loop.last}} #是否是最后一个
3.4 过滤器
过滤器就是函数的方法,属性,在模板中使用后端代码的地方。
{{变量|属性}}
3.4.1 转义
{{user|safe}} //转义字符,可以识别出是否是html体
3.4.2 首字母大写
{{user|capitalize}}
3.4.3 title
每一行大写
3.4.4 reverse
翻转
3.4.5 format
{{“%s is %d years old.”|format(1,2)}
3.4.6 truncate
截断
{{"hello world"|truncate(5)|reverse}}
3.5 列表过滤器
sum
{{count|sum}} //用于整形
sort
排序
获取列表字典
{%for user in users%}
{%for k,v in user|items%}
{{k}}->{{v}}
{%endfor%}
{%endfor%}
3.6 自定义过滤器
def xxx():
app.add_template_filter(xxx,'xxx') #手动塞入
#装饰器形式
@app.template_filter('xxx')
def xxx():
3.7 模板继承
导入basic.html
{%extends 'basic.html'%}
想要改变里面的内容需要block进行改变,在basic.html里面有block。
    {%block middle%}
    {%endblock%}
直接添加,不像上面是继承父类文件,在写入子类
{%include 'header.html'%}
3.8 静态文件
我们根据app.url_map可以看到flask为我们准备了static,我们在服务器上获取内容,使用绝对定位是一种不负责任的手法。
[<Rule '/static/<filename>' (GET, HEAD, OPTIONS) -> static>
使用url_for(‘static’,filename=‘’)
{%url_for('static',filename='xlkj')%}
———————
4 发送文件
flask提供给了我们将response-type改成文件类型的发送方法,我们可以不自己更改Response对象了。
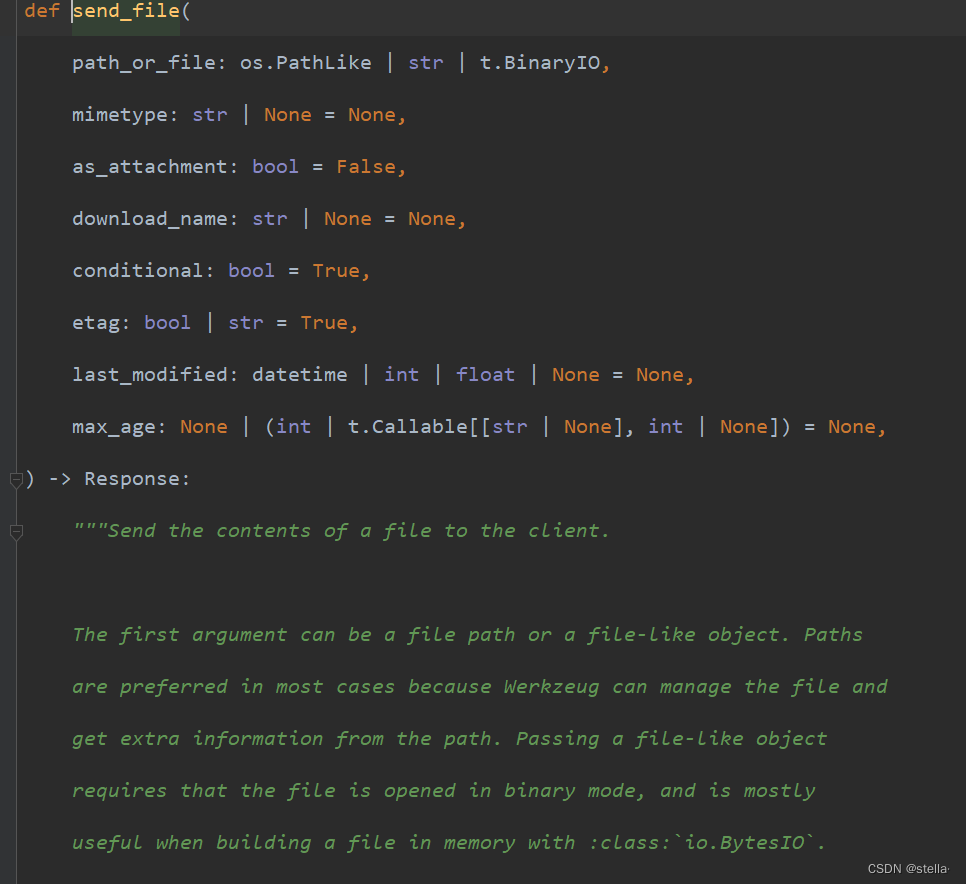
这里他说需要使用一个BytesIo进行二进制流的接收,进行发送
@user_bp.route("/get_captcha",methods=['get'])
def get_captcha():
    captcha = create_captcha(length=4)
    img_io = BytesIO()
    captcha.save(img_io, 'PNG')
    img_io.seek(0)
    return send_file(img_io, mimetype='image/png')
如果你不想使用flask自带的,那你就需要使用make_resposne进行自己的创建。
@user_bp.route("/get_captcha",methods=['get'])
def get_captcha():
    captcha = create_captcha(length=4)
    img_io = BytesIO()
    captcha.save(img_io, 'PNG')
    img_io.seek(0)
    response = make_response(img_io)
    response.headers['Content-Type']='image/png'
    return response
5 flash
flask为我们提供了快速返回前端内容,他将内容保存到session中,在前端通过使用全局函数**get_flashed_messages()**获取消息并将它显示出来。
@home_bp.route("/", methods=['get', 'post'])
def home_center():
flash("欢迎来到主页!!")
    return render_template("index.html")
通过这个方法遍历,他会返回一个list[str]。
        {% for message in get_flashed_messages() %}
            {{ message }}
        {% endfor %}
他有三个类型
1.info
2.warning
3.error


 被折叠的 条评论
为什么被折叠?
被折叠的 条评论
为什么被折叠?
 到【灌水乐园】发言


