


名人说:路漫漫其修远兮,吾将上下而求索。—— 屈原《离骚》
创作者:Code_流苏(CSDN)(一个喜欢古诗词和编程的Coder😊)
目录
👋 专栏介绍: Python星球日记专栏介绍(持续更新ing)
✅ 上一篇: 《Python星球日记》 第95天:分布式训练与推理
欢迎回到Python星球🪐日记!今天是我们旅程的第96天,旅程将暂时告一段落,谢谢大家的一路陪伴!
在我们旅程的最后一天,让我们把前面95天所学的知识融会贯通,通过构建一个完整的端到端AI工程化项目,来巩固和应用我们的技能。这篇文章不仅是对前面学习内容的总结,更是对实际AI项目开发全流程的系统展示。
一、项目概述
1. 什么是端到端AI工程化?
端到端AI工程化是指将AI项目从需求分析、数据准备、模型训练到部署维护的全生命周期进行规范化、自动化和工程化的过程。
我们可以一起想象一下建造一座房子的过程:不仅需要设计图纸(模型算法),还需要准备建材(数据),招募工人(计算资源),实际建造(训练过程),以及后期维护(监控与更新)。传统的AI开发常常只关注"设计图纸",而忽略了整体工程的系统性和可持续性。

端到端AI工程化就像是把一个AI想法变成现实世界产品的完整蓝图,它不仅关注模型本身的效果,更注重整个AI系统的可靠性、可扩展性和可维护性。
AI工程项目的流程简单可视化如下:

2. 我们的项目任务
在这个综合项目中,我们将构建一个智能文本分类系统,完成从数据收集到模型部署的全流程工作。该系统能够自动对输入的文本进行主题分类,并通过REST API提供服务。
这就像是开发一个能够自动分拣信件的邮局系统,根据信件内容将其分到不同的类别中去。只不过我们的"邮局"是数字化的,处理的是文本数据,而且速度更快、规模更大。
3. 技术栈概览
我们将使用以下技术栈:
- 数据处理:Python、Pandas、NLTK
- 模型训练:PyTorch、Hugging Face Transformers
- 自动化平台:MLflow
- 容器化:Docker
- 编排与部署:Kubernetes
- API开发:FastAPI
- 监控:Prometheus、Grafana
这些技术组合在一起,就像是一个完整的乐队,每个技术担任一个不同的角色,共同演奏出一段和谐的AI工程"交响曲"。
二、项目需求分析
1. 业务需求
建立一个文本分类系统,能够:
- 对输入的文本自动分类为预定义的主题(如技术、体育、娱乐、政治等)
- 提供REST API接口,方便其他系统集成
- 具备良好的扩展性,能够处理增长的请求量
- 提供模型性能监控和预警机制
这些需求源于现实业务场景。例如,一个新闻网站可能希望自动对文章进行分类,以便于内容组织和推荐;一个客服系统可能需要自动分类用户查询,以便快速路由到相应的部门。
2. 技术需求
- 模型准确率≥90%
- API响应时间<500ms
- 系统可用性>99.9%
- 具备自动伸缩能力,应对流量高峰
- 支持模型版本控制和回滚
这些技术要求确保了我们的系统不仅"能用",而且"好用"。就像一辆汽车,不仅要能开,还要保证速度快、油耗低、安全可靠。
三、数据准备
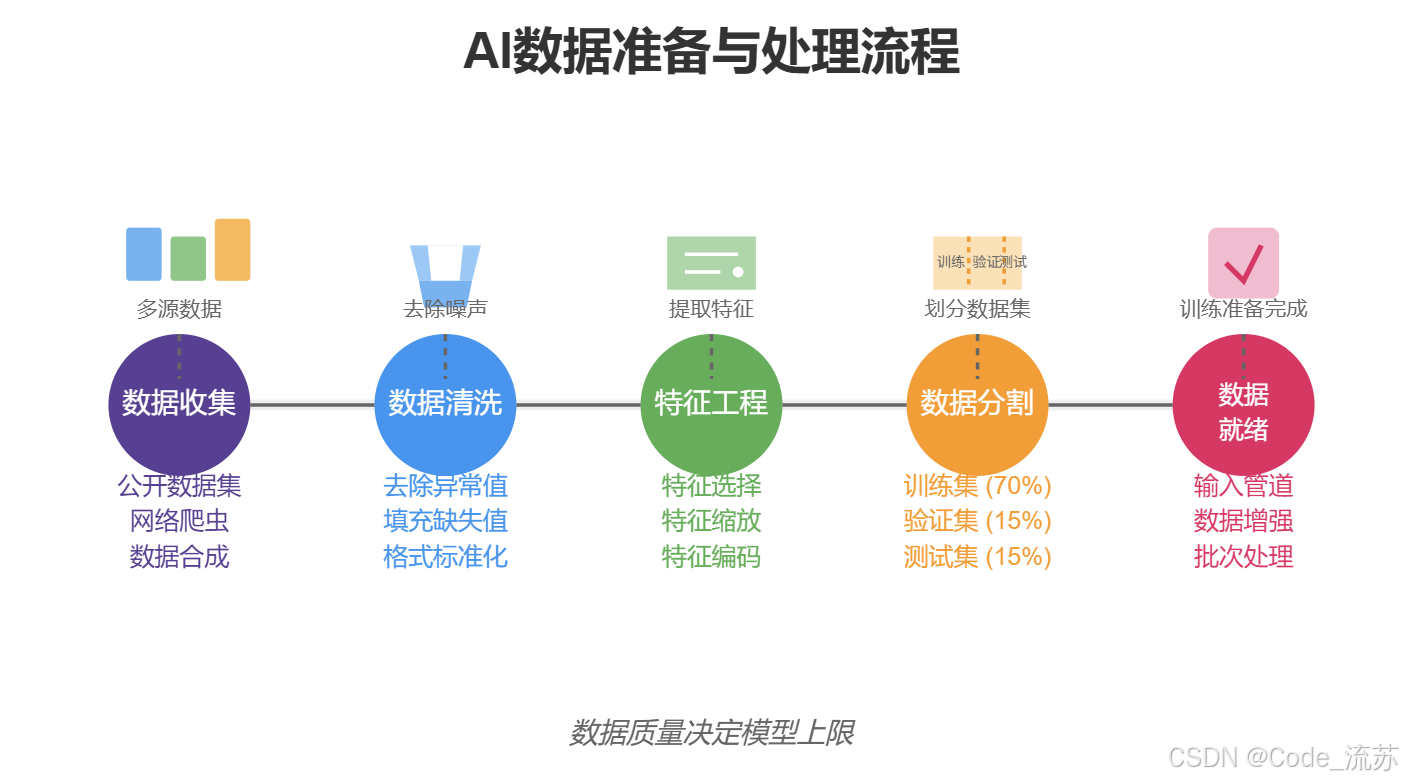
1. 数据收集
数据是AI项目的基础,就像烹饪需要原材料一样,没有好的数据,就做不出好的AI模型。对于文本分类任务,我们需要大量带标签的文本数据。
数据来源选择:
- 公开数据集:如AG News、20 Newsgroups等
- 网络爬虫:从特定网站抓取文章并分类
- 数据合成:通过规则或AI生成补充数据
以下是使用datasets库加载AG News数据集的代码:
from datasets import load_dataset

# 加载AG News数据集
dataset = load_dataset("ag_news")

# 查看数据集信息
print(f"训练集大小: {len(dataset['train'])}")
print(f"测试集大小: {len(dataset['test'])}")
print(f"类别数量: {len(set(dataset['train']['label']))}")

# 查看前5条数据
for i in range(5):
    print(f"文本: {dataset['train'][i]['text']}")
    print(f"标签: {dataset['train'][i]['label']}")
    print("-" * 50)
这段代码不仅加载了数据,还帮助我们了解数据的基本情况,就像是在购买原材料前先检查它们的新鲜度和品质一样。
2. 数据标注
对于没有标签的数据,我们需要进行标注。想象一下你有一堆照片,但没有任何分类标签,你需要一张一张地给它们贴上"风景"、“人像”、"动物"等标签,这就是数据标注的过程。

可以采用以下方式:
- 人工标注:最准确但成本高
- 半自动标注:先用简单模型预标注,再人工校正
- 众包标注:将任务分发给多人,通过多数投票确定标签
标注平台推荐:
- Label Studio:开源的数据标注平台
- Prodigy:高效的文本和图像标注工具
- CVAT:用于计算机视觉的标注工具
选择合适的标注方法和工具,就像选择合适的工具来整理杂乱的房间,能够大大提高效率和质量。
3. 数据预处理
数据预处理是提高模型性能的关键步骤。原始数据常常包含噪声、格式不统一或冗余信息,需要经过"清洗"才能用于训练模型。
import pandas as pd
import numpy as np
from sklearn.model_selection import train_test_split
import nltk
from nltk.corpus import stopwords
from nltk.tokenize import word_tokenize
import re

# 下载必要的NLTK资源
nltk.download('punkt')
nltk.download('stopwords')

def preprocess_text(text):
    """文本预处理函数"""
    # 转换为小写
    text = text.lower()

    # 移除特殊字符和数字
    text = re.sub(r'[^\w\s]', '', text)
    text = re.sub(r'\d+', '', text)

    # 分词
    tokens = word_tokenize(text)

    # 移除停用词
    stop_words = set(stopwords.words('english'))
    tokens = [word for word in tokens if word not in stop_words]

    # 重新组合成文本
    return ' '.join(tokens)

# 应用预处理
dataset['train'] = dataset['train'].map(lambda x: {
    'text': preprocess_text(x['text']),
    'label': x['label']
})

# 分割训练集和验证集
train_data, val_data = train_test_split(
    dataset['train'],
    test_size=0.1,
    random_state=42,
    stratify=dataset['train']['label']
)
文本预处理流程图清晰地展示了从原始文本到准备好的训练数据的转换过程:
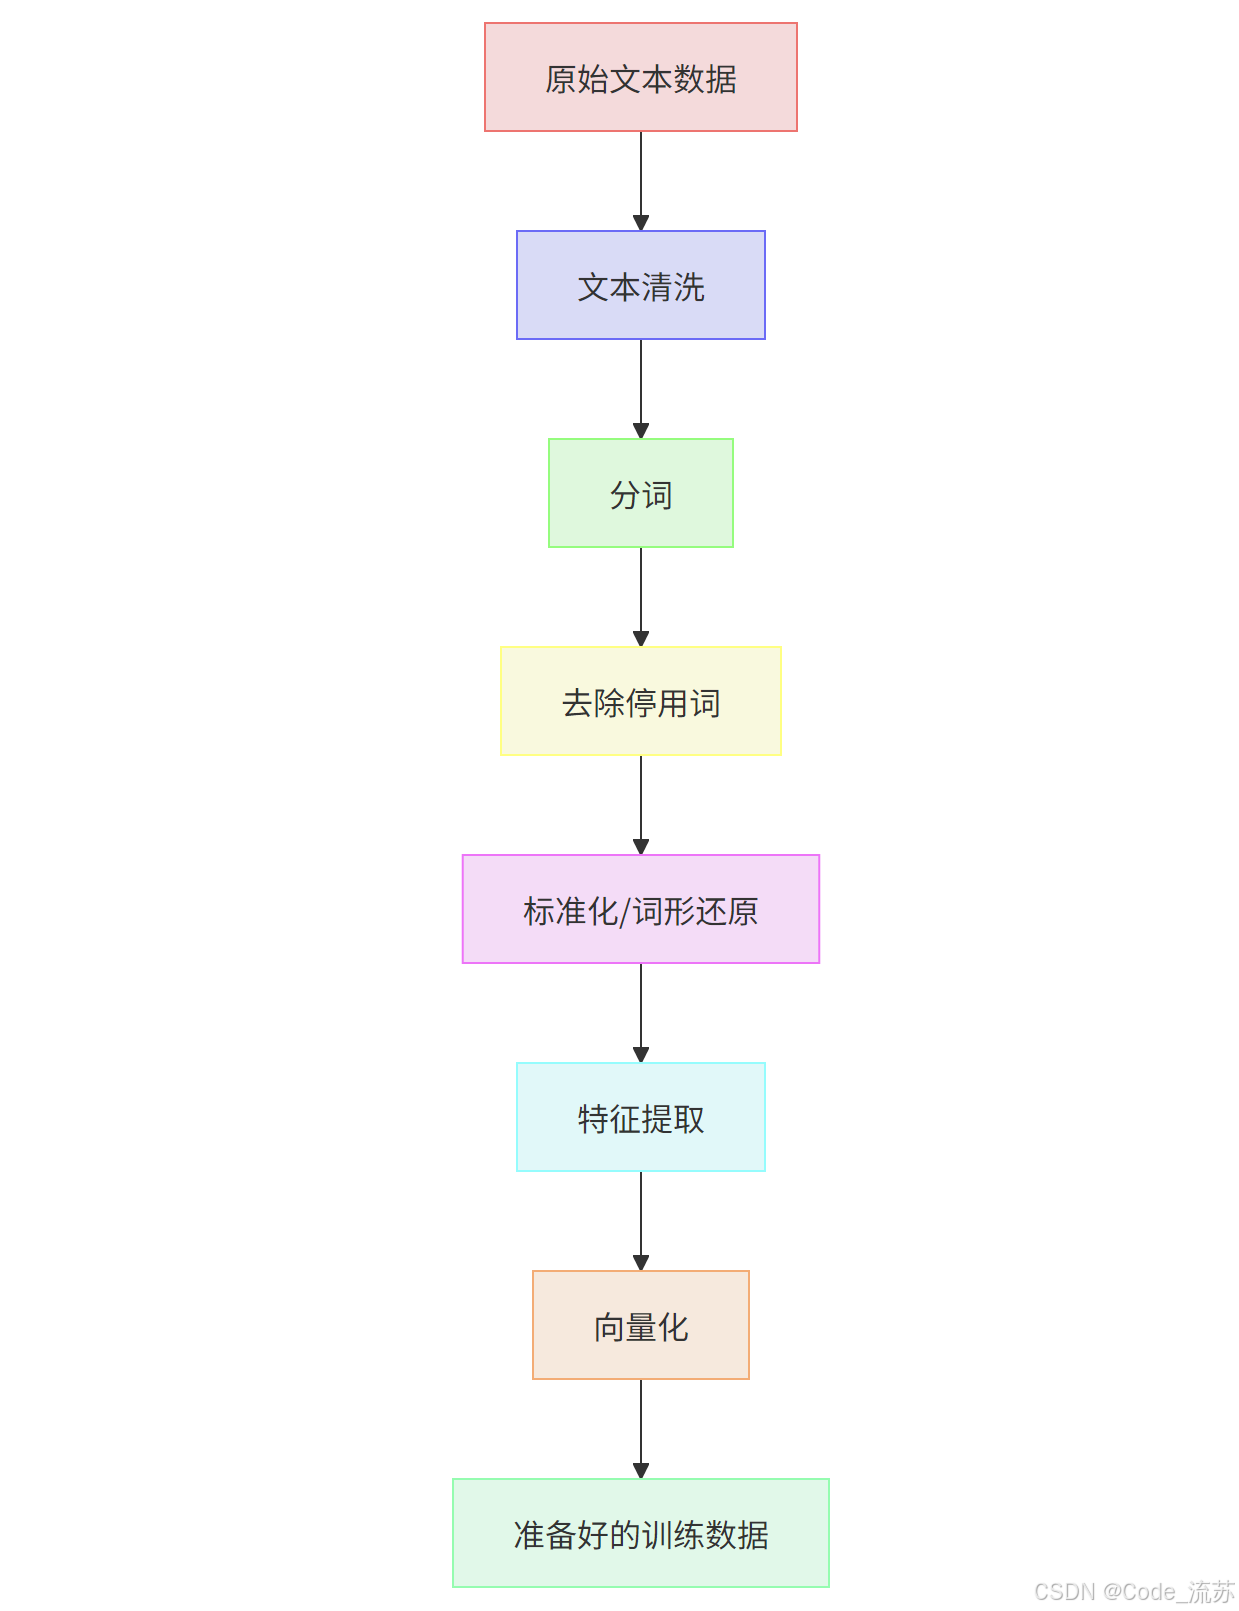
这个过程就像是把粗糙的原石经过打磨、切割、抛光,最终变成闪亮的宝石。每一步都有其特定的目的,共同作用使数据更适合模型学习。
四、模型训练
1. 选择合适的模型
对于文本分类任务,我们有多种模型可选,就像钓鱼时选择合适的鱼竿和鱼饵一样重要:
- 传统机器学习模型:如朴素贝叶斯、支持向量机等
- 深度学习模型:如CNN、RNN、LSTM等
- 预训练语言模型:如BERT、RoBERTa、DistilBERT等
在本项目中,我们选择使用DistilBERT,它是BERT的轻量级版本,保持了BERT大部分性能的同时,速度更快、资源消耗更少。这就像是一款紧凑型的高性能汽车,虽然没有旗舰车型那么豪华,但更经济实用,同时保留了核心性能。
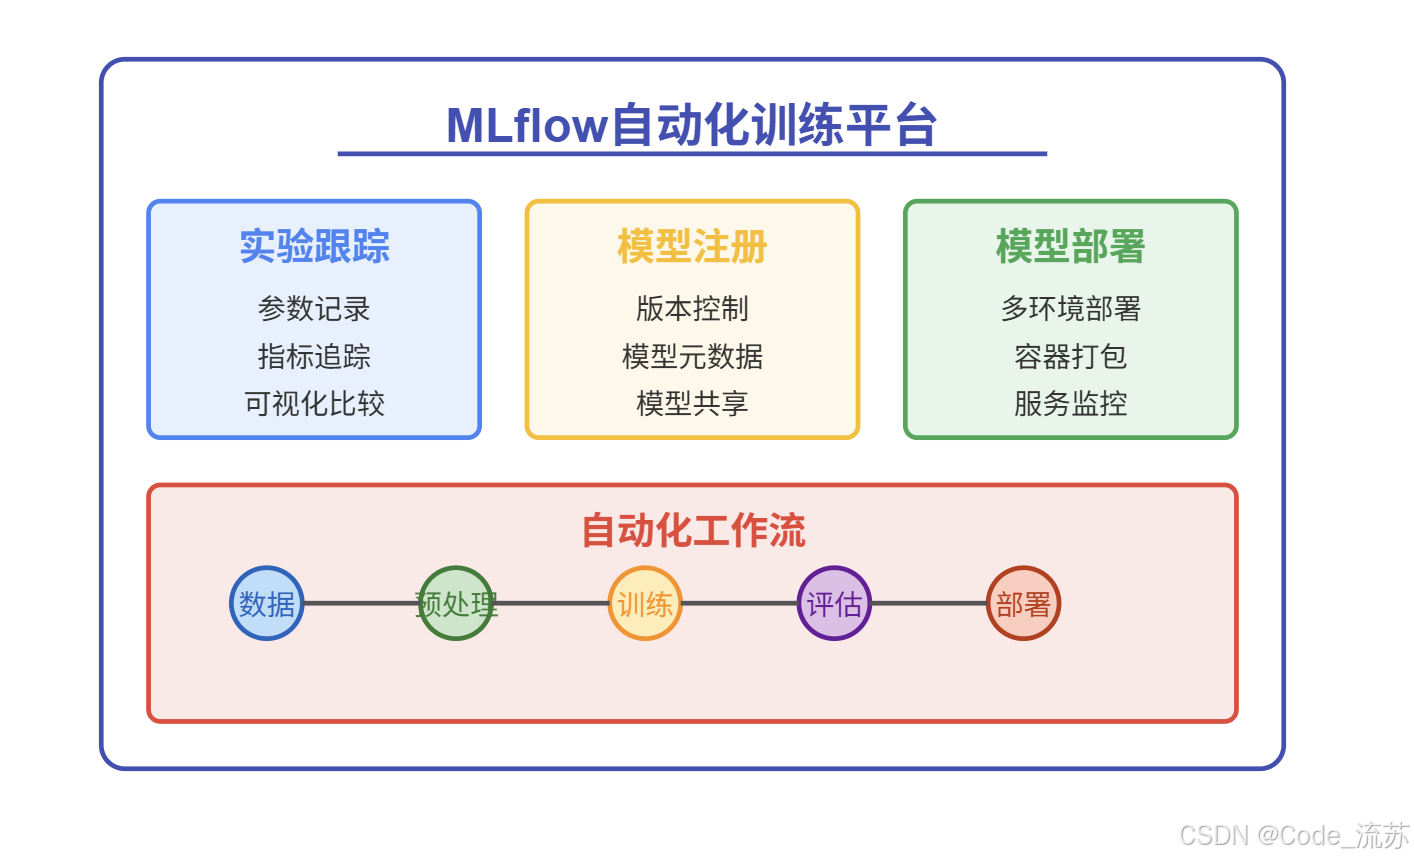
2. 使用自动化训练平台
MLflow是一个优秀的开源平台,可以跟踪实验、打包代码并共享模型。使用自动化训练平台就像是有了一个实验助手,帮你记录每次实验的条件和结果,以便你能清楚地知道哪些调整有效,哪些无效。
import mlflow
import torch
from transformers import DistilBertTokenizer, DistilBertForSequenceClassification
from transformers import Trainer, TrainingArguments
from datasets import load_metric

# 配置MLflow
mlflow.set_experiment("文本分类项目")

# 定义评估指标
metric = load_metric("accuracy")
def compute_metrics(eval_pred):
    predictions, labels = eval_pred
    predictions = np.argmax(predictions, axis=1)
    return metric.compute(predictions=predictions, references=labels)

# 开始训练,跟踪实验
with mlflow.start_run():
    # 记录参数
    mlflow.log_param("model_name", "distilbert-base-uncased")
    mlflow.log_param("batch_size", 16)
    mlflow.log_param("learning_rate", 2e-5)
    mlflow.log_param("epochs", 3)

    # 加载预训练模型和分词器
    tokenizer = DistilBertTokenizer.from_pretrained("distilbert-base-uncased")
    model = DistilBertForSequenceClassification.from_pretrained(
        "distilbert-base-uncased",
        num_labels=4  # AG News有4个类别
    )

    # 准备数据集
    def tokenize_function(examples):
        return tokenizer(examples["text"], padding="max_length", truncation=True)

    tokenized_train = train_data.map(tokenize_function, batched=True)
    tokenized_val = val_data.map(tokenize_function, batched=True)
    tokenized_test = dataset["test"].map(tokenize_function, batched=True)

    # 设置训练参数
    training_args = TrainingArguments(
        output_dir="./results",
        evaluation_strategy="epoch",
        learning_rate=2e-5,
        per_device_train_batch_size=16,
        per_device_eval_batch_size=16,
        num_train_epochs=3,
        weight_decay=0.01,
        push_to_hub=False,
    )

    # 初始化训练器
    trainer = Trainer(
        model=model,
        args=training_args,
        train_dataset=tokenized_train,
        eval_dataset=tokenized_val,
        compute_metrics=compute_metrics,
    )

    # 训练模型
    trainer.train()

    # 评估模型
    eval_results = trainer.evaluate(tokenized_test)

    # 记录指标
    mlflow.log_metric("accuracy", eval_results["eval_accuracy"])

    # 保存模型
    trainer.save_model("./final_model")
    mlflow.pytorch.log_model(model, "text_classifier")
这段代码不仅完成了模型训练,还通过MLflow记录了训练过程中的参数和结果,使实验可重现、可比较。
3. 超参数调优
为了获得最佳性能,我们需要调整模型的超参数。这就像是调整烹饪的火候、时间、调料比例,以找到最佳的烹饪方法。
可以使用MLflow结合Optuna进行自动化超参数调优:
import optuna
from optuna.integration.mlflow import MLflowCallback

mlflow_callback = MLflowCallback(
    tracking_uri=mlflow.get_tracking_uri(),
    metric_name="accuracy",
    mlflow_exp_id=mlflow.get_experiment_by_name("文本分类项目").experiment_id
)

def objective(trial):
    # 定义超参数搜索空间
    learning_rate = trial.suggest_float("learning_rate", 1e-5, 5e-5, log=True)
    batch_size = trial.suggest_categorical("batch_size", [8, 16, 32])
    weight_decay = trial.suggest_float("weight_decay", 0.01, 0.1)

    # 配置训练参数
    training_args = TrainingArguments(
        output_dir=f"./results/{trial.number}",
        evaluation_strategy="epoch",
        learning_rate=learning_rate,
        per_device_train_batch_size=batch_size,
        per_device_eval_batch_size=batch_size,
        num_train_epochs=3,
        weight_decay=weight_decay,
    )

    # 初始化模型
    model = DistilBertForSequenceClassification.from_pretrained(
        "distilbert-base-uncased",
        num_labels=4
    )

    # 初始化训练器
    trainer = Trainer(
        model=model,
        args=training_args,
        train_dataset=tokenized_train,
        eval_dataset=tokenized_val,
        compute_metrics=compute_metrics,
    )

    # 训练模型
    trainer.train()

    # 评估模型
    eval_results = trainer.evaluate(tokenized_val)
    accuracy = eval_results["eval_accuracy"]

    return accuracy

# 创建学习器并开始优化
study = optuna.create_study(direction="maximize")
study.optimize(objective, n_trials=10, callbacks=[mlflow_callback])

# 获取最佳超参数
best_params = study.best_params
print(f"最佳超参数: {best_params}")
print(f"最佳准确率: {study.best_value:.4f}")
五、模型部署
1. Docker容器化
Docker容器化可以确保模型在不同环境中的一致性运行。想象一下,如果你在自己的电脑上开发了一个完美运行的模型,但当你把它发送给同事或部署到服务器时,却发现它无法正常工作,因为环境不同。Docker就是解决这个问题的"包装盒",它将模型及其所有依赖打包在一起,确保在任何地方都能一致运行。
以下是我们的Dockerfile:
# 基础镜像
FROM python:3.9-slim

# 设置工作目录
WORKDIR /app

# 安装依赖
COPY requirements.txt .
RUN pip install --no-cache-dir -r requirements.txt

# 复制模型和代码
COPY ./final_model ./model
COPY ./app.py .

# 暴露端口
EXPOSE 8000

# 启动命令
CMD ["uvicorn", "app:app", "--host", "0.0.0.0", "--port", "8000"]
构建Docker镜像的命令:
docker build -t text-classifier:v1 .
测试Docker容器:
docker run -p 8000:8000 text-classifier:v1
这些步骤就像是把我们的AI模型装入一个标准化的容器中,方便运输和部署到任何支持Docker的环境中。
2. FastAPI服务
我们使用FastAPI构建高性能的REST API接口。FastAPI是一个现代化的Python Web框架,专为API开发而设计,它快速、易用且支持自动生成API文档。
# app.py
from fastapi import FastAPI, HTTPException
from pydantic import BaseModel
from transformers import DistilBertTokenizer, DistilBertForSequenceClassification
import torch
import time

# 定义请求和响应模型
class TextRequest(BaseModel):
    text: str

class PredictionResponse(BaseModel):
    category: str
    confidence: float
    processing_time: float

# 类别映射
id2label = {0: "World", 1: "Sports", 2: "Business", 3: "Sci/Tech"}

# 初始化FastAPI应用
app = FastAPI(title="文本分类API", description="使用DistilBERT进行文本分类")

# 加载模型和分词器
@app.on_event("startup")
async def startup_event():
    global model, tokenizer
    model = DistilBertForSequenceClassification.from_pretrained("./model")
    tokenizer = DistilBertTokenizer.from_pretrained("distilbert-base-uncased")
    model.eval()  # 设置为评估模式

# 健康检查端点
@app.get("/health")
def health_check():
    return {"status": "healthy"}

# 预测端点
@app.post("/predict", response_model=PredictionResponse)
def predict(request: TextRequest):
    start_time = time.time()

    try:
        # 预处理文本
        inputs = tokenizer(request.text, return_tensors="pt", padding=True, truncation=True)

        # 预测
        with torch.no_grad():
            outputs = model(**inputs)
            predictions = outputs.logits

        # 获取最可能的类别和置信度
        probabilities = torch.nn.functional.softmax(predictions, dim=1)
        confidence, predicted_class = torch.max(probabilities, dim=1)

        # 计算处理时间
        processing_time = time.time() - start_time

        # 返回结果
        return PredictionResponse(
            category=id2label[predicted_class.item()],
            confidence=confidence.item(),
            processing_time=processing_time
        )

    except Exception as e:
        raise HTTPException(status_code=500, detail=str(e))
这段代码创建了一个API服务,能够接收文本输入,使用我们训练好的模型进行预测,并返回预测结果。这就像是给我们的AI模型创建了一个接待窗口,使其他系统能够方便地与我们的模型交互。
3. Kubernetes部署
使用Kubernetes进行容器编排和自动扩缩容,就像是给我们的Docker容器配备了一个智能管理系统,能够根据需求自动增减容器数量,保证服务的可用性和性能。
# deployment.yaml
apiVersion: apps/v1
kind: Deployment
metadata:
  name: text-classifier
spec:
  replicas: 3
  selector:
    matchLabels:
      app: text-classifier
  template:
    metadata:
      labels:
        app: text-classifier
    spec:
      containers:
      - name: text-classifier
        image: text-classifier:v1
        resources:
          requests:
            memory: "1Gi"
            cpu: "500m"
          limits:
            memory: "2Gi"
            cpu: "1000m"
        ports:
        - containerPort: 8000
        readinessProbe:
          httpGet:
            path: /health
            port: 8000
          initialDelaySeconds: 10
          periodSeconds: 5
        livenessProbe:
          httpGet:
            path: /health
            port: 8000
          initialDelaySeconds: 15
          periodSeconds: 20

---
# service.yaml
apiVersion: v1
kind: Service
metadata:
  name: text-classifier-service
spec:
  selector:
    app: text-classifier
  ports:
  - port: 80
    targetPort: 8000
  type: LoadBalancer

---
# hpa.yaml
apiVersion: autoscaling/v2
kind: HorizontalPodAutoscaler
metadata:
  name: text-classifier-hpa
spec:
  scaleTargetRef:
    apiVersion: apps/v1
    kind: Deployment
    name: text-classifier
  minReplicas: 2
  maxReplicas: 10
  metrics:
  - type: Resource
    resource:
      name: cpu
      target:
        type: Utilization
        averageUtilization: 70
部署到Kubernetes集群:
kubectl apply -f deployment.yaml
kubectl apply -f service.yaml
kubectl apply -f hpa.yaml
Kubernetes部署架构图展示了如何通过Kubernetes管理多个容器实例,实现高可用性和自动扩展:
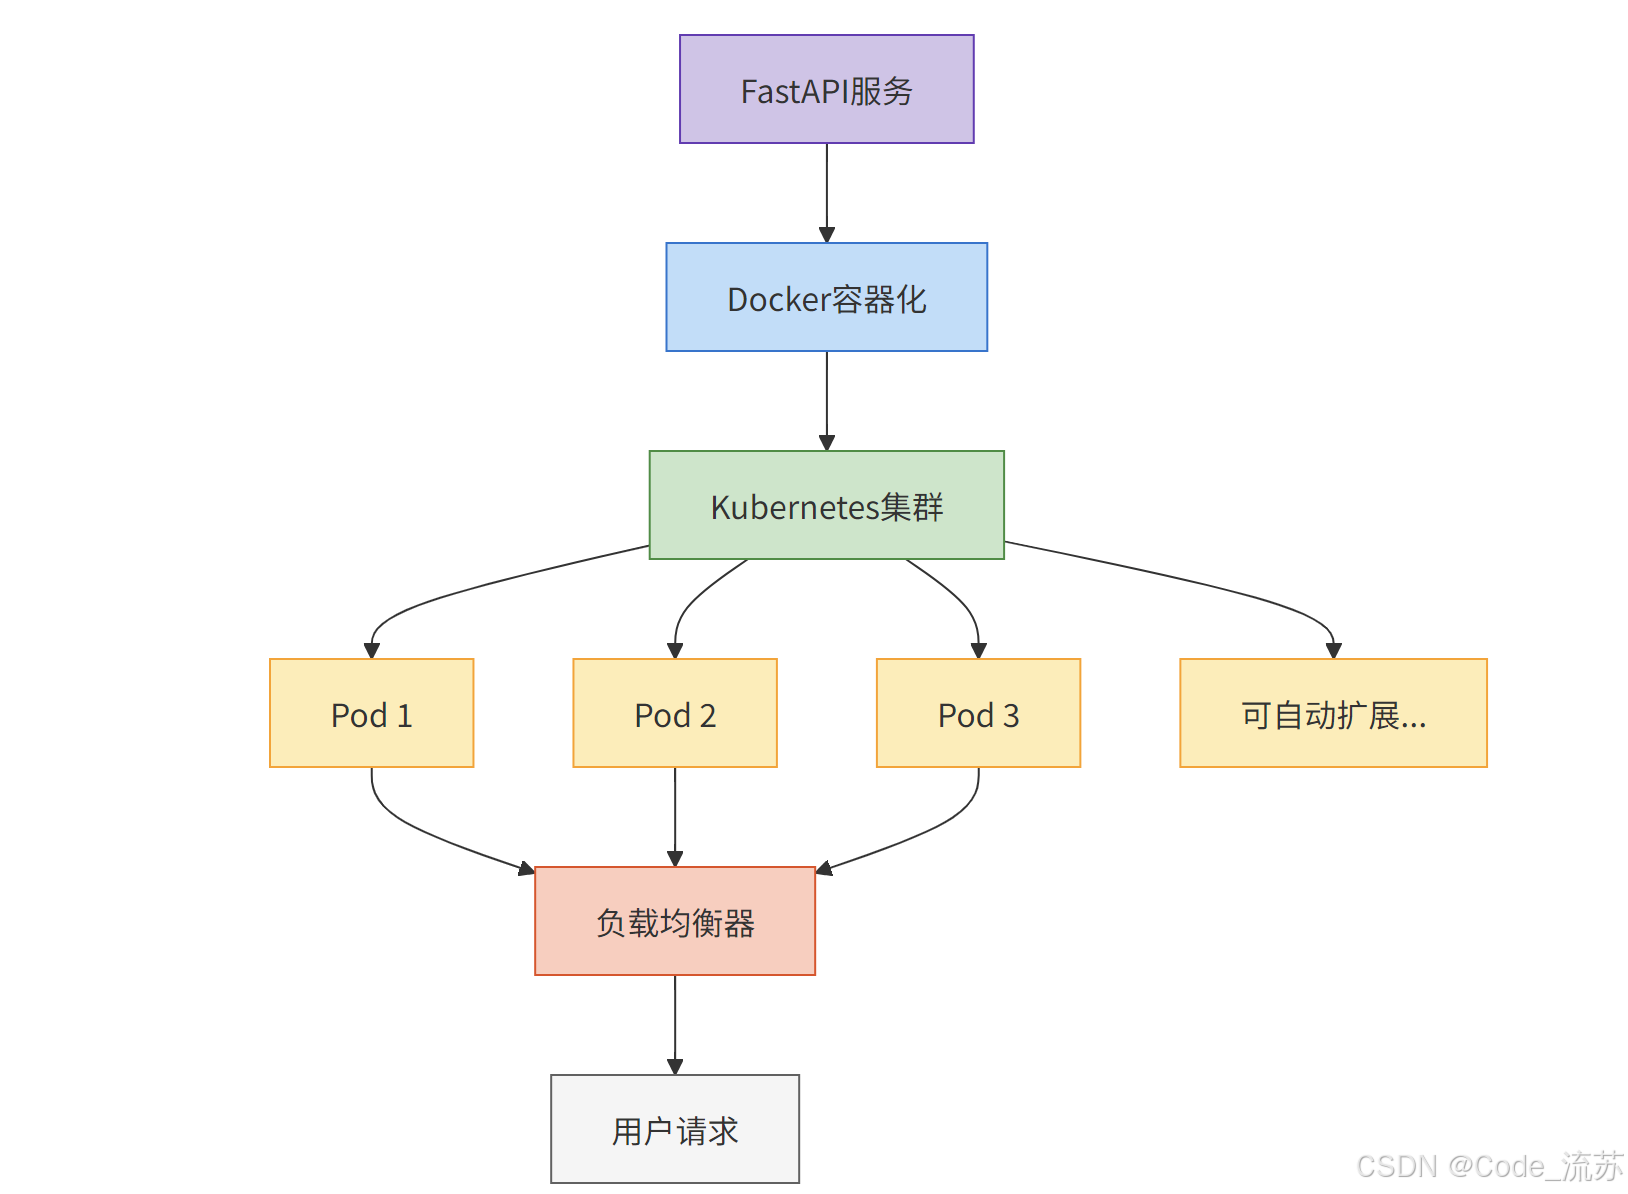
这个架构就像是一个智能交通系统,根据道路拥堵情况自动调整信号灯和车道数量,确保交通流畅,同时应对高峰期的流量增加。
六、端到端监控与维护
1. 性能监控
在生产环境中,持续监控模型性能至关重要。想象一下,如果你开车上路却没有仪表盘,无法知道速度、油量和发动机状态,这将是非常危险的。同样,AI系统也需要"仪表盘"来监控其健康状态。
我们使用Prometheus和Grafana来构建监控系统:
# prometheus.yaml
apiVersion: v1
kind: ConfigMap
metadata:
  name: prometheus-config
data:
  prometheus.yml: |
    global:
      scrape_interval: 15s
    scrape_configs:
      - job_name: 'text-classifier'
        metrics_path: '/metrics'
        static_configs:
          - targets: ['text-classifier-service:80']
在FastAPI应用中添加Prometheus指标:
from prometheus_client import Counter, Histogram, generate_latest
from fastapi import Response

# 定义指标
REQUESTS = Counter('text_classifier_requests_total', 'Total number of requests')
PREDICTIONS = Counter('text_classifier_predictions', 'Predictions by category', ['category'])
LATENCY = Histogram('text_classifier_latency_seconds', 'Request latency in seconds')

# 指标端点
@app.get("/metrics")
def metrics():
    return Response(content=generate_latest(), media_type="text/plain")

# 修改预测端点以记录指标
@app.post("/predict", response_model=PredictionResponse)
def predict(request: TextRequest):
    REQUESTS.inc()

    # 使用Histogram计时器
    with LATENCY.time():
        # 现有的预测代码...

        # 记录预测类别
        PREDICTIONS.labels(category=id2label[predicted_class.item()]).inc()

        # 返回结果...
这样,我们就能够实时监控系统的请求量、响应时间和预测分布,及时发现异常情况。
2. 模型漂移检测
模型漂移是指模型性能随时间变化而降低的现象。就像一艘船在海上航行时会因海流而偏离航向,AI模型也会因为数据分布的变化而"偏离"原本的性能水平。
我们可以实现一个简单的漂移检测系统:
from datetime import datetime
import pandas as pd
from sklearn.metrics import accuracy_score
import json
import os

class DriftDetector:
    def __init__(self, baseline_accuracy, threshold=0.05):
        self.baseline_accuracy = baseline_accuracy
        self.threshold = threshold
        self.predictions_log = []
        self.last_check_time = datetime.now()
        self.check_interval_hours = 24

    def log_prediction(self, text, predicted_label, true_label=None):
        """记录预测结果"""
        self.predictions_log.append({
            'timestamp': datetime.now(),
            'text': text,
            'predicted_label': predicted_label,
            'true_label': true_label
        })

        # 检查是否需要进行漂移检测
        hours_since_last_check = (datetime.now() - self.last_check_time).total_seconds() / 3600
        if hours_since_last_check >= self.check_interval_hours:
            self.check_drift()

    def check_drift(self):
        """检查模型漂移"""
        # 只有当有足够的样本和真实标签时才进行检测
        labeled_predictions = [p for p in self.predictions_log if p['true_label'] is not None]

        if len(labeled_predictions) >= 100:
            df = pd.DataFrame(labeled_predictions)
            current_accuracy = accuracy_score(
                df['true_label'],
                df['predicted_label']
            )

            drift_amount = self.baseline_accuracy - current_accuracy

            if drift_amount > self.threshold:
                self.alert_drift(current_accuracy, drift_amount)

            # 重置记录
            self.predictions_log = []
            self.last_check_time = datetime.now()

    def alert_drift(self, current_accuracy, drift_amount):
        """发出模型漂移警报"""
        alert_message = {
            'alert': 'Model Drift Detected',
            'timestamp': datetime.now().isoformat(),
            'baseline_accuracy': self.baseline_accuracy,
            'current_accuracy': current_accuracy,
            'drift_amount': drift_amount
        }

        # 将警报记录到文件
        with open('drift_alerts.json', 'a') as f:
            f.write(json.dumps(alert_message) + '\n')

        # 在实际系统中,你可能希望发送电子邮件或触发其他通知
        print(f"ALERT: Model drift detected! Current accuracy: {current_accuracy:.4f}, Drift: {drift_amount:.4f}")
这个漂移检测系统就像是船上的导航系统,持续检查实际航向与计划航向的偏差,一旦偏差超过阈值,就会发出警报,提醒需要调整航向。
3. 自动重训练流程
随着数据分布的变化,我们需要定期重新训练模型。这就像是定期维护和更新软件,确保它始终处于最佳状态。
以下是一个基于Airflow的自动重训练流程:
from airflow import DAG
from airflow.operators.python import PythonOperator
from airflow.operators.bash import BashOperator
from datetime import datetime, timedelta

# 定义默认参数
default_args = {
    'owner': 'data_science_team',
    'depends_on_past': False,
    'start_date': datetime(2023, 1, 1),
    'email': ['alert@example.com'],
    'email_on_failure': True,
    'email_on_retry': False,
    'retries': 1,
    'retry_delay': timedelta(minutes=5),
}

# 创建DAG
dag = DAG(
    'text_classifier_retraining',
    default_args=default_args,
    description='定期重新训练文本分类模型',
    schedule_interval=timedelta(days=30),  # 每30天运行一次
)

# 定义任务
def collect_new_data():
    """收集新数据"""
    # 实现数据收集逻辑
    pass

def prepare_data():
    """准备训练数据"""
    # 实现数据预处理逻辑
    pass

def train_model():
    """训练模型"""
    # 实现模型训练逻辑
    pass

def evaluate_model():
    """评估模型"""
    # 实现模型评估逻辑
    pass

def deploy_model():
    """部署模型"""
    # 实现模型部署逻辑
    pass

# 创建任务
t1 = PythonOperator(
    task_id='collect_new_data',
    python_callable=collect_new_data,
    dag=dag,
)

t2 = PythonOperator(
    task_id='prepare_data',
    python_callable=prepare_data,
    dag=dag,
)

t3 = PythonOperator(
    task_id='train_model',
    python_callable=train_model,
    dag=dag,
)

t4 = PythonOperator(
    task_id='evaluate_model',
    python_callable=evaluate_model,
    dag=dag,
)

t5 = PythonOperator(
    task_id='deploy_model',
    python_callable=deploy_model,
    dag=dag,
)

# 定义任务依赖关系
t1 >> t2 >> t3 >> t4 >> t5
这个自动重训练流程就像是设置了一个定时任务,定期对AI系统进行"体检"和"更新",确保它始终保持最佳状态。
下表列出了AI系统的关键监控指标及应对策略:
| 监控指标 | 描述 | 告警阈值 | 应对策略 |
|---|---|---|---|
| 模型性能 | 模型准确率、精确率、召回率等 | 准确率低于85% | 触发模型重训练流程 |
| 数据漂移 | 输入数据分布与训练数据的差异 | 漂移指数>0.2 | 收集新数据并更新训练集 |
| 延迟 | API响应时间 | 平均>500ms | 优化推理过程或扩展资源 |
| 吞吐量 | 每秒处理请求数 | 下降20% | 增加实例数量或分析性能瓶颈 |
| 错误率 | 服务错误百分比 | >1% | 检查日志并修复问题 |
| 资源使用 | CPU、内存、GPU使用率 | CPU>80%、内存>85% | 自动扩容或优化资源配置 |
| 预测分布 | 各类别预测分布情况 | 与历史分布差异>30% | 分析是否为模型问题或数据变化 |
| 批量准确性 | 批处理作业的准确率 | 低于基线5% | 暂停批处理并分析原因 |
| 模型置信度 | 预测置信分数分布 | 低置信度比例>20% | 考虑调整决策阈值或重训练 |
这些监控指标就像是AI系统的"体检报告",帮助我们全面了解系统的健康状况,及时发现并解决问题。
七、综合项目:文本情感分析系统
1. 项目概述与架构设计
让我们通过一个完整的端到端文本情感分析系统来综合应用我们学到的知识。这个系统将能够分析用户评论的情感倾向(积极、消极或中性),并提供实时的API服务。
这个项目整合了我们前面学习的所有内容,从数据处理到模型训练,再到部署和监控,形成一个完整的AI工程化项目。
情感分析系统架构图展示了完整的系统架构:
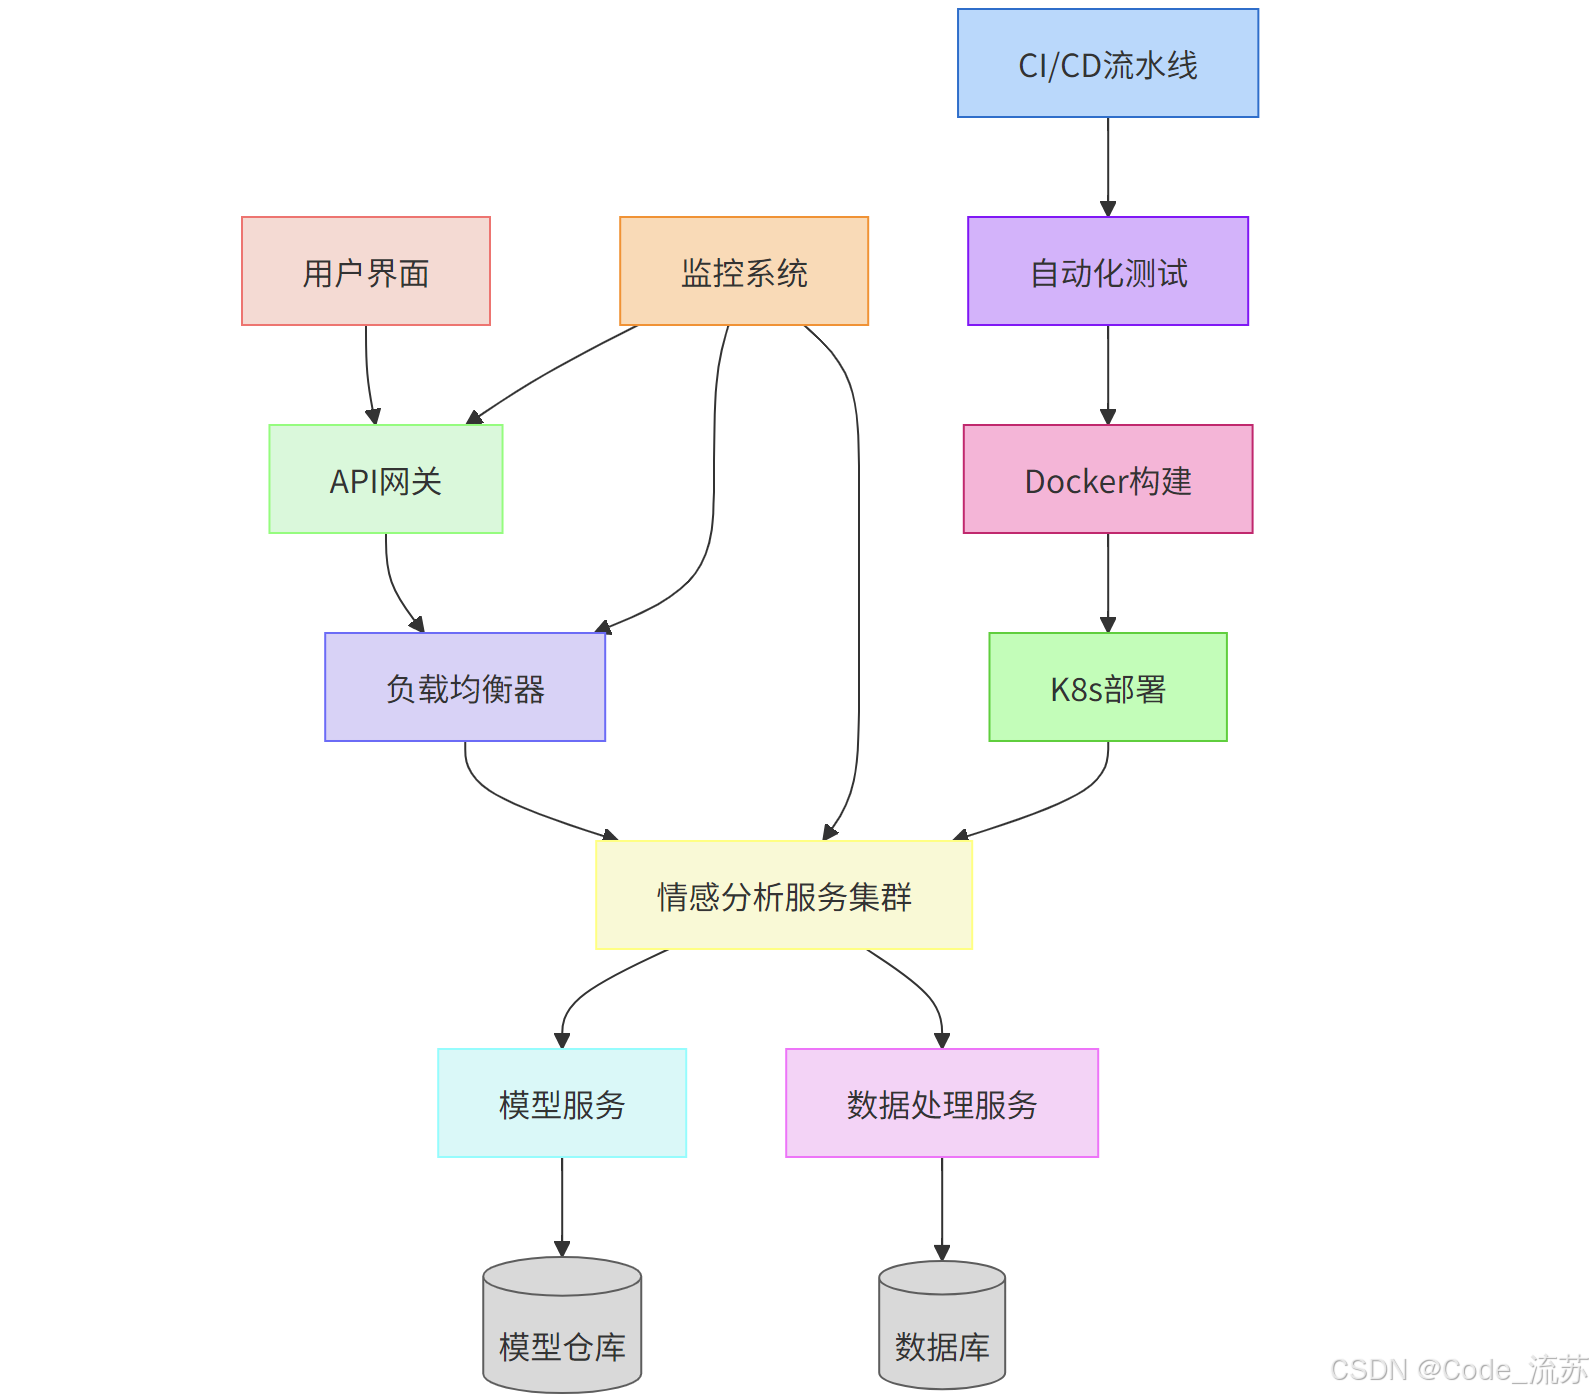
这个架构图就像是一幢建筑的蓝图,展示了各个组件如何协同工作,从用户界面到后端服务,再到底层的数据存储和模型,形成一个完整的系统。
2. 项目实现代码
下面是我们项目的核心代码实现,包括数据处理、模型训练和API服务。这些代码整合了我们前面所学的知识,形成一个完整的端到端AI系统。
首先是情感分析器的核心代码:
# sentiment_analyzer.py
import torch
from transformers import AutoModelForSequenceClassification, AutoTokenizer
import numpy as np
from typing import Dict, List, Union
import logging

# 配置日志
logging.basicConfig(
    level=logging.INFO,
    format='%(asctime)s - %(name)s - %(levelname)s - %(message)s',
    handlers=[logging.FileHandler("sentiment_analyzer.log"), logging.StreamHandler()]
)
logger = logging.getLogger(__name__)

class SentimentAnalyzer:
    """情感分析模型封装类"""

    def __init__(self, model_name: str = "distilbert-base-uncased-finetuned-sst-2-english"):
        """初始化情感分析器

        Args:
            model_name: 预训练模型名称或本地模型路径
        """
        logger.info(f"初始化情感分析器,使用模型: {model_name}")
        try:
            # 加载分词器和模型
            self.tokenizer = AutoTokenizer.from_pretrained(model_name)
            self.model = AutoModelForSequenceClassification.from_pretrained(model_name)

            # 设置设备
            self.device = torch.device("cuda" if torch.cuda.is_available() else "cpu")
            logger.info(f"使用设备: {self.device}")
            self.model.to(self.device)

            # 设置评估模式
            self.model.eval()

            # 情感标签映射
            self.id2label = {
                0: "negative",
                1: "positive"
            }

            logger.info("情感分析器初始化完成")
        except Exception as e:
            logger.error(f"模型加载失败: {str(e)}")
            raise

    def predict(self, text: Union[str, List[str]]) -> List[Dict]:
        """对文本进行情感分析

        Args:
            text: 单个文本字符串或文本列表

        Returns:
            包含情感分析结果的字典列表
        """
        # 确保输入是列表格式
        if isinstance(text, str):
            text = [text]

        try:
            # 对文本进行分词处理
            encoded_input = self.tokenizer(
                text,
                padding=True,
                truncation=True,
                max_length=512,
                return_tensors="pt"
            ).to(self.device)

            # 使用模型进行预测
            with torch.no_grad():
                outputs = self.model(**encoded_input)
                logits = outputs.logits
                probabilities = torch.nn.functional.softmax(logits, dim=1)

            # 处理预测结果
            results = []
            for i, probs in enumerate(probabilities):
                # 获取最高概率的类别及其概率值
                confidence, prediction = torch.max(probs, dim=0)
                sentiment = self.id2label[prediction.item()]
                confidence_value = confidence.item()

                # 计算情感得分 (-1 到 1 之间)
                # 如果是正面情感,得分为正;如果是负面情感,得分为负
                if sentiment == "positive":
                    sentiment_score = confidence_value
                else:
                    sentiment_score = -confidence_value

                results.append({
                    "text": text[i],
                    "sentiment": sentiment,
                    "confidence": confidence_value,
                    "sentiment_score": sentiment_score
                })

            return results

        except Exception as e:
            logger.error(f"预测过程中出错: {str(e)}")
            raise
然后是API服务的实现:
# app.py
from fastapi import FastAPI, HTTPException, BackgroundTasks
from pydantic import BaseModel, Field
from typing import List, Dict, Optional
import time
import uuid
import redis
import json
from sentiment_analyzer import SentimentAnalyzer
from prometheus_client import Counter, Histogram, generate_latest, CONTENT_TYPE_LATEST
from fastapi.middleware.cors import CORSMiddleware
from fastapi.responses import Response
import logging

# 配置日志
logging.basicConfig(level=logging.INFO)
logger = logging.getLogger(__name__)

# 初始化FastAPI应用
app = FastAPI(
    title="情感分析API",
    description="基于DistilBERT的文本情感分析服务",
    version="1.0.0"
)

# 添加CORS中间件
app.add_middleware(
    CORSMiddleware,
    allow_origins=["*"],
    allow_credentials=True,
    allow_methods=["*"],
    allow_headers=["*"],
)

# 初始化Redis连接(用于缓存和异步处理)
try:
    redis_client = redis.Redis(host='redis', port=6379, db=0)
    redis_client.ping()  # 测试连接
    logger.info("Redis连接成功")
except Exception as e:
    logger.warning(f"Redis连接失败: {str(e)},将禁用缓存和异步处理功能")
    redis_client = None

# 初始化情感分析器
sentiment_analyzer = SentimentAnalyzer()

# 定义Prometheus指标
REQUESTS = Counter('sentiment_api_requests_total', 'Total number of requests')
PREDICTIONS = Counter('sentiment_api_predictions', 'Predictions by sentiment', ['sentiment'])
BATCH_SIZE = Histogram('sentiment_api_batch_size', 'Batch size of requests')
LATENCY = Histogram('sentiment_api_latency_seconds', 'Request latency in seconds')

# 定义请求和响应模型
class TextRequest(BaseModel):
    text: str = Field(..., description="要分析的文本内容")
    request_id: Optional[str] = Field(None, description="请求ID,用于异步请求")

class BatchTextRequest(BaseModel):
    texts: List[str] = Field(..., description="要批量分析的文本列表")
    async_processing: Optional[bool] = Field(False, description="是否异步处理")

class SentimentResponse(BaseModel):
    text: str = Field(..., description="原文本")
    sentiment: str = Field(..., description="情感(positive或negative)")
    confidence: float = Field(..., description="置信度")
    sentiment_score: float = Field(..., description="情感得分(-1到1之间)")
    processing_time: Optional[float] = Field(None, description="处理时间(秒)")

class BatchSentimentResponse(BaseModel):
    results: List[SentimentResponse] = Field(..., description="批量分析结果")
    total_processing_time: float = Field(..., description="总处理时间(秒)")
    request_id: Optional[str] = Field(None, description="异步请求ID")

class AsyncResponse(BaseModel):
    request_id: str = Field(..., description="异步请求ID")
    status: str = Field(..., description="处理状态")
    estimated_time: float = Field(..., description="预计完成时间(秒)")

# 健康检查端点
@app.get("/health")
def health_check():
    return {"status": "healthy", "model_loaded": True}

# Prometheus指标端点
@app.get("/metrics")
def metrics():
    return Response(content=generate_latest(), media_type=CONTENT_TYPE_LATEST)

# 单文本情感分析端点
@app.post("/analyze", response_model=SentimentResponse)
def analyze_sentiment(request: TextRequest):
    REQUESTS.inc()
    start_time = time.time()

    try:
        # 进行情感分析
        with LATENCY.time():
            results = sentiment_analyzer.predict(request.text)
            result = results[0]  # 只有一个结果

        # 增加情感类别计数
        PREDICTIONS.labels(sentiment=result["sentiment"]).inc()

        # 计算处理时间
        processing_time = time.time() - start_time

        # 返回结果
        return SentimentResponse(
            text=result["text"],
            sentiment=result["sentiment"],
            confidence=result["confidence"],
            sentiment_score=result["sentiment_score"],
            processing_time=processing_time
        )

    except Exception as e:
        logger.error(f"分析过程中出错: {str(e)}")
        raise HTTPException(status_code=500, detail=str(e))

# 异步处理函数
def process_batch_async(texts: List[str], request_id: str):
    try:
        # 执行批量情感分析
        results = sentiment_analyzer.predict(texts)

        # 转换为响应格式
        response_results = [
            SentimentResponse(
                text=result["text"],
                sentiment=result["sentiment"],
                confidence=result["confidence"],
                sentiment_score=result["sentiment_score"]
            ) for result in results
        ]

        # 创建完整响应
        response = BatchSentimentResponse(
            results=response_results,
            total_processing_time=0.0,  # 在异步处理中这个值不太重要
            request_id=request_id
        )

        # 将结果存储在Redis中
        if redis_client:
            redis_client.set(
                f"sentiment:result:{request_id}",
                json.dumps(response.dict()),
                ex=3600  # 1小时过期
            )
            redis_client.set(
                f"sentiment:status:{request_id}",
                "completed",
                ex=3600
            )

    except Exception as e:
        logger.error(f"异步处理出错 (request_id={request_id}): {str(e)}")
        if redis_client:
            redis_client.set(
                f"sentiment:status:{request_id}",
                f"error:{str(e)}",
                ex=3600
            )

# 批量文本情感分析端点
@app.post("/analyze/batch", response_model=Union[BatchSentimentResponse, AsyncResponse])
async def analyze_batch(request: BatchTextRequest, background_tasks: BackgroundTasks):
    REQUESTS.inc()
    start_time = time.time()

    # 记录批量大小
    BATCH_SIZE.observe(len(request.texts))

    # 如果请求异步处理并且Redis可用
    if request.async_processing and redis_client:
        # 生成请求ID
        request_id = str(uuid.uuid4())

        # 估计处理时间(假设每个文本0.1秒)
        estimated_time = len(request.texts) * 0.1

        # 设置请求状态
        redis_client.set(
            f"sentiment:status:{request_id}",
            "processing",
            ex=3600  # 1小时过期
        )

        # 添加后台任务
        background_tasks.add_task(
            process_batch_async,
            request.texts,
            request_id
        )

        # 返回异步响应
        return AsyncResponse(
            request_id=request_id,
            status="processing",
            estimated_time=estimated_time
        )

    # 同步处理
    try:
        # 进行批量情感分析
        with LATENCY.time():
            results = sentiment_analyzer.predict(request.texts)

        # 转换为响应格式
        response_results = []
        for result in results:
            # 增加情感类别计数
            PREDICTIONS.labels(sentiment=result["sentiment"]).inc()

            response_results.append(
                SentimentResponse(
                    text=result["text"],
                    sentiment=result["sentiment"],
                    confidence=result["confidence"],
                    sentiment_score=result["sentiment_score"]
                )
            )

        # 计算总处理时间
        total_processing_time = time.time() - start_time

        # 返回结果
        return BatchSentimentResponse(
            results=response_results,
            total_processing_time=total_processing_time,
            request_id=None
        )

    except Exception as e:
        logger.error(f"批量分析过程中出错: {str(e)}")
        raise HTTPException(status_code=500, detail=str(e))

# 获取异步处理结果的端点
@app.get("/analyze/status/{request_id}", response_model=Union[BatchSentimentResponse, AsyncResponse])
def get_async_result(request_id: str):
    # 检查Redis是否可用
    if not redis_client:
        raise HTTPException(status_code=503, detail="异步处理功能暂不可用")

    # 获取请求状态
    status = redis_client.get(f"sentiment:status:{request_id}")
    if not status:
        raise HTTPException(status_code=404, detail="未找到请求")

    status = status.decode("utf-8")

    # 如果处理完成,返回结果
    if status == "completed":
        result_json = redis_client.get(f"sentiment:result:{request_id}")
        if result_json:
            result = json.loads(result_json)
            return BatchSentimentResponse(**result)
        else:
            raise HTTPException(status_code=500, detail="结果已丢失")

    # 如果处理出错
    elif status.startswith("error:"):
        raise HTTPException(status_code=500, detail=status[6:])

    # 如果仍在处理中
    else:
        # 估计剩余时间(简单实现)
        # 在实际系统中,可以记录更精确的进度信息
        return AsyncResponse(
            request_id=request_id,
            status="processing",
            estimated_time=10.0  # 默认剩余10秒
        )

# 应用启动事件
@app.on_event("startup")
async def startup_event():
    logger.info("情感分析API服务启动")

# 应用关闭事件
@app.on_event("shutdown")
async def shutdown_event():
    logger.info("情感分析API服务关闭")
3. CI/CD流水线
使用GitHub Actions自动化部署流程,实现代码提交后自动测试、构建和部署,大大提高了开发效率和系统可靠性:
# .github/workflows/deploy.yml
name: Build and Deploy Sentiment Analysis Service

on:
  push:
    branches: [ main ]
  pull_request:
    branches: [ main ]

jobs:
  test:
    runs-on: ubuntu-latest
    steps:
    - uses: actions/checkout@v3
    - name: Set up Python
      uses: actions/setup-python@v4
      with:
        python-version: '3.9'
    - name: Install dependencies
      run: |
        python -m pip install --upgrade pip
        if [ -f requirements-dev.txt ]; then pip install -r requirements-dev.txt; fi
        if [ -f requirements.txt ]; then pip install -r requirements.txt; fi
    - name: Lint with flake8
      run: |
        flake8 . --count --select=E9,F63,F7,F82 --show-source --statistics
    - name: Test with pytest
      run: |
        pytest

  build-and-push:
    needs: test
    runs-on: ubuntu-latest
    if: github.event_name == 'push' && github.ref == 'refs/heads/main'
    steps:
    - uses: actions/checkout@v3

    - name: Set up Docker Buildx
      uses: docker/setup-buildx-action@v2

    - name: Login to DockerHub
      uses: docker/login-action@v2
      with:
        username: ${{ secrets.DOCKER_USERNAME }}
        password: ${{ secrets.DOCKER_PASSWORD }}

    - name: Build and push
      uses: docker/build-push-action@v4
      with:
        context: .
        push: true
        tags: username/sentiment-analysis:latest,username/sentiment-analysis:${{ github.sha }}
        cache-from: type=registry,ref=username/sentiment-analysis:buildcache
        cache-to: type=registry,ref=username/sentiment-analysis:buildcache,mode=max

  deploy:
    needs: build-and-push
    runs-on: ubuntu-latest
    if: github.event_name == 'push' && github.ref == 'refs/heads/main'
    steps:
    - uses: actions/checkout@v3

    - name: Install kubectl
      uses: azure/setup-kubectl@v3
      with:
        version: 'latest'

    - name: Set Kubernetes context
      uses: azure/k8s-set-context@v3
      with:
        kubeconfig: ${{ secrets.KUBE_CONFIG }}

    - name: Update deployment image
      run: |
        kubectl set image deployment/sentiment-analysis sentiment-analysis=username/sentiment-analysis:${{ github.sha }} -n ai-services

    - name: Verify deployment
      run: |
        kubectl rollout status deployment/sentiment-analysis -n ai-services
这个CI/CD流水线就像是一条自动化的生产线,代码从开发到部署的每一步都被自动化了,大大提高了效率和可靠性。
八、学习总结与后续学习方向
1. 知识回顾
通过这96天的Python星球日记的探索,我们从Python基础开始,一步步深入AI领域的各个方面,最终实现了端到端的AI工程化项目。这就像是一段从山脚到山顶的攀登之旅,每一步都让我们的视野更加开阔,能力更加强大。
我们掌握了:
- Python编程基础与数据结构
- Web开发与API设计
- 数据分析与可视化
- 机器学习算法与应用
- 深度学习模型构建
- NLP与计算机视觉应用
- 大语言模型原理与应用
- AI工程化全流程(数据、训练、部署、监控)
2. 后续学习方向
AI领域正在快速发展,就像是一片广阔的海洋,我们已经开始了航行,但前方还有更多未知的海域等待探索。以下是一些值得继续深入的方向:
- 多模态AI:结合文本、图像、音频等多种模态的AI模型
- 强化学习在实际场景中的应用
- AI系统优化:低延迟推理、量化技术、模型剪枝等
- AutoML/AutoDL:自动模型架构搜索与优化
- 大模型微调与部署优化
- AI安全与可解释性研究
- 领域专业化:选择金融、医疗、自动驾驶等特定领域深入
Python星球日记一路以来的学习路径,我们可以将其可视化,它一路见证了我们的学习历程和未来可能的发展方向:
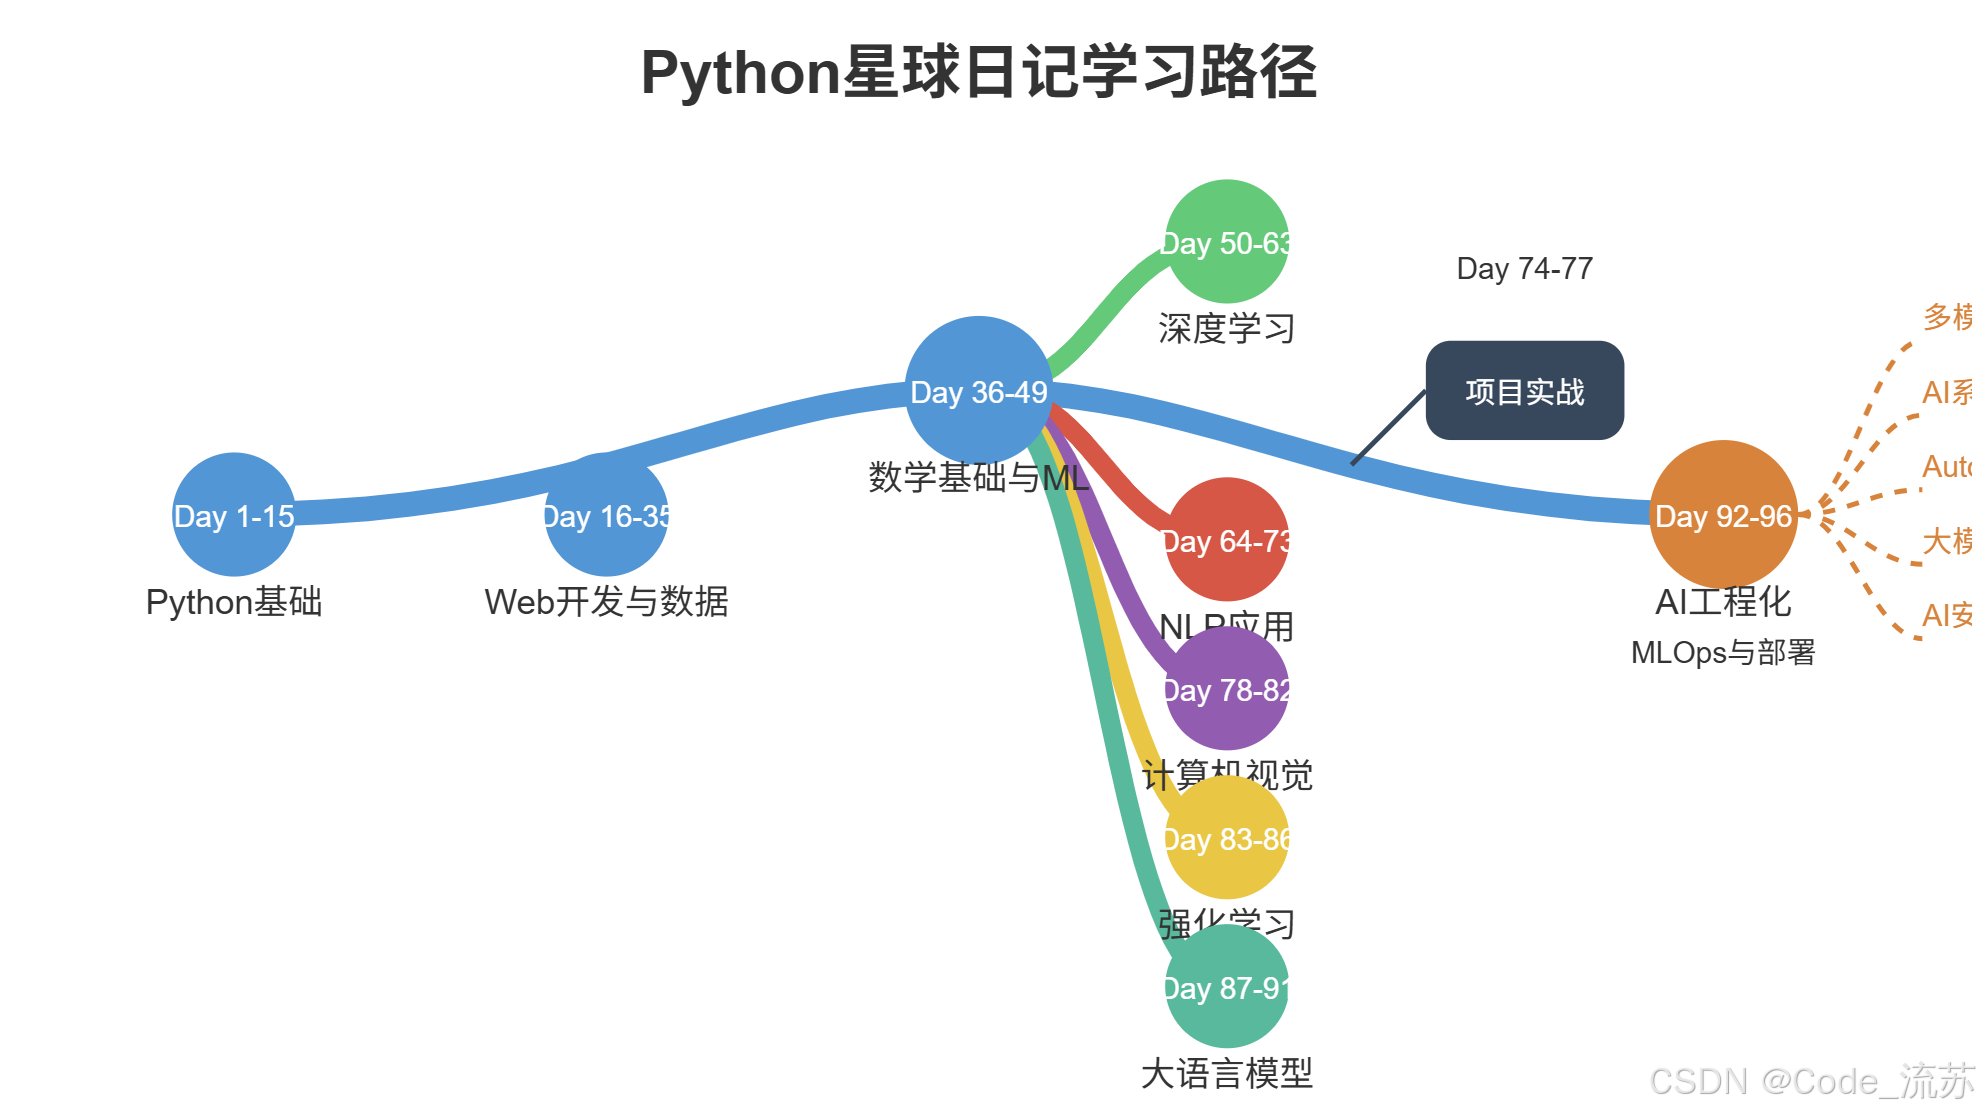
这张图就像是我们的学习地图,记录了已经走过的路,也指明了未来可能的方向。每个人可以根据自己的兴趣和职业规划,选择不同的方向继续深入。
通过这96天的学习,我们不仅掌握了AI开发的技术知识,更重要的是培养了解决实际问题的能力和系统化思考的方法。希望这段学习之旅能够成为你AI道路上的坚实基础,让你在未来的探索中走得更远、更高、更强!
在AI的世界里,学习永无止境,今天的终点只是明天的起点。愿你在这个充满无限可能的领域里,找到属于自己的精彩!
祝你学习愉快,勇敢的Python星球探索者!👨🚀🌠
创作者:Code_流苏(CSDN)(一个喜欢古诗词和编程的Coder😊)
如果你对今天的内容有任何问题,或者想分享你的学习心得,欢迎在评论区留言讨论!


 被折叠的 条评论
为什么被折叠?
被折叠的 条评论
为什么被折叠?
 到【灌水乐园】发言


