


跑通GaitSet(跑不通你来揍我)
3.2 pretreatment.py配置(预处理数据集,使得图片格式可以投入网络训练:64×64且裁剪过)
一、下载GaitSet
注意!
'''
Gaitset是具有泛化能力的, 这一点和图像分类网络完全不一样,
Gaitset不是学训练集中人的步态特征,而是学习提取步态特征的能力,也就是如何在一堆人里(数据库里)找到与探针最相近的那个数据。
所以正在使用的时候,数据库是随时可以改变且不需要再次训练的。
'''
个人推荐的GaitSet论文翻译,看完包懂![]() https://blog.csdn.net/o0haidee0o/article/details/91381669
https://blog.csdn.net/o0haidee0o/article/details/91381669
github地址GitHub - AbnerHqC/GaitSet: A flexible, effective and fast cross-view gait recognition network
GaitsetB-silh数据集地址http://www.cbsr.ia.ac.cn/china/Gait%20Databases%20CH.asp
这里打包好了到百度网盘,部分访问外网慢的小伙伴可以从这里下载喔!
百度网盘(内含GaitSet,这里推荐数据集到官网下载)
链接:https://pan.baidu.com/s/1k0l-BBdMvYJdl5lCeyCQMQ
提取码:w1mb
二、安装环境(pytorch)
按这个链接配置好环境。
深度学习环境配置——windows下的torch-gpu环境配置_阿良是炼丹师的博客-CSDN博客
如果是30系列以上的显卡,推荐按这个链接配置好环境。
使用anaconda配置gpu版本的torch==1.7.1(非30系列以上显卡也可用)_舞雩.的博客-CSDN博客
如果按照以上环境一一配置,绝对可以运行,亲测有效!!!
三、踩坑
3.1 config.py配置
给出详细的注释:(win10 num_workers必须设置为0)不然跑不了!
conf = {
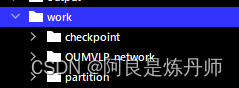
"WORK_PATH": "./work",
"CUDA_VISIBLE_DEVICES": "0", # 所用GPU编号
"data": {
'dataset_path': r"C:\Users\3i\Desktop\GaitSet-master\output", # 数据加载路径(预处理时输出的“绝对”路径)
'resolution': '64', # 输出轮廓图的分辨率,不用更改
'dataset': 'CASIA-B', # 数据集名称
# In CASIA-B, data of subject #5 is incomplete.
# Thus, we ignore it in training.
# For more detail, please refer to
# function: utils.data_loader.load_data
'pid_num': 73, # 训练集人数,73用于训练,其余用于测试
'pid_shuffle': False, # 是否对数据集进行随机划分,如果为False,则直接选取1-pid_num
},
"model": {
'hidden_dim': 256, # 最后一层全连接层的隐藏层数
'lr': 1e-4, # 学习率
'hard_or_full_trip': 'full', # 损失函数
'batch_size': (8, 16), # 批次p*k = 8*16,
'restore_iter': 0, # 第几步开始训练
'total_iter': 80000, # 训练次数
'margin': 0.2, # 损失函数的margin参数
'num_workers': 0, # 线程数
'frame_num': 30, # 每个批次的帧数
'model_name': 'GaitSet',
},
}
3.2 pretreatment.py配置(预处理数据集,使得图片格式可以投入网络训练:64×64且裁剪过)
可以用原来的(两次大改后)*:博主强烈推荐使用这种,而不是接下来那种!
# -*- coding: utf-8 -*-
# @Author  : Abner
# @Time    : 2018/12/19

import os
from scipy import misc as scisc
import cv2
import numpy as np
from warnings import warn
from time import sleep
import argparse

from multiprocessing import Pool
from multiprocessing import TimeoutError as MP_TimeoutError

START = "START"
FINISH = "FINISH"
WARNING = "WARNING"
FAIL = "FAIL"

def boolean_string(s):
    if s.upper() not in {'FALSE', 'TRUE'}:
        raise ValueError('Not a valid boolean string')
    return s.upper() == 'TRUE'

wd = os.getcwd()

parser = argparse.ArgumentParser(description='Test')
parser.add_argument('--input_path', default='', type=str,
                    help='Root path of raw dataset.')
parser.add_argument('--output_path', default='', type=str,
                    help='Root path for output.')
parser.add_argument('--log_file', default='./pretreatment.log', type=str,
                    help='Log file path. Default: ./pretreatment.log')
parser.add_argument('--log', default=False, type=boolean_string,
                    help='If set as True, all logs will be saved. '
                         'Otherwise, only warnings and errors will be saved.'
                         'Default: False')
parser.add_argument('--worker_num', default=1, type=int,
                    help='How many subprocesses to use for data pretreatment. '
                         'Default: 1')
opt = parser.parse_args()

INPUT_PATH = opt.input_path
OUTPUT_PATH = opt.output_path
IF_LOG = opt.log
LOG_PATH = opt.log_file
WORKERS = opt.worker_num

T_H = 64
T_W = 64


def log2str(pid, comment, logs):
    str_log = ''
    if type(logs) is str:
        logs = [logs]
    for log in logs:
        str_log += "# JOB %d : --%s-- %s\n" % (
            pid, comment, log)
    return str_log


def log_print(pid, comment, logs):
    str_log = log2str(pid, comment, logs)
    if comment in [WARNING, FAIL]:
        with open(LOG_PATH, 'a') as log_f:
            log_f.write(str_log)
    if comment in [START, FINISH]:
        if pid % 500 != 0:
            return
    print(str_log, end='')


def cut_img(img, seq_info, frame_name, pid):
    # A silhouette contains too little white pixels
    # might be not valid for identification.
    if img.sum() <= 10000:
        message = 'seq:%s, frame:%s, no data, %d.' % (
            '-'.join(seq_info), frame_name, img.sum())
        warn(message)
        log_print(pid, WARNING, message)
        return None
    # Get the top and bottom point
    y = img.sum(axis=1)
    y_top = (y != 0).argmax(axis=0)
    y_btm = (y != 0).cumsum(axis=0).argmax(axis=0)
    img = img[y_top:y_btm + 1, :]
    # As the height of a person is larger than the width,
    # use the height to calculate resize ratio.
    _r = img.shape[1] / img.shape[0]
    _t_w = int(T_H * _r)
    img = cv2.resize(img, (_t_w, T_H), interpolation=cv2.INTER_CUBIC)
    # Get the median of x axis and regard it as the x center of the person.
    sum_point = img.sum()
    sum_column = img.sum(axis=0).cumsum()
    x_center = -1
    for i in range(sum_column.size):
        if sum_column[i] > sum_point / 2:
            x_center = i
            break
    if x_center < 0:
        message = 'seq:%s, frame:%s, no center.' % (
            '-'.join(seq_info), frame_name)
        warn(message)
        log_print(pid, WARNING, message)
        return None
    h_T_W = int(T_W / 2)
    left = x_center - h_T_W
    right = x_center + h_T_W
    if left <= 0 or right >= img.shape[1]:
        left += h_T_W
        right += h_T_W
        _ = np.zeros((img.shape[0], h_T_W))
        img = np.concatenate([_, img, _], axis=1)
    img = img[:, left:right]
    return img.astype('uint8')


def cut_pickle(seq_info, pid):
    seq_name = '-'.join(seq_info)
    log_print(pid, START, seq_name)
    seq_path = os.path.join(INPUT_PATH, *seq_info)
    out_dir = os.path.join(OUTPUT_PATH, *seq_info)
    frame_list = os.listdir(seq_path)
    frame_list.sort()
    count_frame = 0
    for _frame_name in frame_list:
        frame_path = os.path.join(seq_path, _frame_name)
        img = cv2.imread(frame_path)[:, :, 0]
        img = cut_img(img, seq_info, _frame_name, pid)
        if img is not None:
            # Save the cut img
            save_path = os.path.join(out_dir, _frame_name)
            cv2.imwrite(save_path, img)
            count_frame += 1
    # Warn if the sequence contains less than 5 frames
    if count_frame < 5:
        message = 'seq:%s, less than 5 valid data.' % (
            '-'.join(seq_info))
        warn(message)
        log_print(pid, WARNING, message)

    log_print(pid, FINISH,
              'Contain %d valid frames. Saved to %s.'
              % (count_frame, out_dir))

if __name__ == '__main__':
    pool = Pool(WORKERS)
    results = list()
    pid = 0

    print('Pretreatment Start.\n'
          'Input path: %s\n'
          'Output path: %s\n'
          'Log file: %s\n'
          'Worker num: %d' % (
              INPUT_PATH, OUTPUT_PATH, LOG_PATH, WORKERS))

    id_list = os.listdir(INPUT_PATH)
    id_list.sort()
    # Walk the input path
    for _id in id_list:
        seq_type = os.listdir(os.path.join(INPUT_PATH, _id))
        seq_type.sort()
        for _seq_type in seq_type:
            view = os.listdir(os.path.join(INPUT_PATH, _id, _seq_type))
            view.sort()
            for _view in view:
                seq_info = [_id, _seq_type, _view]
                out_dir = os.path.join(OUTPUT_PATH, *seq_info)
                os.makedirs(out_dir)
                results.append(
                    pool.apply_async(
                        cut_pickle,
                        args=(seq_info, pid)))
                sleep(0.02)
                pid += 1

    pool.close()
    unfinish = 1
    while unfinish > 0:
        unfinish = 0
        for i, res in enumerate(results):
            try:
                res.get(timeout=0.1)
            except Exception as e:
                if type(e) == MP_TimeoutError:
                    unfinish += 1
                    continue
                else:
                    print('\n\n\nERROR OCCUR: PID ##%d##, ERRORTYPE: %s\n\n\n',
                          i, type(e))
                    raise e
    pool.join()
也可以用网上可以替代的预处理代码,代码中有一些小错误,经修正后确认可用,可以替代原作者的pretreatment.py代码
修正后代码如下:
import os
from PIL import Image
import numpy as np


def cut_image(path, cut_path, size):
    '''
    剪切图片
    :param path: 输入图片路径
    :param cut_path: 剪切图片后的输出路径
    :param size: 要剪切的图片大小
    :return:
    '''
    for (root, dirs, files) in os.walk(path):
        temp = root.replace(path, cut_path)
        if not os.path.exists(temp):
            os.makedirs(temp)
        for file in files:
            image, flag = cut(Image.open(os.path.join(root, file)))
            if not flag: Image.fromarray(image).convert('L').resize((size, size)).save(os.path.join(temp, file))
        print(temp)
    pass


def cut(image):
    '''
    通过找到人的最小最大高度与宽度把人的轮廓分割出来,、
    因为原始轮廓图为二值图,因此头顶为将二值图像列相加后,形成一列后第一个像素值不为0的索引。
    同理脚底为形成一列后最后一个像素值不为0的索引。
    人的宽度也同理。
    :param image: 需要裁剪的图片 N*M的矩阵
    :return: temp:裁剪后的图片 size*size的矩阵。flag:是否是符合要求的图片
    '''
    image = np.array(image)
    # 找到人的最小最大高度与宽度
    height_min = (image.sum(axis=1) != 0).argmax()
    height_max = ((image.sum(axis=1) != 0).cumsum()).argmax()
    width_min = (image.sum(axis=0) != 0).argmax()
    width_max = ((image.sum(axis=0) != 0).cumsum()).argmax()
    head_top = image[height_min, :].argmax()
    # 设置切割后图片的大小,为size*size,因为人的高一般都会大于宽
    size = height_max - height_min
    temp = np.zeros((size, size))
    # 将width_max-width_min(宽)乘height_max-height_min(高,szie)的人的轮廓图,放在size*size的图片中央
    # l = (width_max-width_min)//2
    # r = width_max-width_min-l
    # 以头为中心,将将width_max-width_min(宽)乘height_max-height_min(高,szie)的人的轮廓图,放在size*size的图片中央
    l1 = head_top - width_min
    r1 = width_max - head_top
    # 若宽大于高,或头的左侧或右侧身子比要生成图片的一般要大。则此图片为不符合要求的图片
    flag = False
    if size <= width_max - width_min or size // 2 < r1 or size // 2 < l1:
        flag = True
        return temp, flag
    # centroid = np.array([(width_max+width_min)/2,(height_max+height_min)/2],dtype='int')
    temp[:, (size // 2 - l1):(size // 2 + r1)] = image[height_min:height_max, width_min:width_max]
    return temp, flag


if __name__ == '__main__':
    cut_image("/home/embo/jzl/GaitDatasetB-silh", "/home/embo/jzl/GaitSet/pretreatmented", 64)
3.3 train.py的踩坑
错误:
pytorch container.py... IndexError: index 0 is out of range解决:
重载了模型,也就是训练过一次原来工作目录已经有了模型,删掉原来的模型(partition文件全部删掉)或者换一个工作路径(原来的工作路径: ./work )
报这个错误也有可能是因为:
使用了多块GPU,不知道为啥超过一个就报错。(只有一块GPU设置为0!不然会报错)

3.4 test.py的踩坑
可能的错误:
解决:
方法一:
降低numpy版本兼容
pip install numpy=1.16.2 -i https://pypi.mirrors.ustc.edu.cn/simple方法二:
在np.load参数列表上加上allow_pickle=True
pid_list = np.load(xxxx,allow_pickle=True)运行test.py,只需要确保确保 config.py中满足以下条件:
'pid_num': 73,  #  LT划分方式 pid_num+1用于训练,其余用于测试
'pid_shuffle': False,  # 是否对数据集进行随机划分,如果为False,则直接选取
'model_name': 'GaitSet',
'dataset': 'CASIA-B',
模型可以不训练本来就自带哦!
3.5 另外的踩坑
错误:
Warning: masked_scatter_ received a mask with dtype torch.uint8,
this behavior is now deprecated,please use a mask with dtype torch.bool instead
解决:
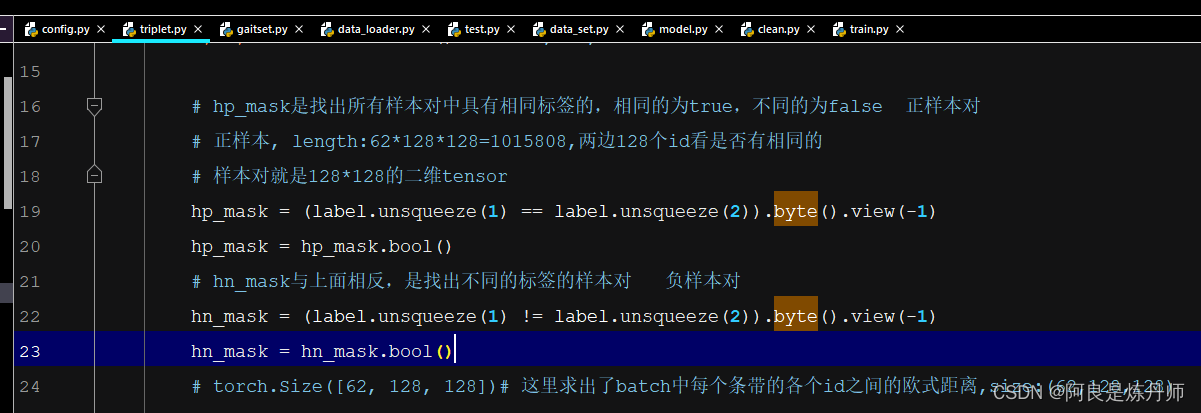
在triplet.py文件中的第19-24行 找到带有_mask的两个变量分别加上 :
hp_mask = hp_mask.bool()
hn_mask = hn_mask.bool()
两行如下图所示:
大功告成!
最后如果本文能帮到大家的话,希望点赞+收藏支持一下博主喔,谢谢!


 525
525


 被折叠的 条评论
为什么被折叠?
被折叠的 条评论
为什么被折叠?
 到【灌水乐园】发言


