


一、Spring前言
1. Spring简介
- Spring是分层的Java SE/EE 应用full-stack轻量级开源框架,以
IoC(Inverse of Control:反转控制)和AOP(Aspect Oriented Programming:面向切面编程)为内核。 - Spring提供了
展现层SpringMVC和持久层Spring JDBCTemplate以及业务层事务管理等众多的企业级业务技术,还整合了开源世界众多著名的第三方框架和类库,逐渐成为使用最多的JavaEE企业级应用开源框架。
2. Spring优势
① 方便解耦,简化开发
通过Spring提供的IoC容器,可以将对象间的依赖关系交由Spring进行控制,避免硬编码所造成的过度耦合。用户也不必再为单例模式类、属性文件解析等这些很底层的需求编写代码,可以更专注于上层的应用。
② AOP编程的支持
通过Spring的AOP功能,方便进行面向切面编程,许多不容易用传统OOP实现的功能可以通过AOP实现。
③ 声明式事务的支持
可以将我们从单调烦闷的事务管理代码中解脱出来,通过声明式方式灵活的进行事务管理,提高开发效率和质量。
④ 方便程序测试
Spring对Junit4支持,可以用非容器依赖的编程方式进行几乎所有的测试工作,测试不再是昂贵的操作,而是随手可做的事情。
⑤ 方便集成各种框架
Spring对各种流行框架(Struts、Hibernate、Hessian、Quartz等)的支持
⑥ 降低JavaEE API的使用难度
Spring对JavaEE API(如JDBC、JavaMail、远程调用等)进行了薄薄的封装层,使这些API的使用难度大为降低。
…
一句话,Spring是一个轻量级的控制反转(IOC)和面向切面(AOP)的容器(框架)。
3. Spring体系结构
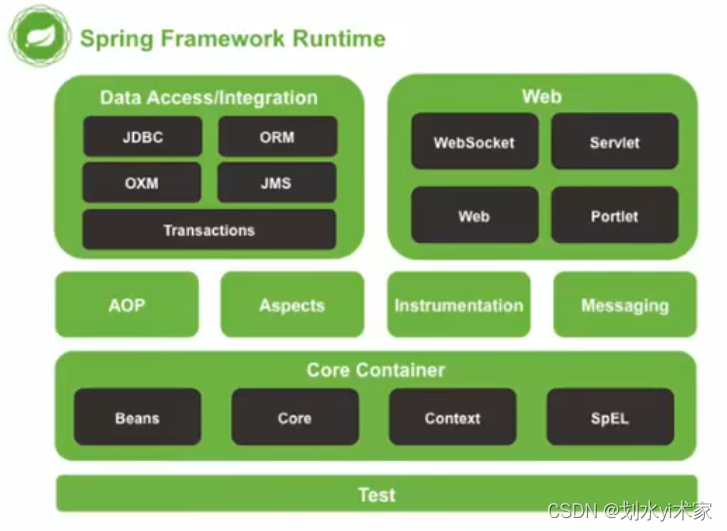
Spring 框架是一个分层架构,由 7 个定义良好的模块组成。Spring 模块构建在核心容器之上,核心容器定义了创建、配置和管理 bean 的方式 。
组成 Spring 框架的每个模块(或组件)都可以单独存在,或者与其他一个或多个模块联合实现。每个模块的功能如下:
Data Access/Integration(数据访问/集成)
数据访问/集成层包括 JDBC、ORM、OXM、JMS 和 Transactions 模块,具体介绍如下。
JDBC 模块:提供了一个 JDBC 的抽象层,大幅度减少了在开发过程中对数据库操作的编码。ORM 模块:对流行的对象关系映射API,包括 JPA、JDO、Hibernate 和 iBatis 提供了的集成层。OXM 模块:提供了一个支持对象/XML映射的抽象层实现,如 JAXB、Castor、XMLBeans、JiBX 和 XStream。JMS 模块:指 Java消息服务,包含的功能为生产和消费的信息。 Transactions 事务模块:支持编程和声明式事务管理实现特殊接口类,并为所有的 POJO。Transactions 事务模块:支持编程和声明式事务管理实现特殊接口类,并为所有的 POJO。
Web 模块
Spring 的 Web 层包括 Web、Servlet、Struts 和 Portlet 组件,具体介绍如下。
Web 模块:提供了基本的 Web 开发集成特性,例如多文件上传功能、使用的 Servlet 监听器的 IoC 容器初始化以及 Web应用上下文。Servlet模块:包括 Spring 模型—视图—控制器(MVC)实现 Web 应用程序。Struts模块:包含支持类内的 Spring 应用程序,集成了经典的 Struts Web 层。Portlet 模块:提供了在 Portlet环境中使用 MVC实现,类似 Web-Servlet 模块的功能。
Core Container(核心容器)
Spring 的核心容器是其他模块建立的基础,由 Beans 模块、Core 核心模块、Context 上下文模块和 Expression Language 表达式语言模块组成,具体介绍如下。
Beans 模块:提供了 BeanFactory,是工厂模式的经典实现,Spring 将管理对象称为 Bean。Core 核心模块:提供了Spring 框架的基本组成部分,包括 IoC 和 DI 功能。Context 上下文模块:建立在核心和 Beans模块的基础之上,它是访问定义和配置任何对象的媒介。ApplicationContext 接口是上下文模块的焦点。ExpressionLanguage 模块:是运行时查询和操作对象图的强大的表达式语言。
其他模块
Spring的其他模块还有 AOP、Aspects、Instrumentation 以及 Test 模块,具体介绍如下。
AOP 模块:提供了面向切面编程实现,允许定义方法拦截器和切入点,将代码按照功能进行分离,以降低耦合性。Aspects 模块:提供与 AspectJ 的集成,是一个功能强大且成熟的面向切面编程(AOP)框架。Instrumentation 模块:提供了类工具的支持和类加载器的实现,可以在特定的应用服务器中使用。Test 模块:支持 Spring 组件,使用 JUnit 或 TestNG 框架的测试。
二、Spring开发步骤
① 导入Spring的坐标
<dependency>
	<groupId>org.springframework</groupId>
	<artifactId>spring-context</artifactId>
	<version>5.3.20</version>
</dependency>
② 编写接口与实现类
③ 创建Spring核心配置文件(一般命名为 applicationContext.xml),并在配置文件中配置各种实现类
<?xml version="1.0" encoding="UTF-8"?>
<beans xmlns="http://www.springframework.org/schema/beans"
       xmlns:xsi="http://www.w3.org/2001/XMLSchema-instance"
       xsi:schemaLocation="http://www.springframework.org/schema/beans http://www.springframework.org/schema/beans/spring-beans.xsd">
	<!--   默认无参构造方法实例化-->
	<bean id="userDao" class="com.tyt.dao.impl.UserDaoImpl">

	</bean>
</beans>
④ 使用Spring的API获取Bean的实例
public class UserDemo {
    public static void main(String[] args) {
        ApplicationContext app = new ClassPathXmlApplicationContext("applicationContext.xml");
        UserDao userDao= app.getBean(UserDao.class);
        // UserDao userDao= (UserDao)app.getBean("UserDao");
        // ...
    }
}
三、Spring配置文件
用于配置对象交由Spring创建,默认情况调用类中的无参构造函数,如果没有无参构造函数则不能创建成功。
1. Bean基本配置(id,class)
id:Bean实例在Spring容器中的唯一标识,不允许重复class:要实例化的Bean的全限定名称(包名 + 类名)
2. Bean范围配置(scope)
scope:指对象的作用范围,取值如下:
| 取值范围 | 说明 |
|---|---|
singleton(单例模式) | 默认值,单例的,整个Spring容器仅存在一个Bean实例 |
prototype(原型模式) | 多例的,整个Spring容器存在多个实例,每次从容器中调用Bean时,都返回一个新的实例 |
| request | Web项目中,每次HTTP请求都会创建一个新的Bean,将对象存入requet域中 |
| session | Web项目中,同一个HTTP sesion中共享一个Bean,不同session使用不同Bean |
① 当scope =
singleton:
Bean实例化个数:1个
Bean实例化时机:Spring核心文件被加载时
Bean生命周期:
- 对象创建:当应用加载,创建容器时,对象被创建
- 对象运行:只要容器在,对象一直活着
- 对象销毁:当应用卸载,销毁容器时,对象就被销毁了
② 当scope =
prototype:
Bean实例化个数:多个
Bean实例化时机:当调用getBean()方法实例化Bean
Bean生命周期:
- 对象创建:当使用对象,创建新的对象实例
- 对象运行:只要对象在使用中,就一直活着
- 对象销毁:当对象长时间不用时,被Java的垃圾回收器回收
③ 当scope =
request:
Bean实例化个数:多个
Bean实例化时机:每一次HTTP请求都会实例化Bean
Bean生命周期:
- 对象创建:在每次HTTP请求时
- 对象运行:请求未处理完
- 对象销毁:处理请求结束
④ 当scope =
session:
Bean实例化个数:多个
Bean实例化时机:session创造时
Bean生命周期:
- 对象创建:session创造时
- 对象运行:session一直有效时
- 对象销毁:session废弃
3. Bean生命周期配置(init-method,destroy-method)
init-method:指定类中的初始化方法名称destroy-method:指定类中销毁方法名称
4. Bean属性注入(property,constructor-arg)
定义两个类方便后面的例子演示,如下:
public class UserDaoImpl implements UserDao {

	private String username;
	private Integer age;
	private List<String > stringList;
	private Map<String, User> userMap;
	private Properties properties;
	private String[] hobby;
	private Set<String> set;

	public UserDaoImpl(){

	}
	public UserDaoImpl(String username, Integer age, Set<String> set) {
		this.username = username;
		this.age = age;
		this.set = set;
	}

	public void setHobby(String[] hobby) {
		this.hobby = hobby;
	}
	public void setSet(Set<String> set) {
		this.set = set;
	}
	public void setUsername(String username) {
		this.username = username;
	}
	public void setAge(Integer age) {
		this.age = age;
	}
	public void setStringList(List<String> stringList) {
		this.stringList = stringList;
	}
	public void setUserMap(Map<String, User> userMap) {
		this.userMap = userMap;
	}
	public void setProperties(Properties properties) {
		this.properties = properties;
	}
}
public class UserServiceImpl implements UserService {

    private UserDao userDao;

    public UserServiceImpl(UserDao userDao) {
        this.userDao = userDao;
    }

    public UserServiceImpl() {

    }

    public void setUserDao(UserDao userDao) {
        this.userDao = userDao;
    }
}
1. property基本配置
name:属性名称value:注入的普通属性值ref:注入的对象引用值
<bean id="userDao" class="com.tyt.dao.impl.UserDaoImpl" scope="prototype">
	<property name="username" value="张三"></property>
	<property name="age" value="17"></property>
</bean>

<bean id="userService" class="com.tyt.service.impl.UserServiceImpl">
	<property name="userDao" ref="userDao"></property>
</bean>
2. list列表注入
list:注入List数据类型变量
<bean id="userDao" class="com.tyt.dao.impl.UserDaoImpl" scope="prototype">
	<property name="stringList" >
		<list>
			<value>aaa</value>
			<value>aaa</value>
			<value>aaa</value>
		</list>
	</property>
</bean>
3. map集合注入
map:注入map数据类型变量
<bean id="userDao" class="com.tyt.dao.impl.UserDaoImpl" scope="prototype">
	<property name="userMap">
		<map>
			<entry key="u1" value-ref="user1"></entry>
			<entry key="u2" value-ref="user2"></entry>
		</map>
	</property>
</bean>
4. props属性注入
props:注入props数据类型变量
<bean id="userDao" class="com.tyt.dao.impl.UserDaoImpl" scope="prototype">
	<property name="properties">
		<props>
			<prop key="p1">ppp1</prop>
			<prop key="p2">ppp2</prop>
			<prop key="p3">ppp3</prop>
		</props>
	</property>
</bean>
5. array数组注入
array:注入数组变量
<bean id="userDao" class="com.tyt.dao.impl.UserDaoImpl" scope="prototype">
	<property name="hobby">
		<array>
			<value>唱</value>
			<value>跳</value>
			<value>rap</value>
			<value>篮球</value>
		</array>
	</property>
</bean>
6. set集合注入
set:注入set数据类型变量
<bean id="userDao" class="com.tyt.dao.impl.UserDaoImpl" scope="prototype">
	<property name="hobby">
		<set>
			<value>aaa</value>
			<value>bbb</value>
			<value>ccc</value>
		</set>
	</property>
</bean>
7. null注入
null:注入null
<bean id="userDao" class="com.tyt.dao.impl.UserDaoImpl" scope="prototype">
	<property name="username"><null/></property>
</bean>
8. constructor-arg标签
constructor-arg:通过有参构造方法创建Bean实例,有三种方式编写
<!-- 第一种根据index参数下标设置 -->
<bean id="userDao" class="com.tyt.dao.impl.UserDaoImpl">
   <!-- index指构造方法 , 下标从0开始 -->
	<constructor-arg index="0" value="张三"/>
	<constructor-arg index="1" value="17"/>
	<constructor-arg index="2" >
		<set>
			<value>aaa</value>
			<value>bbb</value>
			<value>ccc</value>
		</set>
	</constructor-arg>
</bean>

<!-- 第二种根据参数名字设置 -->
<bean id="userDao" class="com.tyt.dao.impl.UserDaoImpl">
   <!-- name指参数名 -->
   <constructor-arg name="username" value="张三"/>
   <constructor-arg name="age" value="17"/>
   <constructor-arg name="set" >
		<set>
			<value>aaa</value>
			<value>bbb</value>
			<value>ccc</value>
		</set>
	</constructor-arg>
</bean>

<!-- 第三种根据参数类型设置 -->
<bean id="userDao" class="com.tyt.dao.impl.UserDaoImpl">
   <constructor-arg type="java.lang.String" value="张三"/>
   <constructor-arg type="java.lang.Integer" value="17"/>
   <constructor-arg type="java.util.Set" >
		<set>
			<value>aaa</value>
			<value>bbb</value>
			<value>ccc</value>
		</set>
	</constructor-arg>
</bean>
5. Bean实例化三种方式
Bean的实例化方式由三种:
①使用类构造器实例化
②工厂方法实例化(静态工厂、实例工厂)
③实现FactoyBean接口。
- 使用类构造器实例化
在配置Bean时,使用class属性指定类的全限定名称。
在 【二、Spring开发步骤】所演示即为使用类构造器实例化,这里不再过多叙述。
静态工厂方法实例化
将对象的创建过程封装成静态方法,当需要对象时,只需要调用静态方法即可。
在配置Bean时,使用class属性指定该静态工厂的全限定名称,同时使用factory-method属性指定实例化对象的静态方法名称。
① 定义静态工厂类,定义实例化对象的静态方法
public class StaticFactory {
    public static UserDao getUserDao(){
        return new UserDaoImpl();
    }
}
② 在Spring核心配置文件中定义静态工厂实例化的方式创建 Bean
	<!--    静态工厂实例化的方式创建 Bean-->
	<bean id="userDao" class="com.tyt.factory.StaticFactory" scope="prototype" factory-method="getUserDao">

	</bean>
工厂实例方法实例化
将对象的创建过程封装到另一个对象实例的方法中。当需要对象时,只需要调用该实例方法即可。
在配置Bean时,首先声明该实例工厂类的Bean;再声明需要实例的对象的Bean,使用factory-bean属性指定实例工厂类的Bean的id,同时使用factory-method属性指定实例工厂中的实例化对象的方法名称。
① 定义实例化工厂类,定义实例化对象的方法
public class DynamicFactory {
    public UserDao getUserDao(){
        return new UserDaoImpl();
    }
}
② 在Spring核心配置文件中定义实例工厂方式创建 Bean
	<!--   实例工厂实例化的方式创建 Bean-->
	<!--   首先声明该实例工厂类的 Bean-->
	<bean id="factoryObject" class="com.tyt.factory.DynamicFactory" scope="prototype">

	</bean>
	<!--   再声明需要实例的对象的Bean-->
	<bean id="userDao" factory-bean="factoryObject" factory-method="getUserDao">

	</bean>
- 使用
FactoryBean接口实例化
FactoryBean是Spring提供的接口
getObject:返回实例化对象;
getObjectType:返回具体类型;
isSingleton:判断Bean是否为单例;
在配置Bean时,使用class属性指定创建的FactoryBean实现类。
① 定义工厂类,并实现FactoryBean接口
public class UserDaoFactoryBean implements FactoryBean<UserDaoImpl> {

    // 代替原始对象工厂中创建对象的方法,返回实例
    @Override
    public UserDaoImpl getObject() throws Exception {
        return new UserDaoImpl();
    }

    // 返回 具体类型
    @Override
    public Class<?> getObjectType() {
        return UserDaoImpl.class;
    }

    // 判断对象是否单例
    @Override
    public boolean isSingleton() {
        return true;
    }
}
② 在Spring核心配置文件中定义使用FactoryBean接口实例化方式创建 Bean
	<!--      使用FactoryBean接口实例化方式创建 Bean-->
	<bean id="userDao" class="com.tyt.factory.UserDaoFactoryBean">

	</bean>
6. import-引入其他配置文件
import:实际开发中,Spring配置内容非常多,这就导致Spring配置繁杂且体积大,所以,可使用import标签将部分配置拆解到其他配置文件,而在Spring主配置文件通过import标签进行加载
<import resource="applicationContext-user.xml"/>
7. p命名空间与c命名空间注入
p(属性:properties)命名空间引入:需要在头文件中加入约束xmlns:p="http://www.springframework.org/schema/p"
<?xml version="1.0" encoding="UTF-8"?>
<beans xmlns="http://www.springframework.org/schema/beans"
       xmlns:xsi="http://www.w3.org/2001/XMLSchema-instance"
       xmlns:p="http://www.springframework.org/schema/p"
       xsi:schemaLocation="http://www.springframework.org/schema/beans http://www.springframework.org/schema/beans/spring-beans.xsd">
	<!--    xmlns:p="http://www.springframework.org/schema/p" p命名空间-->


	<!--    使用set方法传统方法注入,将其改为以下 p命名空间 注入-->
	<!--
	<bean id="userDao" class="com.tyt.dao.impl.UserDaoImpl" scope="prototype">
		<property name="username" value="张三"></property>
		<property name="age" value="17"></property>
	</bean>
	<bean id="userService" class="com.tyt.service.impl.UserServiceImpl">
		<property name="userDao" ref="userDao"></property>
	</bean>
	-->

	<!--    p(属性:properties) 命名空间,直接注入属性-->
	<bean id="userDao" class="com.tyt.dao.impl.UserDaoImpl" scope="prototype" p:username="张三" p:age="17">

	</bean>

	<bean id="userService" class="com.tyt.service.impl.UserServiceImpl" p:userDao-ref ="userDao">

	</bean>
</beans>
c(构造: Constructor)命名空间引入:需要在头文件中加入约束xmlns:c="http://www.springframework.org/schema/c"
<?xml version="1.0" encoding="UTF-8"?>
<beans xmlns="http://www.springframework.org/schema/beans"
       xmlns:xsi="http://www.w3.org/2001/XMLSchema-instance"
       xmlns:p="http://www.springframework.org/schema/p"
       xsi:schemaLocation="http://www.springframework.org/schema/beans http://www.springframework.org/schema/beans/spring-beans.xsd">
	<!--    xmlns:p="http://www.springframework.org/schema/p" p命名空间-->


	<!--    使用set方法传统方法注入,将其改为以下 c命名空间 注入-->
	<!--
	<bean id="userDao" class="com.tyt.dao.impl.UserDaoImpl">
		<constructor-arg type="java.lang.String" value="张三"/>
		<constructor-arg type="java.lang.Integer" value="17"/>
		<constructor-arg type="java.util.Set" >
			<set>
				<value>aaa</value>
				<value>bbb</value>
				<value>ccc</value>
			</set>
		</constructor-arg>
	</bean>
	-->
	<!--    c(构造: Constructor) 命名空间,使用构造器注入-->
	<bean id="userDao" class="com.tyt.dao.impl.UserDaoImpl" scope="prototype" p:username="张三" p:age="17">
		<constructor-arg type="java.util.Set" >
			<set>
				<value>aaa</value>
				<value>bbb</value>
				<value>ccc</value>
			</set>
		</constructor-arg>
	</bean>
</beans>
8. 加载 properties 文件
① 创建jdbc.properties文件
jdbc.driver=com.mysql.jdbc.Driver
jdbc.url=jdbc:mysql://localhost:3306/test?characterEncoding=utf8
jdbc.username=root
jdbc.password=****
- 格式:变量名=变量值
- 在该文件中不要出现多余的空格,因为可能会错误的认为空格也是值的一部分,导致取出的值错误。
- 变量名尽量也不要直接命名为"username"或者"password"这些,这些命名可能会和系统命名重复,在使用${}符取值时会优先取系统变量值。
② 开启context命名空间,加载properties配置文件
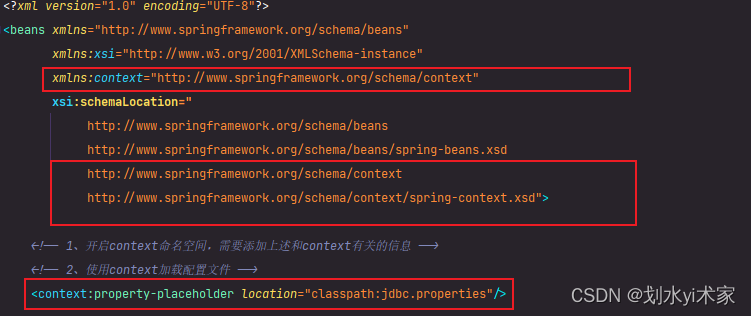
<?xml version="1.0" encoding="UTF-8"?>
<beans xmlns="http://www.springframework.org/schema/beans"
       xmlns:xsi="http://www.w3.org/2001/XMLSchema-instance"
       xmlns:context="http://www.springframework.org/schema/context"
       xsi:schemaLocation="
            http://www.springframework.org/schema/beans
            http://www.springframework.org/schema/beans/spring-beans.xsd
            http://www.springframework.org/schema/context
            http://www.springframework.org/schema/context/spring-context.xsd">

    <!-- 1、开启context命名空间,需要添加上述和context有关的信息 -->
    <!-- 2、使用context加载配置文件 -->
    <context:property-placeholder location="classpath:jdbc.properties"/>
    <!-- 3、使用${}动态获取值 -->
    <bean id="druidDataSource" class="com.alibaba.druid.pool.DruidDataSource">
        <property name="driverClassName" value="${jdbc.driver}"/>
        <property name="url" value="${jdbc.url}"/>
        <property name="username" value="${jdbc.username}"/>
        <property name="password" value="${jdbc.password}"/>
    </bean>
</beans>
- 如果需要加载多个properties文件,可以以英文逗号进行分隔
<context:property-placeholder location="classpath:jdbc.properties,druid.properties"/>
- 使用*号加载所有的配置文件
<context:property-placeholder location="classpath:*.properties"/>
- 如果想要加载jar包中的配置文件,可以使用,注意*号的个数和位置的不同
<context:property-placeholder location="classpath*:*.properties"/>
- 前面提到了properties文件中变量的命名问题,如果想要在使用${}符获取值时不加载系统属性,可以加上system-properties-mode=“NEVER” 解决。
<context:property-placeholder location="classpath:*.properties" system-properties-mode="NEVER"/>
四、Spring相关API
1. ApplicationContext的实现类
ClassPathXmlApplicationContext:从类的根路径下加载配置文件
ApplicationContext app = new ClassPathXmlApplicationContext("applicationContext.xml");
FileSystemXmlApplicationContext:从硬盘路径下加载配置文件,配置文件可在任意位置
ApplicationContext app = new FileSystemXmlApplicationContext("D:\\Idea_Projects\\spring_study\\spring_ioc_test\\src\\main\\resources\\applicationContext.xml");
AnnotationConfigApplicationContext:当使用注解配置容器对象时,需要用到此类来创建Spring容器。它用来读取注解
2. getBean()方法使用
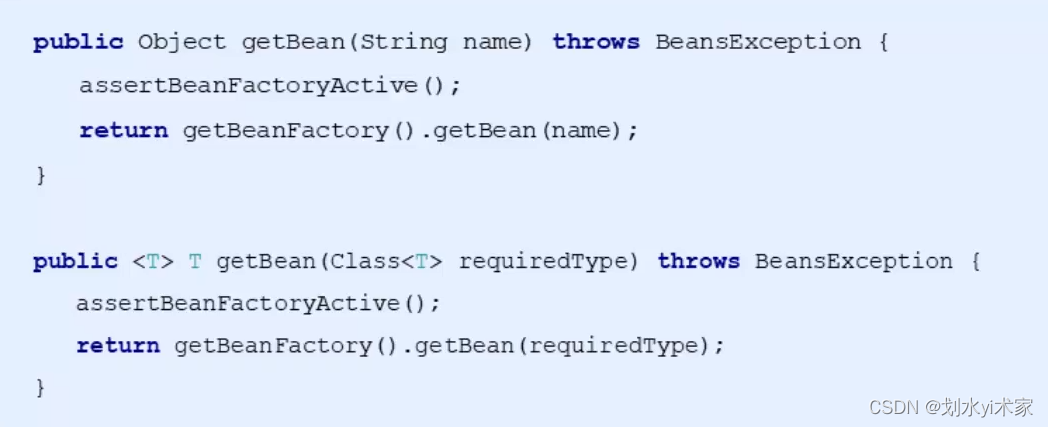 ① 传参为字符串(Bean的id)
// 需要进行类型强转
UserService userService = (UserService)app.getBean("userService");
② 传参为Class类型
// 不需要进行类型强转(只能在容器中只有一个此类型的Bean才可使用)
UserService userService = app.getBean(UserService.class);
五、Bean的自动装配
由于在手动配置xml过程中,常常发生字母缺漏和大小写等错误,而无法对其进行检查,使得开发效率降低。采用自动装配将避免这些错误,并且使配置简单化。
- 自动装配是使用spring满足bean依赖的一种方法
- spring会在应用上下文中为某个bean寻找其依赖的bean。
Spring的自动装配需要从两个角度来实现::
① 组件扫描(component scanning):spring会自动发现应用上下文中所创建的bean
② 自动装配(autowiring):spring自动满足bean之间的依赖,也就是我们说的IoC/DI
我们先按照不使用自动装配的方式来完成一个小案例:
① 新建两个实体类,Child与Parent都有一个eat()的方法
public class Child{
   public void eat() {
       System.out.println("child eat~");
  }
}

public class Parent{
   public void eat() {
       System.out.println("parent eat~");
  }
}
② 新建一个用户类 User
public class User {
   private Child child;
   private Parent parent;
   private String name;
}
③ 编写Spring核心配置文件
<?xml version="1.0" encoding="UTF-8"?>
<beans xmlns="http://www.springframework.org/schema/beans"
      xmlns:xsi="http://www.w3.org/2001/XMLSchema-instance"
      xsi:schemaLocation="http://www.springframework.org/schema/beans
       http://www.springframework.org/schema/beans/spring-beans.xsd">

   <bean id="child" class="com.tyt.domain.Child"/>
   <bean id="parent" class="com.tyt.domain.Parent"/>

   <bean id="user" class="com.tyt.domain.User">
       <property name="child" ref="child"/>
       <property name="parent" ref="parent"/>
       <property name="name" value="tyt"/>
   </bean>
</beans>
④ 搭建一个测试环境
public void testMethodAutowire() {
	ApplicationContext context = new ClassPathXmlApplicationContext("applicationContext.xml");
	User user = (User) context.getBean("user");
	user.getChild().eat();
	user.getParent().eat();
}
结果正常输出,环境OK
1. byName
autowire byName(按名称自动装配)
① 修改bean配置,增加一个属性 autowire=“byName”
<bean id="user" class="com.tyt.domain.User" autowire="byName">
	<property name="name" value="tyt"/>
</bean>
运行,结果正常输出
可以发现,这里省略了上方关于child与parent属性的注入,这就是autowire="byName"的作用。它的自动装配流程如下:
① 将查找其类中所有的set方法名,例如setChild,获得将set去掉并且首字母小写的字符串,即child。
② 去Spring容器中寻找是否有此字符串名称id的对象。
③ 如果有,就取出注入;如果没有,就报空指针异常。
② 我们更改原child的Bean
将
<bean id="child" class="com.tyt.domain.Child"/>
改为
<bean id="child222" class="com.tyt.domain.Child"/>
再次运行, 执行时报空指针java.lang.NullPointerException。因为按byName规则获取的是child字符串,但在Spring容器中并无这个id的Bean,真正的setChild就没执行,对象就没有初始化,所以调用时就会报空指针错误。
2. byType
autowire byType(按类型自动装配)
使用
autowire byType首先需要保证:同一类型的对象,在Spring容器中唯一。如果不唯一,会报异常NoUniqueBeanDefinitionException
① 修改bean配置,增加一个属性 autowire=“byType”
<bean id="user" class="com.tyt.domain.User" autowire="byType">
	<property name="name" value="tyt"/>
</bean>
运行,结果正常输出
可以发现,这里省略了上方关于child与parent属性的注入,这就是autowire="byName"的作用。它的自动装配流程如下:
① 将查找其类中所有的set方法名,例如setChild,获得将set去掉并且首字母小写的字符串,即child。
② 去Spring容器中寻找是否有此字符串名称id的对象。
③ 如果有,就取出注入;如果没有,就报空指针异常。
② 我们增加一个child的Bean
<bean id="child222" class="com.tyt.domain.Child"/>
再次运行, 执行时报异常NoUniqueBeanDefinitionException。因为Spring容器中类型Child并不唯一。
下期文章:


 182
182


 被折叠的 条评论
为什么被折叠?
被折叠的 条评论
为什么被折叠?
 到【灌水乐园】发言


