


目录
0. 前置工作
创建Maven项目后,在pom.xml中添加Spring所必须的依赖。
    <dependencies>
        <dependency>
            <groupId>org.springframework</groupId>
            <artifactId>spring-context</artifactId>
            <version>5.2.3.RELEASE</version>
        </dependency>

        <dependency>
            <groupId>org.springframework</groupId>
            <artifactId>spring-beans</artifactId>
            <version>5.2.3.RELEASE</version>
        </dependency>
    </dependencies>
在 resource 文件夹下,创建spring-config.xml配置文件,写入以下内容:
<?xml version="1.0" encoding="UTF-8"?>
<beans xmlns="http://www.springframework.org/schema/beans"
       xmlns:xsi="http://www.w3.org/2001/XMLSchema-instance"
       xmlns:content="http://www.springframework.org/schema/context"
       xsi:schemaLocation="http://www.springframework.org/schema/beans http://www.springframework.org/schema/beans/spring-beans.xsd http://www.springframework.org/schema/context https://www.springframework.org/schema/context/spring-context.xsd">
    <!-- 👇配置bean注解扫描的根路径(方面后面更简单存储对象到spring容器),当前com.beans表示当前项目java文件夹下所有要存放到spring中bean的根路径-->
    <content:component-scan base-package="com.beans"></content:component-scan>
</beans>
1. 将 Bean 存储到容器
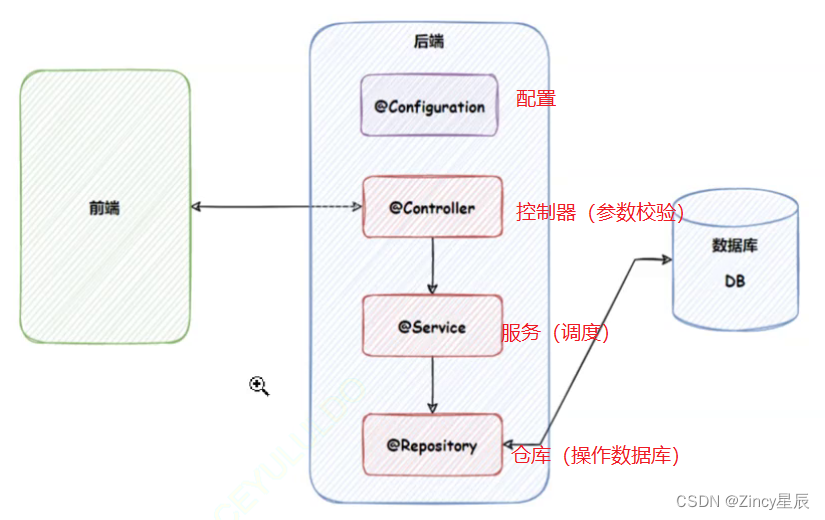
- 【法一】使用五大类注解实现
@Controller【控制器】
@Service【服务】
@Repoistory【仓库】
@Configuration【配置】
@Component【组件】 - 【法二】使用 @Bean 方法注解实现(前提:方法所在的类要加五大类注解)
添加注解后,更加简单地实现了将一个对象存储到Spring当中
(默认会按类名自动扫描注入为小驼峰方式的bean name)
2. 对象注入(对象装配)【从容器中将对象读取出来】
- 属性注入Bean对象(字段注入) @Autowired / @Resource
- 构造方法注入(官方推荐) @Autowired,当该类只有一个构造方法时可以省略
- Setter注入 @Autowired / @Resource


 757
757


 被折叠的 条评论
为什么被折叠?
被折叠的 条评论
为什么被折叠?
 到【灌水乐园】发言


