


一开始用java连接redis时候报的是保护模式关闭,提示要将protected-mode 设为no
 `在这
`在这
但是检查之后发现是 no.不明白这是什么原因,后来想既然是保护模式是不是要用密码来连接。于是就用密码来连接。就报了你的主机已中断了一个已有连接的这个错误。
检查之后发现自己的密码并没有设置
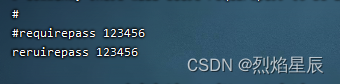
于是设置了一下密码:在redis.conf里面找到requirepass设置密码
这样问题就顺利解决了。
我想可能是因为protected-mode模式无效了也可能是之前配置时有设密码的操作导致即使关闭也需要密码验证正确才能登录。(如果有人知道原因可以在评论区留言)
spring boot整合四步骤:
1.创建spring boot项目
引入两个坐标在pom.xml中
	<dependency>
		<groupId>org.springframework.boot</groupId>
		<artifactId>spring-boot-starter-data-redis</artifactId>
	</dependency>

	<dependency>
		<groupId>org.apache.commons</groupId>
		<artifactId>commons-pool2</artifactId>
		<version>2.6.0</version>
	</dependency>
2.在application.yml或者propertites中配置(我是在propertites里进行的配置)
# 配置redis

#redis服务器地址
spring.redis.host=192.168.23.144
#redis端口
spring.redis.port=6379
spring.redis.password=123456
#redis数据库索引(默认使用0号数据库)
spring.redis.database=0
#连接超时时间
spring.redis.timeout=1800000
#连接池最大连接数(使用负值表示没有限制)
spring.redis.lettuce.pool.max-active=20
#最大阻塞等待时间(负数表示没限制)
spring.redis.lettuce.pool.max-wait=-1
#连接池中的最大空闲连接
spring.redis.lettuce.pool.max-idle=5
#连接池中的最小空闲连接
spring.redis.lettuce.pool.min-idle=0
3.在项目里面创建配置类
package com.example.demo.config;

import com.fasterxml.jackson.annotation.JsonAutoDetect;
import com.fasterxml.jackson.annotation.PropertyAccessor;
import com.fasterxml.jackson.databind.ObjectMapper;
import org.springframework.cache.CacheManager;
import org.springframework.cache.annotation.CachingConfigurerSupport;
import org.springframework.cache.annotation.EnableCaching;
import org.springframework.context.annotation.Bean;
import org.springframework.context.annotation.Configuration;
import org.springframework.data.redis.cache.RedisCacheConfiguration;
import org.springframework.data.redis.cache.RedisCacheManager;
import org.springframework.data.redis.connection.RedisConnectionFactory;
import org.springframework.data.redis.core.RedisTemplate;
import org.springframework.data.redis.serializer.Jackson2JsonRedisSerializer;
import org.springframework.data.redis.serializer.RedisSerializationContext;
import org.springframework.data.redis.serializer.RedisSerializer;
import org.springframework.data.redis.serializer.StringRedisSerializer;

import java.time.Duration;

@EnableCaching
@Configuration
public class RedisConfig extends CachingConfigurerSupport {

    @Bean
    public RedisTemplate<String, Object> redisTemplate(RedisConnectionFactory factory) {
        RedisTemplate<String, Object> template = new RedisTemplate<>();
        RedisSerializer<String> redisSerializer = new StringRedisSerializer();
        Jackson2JsonRedisSerializer jackson2JsonRedisSerializer = new Jackson2JsonRedisSerializer(Object.class);
        ObjectMapper om = new ObjectMapper();
        om.setVisibility(PropertyAccessor.ALL, JsonAutoDetect.Visibility.ANY);
        om.enableDefaultTyping(ObjectMapper.DefaultTyping.NON_FINAL);
        jackson2JsonRedisSerializer.setObjectMapper(om);
        template.setConnectionFactory(factory);
//key序列化方式
        template.setKeySerializer(redisSerializer);
//value序列化
        template.setValueSerializer(jackson2JsonRedisSerializer);
//value hashmap序列化
        template.setHashValueSerializer(jackson2JsonRedisSerializer);
        return template;
    }

    @Bean
    public CacheManager cacheManager(RedisConnectionFactory factory) {
        RedisSerializer<String> redisSerializer = new StringRedisSerializer();
        Jackson2JsonRedisSerializer jackson2JsonRedisSerializer = new Jackson2JsonRedisSerializer(Object.class);
//解决查询缓存转换异常的问题
        ObjectMapper om = new ObjectMapper();
        om.setVisibility(PropertyAccessor.ALL, JsonAutoDetect.Visibility.ANY);
        om.enableDefaultTyping(ObjectMapper.DefaultTyping.NON_FINAL);
        jackson2JsonRedisSerializer.setObjectMapper(om);
// 配置序列化(解决乱码的问题),过期时间600秒
        RedisCacheConfiguration config = RedisCacheConfiguration.defaultCacheConfig()
                .entryTtl(Duration.ofSeconds(600))
                .serializeKeysWith(RedisSerializationContext.SerializationPair.fromSerializer(redisSerializer))
                .serializeValuesWith(RedisSerializationContext.SerializationPair.fromSerializer(jackson2JsonRedisSerializer))
                .disableCachingNullValues();
        RedisCacheManager cacheManager = RedisCacheManager.builder(factory)
                .cacheDefaults(config)
                .build();
        return cacheManager;
    }
}
4.测试
```java
import org.springframework.beans.factory.annotation.Autowired;
import org.springframework.boot.autoconfigure.data.redis.RedisProperties;
import org.springframework.data.redis.core.RedisTemplate;
import org.springframework.web.bind.annotation.GetMapping;
import org.springframework.web.bind.annotation.RequestMapping;
import org.springframework.web.client.RestTemplate;

@org.springframework.web.bind.annotation.RestController
@RequestMapping("/redis")
public class RestController {

    @Autowired
    private RedisTemplate redisTemplate;

    @GetMapping("/test")
    public String test(){


        redisTemplate.opsForValue().set("name","q");

        return (String) redisTemplate.opsForValue().get("name");

    }


}


 1541
1541


 被折叠的 条评论
为什么被折叠?
被折叠的 条评论
为什么被折叠?
 到【灌水乐园】发言


