


文章目录
一、分布式 session 的问题
解决方法直接看 实战:四
- session 是将用户信息按键值对的方式存储到服务器中

- 在微服务情景下,不能跨不同域名共享
- 不同服务之间是不能共享 session 的


二、不同服务器 session 共享解决方案
1.session 复制
在大型项目中,一个 Tomcat 需要保存其他所有 Tomcat 的 session 数据,之间的来回复制占用资源,同时保存数据占用内存
适用场景:
- 小型项目,几个 Tomcat 服务器

2.客户端存储 session
不安全
使用场景:
- 无

3.hash一致性
根据用户访问的 ip 地址固定用户访问的服务器
适用场景:
- 基本适用各种需求
- 虽然横向扩展(增加服务器需要重新解决 ip 分配问题)会丢失数据,但是不是很影响,可以使用

4.统一存储(真正的解决方法)

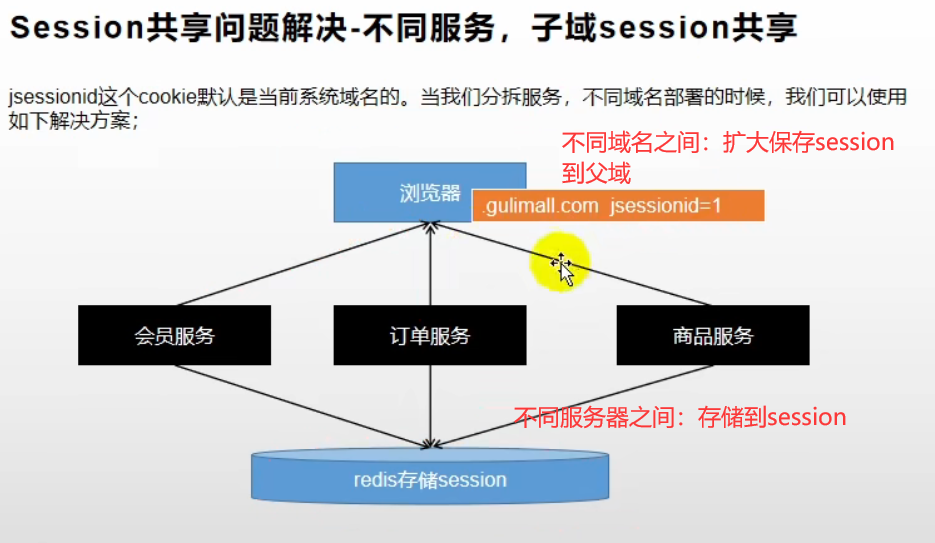
三、子域之间的 session 共享解决方案
- 第一次使用session的时候,浏览器会保存 JSESSIONID 这个 cookie
- 以后浏览器访问哪个子域就会带上这个网站的 cookie
解决方法:
- 在保存 session 的时候,即使在子域操作的,也保存在父域
使用SpringSession 解决以下两个问题
四、Spring Session 实战解决
Spring Session官网:Spring Session
<!--redis-->
<dependency>
    <groupId>org.springframework.boot</groupId>
    <artifactId>spring-boot-starter-data-redis</artifactId>
</dependency>
<!-- 整合spring session-->
<dependency>
    <groupId>org.springframework.session</groupId>
    <artifactId>spring-session-data-redis</artifactId>
</dependency>
配置:
spring.redis.host=192.168.137.128
spring.redis.port=6379
# session 存储方式
spring.session.store-type=redis
# session 过期时间
server.servlet.session.timeout=30m
# Spring Session 的刷新模式,
# spring.session.redis.flush-mode=on_save
# 命名空间 (默认 ‘spring:session ’)
# spring.session.redis.namespace=spring:session
主类加上@EnableRedisHttpSession
注意:如果是以实体类的形式向 redis 存储 session,相关的实体类要实现序列化implements Serializable
redis 中 保存的 session

解决 session 共享域问题:
根据官方文档新建一个配置类来设置存储的 CookieName 以及 设置保存到父域
@Configuration
public class MySessionConfig {

    @Bean
    public CookieSerializer cookieSerializer(){
        DefaultCookieSerializer cookieSerializer = new DefaultCookieSerializer();

        cookieSerializer.setDomainName("gulimall.com");//父域
        cookieSerializer.setCookieName("GULISESSION");//cookie name

        return cookieSerializer;
    }

    @Bean
    public RedisSerializer<Object> springSessionDefaultRedisSerializer(){
        return new GenericJackson2JsonRedisSerializer();
    }
}

五、Spring Session 原理
通过实战发现,Spring Session的实现非常简单,主要通过一个注解、一个配置类就可以解决分布式 session 的问题,接下来通过源码探究 Spring Session 的原理
1.注解 @EnableRedisHttpSession
注解 @EnableRedisHttpSession默认了:
-
在 redis 中的命名空间(spring:session)
-
默认的刷新模式为 ON_SAVE:
-
Spring Session 有两种刷新模式:
-
ON_SAVE:只有当 SessionRepository.save(Session)方法被调用时,才会将session中的数据同步到redis中。在web 应用中,当请求完成响应后,才开始同步。也就是说在执行response 之前session数据都是缓存在本地的.
-
IMMEDIATE:实时同步session 数据到redis。当执行 SessionRepository.createSession()时, 会将session数据同步到redis中;当对 session的attribute进行set/remove 等操作时,也会同步session中的数据到redis中
-
@Deprecated
public enum RedisFlushMode {
    ON_SAVE(FlushMode.ON_SAVE),
    IMMEDIATE(FlushMode.IMMEDIATE);

    private final FlushMode flushMode;

    private RedisFlushMode(FlushMode flushMode) {
        this.flushMode = flushMode;
    }

    public FlushMode getFlushMode() {
        return this.flushMode;
    }
}
-
-
-
默认的保存模式为 ON_SET_ATTRIBUTE:
-
public enum SaveMode {
    ON_SET_ATTRIBUTE,
    ON_GET_ATTRIBUTE,
    ALWAYS;

    private SaveMode() {
    }
}
-
//
// Source code recreated from a .class file by IntelliJ IDEA
// (powered by FernFlower decompiler)
//

package org.springframework.session.data.redis.config.annotation.web.http;

import java.lang.annotation.Documented;
import java.lang.annotation.ElementType;
import java.lang.annotation.Retention;
import java.lang.annotation.RetentionPolicy;
import java.lang.annotation.Target;
import org.springframework.context.annotation.Configuration;
import org.springframework.context.annotation.Import;
import org.springframework.session.FlushMode;
import org.springframework.session.SaveMode;
import org.springframework.session.data.redis.RedisFlushMode;

@Retention(RetentionPolicy.RUNTIME)
@Target({ElementType.TYPE})
@Documented
@Import({RedisHttpSessionConfiguration.class})
@Configuration(
    proxyBeanMethods = false
)
public @interface EnableRedisHttpSession {
    int maxInactiveIntervalInSeconds() default 1800;

    String redisNamespace() default "spring:session";

    /** @deprecated */
    @Deprecated
    RedisFlushMode redisFlushMode() default RedisFlushMode.ON_SAVE;

    FlushMode flushMode() default FlushMode.ON_SAVE;

    String cleanupCron() default "0 * * * * *";

    SaveMode saveMode() default SaveMode.ON_SET_ATTRIBUTE;
}
2. RedisHttpSessionConfiguration配置类
在注解 @EnableRedisHttpSession中导入了 RedisHttpSessionConfiguration配置类
其中又注册了一个RedisIndexedSessionRepository组件,这个组件主要包括 在 redis 中对 session CRUD的封装类,以及一些默认的配置,如序列化配置、刷新模式等,等会我们可以自定义覆盖配置
[外链图片转存失败,源站可能有防盗链机制,建议将图片保存下来直接上传(img-mCvlvbdn-1659493462963)(C:\Users\10418\AppData\Roaming\Typora\typora-user-images\image-20220803093946245.png)]
RedisIndexedSessionRepository相当于redis 中 session 的仓库,包含了一系列CRUD的操作。(后面还有仓库的过滤器)

同时 RedisHttpSessionConfiguration又继承了SpringHttpSessionConfiguration配置类
3. SpringHttpSessionConfiguration配置类

自定义序列化器,扩大 session 作用域,解决子域session 不共享问题:
@Configuration
public class MySessionConfig {

     /**
     * 配置session 的一些信息
     * @return
     */
    @Bean
    public CookieSerializer cookieSerializer(){
        DefaultCookieSerializer cookieSerializer = new DefaultCookieSerializer();

        cookieSerializer.setDomainName("gulimall.com");//父域
        cookieSerializer.setCookieName("GULISESSION");//cookie name

        return cookieSerializer;
    }

    /**
     * 序列化方式
     * @return
     */
    @Bean
    public RedisSerializer<Object> springSessionDefaultRedisSerializer(){
        return new GenericJackson2JsonRedisSerializer();
    }
}
SessionRepositoryFilter过滤器,前面提到的仓库的过滤器

3.SessionRepositoryFilter仓库过滤器

核心:
protected void doFilterInternal(HttpServletRequest request, HttpServletResponse response, FilterChain filterChain) throws ServletException, IOException {
    //一次请求中的所有 session 的CRUD操作,都是在这一个 sessionRepository
    request.setAttribute(SESSION_REPOSITORY_ATTR, this.sessionRepository);
    //对原生的 HttpServletRequest、HttpServletResponse 进行包装=》SessionRepositoryRequestWrapper、SessionRepositoryResponseWrapper
    SessionRepositoryFilter<S>.SessionRepositoryRequestWrapper wrappedRequest = new SessionRepositoryFilter.SessionRepositoryRequestWrapper(request, response);
    SessionRepositoryFilter.SessionRepositoryResponseWrapper wrappedResponse = new SessionRepositoryFilter.SessionRepositoryResponseWrapper(wrappedRequest, response);

    try {
        //将包装后的wrappedRequest、wrappedResponse 执行过滤链
        filterChain.doFilter(wrappedRequest, wrappedResponse);
    } finally {
        wrappedRequest.commitSession();
    }

}
包装成 SessionRepositoryRequestWrapper、SessionRepositoryResponseWrapper 的目的是为了将整个操作包括 获取session(getSession())的的操作都在 RedisIndexedSessionRepository 中执行
原生的 session 获取方法:
HttpServletRequest  request = new HttpServletRequest();
HttpSession session1 =  request.getSession()
从 RedisIndexedSessionRepository 中获取session,也就是存到 redis 中的session

public SessionRepositoryFilter<S>.SessionRepositoryRequestWrapper.HttpSessionWrapper getSession(boolean create) {
    SessionRepositoryFilter<S>.SessionRepositoryRequestWrapper.HttpSessionWrapper currentSession = this.getCurrentSession();
    if (currentSession != null) {
        return currentSession;
    } else {
        S requestedSession = this.getRequestedSession();
        if (requestedSession != null) {
            if (this.getAttribute(SessionRepositoryFilter.INVALID_SESSION_ID_ATTR) == null) {
                requestedSession.setLastAccessedTime(Instant.now());
                this.requestedSessionIdValid = true;
                currentSession = new SessionRepositoryFilter.SessionRepositoryRequestWrapper.HttpSessionWrapper(requestedSession, this.getServletContext());
                currentSession.markNotNew();
                this.setCurrentSession(currentSession);
                return currentSession;
            }
        } else {
            if (SessionRepositoryFilter.SESSION_LOGGER.isDebugEnabled()) {
                SessionRepositoryFilter.SESSION_LOGGER.debug("No session found by id: Caching result for getSession(false) for this HttpServletRequest.");
            }

            this.setAttribute(SessionRepositoryFilter.INVALID_SESSION_ID_ATTR, "true");
        }

        if (!create) {
            return null;
        } else if (SessionRepositoryFilter.this.httpSessionIdResolver instanceof CookieHttpSessionIdResolver && this.response.isCommitted()) {
            throw new IllegalStateException("Cannot create a session after the response has been committed");
        } else {
            if (SessionRepositoryFilter.SESSION_LOGGER.isDebugEnabled()) {
                SessionRepositoryFilter.SESSION_LOGGER.debug("A new session was created. To help you troubleshoot where the session was created we provided a StackTrace (this is not an error). You can prevent this from appearing by disabling DEBUG logging for " + SessionRepositoryFilter.SESSION_LOGGER_NAME, new RuntimeException("For debugging purposes only (not an error)"));
            }

            S session = SessionRepositoryFilter.this.sessionRepository.createSession();
            session.setLastAccessedTime(Instant.now());
            currentSession = new SessionRepositoryFilter.SessionRepositoryRequestWrapper.HttpSessionWrapper(session, this.getServletContext());
            this.setCurrentSession(currentSession);
            return currentSession;
        }
    }
}


 3268
3268


 被折叠的 条评论
为什么被折叠?
被折叠的 条评论
为什么被折叠?
 到【灌水乐园】发言


