


 本文详细介绍如何在Ubuntu系统上通过源码安装Apache服务器的过程,包括进入root用户、安装vm-tools工具、更改镜像源、安装Apache服务器所需组件及依赖件,并进行了测试。
建议阅读时间:30mins
注意:这里安装源代码这些我都有直接给出,这里是为了避免版本之间的冲突。
在ubuntu里面使用源代码安装Apache
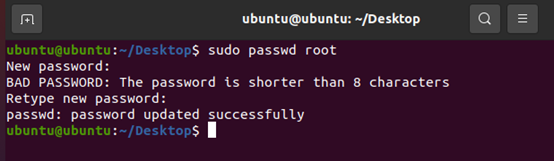
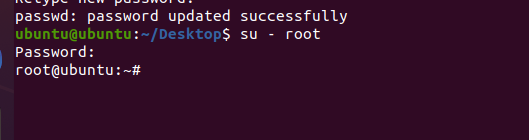
进入到root用户,操作更加快捷方便
更改root密码:sudo passwd root
直接切换到root用户:su – root
安装vm-tools工具
提示:vm-tools是一种针对于linux GUI版本和windows之间相互传文件或者粘贴的一款软件,非常实用。
1.安装工具包open-vm-tools:apt-get install open-vm-tools
2.安装工具包open-vm-tools-desktop: apt-get install open-vm-tools-desktop
3.重启虚拟机:重启启动虚拟机
更改镜像源,方便install的时候速度更快
1. 首先查看当前ubuntu系统的版本号:lsb_release -a
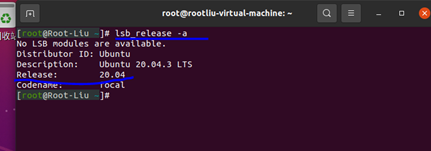
这里我的机器的版本是20.04的,等会用的也就是这个对应的版本。
2.然后寻找镜像源:
这里提供aliyun镜像的网址(包括有16.04到20.04版本的镜像):
https://developer.aliyun.com/mirror/ubuntu?spm=a2c6h.13651102.0.0.5fd31b11bf434k
这里不得不提一句:如果有人和小杨一样是用的21.04的,那你就得去百度一下了。
这里也就顺带提供了吧:
#-----------ubuntu 21.04(hirsute)-----------
deb http://mirrors.aliyun.com/ubuntu hirsute main restricted
deb http://mirrors.aliyun.com/ubuntu hirsute-updates main restricted
deb http://mirrors.aliyun.com/ubuntu hirsute universe
deb http://mirrors.aliyun.com/ubuntu hirsute-updates universe
deb http://mirrors.aliyun.com/ubuntu hirsute multiverse
deb http://mirrors.aliyun.com/ubuntu hirsute-updates multiverse
deb http://mirrors.aliyun.com/ubuntu hirsute-backports main restricted universe multiverse
deb http://mirrors.aliyun.com/ubuntu hirsute-security main restricted
deb http://cn.archive.ubuntu.com/ubuntu hirsute-security universe
deb http://cn.archive.ubuntu.com/ubuntu hirsute-security multiverse
3.配置source.list文件
复制对应版本的内容到寄存器,然后把这个复制到文件/etc/apt/source.list里面就行了
具体的话:
首先vim这个文件,进入到vim编辑界面,按住d不动(连续按两个d是为删除这一行)。等待删除全部的内容,再右键张贴上去。
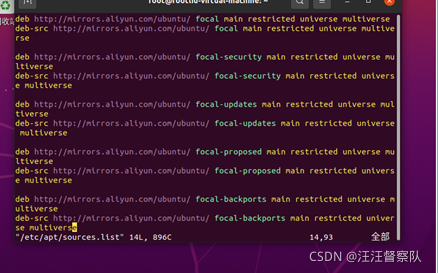
然后依次输入esc,冒号,wq,回车 即可。
退出来后,进行apt源的更新操作: apt-get update
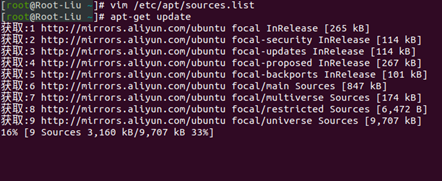
等待完成就把镜像源更换完毕!(如果你这一步完成后,在apt的时候总是报错,那是因为你在选择镜像源的时候,没有选择和你机器一样的版本,这里请看我上面的描述。)
安装apache服务器相应的组件和依赖件
安装下面一系列的依赖件
apt-get install gcc -y
apt-get install make -y
apt-get install libxml2-dev -y
apt-get install expat -y
apt-get install libexpat1-dev -y
apt-get install build-essential -y
下载源代码包:
http://httpd.apache.org/download.cgi
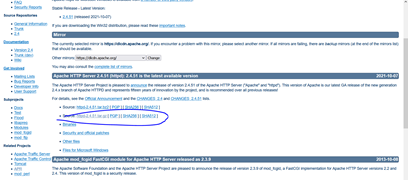
该操作在ubuntu下的火狐浏览器操作就行了。
点击这个gz压缩包,下载就行了,保存文件,不要下载后直接打开。
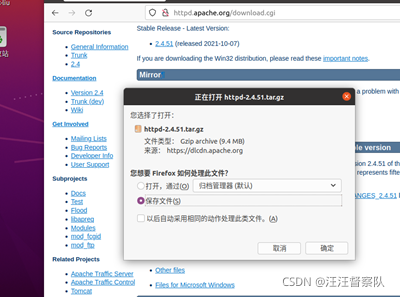
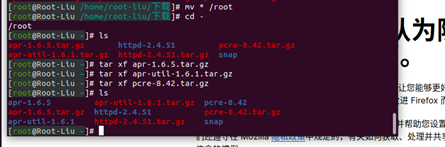
默认下载在这个目录下面:/home/root-liu/下载,我们把他移动到自己的家目录下就行

解压到当前文件夹:

安装apr:http://mirrors.gigenet.com/apache//apr/apr-1.6.5.tar.gz
安装apr-util:http://mirrors.gigenet.com/apache//apr/apr-util-1.6.1.tar.gz
安装pcre(这里需要等5秒,如下图所示):https://sourceforge.net/projects/pcre/files/pcre/8.42/pcre-8.42.tar.gz/download
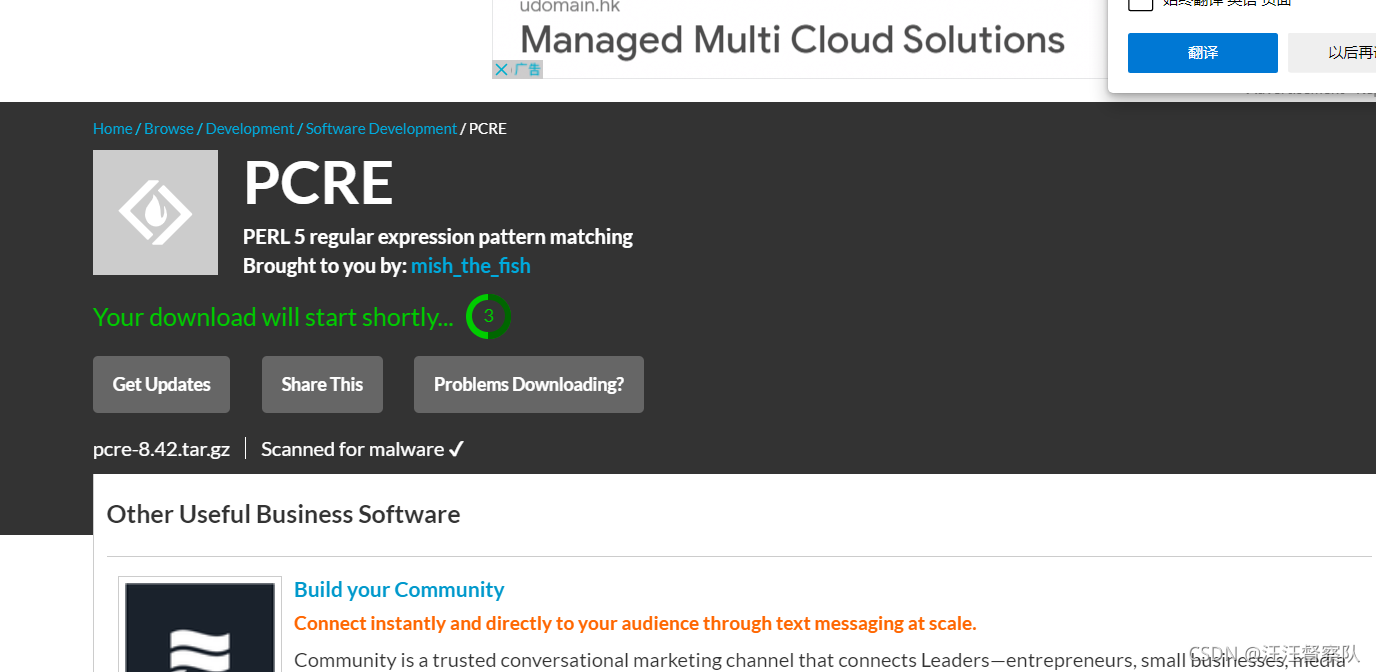
直接把这个链接复制到火狐里面打开就能下载
和源代码同样的操作,都在家目录下解压。
新建软件所在的目录:
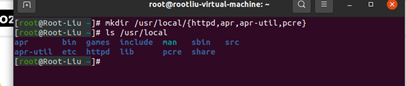
和windows里面的安装软件一样,在安装的时候同样这里也要指定软件安在哪里
安装源代码
安装apr:
cd /root/apr-1.6.5
./configure --prefix=/usr/local/apr
make
make install
依次输入命令,等待完成即可。

安装apr-util:
cd /root/apr-util-1.6.1
./configure --prefix=/usr/local/apr-util --with-apr=/usr/local/apr/bin/apr-1-config
make
make install

安装pcre:
cd /root/pcre-8.42
./configure --prefix=/usr/local/pcre --with-apr=/usr/local/apr/bin/apr-1-config
make
make install

安装httpd:
cd /root/httpd-2.4.51
./configure --prefix=/usr/local/httpd --with-pcre=/usr/local/pcre --with-apr=/usr/local/apr --with-apr-util=/usr/local/apr-util
make
make install
进行测试
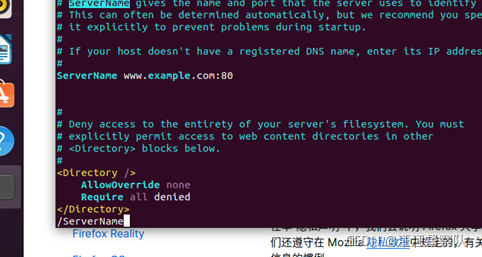
修改源码中配置文件:
vim /usr/local/httpd/conf/httpd.conf
找到ServerName,吧这一行注释去掉(可以对内容进行查找,进到vim界面后,按/然后输ServerName,就可以调到这一行)
进到根
cd /
/usr/local/httpd/bin/apachectl start
然后进到ubuntu的火狐,输入127.0.0.1 或者http://localhost
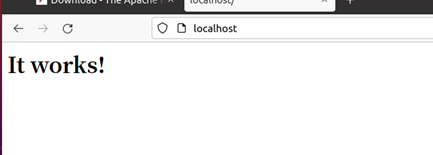
出现这个就说明apache成功运行。
简化启动命令
cp /usr/local/httpd/bin/apachectl /usr/sbin
如果想打开apache服务,输入apachectl start就行了
想关闭apache服务,apachectl stop就行了。
总结
对上述操作,增加了自己对Linux的了解,对Linux一切接文件的思想也更加透彻!


 2171
2171

 被折叠的 条评论
为什么被折叠?
被折叠的 条评论
为什么被折叠?
 到【灌水乐园】发言


