


第四模块MySQL数据库
从今天开始,我们将进入系列课程的 第四模块 的学习,这个模块就是给大家讲解MySQL数据库。
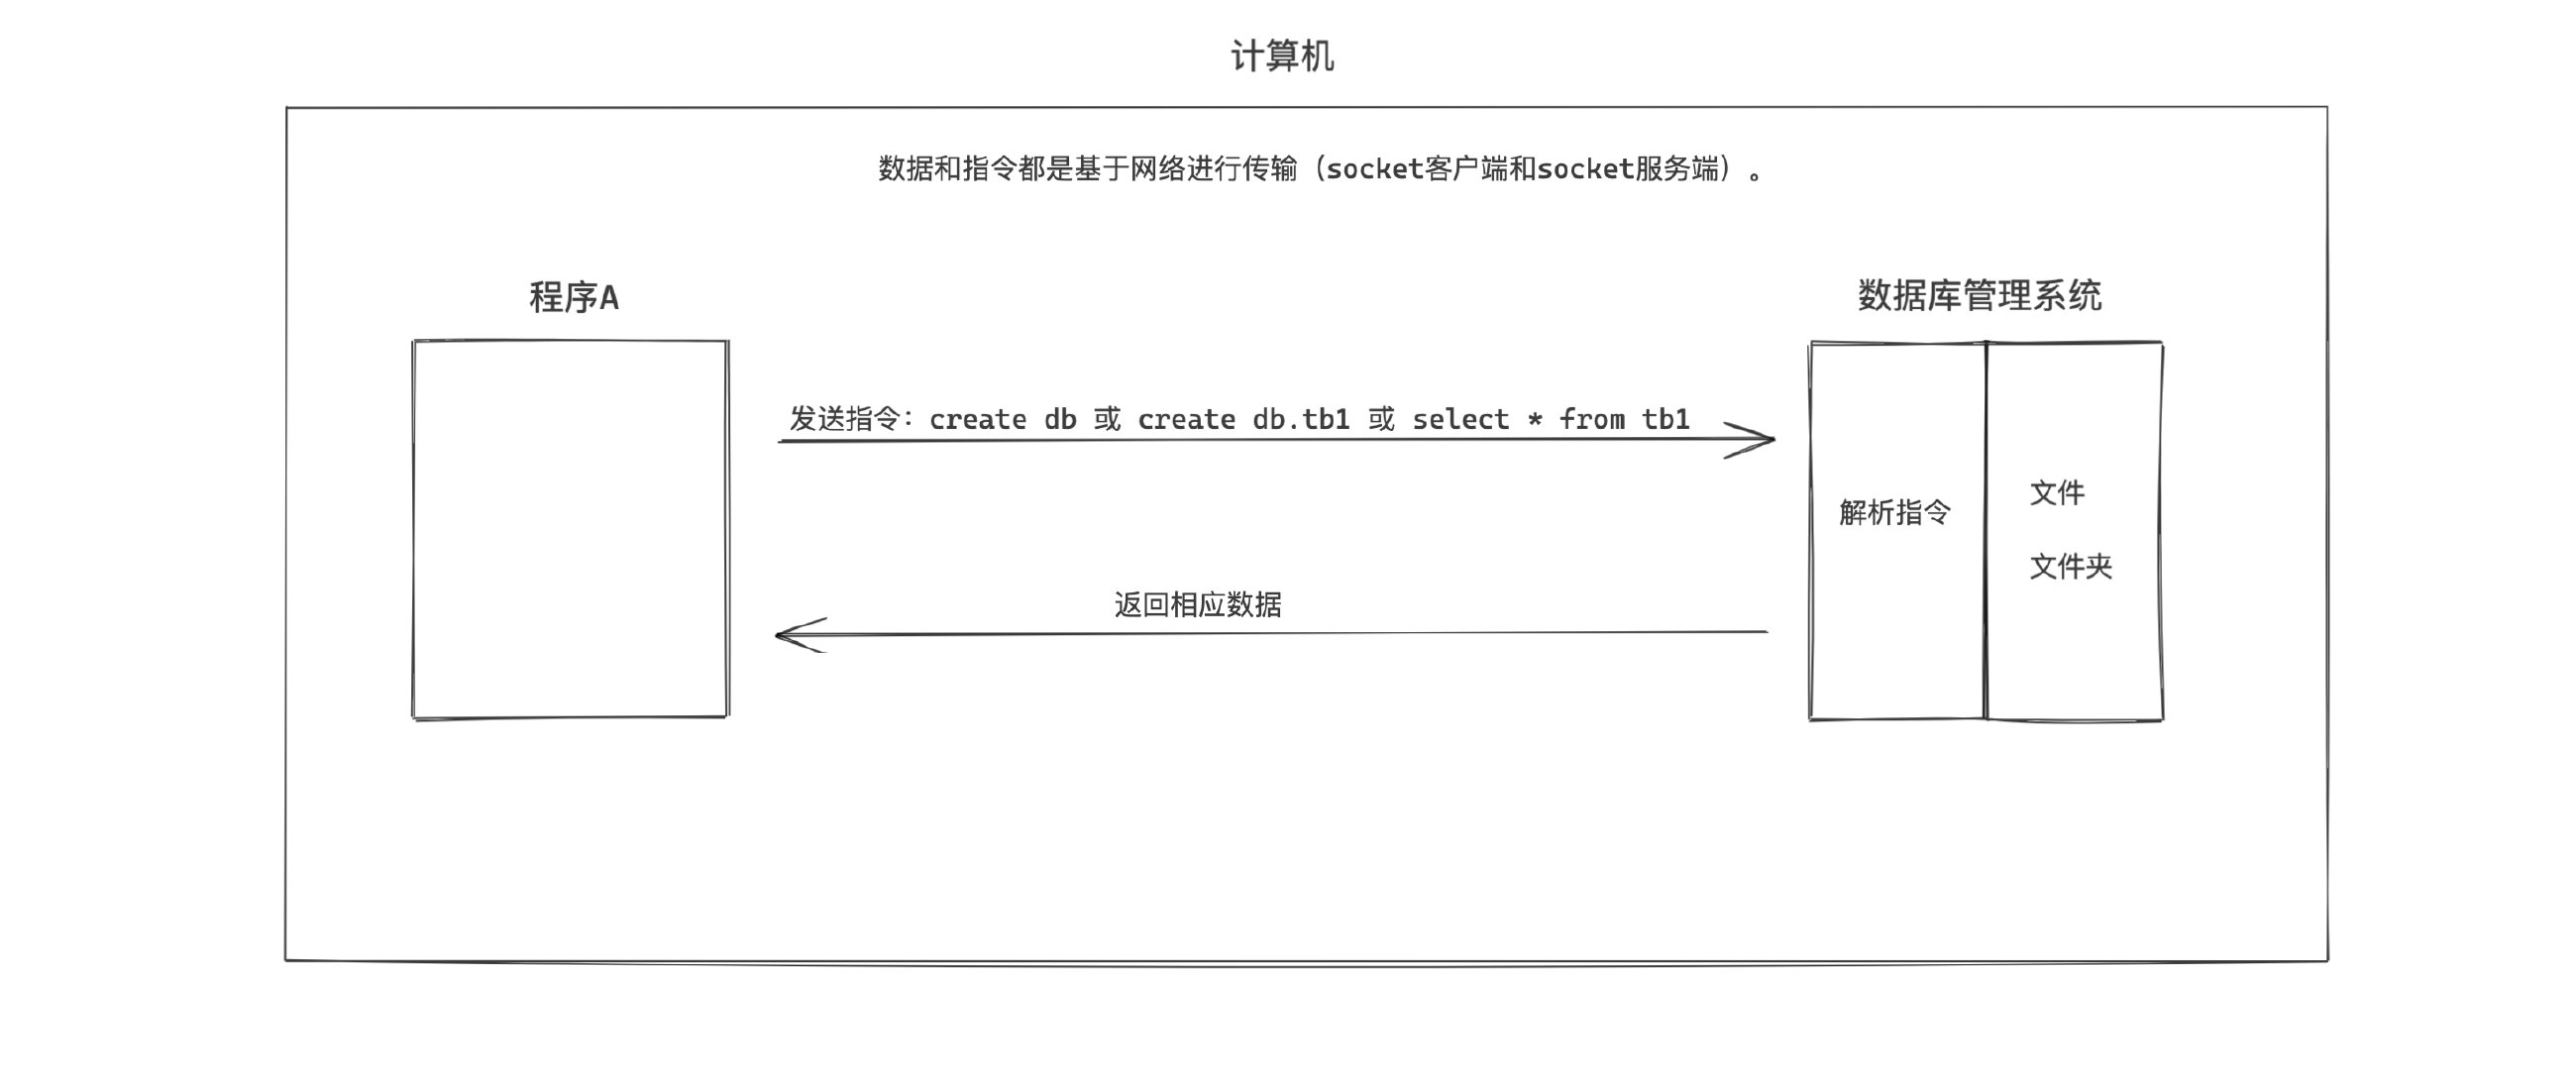
以前,在开发程序时,我们会把很多的数据和信息存储到某个文件夹中的文件中,例如:user.txt 、db.xlsx 等。
现在,有那么一个叫:数据库管理系统(DBMS,Database Management System)的软件,可以帮助我们实现对文件夹中的文件进行操作,而我们只要学习DBMS能识别的指令, 就能控制它去帮助我们实现的文件和文件夹的处理。例如:

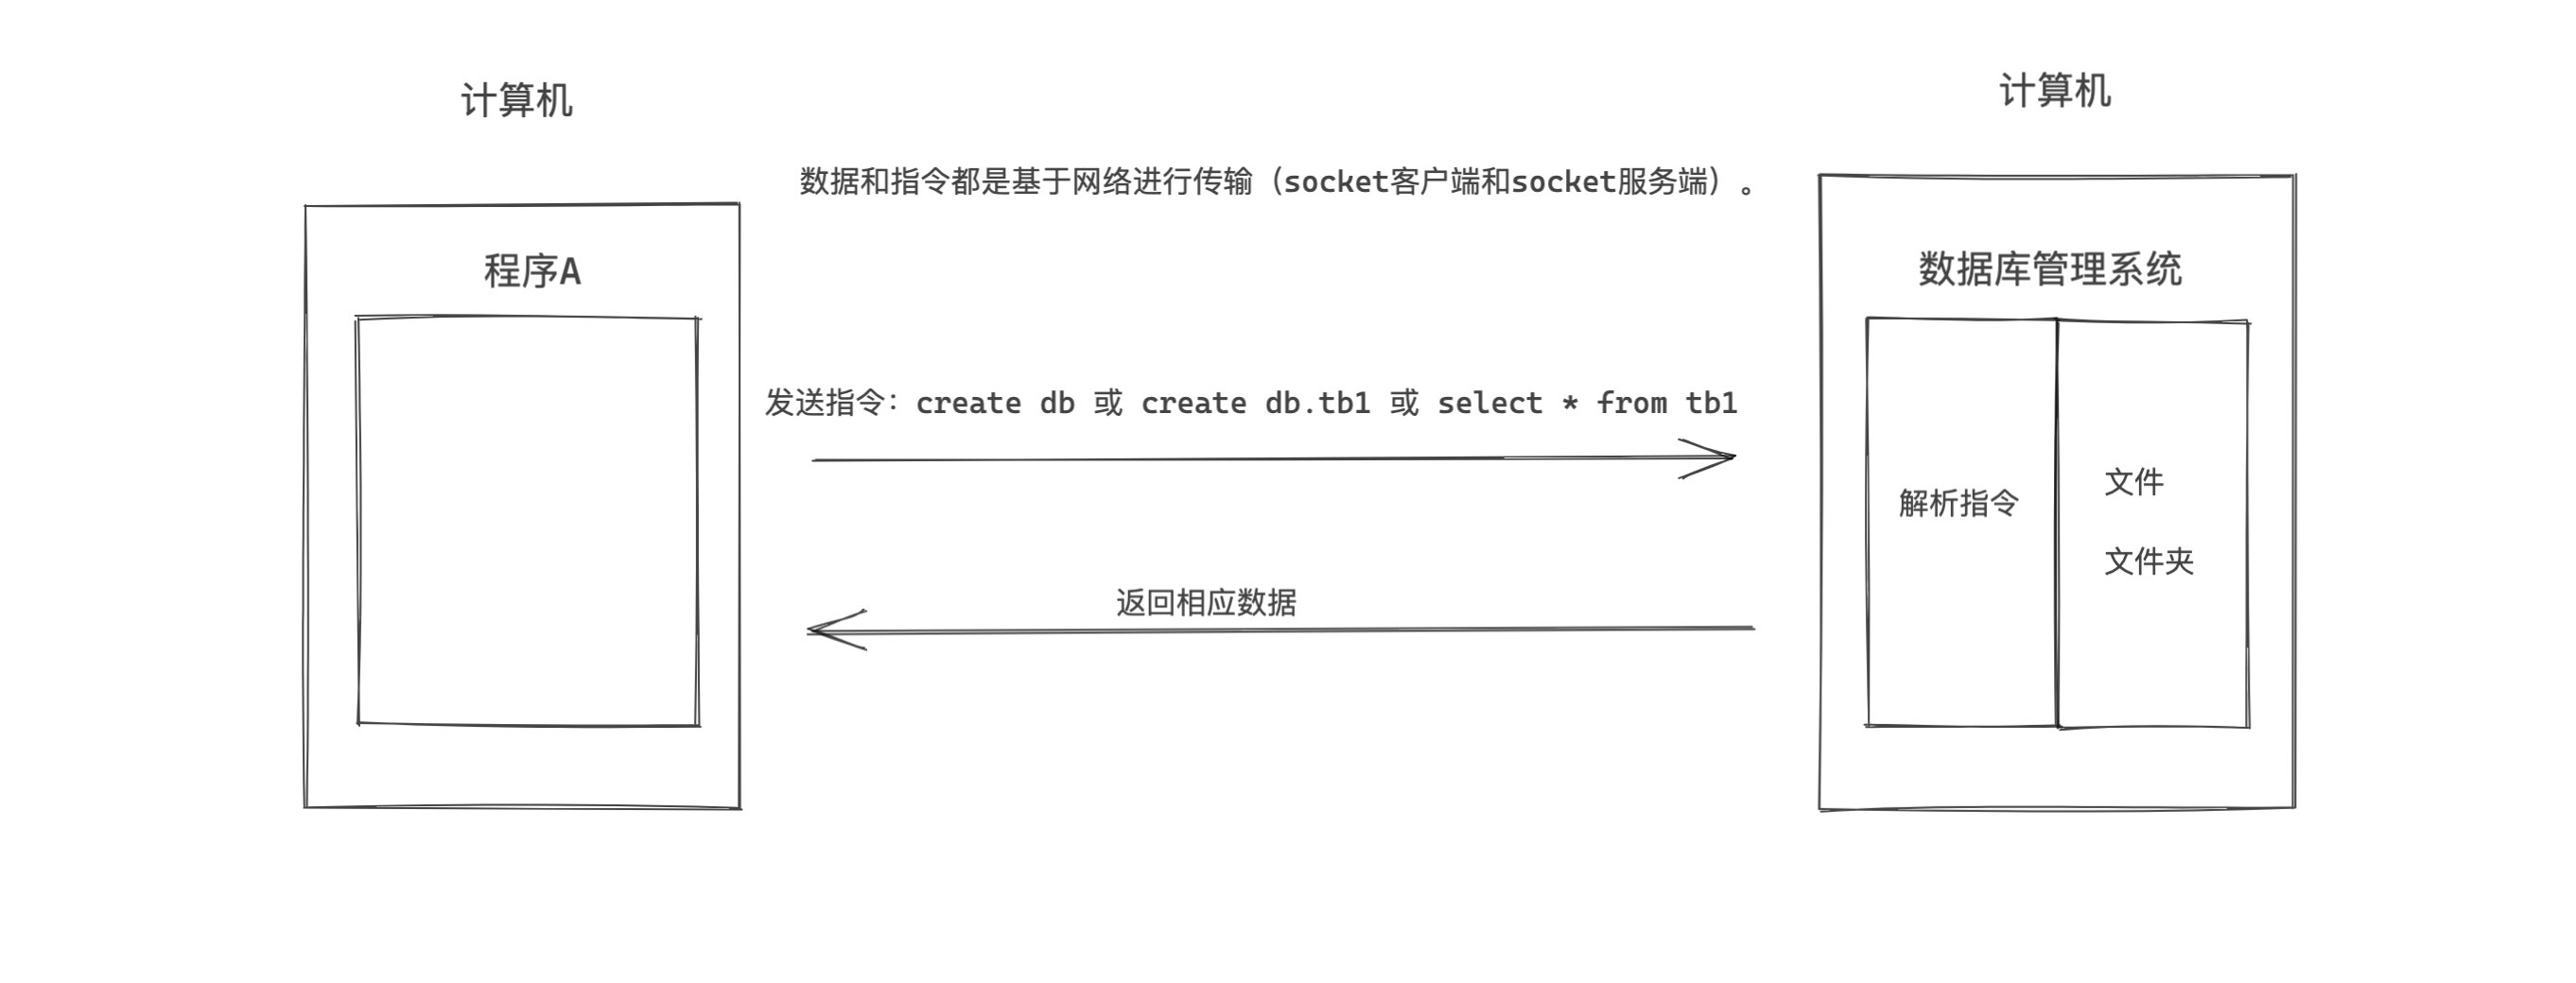
数据库管理系统(DBMS)专注于帮助开发者解决数据存储的问题,这样开发者就可以把主要精力放在实现业务功能上了。
业内有很多的的数据库管理系统产品,例如:
- MySQL,原来是sun公司,后来被甲骨文收购。现在互联网企业几乎都在使用。【免费 + 收费】
- Oracle,甲骨文。收费,一般国企、事业单位居多。【收费】
- Microsoft SQL Server,微软。【收费】
- DB2,IBM。【免费 + 收费】
- SQLite,D. Richard Hipp个人开发。【免费】
- Access, 微软。【收费】
- PostgreSQL,加州大学伯克利分校。【免费】
- 等众多…
由于各大公司都是使用MySQL,所以我们课程主要给大家讲解MySQL数据库。
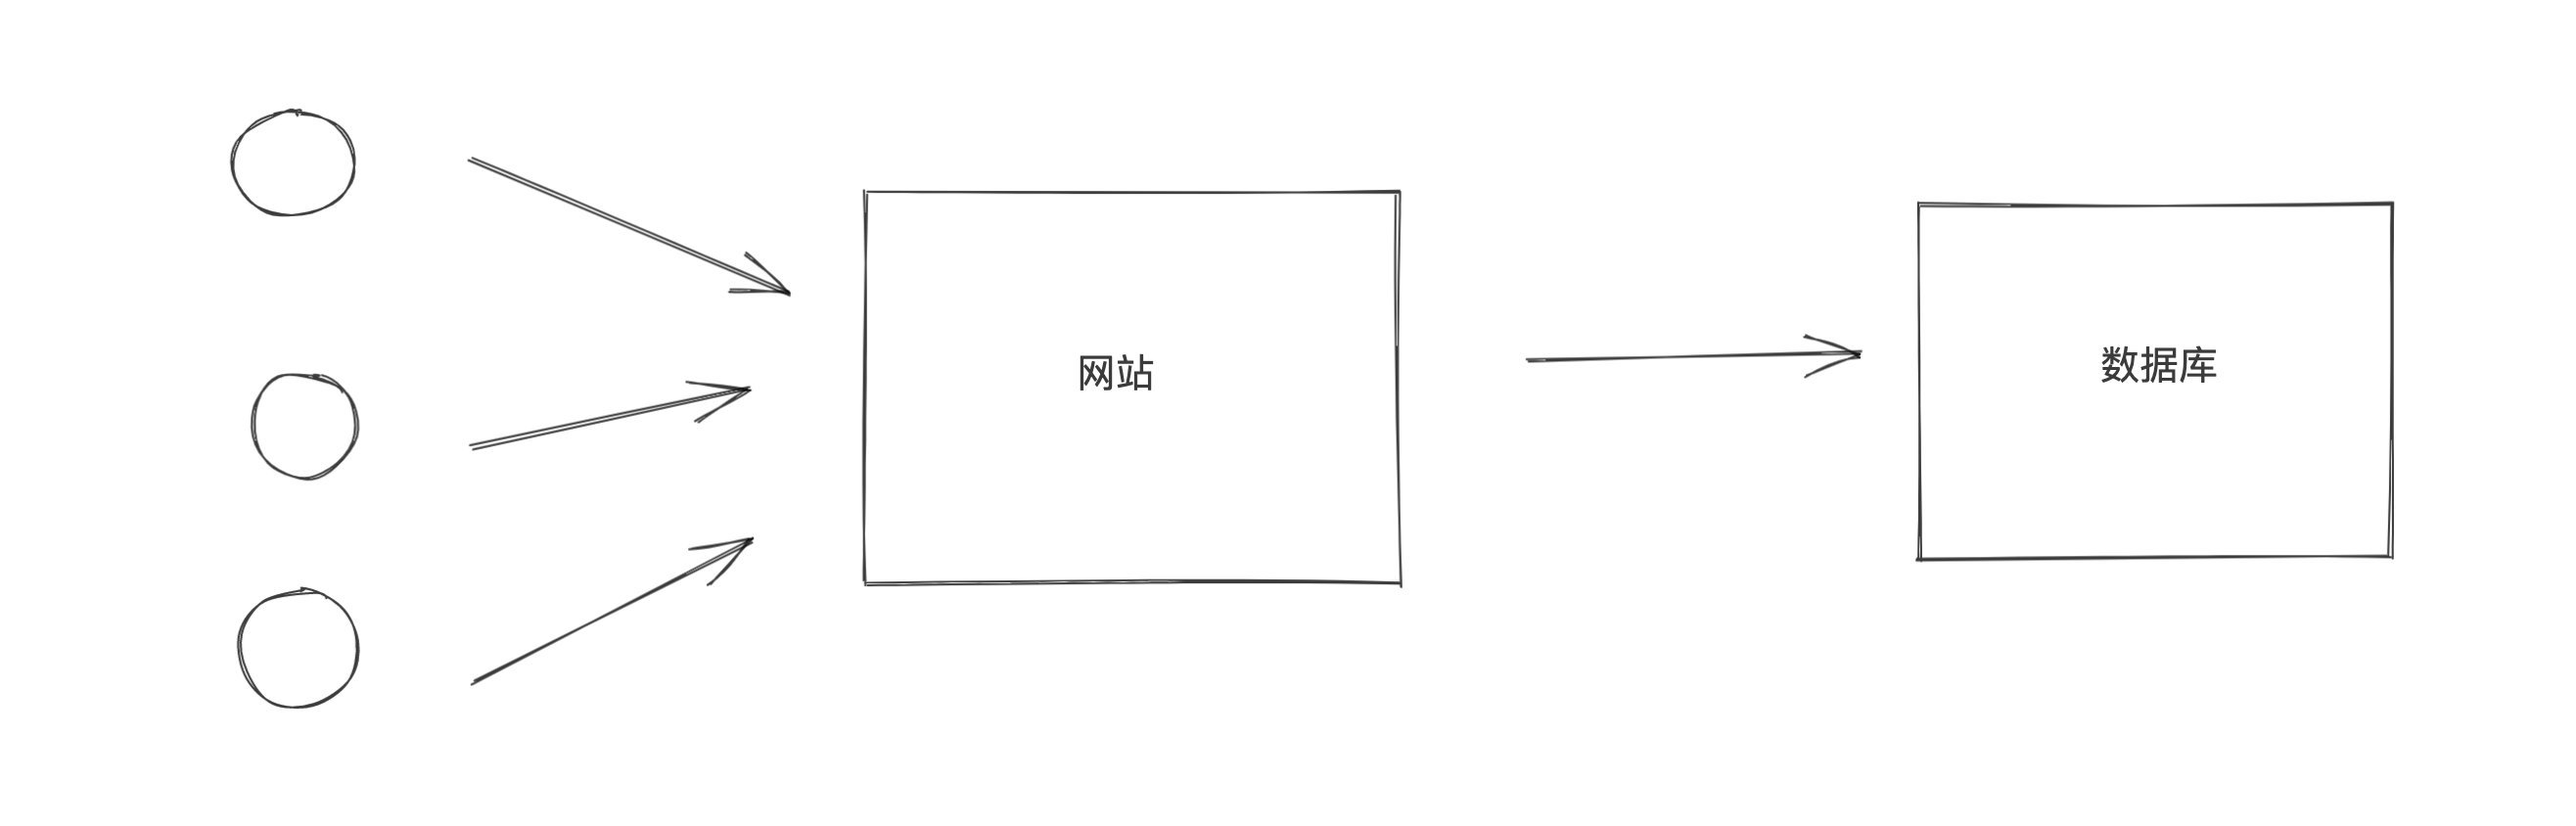
在项目开发中想要基于MySQL来进行数据存储,大致应该怎么做呢?
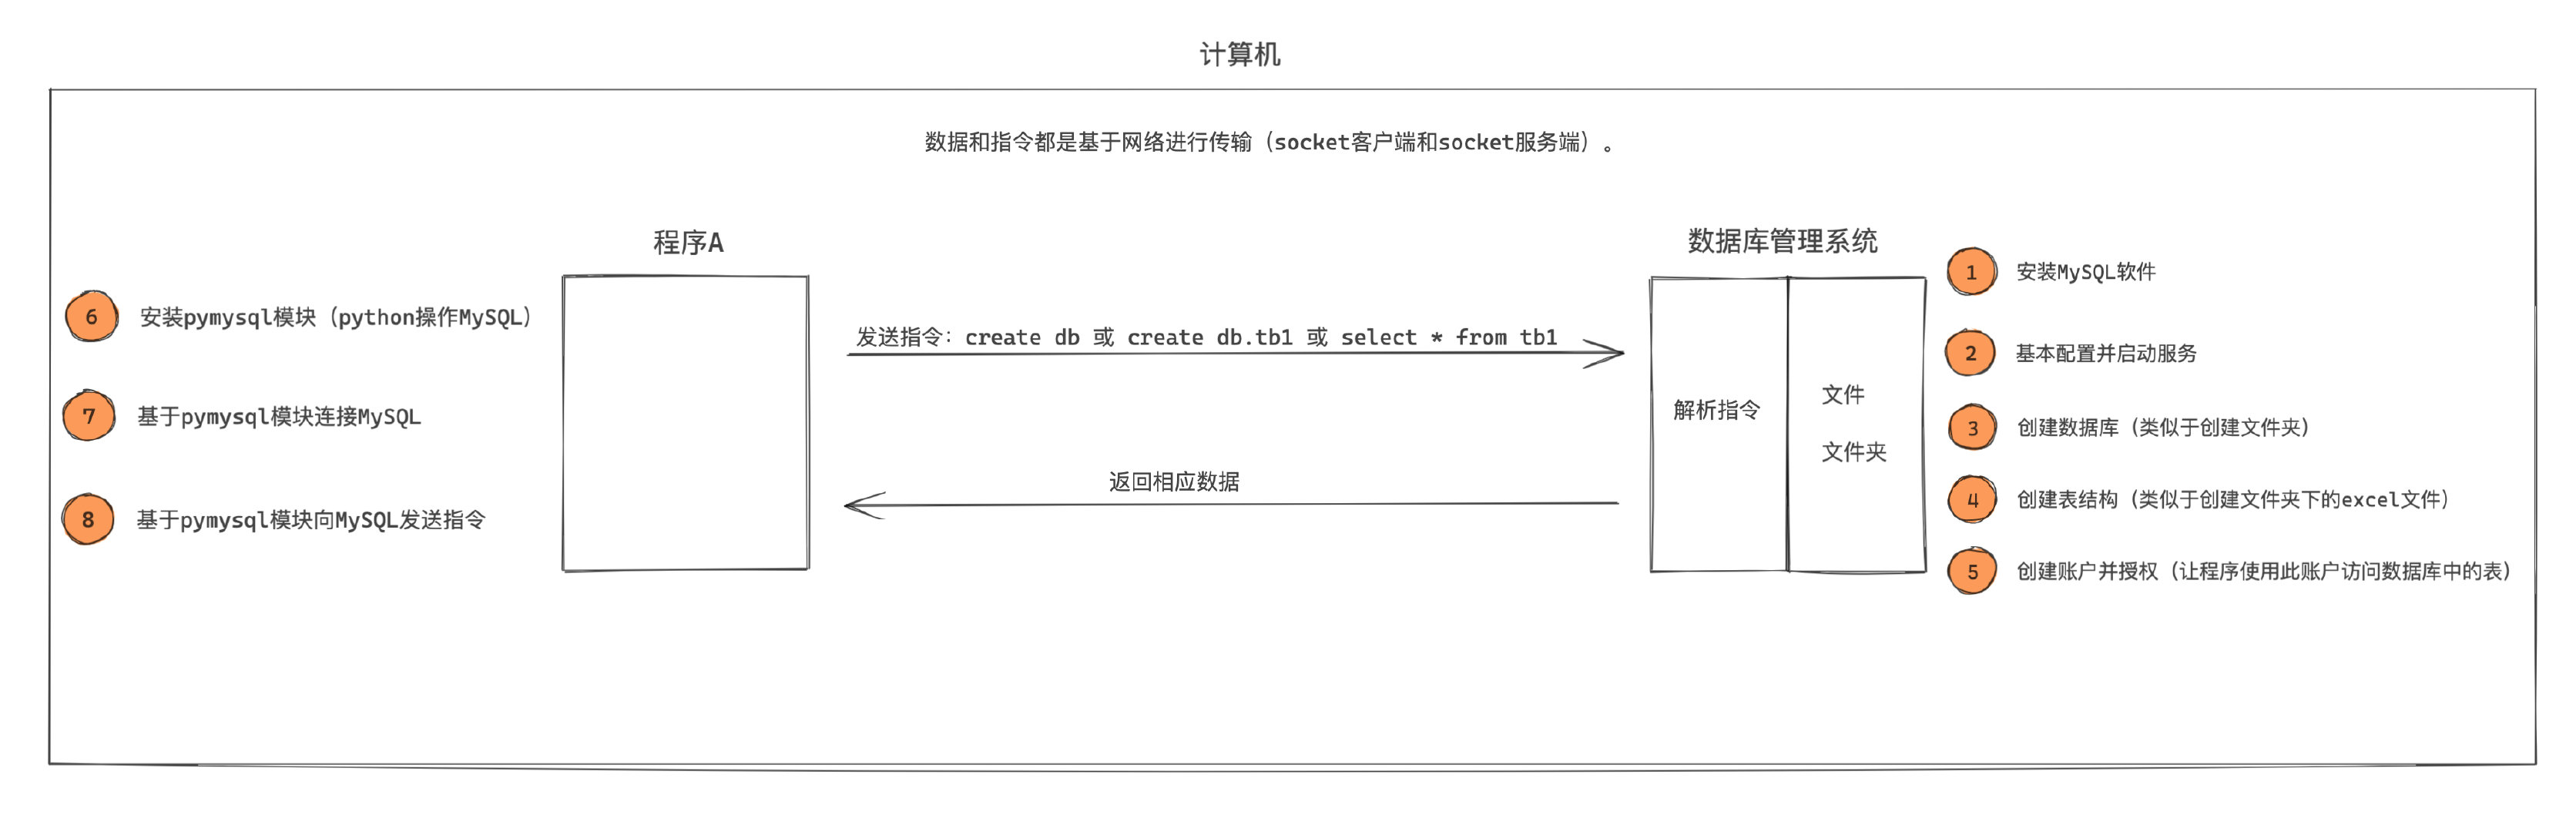
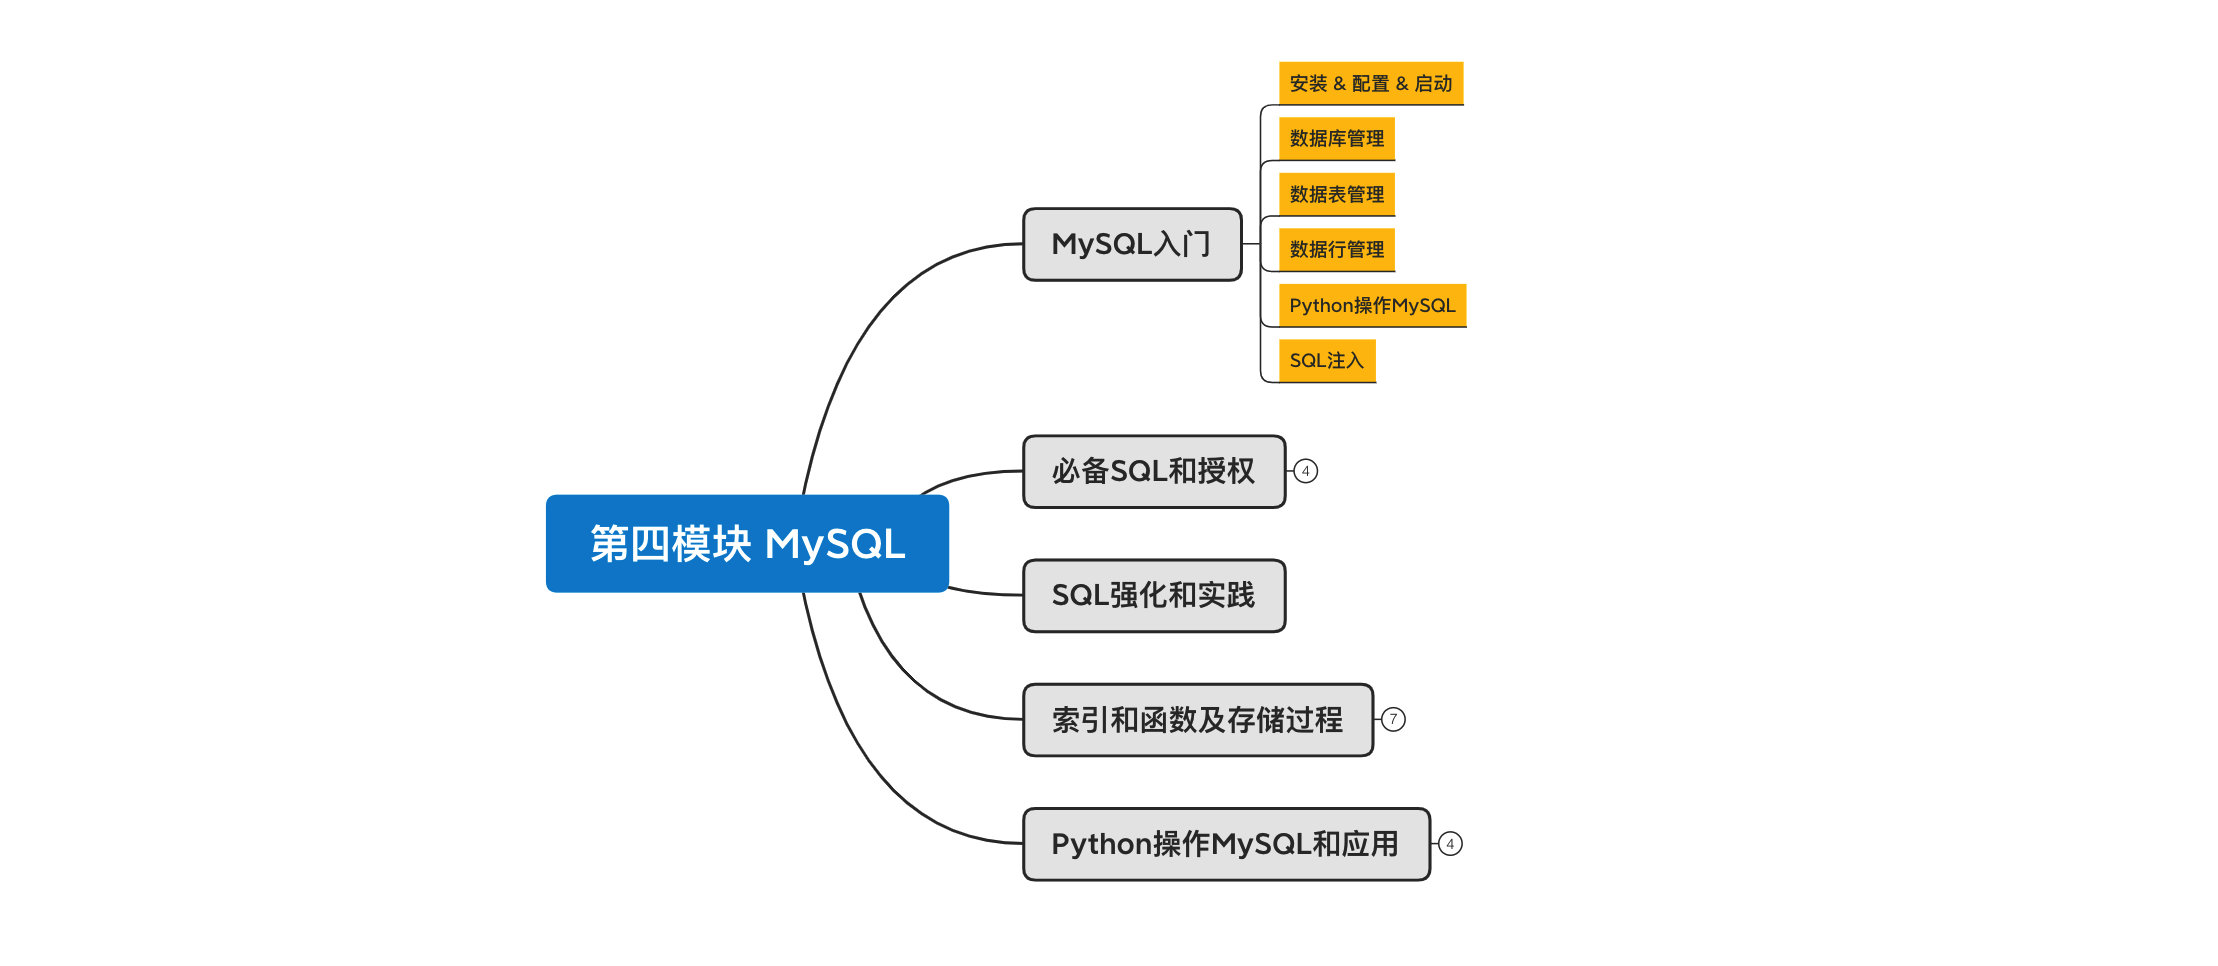
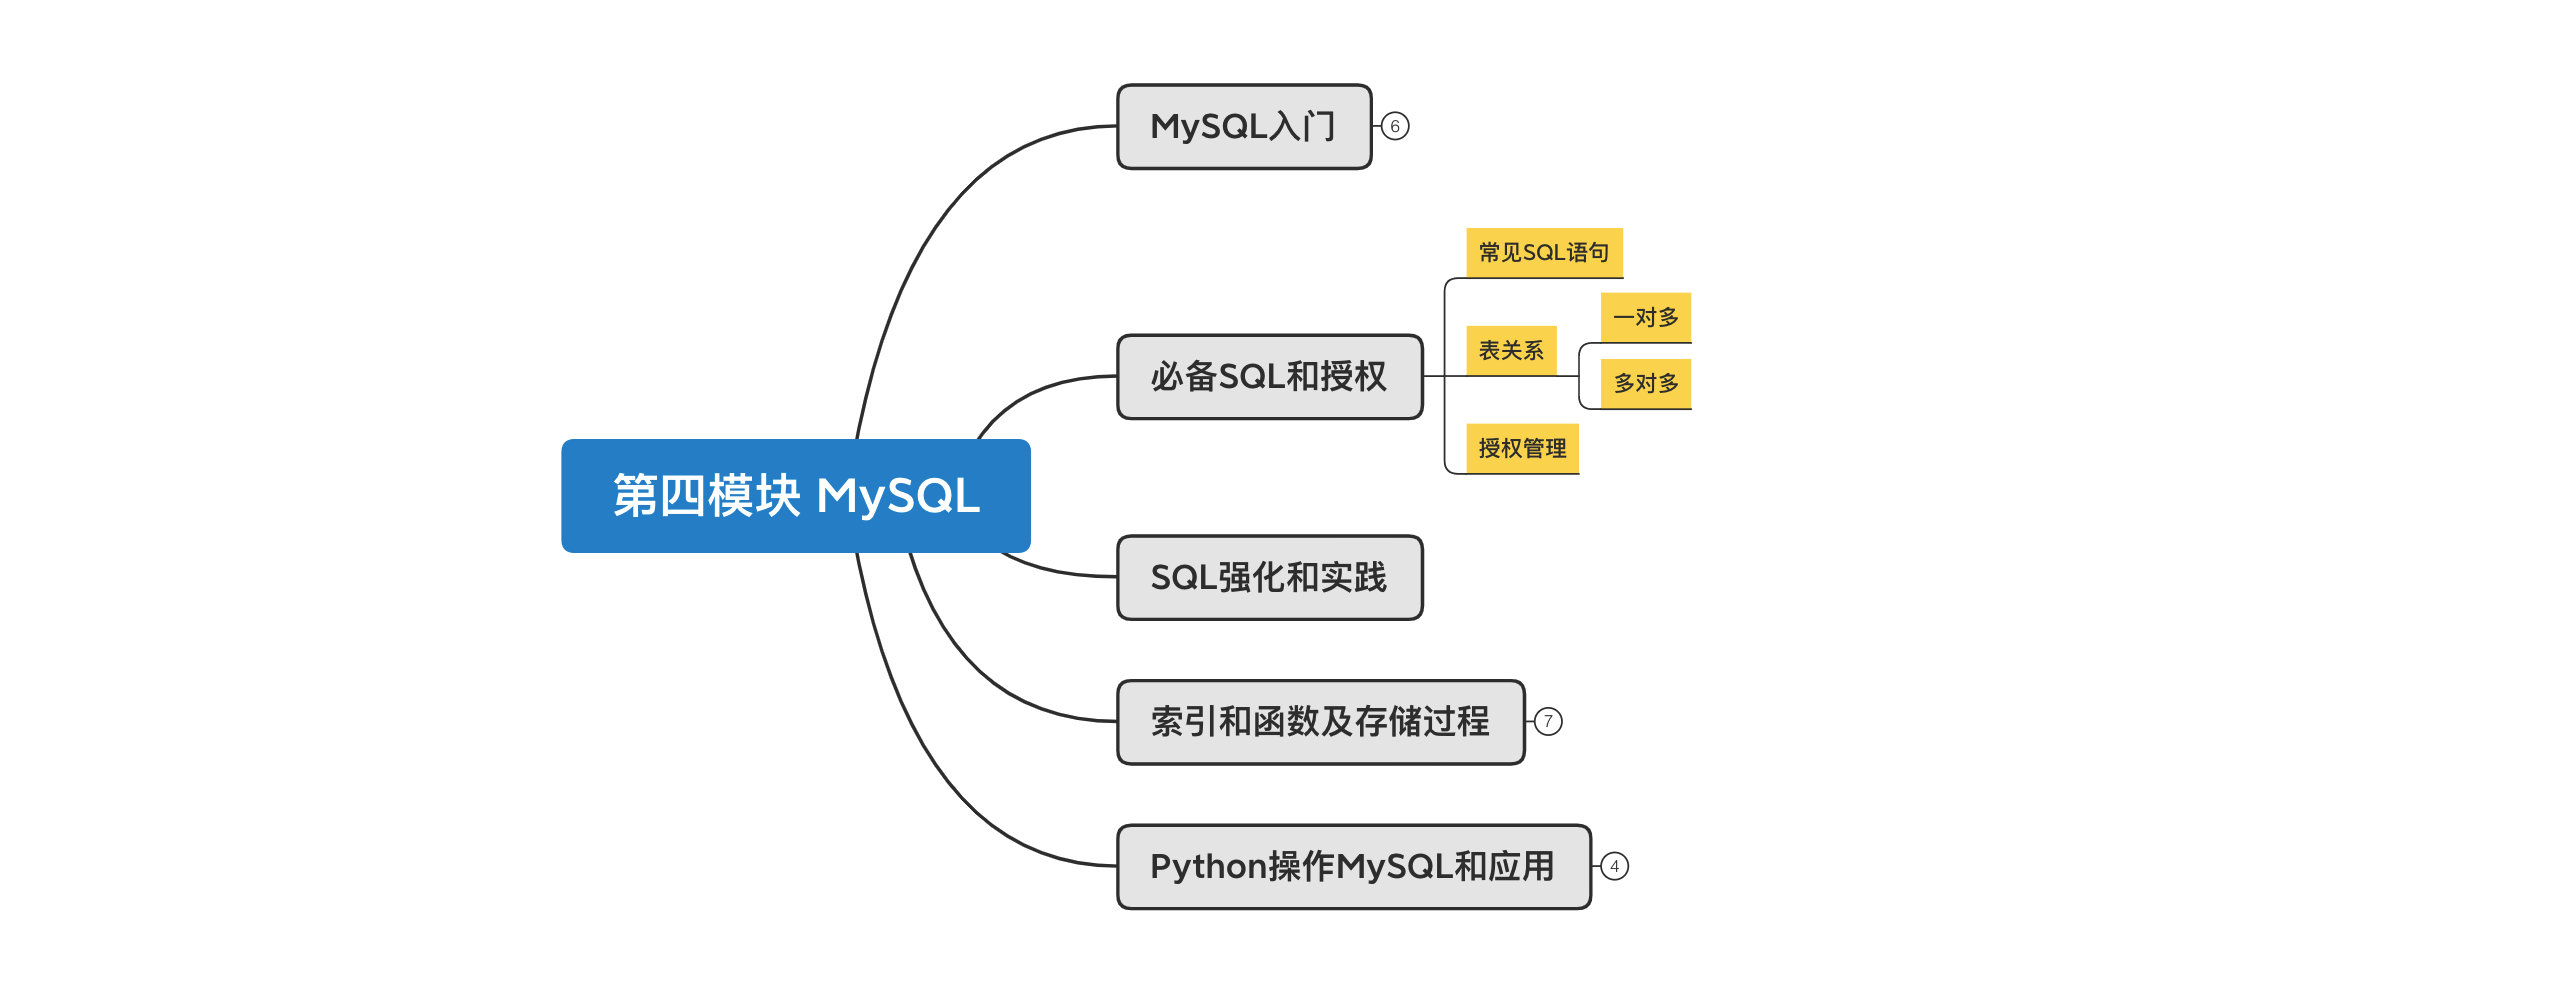
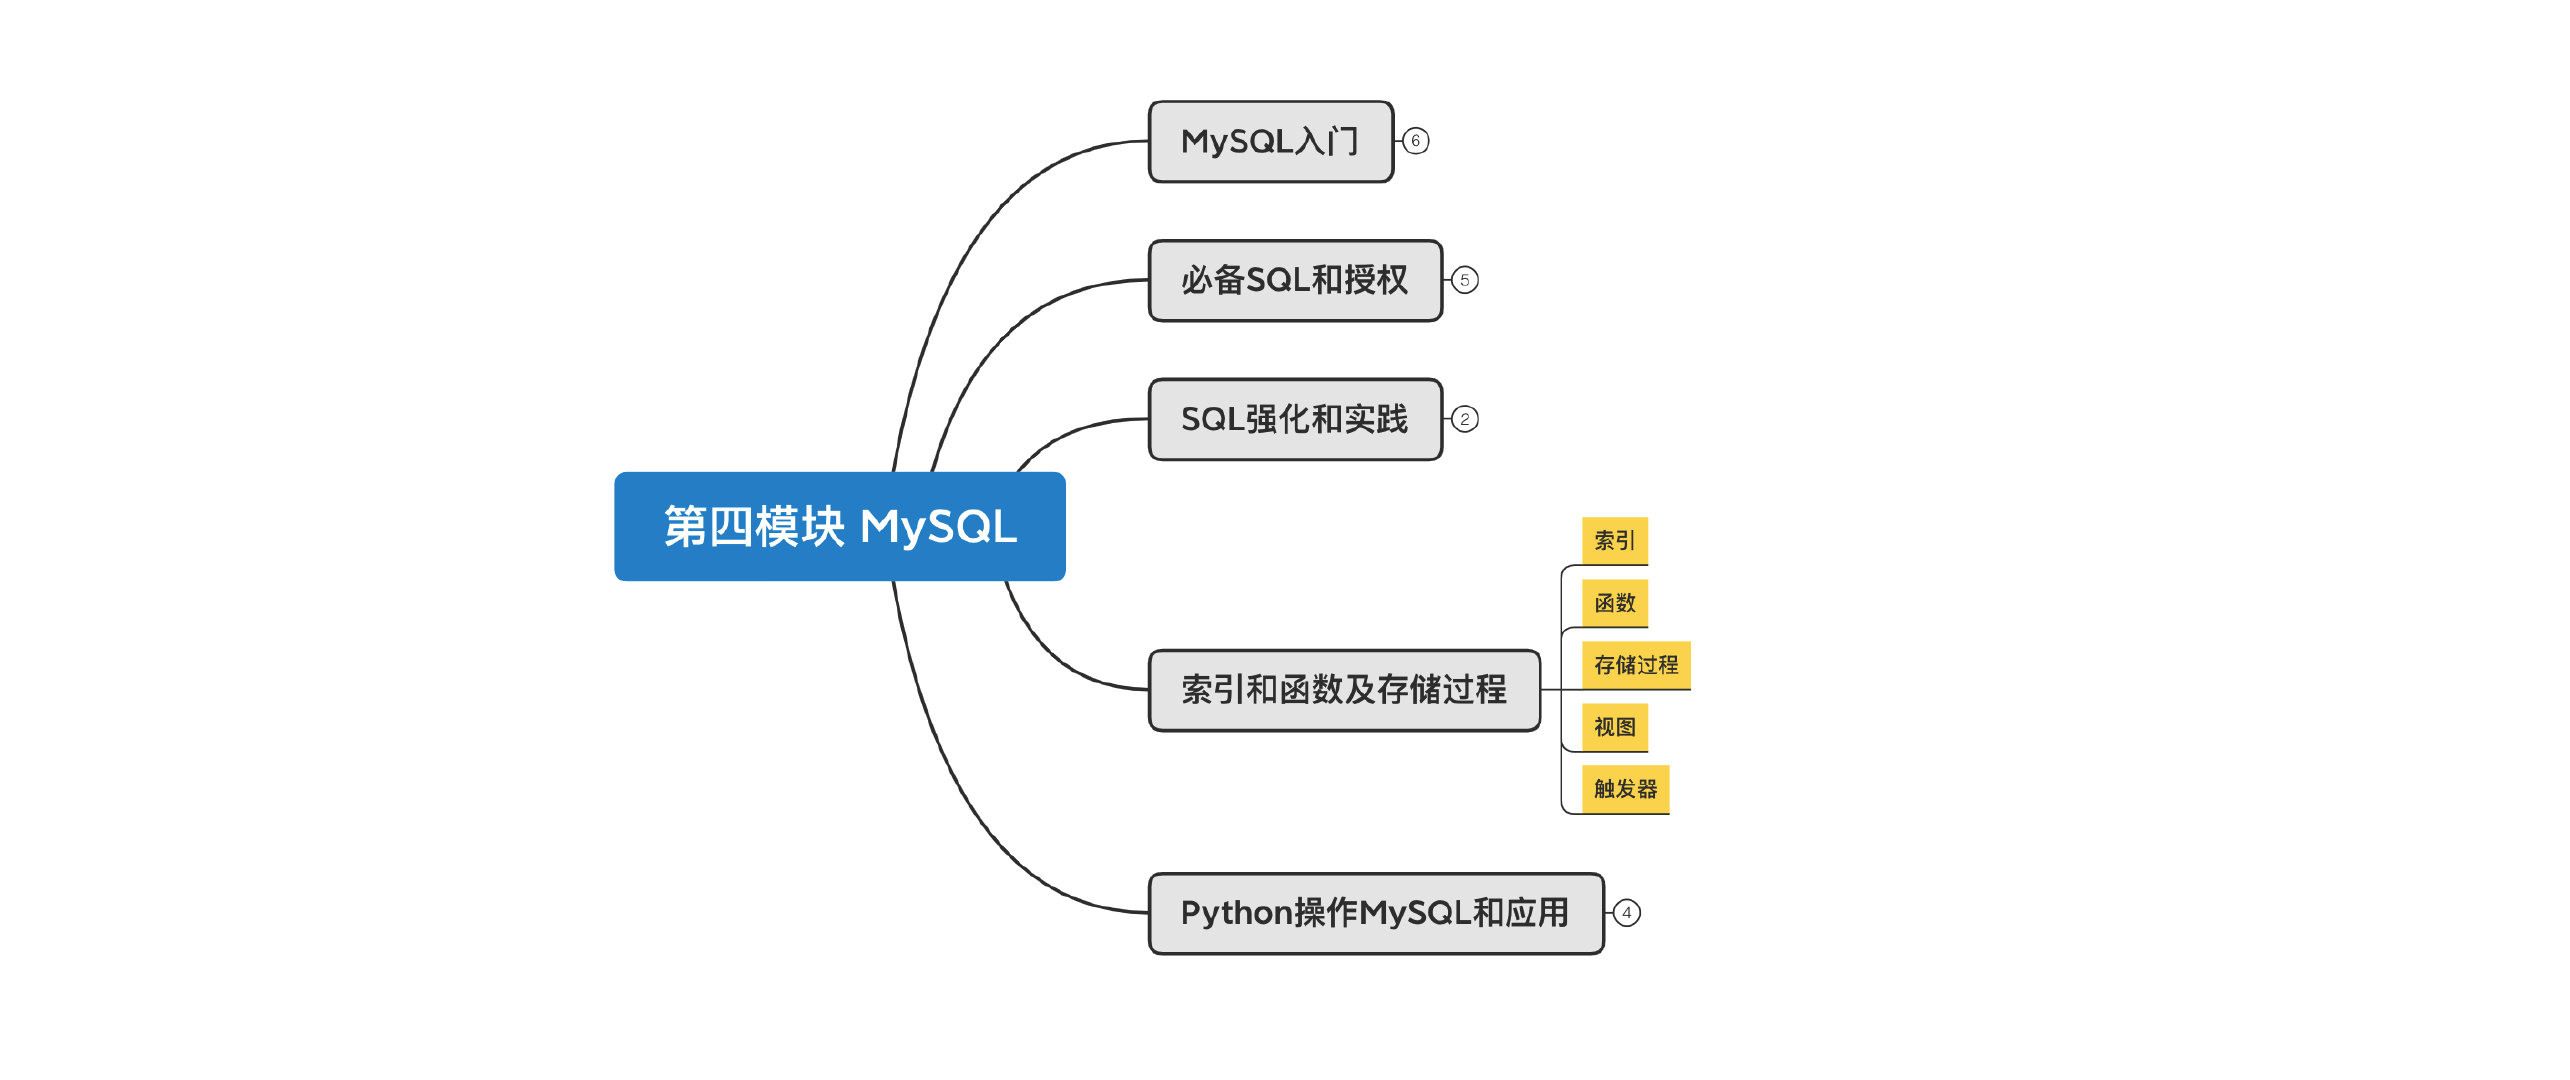
本系列的MySQL模块会分为5部分来讲解:
- MySQL入门,安装和快速应用Python实现数据库的操作。
- 必备SQL和授权,学习更多必备的指令让数据库实现更多业务场景。
- SQL强化和实践,强化练习必备”指令“(项目开发写的最多)。
- 索引和函数以及存储过程,掌握常见性能提升手段以及那些应用不是很频繁却又需了解的知识点。
- Python操作MySQL和应用,侧重点在于Python开发,让大家了解Python开发中必备的实战应用,例如:锁、事务、数据库连接池等。

day25 MySQL入门

课程目标:学习安装和快速应用Python实现数据库的操作。
课程概要:
- 安装 & 配置 & 启动
- win
- mac
- 数据库 管理(类比文件夹)
- 表 管理 (类比文件夹下的Excel文件)
- 数据行 管理(类比Excel文件中的数据行)
- Python操作MySQL及相关安全的问题
1. 安装 & 配置 & 启动
MySQL现在的版本主要分为:
- 5.x 版本,现在互联网企业中的主流版本,包括:头条、美图、百度、腾讯等互联网公司主流的版本。
- 8.x 版本,新增了一些了窗口函数、持久化配置、隐藏索引等其他功能。
所以,我们课程会以常用大版本中最新的版本为例来讲解,即:5.7.31 (依然有很多企业在用5.6.x,但新项目基本上都是5.7.x了)。
1.1 win系统
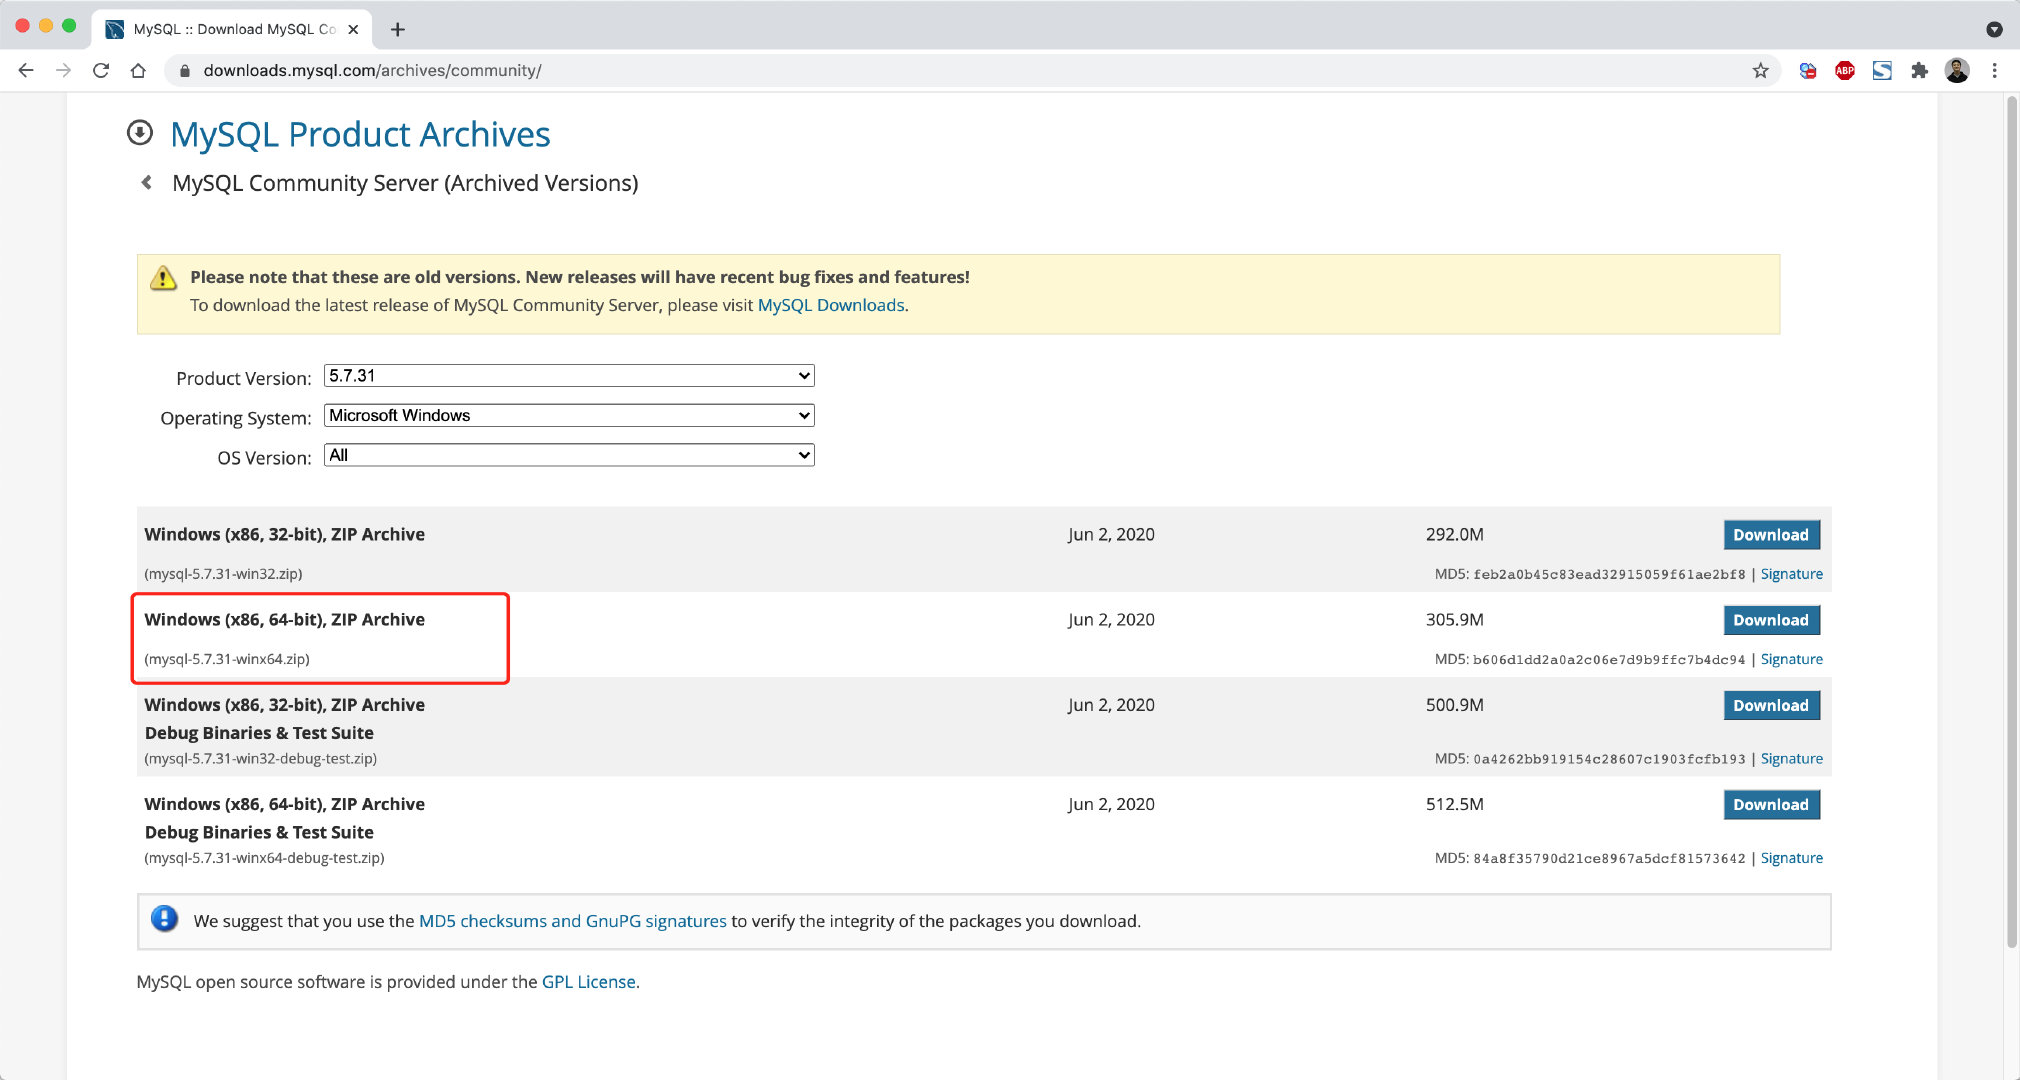
第1步:下载安装
https://downloads.mysql.com/archives/community/
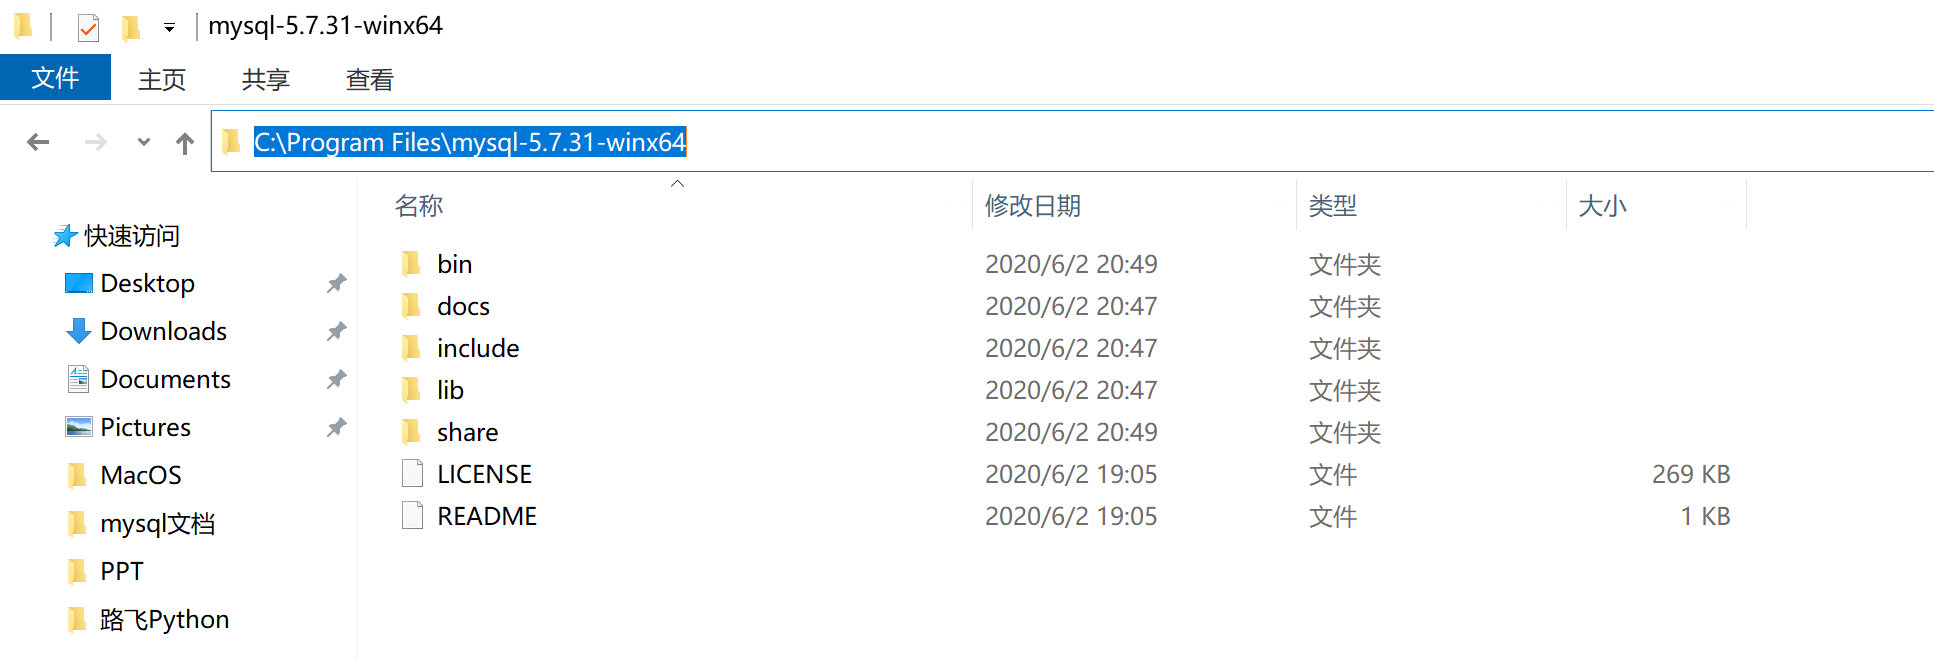
第2步:解压至任意文件夹
建议解压至软件安装目录,例如:
第3步:创建配置文件
在MySQL的安装目录下创建 my.ini 的文件,作为MySQL的配置文件。
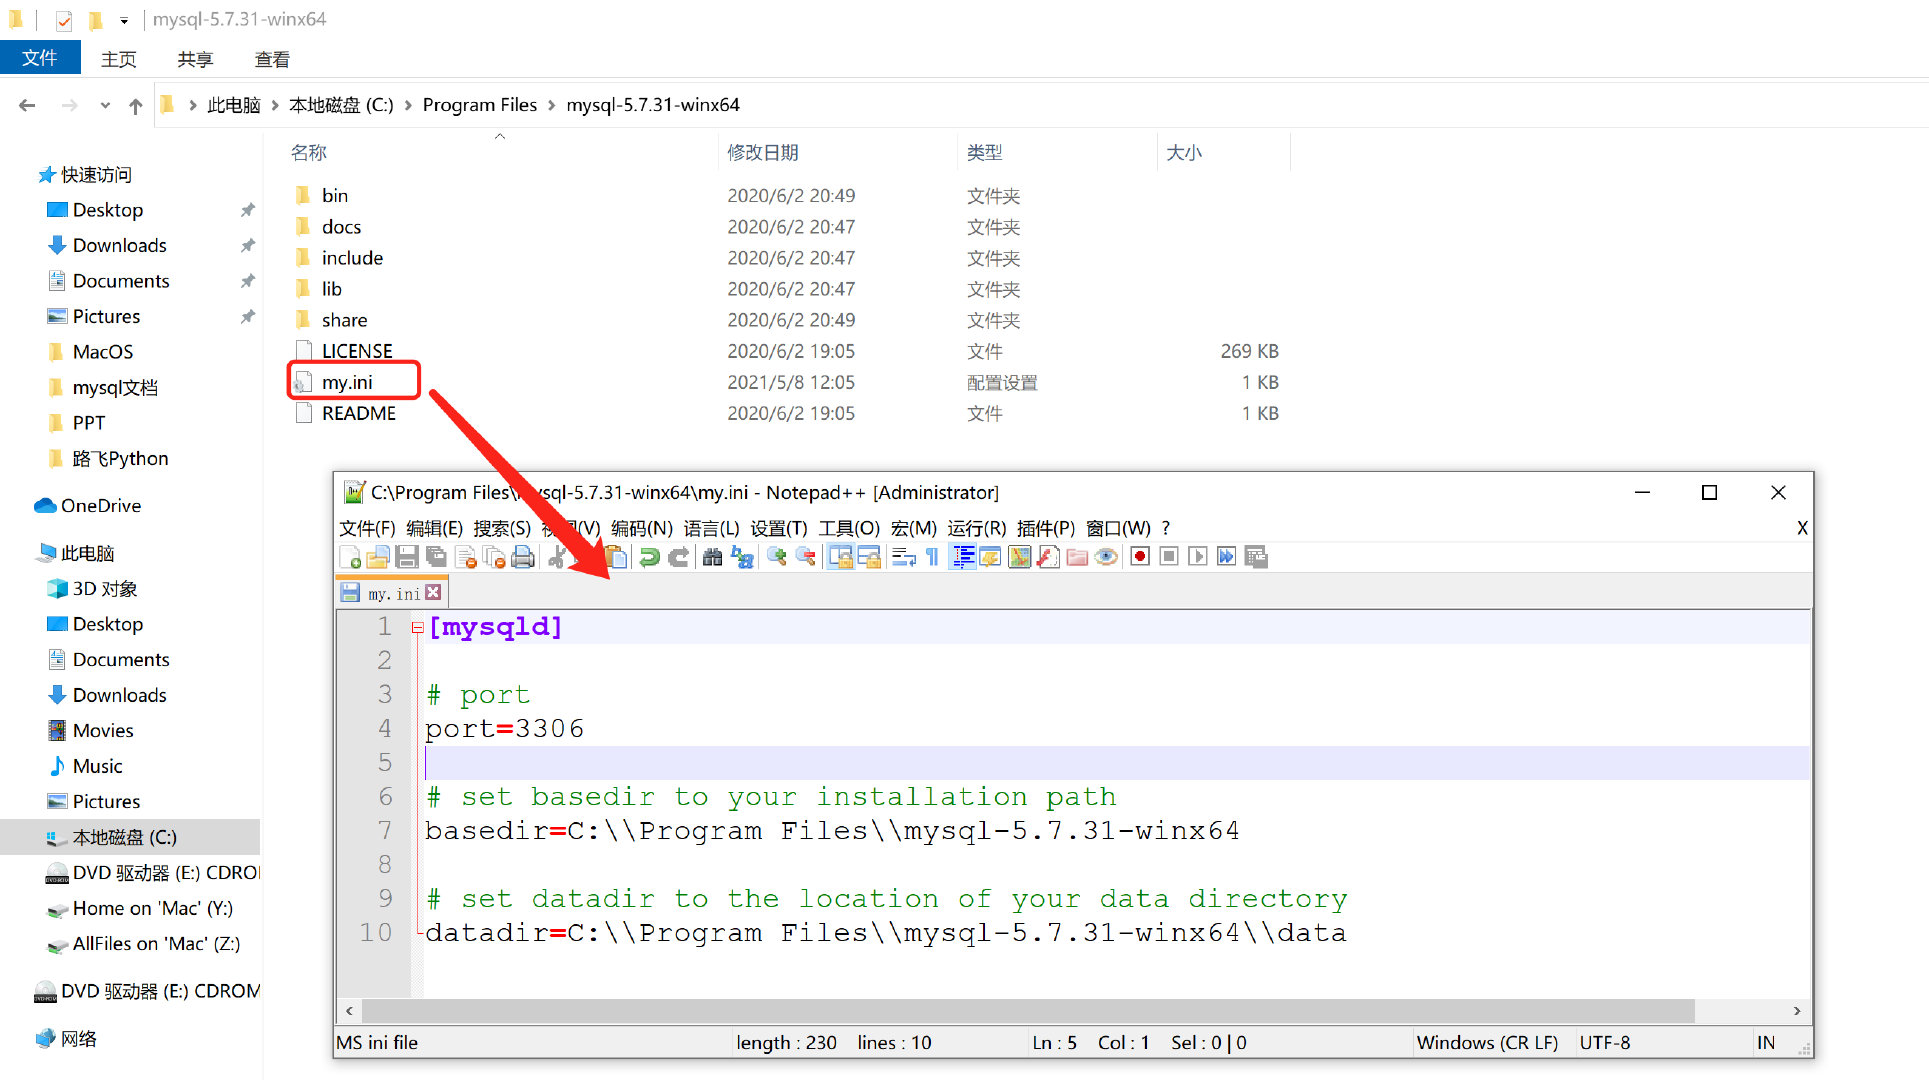
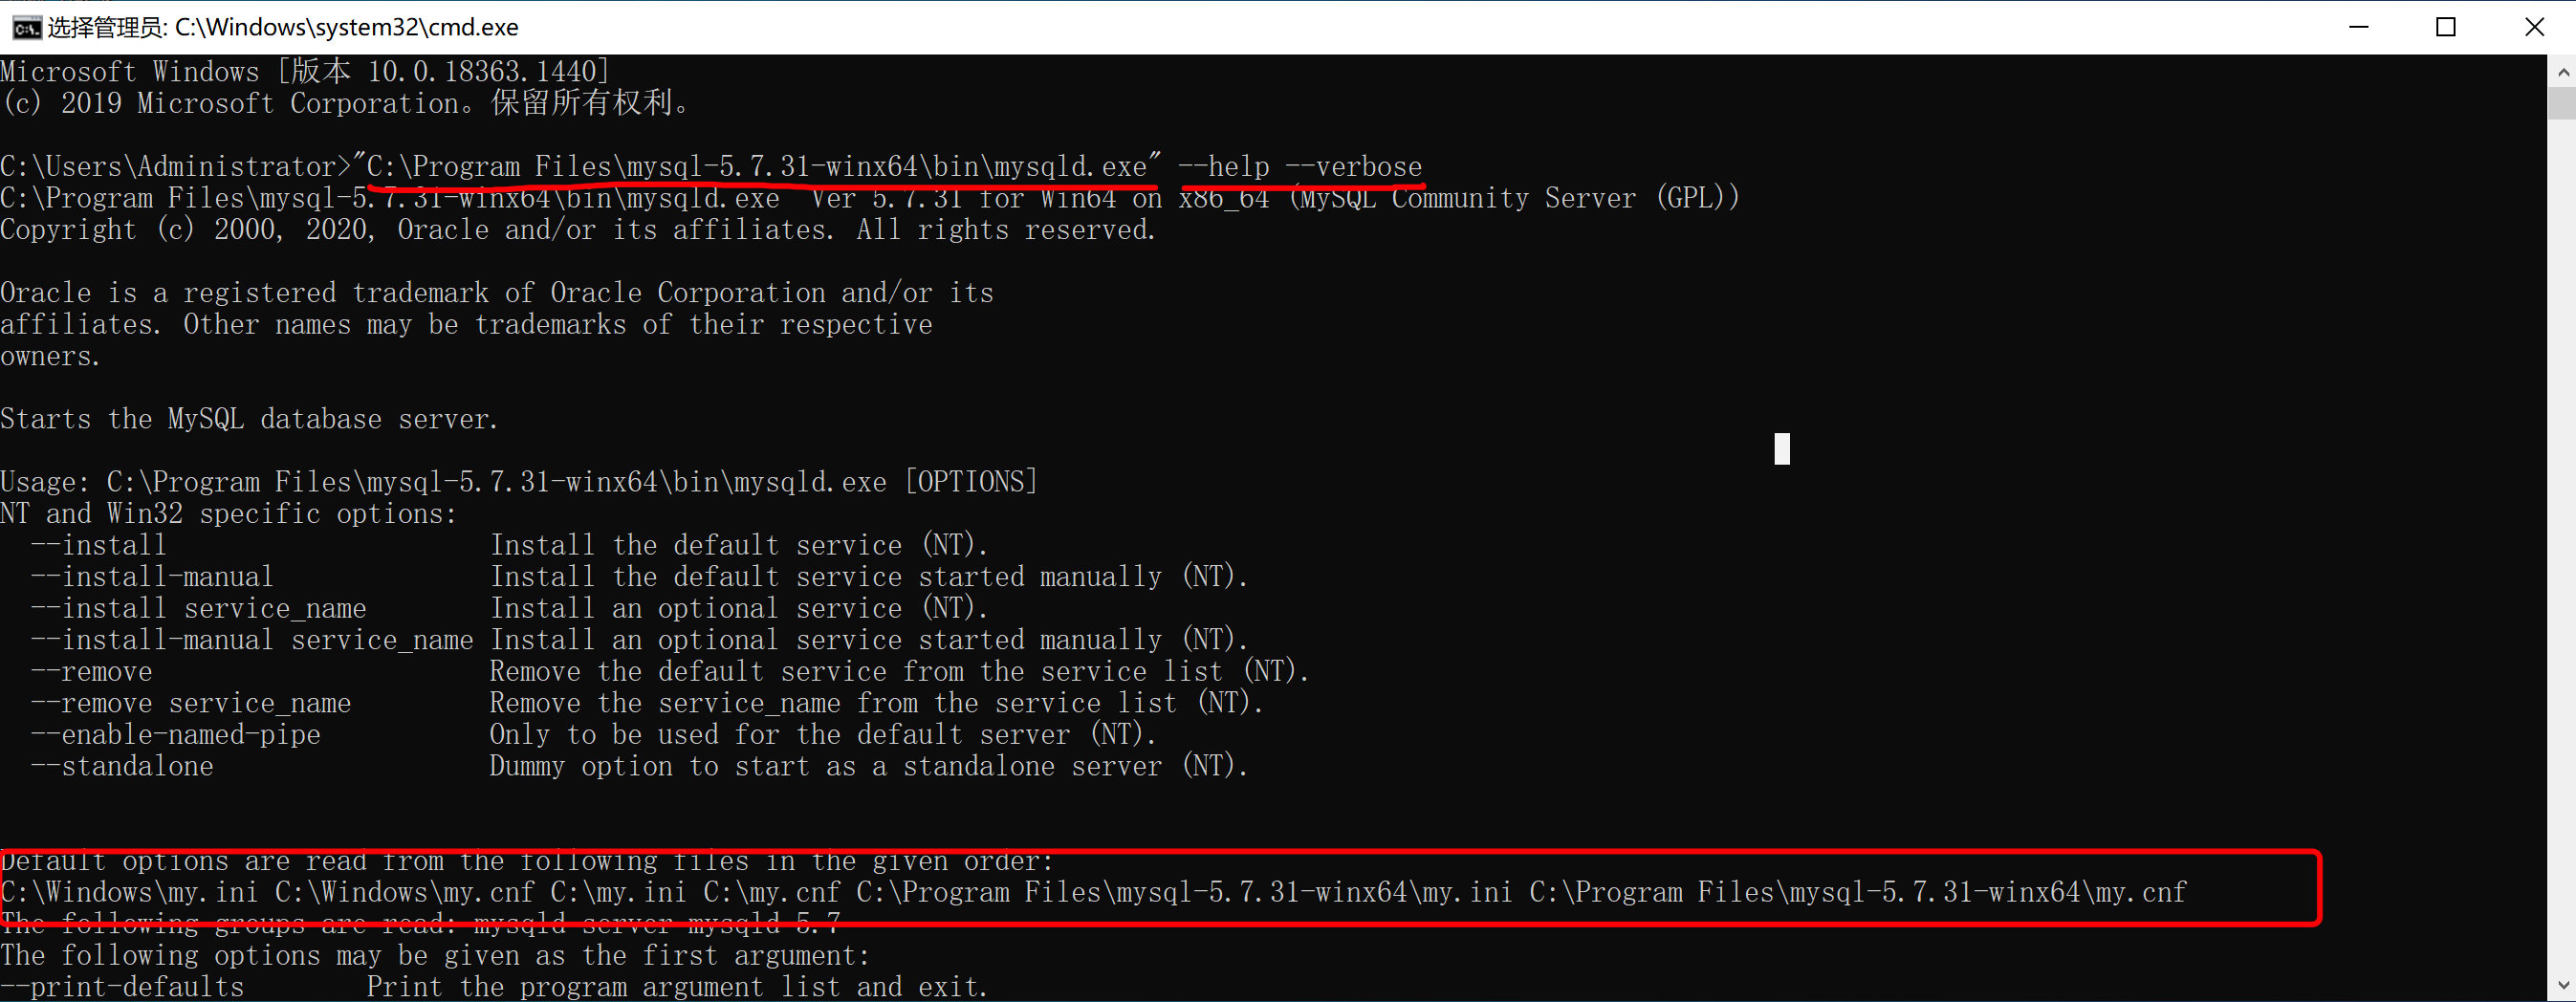
其实,MySQL的配置文件可以放在很多的目录,下图是配置文件的优先级:
强烈,建议大家还是把配置文件放在MySQL安装目录下,这样以后电脑上想要安装多个版本的MySQL时,配置文件可以相互独立不影响。
注意:如果你电脑的上述其他目录存在MySQL配置文件,建议删除,否则可能会影响MySQL的启动。
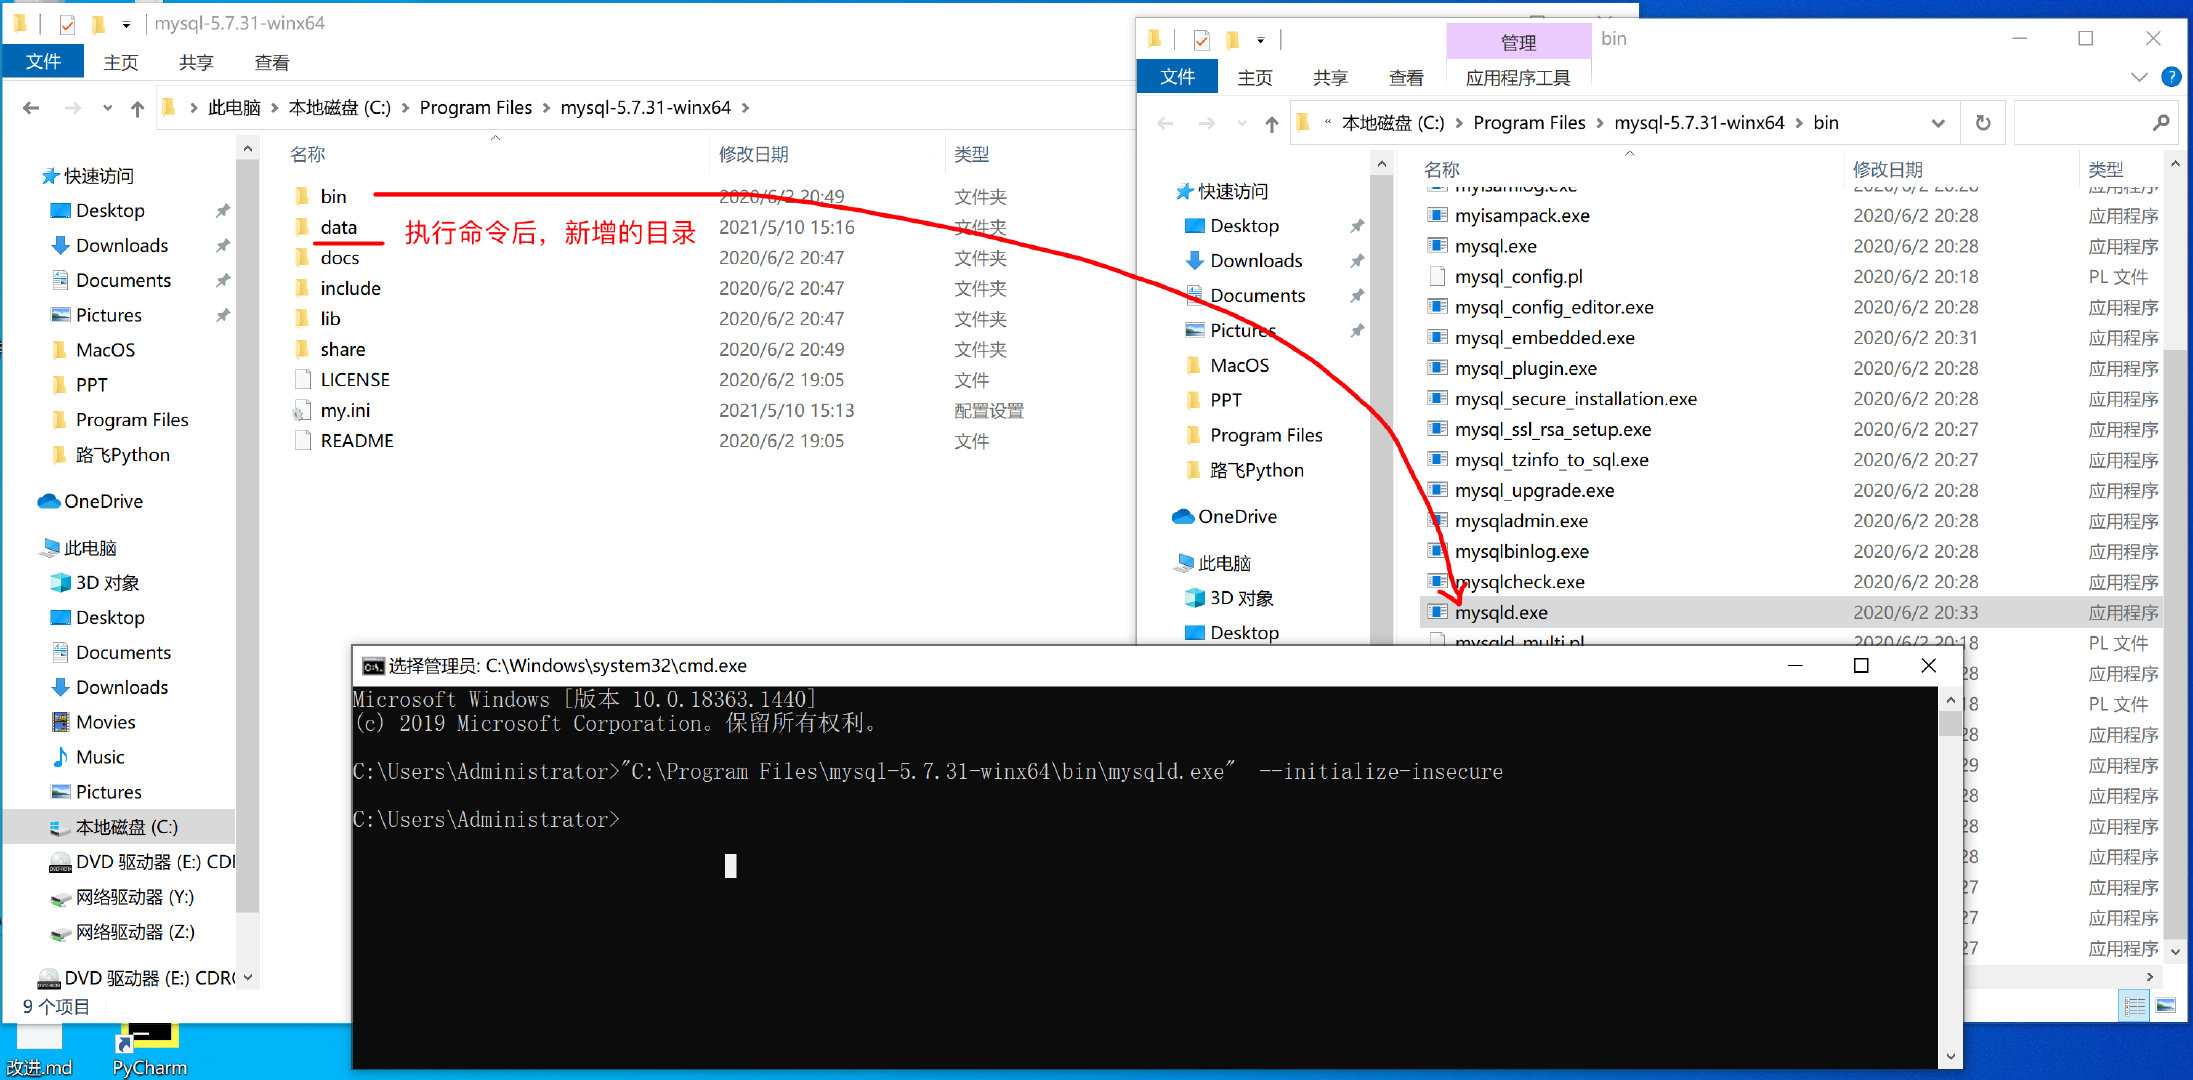
第4步:初始化
>>> "C:\Program Files\mysql-5.7.31-winx64\bin\mysqld.exe" --initialize-insecure
初始化命令在执行时,会自动读取配置文件并执行初始化,此过程主要会做两件事:
- 自动创建data目录,以后我们的数据都会存放在这个目录。
- 同时创建建必备一些的数据,例如默认账户 root (无密码),用于登录MySQL并通过指令操作MySQL。
在windowns安装过程中如果有报错 ( msvcr120.dll不存在 ),请下载并安装下面的两个补丁:
-
vcredist:https://www.microsoft.com/zh-cn/download/confirmation.aspx?id=40784 (主要)

-
dirctx:https://www.microsoft.com/zh-CN/download/details.aspx?id=35

第5步:启动
启动MySQL常见的有两种方式:
-
临时启动
>>> "C:\Program Files\mysql-5.7.31-winx64\bin\mysqld.exe"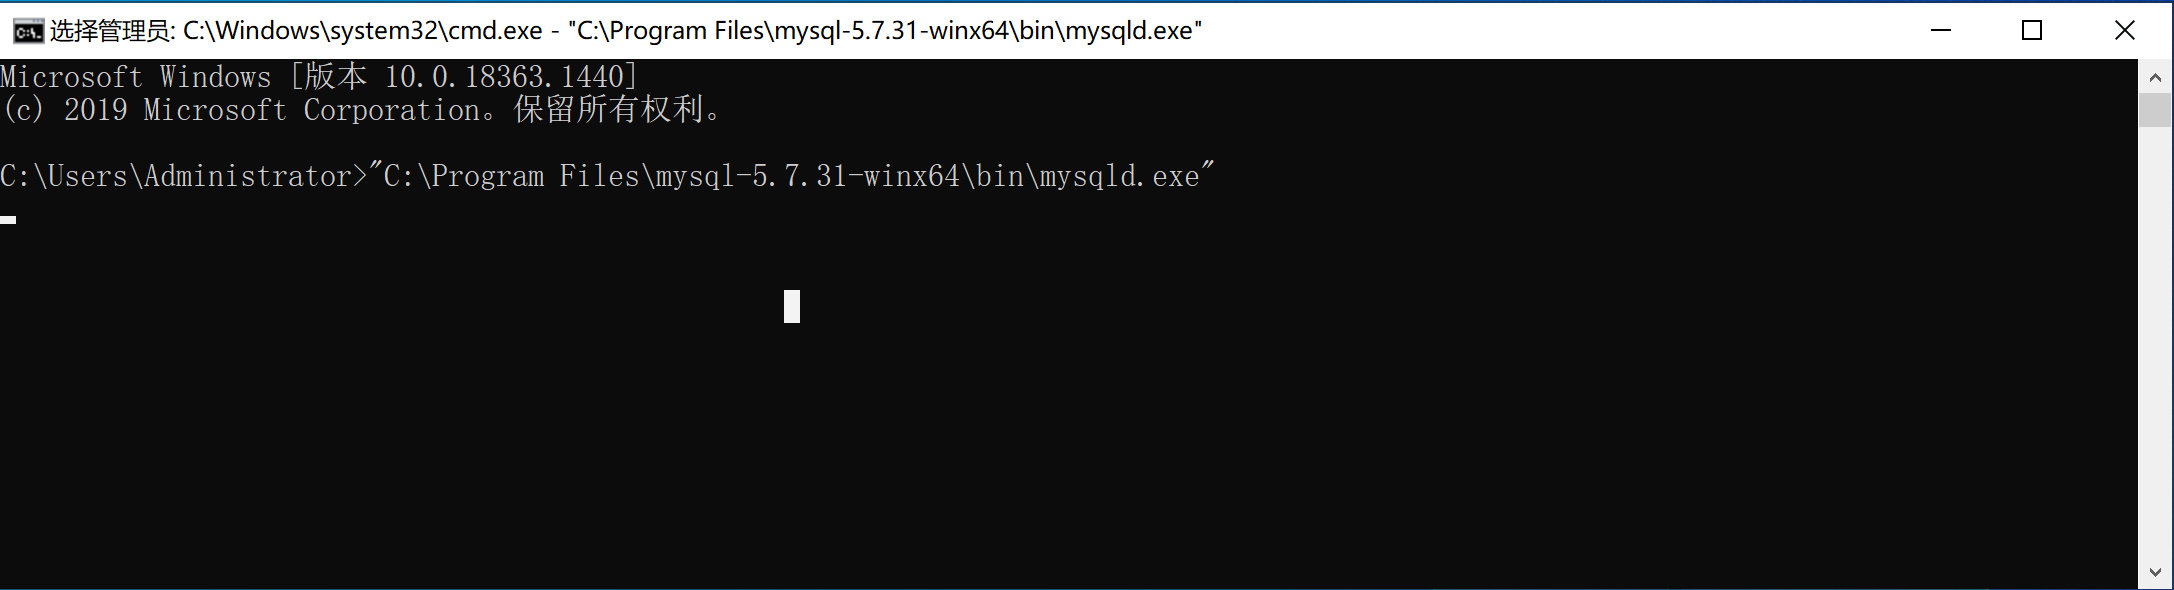
注意:此时程序会挂起,内部就是可以接收客户端发来的MySQL指令,关闭窗口或Ctrl+c 就可以停止运行。
这种启动方式每次开机或想要开启都需要手动执行一遍命令比较麻烦。
-
制作windows服务,基于windows服务管理。
>>>"C:\Program Files\mysql-5.7.31-winx64\bin\mysqld.exe" --install mysql57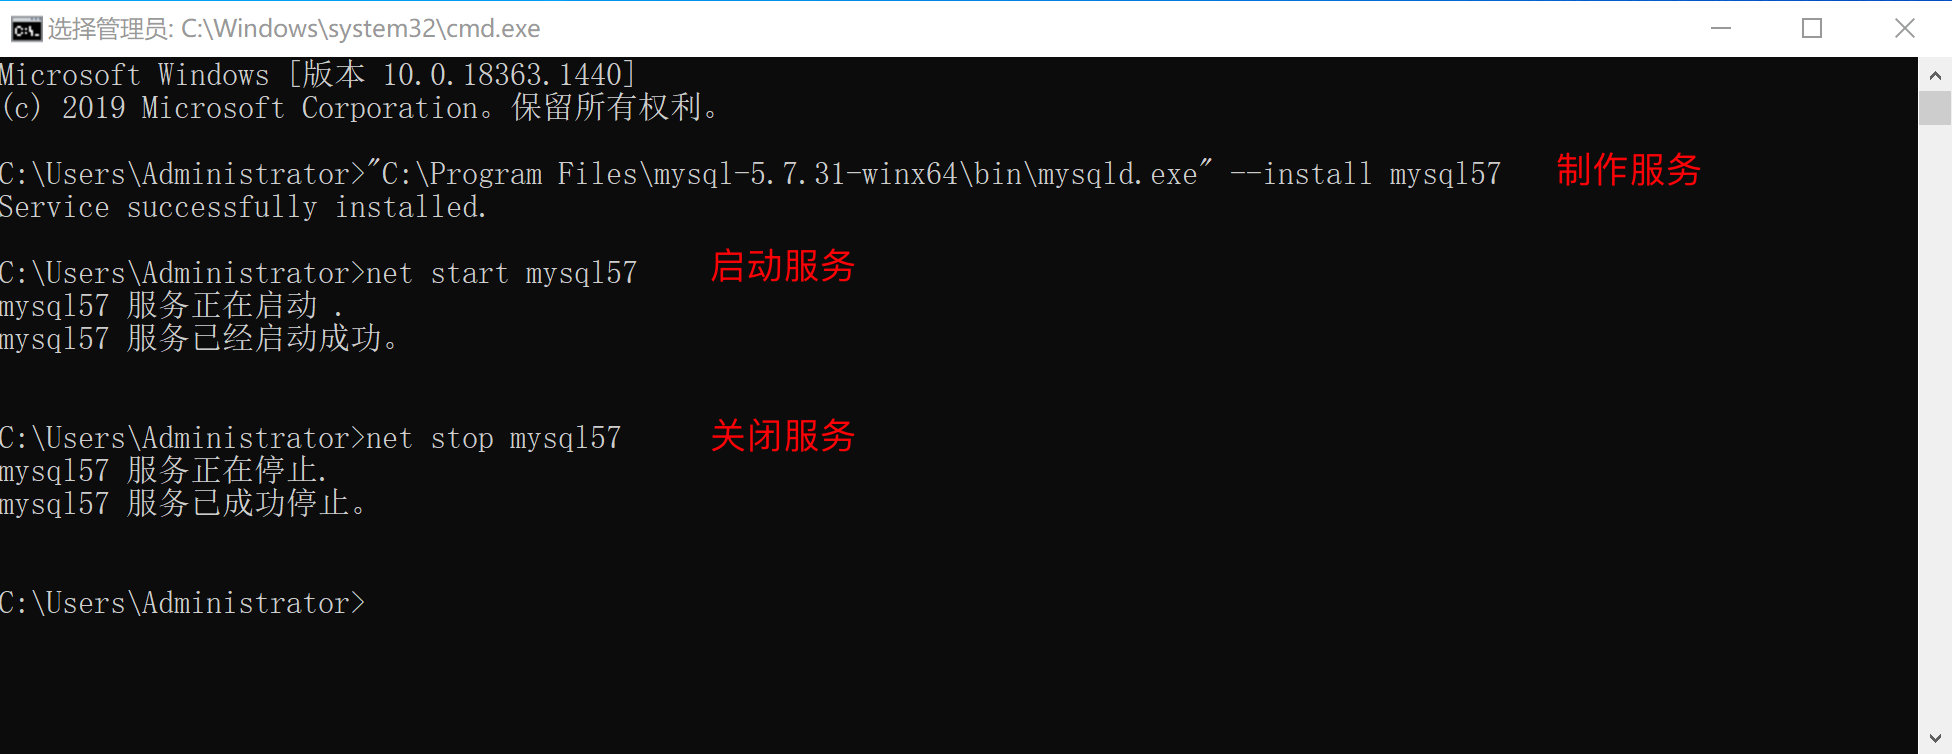
创建好服务之后,可以通过命令 启动和关闭服务,例如:
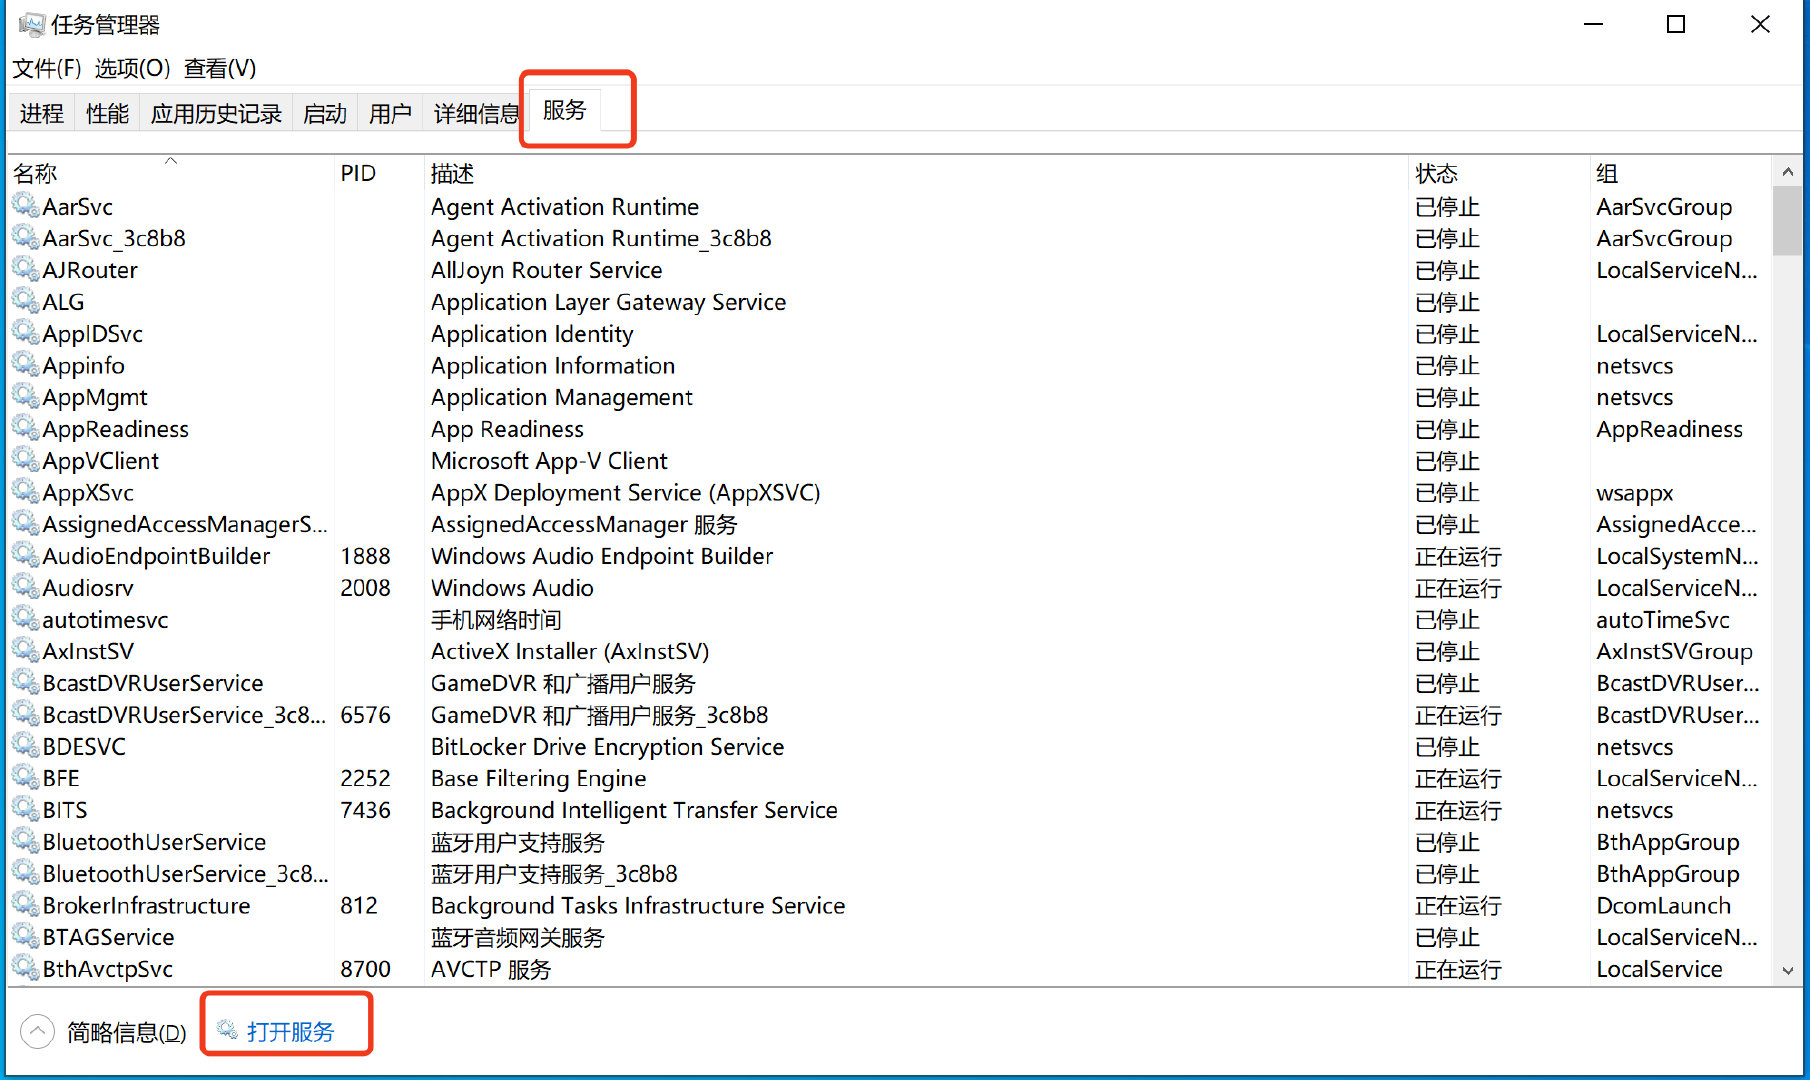
>>> net start mysql57
>>> net stop mysql57
也可以在window的服务管理中点击按钮启动和关闭服务。例如:


以后不再想要使用window服务了,也可以将制作的这个MySQL服务删除。
>>>"C:\Program Files\mysql-5.7.31-winx64\bin\mysqld.exe" --remove mysql57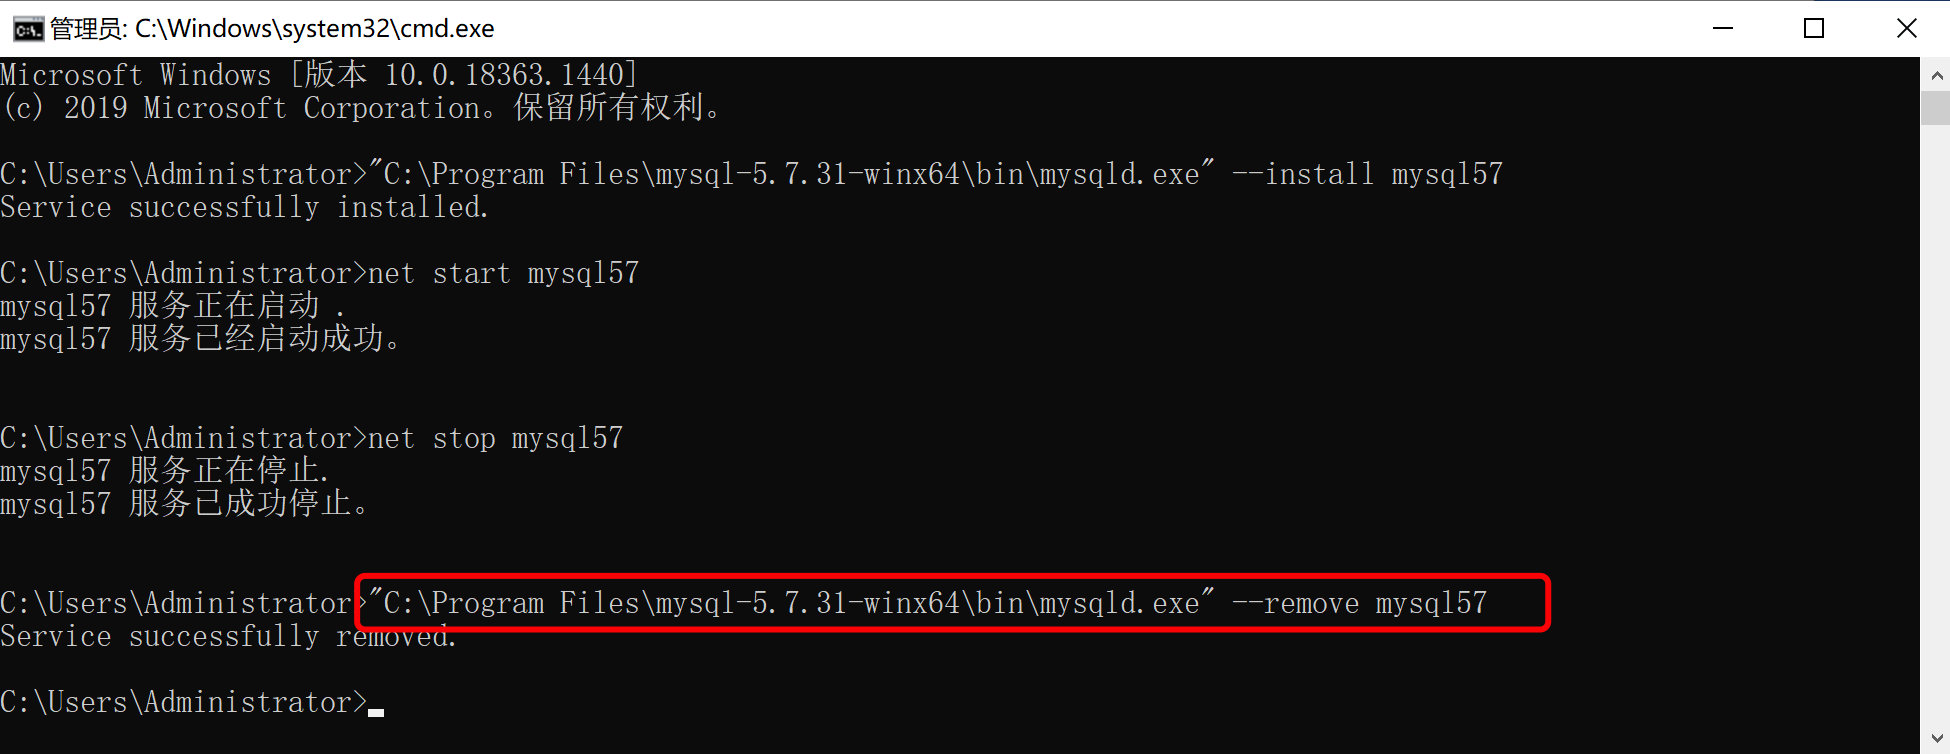
第6步:测试连接MySQL
安装并启动MySQL之后,就可以连接MySQL来测试是否已正确安装并启动成功。

以后在开发时,肯定是要用Python代码来连接MySQL并且进行数据操作(后面讲)。
在安装MySQL时,其实也自动安装了一个工具(客户端),让我们快速实现连接MySQL并发送指令。
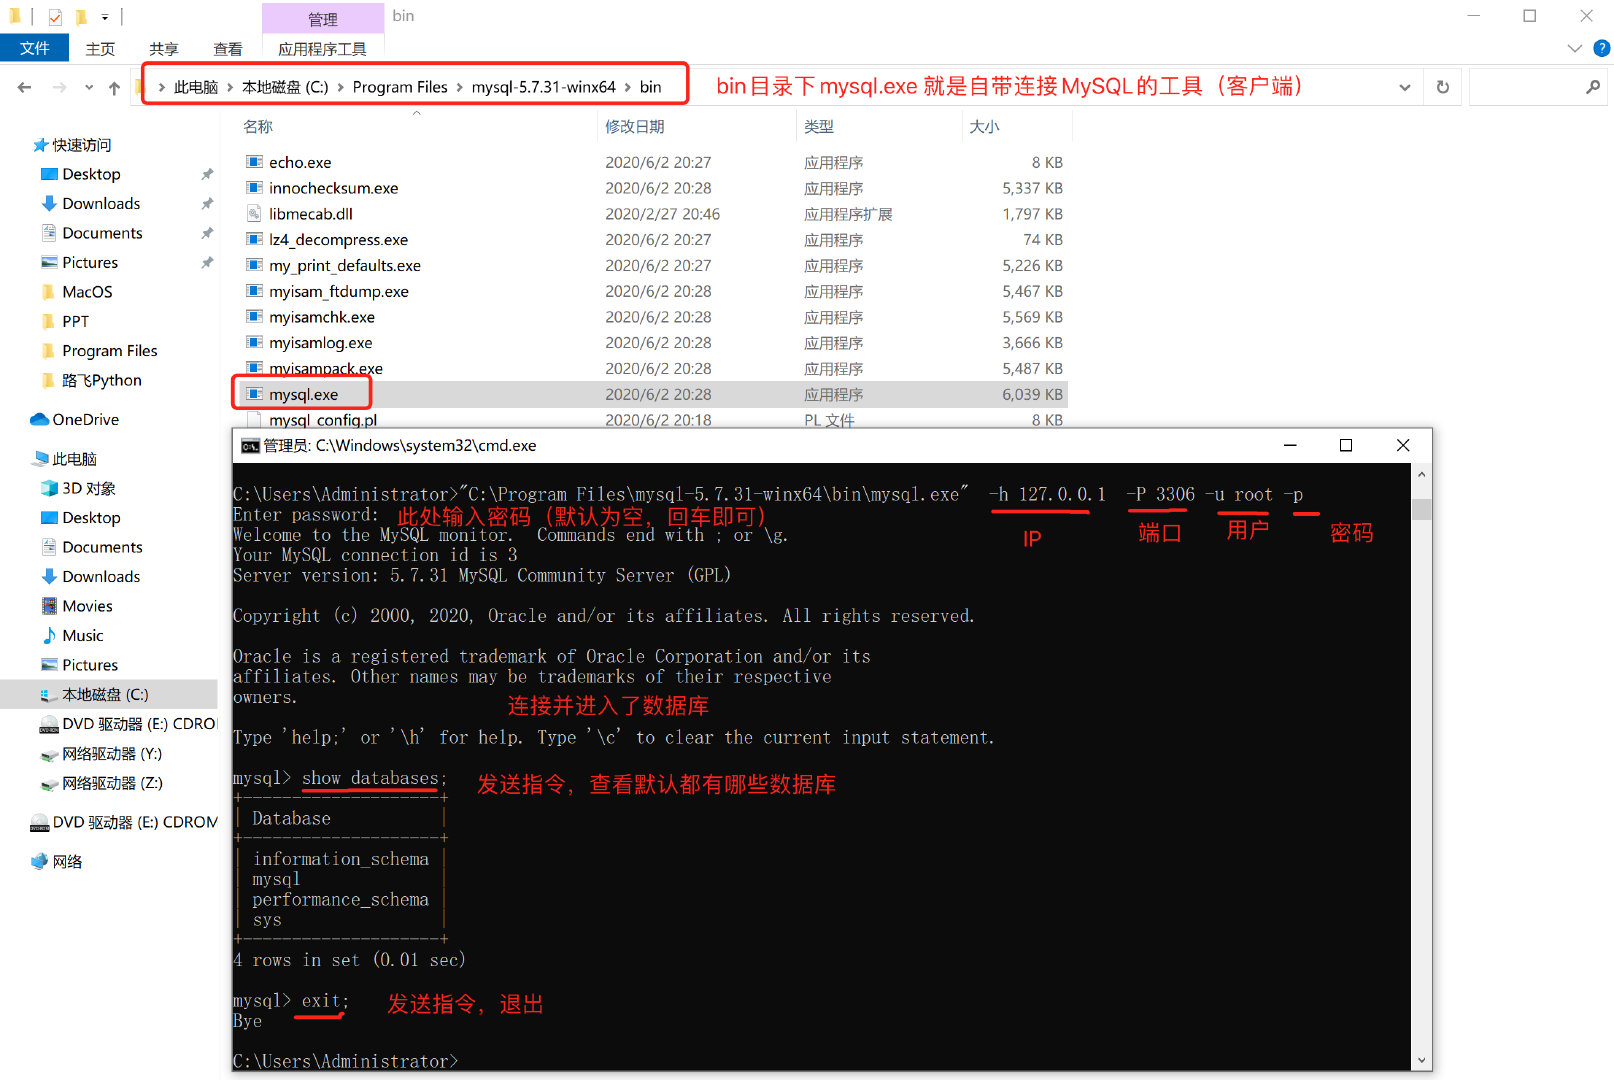
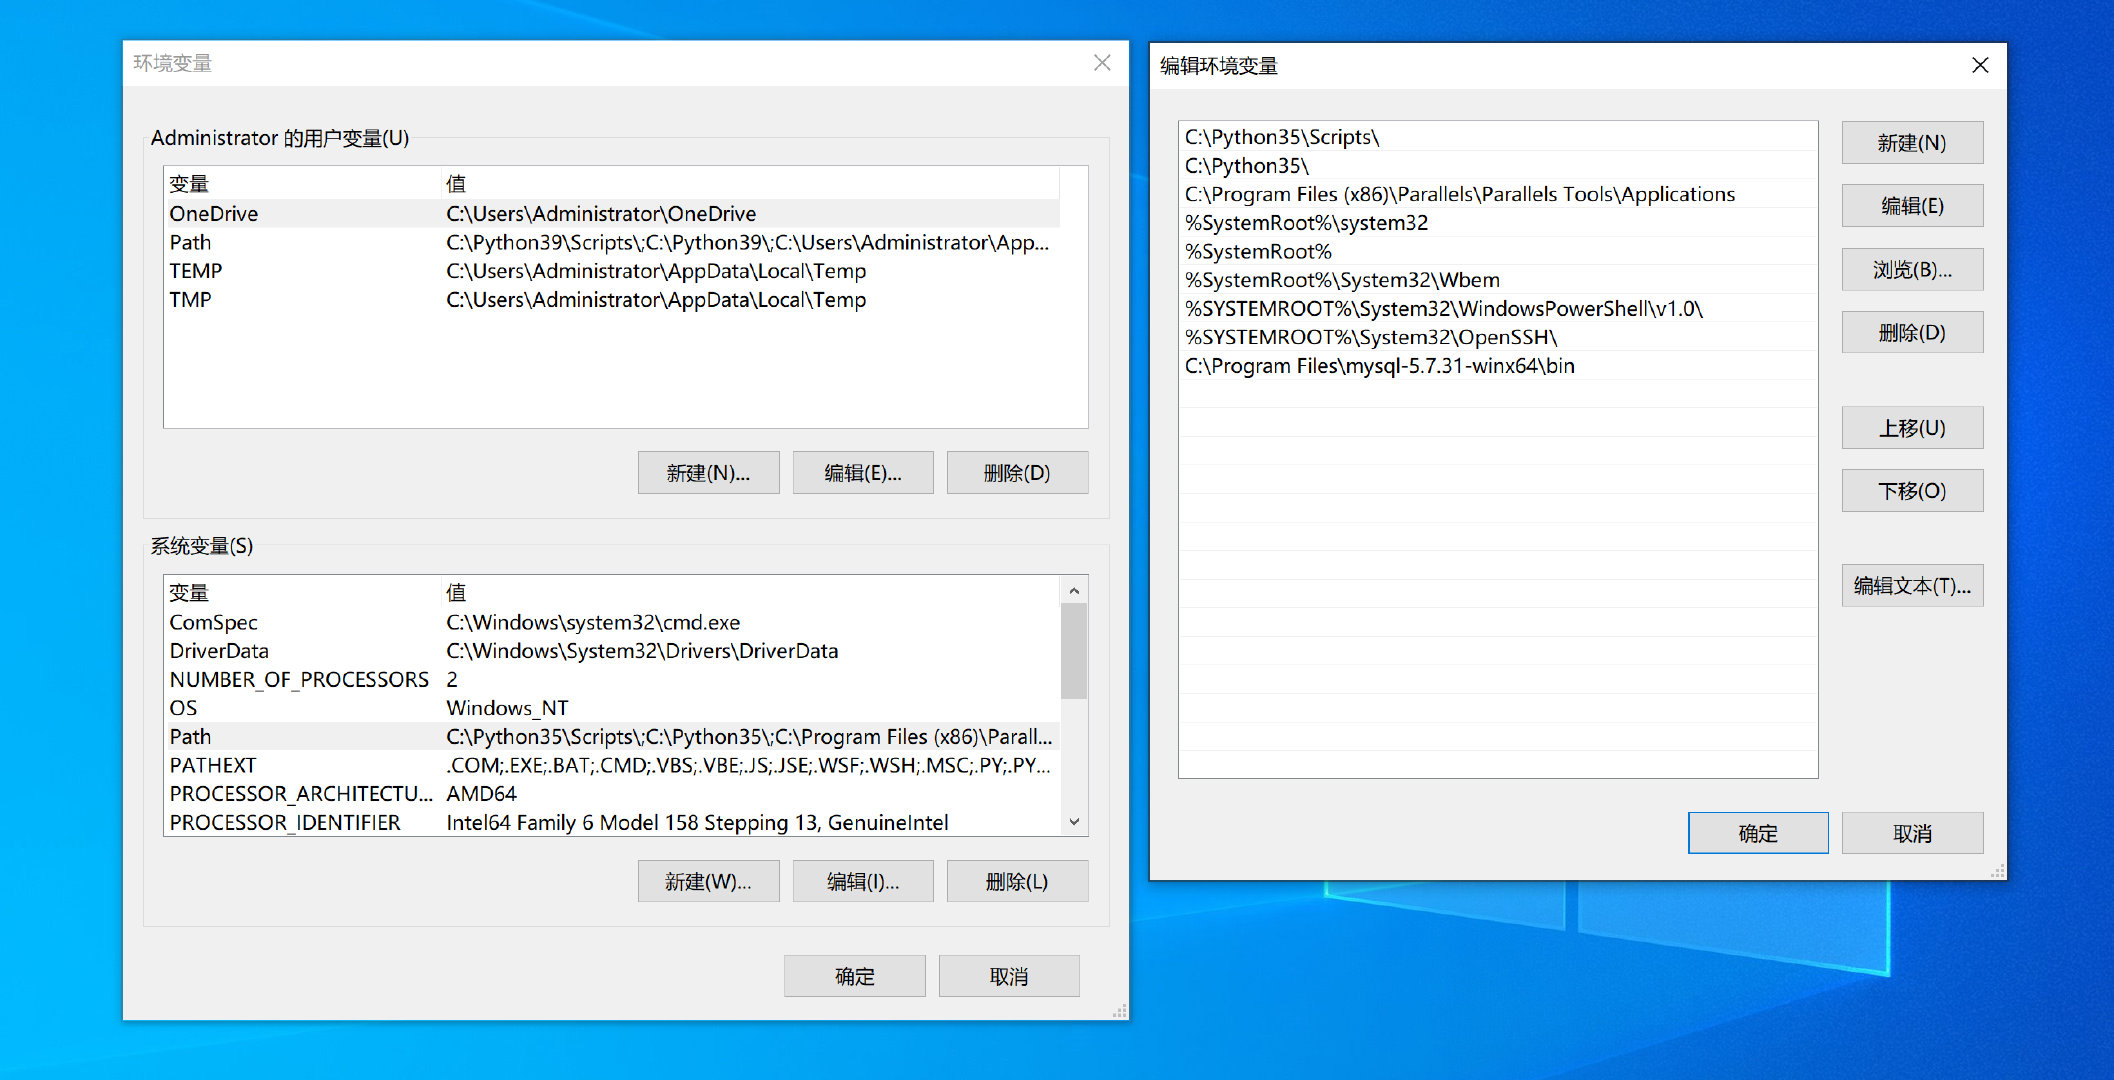
注意:如果把bin目录加入环境变量,每次在运行命令时,就不用再重新输入绝对路径了。
上述过程如果操作完成之后,证明你的安装和启动过程就搞定了。
1.2 mac系统
mac系统和win不同,MySQL为他提供了非常方便的一站式安装程序,只要点击、next就可以安装、初始化完成。
第1步:安装和初始化
https://downloads.mysql.com/archives/community/


这个基于dmg文件的安装过程,其实包含了:
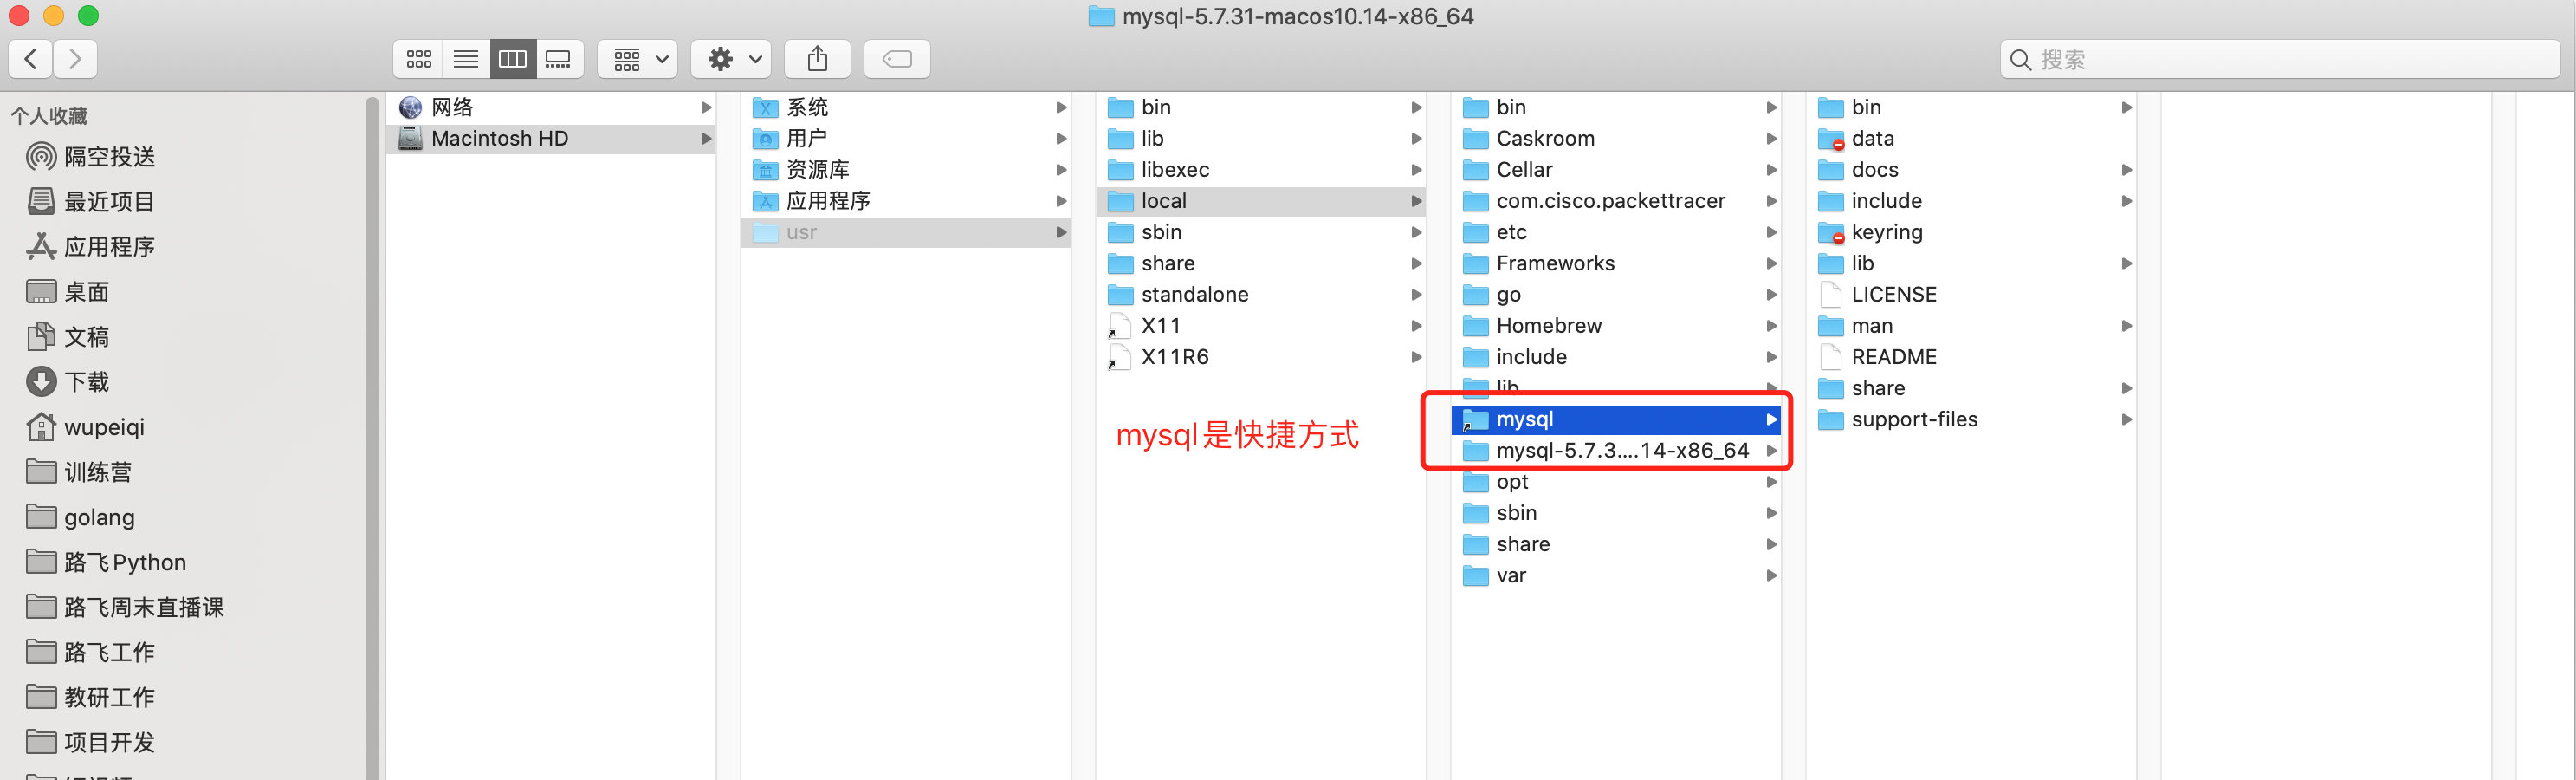
- 安装,默认安装在了
/usr/local/mysql-5.7.31-macos10.14-x86_64/目录。 - 初始化,在安装目录下创建data目录用于存放数据; 初始化模块数据库以及账户相关等,例如: 账cd
第2步:创建配置文件
建议在MySQL安装目录下创建 etc/my.cnf 作为MySQL的配置文件。
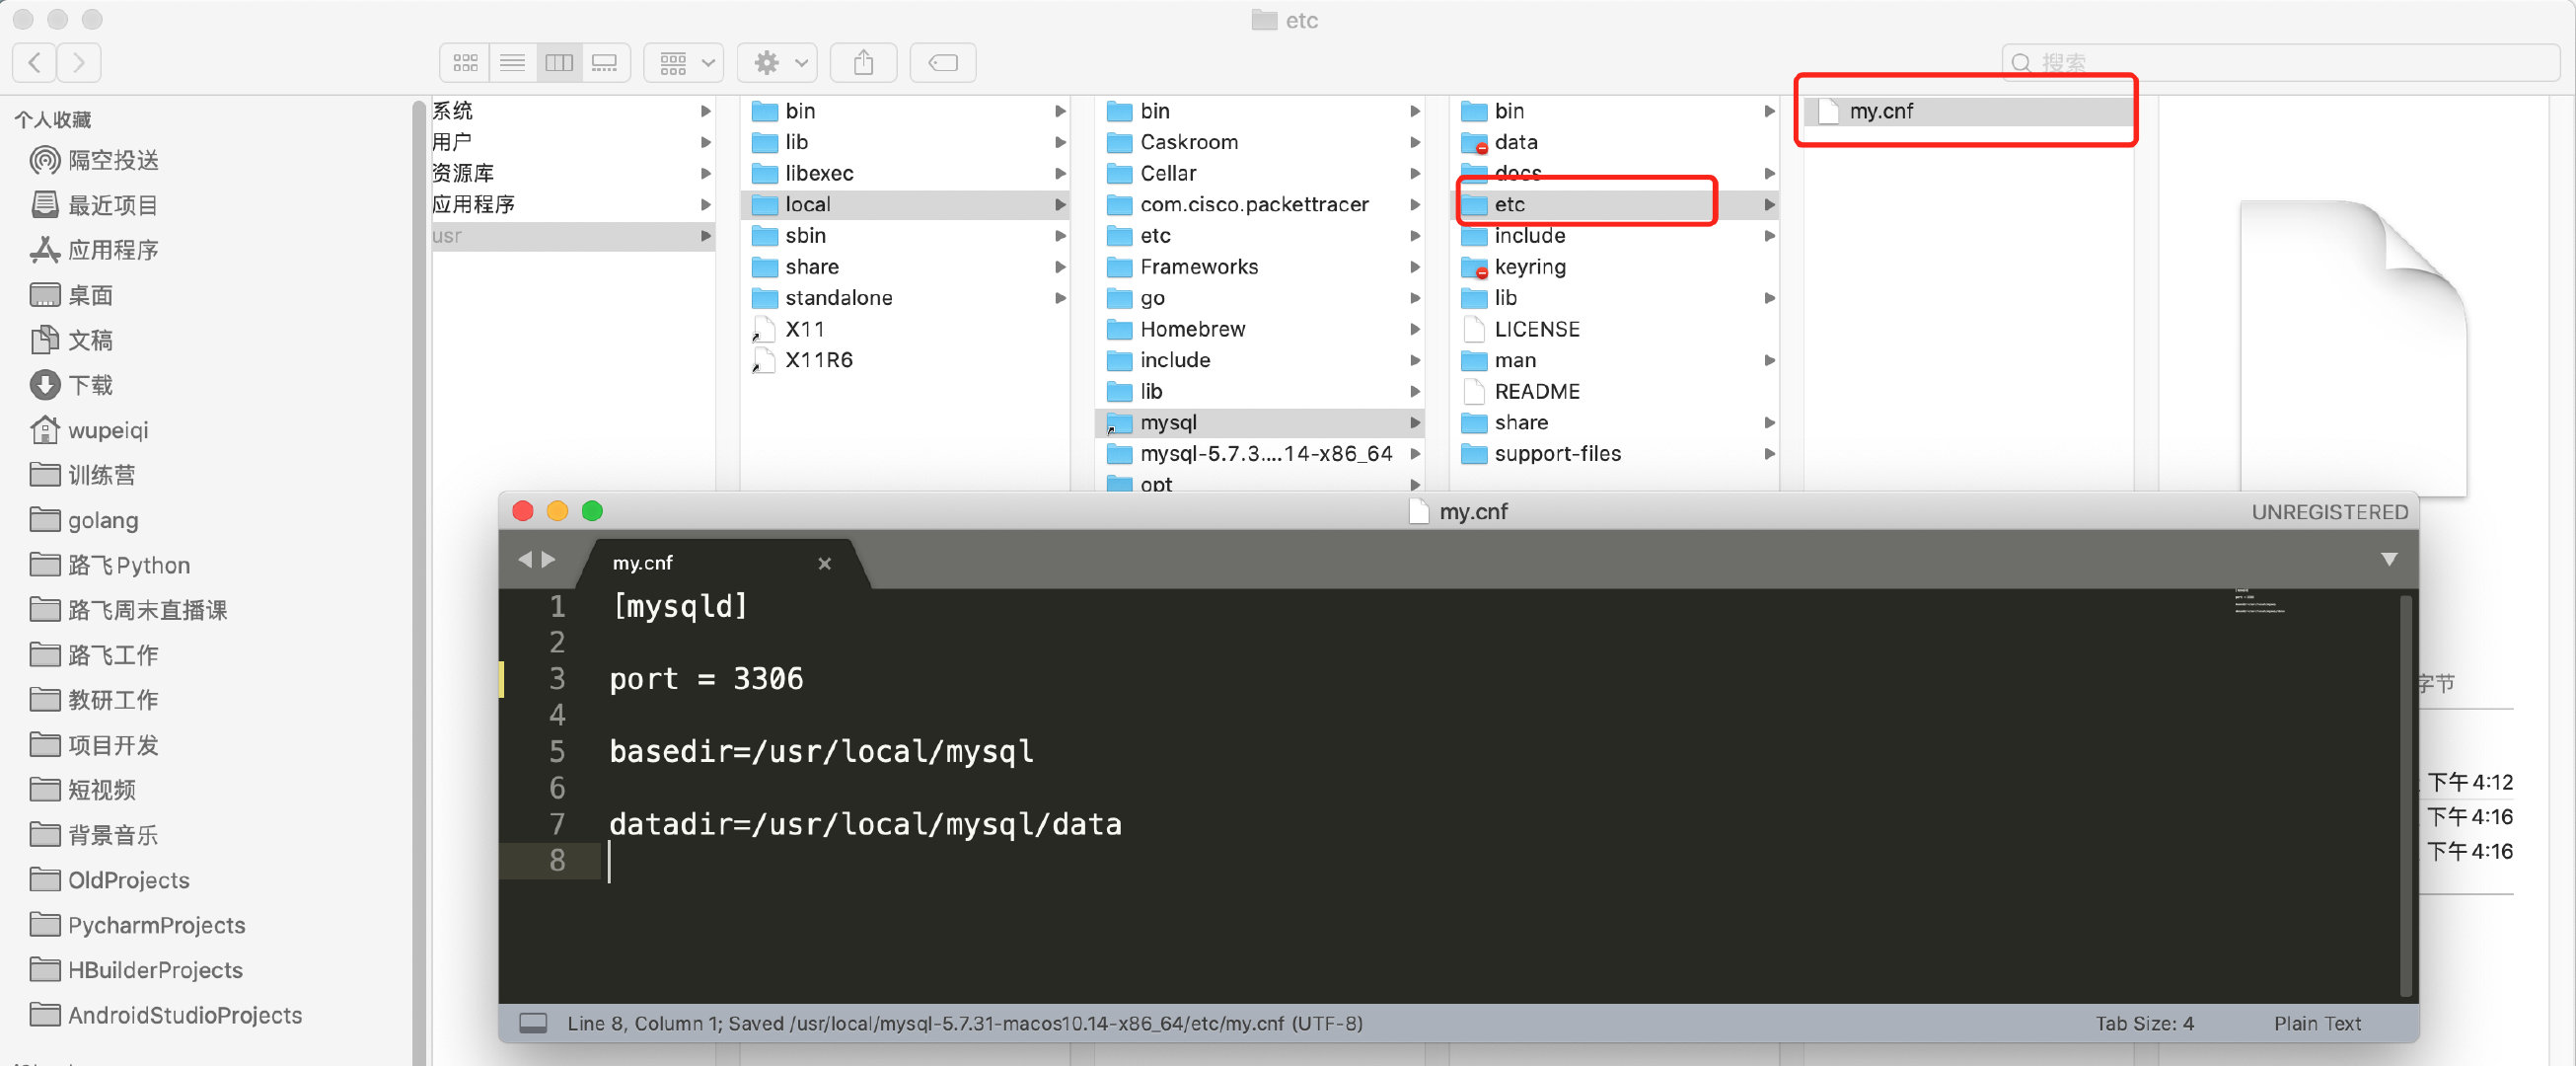
MySQL的配置文件按照优先级,会在以下目录中寻找:

为了避免多个版本共存时,配置文件混乱的问题,建议大家还是把配置文件放在当前MySQL的安装目录下。
第3步:启动
在Mac系统中启动MySQL常见的有2种方式:
-
安装目录中自带
mysql.server脚本(建议)sudo /usr/local/mysql/support-files/mysql.server start # 输入电脑密码 sudo mysql.server start # 输入电脑密码sudo /usr/local/mysql/support-files/mysql.server stop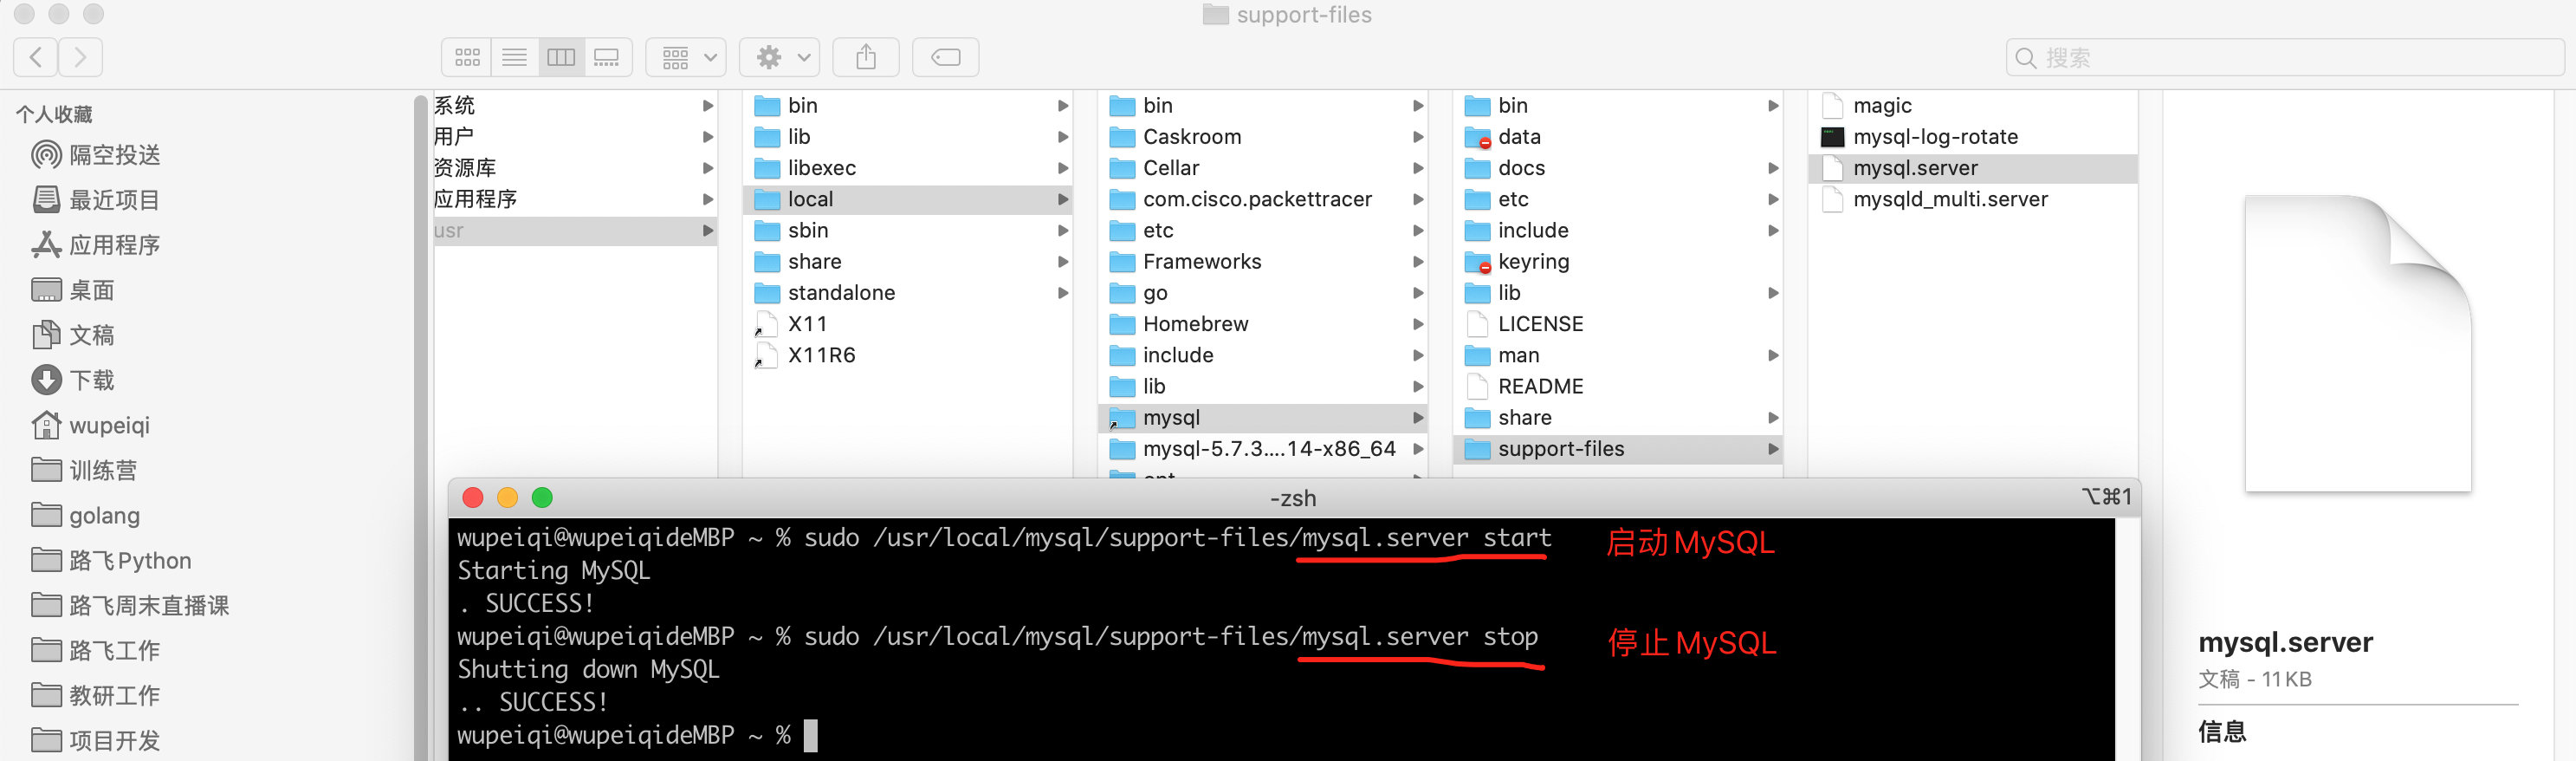
为了避免每次执行命令都需要些路径,可以将路径
/usr/local/mysql/support-files加入到环境变量中。
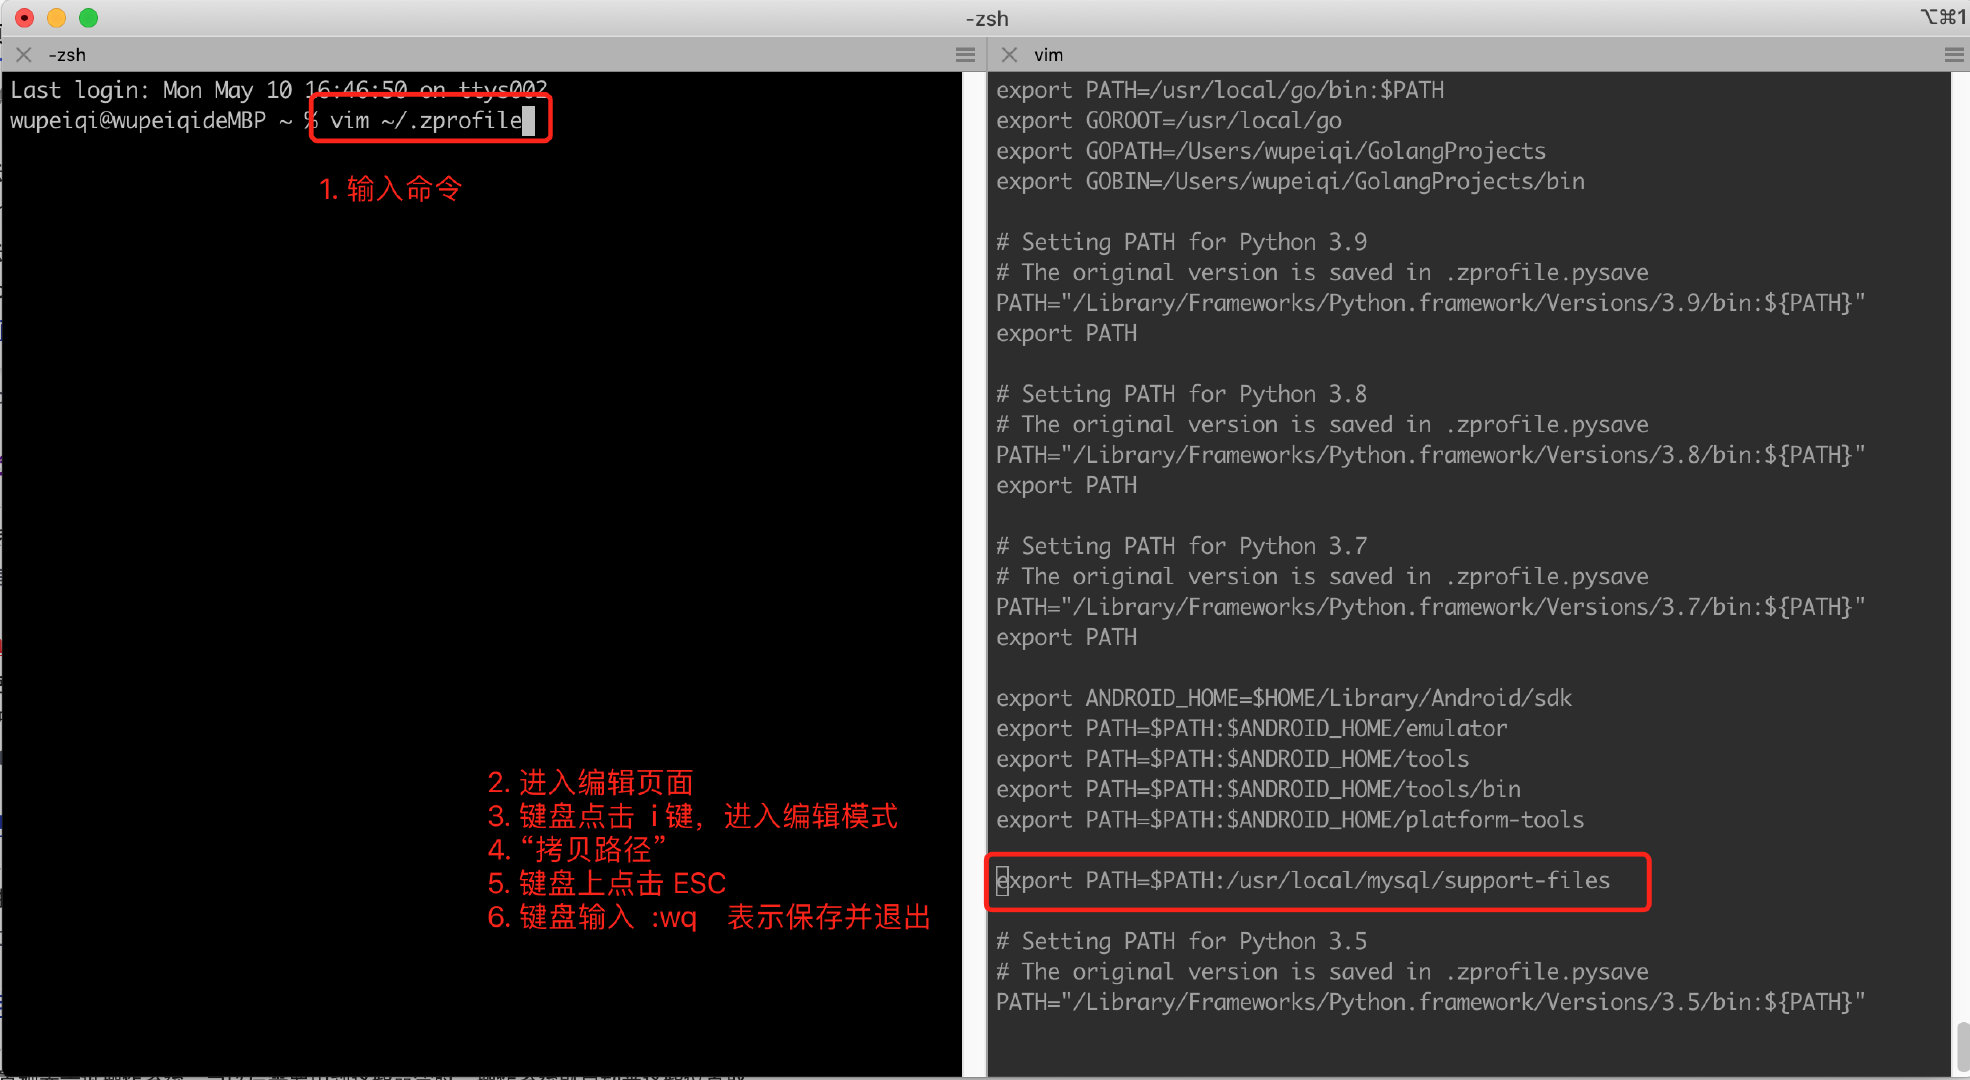
操作完成之后,再在终端执行下命令:source ~/.zprofile 让设置的环境变量立即生效。
注意:mac系统的版本如果比较老,会显示空白的 zprofile 文件,此就要去打开 bash_profile 文件。
这样设置好之后,以后就可以使用下面的命令去启动和关闭MySQL了。
sudo mysql.server start
sudo mysql.server stop
- 系统偏好设置(不推荐)

第一种mysql.server脚本的形式,内部是使用 mysqld_safe运行,可以守护我们的MySQL进程,如意外挂掉可自动重启。
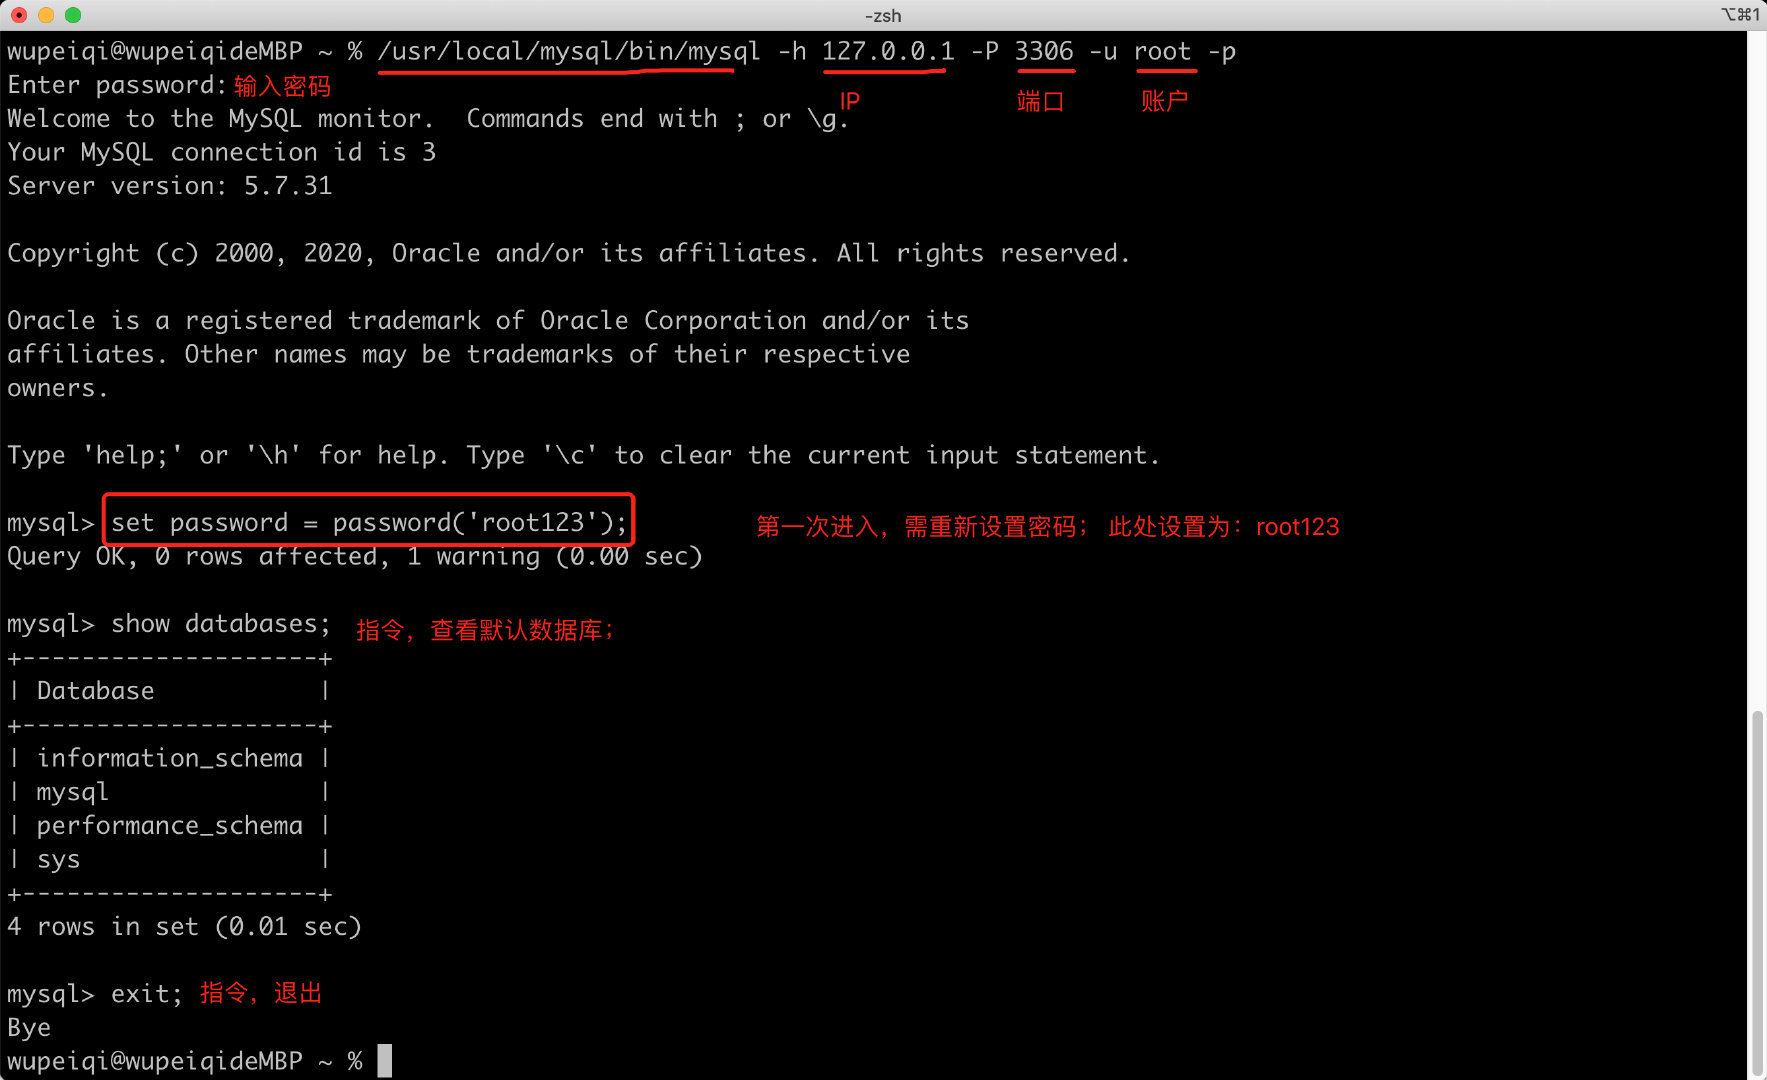
第4步:测试连接MySQL
安装并启动MySQL之后,就可以连接MySQL来测试是否已正确安装并启动成功。
[外链图片转存失败,源站可能有防盗链机制,建议将图片保存下来直接上传(img-LVxXHSug-1648216045232)(/Users/daihao/Documents/第四模块MySQL数据库.assets/image-20210510153336093.png)]
以后在开发时,肯定是要用Python代码来连接MySQL并且进行数据操作(后面讲)。
在安装MySQL时,其实也自动安装了一个工具(客户端),让我们快速实现连接MySQL并发送指令。
[外链图片转存失败,源站可能有防盗链机制,建议将图片保存下来直接上传(img-XPamLbyb-1648216045232)(/Users/daihao/Documents/第四模块MySQL数据库.assets/image-20210510171029083.png)]
注意:/usr/local/mysql/bin也可以加入到环境变量。
至此,在Mac系统中关于MySQL的安装和配置就完成了。
1.3 关于配置文件
上述的过程中,我们在配置文件中只添加了很少的配置。
其实,配置项有很多,而哪些配置项都有默认值,如果我们不配置,MySQL则自动使用默认值。
1.4 关于密码
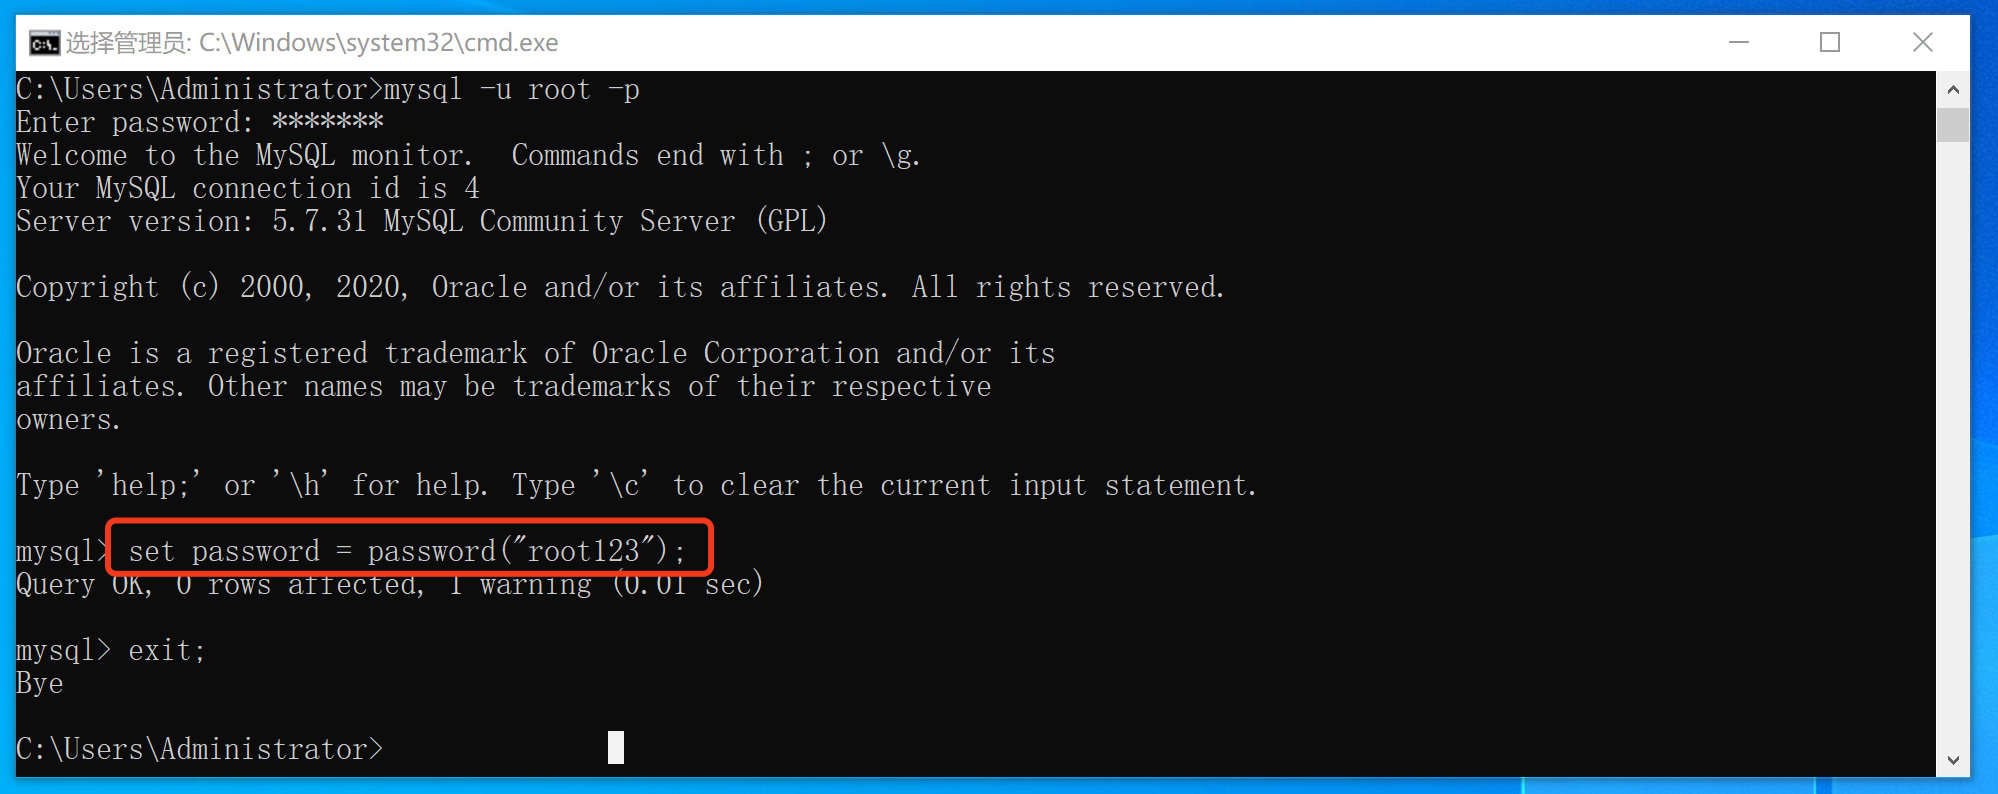
1. 设置和修改root密码
在windows系统中模块默认 root 账户是没有密码的,如果想要为账户设定密码,可以在利用root账户登录成功之后,执行:
2. 忘记root密码
如果你忘记了MySQL账户的密码。
-
修改配置文件,在 [mysqld] 节点下添加
skip-grant-tables=1[mysqld] ... skip-grant-tables=1 ... -
重启MySQL,再次登录时,不需要密码直接可以进去了
-
windows重启
net stop mysql57 net start mysql57 -
mac重启
sudo mysql.server restart
重启后,无序密码就可以进入。
>>> mysql -u root -p -
-
进入数据库后执行修改密码命令
use mysql; update user set authentication_string = password('新密码'),password_last_changed=now() where user='root'; -
退出并再次修改配置文件,删除 [mysqld] 节点下的
skip-grant-tables=1[mysqld] ... # skip-grant-tables=1 ... -
再次重启,以后就可以使用新密码登录了。
2. 数据库 管理
安装上数据库之后,就需要开始学习指令了,通过指令让MySQL去做出一些文件操作。
如果将数据库管理系统与之前的文件管理做类比的话:
| 数据库管理系统 | 文件管理 |
|---|---|
| 数据库 | 文件夹 |
| 数据表 | 文件夹下的excel文件 |
接下来,我们先学习 数据库(文件夹)相关操作的指令。
2.1 内置客户端操作
当连接上MySQL之后,执行如下指令(一般称为SQL语句),就可以对MySQL的数据进行操作。
-
查看当前所有的数据库:
show databases; -
创建数据库:
create database 数据库名 DEFAULT CHARSET utf8 COLLATE utf8_general_ci;create database day25db; create database day25db DEFAULT CHARSET utf8 COLLATE utf8_general_ci; -
删除数据库:
drop database 数据库名; -
进入数据(进入文件):
use 数据库;
示例:
# 1.登录MySQL
wupeiqi@wupeiqideMBP ~ % /usr/local/mysql/bin/mysql -u root -p
Enter password:
Welcome to the MySQL monitor.  Commands end with ; or \g.
Your MySQL connection id is 5
Server version: 5.7.31 MySQL Community Server (GPL)

Copyright (c) 2000, 2020, Oracle and/or its affiliates. All rights reserved.

Oracle is a registered trademark of Oracle Corporation and/or its
affiliates. Other names may be trademarks of their respective
owners.

Type 'help;' or '\h' for help. Type '\c' to clear the current input statement.

# 2.查看当前数据库
mysql> show databases;
+--------------------+
| Database           |
+--------------------+
| information_schema |
| mysql              |
| performance_schema |
| sys                |
+--------------------+
4 rows in set (0.00 sec)

# 3. 创建数据库:  create database 数据库名 default charset 编码 collate 排序规则;
mysql> create database db1 default charset utf8 collate utf8_general_ci;
Query OK, 1 row affected (0.00 sec)

mysql> show databases;
+--------------------+
| Database           |
+--------------------+
| information_schema |
| db1                |
| mysql              |
| performance_schema |
| sys                |
+--------------------+
5 rows in set (0.01 sec)

# 4. 删除数据库
mysql> drop database db1;
Query OK, 0 rows affected (0.00 sec)

# 5. 查看当前数据库
mysql> show databases;
+--------------------+
| Database           |
+--------------------+
| information_schema |
| mysql              |
| performance_schema |
| sys                |
+--------------------+
4 rows in set (0.00 sec)

# 6. 进入数据库
mysql> use mysql;
Reading table information for completion of table and column names
You can turn off this feature to get a quicker startup with -A

Database changed
# 7. 进入mysql数据库(文件夹),查看此数据库下的所有表。
mysql> show tables;
+---------------------------+
| Tables_in_mysql           |
+---------------------------+
| columns_priv              |
| db                        |
| engine_cost               |
| event                     |
| func                      |
| general_log               |
| gtid_executed             |
| help_category             |
| help_keyword              |
| help_relation             |
| help_topic                |
| innodb_index_stats        |
| innodb_table_stats        |
| ndb_binlog_index          |
| plugin                    |
| proc                      |
| procs_priv                |
| proxies_priv              |
| server_cost               |
| servers                   |
| slave_master_info         |
| slave_relay_log_info      |
| slave_worker_info         |
| slow_log                  |
| tables_priv               |
| time_zone                 |
| time_zone_leap_second     |
| time_zone_name            |
| time_zone_transition      |
| time_zone_transition_type |
| user                      |
+---------------------------+
31 rows in set (0.00 sec)

# 8. 退出
mysql>exit;
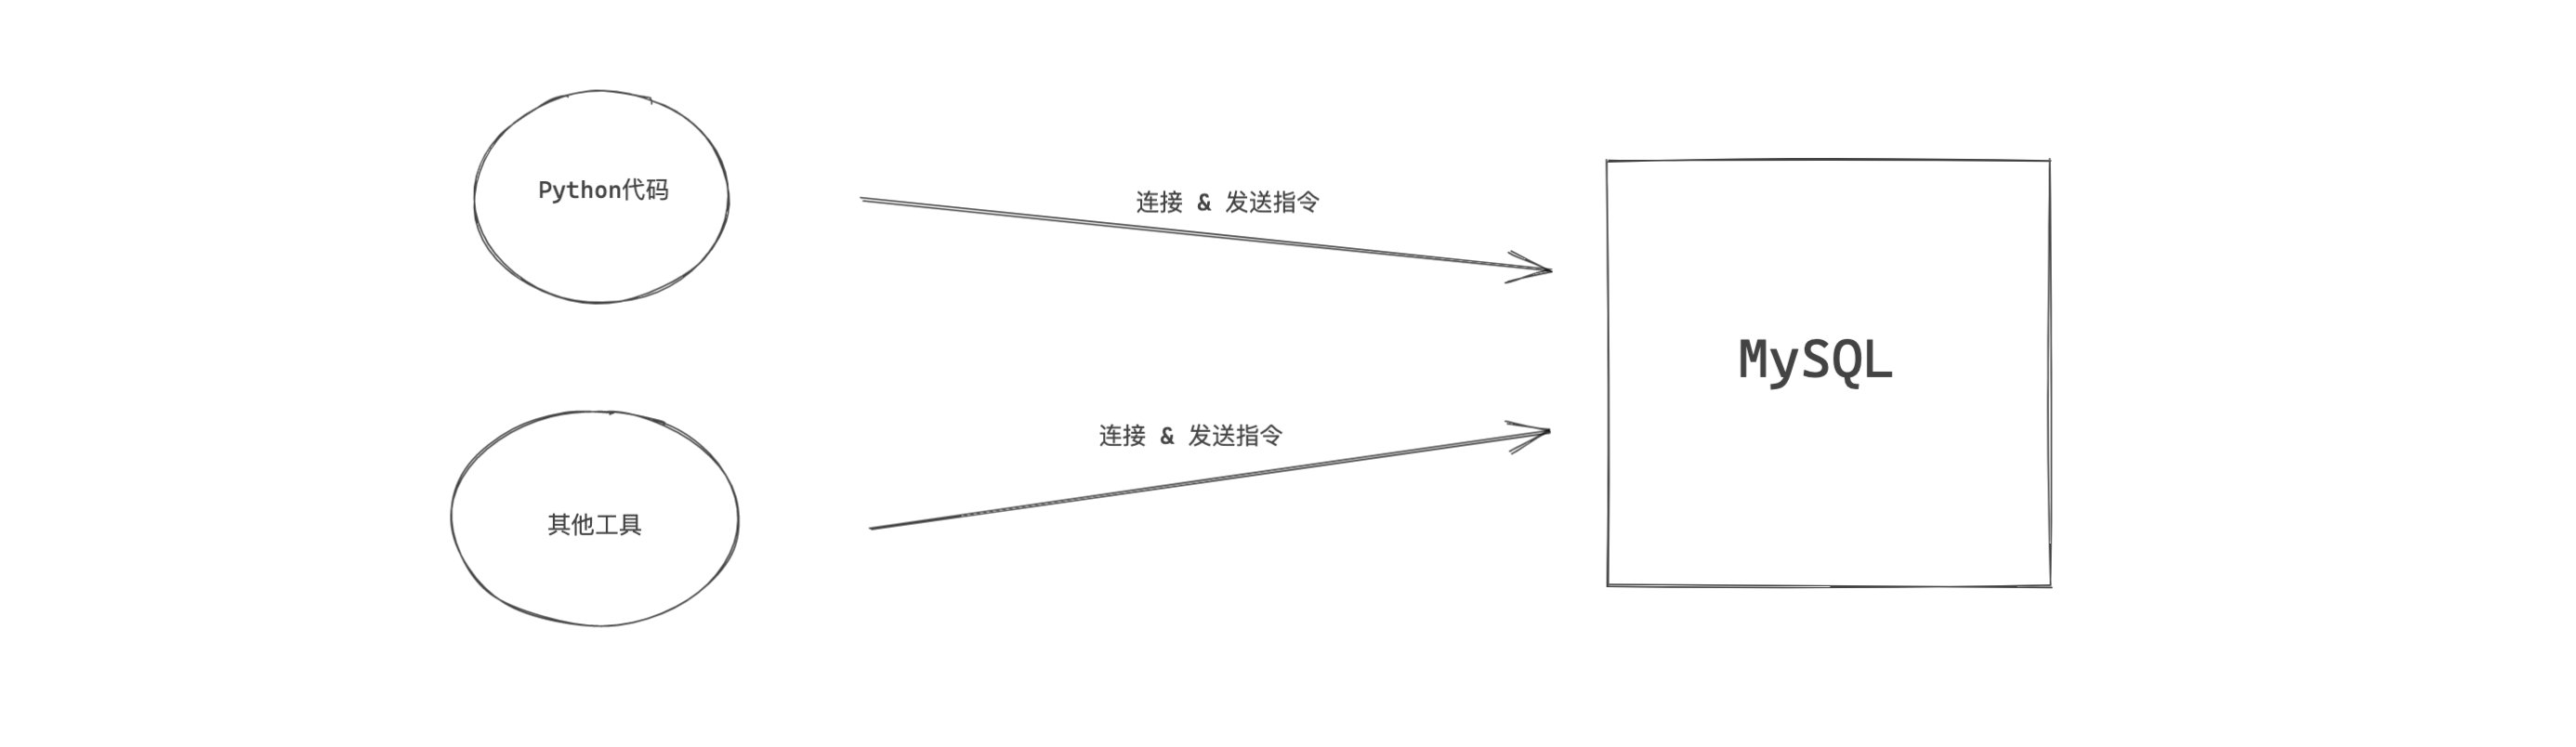
2.2 Python代码操作
无论通过何种方式去连接MySQL,本质上发送的 指令 都是相同的,只是连接的方式和操作形式不同而已。
当连接上MySQL之后,执行如下指令,就可以对MySQL的数据进行操作。(同上述过程)
- 查看当前所有的数据库
show databases; - 创建数据库:
create database 数据库名 default charset utf8 collate utf8_general_ci; - 删除数据库:
drop database 数据库名; - 进入数据(进入文件):
use 数据库;
想要使用Python操作MySQL需要安装第三方模块:
pip3 install pymysql

安装完成后,就可以编写代码:
import pymysql

# 连接MySQL(socket)
conn = pymysql.connect(host='127.0.0.1', port=3306, user='root', passwd='root123', charset="utf8")
# 游标
cursor = conn.cursor()

# 1. 查看数据库
# 发送指令
cursor.execute("show databases")
# 获取指令的结果
# .fetchall 接受返回值
result = cursor.fetchall()
print(result) # (('information_schema',), ('mysql',), ('performance_schema',), ('sys',))

# 2. 创建数据库(新增、删除、修改)
# 发送指令
cursor.execute("create database db3 default charset utf8 collate utf8_general_ci")
conn.commit()

# 3. 查看数据库
# 发送指令
cursor.execute("show databases")
# 获取指令的结果
result = cursor.fetchall()
print(result) # (('information_schema',), ('db3',), ('mysql',), ('performance_schema',), ('sys',))

# 4. 删除数据库
# 发送指令
cursor.execute("drop database db3")
conn.commit()

# 3. 查看数据库
# 发送指令
cursor.execute("show databases")
# 获取指令的结果
result = cursor.fetchall()
print(result) # (('information_schema',), ('mysql',), ('performance_schema',), ('sys',))

# 5. 进入数据库,查看表
# 发送指令
cursor.execute("use mysql")
cursor.execute("show tables")
result = cursor.fetchall()
print(result) # (('columns_priv',), ('db',), ('engine_cost',), ('event',), ('func',), ('general_log',),....

# 关闭连接
cursor.close()
conn.close()
3. 数据表 管理

如果将数据库管理系统与之前的文件管理做类比的话:
| 数据库管理系统 | 文件管理 |
|---|---|
| 数据库 | 文件夹 |
| 数据表 | 文件夹下的文件 |
接下来,我们先学习 数据表(文件夹中的文件)相关操作的指令。

其实在数据库中创建数据库 和 创建Excel非常类似,需要指定: 表名、列名称、类类型(整型、字符串或其他)。
3.1 内置客户端操作
数据表常见操作的指令:
-
进入数据库
use 数据库;,查看当前所有表:show tables; -
创建表结构

create table 表名(
    列名  类型,
    列名  类型,
    列名  类型
)default charset=utf8;
create table tb1( id int, name varchar(16) )default charset=utf8;create table tb2( id int, name varchar(16) not null, -- 不允许为空 email varchar(32) null, -- 允许为空(默认) age int )default charset=utf8;create table tb3( id int, name varchar(16) not null, -- 不允许为空 email varchar(32) null, -- 允许为空(默认) age int default 3 -- 插入数据时,如果不给age列设置值,默认值:3 )default charset=utf8;create table tb4( id int primary key, -- 主键(不允许为空、不能重复) name varchar(16) not null, -- 不允许为空 email varchar(32) null, -- 允许为空(默认) age int default 3 -- 插入数据时,如果不给age列设置值,默认值:3 )default charset=utf8;主键一般用于表示当前这条数据的ID编号(类似于人的身份证),需要我们自己来维护一个不重复的值,比较繁琐。所以,在数据库中一般会将主键和自增结合。
create table tb5(
	id int not null auto_increment primary key,	-- 不允许为空 & 主键 & 自增
    name varchar(16) not null,   		-- 不允许为空
    email varchar(32) null,      		-- 允许为空(默认)
    age int default 3            		-- 插入数据时,如果不给age列设置值,默认值:3
)default charset=utf8;
注意:一个表中只能有一个自增列【自增列,一般都是主键】。
-
删除表
drop table 表名; -
清空表
delete from 表名;或truncate table 表名;(速度快、无法回滚撤销等) -
修改表
-
添加列
alter table 表名 add 列名 类型; alter table 表名 add 列名 类型 DEFAULT 默认值; alter table 表名 add 列名 类型 not null default 默认值; alter table 表名 add 列名 类型 not null primary key auto_increment; -
删除列
alter table 表名 drop column 列名; -
修改列 类型
alter table 表名 modify column 列名 类型; -
修改列 类型 + 名称
alter table 表名 change 原列名 新列名 新类型;alter table tb change id nid int not null; alter table tb change id id int not null default 5; alter table tb change id id int not null primary key auto_increment; alter table tb change id id int; -- 允许为空,删除默认值,删除自增。 -
修改列 默认值
ALTER TABLE 表名 ALTER 列名 SET DEFAULT 1000; -
删除列 默认值
ALTER TABLE 表名 ALTER 列名 DROP DEFAULT; -
添加主键
alter table 表名 add primary key(列名); -
删除主键
alter table 表名 drop primary key;
-
-
常见列类型
create table 表( id int, name varchar(16) )default charset=utf8;-
int[(m)][unsigned][zerofill]int 表示有符号,取值范围:-2147483648 ~ 2147483647 int unsigned 表示无符号,取值范围:0 ~ 4294967295 int(5)zerofill 仅用于显示,当不满足5位时,按照左边补0,例如:00002;满足时,正常显示。mysql> create table L1(id int, uid int unsigned, zid int(5) zerofill) default charset=utf8; Query OK, 0 rows affected (0.03 sec) mysql> insert into L1(id,uid,zid) values(1,2,3); Query OK, 1 row affected (0.00 sec) mysql> insert into L1(id,uid,zid) values(2147483641,4294967294,300000); Query OK, 1 row affected (0.00 sec) mysql> select * from L1; +------------+------------+--------+ | id | uid | zid | +------------+------------+--------+ | 1 | 2 | 00003 | | 2147483641 | 4294967294 | 300000 | +------------+------------+--------+ 2 rows in set (0.00 sec) mysql> insert into L1(id,uid,zid) values(214748364100,4294967294,300000); ERROR 1264 (22003): Out of range value for column 'id' at row 1 mysql> -
tinyint[(m)] [unsigned] [zerofill]有符号,取值范围:-128 ~ 127. 无符号,取值范围:0 ~ 255 -
bigint[(m)][unsigned][zerofill]有符号,取值范围:-9223372036854775808 ~ 9223372036854775807 无符号,取值范围:0 ~ 18446744073709551615 -
decimal[(m[,d])] [unsigned] [zerofill]准确的小数值,m是数字总个数(负号不算),d是小数点后个数。 m最大值为65,d最大值为30。 例如: create table L2( id int not null primary key auto_increment, salary decimal(8,2) )default charset=utf8;mysql> create table L2(id int not null primary key auto_increment,salary decimal(8,2))default charset=utf8; Query OK, 0 rows affected (0.03 sec) mysql> insert into L2(salary) values(1.28); Query OK, 1 row affected (0.01 sec) mysql> insert into L2(salary) values(5.289); Query OK, 1 row affected, 1 warning (0.00 sec) mysql> insert into L2(salary) values(5.282); Query OK, 1 row affected, 1 warning (0.00 sec) mysql> insert into L2(salary) values(512132.28); Query OK, 1 row affected (0.00 sec) mysql> insert into L2(salary) values(512132.283); Query OK, 1 row affected, 1 warning (0.00 sec) mysql> select * from L2; +----+-----------+ | id | salary | +----+-----------+ | 1 | 1.28 | | 2 | 5.29 | | 3 | 5.28 | | 4 | 512132.28 | | 5 | 512132.28 | +----+-----------+ 5 rows in set (0.00 sec) mysql> insert into L2(salary) values(5121321.283); ERROR 1264 (22003): Out of range value for column 'salary' at row 1 mysql> -
FLOAT[(M,D)] [UNSIGNED] [ZEROFILL]单精度浮点数,非准确小数值,m是数字总个数,d是小数点后个数。 -
DOUBLE[(M,D)] [UNSIGNED] [ZEROFILL]双精度浮点数(非准确小数值),m是数字总个数,d是小数点后个数。 -
char(m)定长字符串,m代表字符串的长度,最多可容纳255个字符。 定长的体现:即使内容长度小于m,也会占用m长度。例如:char(5),数据是:yes,底层也会占用5个字符;如果超出m长度限制(默认MySQL是严格模式,所以会报错)。 如果在配置文件中加入如下配置, sql-mode="NO_AUTO_CREATE_USER,NO_ENGINE_SUBSTITUTION" 保存并重启,此时MySQL则是非严格模式,此时超过长度则自动截断(不报错)。。 注意:默认底层存储是固定的长度(不够则用空格补齐),但是查询数据时,会自动将空白去除。 如果想要保留空白,在sql-mode中加入 PAD_CHAR_TO_FULL_LENGTH 即可。 查看模式sql-mode,执行命令:show variables like 'sql_mode'; 一般适用于:固定长度的内容。 create table L3( id int not null primary key auto_increment, name varchar(5), depart char(3) )default charset=utf8; insert into L3(name,depart) values("alexsb","sbalex"); mysql> select * from L3; +----+-------+--------+ | id | name | depart | +----+-------+--------+ | 1 | alexs | sba | | 2 | alexs | sba | +----+-------+--------+ 2 rows in set (0.00 sec) # 固定长度为3个字符 mysql> select id,name,depart,length(depart) from L3; +----+-------+--------+----------------+ | id | name | depart | length(depart) | +----+-------+--------+----------------+ | 1 | alexs | sba | 3 | | 2 | alexs | sba | 3 | +----+-------+--------+----------------+ 2 rows in set (0.01 sec) -
varchar(m)变长字符串,m代表字符串的长度,最多可容纳65535个字节。 变长的体现:内容小于m时,会按照真实数据长度存储;如果超出m长度限制((默认MySQL是严格模式,所以会报错)。 如果在配置文件中加入如下配置, sql-mode="NO_AUTO_CREATE_USER,NO_ENGINE_SUBSTITUTION" 保存并重启,此时MySQL则是非严格模式,此时超过长度则自动截断(不报错)。 例如: create table L3( id int not null primary key auto_increment, name varchar(5), depart char(3) )default charset=utf8;mysql> create table L3(id int not null primary key auto_increment,name varchar(5),depart char(3))default charset=utf8; Query OK, 0 rows affected (0.03 sec) -- 插入多行 mysql> insert into L3(name,depart) values("wu","WU"),("wupei","ALS"); Query OK, 2 rows affected (0.00 sec) Records: 2 Duplicates: 0 Warnings: 0 mysql> select * from L3; +----+-------+--------+ | id | name | depart | +----+-------+--------+ | 1 | wu | WU | | 2 | wupei | ALS | +----+-------+--------+ 2 rows in set (0.00 sec) -- 非严格模式下,不会报错。 mysql> insert into L3(name,depart) values("wupeiqi","ALS"); ERROR 1406 (22001): Data too long for column 'name' at row 1 mysql> insert into L3(name,depart) values("wupei","ALSB"); ERROR 1406 (22001): Data too long for column 'depart' at row 1 mysql> -- 如果 sql-mode 中加入了 PAD_CHAR_TO_FULL_LENGTH ,则查询时char时空白会保留。 mysql> select name,length(name),depart,length(depart) from L3; +-------+--------------+--------+----------------+ | name | length(name) | depart | length(depart) | +-------+--------------+--------+----------------+ | wu | 2 | WU | 3 | | wupei | 5 | ALS | 3 | +-------+--------------+--------+----------------+ 4 rows in set (0.00 sec) mysql> -
texttext数据类型用于保存变长的大字符串,可以组多到65535 (2**16 − 1)个字符。 一般情况下,长文本会用text类型。例如:文章、新闻等。create table L4( id int not null primary key auto_increment, title varchar(128), content text )default charset=utf8; -
mediumtextA TEXT column with a maximum length of 16,777,215 (2**24 − 1) characters. -
longtextA TEXT column with a maximum length of 4,294,967,295 or 4GB (2**32 − 1) -
datetimeYYYY-MM-DD HH:MM:SS(1000-01-01 00:00:00/9999-12-31 23:59:59) -
timestampYYYY-MM-DD HH:MM:SS(1970-01-01 00:00:00/2037年)对于TIMESTAMP,它把客户端插入的时间从当前时区转化为UTC(世界标准时间)进行存储,查询时,将其又转化为客户端当前时区进行返回。 对于DATETIME,不做任何改变,原样输入和输出。mysql> create table L5( -> id int not null primary key auto_increment, -> dt datetime, -> tt timestamp -> )default charset=utf8; Query OK, 0 rows affected (0.03 sec) mysql> insert into L5(dt,tt) values("2025-11-11 11:11:44", "2025-11-11 11:11:44"); mysql> select * from L5; +----+---------------------+---------------------+ | id | dt | tt | +----+---------------------+---------------------+ | 1 | 2025-11-11 11:11:44 | 2025-11-11 11:11:44 | +----+---------------------+---------------------+ 1 row in set (0.00 sec) mysql> show variables like '%time_zone%'; +------------------+--------+ | Variable_name | Value | +------------------+--------+ | system_time_zone | CST | | time_zone | SYSTEM | +------------------+--------+ 2 rows in set (0.00 sec) -- “CST”指的是MySQL所在主机的系统时间,是中国标准时间的缩写,China Standard Time UT+8:00 mysql> set time_zone='+0:00'; Query OK, 0 rows affected (0.00 sec) mysql> show variables like '%time_zone%'; +------------------+--------+ | Variable_name | Value | +------------------+--------+ | system_time_zone | CST | | time_zone | +00:00 | +------------------+--------+ 2 rows in set (0.01 sec) mysql> select * from L5; +----+---------------------+---------------------+ | id | dt | tt | +----+---------------------+---------------------+ | 1 | 2025-11-11 11:11:44 | 2025-11-11 03:11:44 | +----+---------------------+---------------------+ 1 row in set (0.00 sec) -
dateYYYY-MM-DD(1000-01-01/9999-12-31) -
timeHH:MM:SS('-838:59:59'/'838:59:59')
MySQL还有很多其他的数据类型,例如:set、enum、TinyBlob、Blob、MediumBlob、LongBlob 等,详细见官方文档:https://dev.mysql.com/doc/refman/5.7/en/data-types.html
-
上述就是关于数据表的一些基本操作。
3.2 MySQL代码操作
基于Python去连接MySQL之后,想要进行数据表的管理的话,发送的指令其实都是相同的,例如:
import pymysql

# 连接MySQL
conn = pymysql.connect(host='127.0.0.1', port=3306, user='root', passwd='root123', charset="utf8")
cursor = conn.cursor()

# 1. 创建数据库
"""
cursor.execute("create database db4 default charset utf8 collate utf8_general_ci")
conn.commit()
"""

# 2. 进入数据库、查看数据表
"""
cursor.execute("use db4")
cursor.execute("show tables")
result = cursor.fetchall()
print(result)
"""

# 3. 进入数据库创建表
cursor.execute("use db4")
sql = """
create table L4(
    id int not null primary key auto_increment,
    title varchar(128),
    content text,
    ctime datetime
)default charset=utf8;
"""
cursor.execute(sql)
conn.commit()

# 4. 查看数据库中的表
"""
cursor.execute("show tables")
result = cursor.fetchall()
print(result)
"""

# 5. 其他 drop table... 略过


# 关闭连接
cursor.close()
conn.close()
4.数据行
当数据库和数据表创建完成之后,就需要对数据表中的内容进行:增、删、改、查了。

4.1 内置客户端操作
数据行操作的相关SQL语句(指令)如下:
-
新增数据
insert into 表名 (列名,列名,列名) values(对应列的值,对应列的值,对应列的值);insert into tb1(name,password) values('小乔','123123'); insert into tb1(name,password) values('小乔','123123'),('alex','123'); insert into tb1 values('小乔','123123'),('大桥','123'); -- 如果表中只有2列 -
删除数据
delete from 表名;
delete from 表名 where 条件;
delete from tb1; delete from tb1 where name="xiaoqiao"; delete from tb1 where name="xiaoqiao" and password="123"; delete from tb1 where id>9; -
修改数据
update 表名 set 列名=值;
update 表名 set 列名=值 where 条件;
update tb1 set name="xiaoqiao"; update tb1 set name="xiaoqiao" where id=1; update tb1 set age=age+1; -- 整型 update tb1 set age=age+1 where id=2; update L3 set name=concat(name,"db"); update L3 set name=concat(name,"123") where id=2; -- concat一个函数,可以拼接字符串 -
查询数据
select * from 表名;
select 列名,列名,列名 from 表名;
select 列名,列名 as 别名,列名 from 表名;
select * from 表名 where 条件;
select * from tb1; select id,name,age from tb1; select id,name as N,age, from tb1; select id,name as N,age, 111 from tb1; select * from tb1 where id = 1; select * from tb1 where id > 1; select * from tb1 where id != 1; select * from tb1 where name="xiaoqiao" and password="123";
4.2 Python代码操作

import pymysql

# 连接MySQL,自动执行 use userdb; -- 进入数据库
conn = pymysql.connect(host='127.0.0.1', port=3306, user='root', passwd='123456', charset="utf8", db='userdb')
cursor = conn.cursor()


# 1.新增(需commit)

cursor.execute("insert into tb1(name,password) values('xiaoqiao','123123')")
conn.commit()


# 2.删除(需commit)

cursor.execute("delete from tb1 where id=1")
conn.commit()


# 3.修改(需commit)

cursor.execute("update tb1 set name='xx' where id=1")
conn.commit()


# 4.查询

cursor.execute("select * from tb where id>10")
# .fetchone 在数据库中查询到的结果区第一条结果
# .fetchall 在数据库中查询到的结果全部结果
data = cursor.fetchone() # cursor.fetchall()
print(data)


# 关闭连接
cursor.close()
conn.close()
其实在真正做项目开发时,流程如下:
- 第一步:根据项目的功能来设计相应的 数据库 & 表结构(不会经常变动,在项目设计之初就确定好了)。
- 第二步:操作表结构中的数据,已达到实现业务逻辑的目的。
例如:实现一个 用户管理系统。
先使用MySQL自带的客户端创建相关 数据库和表结构(相当于先创建好Excel结构)。
create database usersdb default charset utf8 collate utf8_general_ci;
create table users(
	id int not null primary key auto_increment,
    name varchar(32),
	password varchar(64)
)default charset=utf8;
再在程序中执行编写相应的功能实现 注册、登录 等功能。
import pymysql


def register():
    print("用户注册")

    user = input("请输入用户名:") # alex
    password = input("请输入密码:") # sb

    # 连接指定数据
    conn = pymysql.connect(host='127.0.0.1', port=3306, user='root', passwd='123456', charset="utf8", db="usersdb")
    cursor = conn.cursor()

    # 执行SQL语句(有SQL注入风险,稍后讲解)
    # sql = 'insert into users(name,password)values("alex","sb")'
    sql = 'insert into users(name,password) values("{}","{}")'.format(user, password)

    cursor.execute(sql)
    conn.commit()

    # 关闭数据库连接
    cursor.close()
    conn.close()

    print("注册成功,用户名:{},密码:{}".format(user, password))


def login():
    print("用户登录")

    user = input("请输入用户名:")
    password = input("请输入密码:")

    # 连接指定数据
    conn = pymysql.connect(host='127.0.0.1', port=3306, user='root', passwd='123456', charset="utf8", db="usersdb")
    cursor = conn.cursor()

    # 执行SQL语句(有SQL注入风险,稍后讲解)
    # sql = select * from users where name='xiaoqiao' and password='123'
    sql = "select * from users where name='{}' and password='{}'".format(user, password)
    cursor.execute(sql)

    result = cursor.fetchone() # 去向mysql获取结果
    # None
    # (1,xiaoqiao,123)


    # 关闭数据库连接
    cursor.close()
    conn.close()

    if result:
        print("登录成功", result)
    else:
        print("登录失败")


def run():
    choice = input("1.注册;2.登录")
    if choice == '1':
        register()
    elif choice == '2':
        login()
    else:
        print("输入错误")


if __name__ == '__main__':
    run()
So,你会发现, 在项目开发时,数据库 & 数据表 的操作其实就做那么一次,最最常写的还是 对数据行 的操作。
5.关于SQL注入
假如,你开发了一个用户认证的系统,应该用户登录成功后才能正确的返回相应的用户结果。
import pymysql

# 输入用户名和密码
user = input("请输入用户名:") # ' or 1=1 --
pwd = input("请输入密码:") # 123


conn = pymysql.connect(host='127.0.0.1', port=3306, user='root', passwd='123456', charset="utf8",db='usersdb')
cursor = conn.cursor()

# 基于字符串格式化来 拼接SQL语句
# sql = "select * from users where name='alex' and password='123'"
# sql = "select * from users where name='' or 1=1 -- ' and password='123'"
sql = "select * from users where name='{}' and password='{}'".format(user, pwd)
cursor.execute(sql)

result = cursor.fetchone()
print(result) # None,不是None

cursor.close()
conn.close()
如果用户在输入user时,输入了: ' or 1=1 -- ,这样即使用户输入的密码不存在,也会可以通过验证。
为什么呢?
因为在SQL拼接时,拼接后的结果是:
select * from users where name='' or 1=1 -- ' and password='123'
注意:在MySQL中 -- 表示注释。
那么,在Python开发中 如何来避免SQL注入呢?
切记,SQL语句不要在使用python的字符串格式化,而是使用pymysql的execute方法。
import pymysql

# 输入用户名和密码
user = input("请输入用户名:")
pwd = input("请输入密码:")

conn = pymysql.connect(host='127.0.0.1', port=3306, user='root', passwd='123456', charset="utf8", db='userdb')

cursor = conn.cursor()

cursor.execute("select * from users where name=%s and password=%s", [user, pwd])
# 或
# cursor.execute("select * from users where name=%(n1)s and password=%(n2)s", {"n1": user, 'n2': pwd})

result = cursor.fetchone()
print(result)

cursor.close()
conn.close()
总结

除了 【第5步 用户授权】以外,现在使用的是默认root账户(拥有最大权限),上述所有的过程已讲解完毕。
本节内容大家需要掌握:
- 安装和启动MySQL
- SQL语句:
- 数据库操作
- 表操作
- 数据行操作
- 基于Python操作MySQL
- 注意SQL注入的问题
day26 必备SQL和表关系及授权
课程目标:掌握开发中最常见的SQL语句和表关系及授权相关知识点。
课程概要:
- 必备SQL(8个必备)
- 表关系
- 授权
1. 必备SQL语句
上一节讲解了最基础SQL语句:增删改查,其实在日常的开发中还有很多必备的SQL语句。
这一部分的SQL语句都是围绕着对 表中的数据进行操作的。
提示:今天的所有操作我都只会在 MySQL自带的客户端工具上进行操作。
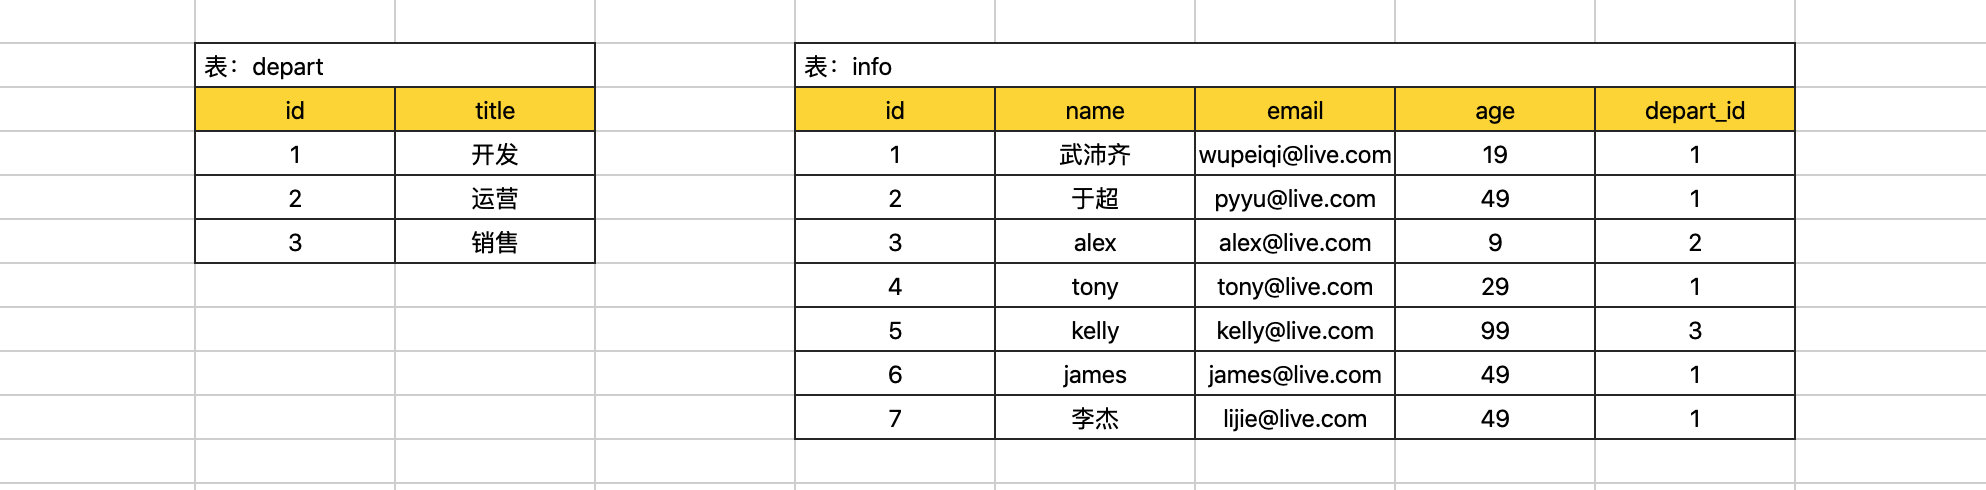
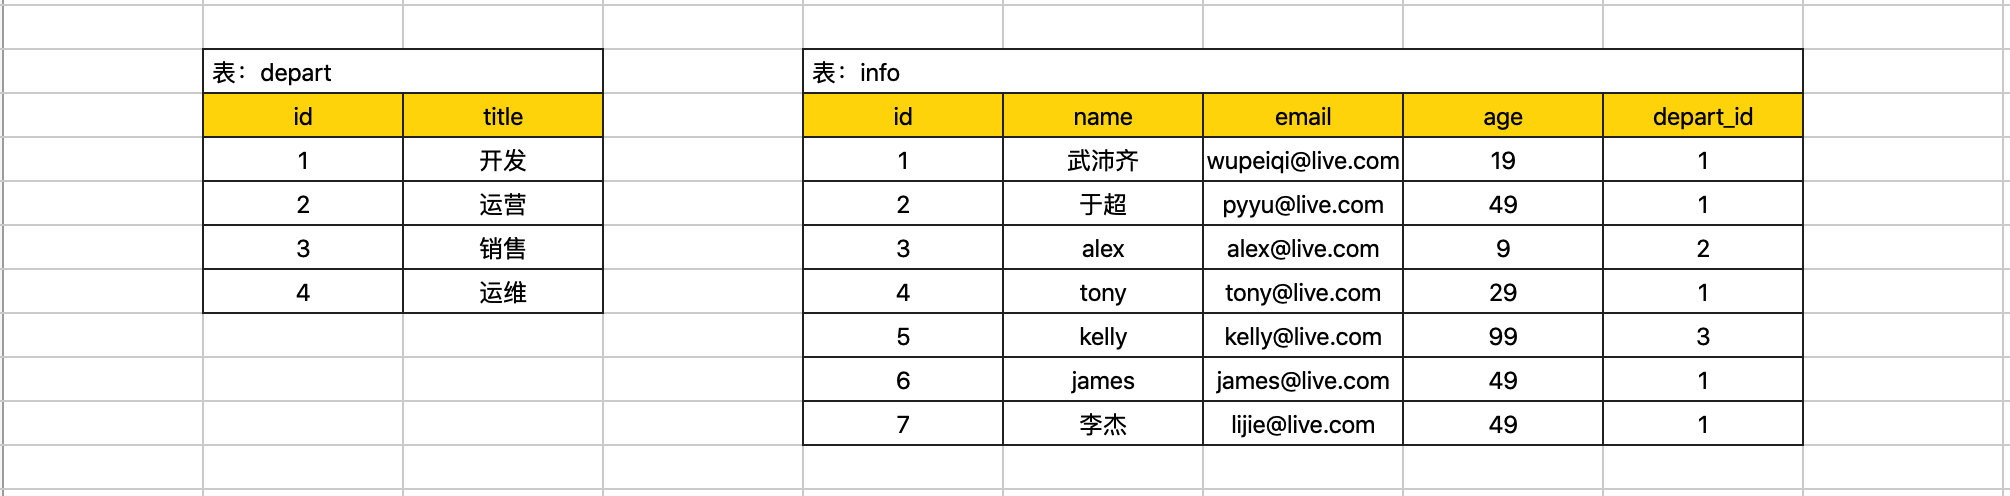
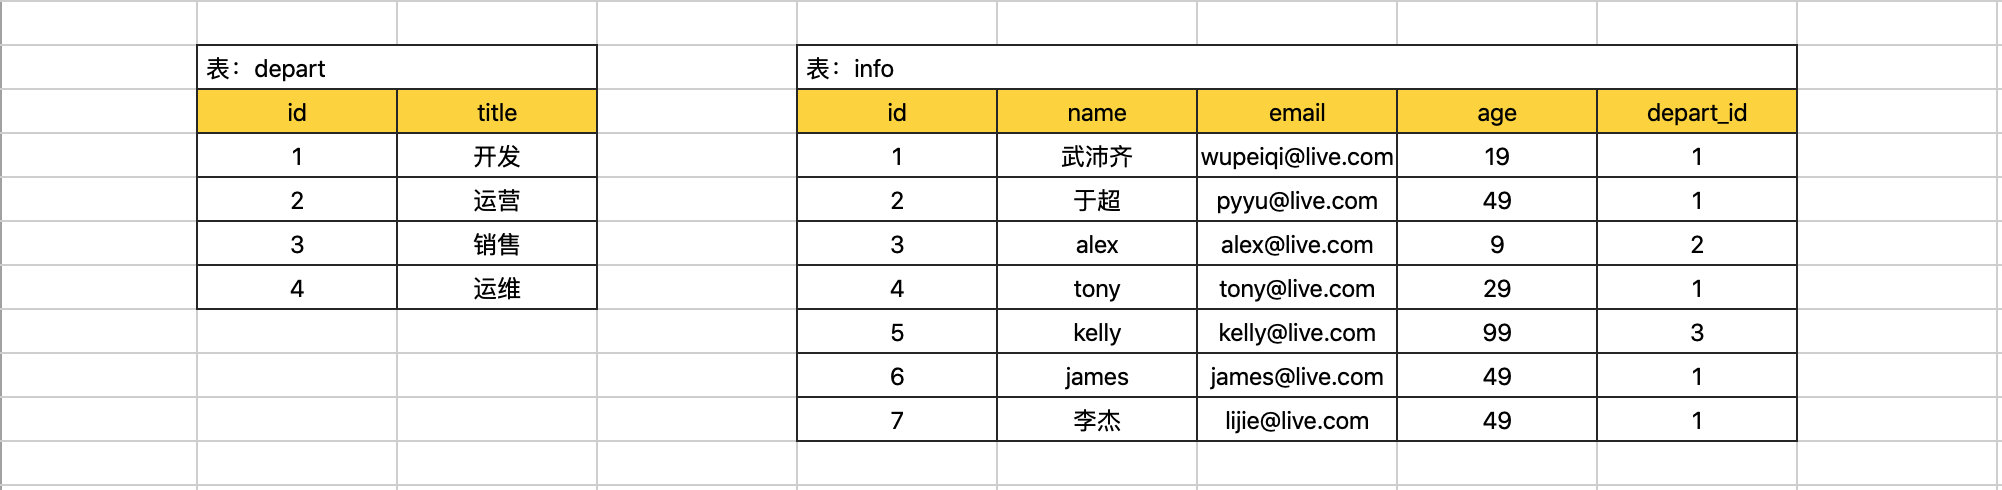
例如:现在创建如下两张表。

create database day26db default charset utf8 collate utf8_general_ci;
create table depart(
	id int not null auto_increment primary key,
    title varchar(16) not null
)default charset=utf8;


create table info(
	id int not null auto_increment primary key,
    name varchar(16) not null,
    email varchar(32) not null,
    age int,
    depart_id int
)default charset=utf8;
insert into depart(title) values("开发"),("运营"),("销售");

insert into info(name,email,age,depart_id) values("小乔","xiaoqiao@live.com",19,1);
insert into info(name,email,age,depart_id) values("狄仁杰","direnjie@live.com",49,1);
insert into info(name,email,age,depart_id) values("孙悟空","sunwukong@live.com",9,2);
insert into info(name,email,age,depart_id) values("tony","tony@live.com",29,1);
insert into info(name,email,age,depart_id) values("kelly","kelly@live.com",99,3);
insert into info(name,email,age,depart_id) values("james","james@live.com",49,1);
insert into info(name,email,age,depart_id) values("李杰","lijie@live.com",49,1);
1.1 条件
根据条件搜索结果。

select * from info where age > 30;
select * from info where id > 1;
select * from info where id = 1;
select * from info where id >= 1;
select * from info where id != 1;
select * from info where id between 2 and 4;   -- id大于等于2、且小于等于4

select * from info where name = 'xiaqo' and age = 19;
select * from info where name = 'direnjie' or age = 49;
select * from info where (name = '李杰' or email="xiaoqiao@live.com")  and age=49;

select * from info where id in (1,4,6); -- id等于1,4,6
select * from info where id not in (1,4,6); -- id不等于1,4,6
select * from info where id in (select id from depart); -- 判断id=5是否存在,
# select * from info where id in (1,2,3);

# exists select * from depart where id=5,去查数据是否存在,如果存在,如果不存在。
select * from info where exists (select * from depart where id=5);
select * from info where not exists (select * from depart where id=5);

select * from (select * from info where id>2) as T where age > 10;
select * from info where info.id > 10;
select * from info where id > 10;
1.2 通配符
一般用于模糊搜索。

select * from info where name like "%小%"; -- %代表多个字符
select * from info where name like "%孙";
select * from info where email like "%@live.com";
select * from info where name like "孙%空";
select * from info where name like "k%y";
select * from info where email like "xiaoqiao%";


select * from info where email like "_@live.com"; -- _代表一个字符
select * from info where email like "_iaoqiao@live.com";
select * from info where email like "__aoqiao@live.com";
select * from info where email like "__aoqia_live.co_";
注意:数量少,数据量大的搜索。
1.3 映射
想要获取的列。
[外链图片转存失败,源站可能有防盗链机制,建议将图片保存下来直接上传(img-7t9DSxaT-1648216045235)(/Users/daihao/Documents/第四模块MySQL数据库.assets/image-20210517184600205.png)]
select * from info;

select id, name				from info;
select id, name as NM 		from info;
select id, name as NM, 123  from info;
注意:少些select * ,自己需求。

select
	id,
	name,
	666 as num,
	( select max(id) from depart ) as mid, -- max/min/sum
	( select min(id) from depart) as nid, -- max/min/sum
	age
from info;
select
	id,
	name,
	( select title from depart where depart.id=info.depart_id) as x1
from info;

# 注意:效率很低

select
	id,
	name,
	( select title from depart where depart.id=info.depart_id) as x1,
	( select title from depart where depart.id=info.id) as x2
from info;
select
	id,
	name,
	case depart_id when 1 then "第1部门" end v1
from info;

select
	id,
	name,
	case depart_id when 1 then "第1部门" else "其他" end v2
from info;

select
	id,
	name,
	case depart_id when 1 then "第1部门" end v1,
	case depart_id when 1 then "第1部门" else "其他" end v2,
	case depart_id when 1 then "第1部门" when 2 then "第2部门" else "其他" end v3,
	case when age<18 then "少年" end v4,
	case when age<18 then "少年" else "油腻男" end v5,
	case when age<18 then "少年" when age<30 then "青年" else "油腻男" end v6
from info;
1.4 排序
[外链图片转存失败,源站可能有防盗链机制,建议将图片保存下来直接上传(img-fmYxbfuA-1648216045235)(/Users/daihao/Documents/第四模块MySQL数据库.assets/image-20210517184600205.png)]
select * from info order by age desc; -- 倒序
select * from info order by age asc;  -- 顺序

select * from info order by id desc;
select * from info order by id asc;
select * from info order by age asc,id desc; -- 优先按照age从小到大;如果age相同则按照id从大到小。

# 先跟条件,在排序
select * from info where id>10 order by age asc,id desc;
select * from info where id>6 or name like "%y" order by age asc,id desc;
1.5 取部分
一般要用于获取部分数据。
[外链图片转存失败,源站可能有防盗链机制,建议将图片保存下来直接上传(img-BGXyyPlb-1648216045235)(/Users/daihao/Documents/第四模块MySQL数据库.assets/image-20210517184600205.png)]
select * from info limit 5;   										-- 获取前5条数据
select * from info order by id desc limit 3;						-- 先排序,再获取前3条数据
select * from info where id > 4 order by id desc limit 3;			-- 先排序,再获取前3条数据


select * from info limit 3 offset 2;	-- 从位置2开始,向后获取前3数据
数据库表中:1000条数据。
- 第一页:
select * from info limit 10 offset 0; - 第二页:
select * from info limit 10 offset 10; - 第三页:
select * from info limit 10 offset 20; - 第四页:
select * from info limit 10 offset 30; - …
1.6 分组

select age,max(id),min(id),count(id),sum(id),avg(id) from info group by age;
-- sum 求和
-- avg 平均数
select age,count(1) from info group by age;
select depart_id,count(id) from info group by depart_id;
# 分组之后,在使用聚合函数是不能使用where,必须使用having
select depart_id,count(id) from info group by depart_id having count(id) > 2;
select count(id) from info;
select max(id) from info;
select age,max(id),min(id),sum(id),count(id) from info group by age;
select age,name from info group by age;  -- 不建议
select * from info where id in (select max(id) from info group by age);
select age,count(id) from info group by age having count(id) > 2;
select age,count(id) from info where id > 4 group by age having count(id) > 2;  -- 聚合条件放在having后面
到目前为止SQL执行顺序:
    where
    group by
    having
    order by
    limit
select age,count(id) from info where id > 2 group by age having count(id) > 1 order by age desc limit 1;
- 要查询的表info
- 条件 id>2
- 根据age分组
- 对分组后的数据再根据聚合条件过滤 count(id)>1
- 根据age从大到小排序
- 获取第1条
1.7 左右连表
多个表可以连接起来进行查询。
展示用户信息&部门名称:
主表 left outer join 从表 on 主表.x = 从表.id
# left outer join 左连接
select * from info left outer join depart on info.depart_id = depart.id;
select info.id,info.name,info.email,depart.title from info left outer join depart on info.depart_id = depart.id;
从表 right outer join 主表 on 主表.x = 从表.id
# right outer join 右连接
select info.id,info.name,info.email,depart.title from info right outer join depart on info.depart_id = depart.id;
为了更加直接的查看效果,我们分别在 depart 表 和 info 中额外插入一条数据。
insert into depart(title) values("运维");
这样一来主从表就有区别:
-
info主表,就以info数据为主,depart为辅。
select info.id,info.name,info.email,depart.title from info left outer join depart on info.depart_id = depart.id; -
depart主表,,就以depart数据为主,info为辅。
select info.id,info.name,info.email,depart.title from info right outer join depart on info.depart_id = depart.id;
select * from info left outer join depart on ....
select * from depart left outer join info on ....
简写:select * from depart left join info on ....
-- 内连接:    表  inner join 表  on 条件
select * from info inner join depart on info.depart_id=depart.id;

+----+-----------+------------------+------+-----------+----+--------+
| id | name      | email            | age  | depart_id | id | title  |
+----+-----------+------------------+------+-----------+----+--------+
|  1 | 武沛齐    | wupeiqi@live.com |   19 |         1 |  1 | 开发   |
|  2 | 于超      | pyyu@live.com    |   49 |         1 |  1 | 开发   |
|  3 | alex      | alex@live.com    |    9 |         2 |  2 | 运营   |
|  4 | tony      | tony@live.com    |   29 |         1 |  1 | 开发   |
|  5 | kelly     | kelly@live.com   |   99 |         3 |  3 | 销售   |
|  6 | james     | james@live.com   |   49 |         1 |  1 | 开发   |
|  7 | 李杰      | lijie@live.com   |   49 |         1 |  1 | 开发   |
+----+-----------+------------------+------+-----------+----+--------+
到目前为止SQL执行顺序:
    join
    on
    where
    group by
    having
    order by
    limit
写在最后:多张表也可以连接。
1.8 联合
[外链图片转存失败,源站可能有防盗链机制,建议将图片保存下来直接上传(img-n5vxD7rK-1648216045236)(/Users/daihao/Documents/第四模块MySQL数据库.assets/image-20210519093004885.png)]
select id,title from depart
union -- 上下连接
select id,name from info;


select id,title from depart
union
select email,name from info;
-- 列数需相同
select id from depart
union
select id from info;

-- 自动去重
select id from depart
union all
select id from info;

-- 保留所有
小结
到目前为止,你已经掌握了如下相关指令(SQL语句):
- 数据库
- 数据表
- 数据行
- 增加
- 删除
- 修改
- 查询(各种变着花样的查询)
2.表关系
在开发项目时,需要根据业务需求去创建很多的表结构,以此来实现业务逻辑,一般表结构有三类:
- 单表,单独一张表就可以将信息保存。

- 一对多,需要两张表来存储信息,且两张表存在
一对多或多对一关系。
- 多对多,需要三张表来存储信息,两张单表 + 关系表,创造出两个单表之间
多对多关系。
在上述的表:一对多的 info.depart_id字段、多对多的 boy_girl.boy_id 、girl_id 直接用整型存储就可以,因为他们只要存储关联表的主键ID即可。
在开发中往往还会为他们添加一个 外键约束,保证某一个列的值必须是其他表中的特定列已存在的值,例如:info.depart_id的值必须是 depart.id中已存在的值。
一对多示例:
create table depart(
	id int not null auto_increment primary key,
    title varchar(16) not null
)default charset=utf8;


create table info(
	id int not null auto_increment primary key,
    name varchar(16) not null,
    email varchar(32) not null,
    age int,
    depart_id int not null,
    constraint fk_info_depart foreign key (depart_id) references depart(id)
)default charset=utf8;
如果表结构已创建好了,额外想要增加外键:
alter table info add constraint fk_info_depart foreign key info(depart_id) references depart(id);
删除外键:
alter table info drop foreign key fk_info_depart;
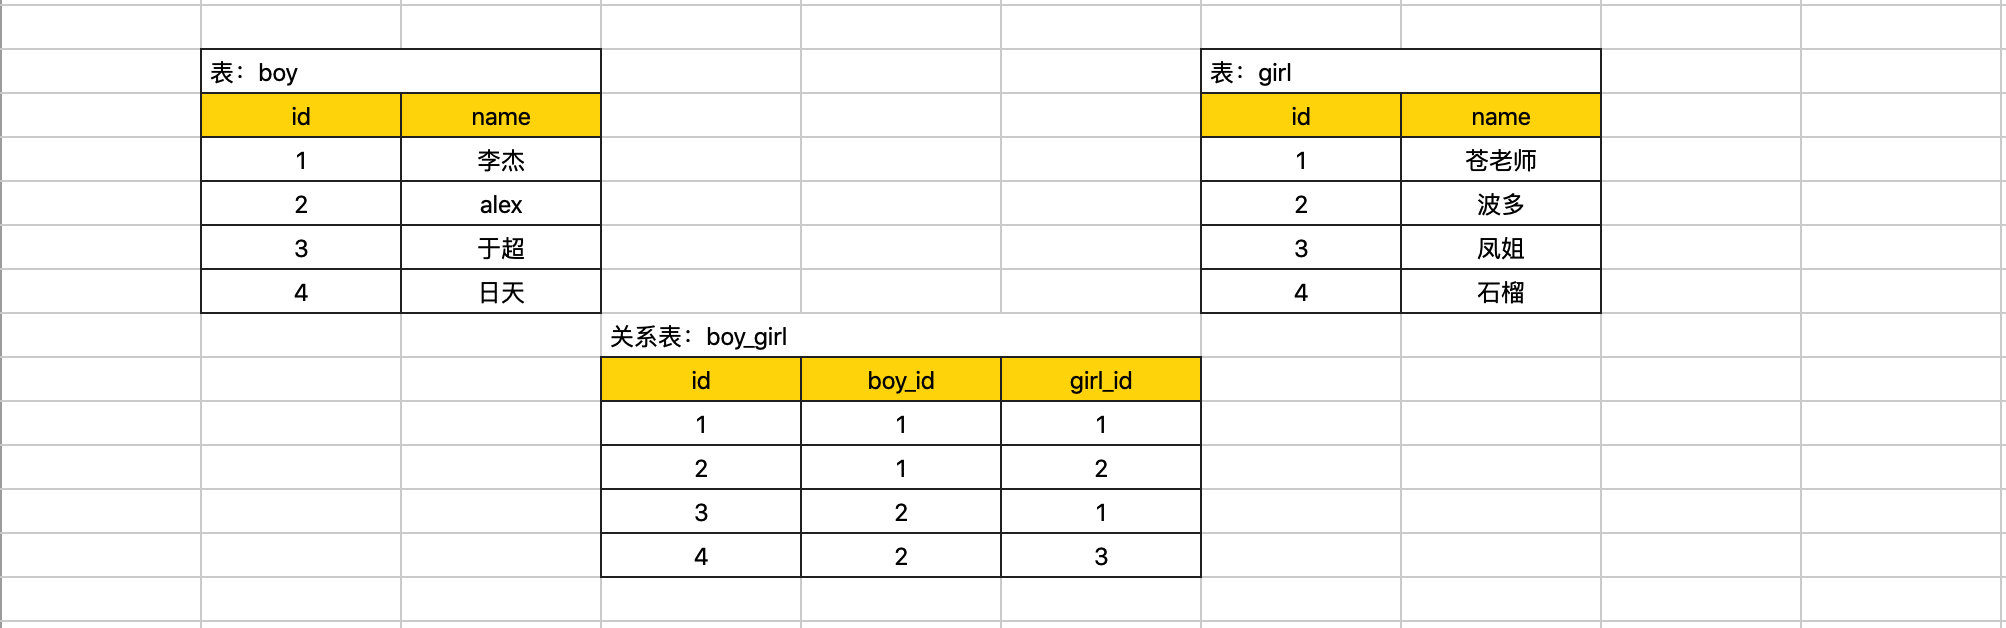
多对多示例:
[外链图片转存失败,源站可能有防盗链机制,建议将图片保存下来直接上传(img-S7NQbgRV-1648216045236)(/Users/daihao/Documents/第四模块MySQL数据库.assets/image-20210520171843289.png)]
create table boy(
	id int not null auto_increment primary key,
    name varchar(16) not null
)default charset=utf8;

create table girl(
	id int not null auto_increment primary key,
    name varchar(16) not null
)default charset=utf8;


create table boy_girl(
	id int not null auto_increment primary key,
    boy_id int not null,
    girl_id int not null,
    constraint fk_boy_girl_boy foreign key boy_girl(boy_id) references boy(id),
    constraint fk_boy_girl_girl foreign key boy_girl(girl_id) references girl(id)
)default charset=utf8;
如果表结构已创建好了,额外想要增加外键:
alter table boy_girl add constraint fk_boy_girl_boy foreign key boy_girl(boy_id) references boy(id);
alter table boy_girl add constraint fk_boy_girl_girl foreign key boy_girl(girl_id) references girl(id);
删除外键:
alter table info drop foreign key fk_boy_girl_boy;
alter table info drop foreign key fk_boy_girl_girl;
在以后项目开发时,设计表结构及其关系的是一个非常重要的技能。一般项目开始开发的步骤:
- 需求调研
- 设计数据库表结构(根据需求)
- 项目开发(写代码)
大量的工作应该放在前2个步骤,前期的设计完成之后,后续的功能代码开发就比较简单了。
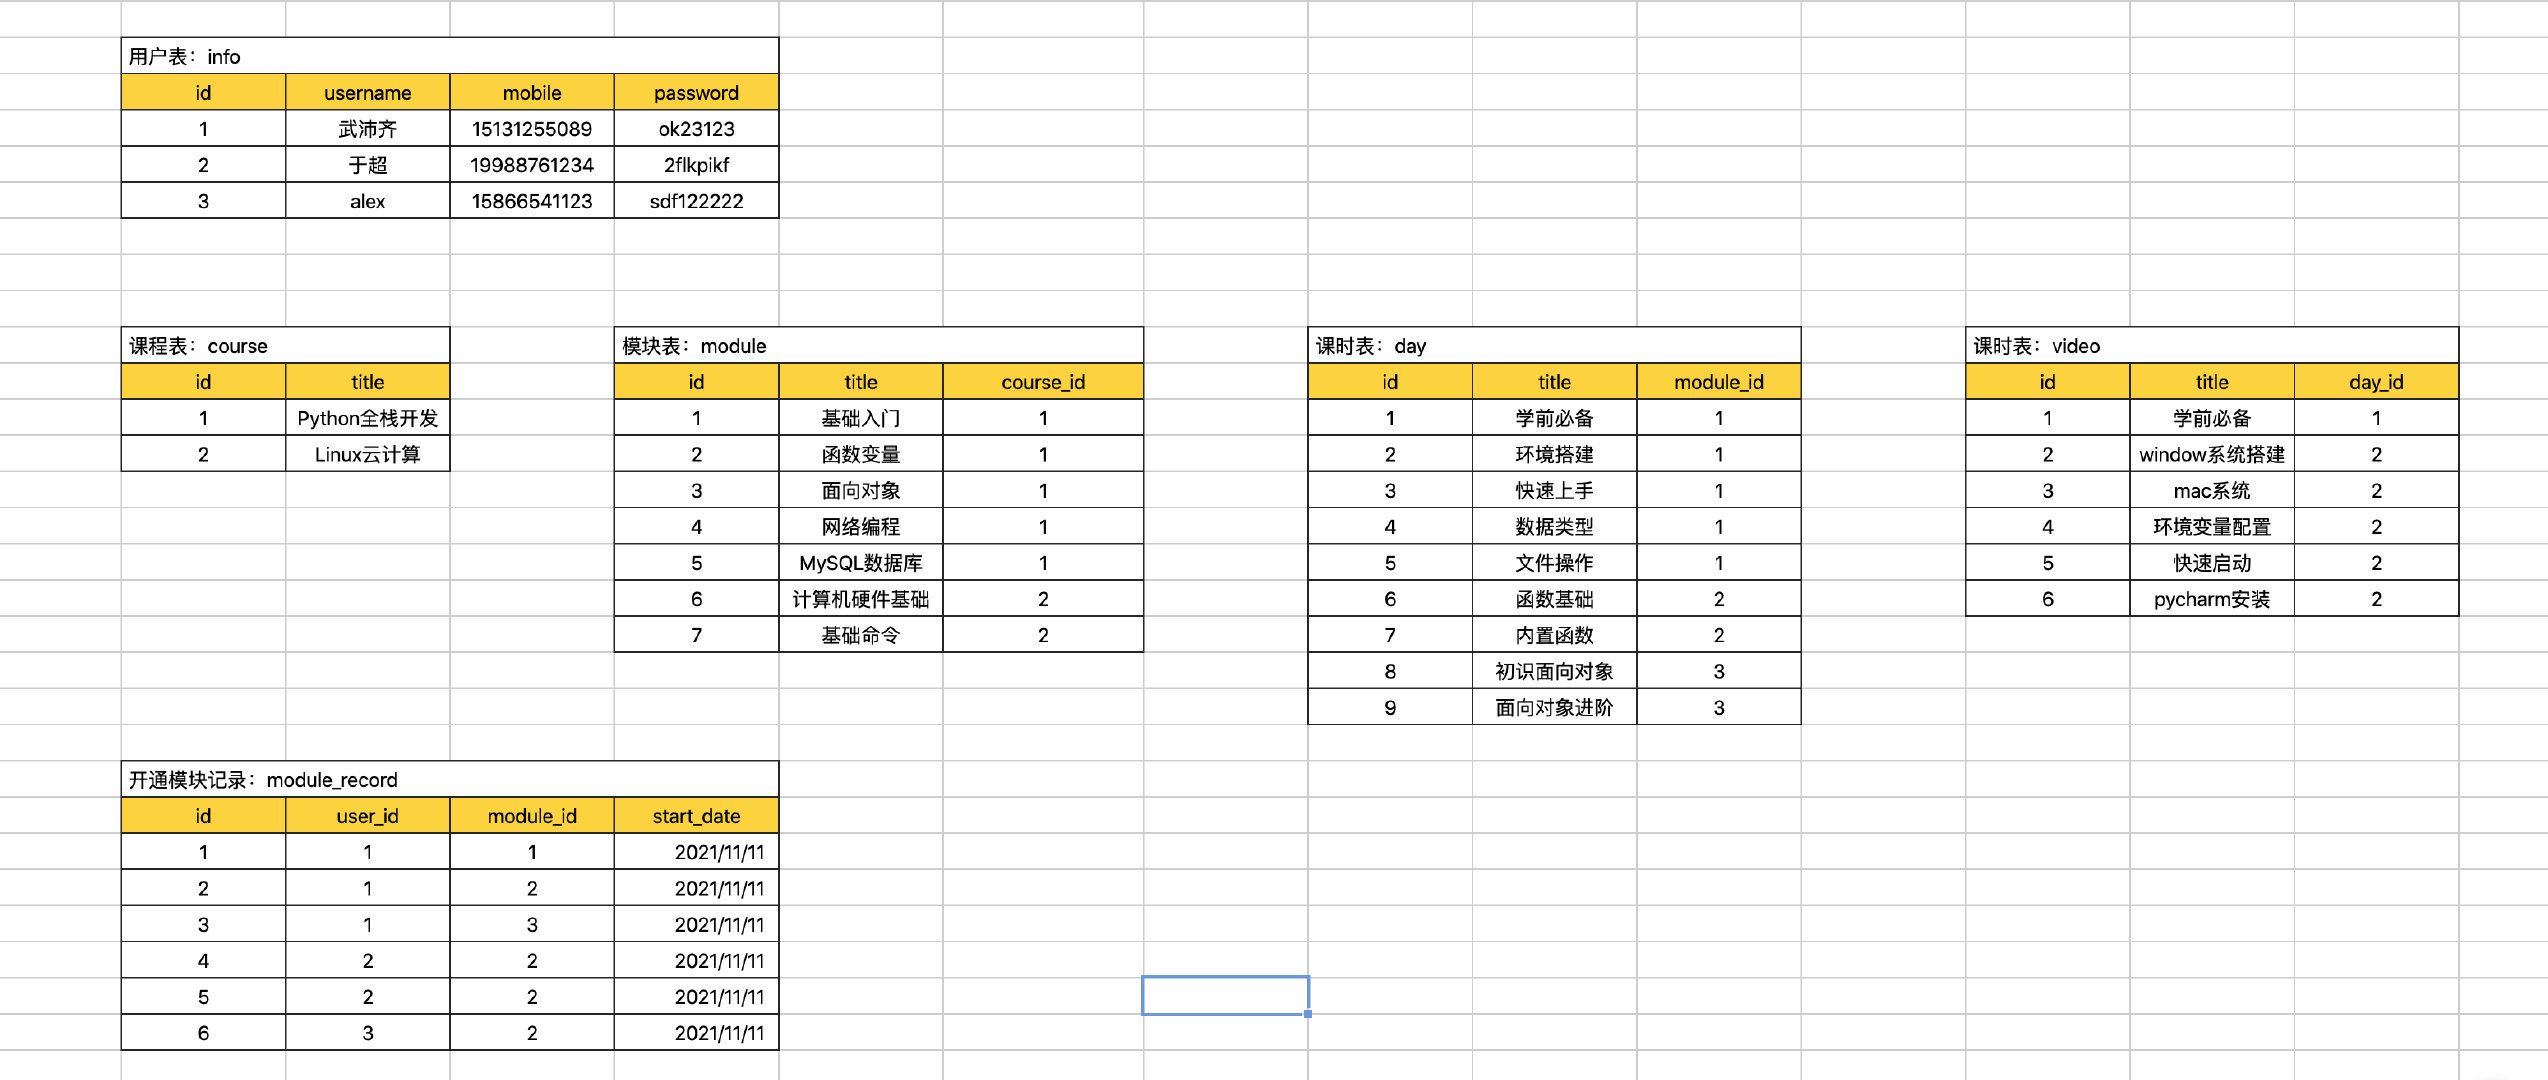
案例:简易版路飞学城
create database luffy default charset utf8 collate utf8_general_ci;

use luffy;
create table info(
	id int not null auto_increment primary key,
    username varchar(16) not null,
    mobile char(11) not null,
    password varchar(64) not null
)default charset=utf8;
create table course(
	id int not null auto_increment primary key,
    title varchar(16) not null
)default charset=utf8;


create table module(
	id int not null auto_increment primary key,
    title varchar(16) not null,
    course_id int not null,
    constraint fk_module_course foreign key (course_id) references course(id)
)default charset=utf8;


create table day(
	id int not null auto_increment primary key,
    title varchar(16) not null,
	module_id int not null,
    constraint fk_day_module foreign key (module_id) references module(id)
)default charset=utf8;


create table video(
	id int not null auto_increment primary key,
    title varchar(16) not null,
	day_id int not null,
    constraint fk_video_day foreign key (day_id) references day(id)
)default charset=utf8;
create table module_record(
	id int not null auto_increment primary key,
    user_id int not null,
    module_id int not null,
    constraint fk_user_id foreign key module_record(user_id) references info(id),
    constraint fk_module_id foreign key module_record(module_id) references module(id)
)default charset=utf8;
3. 授权
之前我们无论是基于Python代码 or 自带客户端 去连接MySQL时,均使用的是 root 账户,拥有对MySQL数据库操作的所有权限。
[外链图片转存失败,源站可能有防盗链机制,建议将图片保存下来直接上传(img-ysleWW0X-1648216045237)(/Users/daihao/Documents/第四模块MySQL数据库.assets/image-20210520173921204.png)]
如果有多个程序的数据库都放在同一个MySQL中,如果程序都用root账户就存在风险了。
这种情况怎么办呢?
在MySQL中支持创建账户,并给账户分配权限,例如:只拥有数据库A操作的权限、只拥有数据库B中某些表的权限、只拥有数据库B中某些表的读权限等。
3.1 用户管理
在MySQL的默认数据库 mysql 中的 user 表中存储着所有的账户信息(含账户、权限等)。
mysql> show databases;
+--------------------+
| Database           |
+--------------------+
| information_schema |
| day26              |
| mysql              |
| performance_schema |
| sys                |
+--------------------+
10 rows in set (0.00 sec)

mysql> select user,authentication_string,host from  mysql.user;
+----------------------------------+-------------------------------------------+-------------------------------+
| user                             | authentication_string                     | host                          |
+----------------------------------+-------------------------------------------+-------------------------------+
| root                             | *FAAFFE644E901CFAFAEC7562415E5FAEC243B8B2 | localhost                     |
| mysql.session                    | *THISISNOTAVALIDPASSWORDTHATCANBEUSEDHERE | localhost                     |
| mysql.sys                        | *THISISNOTAVALIDPASSWORDTHATCANBEUSEDHERE | localhost                     |
+----------------------------------+-------------------------------------------+-------------------------------+
3 rows in set (0.00 sec)
-
创建和删除用户
create user '用户名'@'连接者的IP地址' identified by '密码';create user wupeiqi1@127.0.0.1 identified by 'root123'; drop user wupeiqi1@127.0.0.1; create user wupeiqi2@'127.0.0.%' identified by 'root123'; drop user wupeiqi2@'127.0.0.%'; create user wupeiqi3@'%' identified by 'root123'; drop user wupeiqi3@'%'; create user 'wupeiqi4'@'%' identified by 'root123'; drop user 'wupeiqi4'@'%'; -
修改用户
rename user '用户名'@'IP地址' to '新用户名'@'IP地址';rename user wupeiqi1@127.0.0.1 to wupeiqi1@localhost; rename user 'wupeiqi1'@'127.0.0.1' to 'wupeiqi1'@'localhost'; -
修改密码
set password for '用户名'@'IP地址' = Password('新密码')set password for 'wupeiqi4'@'%' = Password('123123');
3.2 授权管理
创建好用户之后,就可以为用户进行授权了。
-
授权
grant 权限 on 数据库.表 to '用户'@'IP地址'grant all privileges on *.* TO 'wupeiqi'@'localhost'; -- 用户wupeiqi拥有所有数据库的所有权限 grant all privileges on day26.* TO 'wupeiqi'@'localhost'; -- 用户wupeiqi拥有数据库day26的所有权限 grant all privileges on day26.info TO 'wupeiqi'@'localhost'; -- 用户wupeiqi拥有数据库day26中info表的所有权限 grant select on day26.info TO 'wupeiqi'@'localhost'; -- 用户wupeiqi拥有数据库day26中info表的查询权限 grant select,insert on day26.* TO 'wupeiqi'@'localhost'; -- 用户wupeiqi拥有数据库day26所有表的查询和插入权限 grant all privileges on day26db.* to 'wupeiqi4'@'%'; 注意:flush privileges; -- 将数据读取到内存中,从而立即生效。-
对于权限
all privileges 除grant外的所有权限 select 仅查权限 select,insert 查和插入权限 ... usage 无访问权限 alter 使用alter table alter routine 使用alter procedure和drop procedure create 使用create table create routine 使用create procedure create temporary tables 使用create temporary tables create user 使用create user、drop user、rename user和revoke all privileges create view 使用create view delete 使用delete drop 使用drop table execute 使用call和存储过程 file 使用select into outfile 和 load data infile grant option 使用grant 和 revoke index 使用index insert 使用insert lock tables 使用lock table process 使用show full processlist select 使用select show databases 使用show databases show view 使用show view update 使用update reload 使用flush shutdown 使用mysqladmin shutdown(关闭MySQL) super 使用change master、kill、logs、purge、master和set global。还允许mysqladmin调试登陆 replication client 服务器位置的访问 replication slave 由复制从属使用 -
对于数据库和表
数据库名.*            数据库中的所有
数据库名.表名          指定数据库中的某张表
数据库名.存储过程名     指定数据库中的存储过程
*.*                  所有数据库
-
-
查看授权
show grants for '用户'@'IP地址'show grants for 'wupeiqi'@'localhost'; show grants for 'wupeiqi4'@'%'; -
取消授权
revoke 权限 on 数据库.表 from '用户'@'IP地址'revoke ALL PRIVILEGES on day26.* from 'wupeiqi'@'localhost'; revoke ALL PRIVILEGES on day26db.* from 'wupeiqi4'@'%'; 注意:flush privileges; -- 将数据读取到内存中,从而立即生效。
一般情况下,在很多的 正规 公司,数据库都是由 DBA 来统一进行管理,DBA为每个项目的数据库创建用户,并赋予相关的权限。
总结
本节主要讲解的三大部分的知识点:
- 常见SQL语句,项目开发中使用最频繁的知识点。
- 表关系,项目开发前,项目表结构设计时必备知识点。
- 单表
- 一对多
- 多对多
- 授权,在MySQL中创建用户并赋予相关权限。
day28 索引和函数及存储过程
课程目标:了解MySQL中索引、函数、存储过程、函数、触发器、视图等知识点。
课程概要:
- 索引
- 函数
- 存储过程
- 视图
- 触发器
1. 索引
在数据库中索引最核心的作用是:加速查找。 例如:在含有300w条数据的表中查询,无索引需要700秒,而利用索引可能仅需1秒。
mysql> select * from big where password="81f98021-6927-433a-8f0d-0f5ac274f96e";
+----+---------+---------------+--------------------------------------+------+
| id | name    | email         | password                             | age  |
+----+---------+---------------+--------------------------------------+------+
| 11 | wu-13-1 | w-13-1@qq.com | 81f98021-6927-433a-8f0d-0f5ac274f96e |    9 |
+----+---------+---------------+--------------------------------------+------+
1 row in set (0.70 sec)

mysql> select * from big where id=11;
+----+---------+---------------+--------------------------------------+------+
| id | name    | email         | password                             | age  |
+----+---------+---------------+--------------------------------------+------+
| 11 | wu-13-1 | w-13-1@qq.com | 81f98021-6927-433a-8f0d-0f5ac274f96e |    9 |
+----+---------+---------------+--------------------------------------+------+
1 row in set (0.00 sec)

mysql> select * from big where name="wu-13-1";
+----+---------+---------------+--------------------------------------+------+
| id | name    | email         | password                             | age  |
+----+---------+---------------+--------------------------------------+------+
| 11 | wu-13-1 | w-13-1@qq.com | 81f98021-6927-433a-8f0d-0f5ac274f96e |    9 |
+----+---------+---------------+--------------------------------------+------+
1 row in set (0.00 sec)
在开发过程中会为哪些 经常会被搜索的列 创建索引,以提高程序的响应速度。例如:查询手机号、邮箱、用户名等。
1.1 索引原理
为什么加上索引之后速度能有这么大的提升呢? 因为索引的底层是基于B+Tree的数据结构存储的。

[外链图片转存失败,源站可能有防盗链机制,建议将图片保存下来直接上传(img-8QM4jZrw-1648216045237)(/Users/daihao/Documents/第四模块MySQL数据库.assets/image-20210526155746811.png)]
[外链图片转存失败,源站可能有防盗链机制,建议将图片保存下来直接上传(img-mKTRM3Sb-1648216045237)(/Users/daihao/Documents/第四模块MySQL数据库.assets/image-20210526160519425.png)]
很明显,如果有了索引结构的查询效率比表中逐行查询的速度要快很多且数据量越大越明显。
B+Tree结构连接:https://www.cs.usfca.edu/~galles/visualization/BPlusTree.html
数据库的索引是基于上述B+Tree的数据结构实现,但在创建数据库表时,如果指定不同的引擎,底层使用的B+Tree结构的原理有些不同。
-
myisam引擎,非聚簇索引(数据 和 索引结构 分开存储)
-
innodb引擎,聚簇索引(数据 和 主键索引结构存储在一起)
1.1.1 非聚簇索引(mysiam引擎)
create table 表名(
    id int not null auto_increment primary key,
    name varchar(32) not null,
    age int
)engine=myisam default charset=utf8;

[外链图片转存失败,源站可能有防盗链机制,建议将图片保存下来直接上传(img-T7G4aT52-1648216045237)(/Users/daihao/Documents/第四模块MySQL数据库.assets/image-20210526155746811.png)]
[外链图片转存失败,源站可能有防盗链机制,建议将图片保存下来直接上传(img-Ihwkeqn1-1648216045237)(/Users/daihao/Documents/第四模块MySQL数据库.assets/image-20210526155118552.png)]
1.1.2 聚簇索引(innodb引擎)
create table 表名(
    id int not null auto_increment primary key,
    name varchar(32) not null,
    age int
)engine=innodb default charset=utf8;
[外链图片转存失败,源站可能有防盗链机制,建议将图片保存下来直接上传(img-5I2kg37C-1648216045237)(/Users/daihao/Documents/第四模块MySQL数据库.assets/image-20210526160040895.png)]

[外链图片转存失败,源站可能有防盗链机制,建议将图片保存下来直接上传(img-wac4Yc9q-1648216045238)(/Users/daihao/Documents/第四模块MySQL数据库.assets/image-20210526160519425.png)]

在MySQL文件存储中的体现:
root@192 userdb # pwd
/usr/local/mysql/data/userdb
root@192 userdb # ls -l
total 1412928
-rw-r-----  1 _mysql  _mysql       8684 May 15 22:51 big.frm,表结构。
-rw-r-----  1 _mysql  _mysql  717225984 May 15 22:51 big.ibd,数据和索引结构。
-rw-r-----  1 _mysql  _mysql       8588 May 16 11:38 goods.frm
-rw-r-----  1 _mysql  _mysql      98304 May 16 11:39 goods.ibd
-rw-r-----  1 _mysql  _mysql       8586 May 26 10:57 t2.frm,表结构
-rw-r-----  1 _mysql  _mysql          0 May 26 10:57 t2.MYD,数据
-rw-r-----  1 _mysql  _mysql       1024 May 26 10:57 t2.MYI,索引结构
上述 聚簇索引 和 非聚簇索引 底层均利用了B+Tree结构结构,只不过内部数据存储有些不同罢了。
在企业开发中一般都会使用 innodb 引擎(内部支持事务、行级锁、外键等特点),在MySQL5.5版本之后默认引擎也是innodb。
mysql> show create table users \G;
*************************** 1. row ***************************
       Table: users
Create Table: CREATE TABLE `users` (
  `id` int(11) NOT NULL AUTO_INCREMENT,
  `name` varchar(32) DEFAULT NULL,
  `password` varchar(64) DEFAULT NULL,
  `ctime` datetime DEFAULT NULL,
  `age` int(11) DEFAULT '5',
  PRIMARY KEY (`id`)
) ENGINE=InnoDB AUTO_INCREMENT=11 DEFAULT CHARSET=utf8
1 row in set (0.00 sec)

ERROR:
No query specified

mysql> show index from users \G;
*************************** 1. row ***************************
        Table: users
   Non_unique: 0
     Key_name: PRIMARY
 Seq_in_index: 1
  Column_name: id
    Collation: A
  Cardinality: 3
     Sub_part: NULL
       Packed: NULL
         Null:
   Index_type: BTREE   -- 虽然显示BTree,但底层数据结构基于B+Tree。
      Comment:
Index_comment:
1 row in set (0.00 sec)

ERROR:
No query specified

mysql>
innodb引擎,一般创建的索引:聚簇索引。
1.2 常见索引
在innodb引擎下,索引底层都是基于B+Tree数据结构存储(聚簇索引)。

在开发过程中常见的索引类型有:
- 主键索引:加速查找、不能为空、不能重复。 + 联合主键索引
- 唯一索引:加速查找、不能重复。 + 联合唯一索引
- 普通索引:加速查找。 + 联合索引
1.2.1 主键和联合主键索引
create table 表名(
    id int not null auto_increment primary key,   -- 主键
    name varchar(32) not null
);

create table 表名(
    id int not null auto_increment,
    name varchar(32) not null,
    primary key(id)
);

create table 表名(
    id int not null auto_increment,
    name varchar(32) not null,
    primary key(列1,列2)          -- 如果有多列,称为联合主键(不常用且myisam引擎支持)
);
alter table 表名 add primary key(列名);
alter table 表名 drop primary key;
注意:删除索引时可能会报错,自增列必须定义为键。
ERROR 1075 (42000): Incorrect table definition; there can be only one auto column and it must be defined as a key

alter table 表 change id id int not null;
create table t7(
    id int not null,
    name varchar(32) not null,
    primary key(id)
);

alter table t6 drop primary key;
1.2.2 唯一和联合唯一索引
create table 表名(
    id int not null auto_increment primary key,
    name varchar(32) not null,
    email varchar(64) not null,
    unique ix_name (name),
    unique ix_email (email),
);

create table 表名(
    id int not null auto_increment,
    name varchar(32) not null,
    unique (列1,列2)               -- 如果有多列,称为联合唯一索引。
);
create unique index 索引名 on 表名(列名);
drop unique index 索引名 on 表名;
1.2.3 索引和联合索引
create table 表名(
    id int not null auto_increment primary key,
    name varchar(32) not null,
    email varchar(64) not null,
    index ix_email (email),
    index ix_name (name),
);

create table 表名(
    id int not null auto_increment primary key,
    name varchar(32) not null,
    email varchar(64) not null,
    index ix_email (name,email)     -- 如果有多列,称为联合索引。
);
create index 索引名 on 表名(列名);
drop index 索引名 on 表名;
在项目开发的设计表结构的环节,大家需要根据业务需求的特点来决定是否创建相应的索引。
案例:博客系统
- 每张表id列都创建 自增 + 主键。
- 用户表
- 用户名 + 密码 创建联合索引。
- 手机号,创建唯一索引。
- 邮箱,创建唯一索引。
- 推荐表
- user_id和article_id创建联合唯一索引。
1.3 操作表
在表中创建索引后,查询时一定要命中索引。


在数据库的表中创建索引之后优缺点如下:
- 优点:查找速度快、约束(唯一、主键、联合唯一)
- 缺点:插入、删除、更新速度比较慢,因为每次操作都需要调整整个B+Tree的数据结构关系。
所以,在表中不要无节制的去创建索引啊。。。
在开发中,我们会对表中经常被搜索的列创建索引,从而提高程序的响应速度。

CREATE TABLE `big` (
    `id` int(11) NOT NULL AUTO_INCREMENT,
    `name` varchar(32) DEFAULT NULL,
    `email` varchar(64) DEFAULT NULL,
    `password` varchar(64) DEFAULT NULL,
    `age` int(11) DEFAULT NULL,
    PRIMARY KEY (`id`),                       -- 主键索引
    UNIQUE KEY `big_unique_email` (`email`),  -- 唯一索引
    index `ix_name_pwd` (`name`,`password`)     -- 联合索引
) ENGINE=InnoDB DEFAULT CHARSET=utf8
一般情况下,我们针对只要通过索引列去搜搜都可以 命中 索引(通过索引结构加速查找)。
select * from big where id = 5;
select * from big where id > 5;
select * from big where email = "wupeiqi@live.com";
select * from big where name = "武沛齐";
select * from big where name = "kelly" and password="ffsijfs";
...
但是,还是会有一些特殊的情况,让我们无法命中索引(即使创建了索引),这也是需要大家在开发中要注意的。

-
类型不一致
select * from big where name = 123; -- 未命中 select * from big where email = 123; -- 未命中 特殊的主键: select * from big where id = "123"; -- 命中 -
使用不等于
select * from big where name != "武沛齐"; -- 未命中 select * from big where email != "wupeiqi@live.com"; -- 未命中 特殊的主键: select * from big where id != 123; -- 命中 -
or,当or条件中有未建立索引的列才失效。
select * from big where id = 123 or password="xx"; -- 未命中 select * from big where name = "wupeiqi" or password="xx"; -- 未命中 特别的: select * from big where id = 10 or password="xx" and name="xx"; -- 命中 -
排序,当根据索引排序时候,选择的映射如果不是索引,则不走索引。
select * from big order by name asc; -- 未命中 select * from big order by name desc; -- 未命中 特别的主键: select * from big order by id desc; -- 命中 -
like,模糊匹配时。
select * from big where name like "%u-12-19999"; -- 未命中 select * from big where name like "_u-12-19999"; -- 未命中 select * from big where name like "wu-%-10"; -- 未命中 特别的: select * from big where name like "wu-1111-%"; -- 命中 select * from big where name like "wuw-%"; -- 命中 -
使用函数
select * from big where reverse(name) = "wupeiqi"; -- 未命中 特别的: select * from big where name = reverse("wupeiqi"); -- 命中 -
最左前缀,如果是联合索引,要遵循最左前缀原则。
如果联合索引为:(name,password)
    name and password       -- 命中
    name                 	-- 命中
    password                -- 未命中
    name or password       	-- 未命中
常见的无法命中索引的情况就是上述的示例。
对于大家来说会现在的最大的问题是,记不住,哪怎么办呢?接下来看执行计划。
1.4 执行计划
MySQL中提供了执行计划,让你能够预判SQL的执行(只能给到一定的参考,不一定完全能预判准确)。
explain + SQL语句;
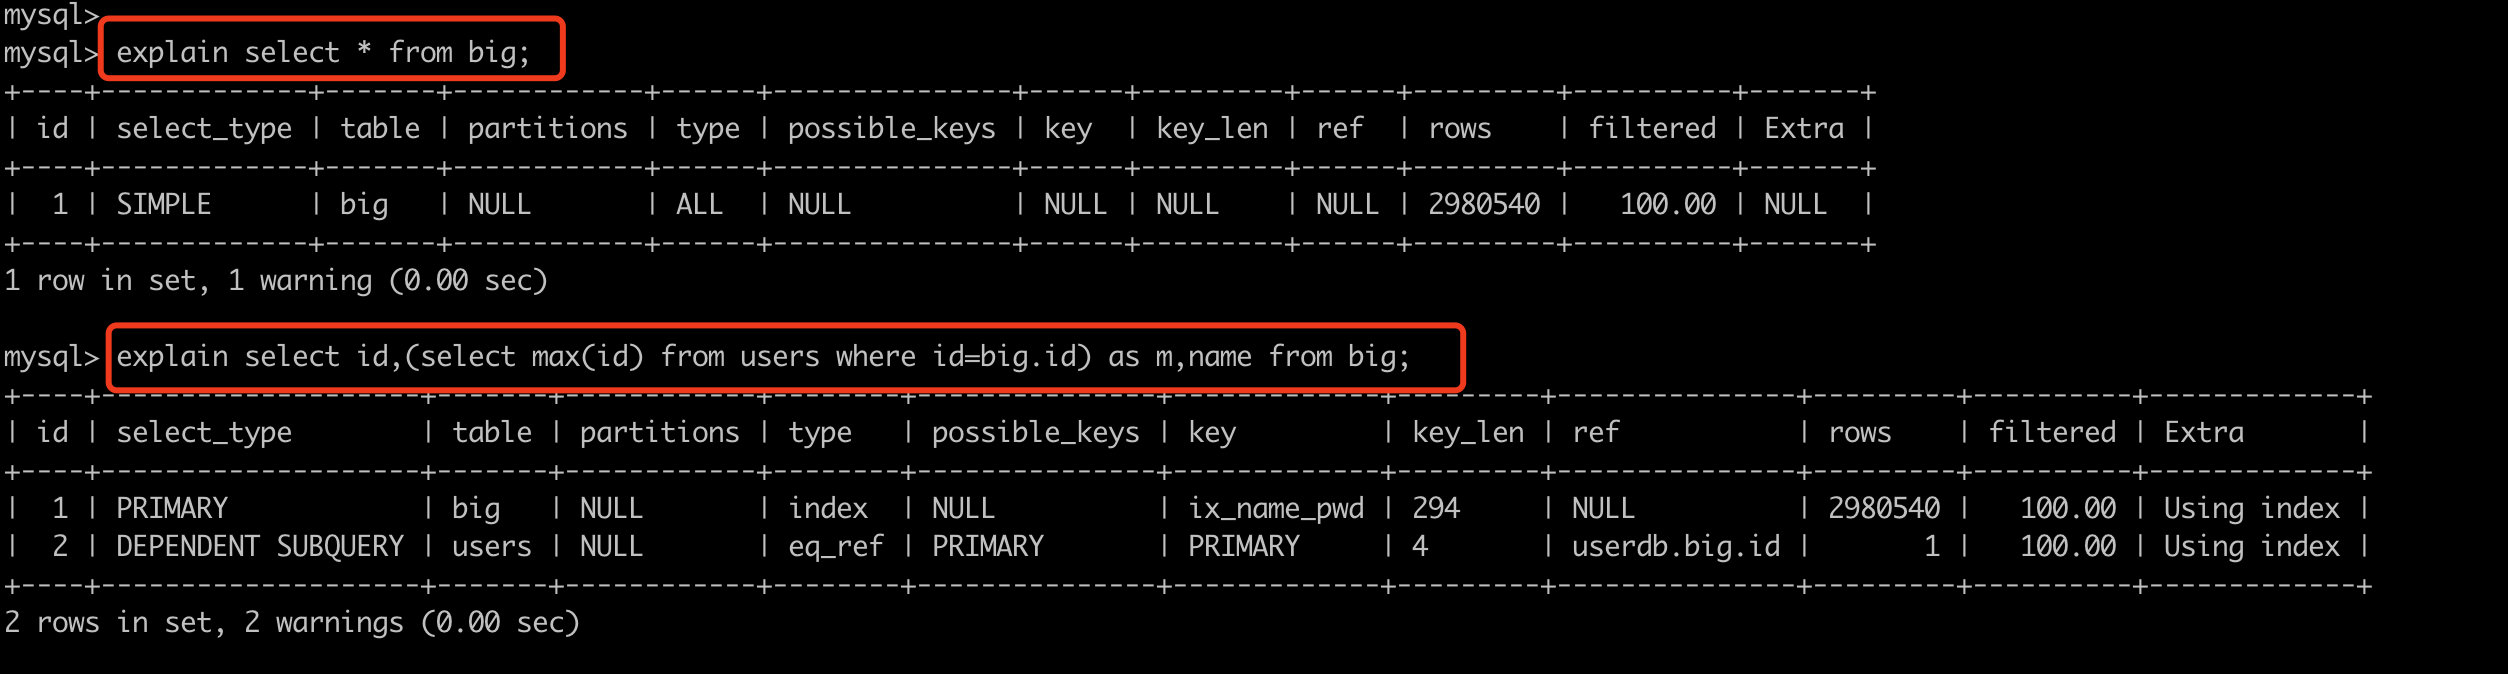
其中比较重要的是 type,他他SQL性能比较重要的标志,性能从低到高依次:all < index < range < index_merge < ref_or_null < ref < eq_ref < system/const
-
ALL,全表扫描,数据表从头到尾找一遍。(一般未命中索引,都是会执行权标扫描)
select * from big; 特别的:如果有limit,则找到之后就不在继续向下扫描. select * from big limit 1; -
INDEX,全索引扫描,对索引从头到尾找一遍
explain select id from big; explain select name from big; -
RANGE,对索引列进行范围查找
explain select * from big where id > 10; explain select * from big where id in (11,22,33); explain select * from big where id between 10 and 20; explain select * from big where name > "wupeiqi" ; -
INDEX_MERGE,合并索引,使用多个单列索引搜索
explain select * from big where id = 10 or name="武沛齐"; -
REF,根据 索引 直接去查找(非键)。
select * from big where name = '武沛齐'; -
EQ_REF,连表操作时常见。
explain select big.name,users.id from big left join users on big.age = users.id; -
CONST,常量,表最多有一个匹配行,因为仅有一行,在这行的列值可被优化器剩余部分认为是常数,const表很快。
explain select * from big where id=11; -- 主键 explain select * from big where email="w-11-0@qq.com"; -- 唯一索引 -
SYSTEM,系统,表仅有一行(=系统表)。这是const联接类型的一个特例。
explain select * from (select * from big where id=1 limit 1) as A;
其他列:
id,查询顺序标识

z,查询类型
    SIMPLE          简单查询
    PRIMARY         最外层查询
    SUBQUERY        映射为子查询
    DERIVED         子查询
    UNION           联合
    UNION RESULT    使用联合的结果
    ...

table,正在访问的表名

partitions,涉及的分区(MySQL支持将数据划分到不同的idb文件中,详单与数据的拆分)。 一个特别大的文件拆分成多个小文件(分区)。

possible_keys,查询涉及到的字段上若存在索引,则该索引将被列出,即:可能使用的索引。
key,显示MySQL在查询中实际使用的索引,若没有使用索引,显示为NULL。例如:有索引但未命中,则possible_keys显示、key则显示NULL。

key_len,表示索引字段的最大可能长度。(类型字节长度 + 变长2 + 可空1),例如:key_len=195,类型varchar(64),195=64*3+2+1

ref,连表时显示的关联信息。例如:A和B连表,显示连表的字段信息。

rows,估计读取的数据行数(只是预估值)
	explain select * from big where password ="025dfdeb-d803-425d-9834-445758885d1c";
	explain select * from big where password ="025dfdeb-d803-425d-9834-445758885d1c" limit 1;
filtered,返回结果的行占需要读到的行的百分比。
	explain select * from big where id=1;  -- 100,只读了一个1行,返回结果也是1行。
	explain select * from big where password="27d8ba90-edd0-4a2f-9aaf-99c9d607c3b3";  -- 10,读取了10行,返回了1行。
	注意:密码27d8ba90-edd0-4a2f-9aaf-99c9d607c3b3在第10行

extra,该列包含MySQL解决查询的详细信息。
    “Using index”
    此值表示mysql将使用覆盖索引,以避免访问表。不要把覆盖索引和index访问类型弄混了。
    “Using where”
    这意味着mysql服务器将在存储引擎检索行后再进行过滤,许多where条件里涉及索引中的列,当(并且如果)它读取索引时,就能被存储引擎检验,因此不是所有带where子句的查询都会显示“Using where”。有时“Using where”的出现就是一个暗示:查询可受益于不同的索引。
    “Using temporary”
    这意味着mysql在对查询结果排序时会使用一个临时表。
    “Using filesort”
    这意味着mysql会对结果使用一个外部索引排序,而不是按索引次序从表里读取行。mysql有两种文件排序算法,这两种排序方式都可以在内存或者磁盘上完成,explain不会告诉你mysql将使用哪一种文件排序,也不会告诉你排序会在内存里还是磁盘上完成。
    “Range checked for each record(index map: N)”
    这个意味着没有好用的索引,新的索引将在联接的每一行上重新估算,N是显示在possible_keys列中索引的位图,并且是冗余的。
小结
上述索引相关的内容讲的比较多,大家在开发过程中重点应该掌握的是:
- 根据情况创建合适的索引(加速查找)。
- 有索引,则查询时要命中索引。
2. 函数
MySQL中提供了很多函数,为我们的SQL操作提供便利,例如:
mysql> select * from d1;
+----+-----------+
| id | name      |
+----+-----------+
|  1 | 武沛齐    |
|  3 | xxx       |
|  4 | pyyu      |
+----+-----------+
3 rows in set (0.00 sec)

mysql> select count(id), max(id),min(id),avg(id) from d1;
+-----------+---------+---------+---------+
| count(id) | max(id) | min(id) | avg(id) |
+-----------+---------+---------+---------+
|         3 |       4 |       1 |  2.6667 |
+-----------+---------+---------+---------+
1 row in set (0.00 sec)

mysql>
mysql>
mysql> select id,reverse(name) from d1;
+----+---------------+
| id | reverse(name) |
+----+---------------+
|  1 | 齐沛武        |
|  3 | xxx           |
|  4 | uyyp          |
+----+---------------+
3 rows in set (0.00 sec)

mysql> select id, reverse(name),concat(name,name), NOW(), DATE_FORMAT( NOW(),'%Y-%m-%d %H:%i:%s')  from d1;
+----+---------------+--------------------+---------------------+-----------------------------------------+
| id | reverse(name) | concat(name,name)  | NOW()               | DATE_FORMAT( NOW(),'%Y-%m-%d %H:%i:%s') |
+----+---------------+--------------------+---------------------+-----------------------------------------+
|  1 | 齐沛武        | 武沛齐武沛齐       | 2021-05-27 09:18:07 | 2021-05-27 09:18:07                     |
|  3 | xxx           | xxxxxx             | 2021-05-27 09:18:07 | 2021-05-27 09:18:07                     |
|  4 | uyyp          | pyyupyyu           | 2021-05-27 09:18:07 | 2021-05-27 09:18:07                     |
+----+---------------+--------------------+---------------------+-----------------------------------------+
3 rows in set (0.00 sec)

mysql> select concat("alex","sb");
+---------------------+
| concat("alex","sb") |
+---------------------+
| alexsb              |
+---------------------+
1 row in set (0.00 sec)

mysql> select sleep(1);
+----------+
| sleep(1) |
+----------+
|        0 |
+----------+
1 row in set (1.00 sec)
部分函数列表:
CHAR_LENGTH(str)
    返回值为字符串str 的长度,长度的单位为字符。一个多字节字符算作一个单字符。
    对于一个包含五个二字节字符集, LENGTH()返回值为 10, 而CHAR_LENGTH()的返回值为5。

CONCAT(str1,str2,...)
    字符串拼接
    如有任何一个参数为NULL ,则返回值为 NULL。
CONCAT_WS(separator,str1,str2,...)
    字符串拼接(自定义连接符)
    CONCAT_WS()不会忽略任何空字符串。 (然而会忽略所有的 NULL)。

CONV(N,from_base,to_base)
    进制转换
    例如:
        SELECT CONV('a',16,2); 表示将 a 由16进制转换为2进制字符串表示

FORMAT(X,D)
    将数字X 的格式写为'#,###,###.##',以四舍五入的方式保留小数点后 D 位, 并将结果以字符串的形式返回。若  D 为 0, 则返回结果不带有小数点,或不含小数部分。
    例如:
        SELECT FORMAT(12332.1,4); 结果为: '12,332.1000'
INSERT(str,pos,len,newstr)
    在str的指定位置插入字符串
        pos:要替换位置其实位置
        len:替换的长度
        newstr:新字符串
    特别的:
        如果pos超过原字符串长度,则返回原字符串
        如果len超过原字符串长度,则由新字符串完全替换
INSTR(str,substr)
    返回字符串 str 中子字符串的第一个出现位置。

LEFT(str,len)
    返回字符串str 从开始的len位置的子序列字符。

LOWER(str)
    变小写

UPPER(str)
    变大写

LTRIM(str)
    返回字符串 str ,其引导空格字符被删除。
RTRIM(str)
    返回字符串 str ,结尾空格字符被删去。
SUBSTRING(str,pos,len)
    获取字符串子序列

LOCATE(substr,str,pos)
    获取子序列索引位置

REPEAT(str,count)
    返回一个由重复的字符串str 组成的字符串,字符串str的数目等于count 。
    若 count <= 0,则返回一个空字符串。
    若str 或 count 为 NULL,则返回 NULL 。
REPLACE(str,from_str,to_str)
    返回字符串str 以及所有被字符串to_str替代的字符串from_str 。
REVERSE(str)
    返回字符串 str ,顺序和字符顺序相反。
RIGHT(str,len)
    从字符串str 开始,返回从后边开始len个字符组成的子序列

SPACE(N)
    返回一个由N空格组成的字符串。

SUBSTRING(str,pos) , SUBSTRING(str FROM pos) SUBSTRING(str,pos,len) , SUBSTRING(str FROM pos FOR len)
    不带有len 参数的格式从字符串str返回一个子字符串,起始于位置 pos。带有len参数的格式从字符串str返回一个长度同len字符相同的子字符串,起始于位置 pos。 使用 FROM的格式为标准 SQL 语法。也可能对pos使用一个负值。假若这样,则子字符串的位置起始于字符串结尾的pos 字符,而不是字符串的开头位置。在以下格式的函数中可以对pos 使用一个负值。

    mysql> SELECT SUBSTRING('Quadratically',5);
        -> 'ratically'

    mysql> SELECT SUBSTRING('foobarbar' FROM 4);
        -> 'barbar'

    mysql> SELECT SUBSTRING('Quadratically',5,6);
        -> 'ratica'

    mysql> SELECT SUBSTRING('Sakila', -3);
        -> 'ila'

    mysql> SELECT SUBSTRING('Sakila', -5, 3);
        -> 'aki'

    mysql> SELECT SUBSTRING('Sakila' FROM -4 FOR 2);
        -> 'ki'

TRIM([{BOTH | LEADING | TRAILING} [remstr] FROM] str) TRIM(remstr FROM] str)
    返回字符串 str , 其中所有remstr 前缀和/或后缀都已被删除。若分类符BOTH、LEADIN或TRAILING中没有一个是给定的,则假设为BOTH 。 remstr 为可选项,在未指定情况下,可删除空格。

    mysql> SELECT TRIM('  bar   ');
            -> 'bar'

    mysql> SELECT TRIM(LEADING 'x' FROM 'xxxbarxxx');
            -> 'barxxx'

    mysql> SELECT TRIM(BOTH 'x' FROM 'xxxbarxxx');
            -> 'bar'

    mysql> SELECT TRIM(TRAILING 'xyz' FROM 'barxxyz');
            -> 'barx'
更多函数:https://dev.mysql.com/doc/refman/5.7/en/functions.html
当然,MySQL中也支持让你去自定义函数。
-
创建函数
delimiter $$ -- $$修改 ;不让sql语句结束 create function f1( i1 int, i2 int) returns int BEGIN declare num int; declare maxId int; select max(id) from big into maxId; set num = i1 + i2 + maxId; return(num); END $$ delimiter ; -- 改回 ; 让sql语句以分号结束。 -
执行函数
select f1(11,22); select f1(11,id),name from d1; -
删除函数
drop function f1;
3. 存储过程
存储过程,是一个存储在MySQL中的SQL语句集合,当主动去调用存储过程时,其中内部的SQL语句会按照逻辑执行。
[外链图片转存失败,源站可能有防盗链机制,建议将图片保存下来直接上传(img-4fyh80YW-1648216045239)(/Users/daihao/Documents/第四模块MySQL数据库.assets/image-20210531174813902.png)]
-
创建存储过程
delimiter $$ create procedure p1() BEGIN select * from d1; END $$ delimiter ; -
执行存储过程
call p1();#!/usr/bin/env python # -*- coding:utf-8 -*- import pymysql conn = pymysql.connect(host='127.0.0.1', port=3306, user='root', passwd='root123', db='userdb') cursor = conn.cursor(cursor=pymysql.cursors.DictCursor) # 执行存储过程 cursor.callproc('p1') result = cursor.fetchall() cursor.close() conn.close() print(result) -
删除存储过程
drop procedure proc_name;
3.1 参数类型
存储过程的参数可以有如下三种:
- in,仅用于传入参数用
- out,仅用于返回值用
- inout,既可以传入又可以当作返回值
delimiter $$
create procedure p2(
    in i1 int,
    in i2 int,
    inout i3 int,
    out r1 int
)
BEGIN
    DECLARE temp1 int;
    DECLARE temp2 int default 0;

    set temp1 = 1;

    set r1 = i1 + i2 + temp1 + temp2;

    set i3 = i3 + 100;

end $$
delimiter ;
set @t1 =4;
set @t2 = 0;
CALL p2 (1, 2 ,@t1, @t2);
SELECT @t1,@t2;
#!/usr/bin/env python
# -*- coding:utf-8 -*-
import pymysql

conn = pymysql.connect(host='127.0.0.1', port=3306, user='root', passwd='root123', db='userdb')
cursor = conn.cursor(cursor=pymysql.cursors.DictCursor)

# 执行存储过程
cursor.callproc('p2',args=(1, 22, 3, 4))

# 获取执行完存储的参数
cursor.execute("select @_p2_0,@_p2_1,@_p2_2,@_p2_3")
result = cursor.fetchall()
# {"@_p2_0":11 }

cursor.close()
conn.close()

print(result)
3.2 返回值 & 结果集
delimiter $$
create procedure p3(
    in n1 int,
    inout n2 int,
    out n3 int
)
begin
    set n2 = n1 + 100;
    set n3 = n2 + n1 + 100;
    select * from d1;
end $$
delimiter ;
set @t1 =4;
set @t2 = 0;
CALL p3 (1,@t1, @t2);
SELECT @t1,@t2;
#!/usr/bin/env python
# -*- coding:utf-8 -*-
import pymysql

conn = pymysql.connect(host='127.0.0.1', port=3306, user='root', passwd='root123', db='userdb')
cursor = conn.cursor(cursor=pymysql.cursors.DictCursor)
# 执行存储过程
cursor.callproc('p3',args=(22, 3, 4))
table = cursor.fetchall() # 得到执行存储过中的结果集

# 获取执行完存储的参数
cursor.execute("select @_p3_0,@_p3_1,@_p3_2")
rets = cursor.fetchall()

cursor.close()
conn.close()

print(table)
print(rets)
3.3 事务 & 异常
事务,成功都成功,失败都失败。
delimiter $$
create PROCEDURE p4(
    OUT p_return_code tinyint
)
BEGIN
  DECLARE exit handler for sqlexception
  BEGIN
    -- ERROR
    set p_return_code = 1;
    rollback;
  END;

  DECLARE exit handler for sqlwarning
  BEGIN
    -- WARNING
    set p_return_code = 2;
    rollback;
  END;

  START TRANSACTION;  -- 开启事务
    delete from d1;
    insert into tb(name)values('seven');
  COMMIT;  -- 提交事务

  -- SUCCESS
  set p_return_code = 0;

  END $$
delimiter ;
set @ret =100;
CALL p4(@ret);
SELECT @ret;
#!/usr/bin/env python
# -*- coding:utf-8 -*-
import pymysql

conn = pymysql.connect(host='127.0.0.1', port=3306, user='root', passwd='root123', db='userdb')
cursor = conn.cursor(cursor=pymysql.cursors.DictCursor)
# 执行存储过程
cursor.callproc('p4',args=(100))

# 获取执行完存储的参数
cursor.execute("select @_p4_0")
rets = cursor.fetchall()

cursor.close()
conn.close()

print(table)
print(rets)
3.4 游标
delimiter $$
create procedure p5()
begin
    declare sid int;
    declare sname varchar(50);
    declare done int default false;


    declare my_cursor CURSOR FOR select id,name from d1;

    DECLARE CONTINUE HANDLER FOR NOT FOUND SET done = TRUE;

    open my_cursor;
        xxoo: LOOP
            fetch my_cursor into sid,sname;
            IF done then
                leave xxoo;
            END IF;
            insert into t1(name) values(sname);
        end loop xxoo;
    close my_cursor;
end $$
delimiter ;
call p5();
4.视图
视图其实是一个虚拟表(非真实存在),其本质是【根据SQL语句获取动态的数据集,并为其命名】,用户使用时只需使用【名称】即可获取结果集,并可以将其当作表来使用。
SELECT
    *
FROM
    (SELECT nid,name FROM tb1 WHERE nid > 2) AS A
WHERE
    A.name > 'alex';
-
创建视图
create view v1 as select id,name from d1 where id > 1; -
使用视图
select * from v1; -- select * from (select id,name from d1 where id > 1) as v1; -
删除视图
drop view v1; -
修改视图
alter view v1 as SQL语句
注意:基于视图只能查询,针对视图不能执行 增加、修改、删除。 如果源表发生变化,视图表也会发生变化。
5.触发器
[外链图片转存失败,源站可能有防盗链机制,建议将图片保存下来直接上传(img-lXoEHq4m-1648216045239)(/Users/daihao/Documents/第四模块MySQL数据库.assets/image-20210531181738177.png)]
对某个表进行【增/删/改】操作的前后如果希望触发某个特定的行为时,可以使用触发器。
# 插入前
CREATE TRIGGER tri_before_insert_tb1 BEFORE INSERT ON tb1 FOR EACH ROW
BEGIN
    ...
END

# 插入后
CREATE TRIGGER tri_after_insert_tb1 AFTER INSERT ON tb1 FOR EACH ROW
BEGIN
    ...
END

# 删除前
CREATE TRIGGER tri_before_delete_tb1 BEFORE DELETE ON tb1 FOR EACH ROW
BEGIN
    ...
END

# 删除后
CREATE TRIGGER tri_after_delete_tb1 AFTER DELETE ON tb1 FOR EACH ROW
BEGIN
    ...
END

# 更新前
CREATE TRIGGER tri_before_update_tb1 BEFORE UPDATE ON tb1 FOR EACH ROW
BEGIN
    ...
END

# 更新后
CREATE TRIGGER tri_after_update_tb1 AFTER UPDATE ON tb1 FOR EACH ROW
BEGIN
    ...
END
DROP TRIGGER tri_after_insert_tb1;
示例:
-
在 t1 表中插入数据之前,先在 t2 表中插入一行数据。
delimiter $$
CREATE TRIGGER tri_before_insert_t1 BEFORE INSERT ON t1 FOR EACH ROW
BEGIN
	-- NEW.id  NEW.name  NEW.email
	-- INSERT INTO t2 (name) VALUES();
	IF NEW.name = 'alex' THEN
        INSERT INTO t2 (name) VALUES(NEW.id);
    END IF;

END $$
delimiter ;
insert into t1(id,name,email)values(1,"alex","xxx@qq.com") -
在t1表中删除数据之后,再在t2表中插入一行数据。
delimiter $$
CREATE TRIGGER tri_after_insert_t1 AFTER DELETE ON t1 FOR EACH ROW
BEGIN

IF OLD.name = 'alex' THEN
    INSERT INTO t2 (name) VALUES(OLD.id);
END IF;

END $$
delimiter ;
特别的:NEW表示新数据,OLD表示原来的数据。
总结
对于Python开发人员,其实在开发过程中触发器、视图、存储过程用的很少(以前搞C#经常写存储过程),最常用的其实就是正确的使用索引以及常见的函数。
- 索引,加速查找 & 约束。
- innodb和myisam的区别,聚簇索引 和 非聚簇索引。
- 常见的索引:主键、唯一、普通。
- 命中索引
- 执行计划
- 函数,提供了一些常见操作 & 配合SQL语句,执行后返回结果。
- 存储过程,一个SQL语句的集合,可以出发复杂的情况,最终可以返回结果 + 数据集。
- 视图,一个虚拟的表。
- 触发器,在表中数据行执行前后自定义一些操作。
day29 Python操作MySQL和实战
[外链图片转存失败,源站可能有防盗链机制,建议将图片保存下来直接上传(img-AXOJF9Dk-1648216045239)(/Users/daihao/Documents/第四模块MySQL数据库.assets/image-20210531185255250.png)]
课程目标:掌握事务和锁以及Python操作MySQL的各种开发必备知识。
课程概要:
- 事务
- 锁
- 数据库连接池
- SQL工具类
- 其他
1. 事务
innodb引擎中支持事务,myisam不支持。
CREATE TABLE `users` (
  `id` int(11) NOT NULL AUTO_INCREMENT PRIMARY KEY,
  `name` varchar(32) DEFAULT NULL,
  `amount` int(11) DEFAULT NULL
) ENGINE=InnoDB DEFAULT CHARSET=utf8;
[外链图片转存失败,源站可能有防盗链机制,建议将图片保存下来直接上传(img-npviJoQp-1648216045239)(/Users/daihao/Documents/第四模块MySQL数据库.assets/image-20210527145549634.png)]
例如:李杰 给 武沛齐 转账 100,那就会涉及2个步骤。
- 李杰账户 减100
- 武沛齐账户 加 100
这两个步骤必须同时完成才算完成,并且如果第一个完成、第二步失败,还是回滚到初始状态。
事务,就是来解决这种情况的。 大白话:要成功都成功;要失败都失败。
事务的具有四大特性(ACID):
-
原子性(Atomicity)
原子性是指事务包含的所有操作不可分割,要么全部成功,要么全部失败回滚。 -
一致性(Consistency)
执行的前后数据的完整性保持一致。 -
隔离性(Isolation)
一个事务执行的过程中,不应该受到其他事务的干扰。 -
持久性(Durability)
事务一旦结束,数据就持久到数据库
1.1 MySQL客户端
mysql> select * from users;
+----+---------+---------+
| id | name    | amount  |
+----+---------+---------+
|  1 | wupeiqi |    5    |
|  2 |  alex   |    6    |
+----+---------+---------+
3 rows in set (0.00 sec)

mysql> begin;  -- 开启事务 start transaction;
Query OK, 0 rows affected (0.00 sec)

mysql> update users set amount=amount-2 where id=1;   -- 执行操作
Query OK, 1 row affected (0.00 sec)
Rows matched: 1  Changed: 1  Warnings: 0

mysql> update users set amount=amount+2 where id=2;   -- 执行操作
Query OK, 1 row affected (0.00 sec)
Rows matched: 1  Changed: 1  Warnings: 0

mysql> commit;  -- 提交事务  rollback;
Query OK, 0 rows affected (0.00 sec)

mysql> select * from users;
+----+---------+---------+
| id | name    | amount  |
+----+---------+---------+
|  1 | wupeiqi |    3    |
|  2 |  ale x  |    8    |
+----+---------+---------+
3 rows in set (0.00 sec)
mysql> select * from users;
+----+---------+---------+
| id | name    | amount  |
+----+---------+---------+
|  1 | wupeiqi |    3    |
|  2 |  ale x  |    8    |
+----+---------+---------+
3 rows in set (0.00 sec)

mysql> begin; -- 开启事务
Query OK, 0 rows affected (0.00 sec)

mysql> update users set amount=amount-2 where id=1; -- 执行操作(此时数据库中的值已修改)
Query OK, 1 row affected (0.00 sec)
Rows matched: 1  Changed: 1  Warnings: 0

mysql> rollback; -- 事务回滚(回到原来的状态)
Query OK, 0 rows affected (0.00 sec)

mysql> select * from users;
+----+---------+---------+
| id | name    | amount  |
+----+---------+---------+
|  1 | wupeiqi |    3    |
|  2 |  ale x  |    8    |
+----+---------+---------+
3 rows in set (0.00 sec)
1.2 Python代码
import pymysql

conn = pymysql.connect(host='127.0.0.1', port=3306, user='root', passwd='root123', charset="utf8", db='userdb')
cursor = conn.cursor()

# 开启事务
conn.begin()

try:
    cursor.execute("update users set amount=1 where id=1")
    int('asdf')
    cursor.execute("update tran set amount=2 where id=2")
except Exception as e:
    # 回滚
    print("回滚")
    conn.rollback()
else:
    # 提交
    print("提交")
    conn.commit()

cursor.close()
conn.close()
2. 锁
在用MySQL时,不知你是否会疑问:同时有很多做更新、插入、删除动作,MySQL如何保证数据不出错呢?
MySQL中自带了锁的功能,可以帮助我们实现开发过程中遇到的同时处理数据的情况。对于数据库中的锁,从锁的范围来讲有:
- 表级锁,即A操作表时,其他人对整个表都不能操作,等待A操作完之后,才能继续。
- 行级锁,即A操作表时,其他人对指定的行数据不能操作,其他行可以操作,等待A操作完之后,才能继续。
MYISAM支持表锁,不支持行锁;
InnoDB引擎支持行锁和表锁。

即:在MYISAM下如果要加锁,无论怎么加都会是表锁。
    在InnoDB引擎支持下如果是基于索引查询的数据则是行级锁,否则就是表锁。
所以,一般情况下我们会选择使用innodb引擎,并且在 搜索 时也会使用索引(命中索引)。
接下来的操作就基于innodb引擎来操作:
CREATE TABLE `L1` (
  `id` int(11) NOT NULL AUTO_INCREMENT,
  `name` varchar(255) DEFAULT NULL,
  `count` int(11) DEFAULT NULL,
  PRIMARY KEY (`id`)
) ENGINE=InnoDB  DEFAULT CHARSET=utf8;

在innodb引擎中,update、insert、delete的行为内部都会先申请锁(排它锁),申请到之后才执行相关操作,最后再释放锁。
所以,当多个人同时像数据库执行:insert、update、delete等操作时,内部加锁后会排队逐一执行。
而select则默认不会申请锁。
select * from xxx;
如果,你想要让select去申请锁,则需要配合 事务 + 特殊语法来实现。
-
for update,排它锁,加锁之后,其他不可以读写。begin; select * from L1 where name="武沛齐" for update; -- name列不是索引(表锁) commit;begin; -- 或者 start transaction; select * from L1 where id=1 for update; -- id列是索引(行锁) commit; -
lock in share mode,共享锁,加锁之后,其他可读但不可写。begin; select * from L1 where name="武沛齐" lock in share mode; -- 假设name列不是索引(表锁) commit;begin; -- 或者 start transaction; select * from L1 where id=1 lock in share mode; -- id列是索引(行锁) commit;
2.1 排它锁
排它锁( for update),加锁之后,其他事务不可以读写。
应用场景:总共100件商品,每次购买一件需要让商品个数减1 。
A: 访问页面查看商品剩余 100
B: 访问页面查看商品剩余 100

此时 A、B 同时下单,那么他们同时执行SQL:
	update goods set count=count-1 where id=3
由于Innodb引擎内部会加锁,所以他们两个即使同一时刻执行,内部也会排序逐步执行。


但是,当商品剩余 1个时,就需要注意了。
A: 访问页面查看商品剩余 1
B: 访问页面查看商品剩余 1

此时 A、B 同时下单,那么他们同时执行SQL:
	update goods set count=count-1 where id=3
这样剩余数量就会出现 -1,很显然这是不正确的,所以应该怎么办呢?


这种情况下,可以利用 排它锁,在更新之前先查询剩余数量,只有数量 >0 才可以购买,所以,下单时应该执行:
	begin; -- start transaction;
	select count from goods where id=3 for update;
	-- 获取个数进行判断
	if 个数>0:
		update goods set count=count-1 where id=3;
	else:
		-- 已售罄
	commit;
基于Python代码示例:
import pymysql
import threading


def task():
    conn = pymysql.connect(host='127.0.0.1', port=3306, user='root', passwd='root123', charset="utf8", db='userdb')
    cursor = conn.cursor(pymysql.cursors.DictCursor)
    # cursor = conn.cursor()

    # 开启事务
    conn.begin()

    cursor.execute("select id,age from tran where id=2 for update")
    # fetchall      ( {"id":1,"age":10},{"id":2,"age":10}, )   ((1,10),(2,10))
    # {"id":1,"age":10}   (1,10)
    result = cursor.fetchone()
    current_age = result['age']

    if current_age > 0:
        cursor.execute("update tran set age=age-1 where id=2")
    else:
        print("已售罄")

    conn.commit()

    cursor.close()
    conn.close()


def run():
    for i in range(5):
        t = threading.Thread(target=task)
        t.start()


if __name__ == '__main__':
    run()
2.2 共享锁
共享锁( lock in share mode),可以读,但不允许写。
加锁之后,后续其他事物可以可以进行读,但不允许写(update、delete、insert),因为写的默认也会加锁。
Locking Read Examples
Suppose that you want to insert a new row into a table child, and make sure that the child row has a parent row in table parent. Your application code can ensure referential integrity throughout this sequence of operations.
First, use a consistent read to query the table PARENT and verify that the parent row exists. Can you safely insert the child row to table CHILD? No, because some other session could delete the parent row in the moment between your SELECT and your INSERT, without you being aware of it.
To avoid this potential issue, perform the SELECT using LOCK IN SHARE MODE:
SELECT * FROM parent WHERE NAME = 'Jones' LOCK IN SHARE MODE;
After the LOCK IN SHARE MODE query returns the parent 'Jones', you can safely add the child record to the CHILD table and commit the transaction. Any transaction that tries to acquire an exclusive lock in the applicable row in the PARENT table waits until you are finished, that is, until the data in all tables is in a consistent state.
3. 数据库连接池
在操作数据库时需要使用数据库连接池。
pip3.9 install pymysql
pip3.9 install dbutils
import threading
import pymysql
from dbutils.pooled_db import PooledDB

MYSQL_DB_POOL = PooledDB(
    creator=pymysql,  # 使用链接数据库的模块
    maxconnections=5,  # 连接池允许的最大连接数,0和None表示不限制连接数
    mincached=2,  # 初始化时,链接池中至少创建的空闲的链接,0表示不创建
    maxcached=3,  # 链接池中最多闲置的链接,0和None不限制
    blocking=True,  # 连接池中如果没有可用连接后,是否阻塞等待。True,等待;False,不等待然后报错
    setsession=[],  # 开始会话前执行的命令列表。如:["set datestyle to ...", "set time zone ..."]
    ping=0,
    # ping MySQL服务端,检查是否服务可用。
    # 如:0 = None = never, 1 = default = whenever it is requested,
    # 2 = when a cursor is created, 4 = when a query is executed, 7 = always
    host='127.0.0.1',
    port=3306,
    user='root',
    password='root123',
    database='userdb',
    charset='utf8'
)


def task():
    # 去连接池获取一个连接
    conn = MYSQL_DB_POOL.connection()
    cursor = conn.cursor(pymysql.cursors.DictCursor)

    cursor.execute('select sleep(2)')
    result = cursor.fetchall()
    print(result)

    cursor.close()
    # 将连接交换给连接池
    conn.close()

def run():
    for i in range(10):
        t = threading.Thread(target=task)
        t.start()


if __name__ == '__main__':
    run()
4. SQL工具类
基于数据库连接池开发一个公共的SQL操作类,方便以后操作数据库。
4.1 单例和方法
# db.py
import pymysql
from dbutils.pooled_db import PooledDB


class DBHelper(object):

    def __init__(self):
        # TODO 此处配置,可以去配置文件中读取。
        self.pool = PooledDB(
            creator=pymysql,  # 使用链接数据库的模块
            maxconnections=5,  # 连接池允许的最大连接数,0和None表示不限制连接数
            mincached=2,  # 初始化时,链接池中至少创建的空闲的链接,0表示不创建
            maxcached=3,  # 链接池中最多闲置的链接,0和None不限制
            blocking=True,  # 连接池中如果没有可用连接后,是否阻塞等待。True,等待;False,不等待然后报错
            setsession=[],  # 开始会话前执行的命令列表。如:["set datestyle to ...", "set time zone ..."]
            ping=0,
            # ping MySQL服务端,检查是否服务可用。# 如:0 = None = never, 1 = default = whenever it is requested, 2 = when a cursor is created, 4 = when a query is executed, 7 = always
            host='127.0.0.1',
            port=3306,
            user='root',
            password='root123',
            database='userdb',
            charset='utf8'
        )

    def get_conn_cursor(self):
        conn = self.pool.connection()
        cursor = conn.cursor(pymysql.cursors.DictCursor)
        return conn, cursor

    def close_conn_cursor(self, *args):
        for item in args:
            item.close()

    def exec(self, sql, **kwargs):
        conn, cursor = self.get_conn_cursor()

        cursor.execute(sql, kwargs)
        conn.commit()

        self.close_conn_cursor(conn, cursor)

    def fetch_one(self, sql, **kwargs):
        conn, cursor = self.get_conn_cursor()

        cursor.execute(sql, kwargs)
        result = cursor.fetchone()

        self.close_conn_cursor(conn, cursor)
        return result

    def fetch_all(self, sql, **kwargs):
        conn, cursor = self.get_conn_cursor()

        cursor.execute(sql, kwargs)
        result = cursor.fetchall()

        self.close_conn_cursor(conn, cursor)

        return result


db = DBHelper()
from db import db

db.exec("insert into d1(name) values(%(name)s)", name="武沛齐666")

ret = db.fetch_one("select * from d1")
print(ret)

ret = db.fetch_one("select * from d1 where id=%(nid)s", nid=3)
print(ret)

ret = db.fetch_all("select * from d1")
print(ret)

ret = db.fetch_all("select * from d1 where id>%(nid)s", nid=2)
print(ret)
4.2 上下文管理
如果你想要让他也支持 with 上下文管理。
with 获取连接:
	执行SQL(执行完毕后,自动将连接交还给连接池)
# db_context.py
import threading
import pymysql
from dbutils.pooled_db import PooledDB

POOL = PooledDB(
    creator=pymysql,  # 使用链接数据库的模块
    maxconnections=5,  # 连接池允许的最大连接数,0和None表示不限制连接数
    mincached=2,  # 初始化时,链接池中至少创建的空闲的链接,0表示不创建
    maxcached=3,  # 链接池中最多闲置的链接,0和None不限制
    blocking=True,  # 连接池中如果没有可用连接后,是否阻塞等待。True,等待;False,不等待然后报错
    setsession=[],  # 开始会话前执行的命令列表。如:["set datestyle to ...", "set time zone ..."]
    ping=0,
    host='127.0.0.1',
    port=3306,
    user='root',
    password='root123',
    database='userdb',
    charset='utf8'
)


class Connect(object):
    def __init__(self):
        self.conn = conn = POOL.connection()
        self.cursor = conn.cursor(pymysql.cursors.DictCursor)

    def __enter__(self):
        return self

    def __exit__(self, exc_type, exc_val, exc_tb):
        self.cursor.close()
        self.conn.close()

    def exec(self, sql, **kwargs):
        self.cursor.execute(sql, kwargs)
        self.conn.commit()

    def fetch_one(self, sql, **kwargs):
        self.cursor.execute(sql, kwargs)
        result = self.cursor.fetchone()
        return result

    def fetch_all(self, sql, **kwargs):
        self.cursor.execute(sql, kwargs)
        result = self.cursor.fetchall()
        return result
from db_context import Connect

with Connect() as obj:
    # print(obj.conn)
    # print(obj.cursor)
    ret = obj.fetch_one("select * from d1")
    print(ret)

    ret = obj.fetch_one("select * from d1 where id=%(id)s", id=3)
    print(ret)
5.其他
navicat,是一个桌面应用,让我们可以更加方便的管理MySQL数据库。
- mac系统:https://www.macdo.cn/17030.html
- win系统:
- 链接: https://pan.baidu.com/s/13cjbrBquz9vjVqKgWoCQ1w 密码: qstp
- 链接: https://pan.baidu.com/s/1JULIIwQA5s0qN98KP8UXHA 密码: p18f
总结
本节内容比较重要,也是开发中经常会使用到的技能。
- 事务,解决批量操作同时成功或失败的问题。
- 锁,解决并发处理的问题。
- 数据库连接池,解决多个人请求连接数据库的问题。
- SQL工具类,解决连接数据库代码重复的问题。
- navicat工具


 492
492


 被折叠的 条评论
为什么被折叠?
被折叠的 条评论
为什么被折叠?
 到【灌水乐园】发言


