


fastapi框架
FastApi,一个用于构建API的现代、快速(高性能)的web框架。
- 快速:可与 NodeJS 和 Go 比肩的极高性能(归功于 Starlette 和 Pydantic),是最快的 Python web 框架之一。
- 高效编码:提高功能开发速度约 200% 至 300%。
- 更少bug:减少约 40% 的人为(开发者)导致错误。
- 智能:极佳的编辑器支持。处处皆可自动补全,减少调试时间。
- 简单:设计的易于使用和学习,阅读文档的时间更短。
- 简短:使代码重复最小化。通过不同的参数声明实现丰富功能。
- 健壮:生产可用级别的代码。还有自动生成的交互式文档。
依赖:Python 3.6 及更高版本,FastAPI 站在以下巨人的肩膀之上:
Starlette 负责 web 部分。
Pydantic 负责数据部分。
广泛应用于当前各种前后端分离的项目开发,测试运维自动化以及微服务的场景中。
一、预备知识点
1.1、http协议
1.什么是请求头请求体,响应头响应体
2.URL地址包括什么
3.get请求和post请求到底是什么
4.Content-Type是什么
一、简介
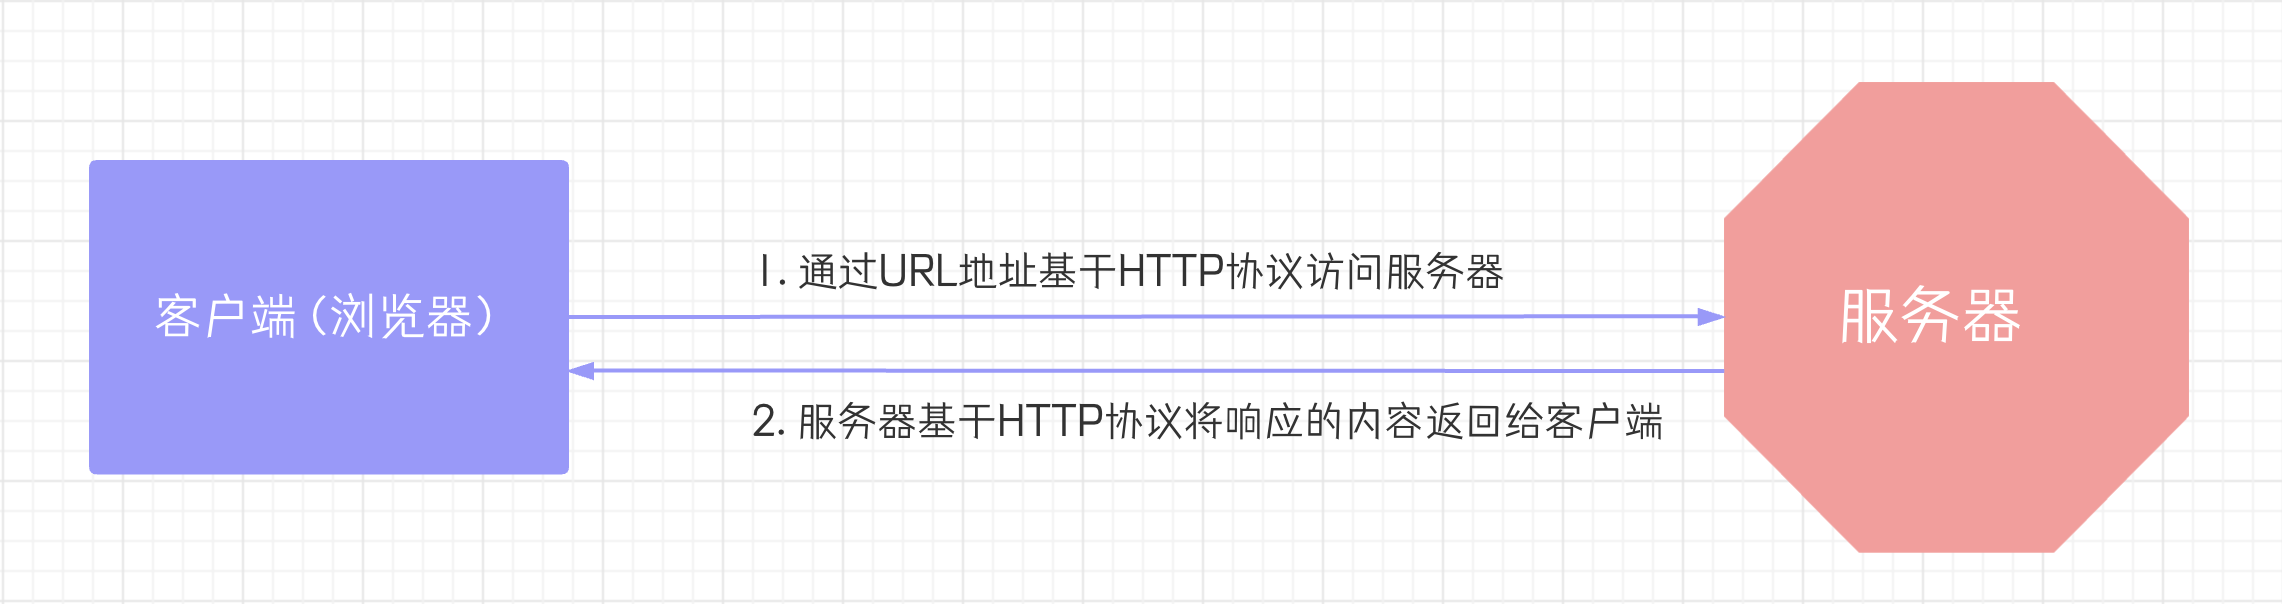
HTTP协议是Hyper Text Transfer Protocol(超文本传输协议)的缩写,是用于万维网(WWW:World Wide Web )服务器与本地浏览器之间传输超文本的传送协议。HTTP是一个属于应用层的面向对象的协议,由于其简捷、快速的方式,适用于分布式超媒体信息系统。它于1990年提出,经过几年的使用与发展,得到不断地完善和扩展。HTTP协议工作于客户端-服务端架构为上。浏览器作为HTTP客户端通过URL向HTTP服务端即WEB服务器发送所有请求。Web服务器根据接收到的请求后,向客户端发送响应信息。
二、 http协议特性
1.基于TCP/IP协议
http协议是基于TCP/IP协议之上的应用层协议。
(2) 基于请求-响应模式
HTTP协议规定,请求从客户端发出,最后服务器端响应该请求并 返回。换句话说,肯定是先从客户端开始建立通信的,服务器端在没有 接收到请求之前不会发送响应
(3) 无状态保存
HTTP是一种不保存状态,即无状态(stateless)协议。HTTP协议 自身不对请求和响应之间的通信状态进行保存。也就是说在HTTP这个 级别,协议对于发送过的请求或响应都不做持久化处理。
使用HTTP协议,每当有新的请求发送时,就会有对应的新响应产 生。协议本身并不保留之前一切的请求或响应报文的信息。这是为了更快地处理大量事务,确保协议的可伸缩性,而特意把HTTP协议设计成 如此简单的。
(4) 短连接
HTTP1.0默认使用的是短连接。浏览器和服务器每进行一次HTTP操作,就建立一次连接,任务结束就中断连接。
HTTP/1.1起,默认使用长连接。要使用长连接,客户端和服务器的HTTP首部的Connection都要设置为keep-alive,才能支持长连接。
HTTP长连接,指的是复用TCP连接。多个HTTP请求可以复用同一个TCP连接,这就节省了TCP连接建立和断开的消耗。
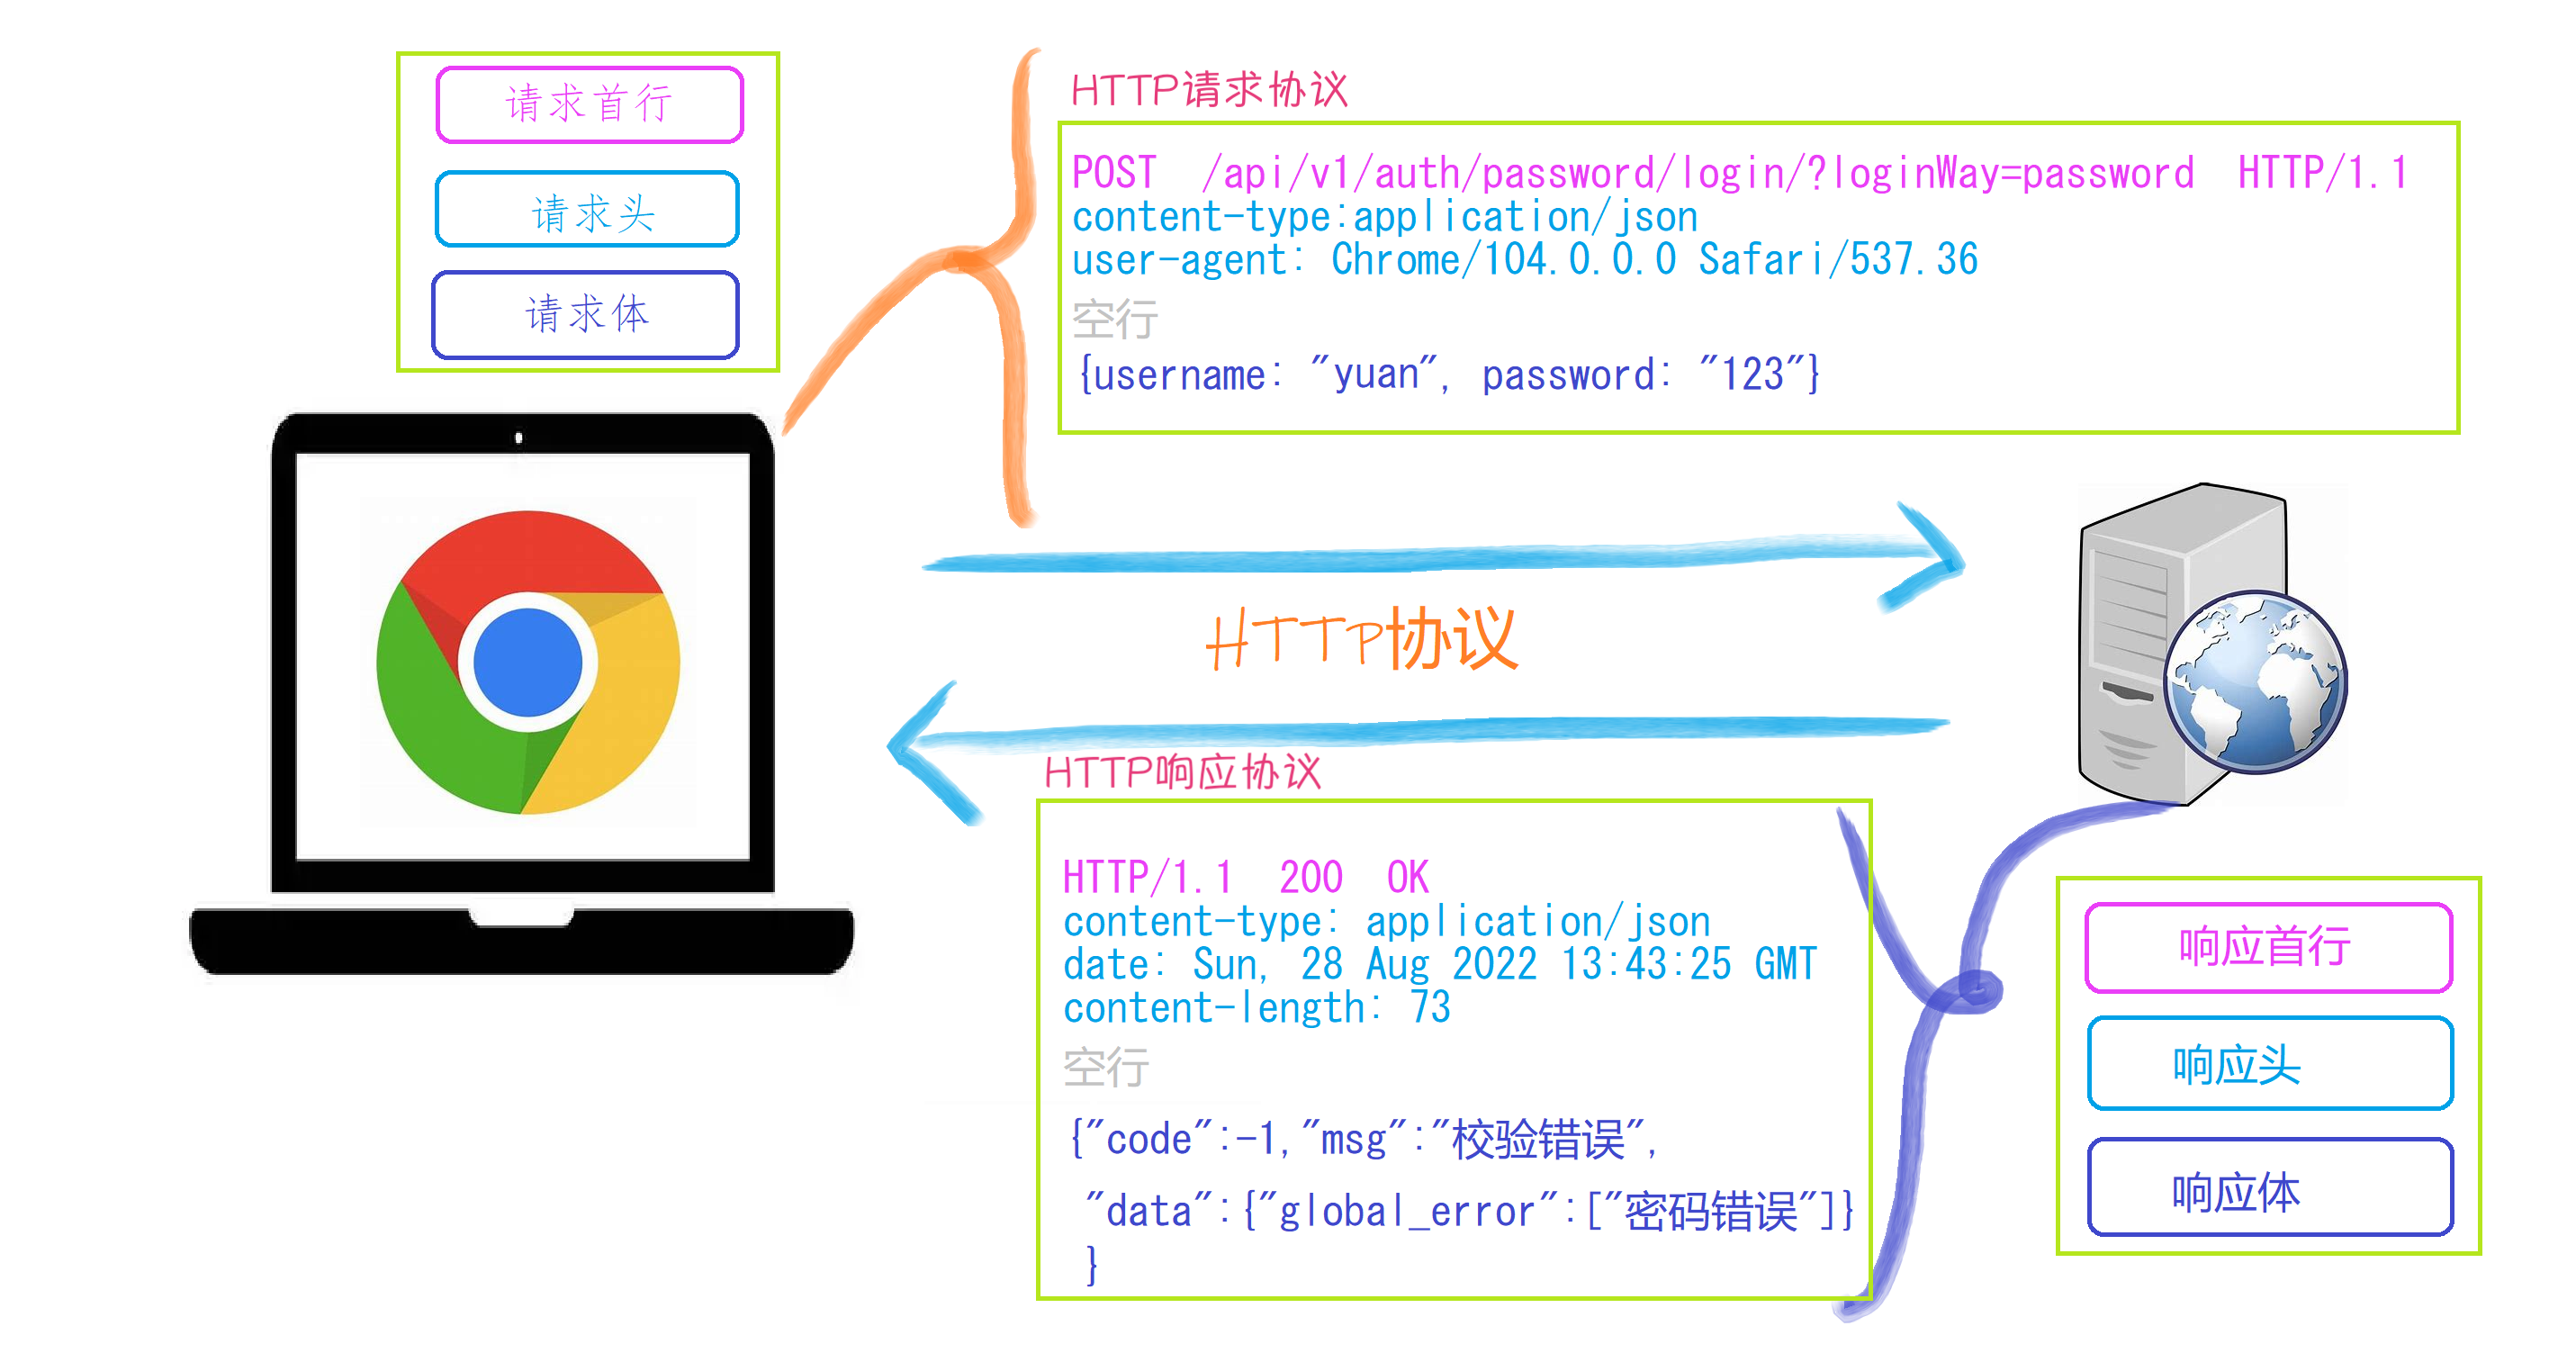
三、http请求协议与响应协议
http协议包含由浏览器发送数据到服务器需要遵循的请求协议与服务器发送数据到浏览器需要遵循的请求协议。用于HTTP协议交互的信被为HTTP报文。请求端(客户端)的HTTP报文 做请求报文,响应端(服务器端)的 做响应报文。HTTP报文本身是由多行数据构成的字文本。
一个完整的URL包括:协议、ip、端口、路径、参数
例如: https://www.baidu.com/s?wd=yuan 其中https是协议,www.baidu.com 是IP,端口默认80,/s是路径,参数是wd=yuan
请求方式: get与post请求
- GET提交的数据会放在URL之后,以?分割URL和传输数据,参数之间以&相连,如EditBook?name=test1&id=123456. POST方法是把提交的数据放在HTTP包的请求体中.
- GET提交的数据大小有限制(因为浏览器对URL的长度有限制),而POST方法提交的数据没有限制
响应状态码:状态码的职 是当客户端向服务器端发送请求时, 返回的请求 结果。借助状态码,用户可以知道服务器端是正常 理了请求,还是出 现了 。状态码如200 OK,以3位数字和原因 组成。
1.2、api接口
在开发web应用中,有两种应用模式:
1.前后端不分离【客户端看到的内容和所有界面效果都是有服务端提供出来的】
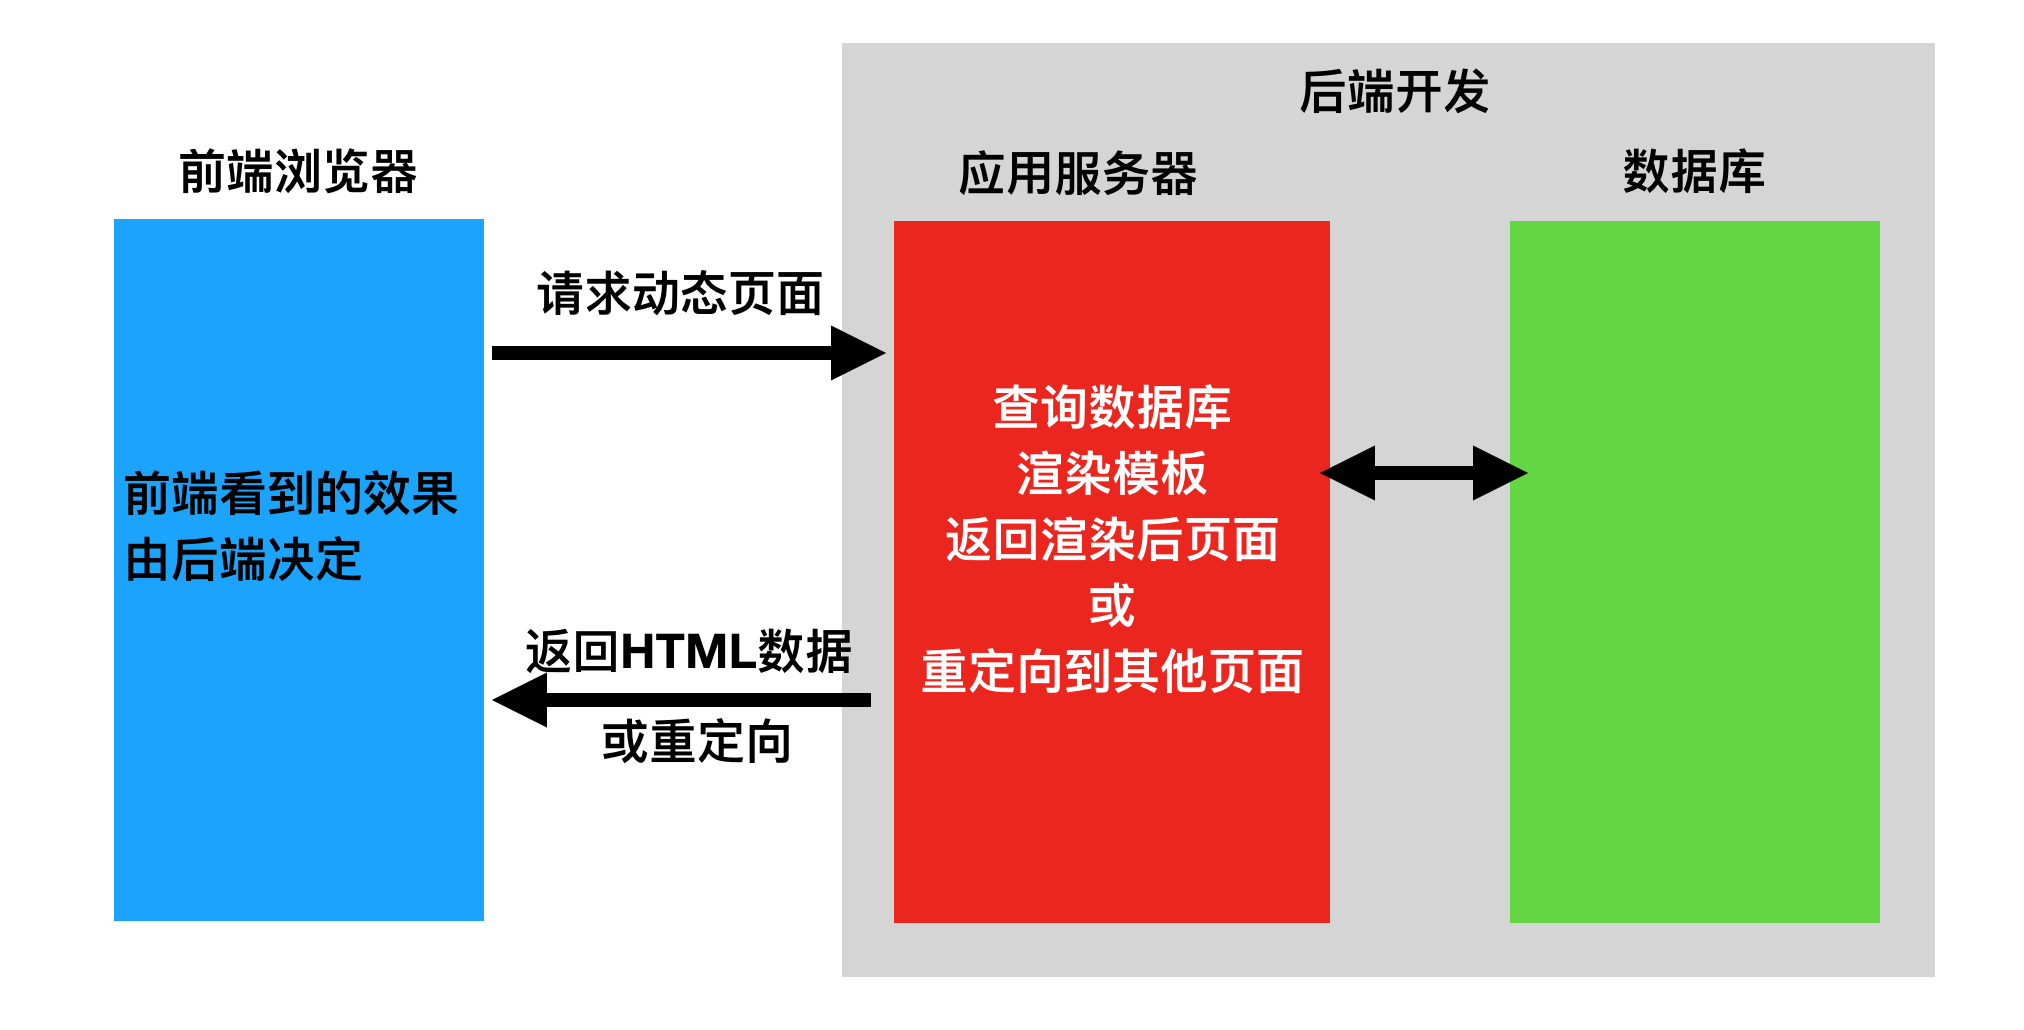
2.前后端分离【把前端的界面效果(HTML,CSS,JS分离到另一个服务端,Python服务端只需要返回数据即可)】
前端形成一个独立的网站,服务端构成一个独立的网站
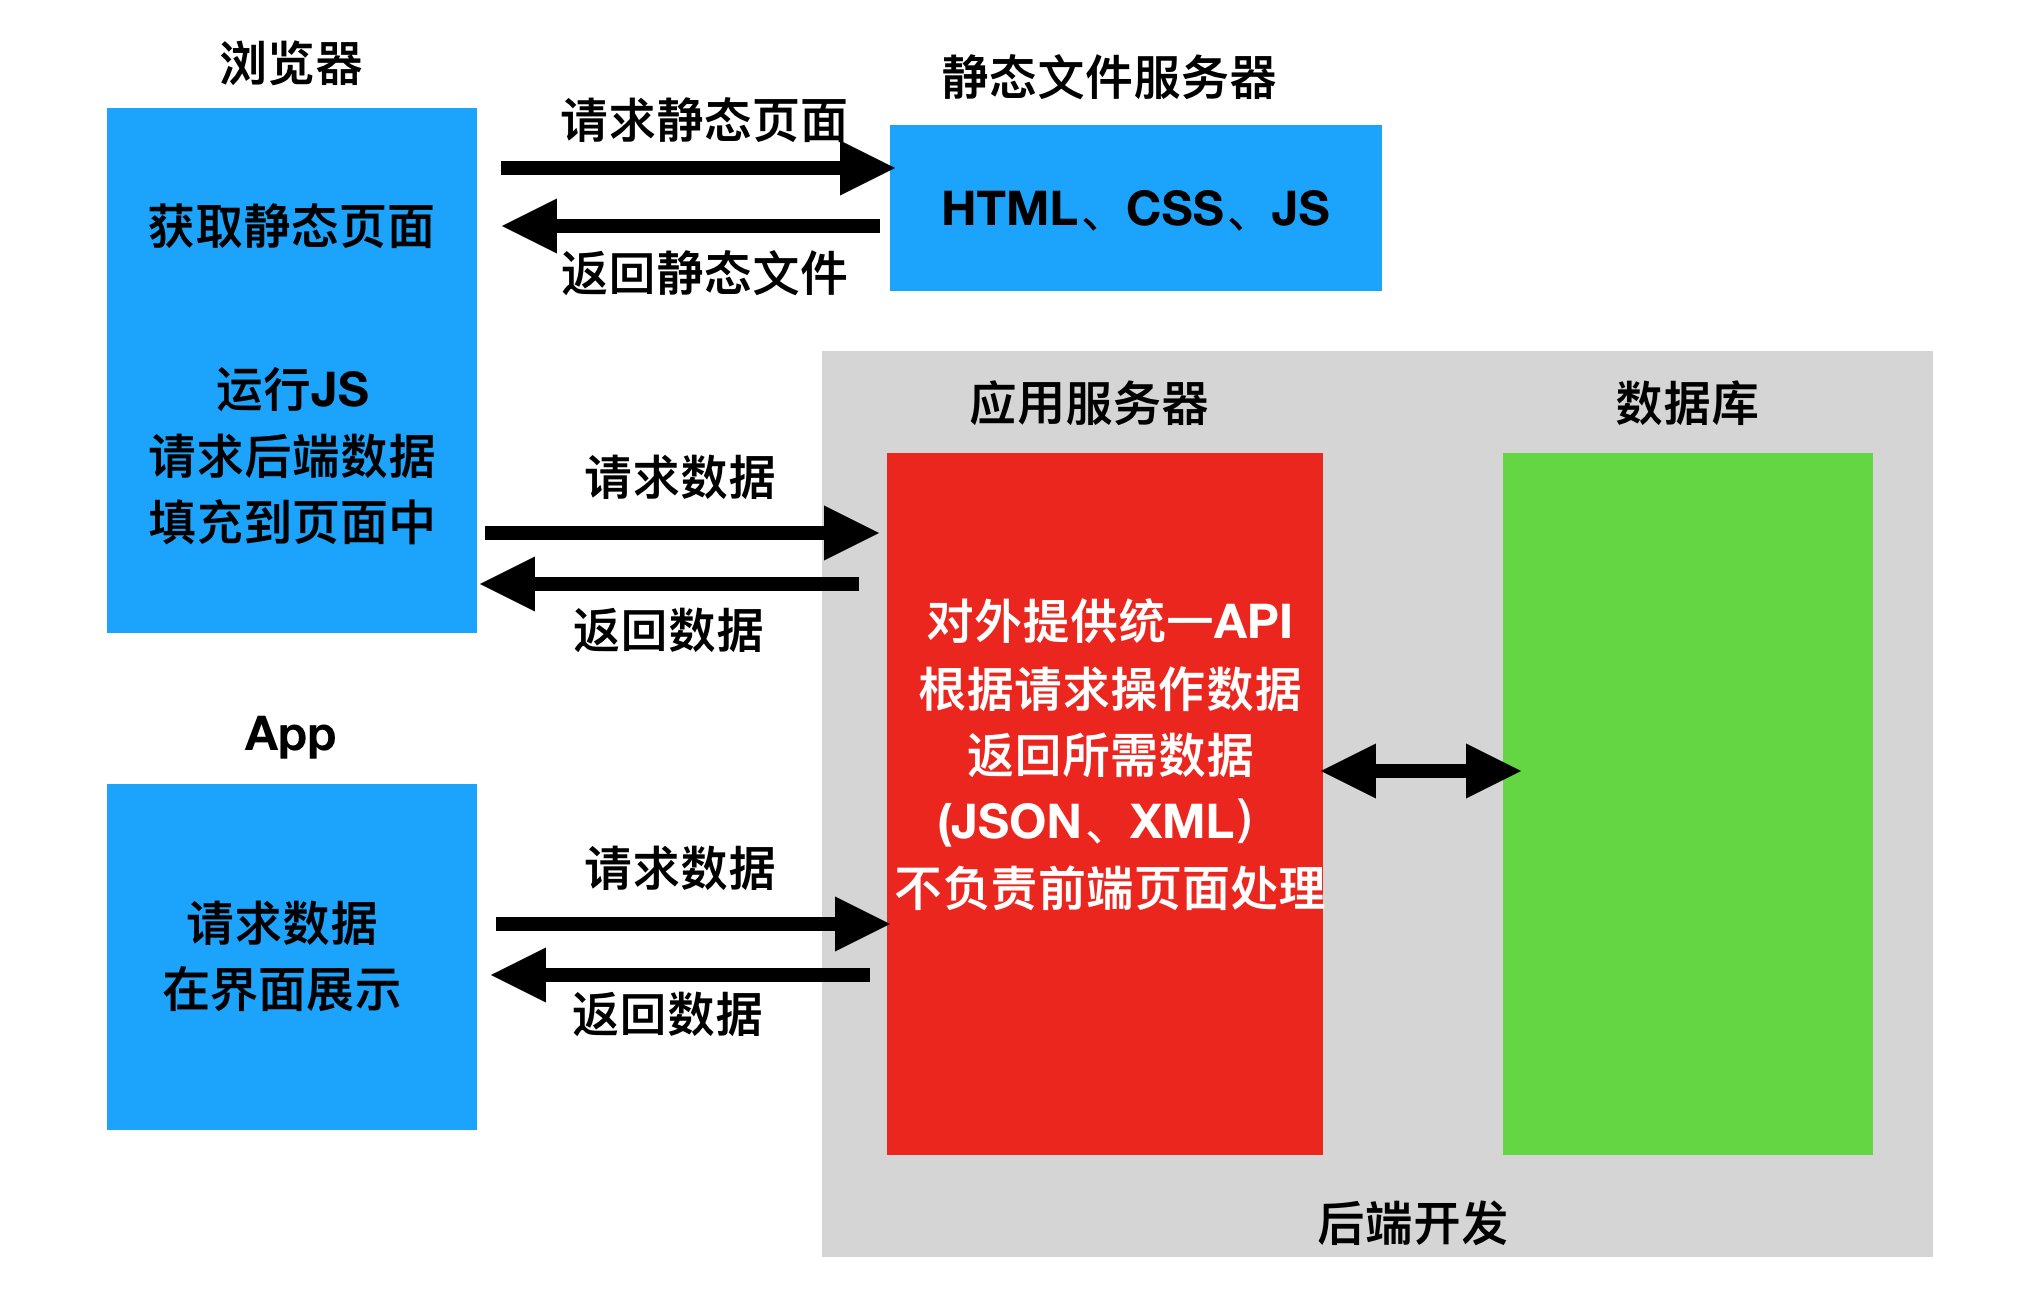
应用程序编程接口(Application Programming Interface,API接口),就是应用程序对外提供了一个操作数据的入口,这个入口可以是一个函数或类方法,也可以是一个url地址或者一个网络地址。当客户端调用这个入口,应用程序则会执行对应代码操作,给客户端完成相对应的功能。
当然,api接口在工作中是比较常见的开发内容,有时候,我们会调用其他人编写的api接口,有时候,我们也需要提供api接口给其他人操作。由此就会带来一个问题,api接口往往都是一个函数、类方法、或者url或其他网络地址,不断是哪一种,当api接口编写过程中,我们都要考虑一个问题就是这个接口应该怎么编写?接口怎么写的更加容易维护和清晰,这就需要大家在调用或者编写api接口的时候要有一个明确的编写规范!!!
为了在团队内部形成共识、防止个人习惯差异引起的混乱,我们都需要找到一种大家都觉得很好的接口实现规范,而且这种规范能够让后端写的接口,用途一目了然,减少客户端和服务端双方之间的合作成本。
目前市面上大部分公司开发人员使用的接口实现规范主要有:restful、RPC。
REST全称是Representational State Transfer,中文意思是表述(编者注:通常译为表征)性状态转移。 它首次出现在2000年Roy Fielding的博士论文中。
RESTful是一种专门为Web 开发而定义API接口的设计风格,尤其适用于前后端分离的应用模式中。
关键:面向资源开发
这种风格的理念认为后端开发任务就是提供数据的,对外提供的是数据资源的访问接口,所以在定义接口时,客户端访问的URL路径就表示这种要操作的数据资源。
而对于数据资源分别使用POST、DELETE、GET、UPDATE等请求动作来表达对数据的增删查改。
| 请求方法 | 请求地址 | 后端操作 |
|---|---|---|
| POST | /student/ | 增加学生 |
| GET | /student/ | 获取所有学生 |
| GET | /student/1 | 获取id为1的学生 |
| PUT | /student/1 | 修改id为1的学生 |
| DELETE | /student/1 | 删除id为1的学生 |
restful规范是一种通用的规范,不限制语言和开发框架的使用。事实上,我们可以使用任何一门语言,任何一个框架都可以实现符合restful规范的API接口。
二、quick start
简单案例
安装
pip install fastapi
你还会需要一个 ASGI 服务器,生产环境可以使用 Uvicorn
pip install uvicorn
代码
from fastapi import FastAPI # FastAPI 是一个为你的API提供了所有的功能Python类

app = FastAPI # 这个示例是常见你所有API的主要交互对象,这个APP同样在如下命令vuvcorn所引用

@app.get("/")
async def root():
    return {"message": "hello hao"}
通过一下命令运行服务器:
uvicorn main:app --reload
INFO:     Uvicorn running on http://127.0.0.1:8000 (Press CTRL+C to quit)
INFO:     Started reloader process [73408]
INFO:     Started server process [73408]
INFO:     Waiting for application startup
INFO:     Application startup complete
也可以执行运行:
if __name__ == '__main__':
    import uvicorn

    uvicorn.run("main:app", host="127.0.0.1", port=8080, debug=True, reload=True)
(1)导入 FastAPI。 (2)创建一个 app 实例。 (3)编写一个路径操作装饰器(如 @app.get("/"))。 (4)编写一个路径操作函数(如上面的 def root(): …) (5)定义返回值 (6)运行开发服务器(如 uvicorn main:app –reload)
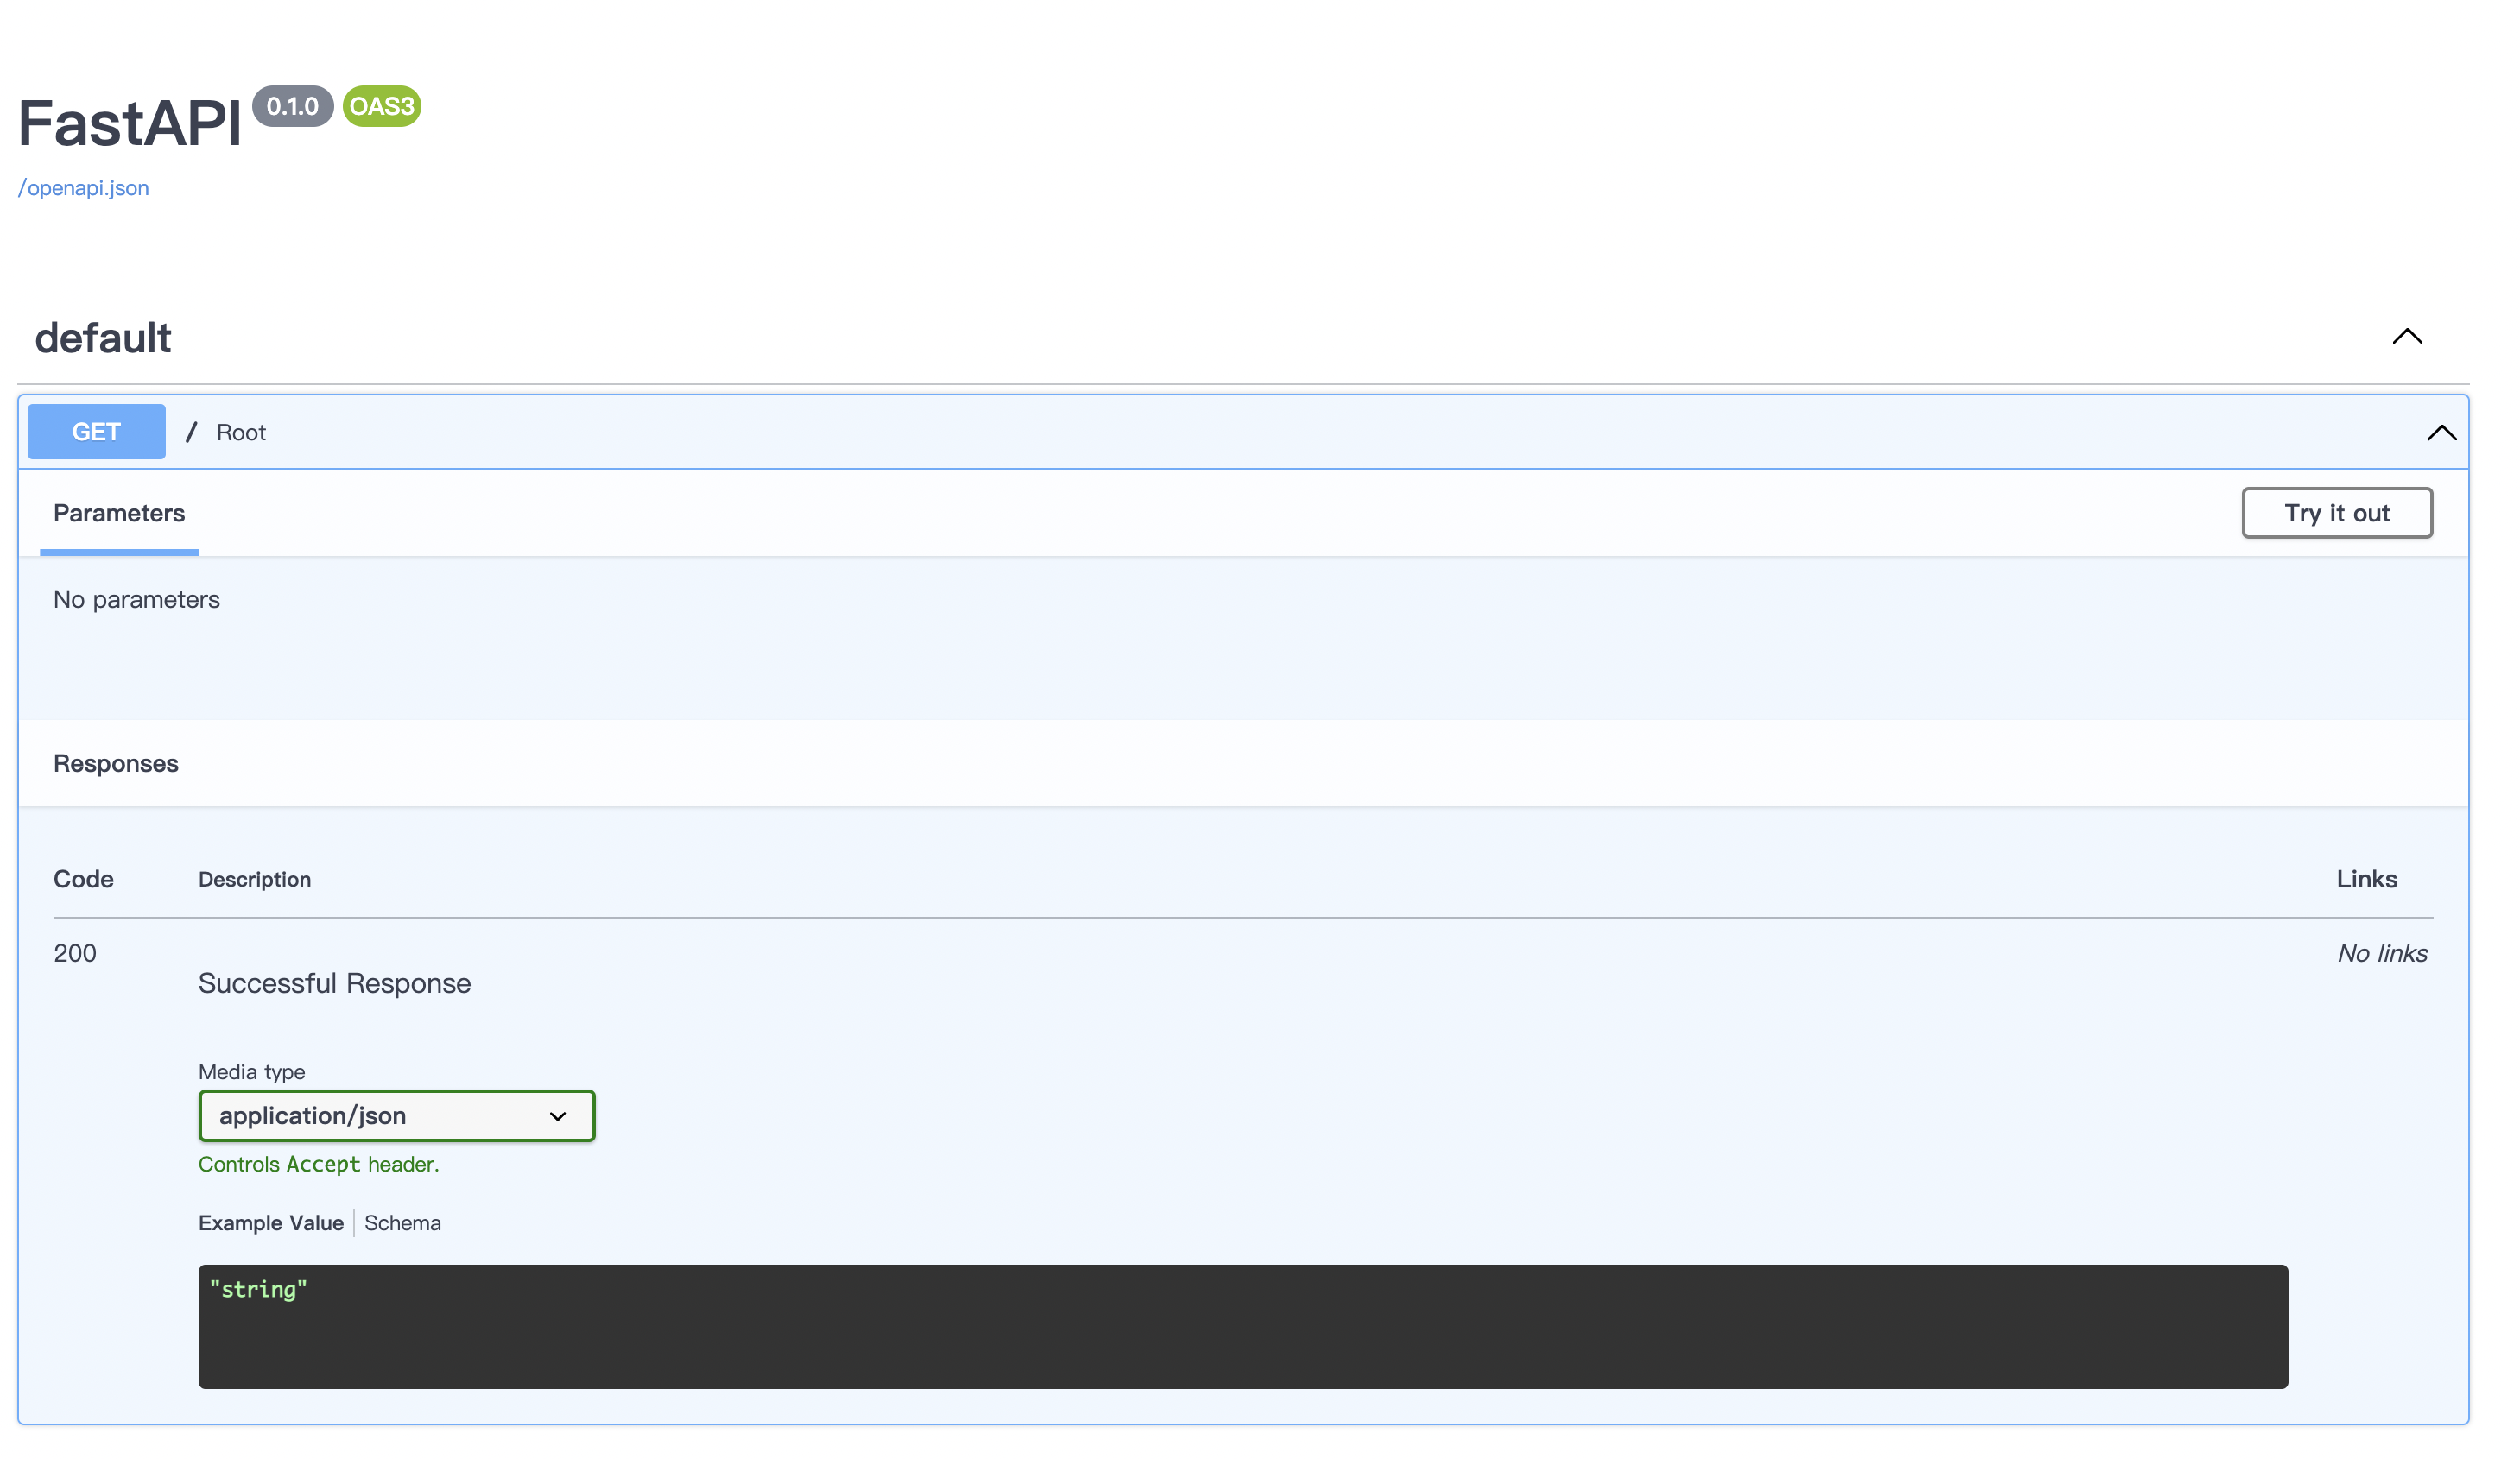
此外,fastapi有这非常棒的交互式API文档,这一点很吸引人。
跳转到 http://127.0.0.1:8000/docs。你将会看到自动生成的交互式 API 文档。
三、路径操作
路径操作装饰器
fastapi支持各种请求方式:
@app.get()
@app.post()
@app.put()
@app.delete()
@app.patch()
@app.options()
@app.head()
@app.trace()
from typing import Union
from fastapi import FastAPI
from pydantic import BaseModel
app = FastAPI()
@app.get("/get")
def get_test():
return {"method": "get方法"}
@app.post("/post")
def post_test():
return {"method": "post方法"}
@app.put("/put")
def put_test():
return {"method": "put方法"}
@app.delete("/delete")
def delete_test():
return {"method": "delete方法"}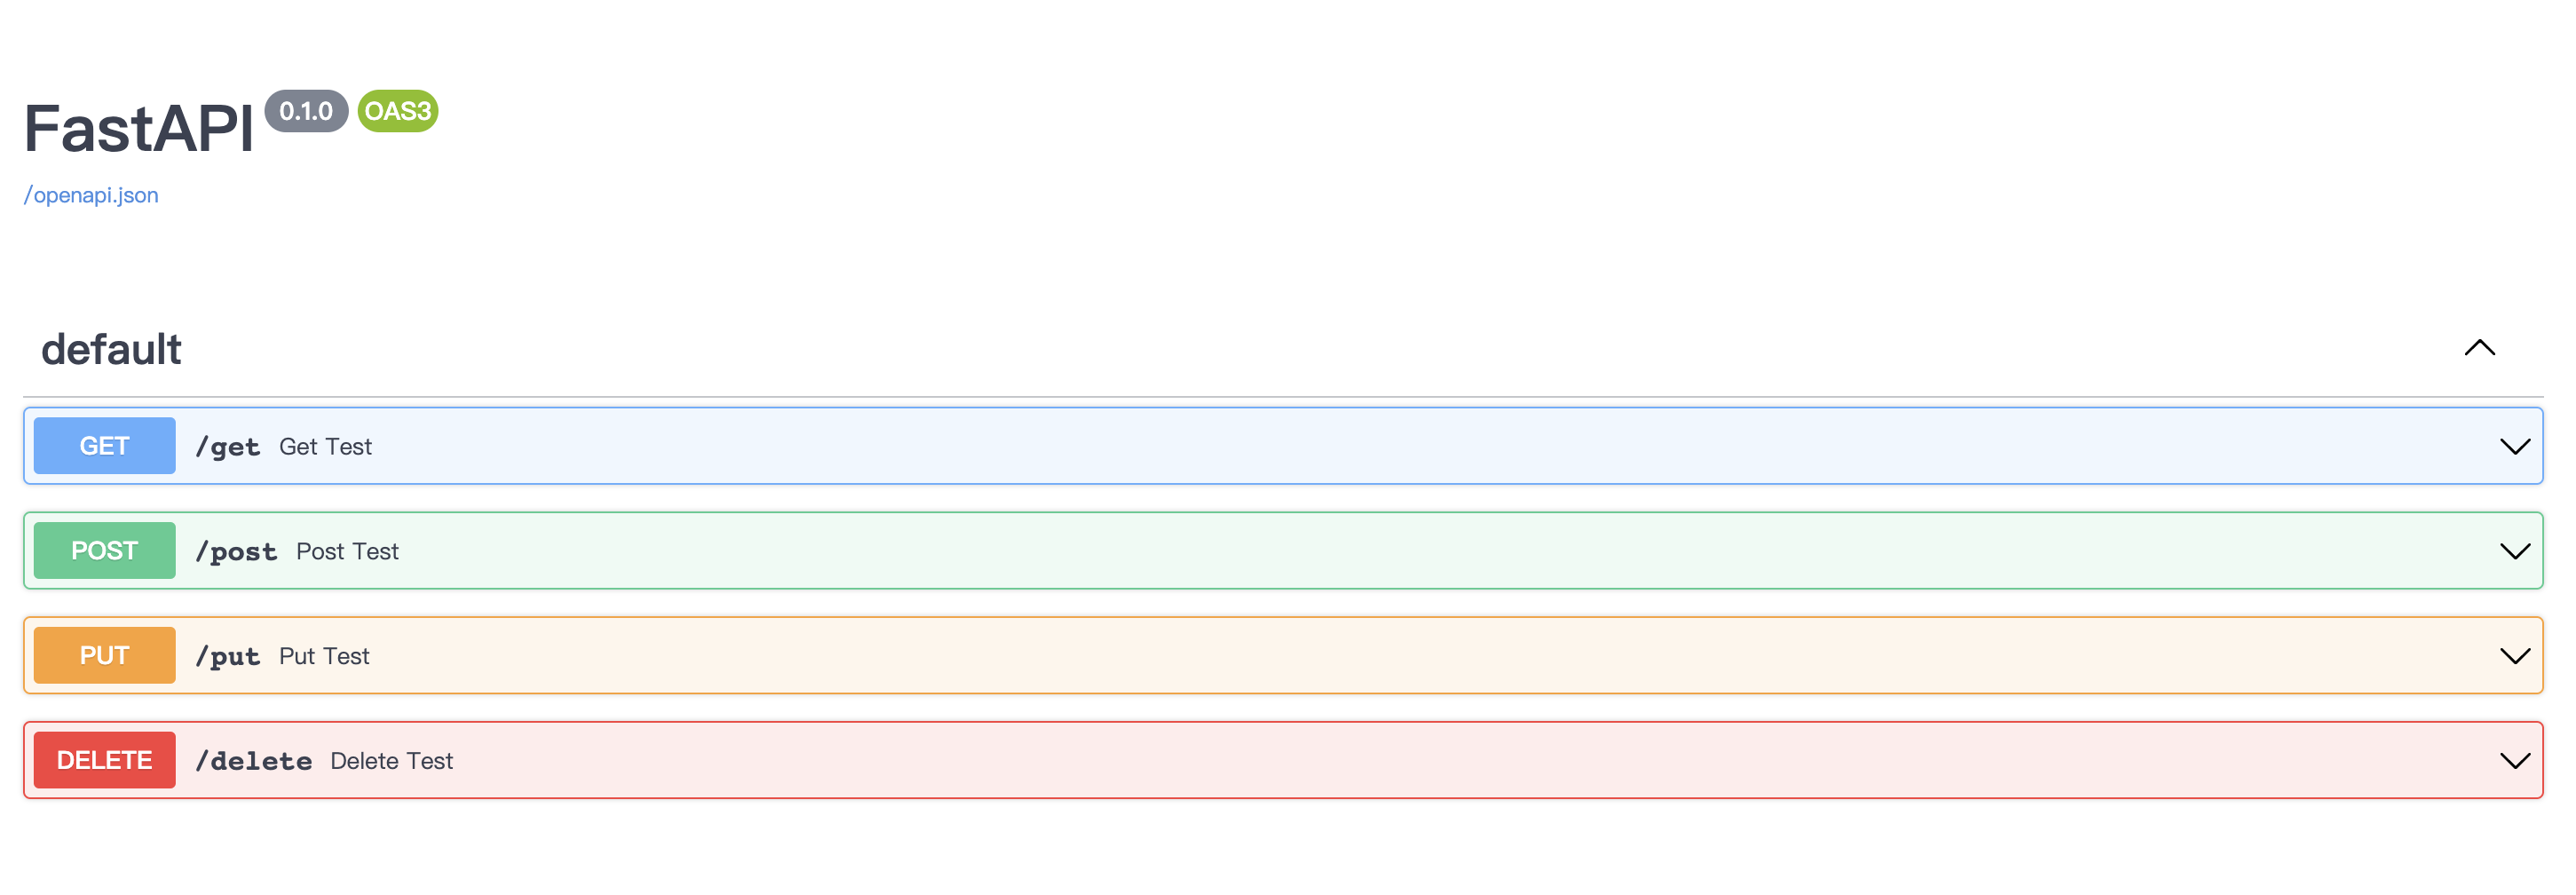
路径操作装饰器参数:
@app.post(
    "/items/{item_id}",
    response_model=Item,
    status_code=status.HTTP_200_OK,
    tags=["AAA"],
    summary="this is summary",
    description="this is description",
    response_description= "this is response_description",
    deprecated=False,
)
include_router
main.py
from typing import Union

from fastapi import FastAPI
import uvicorn

from apps import app01, app02

app = FastAPI()

app.include_router(app01, prefix="/app01", tags=["第一章节:商城接口", ])
app.include_router(app02, prefix="/app02", tags=["第二章节:用户中心接口", ])

if __name__ == '__main__':
    uvicorn.run("main:app", host="127.0.0.1", port=8080, debug=True, reload=True)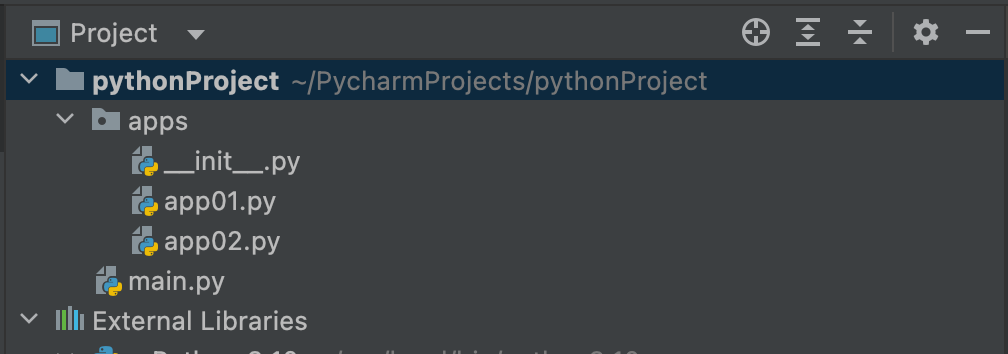
# __init__.py
from .app01 import app01
from .app02 import app02
from fastapi import APIRouter
app01 = APIRouter()
@app01.get("/shop/food")
def shop_food():
return {"shop": "food"}
@app01.get("/shop/bed")
def shop_food():
return {"shop": "bed"}from fastapi import APIRouter
app02 = APIRouter()
@app02.post("/user/login")
def shop_food():
return {"user": "login"}
@app02.post("/user/reg")
def shop_food():
return {"user": "reg"}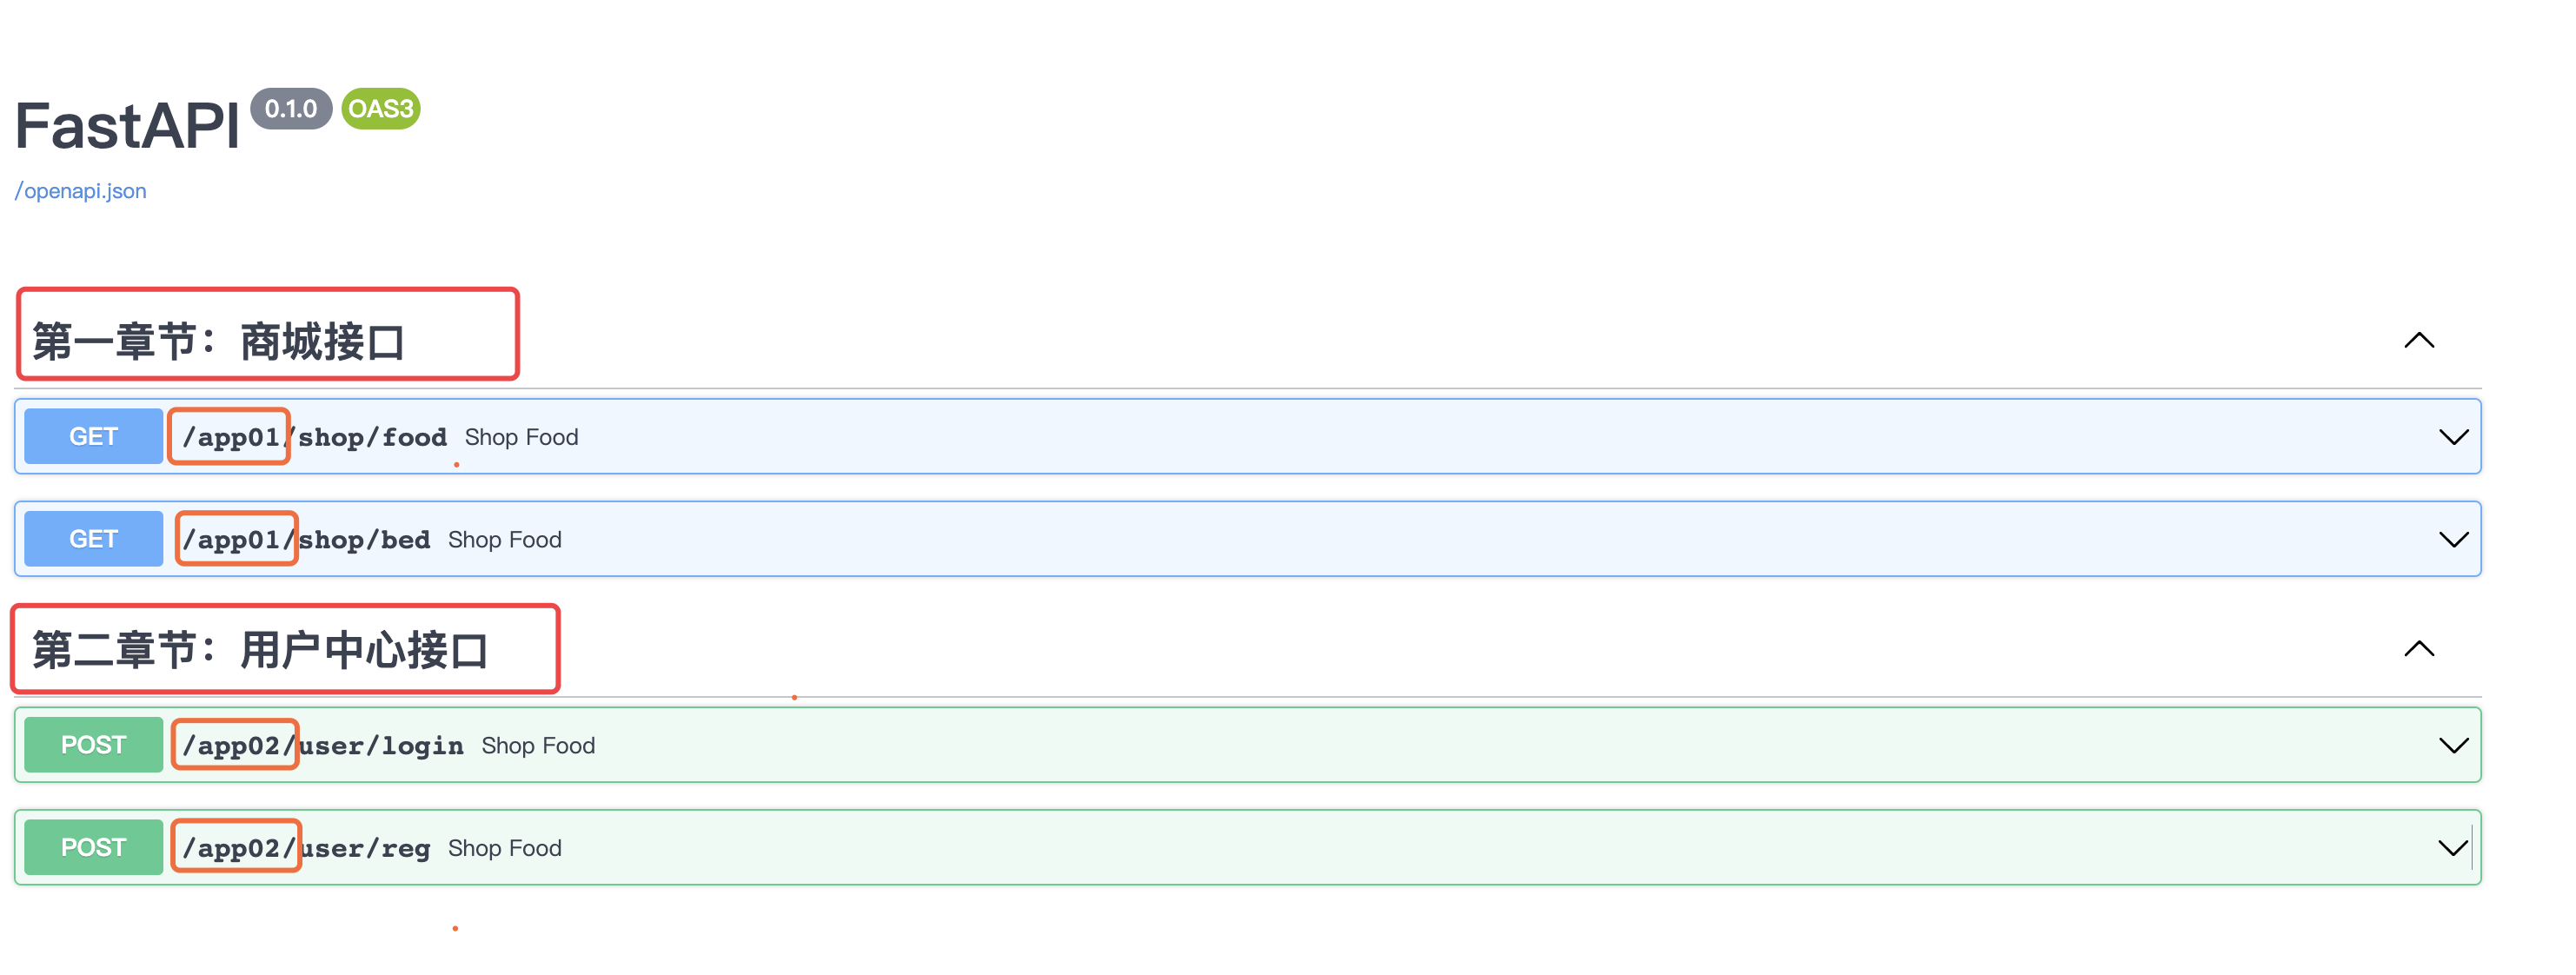
四、请求
4.1、路径参数
(1)基本用法
以使用与Python格式化字符串形同的语法来声明路劲"参数"或"变量"
@app.get("/user/{user_id}")
def get_user(user_id):
    print(user_id, type(user_id))
return {"user_id": user_id}路径参数user_id的值作为参数user_id传递给你的函数。
(2)有类型的路径参数
你可以适用标准的Python类型标注为函数中的路径参数声明类型
@app.get("/user/{user_id}")
def get_user(user_id: int):
    print(user_id, type(user_id))
return {"user_id": user_id}这个栗子中,user_id被声明为int类型
这将为你的函数提供编辑器支持,包括错误检查、代码补全等等。
(3)注意顺序
在创建路径操作时,你会发现有些情况下路径是固定的。
比如/user/me,我们假设它用来获取关于当前用户的数据。
然后,你还可以使用路径/user/{username}来通过用户名获取关于特定用户的数据。
由于路径操作手按顺序依次运行的,你需要确保路径/user/me声明在路径/user/{username}之前:
@app.get("/user/me")
async def read_user_me():
    return {"username": "the current user"}

@app.get("/user/{username}")
async def read_user(username: str):
return {"username": username}否则,/user/username 的路径还将与/user/me相匹配,"认为"自己正在接收一个值为"me"的username参数
4.2、查询参数(请求参数)
请求参数和路径参数是客户端传递参数给服务端的两种方式。
声明不是属于路径参数的其他函数参数时,他们将被解释为"查询字符串"参数
@app.get("/items/{item_id}")
async def read_item(item_id: str, q: Union[str, None] = None):  # 有默认值即可选,否则必选
    if q:
        return {"item_id": item_id, "q": q}
    return {"item_id": item_id}
在这个例子中,函数参数
q将是可选的,并且默认值为None。
4.3、请求体
当你需要将数据从客户端(例如浏览器)发送给 API 时,你将其作为「请求体」发送。请求体是客户端发送给 API 的数据。响应体是 API 发送给客户端的数据。你的 API 几乎总是要发送响应体。但是客户端并不总是需要发送请求体。
fastapi使用 Pydantic
模型来声明请求体,并能够获得它们所具有的所有能力和优点。
GET请求无法发送请求体
from typing import Union

from fastapi import FastAPI
from pydantic import BaseModel


class Item(BaseModel):
    name: str
    description: Union[str, None] = None
    price: float
    tax: Union[float, None] = None


app = FastAPI()

@app.post("/items/")
async def create_item(item: Item):
    return item
和声明一个查询参数时一样,当一个模型属性具有默认值时,它不是必须得,否则他是一个必须属性,将默认值设为None,可使其成为可选属性。
例如。上面的模型声明了一个这样的 JSON「object」(或 Python dict):
{
    "name": "Foo",
    "description": "An optional description",
    "price": 45.2,
    "tax": 3.5
}
由于 description 和 tax 是可选的(它们的默认值为 None),下面的 JSON「object」也将是有效的:
{
    "name": "Foo",
    "price": 45.2
}
4.4、form表单数据
from fastapi import FastAPI, Form

app = FastAPI()

@app.post("/login/")
async def login(username: str = Form(), password: str = Form()):
    return {"username": username}

if __name__ == '__main__':
    import uvicorn
    uvicorn.run("main:app", host="127.0.0.1", port=8080, debug=True, reload=True)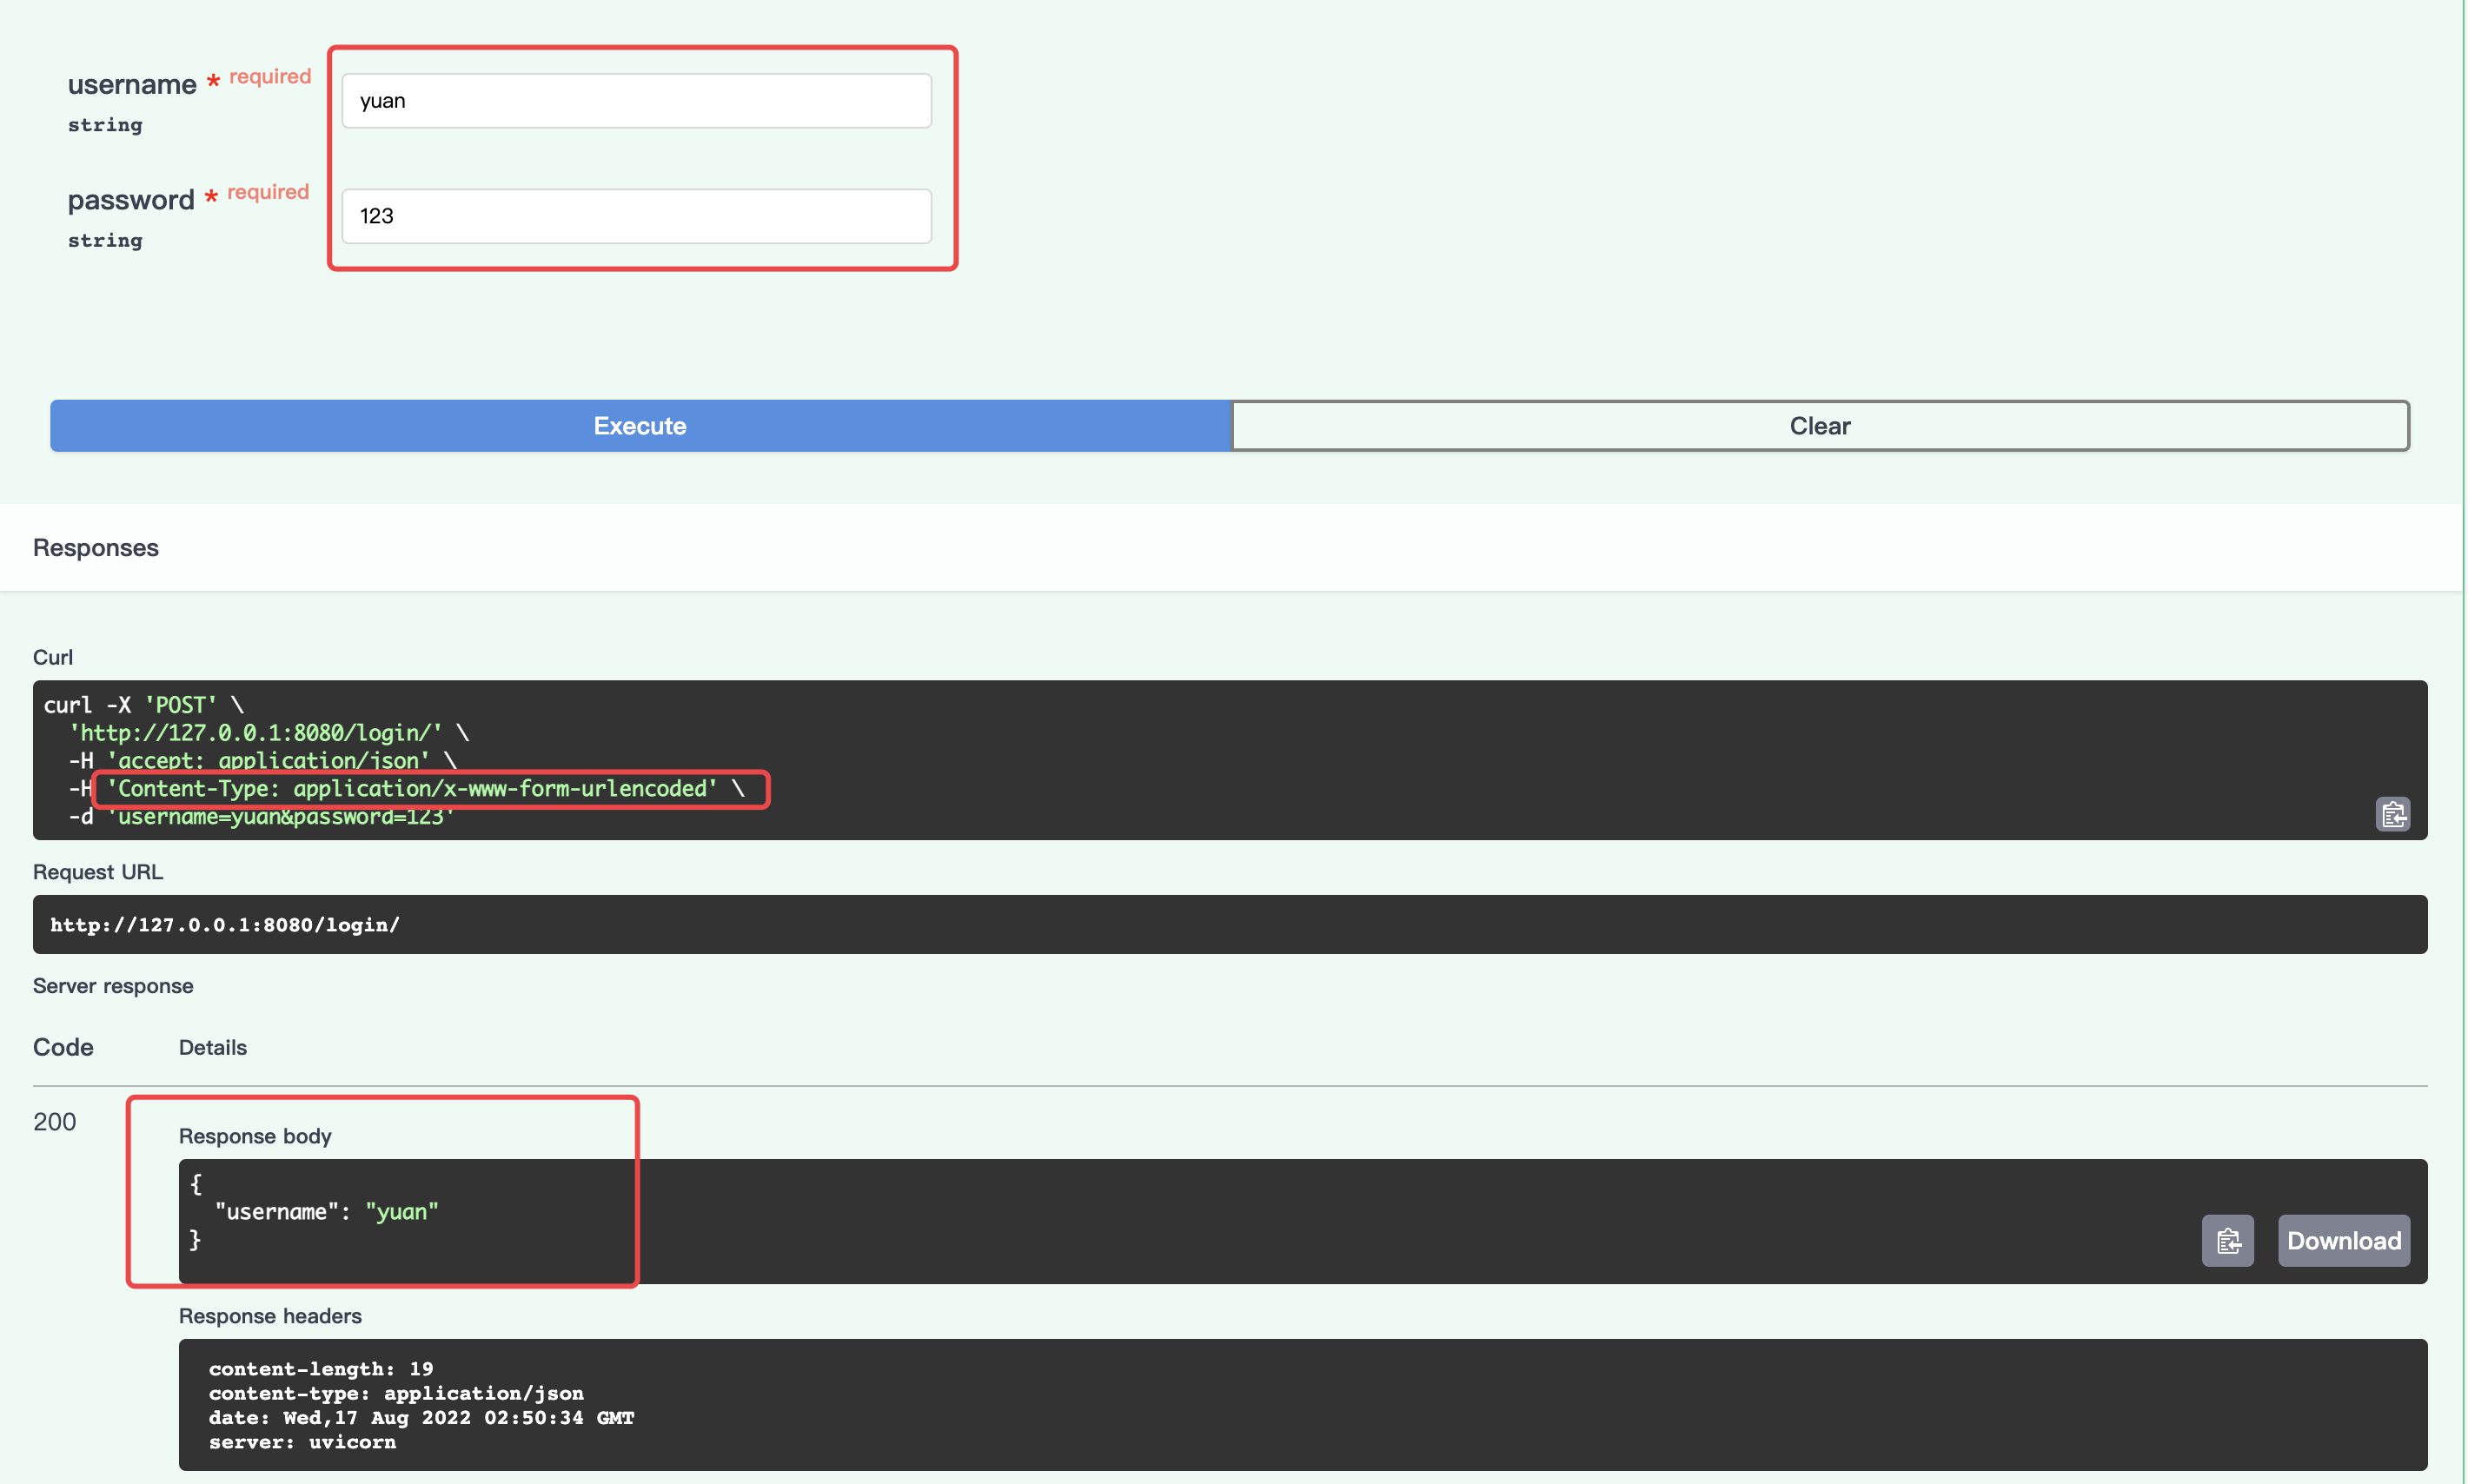
4.5、文件上传
from fastapi import FastAPI, File, UploadFile
from typing import List

app = FastAPI()


@app.post("/files/")
async def create_file(file: bytes = File()):
    return {"file_size": len(file)}


@app.post("/uploadFile/")
async def create_upload_file(file: UploadFile):
    return {"filename": file.filename}


@app.post("/multiFiles/")
async def create_files(files: List[bytes] = File()):
    return {"file_sizes": [len(file) for file in files]}


@app.post("/multiUploadFiles/")
async def create_upload_files(files: List[UploadFile]):
    return {"filenames": [file.filename for file in files]}


if __name__ == '__main__':
    import uvicorn

    uvicorn.run("main:app", host="127.0.0.1", port=8080, debug=True, reload=True)
4.6、请求静态文件
from fastapi.staticfiles import StaticFiles

app = FastAPI()
app.mount("/static",StaticFiles(directory="static"))
四、响应
4.1、响应模型
你可以在任意的路径中操作中使用,response_model参数来声明用于响应的 模型
from typing import Union

from fastapi import FastAPI
from pydantic import BaseModel, EmailStr

app = FastAPI()


class UserIn(BaseModel):
    username: str
    password: str
    email: EmailStr
    full_name: Union[str, None] = None


class UserOut(BaseModel):
    username: str
    email: EmailStr
    full_name: Union[str, None] = None


@app.post("/user/", response_model=UserOut)
async def create_user(user: UserIn):
    return user


if __name__ == '__main__':
    import uvicorn

    uvicorn.run("main:app", host="127.0.0.1", port=8080, debug=True, reload=True)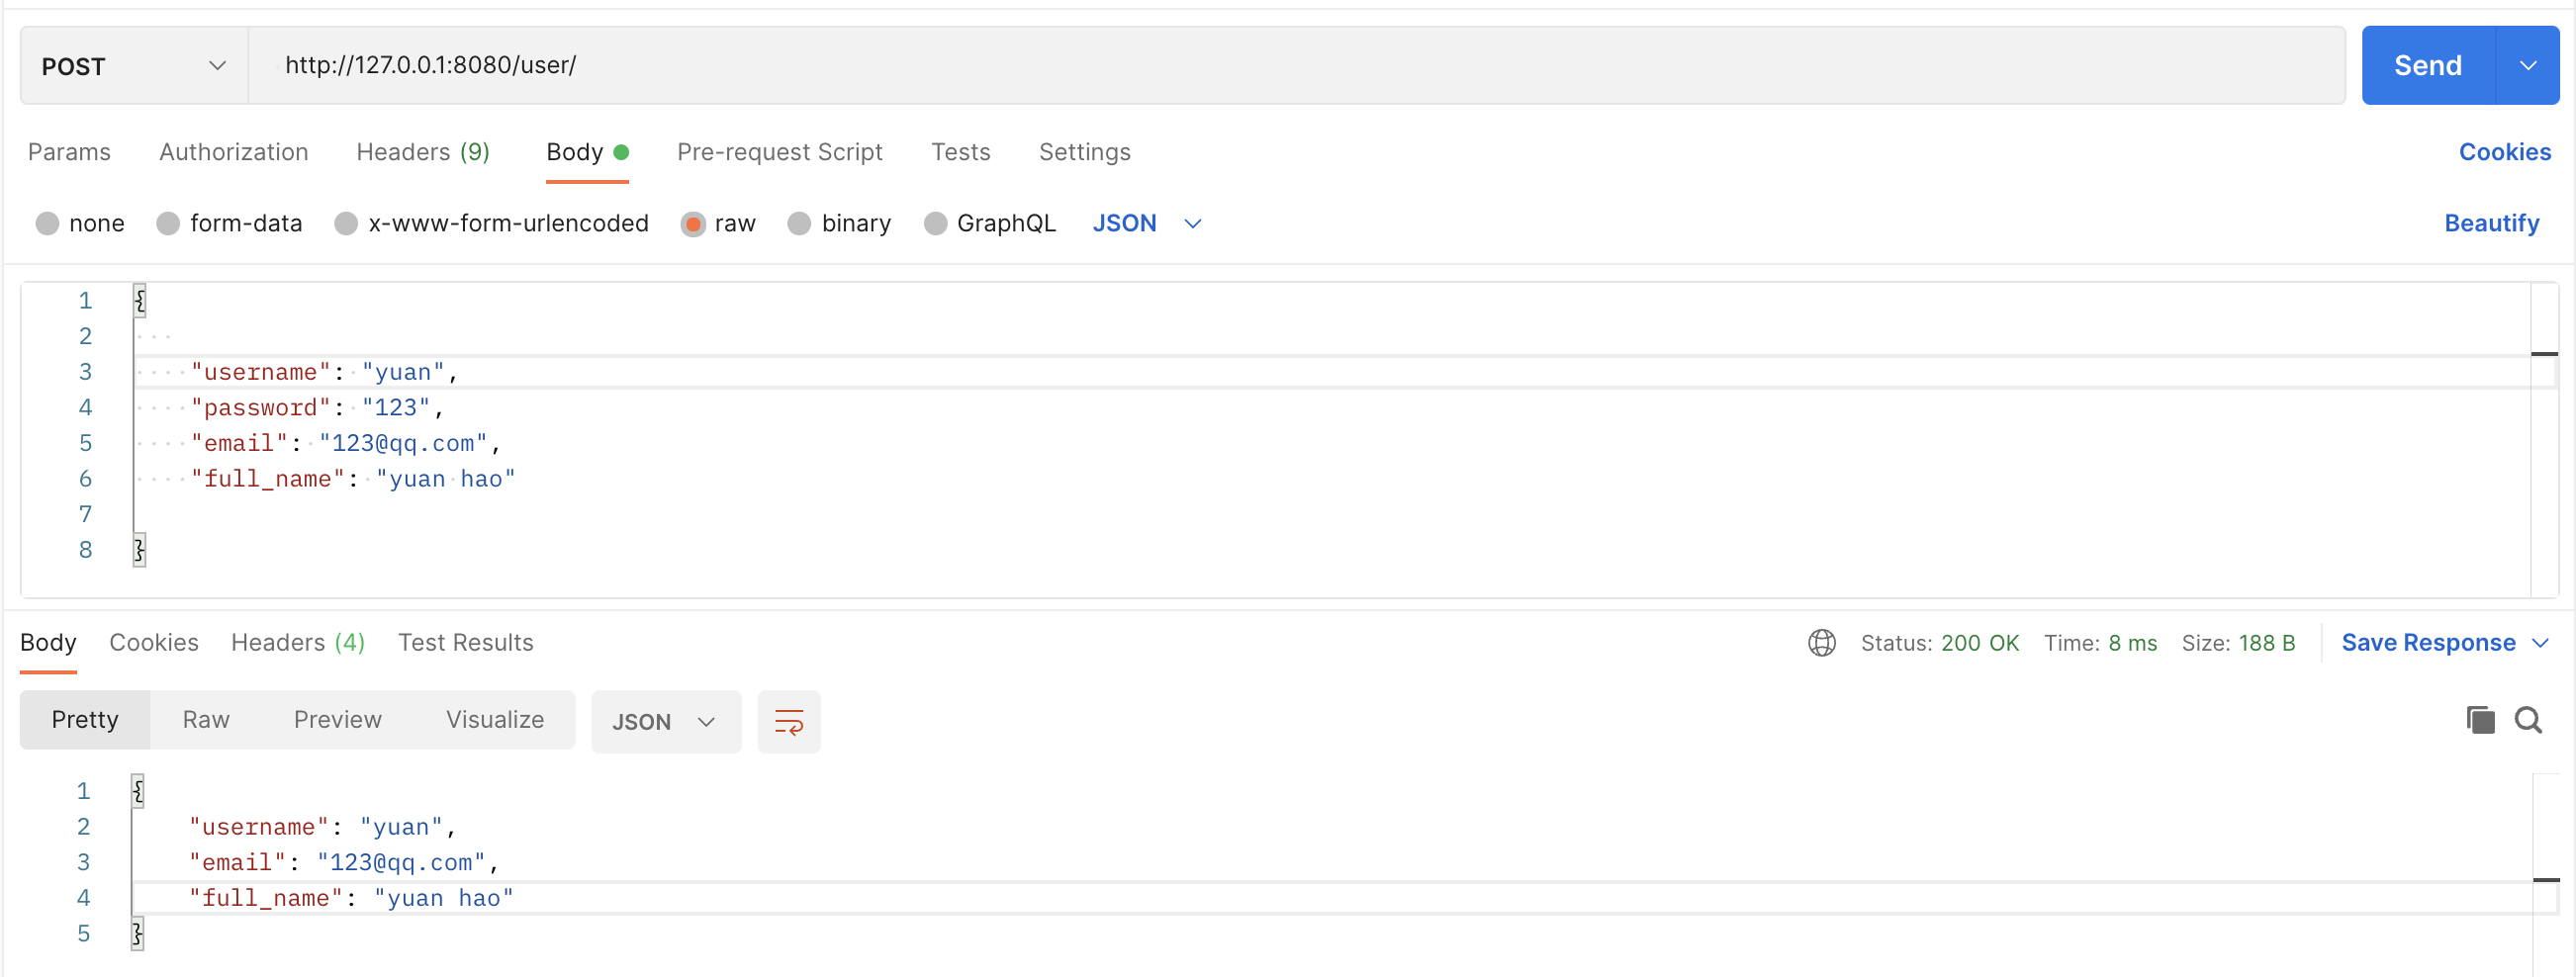
4.2、响应模型编码参数
from typing import List, Union

from fastapi import FastAPI
from pydantic import BaseModel

app = FastAPI()


class Item(BaseModel):
    name: str
    description: Union[str, None] = None
    price: float
    tax: float = 10.5
    tags: List[str] = []


items = {
    "foo": {"name": "Foo", "price": 50.2},
    "bar": {"name": "Bar", "description": "The bartenders", "price": 62, "tax": 20.2},
    "baz": {"name": "Baz", "description": None, "price": 50.2, "tax": 10.5, "tags": []},
}


@app.get("/items/{item_id}", response_model=Item, response_model_exclude_unset=True)
async def read_item(item_id: str):
    return items[item_id]


if __name__ == '__main__':
    import uvicorn

    uvicorn.run("main:app", host="127.0.0.1", port=8080, debug=True, reload=True)
description: Union[str, None] = None 具有默认值 None。tax: float = 10.5 具有默认值 10.5.tags: List[str] = [] 具有一个空列表作为默认值: [].
使用路径操作装饰器的 response_model 参数来定义响应模型,特别是确保私有数据被过滤掉。
使用 response_model_exclude_unset 来仅返回显式设定的值。
五、jinja2模板
六、中间件
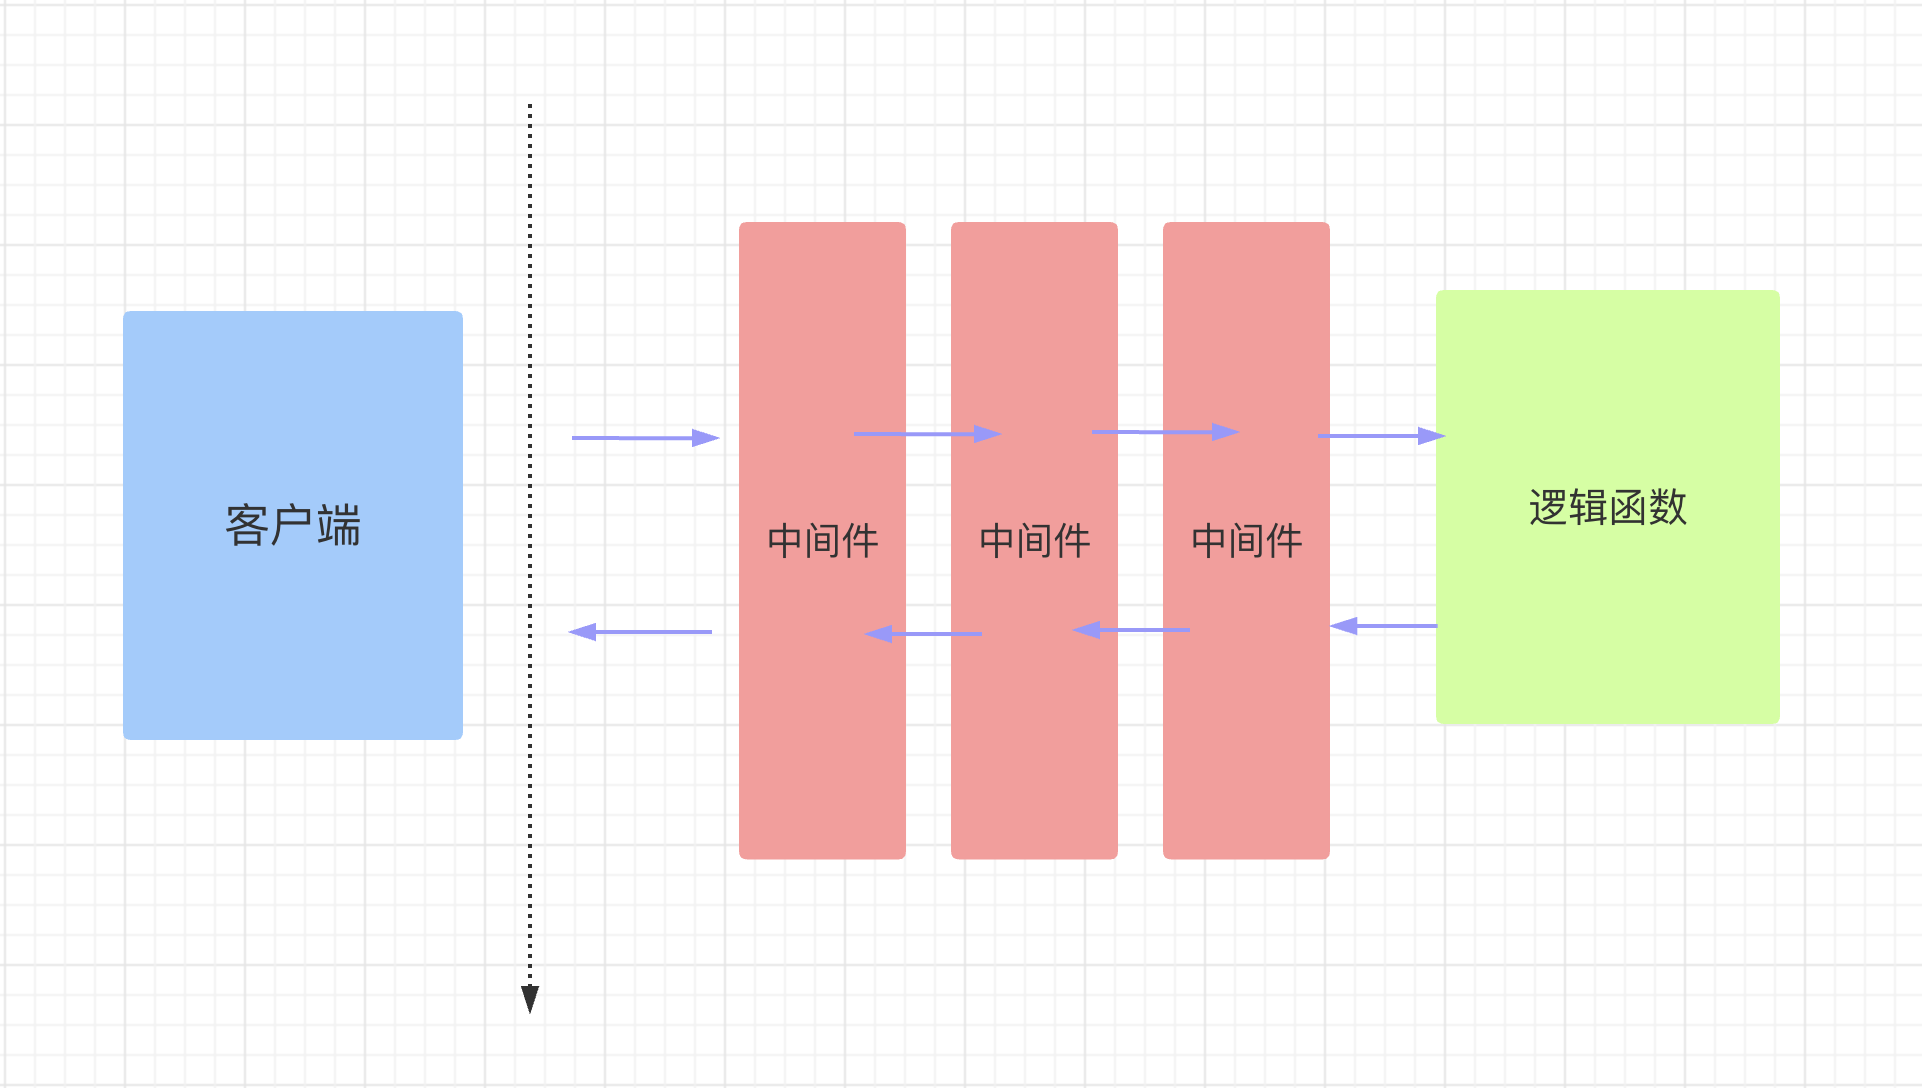
你可以向 FastAPI 应用添加中间件.
“中间件"是一个函数,它在每个请求被特定的路径操作处理之前,以及在每个响应返回之前工作.
如果你使用了 yield 关键字依赖, 依赖中的退出代码将在执行中间件后执行.
如果有任何后台任务(稍后记录), 它们将在执行中间件后运行.
要创建中间件你可以在函数的顶部使用装饰器@app.middleware("http").
中间件参数接收如下参数:
request.- 一个函数
call_next,它将接收request,作为参数.
- 这个函数将
request 传递给相应的 路径操作. - 然后它将返回由相应的路径操作生成的
response.
- 然后你可以在返回
response 前进一步修改它.
from fastapi import FastAPI, Request
import time
import uvicorn

app = FastAPI()


@app.middleware("http")
async def add_process_time_header(request: Request, call_next):
    start_time = time.time()
    response = await call_next(request)
    process_time = time.time() - start_time
    response.headers["X-Process-Time"] = str(process_time)
    return response

@app.get("/user/1")
def get_user():
    time.sleep(2)
    return {"user_id": 1}


if __name__ == '__main__':
    uvicorn.run("main:app", host="127.0.0.1", port=8080, debug=True, reload=True)
七、CORS
<!DOCTYPE html>
<html lang="en">
<head>
    <meta charset="UTF-8">
    <title>Title</title>
    <script src="https://cdn.bootcdn.net/ajax/libs/jquery/3.6.0/jquery.js"></script>
</head>
<body>

<p>click</p>

<script>
    $("p").click(function () {
        $.ajax({
            url: "http://127.0.0.1:8080/",
            success: function (res) {
                $("p").html(res.message)
            },
        })
    })

</script>


</body>
</html>
from fastapi import FastAPI
from fastapi.middleware.cors import CORSMiddleware
app = FastAPI()
origins = [
"http://localhost:63342"
]
app.add_middleware(
CORSMiddleware,
allow_origins=origins, # *:代表所有客户端
allow_credentials=True,
allow_methods=["GET"],
allow_headers=["*"],
)
@app.get("/")
def main():
return {"message": "Hello World"}
if __name__ == '__main__':
import uvicorn
uvicorn.run("main:app", host="127.0.0.1", port=8080, debug=True, reload=True)八、ORM操作
在大型的web开发中,我们肯定会用到数据库操作,那么Fastapi也支持数据库的开发,你可以用 PostgreSQL MySQL SQLite Oracle 等
本文用SQLite为例。我们在下载fastapi是如何操作设计数据库的。
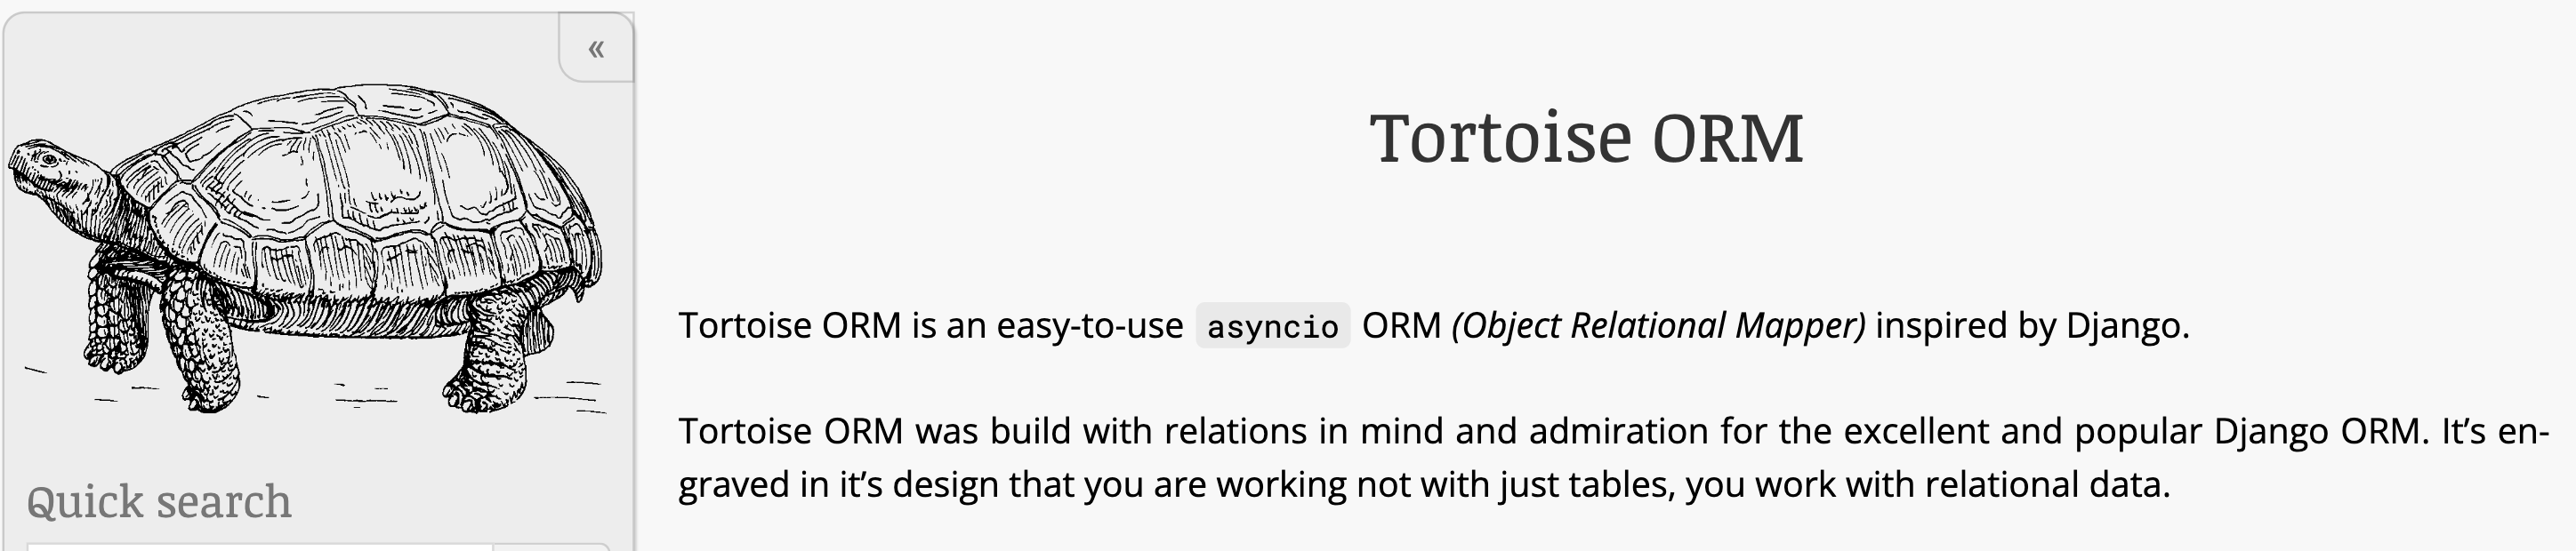
fastapi是一个很优秀的框架,但是缺少一个合适的ORM,官方代码里使用sqlalchemy,Tortoise ORM 是Django启发的易于使用异步ORM(对象关系映射器。)
Tortoise ORM 目前支持以下数据库:
- PostgreSQL >= 9.4(使用
asyncpg) - SQLite(使用
aiosqlite) - MySQL/MariaDB(使用
aiomysql或使用asyncmy)
8.1、创建模型
以选课系统为例:
models.py
from tortoise.models import Model
from tortoise import fields
class Clas(Model):
name = fields.CharField(max_length=255, description='班级名称')
class Teacher(Model):
id = fields.IntField(pk=True)
name = fields.CharField(max_length=255, description='姓名')
tno = fields.IntField(description='账号')
pwd = fields.CharField(max_length=255, description='密码')
class Student(Model):
id = fields.IntField(pk=True)
sno = fields.IntField(description='学号')
pwd = fields.CharField(max_length=255, description='密码')
name = fields.CharField(max_length=255, description='姓名')
# 一对多
clas = fields.ForeignKeyField('models.Clas', related_name='students')
# 多对多
courses = fields.ManyToManyField('models.Course', related_name='students', through='stu2course',
description='学生选课表')
class Course(Model):
id = fields.IntField(pk=True)
name = fields.CharField(max_length=255, description='课程名')
teacher = fields.ForeignKeyField('models.Teacher', related_name='courses', description='课程讲师')
class Stu2Course(Model):
sid = fields.ForeignKeyField('models.Student')
tid = fields.ForeignKeyField('models.Course')
score = fields.DecimalField(max_digits=5, decimal_places=2)
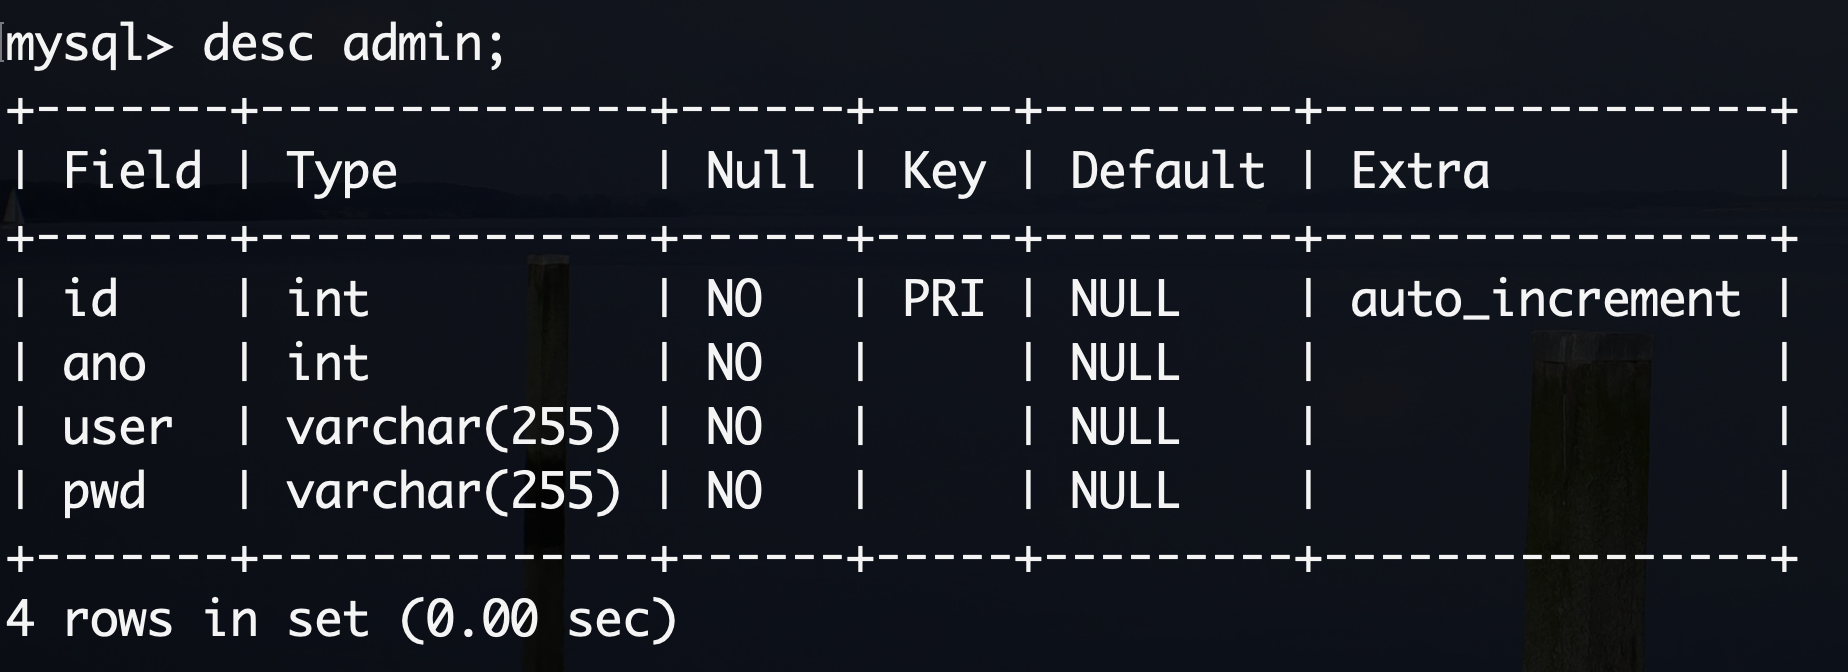
class Admin(Model):
id = fields.IntField(pk=True)
ano = fields.IntField(description='账号')
user = fields.CharField(max_length=255, description='名称')
pwd = fields.CharField(max_length=255, description='密码')8.2、aerich迁移工具
settings.py
TORTOISE_ORM = {
    'connections': {
        'default': {
            # 'engine': 'tortoise.backends.asyncpg',  PostgreSQL
            'engine': 'tortoise.backends.mysql',  # MySQL or Mariadb
            'credentials': {
                'host': '127.0.0.1',
                'port': '3306',
                'user': 'root',
                'password': 'yuan0316',
                'database': 'fastapi',
                'minsize': 1,
                'maxsize': 5,
                'charset': 'utf8mb4',
                "echo": True
            }
        },
    },
    'apps': {
        'models': {
            'models': ['apps.models', "aerich.models"],
            'default_connection': 'default',

        }
    },
    'use_tz': False,
    'timezone': 'Asia/Shanghai'
}
main.py
import uvicorn
from fastapi import FastAPI

from tortoise.contrib.fastapi import register_tortoise
from settings import TORTOISE_ORM
app = FastAPI()

# 该方法会在fastapi启动时触发,内部通过传递进去的app对象,监听服务启动和终止事件
# 当检测到启动事件时,会初始化Tortoise对象,如果generate_schemas为True则还会进行数据库迁移
# 当检测到终止事件时,会关闭连接
register_tortoise(
    app,
    config=TORTOISE_ORM,
    # generate_schemas=True,  # 如果数据库为空,则自动生成对应表单,生产环境不要开
    # add_exception_handlers=True,  # 生产环境不要开,会泄露调试信息
)

if __name__ == '__main__':
    uvicorn.run('main:app', host='127.0.0.1', port=8000, reload=True,
debug=True, workers=1)aerich是一种ORM迁移工具,需要结合tortoise异步orm框架使用。安装aerichpip install aerich
1. 初始化配置,只需要使用一次
aerich init -t settings.TORTOISE_ORM # TORTOISE_ORM配置的位置)
初始化完会在当前目录生成一个文件:pyproject.toml和一个文件夹:migrations
pyproject.toml:保存配置文件路径,低版本可能是aerich.inimigrations:存放迁移文件

2. 初始化数据库,一般情况下只用一次
aerich init-db
-
此时数据库中就有相应的表格
-
如果TORTOISE_ORM配置文件中的models改了名,则执行这条命令时需要增加--app参数,来指定你修改的名字

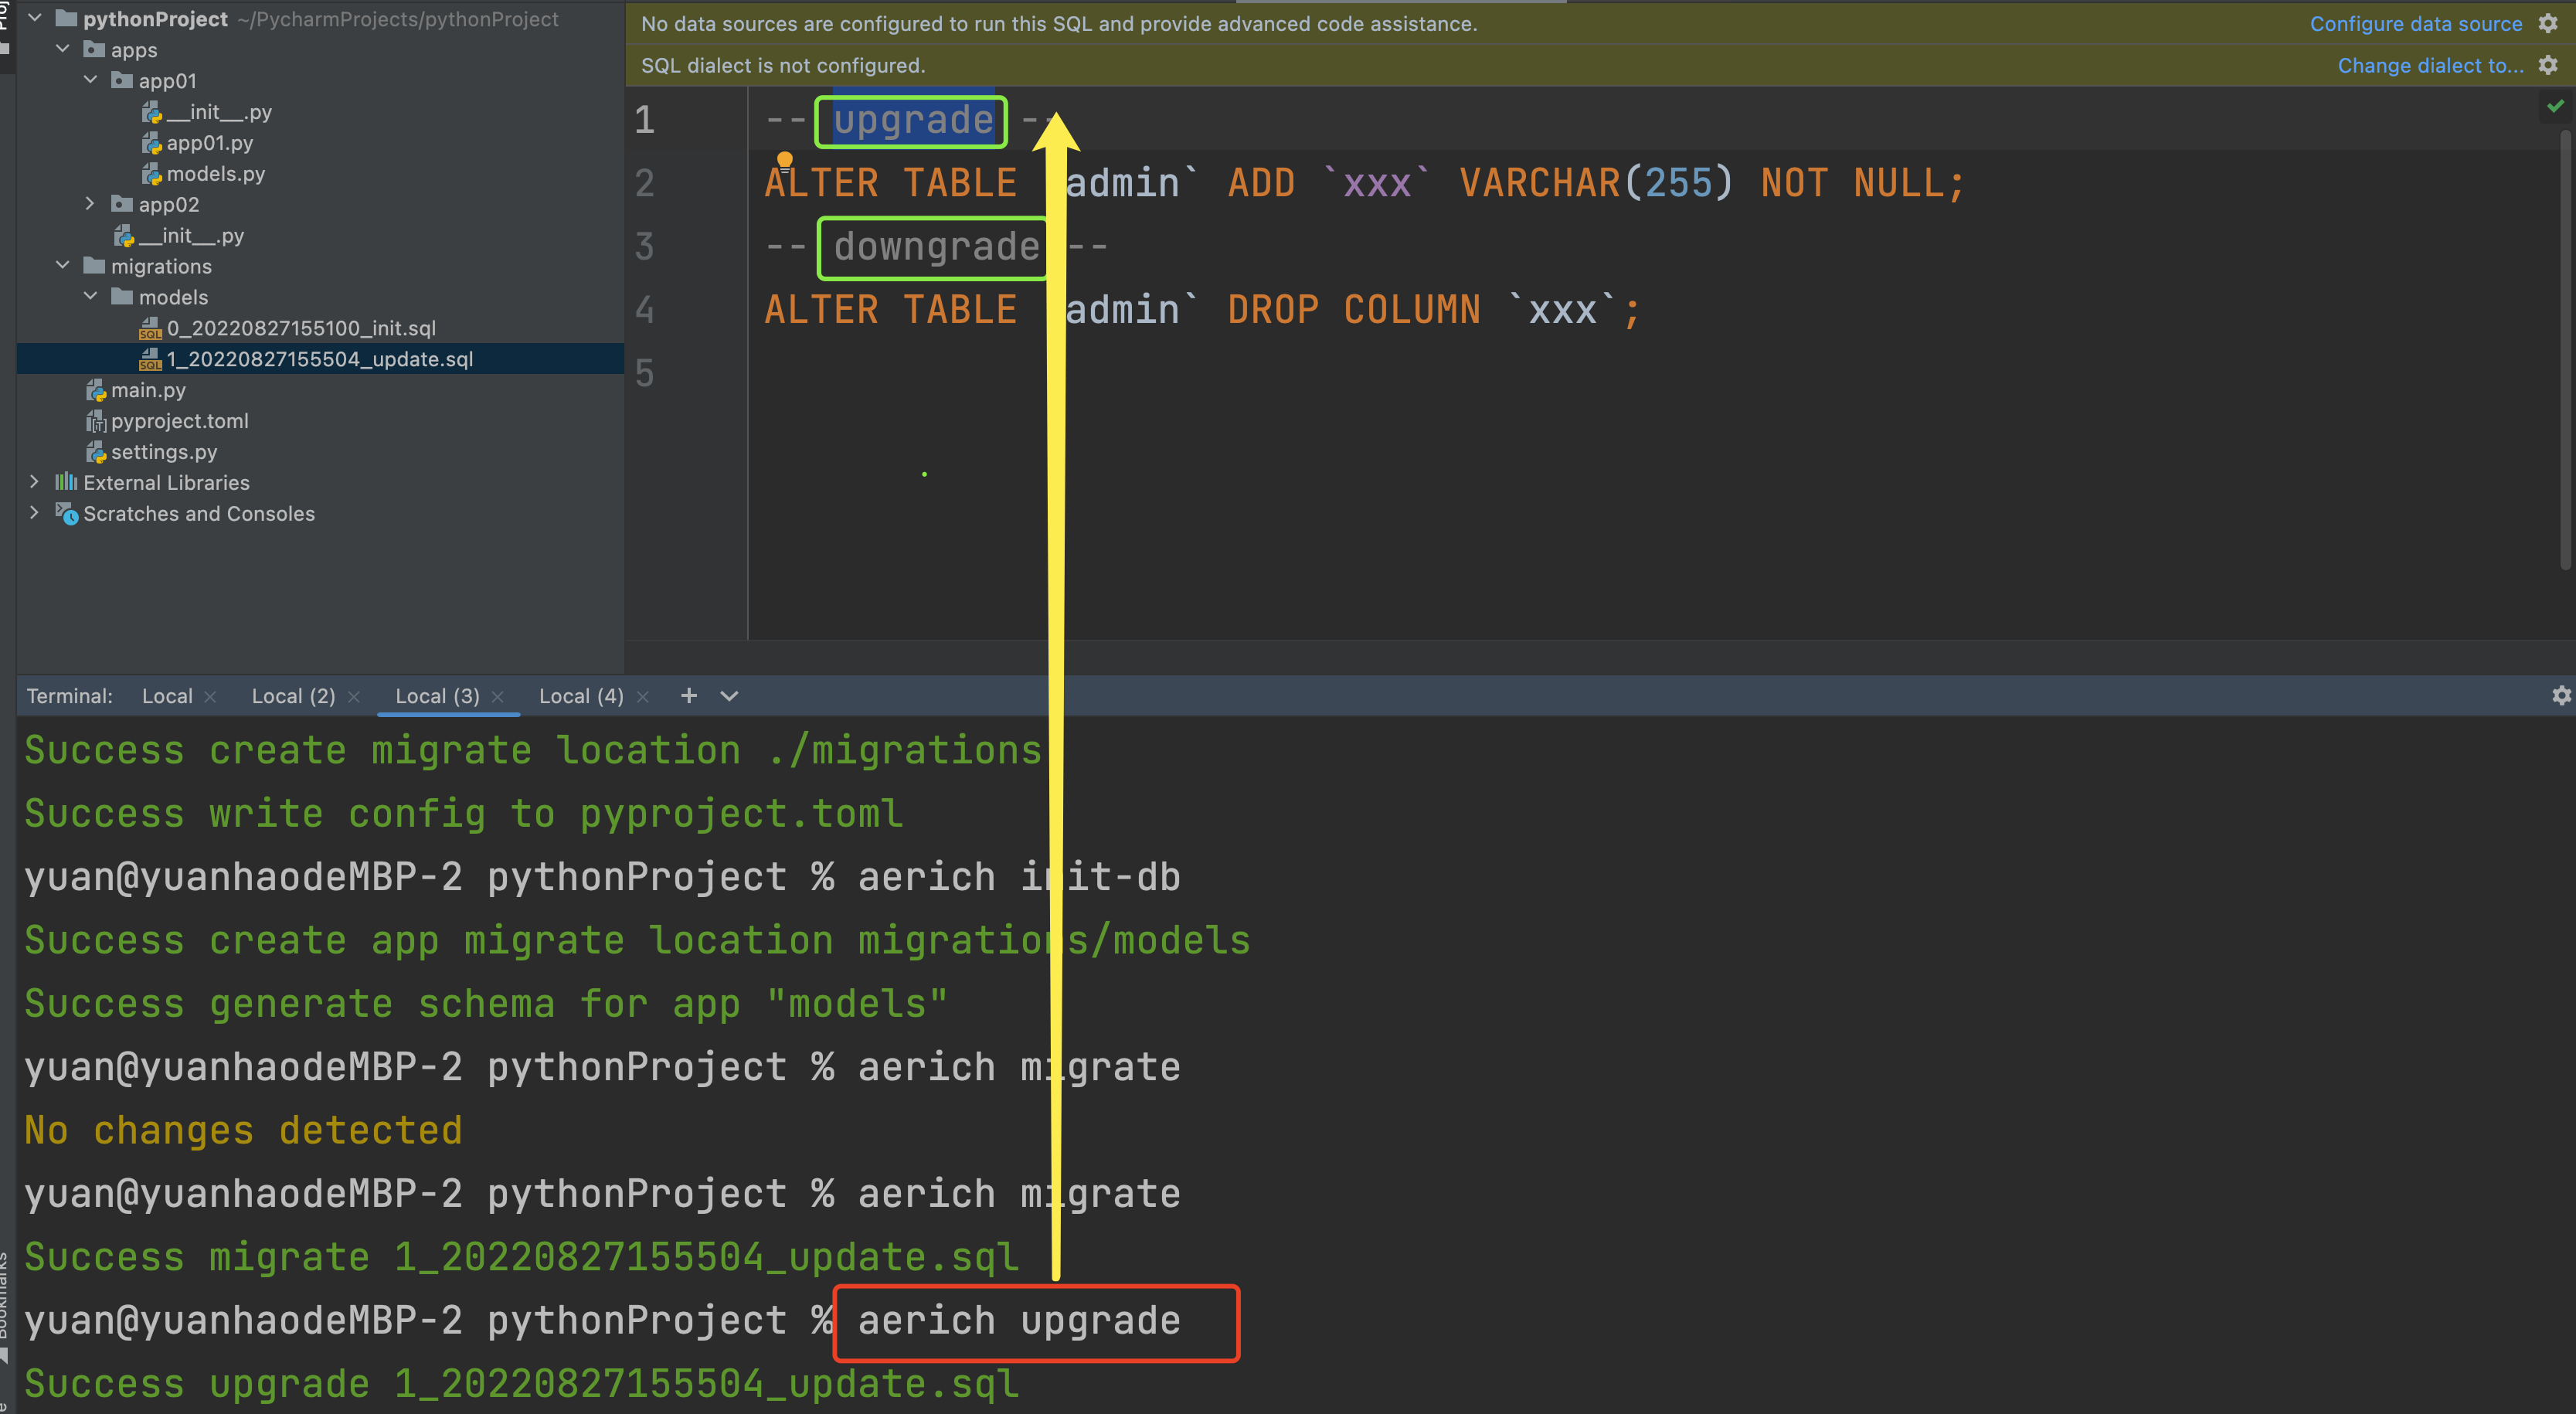
3. 更新模型并进行迁移
修改model类,重新生成迁移文件,比如添加一个字段
class Admin(Model):
    ...
    xxx = fields.CharField(max_length=255)
aerich migrate [--name] (标记修改操作) # aerich migrate --name add_column
迁移文件名的格式为 {version_num}{datetime}{name|update}.json。

注意,此时sql并没有执行,数据库中admin表中没有xxx字段
4. 重新执行迁移,写入数据库
aerich history
5. 回到上一个版本
| |

6. 查看历史迁移记录
| |


 被折叠的 条评论
为什么被折叠?
被折叠的 条评论
为什么被折叠?
 到【灌水乐园】发言


