


简介
本教程使用软件版本
Centos 7
rabbitmq-server-generic-unix-3.10.25.tar
otp_src_25.1.1.tar
rabbitmq_delayed_message_exchange-3.10.2
提取地址
链接:https://pan.baidu.com/s/1URqeK1OM8ZyxsyMdfA23MA
提取码:qwer
1.环境搭建
1.1 安装Erlang
RabbitMQ是使用Erlang语言开发的,所以要先下载安装Erlang
1.1.1 安装erlang前先安装Linux依赖库
yum -y install make gcc gcc-c++ kernel-devel m4 ncurses-devel openssl-devel说明:yum -y install 安装linux的一些依赖库的命令 ,-y表示自动确认;
1.1.2 解压erlang压缩包文件
tar -zxvf otp_src_25.1.1.tar.gz1.1.3 配置
切换到解压的目录下,运行相应命令
cd otp_src_25.1.1./configure1.1.4 编译
make1.1.5 安装
make install安装好了erlang后可以将解压的文件夹删除:
rm -rf otp_src_25.1.11.1.6 验证erlang是否安装成功
在命令行输入: erl 如果进入了编程命令行则表示安装成功,然后按ctrl + z 退出编程命令行;
1.2 安装RabbitMQ
解压RabbitMQ的压缩包,即安装完成,无需再编译
说明 :-C 选项是指定解压目录,如果不指定会解压到当前目录此时rabbitmq就安装好了;
tar -xvf rabbitmq-server-generic-unix-3.10.25.tar.xz -C /usr/local/1.3 启动及停止RabbitMQ
1.3.1 启动RabbitMQ
切换到安装目录的sbin目录下:
./rabbitmq-server -detached说明:
-detached 将表示在后台启动运行rabbitmq;不加该参数表示前台启动;
rabbitmq的运行日志存放在安装目录的var目录下;
现在的目录是:/usr/local/rabbitmq_server-3.10.25/var/log/rabbitmq
1.3.2 查看RabbitMQ的状态
切换到sbin目录下执行:
./rabbitmqctl status1.3.3 停止RabbitMQ
切换到sbin目录下执行:
./rabbitmqctl shutdown1.3.4 配置path环境变量
为了在Linux每个目录下都可以执行,我们这边先来配置一下环境变量
首先vi /etc/profile 在文件的最后插入以下代码:
source /etc/profileRABBIT_HOME=/usr/local/rabbitmq_server-3.10.25
PATH=$PATH:$RABBIT_HOME/sbin
export RABBIT_HOME PATH刷新环境变量,命令如下
2. RabbitMQ管理命令
. /rabbitmqctl 是一个管理命令,可以管理rabbitmq的很多操作。
./rabbitmqctl help可以查看一下有哪些操作
查看具体子命令 可以使用 ./rabbitmqctl help 子命令名称
2.1 用户管理
用户管理包括增加用户,删除用户,查看用户列表,修改用户密码。
这些操作都是通过rabbitmqctl管理命令来实现完成。
查看帮助:
rabbitmqctl add_user --help
相应的命令
(1) 查看当前用户列表
rabbitmqctl list_users
(2) 新增一个用户
语法:rabbitmqctl add_user Username Password
rabbitmqctl add_user admin 1234562.2 设置用户角色
语法:rabbitmqctl set_user_tags User Tag
说明:此处设置用户的角色为管理员角色
abbitmqctl set_user_tags admin administrator2.3 设置用户权限
说明:此操作是设置admin用户拥有操作虚拟主机/下的所有权限
rabbitmqctl set_permissions -p admin ".*" ".*" ".*"查看用户权限
./rabbitmqctl list_permissions3. web管理后台
Rabbitmq有一个web管理后台,这个管理后台是以插件的方式提供的,启动后台web管理功能,切换到sbin目录下执行:
3.1 启用管理后台
# 查看rabbitmq 的插件列表
./rabbitmq-plugins list
#启用
./rabbitmq-plugins enable rabbitmq_management
#禁用
./rabbitmq-plugins disable rabbitmq_management
3.2 关闭防火墙
systemctl status firewalld --检查防火墙状态
systemctl stop firewalld --关闭防火墙,Linux重启之后会失效
systemctl disable firewalld --防火墙置为不可用,重启后依然是不可用
3.3 Web访问
http://192.168.10.132:15672
用户名/密码为我们上面创建的admin/123456
注意上面改成你的虚拟主机的ip地址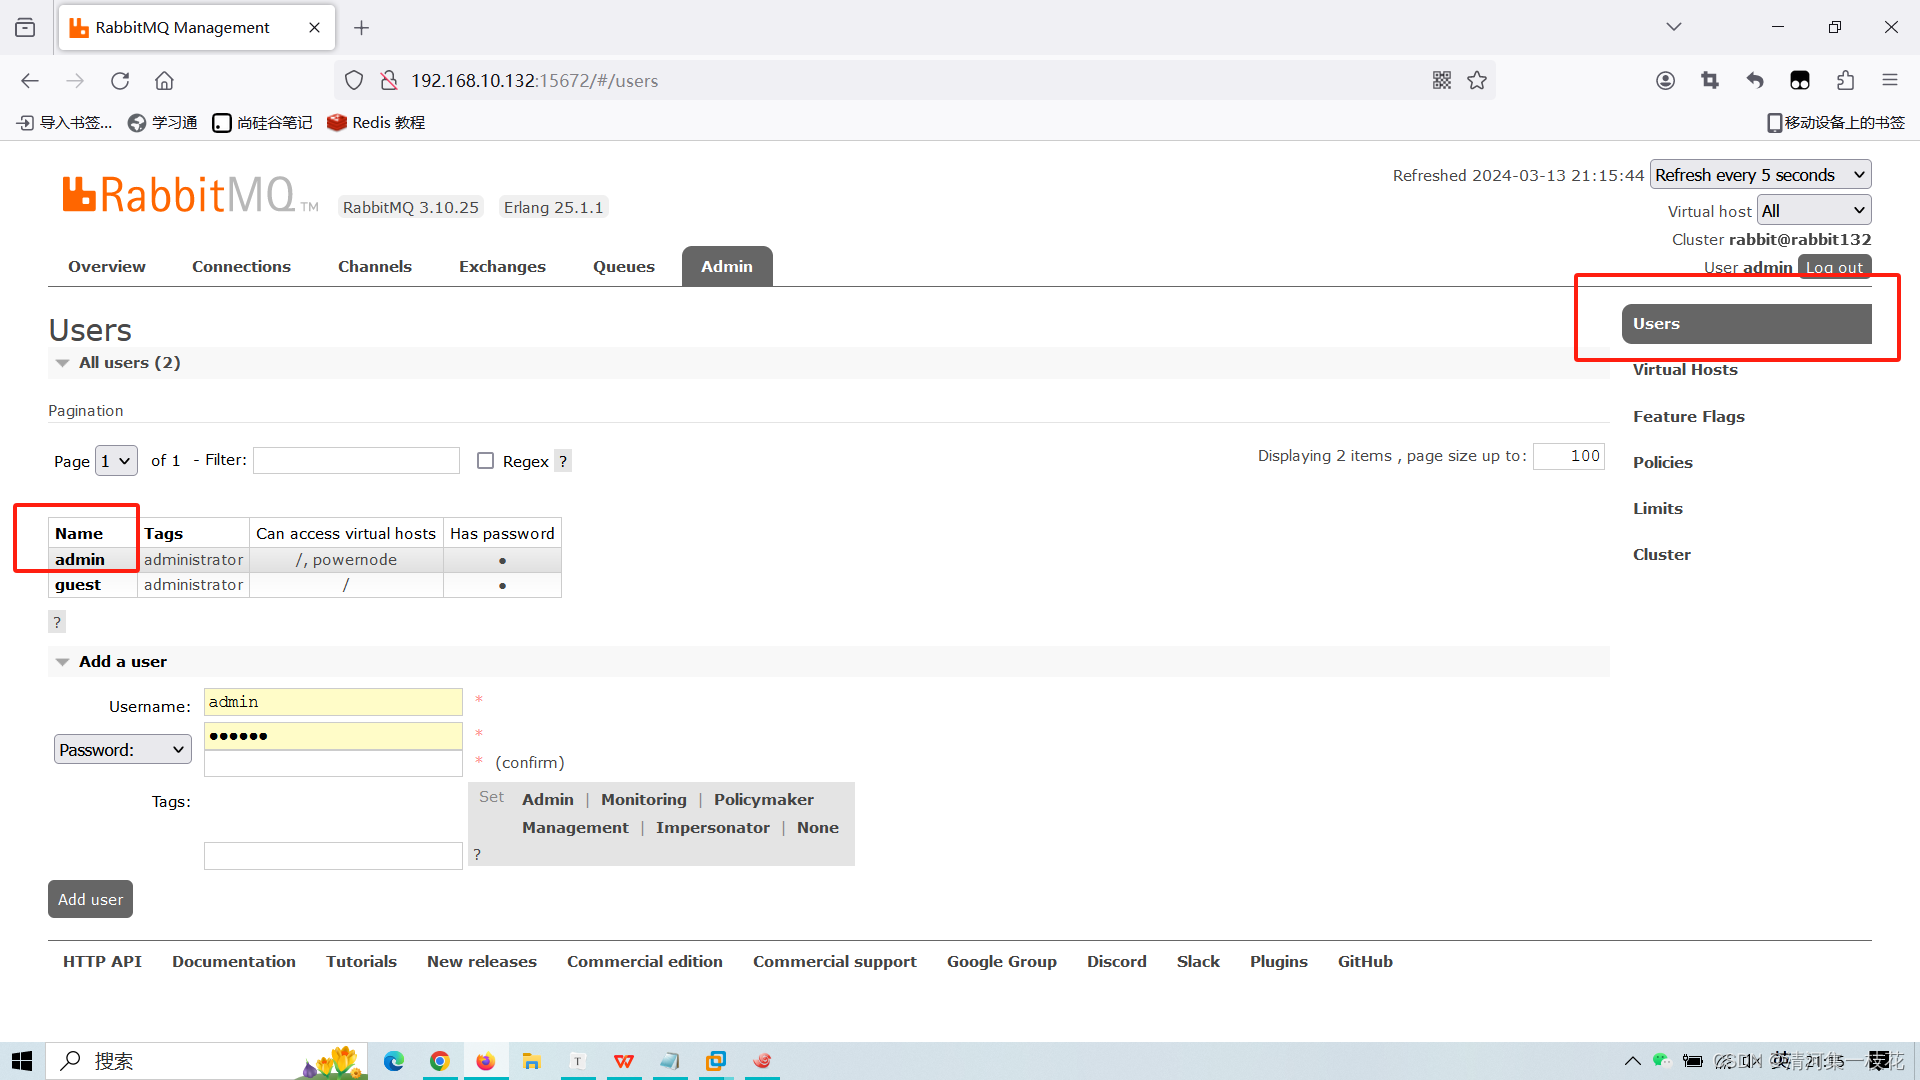
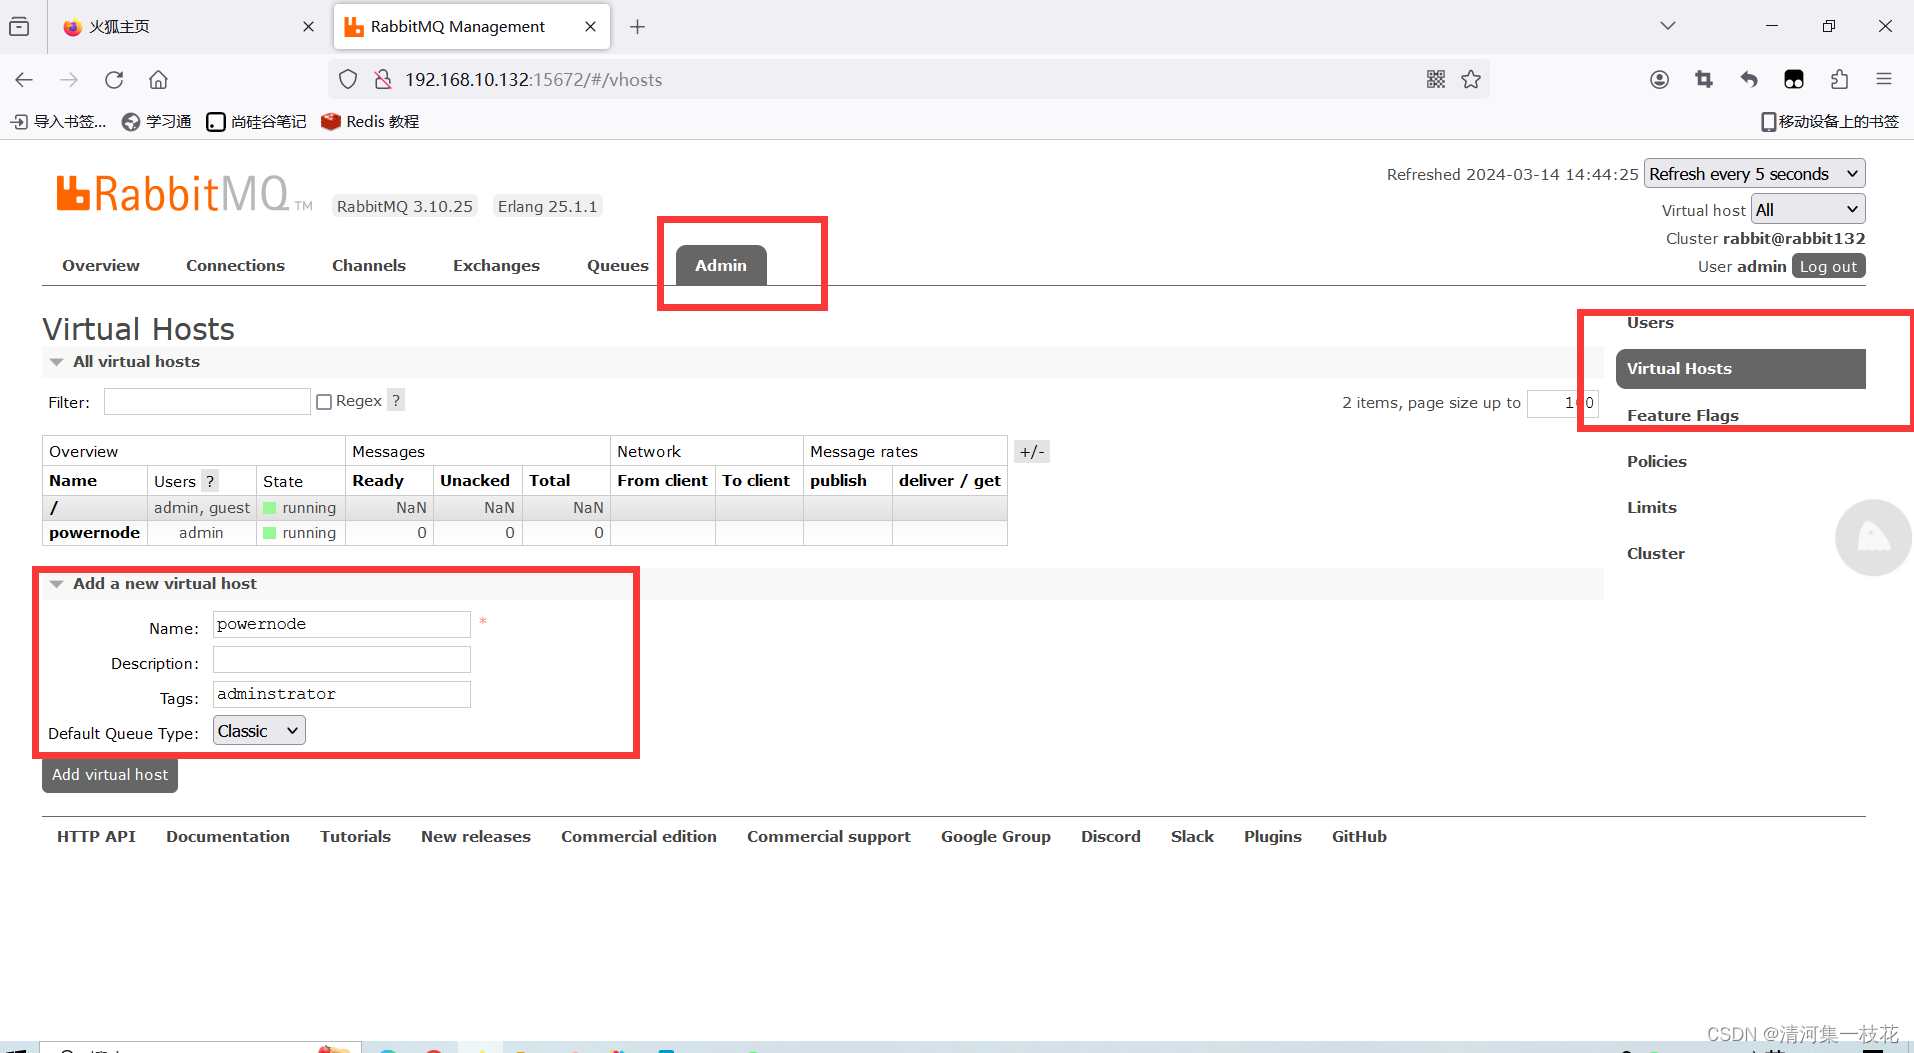
3.4 通过Web页面创建虚拟主机
4. Rabbit工作模型
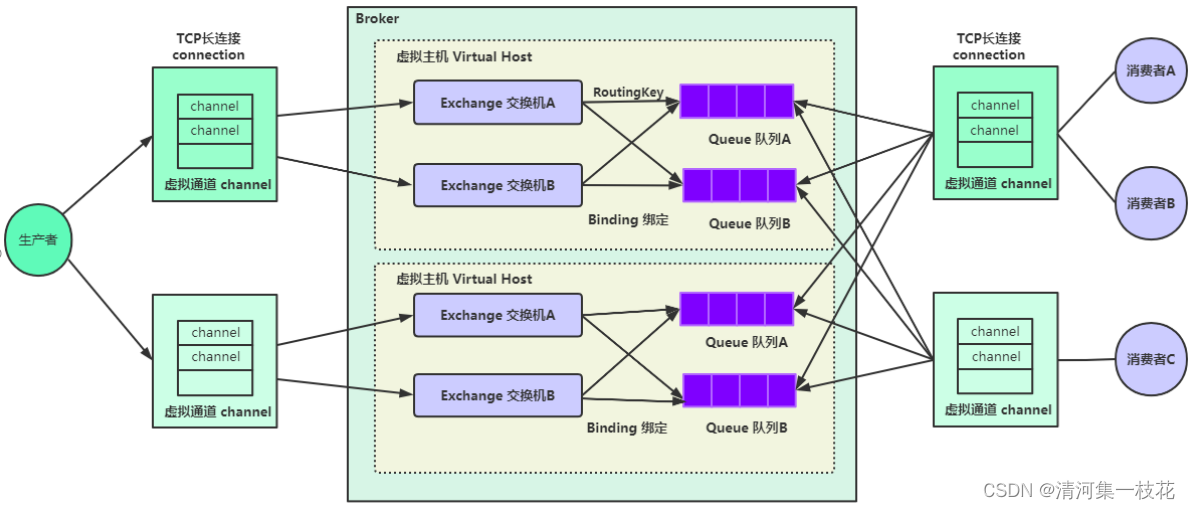
消息队列有三个核心要素: 消息生产者、消息队列、消息消费者;
生产者(Producer):发送消息的应用;(java程序,也可能是别的语言写的程序)
消费者(Consumer):接收消息的应用;(java程序,也可能是别的语言写的程序)
代理(Broker):就是消息服务器,RabbitMQ Server就是Message Broker;
连接(Connection):连接RabbitMQ服务器的TCP长连接;
信道(Channel):连接中的一个虚拟通道,消息队列发送或者接收消息时,都是通过信道进行的;
虚拟主机(Virtual host):一个虚拟分组,在代码中就是一个字符串,当多个不同的用户使用同一个RabbitMQ服务时,可以划分出多个Virtual host,每个用户在自己 的Virtual host创建exchange/queue等;(分类比较清晰、相互隔离)
交换机(Exchange):交换机负责从生产者接收消息,并根据交换机类型分发到对应的消息队列 中,起到一个路由的作用;
路由键(Routing Key):交换机根据路由键来决定消息分发到哪个队列,路由键是消息的目的地 址;
绑定(Binding):绑定是队列和交换机的一个关联连接(关联关系);
队列(Queue):存储消息的缓存;
消息(Message):由生产者通过RabbitMQ发送给消费者的信息;(消息可以任何数据,字符串、user对象,json串等等)
5. RabbitMQ交换机类型
Exchange(X) 可翻译成交换机/交换器/路由器
5.1 RabbitMQ交换器 (Exchange)类型
| 1、Fanout Exchange(扇形) 2、Direct Exchange(直连) 3、Topic Exchange(主题) 4、Headers Exchange(头部) |
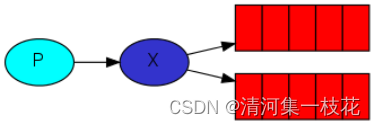
5.2 Fanout Exchange
5.2.1 介绍
Fanout 扇形的,散开的; 扇形交换机
投递到所有绑定的队列,不需要路由键,不需要进行路由键的匹配,相当于广播、群发;
5.2.2 代码实现
创建SpringBoot工程
5.2.2.1 相关依赖
<dependencies>
        <dependency>
            <groupId>org.springframework.boot</groupId>
            <artifactId>spring-boot-starter</artifactId>
        </dependency>

        <!-- 测试环境 -->
        <dependency>
            <groupId>org.springframework.boot</groupId>
            <artifactId>spring-boot-starter-test</artifactId>
        </dependency>

        <dependency>
            <groupId>org.projectlombok</groupId>
            <artifactId>lombok</artifactId>
            <version>1.18.28</version>
        </dependency>
        <dependency>
            <groupId>org.springframework.boot</groupId>
            <artifactId>spring-boot-starter-amqp</artifactId>
        </dependency>

    </dependencies>
5.2.2.2 yml文件
server:
  port: 8080

spring:
  application:
    name: fanout-learn
  rabbitmq:
    host: 192.168.10.132 # 虚拟机ip
    port: 5672 # 端口号
    username: admin # 用户名
    password: 123456 # 密码
    virtual-host: powernode # 虚拟主机
5.2.2.3 创建交换机、队列三部曲
package com.atguigu.config;

import org.springframework.amqp.core.Binding;
import org.springframework.amqp.core.BindingBuilder;
import org.springframework.amqp.core.FanoutExchange;
import org.springframework.amqp.core.Queue;
import org.springframework.context.annotation.Bean;
import org.springframework.context.annotation.Configuration;

/**
 * @author 28156
 */
@Configuration
public class RabbitConfig {
    //rabbitmq三部曲
     //1.定义交换机
    @Bean
    public FanoutExchange fanoutExchange(){
        return new FanoutExchange("exchange.fanout");
    }
    //2.定义队列
    @Bean
    public Queue queueA(){
        return new Queue("queue.fanoutA.a");
    }
    @Bean
    public Queue queueB(){
        return new Queue("queue.fanoutB.b");
    }
    //3.进行绑定
    @Bean
    public Binding bindingA(FanoutExchange fanoutExchange,Queue queueA){
        //将A绑定到扇形交换机
        return BindingBuilder.bind(queueA).to(fanoutExchange);
    }
    @Bean
    public Binding bindingB(FanoutExchange fanoutExchange,Queue queueB){
        //将B绑定到扇形交换机
        return BindingBuilder.bind(queueB).to(fanoutExchange);
    }

}
5.2.2.4 生产者发送消息
package com.atguigu.service;

import lombok.extern.slf4j.Slf4j;
import org.springframework.amqp.core.Message;
import org.springframework.amqp.rabbit.core.RabbitTemplate;
import org.springframework.beans.factory.annotation.Autowired;
import org.springframework.stereotype.Component;

import java.util.Date;

/**
 * @author 28156
 */
@Component
@Slf4j
public class MessageService {
    @Autowired
    private RabbitTemplate rabbitTemplate;

    public void sendMessage(){
        String str="hello word!";
        Message message = new Message(str.getBytes());
        rabbitTemplate.convertAndSend("exchange.fanout","",message);
        log.info("消息发送完毕,发送时间为{}",new Date());
    }
}
5.2.2.4 启动类
package com.atguigu;

import com.atguigu.service.MessageService;
import lombok.extern.slf4j.Slf4j;
import org.springframework.beans.factory.annotation.Autowired;
import org.springframework.boot.ApplicationArguments;
import org.springframework.boot.ApplicationRunner;
import org.springframework.boot.SpringApplication;
import org.springframework.boot.autoconfigure.SpringBootApplication;

/**
 * @author 28156
 */
@SpringBootApplication
@Slf4j
public class Application implements ApplicationRunner{
    @Autowired
    private MessageService messageService;
    public static void main(String[] args) {
        SpringApplication.run(Application.class,args);
    }

    @Override
    public void run(ApplicationArguments args) throws Exception {
        messageService.sendMessage();
        log.info("程序启动完毕最后");
    }
}
5.2.2.5 结果
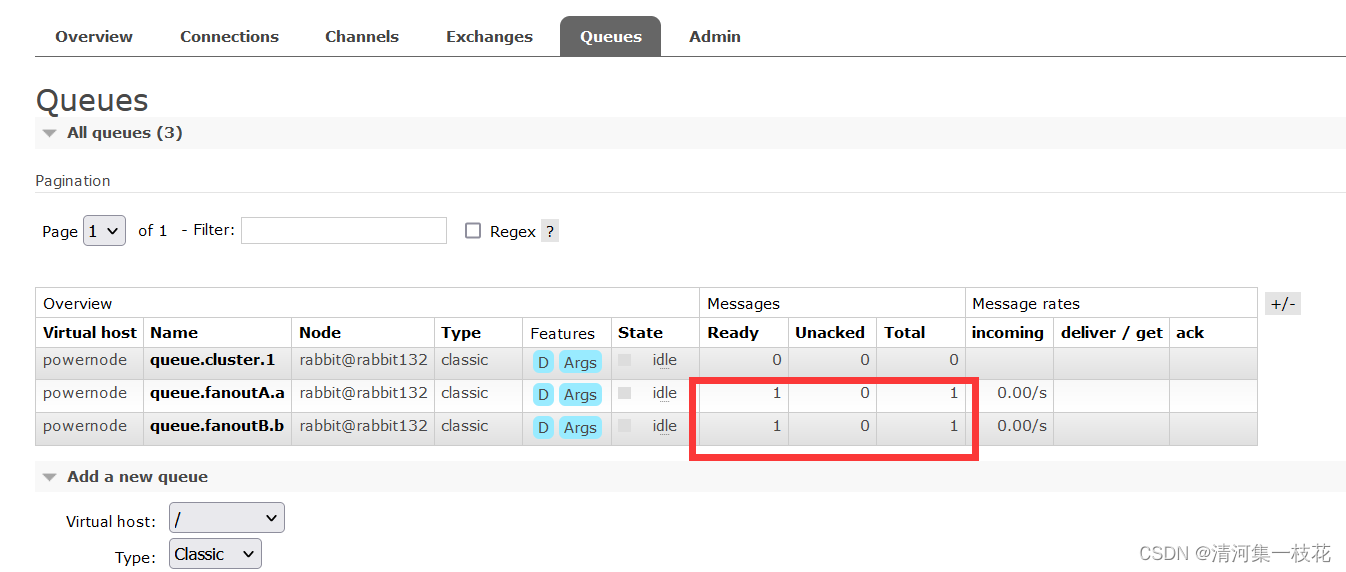
5.2.3 消费者接收消息
package com.atguigu.service;

import lombok.extern.slf4j.Slf4j;
import org.springframework.amqp.core.Message;
import org.springframework.amqp.rabbit.annotation.RabbitListener;
import org.springframework.stereotype.Component;

/**
 * @author 28156
 */
@Component
@Slf4j
public class ReceiveMessage {
    //接收两个队列的消息
    @RabbitListener(queues = {"queue.fanoutA.a","queue.fanoutB.b"})
    public void receiveMessage(Message message){
        byte[] body = message.getBody();
        String str = new String(body);
        log.info("接收到的消息为:{}",str);
    }
}
重新启动项目

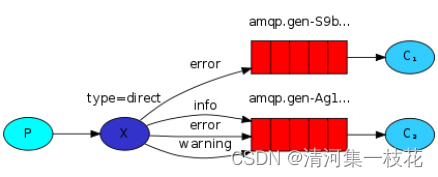
5.3 Direct Exchange
5.3.1 介绍
根据路由键精确匹配(一模一样)进行路由消息队列;
5.3.2 具体实现
相关依赖可参考5.2.2.1 启动类可参考5.2.2.4 接收消息参考5.2.3(接收消息只修改监听队列即可)
5.3.2.1 yml配置文件
server:
  port: 8080

spring:
  application:
    name: direct-learn
  rabbitmq:
    host: 192.168.10.132
    port: 5672java
    username: admin
    password: 123456
    virtual-host: powernodexm

my:
  exchangeName: exchange.direct # 自己定义交换机名称
  queueAName: queue.direct.a # 队列A
  queueBName: queue.direct.b # 队列B
5.3.2.2 三部曲
package com.atguigu.config;

import org.springframework.amqp.core.*;
import org.springframework.beans.factory.annotation.Value;
import org.springframework.boot.context.properties.ConfigurationProperties;
import org.springframework.context.annotation.Bean;
import org.springframework.context.annotation.Configuration;

/**
 * @author 28156
 */
@Configuration
public class RabbitConfig {
    /**
     * 交换机名字和队列A和队列B名字
     */
    @Value("${my.exchangeName}")
    private String exchangeName;

    @Value("${my.queueAName}")
    private String queueAName;
    @Value("${my.queueBName}")
    private String queueBName;
    @Bean
    public DirectExchange directExchange(){
        return ExchangeBuilder.directExchange(exchangeName).build();
    }
    @Bean
    public Queue queueA(){
        return QueueBuilder.durable(queueAName).build();
    }
    @Bean
    public Queue queueB(){
        return QueueBuilder.durable(queueBName).build();
    }
    @Bean
    public Binding bindingA(DirectExchange directExchange,Queue queueA){
        return BindingBuilder.bind(queueA).to(directExchange).with("error");
    }


    @Bean
    public Binding bindingB1(DirectExchange directExchange,Queue queueB){
        return BindingBuilder.bind(queueB).to(directExchange).with("error");
    }
    @Bean
    public Binding bindingB2(DirectExchange directExchange,Queue queueB){
        return BindingBuilder.bind(queueB).to(directExchange).with("info");
    }
    @Bean
    public Binding bindingB3(DirectExchange directExchange,Queue queueB){
        return BindingBuilder.bind(queueB).to(directExchange).with("warning");
    }

}
5.3.2.3 生产者
这里是向交换机与队列绑定key为info的队列发送消息
package com.atguigu.service;

import lombok.extern.slf4j.Slf4j;
import org.springframework.amqp.core.Message;
import org.springframework.amqp.core.MessageBuilder;
import org.springframework.amqp.rabbit.core.RabbitTemplate;
import org.springframework.beans.factory.annotation.Autowired;
import org.springframework.stereotype.Service;

import java.util.Date;

/**
 * @author 28156
 */
@Service
@Slf4j
public class MessageService {
    @Autowired
    private RabbitTemplate rabbitTemplate;

    public void sendMsg(){
        //使用建造者模式创建消息
        Message message = MessageBuilder.withBody("hello直连交换机".getBytes()).build();
        rabbitTemplate.convertAndSend("exchange.direct","info",message);
        log.info("发送完成,发送时间为{}",new Date());

    }
}
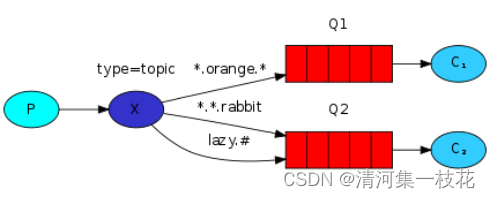
5.4 Topic Exchange
5.4.1 介绍
通配符匹配,相当于模糊匹配;
#匹配多个单词,用来表示任意数量(零个或多个)单词
*匹配一个单词(必须有一个,而且只有一个),用.隔开的为一个单词:
beijing.# == beijing.queue.abc, beijing.queue.xyz.xxx
beijing.* == beijing.queue, beijing.xyz
5.4.2 具体实现
相关依赖可参考5.2.2.1 启动类可参考5.2.2.4 接收消息参考5.2.3(接收消息只修改监听队列即可)
5.4.2.1 yml配置文件
server:
  port: 8080

spring:
  application:
    name: topic-learn
  rabbitmq:
    host: 192.168.10.132
    port: 5672
    username: admin
    password: 123456
    virtual-host: powernode

my:
  exchangeName: exchange.topic
  queueAName: queue.topic.a
  queueBName: queue.topic.b
5.4.2.2 三部曲
package com.atguigu.config;

import lombok.extern.slf4j.Slf4j;
import org.springframework.amqp.core.*;
import org.springframework.beans.factory.annotation.Value;
import org.springframework.context.annotation.Bean;
import org.springframework.stereotype.Service;

/**
 * @author 28156
 */
@Service
@Slf4j
public class RabbitConfig {
    /**
     * 交换机名字和队列A和队列B名字
     */
    @Value("${my.exchangeName}")
    private String exchangeName;

    @Value("${my.queueAName}")
    private String queueAName;
    @Value("${my.queueBName}")
    private String queueBName;
    @Bean
    public TopicExchange topicExchange(){
        return ExchangeBuilder.topicExchange(exchangeName).build();
    }
    @Bean
    public Queue queueA(){
        return QueueBuilder.durable(queueAName).build();
    }
    @Bean
    public Queue queueB(){
        return QueueBuilder.durable(queueBName).build();
    }
    @Bean
    public Binding bindingA(TopicExchange topicExchange, Queue queueA){
        return BindingBuilder.bind(queueA).to(topicExchange).with("*.orange.*");
    }
    @Bean
    public Binding bindingB1(TopicExchange topicExchange, Queue queueB){
        return BindingBuilder.bind(queueB).to(topicExchange).with("*.*.rabbit");
    }
    @Bean
    public Binding bindingB2(TopicExchange topicExchange, Queue queueB){
        return BindingBuilder.bind(queueB).to(topicExchange).with("lazy.#");
    }
}
5.4.2.3 生产者
package com.atguigu.service;

import lombok.extern.slf4j.Slf4j;
import org.springframework.amqp.core.AmqpTemplate;
import org.springframework.amqp.core.Message;
import org.springframework.amqp.core.MessageBuilder;
import org.springframework.beans.factory.annotation.Autowired;
import org.springframework.stereotype.Service;

import java.util.Date;

/**
 * @author 28156
 */
@Service
@Slf4j
public class MessageService {
    @Autowired
    private AmqpTemplate amqpTemplate;

    public void sendMsg(){
        Message message = MessageBuilder.withBody("hello topic exchange".getBytes()).build();
        //参数1交换机   参数2 发送路由key  参数3 消息
        amqpTemplate.convertAndSend("exchange.topic","lazy.a.rabbit",message);
        log.info("发送完成,当前时间{}",new Date());
    }
}
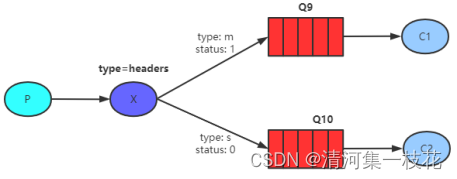
5.5 Headers Exchange
5.5.1 介绍
基于消息内容中的headers属性进行匹配;
5.5.2 具体实现
相关依赖可参考5.2.2.1 启动类可参考5.2.2.4 接收消息参考5.2.3(接收消息只修改监听队列即可)
5.5.2.1 yml配置文件
server:
  port: 8080

spring:
  application:
    name: headers-learn
  rabbitmq:
    host: 192.168.10.132
    port: 5672
    username: admin
    password: 123456
    virtual-host: powernode

my:
  exchangeName: exchange.headers
  queueAName: queue.headers.a
  queueBName: queue.headers.b
5.5.2.2 三部曲
package com.atguigu.config;

import lombok.extern.slf4j.Slf4j;
import org.springframework.amqp.core.*;
import org.springframework.beans.factory.annotation.Value;
import org.springframework.context.annotation.Bean;
import org.springframework.context.annotation.Configuration;

import java.util.HashMap;
import java.util.Map;

/**
 * @author 28156
 */
@Configuration
@Slf4j
public class RabbitConfig {
    /**
     * 交换机名字和队列A和队列B名字
     */
    @Value("${my.exchangeName}")
    private String exchangeName;

    @Value("${my.queueAName}")
    private String queueAName;
    @Value("${my.queueBName}")
    private String queueBName;
    @Bean
    public HeadersExchange headersExchange(){
        return ExchangeBuilder.headersExchange(exchangeName).build();
    }
    @Bean
    public Queue queueA(){
        return QueueBuilder.durable(queueAName).build();
    }
    @Bean
    public Queue queueB(){
        return QueueBuilder.durable(queueBName).build();
    }
    @Bean
    public Binding bindingA(HeadersExchange headersExchange,Queue queueA){
        Map<String, Object> headerValues =new HashMap<>();
        headerValues.put("type","m");
        headerValues.put("status","1");
        return BindingBuilder.bind(queueA).to(headersExchange).whereAll(headerValues).match();
    }
    @Bean
    public Binding bindingB(HeadersExchange headersExchange,Queue queueB){
        Map<String, Object> headerValues =new HashMap<>();
        headerValues.put("type","s");
        headerValues.put("status","0");
        return BindingBuilder.bind(queueB).to(headersExchange).whereAll(headerValues).match();
    }


}
5.5.2.3 生产者
package com.atguigu.service;

import lombok.extern.slf4j.Slf4j;
import org.springframework.amqp.core.Message;
import org.springframework.amqp.core.MessageBuilder;
import org.springframework.amqp.core.MessageProperties;
import org.springframework.amqp.rabbit.core.RabbitTemplate;
import org.springframework.beans.factory.annotation.Autowired;
import org.springframework.stereotype.Service;

import java.util.Date;
import java.util.HashMap;
import java.util.Map;

/**
 * @author 28156
 */
@Slf4j
@Service
public class MessageService {
    @Autowired
    private RabbitTemplate rabbitTemplate;

    public void sendMsg(){
        //消息属性
        MessageProperties messageProperties = new MessageProperties();
        Map<String, Object> headers =new HashMap<>();
        headers.put("type","s");
        headers.put("status","0");
        //设置消息头
        messageProperties.setHeaders(headers);
        //添加消息属性
        Message message = MessageBuilder.withBody("hello headers".getBytes())
                .andProperties(messageProperties).build();
        //头部交换机,路由key传不传无所谓,用的是消息属性的消息头
        rabbitTemplate.convertAndSend("exchange.headers","",message);
        log.info("消息发送完毕,时间为{}",new Date());
    }
}
6. RabbitMQ过期消息
过期消息也叫TTL消息,TTL:Time To Live
消息的过期时间有两种设置方式:(过期消息)
队列的过期时间决定了在没有任何消费者的情况下,队列中的消息可以存活多久;
注意事项:如果消息和对列都设置过期时间,则消息的TTL以两者之间较小的那个数值为准。
6.1 设置单条消息的过期时间
相关依赖可参考5.2.2.1 启动类可参考5.2.2.4 接收消息参考5.2.3(接收消息只修改监听队列即可)
6.1.1 yml配置文件
server:
  port: 8080

spring:
  application:
    name: ttl1-learn
  rabbitmq:
    host: 192.168.10.132
    port: 5672
    username: admin
    password: 123456
    virtual-host: powernode

my:
  exchangeName: exchange.ttl.a
  queueAName: queue.ttl.a
6.1.2 三部曲
package com.atguigu.config;

import org.springframework.amqp.core.*;
import org.springframework.beans.factory.annotation.Value;
import org.springframework.context.annotation.Bean;
import org.springframework.context.annotation.Configuration;

/**
 * @author 28156
 */
@Configuration
public class RabbitConfig {
    /**
     * 交换机名字和队列A和队列B名字
     */
    @Value("${my.exchangeName}")
    private String exchangeName;

    @Value("${my.queueAName}")
    private String queueAName;
    @Bean
    public DirectExchange directExchange(){
        return ExchangeBuilder.directExchange(exchangeName).build();
    }
    @Bean
    public Queue queueA(){
        return QueueBuilder.durable(queueAName).build();
    }

    @Bean
    public Binding bindingB2(DirectExchange directExchange,Queue queueA){
        return BindingBuilder.bind(queueA).to(directExchange).with("info");
    }


}
6.1.3 生产者
package com.atguigu.service;

import lombok.extern.slf4j.Slf4j;
import org.springframework.amqp.core.Message;
import org.springframework.amqp.core.MessageBuilder;
import org.springframework.amqp.core.MessageProperties;
import org.springframework.amqp.rabbit.core.RabbitTemplate;
import org.springframework.beans.factory.annotation.Autowired;
import org.springframework.stereotype.Service;

import java.util.Date;

/**
 * @author 28156
 */
@Service
@Slf4j
public class MessageService {
    @Autowired
    private RabbitTemplate rabbitTemplate;

    public void sendMsg(){

        MessageProperties messageProperties = new MessageProperties();
        messageProperties.setExpiration("35000");//过期的时间
        Message message = MessageBuilder.withBody("hello ttl direcr".getBytes()).build();
        rabbitTemplate.convertAndSend("exchange.ttl.a","info",message);
        log.info("消息发送完毕,发送时间为{}",new Date());
    }
}
6.2 通过队列属性设置消息过期时间
相关依赖可参考5.2.2.1 启动类可参考5.2.2.4 接收消息参考5.2.3(接收消息只修改监听队列即可)
6.2.1 yml配置文件
server:
  port: 8080

spring:
  application:
    name: ttl1-learn2
  rabbitmq:
    host: 192.168.10.132
    port: 5672
    username: admin
    password: 123456
    virtual-host: powernode

my:
  exchangeName: exchange.ttl.b
  queueAName: queue.ttl.b
6.2.2 三部曲
package com.atguigu.config;

import org.springframework.amqp.core.*;
import org.springframework.beans.factory.annotation.Value;
import org.springframework.context.annotation.Bean;
import org.springframework.context.annotation.Configuration;

import java.util.HashMap;
import java.util.Map;

/**
 * @author 28156
 */
@Configuration
public class RabbitConfig {
    /**
     * 交换机名字和队列A和队列B名字
     */
    @Value("${my.exchangeName}")
    private String exchangeName;

    @Value("${my.queueAName}")
    private String queueAName;
    @Bean
    public DirectExchange directExchange(){
        return ExchangeBuilder.directExchange(exchangeName).build();
    }
    @Bean
    public Queue queue(){
        //方式一:new Queue
        Map<String, Object> arguments = new HashMap<>();
        arguments.put("x-message-ttl",15000);
        return new Queue(queueAName,true,false,false,arguments);
        //方式二:建造者模式
        //return QueueBuilder.durable(queueAName).withArguments(arguments).build();
    }

    @Bean
    public Binding bindingB2(DirectExchange directExchange,Queue queue){
        return BindingBuilder.bind(queue).to(directExchange).with("info");
    }


}
6.2.3 生产者
package com.atguigu.service;

import lombok.extern.slf4j.Slf4j;
import org.springframework.amqp.core.Message;
import org.springframework.amqp.core.MessageBuilder;
import org.springframework.amqp.rabbit.core.RabbitTemplate;
import org.springframework.beans.factory.annotation.Autowired;
import org.springframework.stereotype.Service;

import java.util.Date;

/**
 * @author 28156
 */
@Service
@Slf4j
public class MessageService {
    @Autowired
    private RabbitTemplate rabbitTemplate;

    public void sendMsg(){

        Message message = MessageBuilder.withBody("hello ttl2 direct".getBytes()).build();
        rabbitTemplate.convertAndSend("exchange.ttl.b","info",message);
        log.info("消息发送完毕,发送时间为{}",new Date());
    }
}
7. RabbitMQ死信队列
也有叫 死信交换机、死信邮箱等说法;
DLX: Dead-Letter-Exchange 死信交换器,死信邮箱
如下情况下一个消息会进入DLX(Dead Letter Exchange)死信交换机。
这里使用直连交换机的方式进行演示,需要一台正常交换机,一台死信交换机,一个正常队列,一个死信队列
7.1 消息过期
7.1.1 yml配置文件
server:
  port: 8080

spring:
  application:
    name: dlx-learn3
  rabbitmq:
    host: 192.168.10.132
    port: 5672
    username: admin
    password: 123456
    virtual-host: powernode

my:
  exchangeNormalName: exchange.normal.2
  queueNormalName: queue.normal.2
  exchangeDlxName: exchange.dlx.2
  queueDlxName: queue.dlx.2
7.1.2 三部曲
package com.atguigu.config;

import lombok.extern.slf4j.Slf4j;
import org.springframework.amqp.core.*;
import org.springframework.beans.factory.annotation.Value;
import org.springframework.context.annotation.Bean;
import org.springframework.context.annotation.Configuration;

import java.util.HashMap;
import java.util.Map;

/**
 * @author 28156
 */
@Configuration
@Slf4j
public class RabbitConfig {

    @Value("${my.exchangeNormalName}")
    private String exchangeNormalName;
    @Value("${my.queueNormalName}")
    private String queueNormalName;
    @Value("${my.exchangeDlxName}")
    private String exchangeDlxName;
    @Value("${my.queueDlxName}")
    private String queueDlxName;
    @Bean
    public DirectExchange normalExchange(){
        return ExchangeBuilder.directExchange(exchangeNormalName).build();
    }
    @Bean
    public Queue normalQueue(){
        Map<String, Object> arguments=new HashMap<>();
        //设置死信交换机
        arguments.put("x-dead-letter-exchange",exchangeDlxName);
        //设置死信路由key,要和死信队列和死信交换机绑定的key一样
        arguments.put("x-dead-letter-routing-key","error");
        return QueueBuilder.durable(queueNormalName).withArguments(arguments).build();
    }
    @Bean
    public Binding binding(DirectExchange normalExchange,Queue normalQueue){
        return BindingBuilder.bind(normalQueue).to(normalExchange).with("order");
    }

    @Bean
    public  DirectExchange dlxExchange(){
        return ExchangeBuilder.directExchange(exchangeDlxName).build();
    }

    @Bean
    public Queue dlxQueue(){
        return QueueBuilder.durable(queueDlxName).build();
    }
    @Bean
    public Binding bindingDlx(DirectExchange dlxExchange,Queue dlxQueue){
        return BindingBuilder.bind(dlxQueue).to(dlxExchange).with("error");
    }
}
7.1.3 生产者
package com.atguigu.service;

import lombok.extern.slf4j.Slf4j;
import org.springframework.amqp.core.Message;
import org.springframework.amqp.core.MessageBuilder;
import org.springframework.amqp.core.MessageProperties;
import org.springframework.amqp.rabbit.core.RabbitTemplate;
import org.springframework.beans.factory.annotation.Autowired;
import org.springframework.stereotype.Service;

import java.util.Date;

/**
 * @author 28156
 */
@Service
@Slf4j
public class MessageService {
    @Autowired
    private RabbitTemplate rabbitTemplate;

    public void sendMsg(){
        MessageProperties messageProperties = new MessageProperties();
        messageProperties.setExpiration("15000");

        Message message = MessageBuilder.withBody("hello dlx".getBytes()).andProperties(messageProperties).build();
        rabbitTemplate.convertAndSend("exchange.normal.2","order",message);
        log.info("消息发送完成,时间为{}",new Date());

    }
}
7.2 队列过期
@Bean
    public Queue normalQueue(){
        Map<String, Object> arguments=new HashMap<>();
        //设置死信交换机
        arguments.put("x-dead-letter-exchange",exchangeDlxName);
        //设置死信路由key,要和死信队列和死信交换机绑定的key一样
        arguments.put("x-dead-letter-routing-key","error");
        return QueueBuilder.durable(queueNormalName).withArguments(arguments).build();
    }
7.3 队列达到最大长度(先入队的消息会被发送到DLX)
@Bean
    public Queue normalQueue(){
        Map<String, Object> arguments=new HashMap<>();
        //设置队列的最大长度
        arguments.put("x-max-length",5);
        //设置死信交换机
        arguments.put("x-dead-letter-exchange",exchangeDlxName);
        //设置死信路由key,要和死信队列和死信交换机绑定的key一样
        arguments.put("x-dead-letter-routing-key","error");
        return QueueBuilder.durable(queueNormalName).withArguments(arguments).build();
    }
7.4 消费者拒绝消息不进行重新投递
首先配置yml文件进行手动确认
server:
  port: 9090

spring:
  application:
    name: dlx-receiver-msg
  rabbitmq:
    host: 192.168.10.132
    port: 5672
    username: admin
    password: 123456
    virtual-host: powernode
    listener:
      simple:
        acknowledge-mode: manual # 开启手动确认
消费者
package com.atguigu.message;

import com.rabbitmq.client.Channel;
import lombok.extern.slf4j.Slf4j;
import org.springframework.amqp.core.Message;
import org.springframework.amqp.core.MessageProperties;
import org.springframework.amqp.rabbit.annotation.RabbitListener;
import org.springframework.stereotype.Component;

import java.io.IOException;

/**
 * @author 28156
 */
@Component
@Slf4j
public class MessageReceiver {
    @RabbitListener(queues ={"queue.normal.4"} )
    public void receiveMsg(Message message, Channel channel){
        //获取消息属性
        MessageProperties messageProperties = message.getMessageProperties();
        //获取唯一标识
        long deliveryTag = messageProperties.getDeliveryTag();

        try {
            byte[] body = message.getBody();
            String str  =new String(body);
            log.info("接收到的消息为{}",str);
            //消费者的手动确认      false表示只确认当前消息,改为true为批量确认
            channel.basicAck(deliveryTag,false);
        } catch (Exception e) {
            log.error("接收者出现问题:{}",e.getMessage());
            try {
                //消费者的手动不确认    参数3为   是否重新入队
                channel.basicNack(deliveryTag,false, false);

            } catch (IOException ex) {
                throw new RuntimeException(ex);
            }
            throw new RuntimeException(e);
        }
    }
}
7.5 消费者拒绝消息
package com.atguigu.message;

import com.rabbitmq.client.Channel;
import lombok.extern.slf4j.Slf4j;
import org.springframework.amqp.core.Message;
import org.springframework.amqp.core.MessageProperties;
import org.springframework.amqp.rabbit.annotation.RabbitListener;
import org.springframework.stereotype.Component;
import java.io.IOException;

/**
 * @author 28156
 */
@Component
@Slf4j
public class MessageReceiver {
    @RabbitListener(queues ={"queue.normal.4"} )
    public void receiveMsg(Message message, Channel channel){
        //获取消息属性
        MessageProperties messageProperties = message.getMessageProperties();
        //获取唯一标识
        long deliveryTag = messageProperties.getDeliveryTag();

        try {
            byte[] body = message.getBody();
            String str  =new String(body);
            log.info("接收到的消息为{}",str);
            //消费者的手动确认      false表示只确认当前消息,改为true为批量确认
            channel.basicAck(deliveryTag,false);
        } catch (Exception e) {
            log.error("接收者出现问题:{}",e.getMessage());
            try {
                //参数1为消息的唯一标识  参数2为是否重新入队,不可以批量处理
                channel.basicReject(deliveryTag,false);
            } catch (IOException ex) {
                throw new RuntimeException(ex);
            }
            throw new RuntimeException(e);
        }
    }
}
8. RabbitMQ延迟队列
8.1 定时任务方式
每隔3秒扫描一次数据库,查询过期的订单然后进行处理;
优点:简单,容易实现;
缺点:
- 存在延迟(延迟时间不准确),如果你每隔1分钟扫一次,那么就有可能延迟1分钟;
- 性能较差,每次扫描数据库,如果订单量很大
8.2 JDK延迟队列(单体应用,不能分布式下)
DelayedQueue无界阻塞队列,该队列只有在延迟期满的时候才能从中获取元素
优点:实现简单,任务延迟低;
缺点:服务重启、宕机,数据丢失;只适合单机版,不适合集群;
订单量大,可能内存不足而发生异常; oom
8.3 采用消息中间件(rabbitmq)
- RabbitMQ本身不支持延迟队列,可以使用TTL结合DLX的方式来实现消息的延迟投递,即把DLX跟某个队列绑定,到了指定时间,消息过期后,就会从DLX路由到这个队列,消费者可以从这个队列取走消息。
代码:正常延迟
问题? 如果先发送的消息,消息延迟时间长,会影响后面的 延迟时间段的消息的消费;
解决:不同延迟时间的消息要发到不同的队列上,同一个队列的消息,它的延迟时间应该一样
 8.4 使用rabbitmq-delayed-message-exchange 延迟插件
可从上面网盘下载
8.4.1 解压
| unzip rabbitmq_delayed_message_exchange-3.10.2.ez |
如果unzip 没有安装,先安装一下
| yum install unzip -y |
8.4.2 启用插件
./rabbitmq-plugins enable rabbitmq_delayed_message_exchange 开启插件;
重启rabbitmq使其生效;
消息发送后不会直接投递到队列,
而是存储到 Mnesia(嵌入式数据库),检查 x-delay 时间(消息头部);
延迟插件在 RabbitMQ 3.5.7 及以上的版本才支持,依赖 Erlang/OPT 18.0 及以上运行环境;
Mnesia 是一个小型数据库,不适合于大量延迟消息的实现
解决了消息过期时间不一致出现的问题。
8.4.3 代码实现
相关依赖可参考5.2.2.1 启动类可参考5.2.2.4 接收消息参考5.2.3(接收消息只修改监听队列即可)
1.yml配置文件
server:
  port: 8080

spring:
  application:
    name: delay-plugin1
  rabbitmq:
    host: 192.168.10.132
    port: 5672
    username: admin
    password: 123456
    virtual-host: powernode

my:
  exchangeName: exchange.delay.4
  queueDelayName: queue.delay.4
2.三部曲
package com.atguigu.config;

import org.springframework.amqp.core.*;
import org.springframework.beans.factory.annotation.Value;
import org.springframework.context.annotation.Bean;
import org.springframework.context.annotation.Configuration;

import java.util.HashMap;
import java.util.Map;

/**
 * @author 28156
 */
@Configuration
public class RabbitConfig {
    /**
     * 交换机名字和队列A和队列B名字
     */
    @Value("${my.exchangeName}")
    private String exchangeName;

    @Value("${my.queueDelayName}")
    private String queueDelayName;
    @Bean
    public CustomExchange customExchange(){
        //String name, String type, boolean durable, boolean autoDelete, Map<String, Object> arguments
        Map<String, Object> arguments = new HashMap<>();
        arguments.put("x-delayed-type","direct");
        CustomExchange customExchange =
                new CustomExchange(exchangeName,"x-delayed-message",true,false,arguments);
        return customExchange;
    }
    @Bean
    public Queue queueDelayName(){
        return QueueBuilder.durable(queueDelayName).build();
    }


    @Bean
    public Binding binding(CustomExchange customExchange,Queue queueDelayName){
        //绑定路由key,加一个noargs()方法
        return BindingBuilder.bind(queueDelayName).to(customExchange).with("plugin").noargs();
    }


}
3.生产者
package com.atguigu.service;

import lombok.extern.slf4j.Slf4j;
import org.springframework.amqp.core.Message;
import org.springframework.amqp.core.MessageBuilder;
import org.springframework.amqp.core.MessageProperties;
import org.springframework.amqp.rabbit.core.RabbitTemplate;
import org.springframework.beans.factory.annotation.Autowired;
import org.springframework.stereotype.Service;

import java.util.Date;

/**
 * @author 28156
 */
@Service
@Slf4j
public class MessageService {
    @Autowired
    private RabbitTemplate rabbitTemplate;

    public void sendMsg(){
        {
            MessageProperties messageProperties = new MessageProperties();
            messageProperties.setHeader("x-delay",25000);

            Message message = MessageBuilder.withBody("hello ttl2 direct".getBytes())
                    .andProperties(messageProperties).build();
            rabbitTemplate.convertAndSend("exchange.delay.4", "plugin", message);
            log.info("消息发送完毕,发送时间为{}", new Date());
        }
        {
            MessageProperties messageProperties = new MessageProperties();
            messageProperties.setHeader("x-delay",15000);

            Message message = MessageBuilder.withBody("hello ttl2 direct".getBytes())
                    .andProperties(messageProperties).build();
            rabbitTemplate.convertAndSend("exchange.delay.4", "plugin", message);
            log.info("消息发送完毕,发送时间为{}", new Date());
        }
    }
}
4.消费者
package com.atguigu.service;

import lombok.extern.slf4j.Slf4j;
import org.springframework.amqp.core.Message;
import org.springframework.amqp.rabbit.annotation.RabbitListener;
import org.springframework.stereotype.Component;

import java.util.Date;

/**
 * @author 28156
 */
@Component
@Slf4j
public class ReceiveMessage {
    @RabbitListener(queues = {"queue.delay.4"})
    public void getMsg(Message message){
        byte[] body = message.getBody();
        String str = new String(body);
        log.info("消息接收完毕,接收时间为{}", new Date());


    }
}
9.RabbitMQ消息Confirm模式
9.1 Confirm模式简介
消息的confirm确认机制,是指生产者投递消息后,到达了消息服务器Broker里面的exchange交换机,则会给生产者一个应答,生产者接收到应答,用来确定这条消息是否正常的发送到Broker的exchange中,这也是消息可靠性投递的重要保障;
9.2 代码实现
相关依赖可参考5.2.2.1 启动类可参考5.2.2.4 接收消息参考5.2.3(接收消息只修改监听队列即可)
9.2.1 yml配置文件
server:
  port: 8080

spring:
  application:
    name: confirm-learn1
  rabbitmq:
    host: 192.168.10.132
    port: 5672
    username: admin
    password: 123456
    virtual-host: powernode
    publisher-confirm-type: correlated

my:
  exchangeName: exchange.confirm.1
  queueAName: queue.confirm.1
9.2.2 三部曲
package com.atguigu.config;

import org.springframework.amqp.core.*;
import org.springframework.beans.factory.annotation.Value;
import org.springframework.context.annotation.Bean;
import org.springframework.context.annotation.Configuration;

/**
 * @author 28156
 */
@Configuration
public class RabbitConfig {
    /**
     * 交换机名字和队列A和队列B名字
     */
    @Value("${my.exchangeName}")
    private String exchangeName;

    @Value("${my.queueAName}")
    private String queueAName;
    @Bean
    public DirectExchange directExchange(){
        return ExchangeBuilder.directExchange(exchangeName).build();
    }
    @Bean
    public Queue queueA(){
        return QueueBuilder.durable(queueAName).build();
    }

    @Bean
    public Binding bindingB2(DirectExchange directExchange,Queue queueA){
        return BindingBuilder.bind(queueA).to(directExchange).with("info");
    }


}
9.2.3 ConfirmCallBack方法
package com.atguigu.config;

import lombok.extern.slf4j.Slf4j;
import org.springframework.amqp.rabbit.connection.CorrelationData;
import org.springframework.amqp.rabbit.core.RabbitTemplate;
import org.springframework.stereotype.Component;

/**
 * @author 28156
 */
@Component
@Slf4j
public class MyConfirmCallBack implements RabbitTemplate.ConfirmCallback {
    @Override
    public void confirm(CorrelationData correlationData, boolean ack, String cause) {
        if(ack=true){
            log.info("消息正确到达交换机");
            return;
        }
            log.error("消息没有到达交换机,原因为{}",cause);

    }
}
9.3.4 生产者
package com.atguigu.service;

import com.atguigu.config.MyConfirmCallBack;
import jakarta.annotation.PostConstruct;
import lombok.extern.slf4j.Slf4j;
import org.springframework.amqp.core.Message;
import org.springframework.amqp.core.MessageBuilder;
import org.springframework.amqp.core.MessageProperties;
import org.springframework.amqp.rabbit.connection.CorrelationData;
import org.springframework.amqp.rabbit.core.RabbitTemplate;
import org.springframework.beans.factory.annotation.Autowired;
import org.springframework.stereotype.Service;

import java.util.Date;

/**
 * @author 28156
 */
@Service
@Slf4j
public class MessageService {
    @Autowired
    private RabbitTemplate rabbitTemplate;
    @Autowired
    private MyConfirmCallBack myConfirmCallBack;

    @PostConstruct
    public void init(){
        rabbitTemplate.setConfirmCallback(myConfirmCallBack);
    }

    public void sendMsg(){

        MessageProperties messageProperties = new MessageProperties();
        Message message = MessageBuilder.withBody("hello confirm direct".getBytes()).build();
        //关联数据
        CorrelationData correlationData = new CorrelationData();
        //发送订单信息
        correlationData.setId("order_123456");

        rabbitTemplate.convertAndSend("exchange.confirm.1","info",message,correlationData);
        log.info("消息发送完毕,发送时间为{}",new Date());
    }
}
10.RabbitMQ消息Return模式
rabbitmq 整个消息投递的路径为:
producer —> exchange —> queue —> consumer
>> 消息从 producer 到 exchange 则会返回一个 confirmCallback;
>> 消息从 exchange –> queue 投递失败则会返回一个 returnCallback;
我们可以利用这两个callback控制消息的可靠性投递;开启 确认模式;
使用rabbitTemplate.setConfirmCallback设置回调函数,当消息发送到exchange后回调confirm方法。在方法中判断ack,如果为true,则发送成功,如果为false,则发送失败,需要处理;
10.1 yml配置文件
server:
  port: 8080

spring:
  application:
    name: return-learn1
  rabbitmq:
    host: 192.168.10.132
    port: 5672
    username: admin
    password: 123456
    virtual-host: powernode
    publisher-returns: true

my:
  exchangeName: exchange.return.1
  queueAName: queue.return.1
10.2 三部曲
package com.atguigu.config;

import org.springframework.amqp.core.*;
import org.springframework.beans.factory.annotation.Value;
import org.springframework.context.annotation.Bean;
import org.springframework.context.annotation.Configuration;

/**
 * @author 28156
 */
@Configuration
public class RabbitConfig {
    /**
     * 交换机名字和队列A和队列B名字
     */
    @Value("${my.exchangeName}")
    private String exchangeName;

    @Value("${my.queueAName}")
    private String queueAName;
    @Bean
    public DirectExchange directExchange(){
        return ExchangeBuilder.directExchange(exchangeName).build();
    }
    @Bean
    public Queue queueA(){
        return QueueBuilder.durable(queueAName).build();
    }

    @Bean
    public Binding bindingB2(DirectExchange directExchange,Queue queueA){
        return BindingBuilder.bind(queueA).to(directExchange).with("info");
    }


}
10.3 ReturnsCallback方法
当消息从交换机 没有正确地 到达队列,则会触发该方法
如果消息从交换机 正确地 到达队列了,那么就不会触发该方法
package com.atguigu.config;

import lombok.extern.slf4j.Slf4j;
import org.springframework.amqp.core.ReturnedMessage;
import org.springframework.amqp.rabbit.core.RabbitTemplate;
import org.springframework.stereotype.Component;

/**
 * @author 28156
 */
@Component
@Slf4j
public class MyReturnCallBack implements RabbitTemplate.ReturnsCallback {
    @Override
    public void returnedMessage(ReturnedMessage returnedMessage) {
            log.error("消息没有从交换机正确路由到队列,原因为{}",returnedMessage.getReplyText());
    }
}
10.4 生产者
package com.atguigu.service;

import com.atguigu.config.MyReturnCallBack;
import jakarta.annotation.PostConstruct;
import lombok.extern.slf4j.Slf4j;
import org.springframework.amqp.core.Message;
import org.springframework.amqp.core.MessageBuilder;
import org.springframework.amqp.rabbit.core.RabbitTemplate;
import org.springframework.beans.factory.annotation.Autowired;
import org.springframework.stereotype.Service;

import java.util.Date;

/**
 * @author 28156
 */
@Service
@Slf4j
public class MessageService {
    @Autowired
    private RabbitTemplate rabbitTemplate;
    @Autowired
    private MyReturnCallBack myReturnCallBack;
    @PostConstruct
    public void init(){
        rabbitTemplate.setReturnsCallback(myReturnCallBack);
    }
    public void sendMsg(){

        Message message = MessageBuilder.withBody("hello return direct".getBytes()).build();
        rabbitTemplate.convertAndSend("exchange.return.1","info",message);
        log.info("消息发送完毕,发送时间为{}",new Date());
    }
}
11.RabbitMQ交换机详细属性
11.1具体参数
1、Name:交换机名称;就是一个字符串
2、Type:交换机类型,direct, topic, fanout, headers四种
3、Durability:持久化,声明交换机是否持久化,代表交换机在服务器重启后是否还存在;
4、Auto delete:是否自动删除,曾经有队列绑定到该交换机,后来解绑了,那就会自动删除该交换机;
5、Internal:内部使用的,如果是yes,客户端无法直接发消息到此交换机,它只能用于交换机与交换机的绑定。
6、Arguments:只有一个取值alternate-exchange,表示备用交换机;
结论1:没发消息之前不会创建交换机和对列
结论2:发消息后,如果交换机不存在,才开始创建交换机,如果队列不存在,则创建新的对列
结论3:创建交换机或者队列完成后再重新创建,如果修改交换机或队列参数则会报错
406错误(inequivalent arg 'durable' for exchange 'exchange.durability' in vhost 'powernode': received 'false' but current is 'true', class-id=40, method-id=10))
结论4:设置持久化为false ,重启rabbitmq-server,则交换机丢失,实验durable参数,先看下控制台,然后重启rabbitmq-server
结论5:实验自动删除为 true ,从控制台上手动解绑,会发现自动删除
11.2 自动删除
 @Bean
    public DirectExchange directExchange(){
        return ExchangeBuilder.directExchange(exchangeName)
                //设置自动删除,当没有队列与交换机绑定时
                .autoDelete().build();
    }
11.3 非持久化
@Bean
    public DirectExchange directExchange(){
        return ExchangeBuilder.directExchange(exchangeName)
                //设置不持久化,意味着当服务器重启之后交换机会自动丢失
                .durable(false).build();
    }
11.4 备用交换机
消息经过交换器准备路由给队列的时候,发现没有对应的队列可以投递信息,在rabbitmq中会默认丢弃消息,如果我们想要监测哪些消息被投递到没有对应的队列,我们可以用备用交换机来实现,可以接收备用交换机的消息,然后记录日志或发送报警信息。
备用交换机示例如下:
注意:备用交换机一般使用fanout交换机
测试时:指定一个错误路由
重点:普通交换机设置参数绑定到备用交换机
11.4.1 yml配置文件
server:
  port: 8080

spring:
  application:
    name: exchange-properties-alternate1
  rabbitmq:
    host: 192.168.10.132
    port: 5672
    username: admin
    password: 123456
    virtual-host: powernode

my:
  exchangeNormalName: exchange.normal.alternate.1
  exchangeAlternateName: exchange.alternate.1
  queueNormalName: queue.normal.alternate.1
  queueAlternateName: queue.alternate.1
11.4.2 三部曲
package com.atguigu.config;

import org.springframework.amqp.core.*;
import org.springframework.beans.factory.annotation.Value;
import org.springframework.context.annotation.Bean;
import org.springframework.context.annotation.Configuration;

/**
 * @author 28156
 */
@Configuration
public class RabbitConfig {
    /**
     * 交换机名字和队列A和队列B名字
     */
    @Value("${my.exchangeNormalName}")
    private String exchangeNormalName;
    @Value("${my.exchangeAlternateName}")
    private String exchangeAlternateName;
    @Value("${my.queueNormalName}")
    private String queueNormalName;
    @Value("${my.queueAlternateName}")
    private String queueAlternateName;
    @Bean
    public DirectExchange exchangeNormalName(){
        return ExchangeBuilder.directExchange(exchangeNormalName)
                //设置备用交换机
                .alternate(exchangeAlternateName).build();
    }
    @Bean
    public Queue queueNormalName(){
        return QueueBuilder.durable(queueNormalName).build();
    }

    @Bean
    public Binding bindingNormal(DirectExchange exchangeNormalName,Queue queueNormalName){
        return BindingBuilder.bind(queueNormalName).to(exchangeNormalName).with("info");
    }

    @Bean
    public FanoutExchange alternate(){
        return ExchangeBuilder.fanoutExchange(exchangeAlternateName).build();
    }
    @Bean
    public Queue queueAlternateName(){
        return QueueBuilder.durable(queueAlternateName).build();
    }
    @Bean
    public Binding bindingAlternate(FanoutExchange alternate,Queue queueAlternateName){
        return BindingBuilder.bind(queueAlternateName).to(alternate);
    }
}
11.4.3 生产者
package com.atguigu.service;

import lombok.extern.slf4j.Slf4j;
import org.springframework.amqp.core.Message;
import org.springframework.amqp.core.MessageBuilder;
import org.springframework.amqp.rabbit.core.RabbitTemplate;
import org.springframework.beans.factory.annotation.Autowired;
import org.springframework.beans.factory.annotation.Value;
import org.springframework.stereotype.Service;

import java.util.Date;

/**
 * @author 28156
 */
@Service
@Slf4j
public class MessageService {
    @Autowired
    private RabbitTemplate rabbitTemplate;
    @Value("${my.exchangeNormalName}")
    private String exchangeName;

    public void sendMsg(){

        Message message = MessageBuilder.withBody("hello exchange properties direct".getBytes()).build();
        rabbitTemplate.convertAndSend(exchangeName,"info11",message);
        log.info("消息发送完毕,发送时间为{}",new Date());
    }
}
12.RabbitMQ队列详细属性
12.1 具体参数
Type:队列类型
Name:队列名称,就是一个字符串,随便一个字符串就可以;
Durability:声明队列是否持久化,代表队列在服务器重启后是否还存在;
Auto delete: 是否自动删除,如果为true,当没有消费者连接到这个队列的时候,队列会自动删除;
Exclusive:exclusive属性的队列只对首次声明它的连接可见,并且在连接断开时自动删除;
基本上不设置它,设置成false
Arguments:队列的其他属性,例如指定DLX(死信交换机等);
1、x-expires:Number
当Queue(队列)在指定的时间未被访问,则队列将被自动删除;
2、x-message-ttl:Number
发布的消息在队列中存在多长时间后被取消(单位毫秒);
3、x-overflow:String
设置队列溢出行为,当达到队列的最大长度时,消息会发生什么,有效值为Drop Head或Reject Publish;
4、x-max-length:Number
队列所能容下消息的最大长度,当超出长度后,新消息将会覆盖最前面的消息,类似于Redis的LRU算法;
5、 x-single-active-consumer:默认为false
激活单一的消费者,也就是该队列只能有一个消息者消费消息;
6、x-max-length-bytes:Number
限定队列的最大占用空间,当超出后也使用类似于Redis的LRU算法;
7、x-dead-letter-exchange:String
指定队列关联的死信交换机,有时候我们希望当队列的消息达到上限后溢出的消息不会被删除掉,而是走到另一个队列中保存起来;
8.x-dead-letter-routing-key:String
指定死信交换机的路由键,一般和6一起定义;
9.x-max-priority:Number
如果将一个队列加上优先级参数,那么该队列为优先级队列;
(1)、给队列加上优先级参数使其成为优先级队列
x-max-priority=10【0-255取值范围】
(2)、给消息加上优先级属性
通过优先级特性,将一个队列实现插队消费;
10、x-queue-mode:String(理解下即可)
队列类型x-queue-mode=lazy懒队列,在磁盘上尽可能多地保留消息以减少RAM使用,如果未设置,则队列将保留内存缓存以尽可能快地传递消息;
11、x-queue-master-locator:String(用的较少,不讲)
在集群模式下设置队列分配到的主节点位置信息;
每个queue都有一个master节点,所有对于queue的操作都是事先在master上完成,之后再slave上进行相同的操作;
每个不同的queue可以坐落在不同的集群节点上,这些queue如果配置了镜像队列,那么会有1个master和多个slave。
基本上所有的操作都落在master上,那么如果这些queues的master都落在个别的服务节点上,而其他的节点又很空闲,这样就无法做到负载均衡,那么势必会影响性能;
关于master queue host 的分配有几种策略,可以在queue声明的时候使用x-queue-master-locator参数,或者在policy上设置queue-master-locator,或者直接在rabbitmq的配置文件中定义queue_master_locator,有三种可供选择的策略:
(1)min-masters:选择master queue数最少的那个服务节点host;
(2)client-local:选择与client相连接的那个服务节点host;
(3)random:随机分配;
12.2 自动删除
@Bean
    public Queue queueProperties(){
        //自动删除
        return new Queue(queueName,true,false,true);
    }
12.3 队列最大长度
 @Bean
    public Queue queueProperties(){
        Map<String, Object> arguments=new HashMap<>();
        //设置队列最大长度为5
        arguments.put("x-max-length",5);
        //溢出则拒绝接受
        arguments.put("x-overflow","reject-publish");
        return new Queue(queueName,true,false,false,arguments);
    }
12.4 指定消费者接收
 @Bean
    public Queue queueProperties(){
        Map<String, Object> arguments=new HashMap<>();
        //开启之后意味着只能有一个消费者接收消息
        arguments.put("x-single-active-consumer",true);
        return new Queue(queueName,true,false,false,arguments);
    }
12.5 消息优先级
队列设置
@Bean
    public Queue queueProperties(){
        Map<String, Object> arguments=new HashMap<>();
        //设置消息队列容量单位为字节,这里10只装了两条数据
        //arguments.put("x-max-length-bytes",10);
        //设置队列消息的优先级 1-10
        arguments.put("x-max-priority",10);

        return new Queue(queueName,true,false,false,arguments);
    }
生产者
package com.atguigu.service;

import lombok.extern.slf4j.Slf4j;
import org.springframework.amqp.core.Message;
import org.springframework.amqp.core.MessageBuilder;
import org.springframework.amqp.core.MessageProperties;
import org.springframework.amqp.rabbit.core.RabbitTemplate;
import org.springframework.beans.factory.annotation.Autowired;
import org.springframework.beans.factory.annotation.Value;
import org.springframework.stereotype.Service;

import java.util.Date;

/**
 * @author 28156
 */
@Service
@Slf4j
public class MessageService {
    @Autowired
    private RabbitTemplate rabbitTemplate;
    @Value("${my.exchangeName}")
    private String exchangeName;

    public void sendMsg(){
        {
            for (int i = 1; i <= 5; i++) {
                Message message = MessageBuilder.withBody(("h" + i).getBytes()).build();
                rabbitTemplate.convertAndSend(exchangeName, "info", message);
            }

        }
        {
            MessageProperties messageProperties = new MessageProperties();
            //设置优先级为6
            messageProperties.setPriority(6);
            String str="hello word"+6;
                Message message = MessageBuilder.withBody(str.getBytes()).andProperties(messageProperties).build();
                rabbitTemplate.convertAndSend(exchangeName, "info", message);
        }
        {
            MessageProperties messageProperties = new MessageProperties();
            //设置优先级为7
            messageProperties.setPriority(7);
            String str="hello word"+7;
            Message message = MessageBuilder.withBody(str.getBytes()).andProperties(messageProperties).build();
            rabbitTemplate.convertAndSend(exchangeName, "info", message);
        }
        {
            MessageProperties messageProperties = new MessageProperties();
            //设置优先级为8
            messageProperties.setPriority(8);
            String str="hello word"+8;
            Message message = MessageBuilder.withBody(str.getBytes()).andProperties(messageProperties).build();
            rabbitTemplate.convertAndSend(exchangeName, "info", message);
        }
        log.info("消息发送完毕,发送时间为{}", new Date());
    }
}
13.消息可靠性投递
消息的可靠性投递就是要保证消息投递过程中每一个环节都要成功,那么这肯定会牺牲一些性能,性能与可靠性是无法兼得的;
如果业务实时一致性要求不是特别高的场景,可以牺牲一些可靠性来换取性能。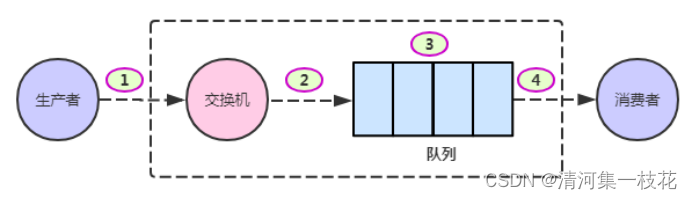
① 代表消息从生产者发送到Exchange;
② 代表消息从Exchange路由到Queue;
③ 代表消息在Queue中存储;
④ 代表消费者监听Queue并消费消息;
1、确保消息发送到RabbitMQ服务器的交换机上
可能因为网络或者Broker的问题导致①失败,而此时应该让生产者知道消息是否正确发送到了Broker的exchange中;
有两种解决方案:
第一种是开启Confirm(确认)模式;(异步)
第二种是开启Transaction(事务)模式;(性能低,实际项目中很少用)
2、确保消息路由到正确的队列
可能因为路由关键字错误,或者队列不存在,或者队列名称错误导致②失败。使用return模式,可以实现消息无法路由的时候返回给生产者;
当然在实际生产环境下,我们不会出现这种问题,我们都会进行严格测试才会上线(很少有这种问题);另一种方式就是使用备份交换机(alternate-exchange),无法路由的消息会发送到这个备用交换机上;
3、确保消息在队列正确地存储
可能因为系统宕机、重启、关闭等等情况导致存储在队列的消息丢失,即③出现问题;
解决方案:
(1)队列持久化
| QueueBuilder.durable(QUEUE).build(); |
(2)交换机持久化
| ExchangeBuilder.directExchange(EXCHANGE).durable(true).build(); |
(3)消息持久化(默认持久化)
(4)集群,镜像队列,高可用
(5)确保消息从队列正确地投递到消费者采用消息消费时的手动ack确认机制来保证;
14.消息的幂等性
消息消费时的幂等性(消息不被重复消费)
同一个消息,第一次接收,正常处理业务,如果该消息第二次再接收,那就不能再处理业务,否则就处理重复了;
幂等性是:对于一个资源,不管你请求一次还是请求多次,对该资源本身造成的影响应该是相同的,不能因为重复的请求而对该资源重复造成影响;
以接口幂等性举例:
接口幂等性是指:一个接口用同样的参数反复调用,不会造成业务错误,那么这个接口就是具有幂等性的;
注册接口;
发送短信验证码接口;
比如同一个订单我支付两次,但是只会扣款一次,第二次支付不会扣款,这说明这个支付接口是具有幂等性的;
如何避免消息的重复消费问题?(消息消费时的幂等性)
全局唯一ID + Redis
生产者在发送消息时,为每条消息设置一个全局唯一的messageId,消费者拿到消息后,使用setnx命令,将messageId作为key放到redis中:setnx(messageId, 1),若返回1,说明之前没有消费过,正常消费;若返回0,说明这条消息之前已消费过,抛弃;
14.1 依赖
<dependencies>
        <dependency>
            <groupId>org.springframework.boot</groupId>
            <artifactId>spring-boot-starter</artifactId>
        </dependency>
        <dependency>
            <groupId>org.springframework.boot</groupId>
            <artifactId>spring-boot-starter-web</artifactId>
        </dependency>

        <!-- 测试环境 -->
        <dependency>
            <groupId>org.springframework.boot</groupId>
            <artifactId>spring-boot-starter-test</artifactId>
        </dependency>

        <dependency>
            <groupId>org.projectlombok</groupId>
            <artifactId>lombok</artifactId>
            <version>1.18.28</version>
        </dependency>
        <dependency>
            <groupId>org.springframework.boot</groupId>
            <artifactId>spring-boot-starter-amqp</artifactId>
        </dependency>
        <dependency>
            <groupId>org.springframework.boot</groupId>
            <artifactId>spring-boot-starter-data-redis</artifactId>
        </dependency>

    </dependencies>
14.2 yml配置文件
server:
  port: 8080

spring:
  application:
    name: idempotent-learn
  rabbitmq:
    host: 192.168.10.132
    port: 5672
    username: admin
    password: 123456
    virtual-host: powernode
    publisher-confirm-type: correlated
    publisher-returns: true
    listener:
      simple:
        acknowledge-mode: manual
  data:
    redis:
      database: 0
      password: 123456
      host: 192.168.10.131
      port: 6379

my:
  exchangeName: exchange.idempotent.1
  queueName: queue.idempotent.1
14.3 实体类
package com.atguigu.vo;

import lombok.AllArgsConstructor;
import lombok.Builder;
import lombok.Data;
import lombok.NoArgsConstructor;

import java.io.Serializable;
import java.math.BigDecimal;
import java.util.Date;

/**
 * @author 28156
 */
@Data
@AllArgsConstructor
@NoArgsConstructor
@Builder
public class Orders implements Serializable {
    private String id;
    private String orderName;
    private BigDecimal orderMoney;
    private Date orderTime;
}
14.4 三部曲
package com.atguigu.config;

import org.springframework.amqp.core.*;
import org.springframework.beans.factory.annotation.Value;
import org.springframework.context.annotation.Bean;
import org.springframework.context.annotation.Configuration;

/**
 * @author 28156
 */
@Configuration
public class RabbitConfig {
    /**
     * 交换机名字和队列A和队列B名字
     */
    @Value("${my.exchangeName}")
    private String exchangeName;

    @Value("${my.queueName}")
    private String queueName;
    @Bean
    public DirectExchange directExchange(){
        //默认就是持久化
        return ExchangeBuilder.directExchange(exchangeName).build();
    }
    @Bean
    public Queue queue(){
        //队列持久化
        return QueueBuilder.durable(queueName).build();
    }

    @Bean
    public Binding bindingB2(DirectExchange directExchange,Queue queue){
        return BindingBuilder.bind(queue).to(directExchange).with("info");
    }


}
14.5 生产者
package com.atguigu.service;

import com.atguigu.vo.Orders;
import com.fasterxml.jackson.core.JsonProcessingException;
import com.fasterxml.jackson.databind.ObjectMapper;
import jakarta.annotation.PostConstruct;
import lombok.extern.slf4j.Slf4j;
import org.springframework.amqp.core.Message;
import org.springframework.amqp.core.MessageBuilder;
import org.springframework.amqp.rabbit.core.RabbitTemplate;
import org.springframework.beans.factory.annotation.Autowired;
import org.springframework.stereotype.Service;

import java.math.BigDecimal;
import java.util.Date;

/**
 * @author 28156
 */
@Service
@Slf4j
public class MessageService {
    @Autowired
    private RabbitTemplate rabbitTemplate;
    /**
     * 序列化和反序列化(Json格式)
     */
    @Autowired
    private ObjectMapper objectMapper;
    @PostConstruct
    public void init(){
        rabbitTemplate.setConfirmCallback(
                (confirmCallback,ack,cause)->{
                    if(ack == false ){
                        log.info("消息没有到达交换机,原因为:{}",cause);
                    }
                }
        );

        rabbitTemplate.setReturnsCallback(
                 returnCallback->{
                     log.info("消息没有正确的路由到队列,原因为{}",returnCallback.getReplyText());
                }
        );
    }
    public void sendMsg() throws JsonProcessingException {
        {
            Orders order1 = Orders.builder()
                    .id("order_12345").orderName("phone")
                    .orderMoney(new BigDecimal(8888))
                    .orderTime(new Date())
                    .build();
            //转为json
            String strOrder1 = objectMapper.writeValueAsString(order1);

            Message message = MessageBuilder.withBody(strOrder1.getBytes()).build();
            rabbitTemplate.convertAndSend("exchange.idempotent.1", "info", message);
            log.info("消息发送完毕,发送时间为{}", new Date());
        }
        {
            Orders order2 = Orders.builder()
                    .id("order_12345").orderName("phone")
                    .orderMoney(new BigDecimal(8888))
                    .orderTime(new Date())
                    .build();
            String strOrder2 = objectMapper.writeValueAsString(order2);
            Message message = MessageBuilder.withBody(strOrder2.getBytes()).build();
            rabbitTemplate.convertAndSend("exchange.idempotent.1", "info", message);
            log.info("消息发送完毕,发送时间为{}", new Date());
        }


    }
}
14.6 消费者
package com.atguigu.service;

import com.rabbitmq.client.Channel;
import lombok.extern.slf4j.Slf4j;
import org.springframework.amqp.core.Message;
import org.springframework.amqp.rabbit.annotation.RabbitListener;
import org.springframework.stereotype.Component;

import java.io.IOException;

/**
 * @author 28156
 */
@Component
@Slf4j
public class ReceiveMessage {
    @RabbitListener(queues = {"queue.reliability.1"})
    public void receiveMsg(Message message, Channel channel){
        long deliveryTag = message.getMessageProperties().getDeliveryTag();
        try {
            log.info("接收到的消息为:{}",new String(message.getBody()));
            //TODO 可以在此处进行业务逻辑处理  插入订单.....
            //第一个参数为消息对应的唯一标识   第二个参数为是否批量处理
            channel.basicAck(deliveryTag,false);
        } catch (Exception e) {
            log.info("消息接收失");
            //第一个参数为消息对应的唯一标识   第二个参数为是否批量处理  第三个参数为是否重新入队
            try {
                channel.basicNack(deliveryTag,false,true);
            } catch (IOException ex) {
                throw new RuntimeException(ex);
            }
        }
    }
}
14.7 启动类
package com.atguigu;

import com.atguigu.service.MessageService;
import org.springframework.beans.factory.annotation.Autowired;
import org.springframework.boot.ApplicationArguments;
import org.springframework.boot.ApplicationRunner;
import org.springframework.boot.SpringApplication;
import org.springframework.boot.autoconfigure.SpringBootApplication;

/**
 * @author 28156
 */
@SpringBootApplication
public class Main implements ApplicationRunner {
    @Autowired
    private MessageService messageService;
    public static void main(String[] args) {
        SpringApplication.run(Main.class,args);
        System.out.println("Hello world!");
    }

    @Override
    public void run(ApplicationArguments args) throws Exception {
        messageService.sendMsg();
    }
}
15 RabbitMQ集群与高可用
RabbitMQ 的集群分两种模式,一种是默认集群模式,一种是镜像集群模式;
在RabbitMQ集群中所有的节点(一个节点就是一个RabbitMQ的broker服务器) 被归为两类:一类是磁盘节点,一类是内存节点;
磁盘节点会把集群的所有信息(比如交换机、绑定、队列等信息)持久化到磁盘中,而内存节点只会将这些信息保存到内存中,如果该节点宕机或重启,内存节点的数据会全部丢失,而磁盘节点的数据不会丢失;
15.1 默认集群模式
默认集群模式也叫 普通集群模式、或者 内置集群模式;
RabbitMQ默认集群模式,只会把交换机、队列、虚拟主机等元数据信息在各个节点同步,而具体队列中的消息内容不会在各个节点中同步;
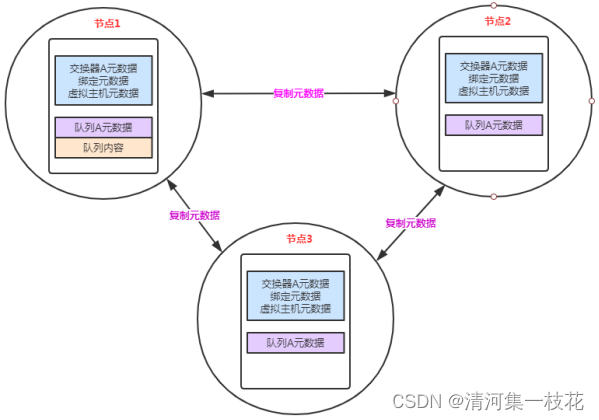
元数据
队列元数据:队列名称和属性(是否可持久化,是否自动删除)
交换器元数据:交换器名称、类型和属性
绑定元数据:交换器和队列的绑定列表
vhost元数据:vhost内的相关属性,如安全属性等;
当用户访问其中任何一个RabbitMQ节点时,查询到的queue/user/exchange/vhost等信息都是相同的;
但集群中队列的具体信息数据只在队列的拥有者节点保存,其他节点只知道队列的元数据和指向该节点的指针,所以其他节点接收到不属于该节点队列的消息时会将该消息传递给该队列的拥有者节点上;
为什么集群不复制队列内容和状态到所有节点:
- 存储空间;
2)性能;
如果消息需要复制到集群中每个节点,网络开销不可避免,持久化消息还需要写磁盘,占用磁盘空间。
那么问题来了?
如果有一个消息生产者或者消息消费者通过amqp-client的客户端连接到节点1进行消息的发送或接收,那么此时集群中的消息收发只与节点1相关,这个没有任何问题;
如果客户端相连的是节点2或者节点3 (队列1数据不在该节点上),那么情况又会是怎么样呢?
如果消息生产者所连接的是节点2或者节点3,此时队列1的完整数据不在该两个节点上,那么在发送消息过程中这两个节点主要起了一个路由转发作用,根据这两个节点上的元数据(也就是指向queue的owner node的指针)转发至节点1上,最终发送的消息还是会存储至节点1的队列1上;
同样,如果消息消费者所连接的节点2或者节点3,那这两个节点也会作为路由节点起到转发作用,将会从节点1的队列1中获取消息进行消费;
15.2 安装前准备
15.2.1 从已经安装好rabbitmq的机器 clone 三台机器
15.2.2 重新设置三台机器的mac地址
注意clone完,先不要启动三台机器,三台机器均要重新生成mac地址,防止clone出的机器ip地址重复
15.2.3 启动三台机器
启动并查看三台机器的ip地址:
| ip a |
15.2.4 使用xshell 连接三台机器
15.2.5 修改三台机器的/etc/hosts 文件
首先需要配置一下hosts文件,因为RabbitMQ集群节点名称是读取hosts文件得到的;
vim /etc/hosts
| 192.168.131.128 rabbit128 192.168.131.129 rabbit129 192.168.131.130 rabbit130 |
15.2.6 三台机器均重启网络,使节点名生效
| systemctl restart network |
15.2.7 三台机器的xshell均退出,然后再重新连接
15.2.8 三台机器的防火墙处理
| systemctl status firewalld systemctl stop firewalld --关闭防火墙 systemctl disable firewalld --开机不启动防火墙 |
15.2.9 三台机器 .erlang.cookie文件保持一致
由于是clone出的三台机器,所以肯定是一样的
| 如果我们使用解压缩方式安装的RabbitMQ,那么该文件会在${用户名}目录下,也就是${用户名}/.erlang.cookie; 如果我们使用rpm安装包方式进行安装,那么这个文件会在/var/lib/rabbitmq目录下; |
注意 .erlang.cookie的权限为400,目前已经是400
15.3 分别启动三台机器上的rabbitmq
15.3.1 启动
| rabbitmq-server -detached |
15.3.2 查看集群状态
使用以下命令查看集群状态
| rabbitmqctl cluster_status |
15.3.3 构建集群
在rabbitmq129机器上执行命令,让129的rabbitmq加入集群:
| ./rabbitmqctl stop_app ./rabbitmqctl reset ./rabbitmqctl join_cluster rabbit@rabbit128 --ram ./rabbitmqctl start_app |
--ram 参数表示让rabbitmq129成为一个内存节点,如果不带参数默认为disk磁盘节点;
把rabbit129节点添加完之后;
在rabbit130节点上也执行同样的命令,使rabbit130节点也加入到集群中,
| ./rabbitmqctl stop_app ./rabbitmqctl reset ./rabbitmqctl join_cluster rabbit@rabbit128 --ram ./rabbitmqctl start_app |
当然也可以让rabbit130作为一个磁盘节点
15.3.4 操作一个节点,添加用户和权限等
| #列出用户 rabbitmqctl list_users # 添加用户 rabbitmqctl add_user admin 123456 #查看权限 rabbitmqctl list_permissions #设置权限 rabbitmqctl set_permissions admin ".*" ".*" ".*" #设置角色 rabbitmqctl set_user_tags admin administrator #启动web控制台插件 ./rabbitmq-plugins enable rabbitmq_management |
使用web浏览器添加一个虚拟主机 :powernode
15.3.5 再次查看集群状态
当执行完操作以后我们在浏览器访问web管控台来看看效果;
随便在哪个节点打开web管控台都能看到集群环境各节点的信息;
也可以使用 ./rabbitmq
ctl cluster_status 查看集群状态;
15.3.6 一些原理
| RabbitMQ底层是通过Erlang架构来实现的,所以rabbitmqctl会启动Erlang节点,并基于Erlang节点来使用Erlang系统连接RabbitMQ节点,在连接过程中需要正确的Erlang Cookie和节点名称,Erlang节点通过交换Erlang Cookie以获得认证; |
以上就是RabbitMQ默认集群模式(普通集群模式)的搭建;
15.3.7 Springboot 连接集群
server:
  port: 8080

spring:
  application:
    name: reliability-learn
  rabbitmq:
    username: admin
    password: 123456
    virtual-host: powernode
    publisher-confirm-type: correlated
    publisher-returns: true
    listener:
      simple:
        acknowledge-mode: manual
    addresses: 192.168.10.132:5672,192.168.10.133:5672,192.168.10.134:5672

my:
  exchangeName: exchange.cluster.1
  queueName: queue.cluster.1
15.4 镜像集群模式
镜像模式是基于默认集群模式加上一定的配置得来的;
在默认模式下的RabbitMQ集群,它会把所有节点的交换机、绑定、队列的元数据进行复制确保所有节点都有一份相同的元数据信息,但是队列数据分为两种:一种是队列的元数据信息(比如队列的最大容量,队列的名称等配置信息),另一种是队列里面的消息;
镜像模式,则是把所有的队列数据完全同步,包括元数据信息和消息数据信息,当然这对性能肯定会有一定影响,当对数据可靠性要求较高时,可以使用镜像模式;
实现镜像模式也非常简单,它是在普通集群模式基础之上搭建而成的;
镜像队列配置命令:
./rabbitmqctl set_policy [-p Vhost] Name Pattern Definition [Priority]
-p Vhost: 可选参数,针对指定vhost下的queue进行设置;
Name: policy的名称;(可以自己取个名字就可以)
Pattern: queue的匹配模式(正则表达式);
Definition:镜像定义,包括三个部分ha-mode, ha-params, ha-sync-mode;(json格式)
{“ha-mode”:”exactly”,”ha-params”:2}
ha-mode:指明镜像队列的模式,有效值为 all/exactly/nodes
all:表示在集群中所有的节点上进行镜像
exactly:表示在指定个数的节点上进行镜像,节点的个数由ha-params指定
nodes:表示在指定的节点上进行镜像,节点名称通过ha-params指定
ha-params:ha-mode模式需要用到的参数
ha-sync-mode:进行队列中消息的同步方式,有效值为automatic和manual
priority:可选参数,policy的优先级;
比如想配置所有名字开头为policy_的队列进行镜像,镜像数量为2,那么命令如下(在任意节点执行如下命令):
./rabbitmqctl set_policy [-p Vhost] Name Pattern Definition [Priority]
| ./rabbitmqctl set_policy -p powernode ha_policy "^policy_" '{"ha-mode":"exactly","ha-params":2,"ha-sync-mode":"automatic"}' |
如果要在所有节点所有队列上进行镜像,则(在任意节点执行如下命令):
所有节点、所有虚拟主机、所有队列 都进行镜像
./rabbitmqctl set_policy [-p Vhost] Name Pattern Definition [Priority]
| ./rabbitmqctl set_policy ha-all "^" '{"ha-mode":"all"}' |
针对某个虚拟主机进行镜像
| rabbitmqctl set_policy -p powernode ha-all "^" '{"ha-mode":"all","ha-sync-mode":"automatic"}' |
(在默认集群模式的基础上,执行上面这个命令就可以把一个默认的集群模式变成镜像集群模式)


 1527
1527

 被折叠的 条评论
为什么被折叠?
被折叠的 条评论
为什么被折叠?
 到【灌水乐园】发言


