


一、AIDE 系统入侵检测工具简介
AIDE,全称为Advanced Intrusion Detection
Environment,是一个主要用于检测文件完整性的入侵检测工具。它能够构建一个指定文件的数据库,并使用aide.conf作为其配置文件。AIDE数据库能够保存文件的各种属性,包括权限、索引节点序号、所属用户、所属用户组、文件大小、最后修改时间、创建时间、最后访问时间、增加的大小以及连接数等。此外,AIDE还支持多种算法,如sha1、md5、rmd160、tiger等,以密文形式建立每个文件的校验码或散列号。然而,这个数据库不应保存经常变动的文件信息,例如:日志文件、邮件、/proc文件系统、用户起始目录以及临时目录等。当操作系统被入侵时,可以通过对比基准数据库来获取文档的改变情况。这种方式能够帮助用户快速发现异常情况,从而及时进行应对。博文以centos7环境安装和使用AIDE为例进行介绍,环境说明:
- 操作系统:centos7.6
- aide版本:0.15.1
二、AIDE安装及使用示例
1、yum安装aide
aide工具
[root@s166 ~]# yum install -y aide
Running transaction
正在安装 : aide-0.15.1-13.el7_9.1.x86_64 1/1
验证中 : aide-0.15.1-13.el7_9.1.x86_64 1/1已安装:
aide.x86_64 0:0.15.1-13.el7_9.1完毕!
2、检查aide.conf配置文件
AIDE作为入侵检测工具,本质上是一个文件完整性校验工具,可以监测和校验配置文件指定的重要文件的完整性,通过MD5、SHA值校验文档是否被更新修改,如果发生变动则通过检测后确认是管理者主动修改还是入侵者执行的改动。
[root@s166 ~]# cat /etc/aide.conf |grep -Ev “#| ” @ @ d e f i n e D B D I R / v a r / l i b / a i d e @ @ d e f i n e L O G D I R / v a r / l o g / a i d e d a t a b a s e = f i l e : @ @ D B D I R / a i d e . d b . g z d a t a b a s e o u t = f i l e : @ @ D B D I R / a i d e . d b . n e w . g z g z i p d b o u t = y e s v e r b o s e = 5 r e p o r t u r l = f i l e : @ @ L O G D I R / a i d e . l o g r e p o r t u r l = s t d o u t F I P S R = p + i + n + u + g + s + m + c + a c l + s e l i n u x + x a t t r s + s h a 256 A L L X T R A H A S H E S = s h a 1 + r m d 160 + s h a 256 + s h a 512 + t i g e r E V E R Y T H I N G = R + A L L X T R A H A S H E S N O R M A L = s h a 256 D I R = p + i + n + u + g + a c l + s e l i n u x + x a t t r s P E R M S = p + u + g + a c l + s e l i n u x + x a t t r s S T A T I C = p + u + g + a c l + s e l i n u x + x a t t r s + i + n + b + c + f t y p e L O G = p + u + g + n + a c l + s e l i n u x + f t y p e C O N T E N T = s h a 256 + f t y p e C O N T E N T E X = s h a 256 + f t y p e + p + u + g + n + a c l + s e l i n u x + x a t t r s D A T A O N L Y = p + n + u + g + s + a c l + s e l i n u x + x a t t r s + s h a 256 / b o o t / C O N T E N T E X / b i n / C O N T E N T E X … / e t c / h o s t s ” @@define DBDIR /var/lib/aide @@define LOGDIR /var/log/aide database=file:@@{DBDIR}/aide.db.gz database_out=file:@@{DBDIR}/aide.db.new.gz gzip_dbout=yes verbose=5 report_url=file:@@{LOGDIR}/aide.log report_url=stdout FIPSR = p+i+n+u+g+s+m+c+acl+selinux+xattrs+sha256 ALLXTRAHASHES = sha1+rmd160+sha256+sha512+tiger EVERYTHING = R+ALLXTRAHASHES NORMAL = sha256 DIR = p+i+n+u+g+acl+selinux+xattrs PERMS = p+u+g+acl+selinux+xattrs STATIC = p+u+g+acl+selinux+xattrs+i+n+b+c+ftype LOG = p+u+g+n+acl+selinux+ftype CONTENT = sha256+ftype CONTENT_EX = sha256+ftype+p+u+g+n+acl+selinux+xattrs DATAONLY = p+n+u+g+s+acl+selinux+xattrs+sha256 /boot/ CONTENT_EX /bin/ CONTENT_EX … /etc/hosts ”@@defineDBDIR/var/lib/aide@@defineLOGDIR/var/log/aidedatabase=file:@@DBDIR/aide.db.gzdatabaseout=file:@@DBDIR/aide.db.new.gzgzipdbout=yesverbose=5reporturl=file:@@LOGDIR/aide.logreporturl=stdoutFIPSR=p+i+n+u+g+s+m+c+acl+selinux+xattrs+sha256ALLXTRAHASHES=sha1+rmd160+sha256+sha512+tigerEVERYTHING=R+ALLXTRAHASHESNORMAL=sha256DIR=p+i+n+u+g+acl+selinux+xattrsPERMS=p+u+g+acl+selinux+xattrsSTATIC=p+u+g+acl+selinux+xattrs+i+n+b+c+ftypeLOG=p+u+g+n+acl+selinux+ftypeCONTENT=sha256+ftypeCONTENTEX=sha256+ftype+p+u+g+n+acl+selinux+xattrsDATAONLY=p+n+u+g+s+acl+selinux+xattrs+sha256/boot/CONTENTEX/bin/CONTENTEX…/etc/hosts CONTENT_EX
/etc/host.conf$ CONTENT_EX
…
3、初始化配置数据库
为了获得系统入侵检测的初始数据,我们需要先对aide数据库进行初始化,使用i参数完成数据库初始化,初始化生成的文件为aide.db.new.gz。使用-
i或者–init初始化数据库。
[root@s166 ~]# aide -i
AIDE, version 0.15.1
AIDE database at /var/lib/aide/aide.db.new.gz initialized.
4、检测配置数据库
使用-C或者–check参数检查数据库。
[root@s166 aide]# aide --check
5、检测并更新配置数据库
更新数据库实际上是先检查然后更新,即先检查文件变化,然后更新输出到新的数据库文件。
[root@s166 aide]# aide --update
6、对比配置数据库
比较数据库配置文件需要在配置文件中指定database和database_new参数。比较结果跟update和check是一样的。
[root@s166 aide]# aide --compare
三、AIDE入侵检测使用简介
AIDE入侵检测工具的本质就是配置文件中指定文件的哈希值存储到数据库文件中,在进行检测的时候进行再次计算并对比。只能发现有区别,并不能告知区别明细。所以我们需要提前将待监控的文件进行备份,在发现文件有改动更新之后进行对比,以便修复还原。监控策略中包含权限、文件类型、ACL、时间属性等,所以我们检测的内容不仅仅是文件大小的变化,实际上也包括文件属性的相关参数。
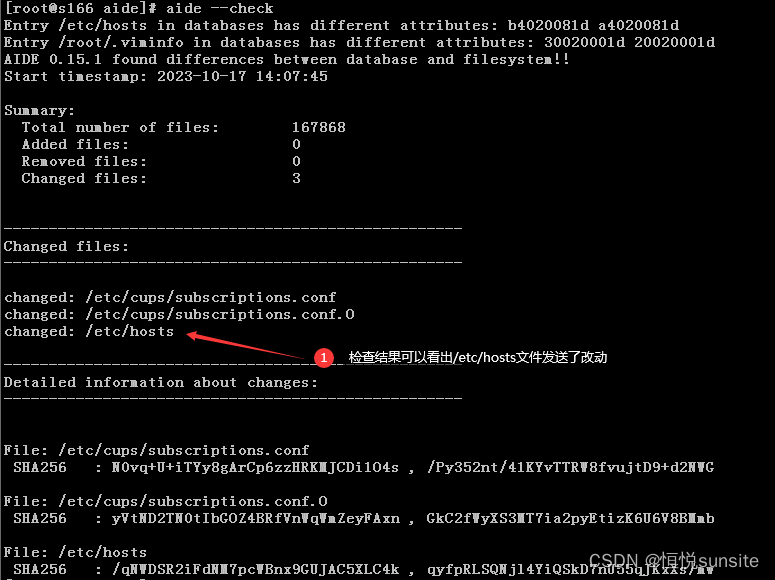
1、修改hosts文件测试AIDE
- 修改/etc/hosts文件
[root@s166 ~]# echo “192.168.0.1 gw” >> /etc/hosts
[root@s166 ~]# cat /etc/hosts
127.0.0.1 localhost localhost.localdomain localhost4
localhost4.localdomain4
::1 localhost localhost.localdomain localhost6 localhost6.localdomain6
192.168.0.166 s166
192.168.0.167 s167
192.168.0.168 s168
192.168.0.1 gw
- 重命名数据库初始化文件
[root@s166 aide]# mv aide.db.new.gz aide.db.gz
- 执行aide数据库检查
[root@s166 aide]# aide --check
Entry /etc/hosts in databases has different attributes: b4020081d a4020081d
…
2、增加一个用户测试比较配置数据库
- 修改配置文件指定数据库文件存储路径参数
[root@s166 aide]# cat /etc/aide.conf |grep database
…
database=file:@@{DBDIR}/aide.db.gz
database_new=file:///var/lib/aide/aide.db.new
database_out=file:///var/lib/aide/aide.db.new
- 增加一个用户
[root@s166 aide]# useradd test
- 执行配置数据库更新
[root@s166 aide]# aide --update

- 执行数据库对比

3、监控指定配置文件
- 编写一个针对指定文件监控的配置文件,我可以复制aide.conf文件,删除后面监控文件内容,加入/home/test/a.conf CONTENT_EX这一行就是我们需要监控的配置文件及监控策略。测试后可以发现如果是初始化默认aide.conf配置文件还是需要一些时间的,如果我们初始化自定义配置文件很快,因为我们只自定义监控了1个文件,而默认包含上百个文件。
[root@s166 aide]# cat aidetest.conf |grep -Ev “$|#”
@@define DBDIR /var/lib/aide
@@define LOGDIR /var/log/aide
database=file:@@{DBDIR}/aide.db.gz
database_out=file:@@{DBDIR}/aide.db.new.gz
database_new=file:@@{DBDIR}/aide.db.new.gz
gzip_dbout=yes
verbose=5
report_url=file:@@{LOGDIR}/aide.log
report_url=stdout
FIPSR = p+i+n+u+g+s+m+c+acl+selinux+xattrs+sha256
ALLXTRAHASHES = sha1+rmd160+sha256+sha512+tiger
EVERYTHING = R+ALLXTRAHASHES
NORMAL = sha256
DIR = p+i+n+u+g+acl+selinux+xattrs
PERMS = p+u+g+acl+selinux+xattrs
STATIC = p+u+g+acl+selinux+xattrs+i+n+b+c+ftype
LOG = p+u+g+n+acl+selinux+ftype
CONTENT = sha256+ftype
CONTENT_EX = sha256+ftype+p+u+g+n+acl+selinux+xattrs
DATAONLY = p+n+u+g+s+acl+selinux+xattrs+sha256
/home/test/a.conf CONTENT_EX
- 创建一个空配置文件
[root@s166 test]# touch a.conf
- 初始化配置数据库
[root@s166 aide]# aide -c aidetest.conf -i
[root@s166 aide]# mv aide.db.new.gz aide.db.gz
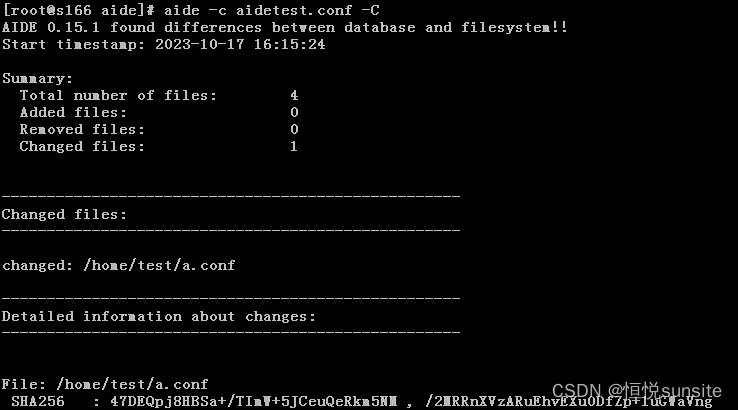
- 更新a.conf文件
[root@s166 test]# echo “This is a change” >> a.conf
- 检查配置文件是否改动
[root@s166 aide]# aide -c aidetest.conf -C
- 修改问权限
[root@s166 test]# chmod -x a.conf
- 检查配置数据库
[root@s166 aide]# aide -c aidetest.conf -C

- 将检查结果写入文件
[root@s166 aide]# aide -c aidetest.conf -C -r file:/tmp/report
#我们可以将检查结果写入文件,这样我们就可以结合定时任务,定期执行检查,通过邮件见结果报告发送到管理者邮箱实现指定配置文件的监控。如果检查结果提示“###
All files match AIDE database. Looks okay!”则表示配置文件没有改动,如果包含其他哈希内容则表示文档有改动。
四、常用文件及策略参数说明
1、常用文件说明
- /etc/aide.conf 服务默认配置文件
- /var/lib/aide.db.gz 默认aide数据库
- /var/lib/aide.db.new.gz 默认aide输出数据库
2、策略参数说明
配置文件中DIR =
p+i+n+u+g+acl+selinux+xattrs类似这样的参数配置均为定义的检查策略,配置中默认定义了目录、静态文件、日志等文件类型的检测策略,各参数说明如下,我们参照选择即可。
| 策略参数 | 参数说明 |
|---|---|
| p | 启用文件属性检查,包括权限、所有者和组。 |
| u | 启用用户ID和组ID检查。 |
| g | 启用组ID检查。 |
| acl | 启用访问控制列表(ACL)检查。 |
| selinux | 启用SELinux上下文检查。 |
| xattrs | 启用扩展属性检查。 |
| i | 启用索引节点检查。 |
| n | 启用设备号和节点号检查。 |
| b | 启用块大小检查。 |
| c | 启用字符集检查。 |
| ftype | 启用文件类型检查。 |
| s | 启用大小检查,包括文件大小和目录大小。 |
| m | 启用修改时间检查,包括文件修改时间和目录修改时间。 |
网络安全工程师(白帽子)企业级学习路线
第一阶段:安全基础(入门)

第二阶段:Web渗透(初级网安工程师)
第三阶段:进阶部分(中级网络安全工程师)
如果你对网络安全入门感兴趣,那么你需要的话可以点击这里👉网络安全重磅福利:入门&进阶全套282G学习资源包免费分享!
学习资源分享


 1160
1160

 被折叠的 条评论
为什么被折叠?
被折叠的 条评论
为什么被折叠?
 到【灌水乐园】发言


