


文章目录
一.SpringIOC
- IOC:控制反转,把对象的创建和对象之间的调用过程交给Spring进行管理
- 使用IOC的目的:代码的耦合度降低了
二. IOC之BeanFactory
- IOC思想是基于IOC容器完成的,IOC容器就是对象工厂
- Spring提供IOC容器两种实现方式:
- BeanFactory提供了IOC的基本实现,是Spring内部接口,不提供给开发人员使用,加载配置文件的时候不会创建对象,当我们获取对象的时候才会创建对象
- ApplicationContext :是BeanFactory的子接口,提供了更为强大的功能,一般由开发人员来使用,加载配置文件就会创建对象
三.IOC操作的Bean
1.创建对象
- id为对象名
- class为类的全限定名
<bean id="user" class="com.sunyanshu.pojo.User"></bean>
2.属性注入
2.1set注入
- 必须要有set方法,否则会报错
- name为属性名,value为属性值
方式一
<bean id="book1" class="com.sunyanshu.pojo.Book">
        <property name="name" value="小时代"></property>
        <property name="price" value="37"></property>
    </bean>
方式二
<bean id="emp2" class="com.sunyanshu.entity.Emp">
        <property name="name" value="斯卡拉姆齐"></property>
        <property name="sex" value="男"></property>

        <property name="dept">
            <bean id="dept2" class="com.sunyanshu.entity.Dept">
                <property name="name" value="愚人众执行官"></property>
            </bean>
        </property>

    </bean>
2.2构造注入
- 必须要有有参构造
<bean id="book3" class="com.sunyanshu.pojo.Book">
        <constructor-arg name="name" value="朝花夕拾"></constructor-arg>
        <constructor-arg name="price" value="276.2"></constructor-arg>
    </bean>
2.3p命名注入
<bean id="book4" class="com.sunyanshu.pojo.Book" p:name="溺光之翼" p:price="234.5"></bean>
2.4对象注入(使用ref引用)
方式一:接口与实现类
<bean id="teacherDaoImpl" class="com.sunyanshu.dao.impl.TeacherDaoImpl"></bean>
    <bean id="teacherService" class="com.sunyanshu.service.TeacherService">
        <property name="teacherDao" ref="teacherDaoImpl"></property>
    </bean>
方式二:类中使用另外的类作为属性
<bean id="dept1" class="com.sunyanshu.entity.Dept">
        <property name="name" value="壁炉之家"></property>
    </bean>
    <bean id="emp1" class="com.sunyanshu.entity.Emp">
        <property name="name" value="林尼"></property>
        <property name="sex" value="男"></property>
        <property name="dept" ref="dept1"></property>
    </bean>
2.5特殊数据注入(如set、map、list、数组)
<bean id="myEntity" class="com.sunyanshu.domain.MyEntity">
        <!--数组-->
        <property name="genshin">
            <array>
                <value>公子</value>
                <value>夜兰</value>
                <value>斯卡拉姆齐</value>
                <value>博士</value>
            </array>
        </property>

        <!--set集合-->
        <property name="set">
            <set>
                <value>蒙德</value>
                <value>枫丹</value>
                <value>至冬</value>
                <value>纳塔</value>
            </set>
        </property>

        <!--list集合-->
        <property name="list">
            <list>
                <value>三笠</value>
                <value>利威尔</value>
                <value>艾伦</value>
            </list>
        </property>

        <!--map集合-->
        <property name="map">
            <map>
                <entry key="java" value="高薪就业"></entry>
                <entry key="嵌入式" value="就业"></entry>
            </map>
        </property>
    </bean>
2.6自动装配
- bean标签中的属性
- autowire=“byName”: 名称注入,注入bean的id值和类中的属性名要一致
xml配置文件中
<bean id="emp" class="com.sunyanshu.entity.Emp" autowire="byName">
            <property name="name" value="张无忌"></property>
            <property name="sex" value="男"></property>
        </bean>
        <bean id="dept" class="com.sunyanshu.entity.Dept">
            <property name="name" value="明教"></property>
        </bean>
- autowire=“byType”: 类型注入
xml配置文件中
<bean id="emp1" class="com.sunyanshu.entity.Emp" autowire="byType">
        <property name="name" value="利威尔"></property>
        <property name="sex" value="男"></property>
    </bean>
    <bean id="dept" class="com.sunyanshu.entity.Dept">
        <property name="name" value="调查兵团"></property>
    </bean>
3.获取对象
- 步骤
- 解析spring配置文件
- 调用getBean()方法获取对象,其中第一个参数为对象名,需要和bean中的id一致;第二个参数为类的class对象
        //解析spring配置文件
        ApplicationContext ac = new ClassPathXmlApplicationContext("ApplicationContext1.xml");
        //获取对象
        User user = ac.getBean("user", User.class);
4.Bean的作用域
- spring容器创建对象默认是单例模式(scope=“singleton”),可以手动修改为多例模式(scope=“prototype”)
- 单例和多例的区别:单例在加载配置文件时创建对象,多例在getBean时创建对象
5.生命周期
- bean的生命周期分两种情况
-
第一种情况
- 第一步:执行无参的构造方法
- 在xml文件中创建bean对象时就会执行无参构造方法
- 第二步:set方法设置属性值
- 给属性设置值时才会执行这个方法,否则不执行
- 在xml文件中给属性设置值,则在初始化之前执行;在获取对象后给属性设置值,则在初始化之后执行
- 第三步:初始化方法
- 在xml文件中的bean标签添加属性init-method才会执行这个方法
- 第四步:获取创建好的bean对象
- 第五步:销毁对象
- 在xml文件中的bean标签添加属性destroy-method才会执行这个方法
- 销毁对象:方式一
ClassPathXmlApplicationContext ac = new ClassPathXmlApplicationContext("ApplicationContext2.xml"); ac.close();- 销毁对象:方式二
ApplicationContext ac = new ClassPathXmlApplicationContext("ApplicationContext2.xml");((ClassPathXmlApplicationContext) ac).close()
- 第一步:执行无参的构造方法
-
第二种情况:配置bean的后置处理器(BeanPostProcessor)
- 第一步:执行无参的构造方法
- 第二步:set方法设置属性值
- 在初始化之前执行的方法
- 第三步:初始化方法
- 在初始化之后执行的方法
- 第四步:获取创建好的bean对象
- 第五步:销毁对象
-
public class MyBean implements BeanPostProcessor {
    @Override
    public Object postProcessBeforeInitialization(Object bean, String beanName) throws BeansException {
        System.out.println("在初始化之前执行的方法");
        return bean;
    }

    @Override
    public Object postProcessAfterInitialization(Object bean, String beanName) throws BeansException {
        System.out.println("在初始化之后执行的方法");
        return bean;
    }
}
xml文件中
<bean id="idol1" class="com.sunyanshu.pojo.Idol" init-method="initMethod" destroy-method="destroyMethod">
            <property name="name" value="三笠"></property>
        </bean>
        <bean id="myBean" class="com.sunyanshu.pojo.MyBean"></bean>
四.IOC基于注解方式开发
- 创建bean实例的注解
- @Component
- @Service
- @Controller
- @Repository
这四个注解功能是一样的,都是用来创建bean实例的,想要创建bean实例需要在xml配置文件中开启扫描,如下
<!--开启扫描-->
    <context:component-scan base-package="org.sunyanshu"></context:component-scan>
- 给成员变量赋值的注解(不需要写getset)
- @Autowired:根据类型进行注入,自动装配
- @Resource(name = “teacherDaoImpl”):根据名字进行注入,自动装配
五.AOP
面向切面编程(面向方面编程),利用AOP可以对业务逻辑的各个部分进行隔离,从而使得业务逻辑之间的耦合度降低了,提高程序的性能
1.AOP术语
- 连接点
- 类里面的哪些方法可以被增强,这些方法成为连接点
- 切入点
- 实际上真正被增强的方法,称为切入点
- 通知(增强)
- 实际增强的逻辑部分称为通知[增强]
- 通知的类型 :
- 前置通知
- 后置通知:若方法抛出异常,则后置通知不会执行
- 环绕通知
- 异常通知:在目标方法抛出异常时执行的通知
- 最终通知:最终通知无论如何都会在目标方法调用过后执行,即使目标方法没有正常的执行完成
- 切面
- 把通知应用到切入点的过程
2.切入点表达式
- 作用:知道哪个类中的哪个方法被增强
- 格式:execution([权限修饰符][返回值类型][类全路径][方法名][参数列表])
- 对cn.liushao.dao.BookDao类里面的add方法进行增强
execution(* cn.liushao.dao.BookDao.add (. .)) - 对cn.liushao.dao.BookDao类里面的所有方法进行增强
execution(* cn.liushao.dao.BookDao.* (. .)) - 对cn.liushao.dao包里面的所有类中所有方法进行增强
execution(* cn.liushao.dao. * .* (. .))
- 对cn.liushao.dao.BookDao类里面的add方法进行增强
3.面向切面编程
- 第一版:使用bean,在spring配置文件中配置如下
<!--被增强类-->
    <bean id="user" class="edu.sunyanshu.entity.User"></bean>
    <!--增强类-->
    <bean id="userProxy" class="edu.sunyanshu.entity.UserProxy"></bean>
    <!--配置aop增强-->
    <aop:config>
        <!--配置切入点-->
        <aop:pointcut id="p" expression="execution(* edu.sunyanshu.entity.User.genshin(..))"/>
        <!--配置切面-->
        <aop:aspect ref="userProxy">
            <!--前置通知-->
            <aop:before method="before" pointcut-ref="p"></aop:before>
            <!--后置通知-->
            <aop:after-returning method="afterReturning" pointcut-ref="p"></aop:after-returning>
            <!--最终通知-->
            <aop:after method="after" pointcut-ref="p"></aop:after>
            <!--异常通知-->
            <aop:after-throwing method="afterThrowing" pointcut-ref="p"></aop:after-throwing>
            <!--环绕通知-->
            <aop:around method="around" pointcut-ref="p"></aop:around>
        </aop:aspect>
    </aop:config>
第二版:使用注解,在增强类中需要使用注解@Aspect生成代理对象
xml配置文件中
    <!--开启aspect生成代理对象-->
    <aop:aspectj-autoproxy></aop:aspectj-autoproxy>
增强类中
@Component
@Aspect //生成代理对象
public class IdolProxy {
    //由于切入点表达式相同造成冗余,所以可以抽取出来
    @Pointcut(value = "execution(* edu.sunyanshu.domain.Idol.yj(..))")
    public void pointcut() {

    }

    @Before(value = "pointcut()")
    public void before() {
        System.out.println("前置通知--before");
    }

    @AfterReturning(value = "execution(* edu.sunyanshu.domain.Idol.yj(..))")
    public void afterReturning() {
        System.out.println("后置通知--afterReturning");
    }

    @After(value = "execution(* edu.sunyanshu.domain.Idol.yj(..))")
    public void after() {
        System.out.println("最终通知--after");
    }

    //在目标方法抛出异常时执行的通知
    @AfterThrowing(value = "pointcut()")
    public void afterThrowing() {
        System.out.println("异常通知--afterThrowing");
    }

    @Around(value = "pointcut()")
    public void around(ProceedingJoinPoint proceedingJoinPoint) throws Throwable {
        System.out.println("环绕通知--around");
        System.out.println("环绕之前");
        proceedingJoinPoint.proceed();
        System.out.println("环绕之后");
    }
}
六.Spring事务管理
- 事务:事务是数据库操作的基本单元,逻辑上是一组操作,要么都成功,要么都失败,如果一个失败了,全部都失败
- 使用场景:银行转账、下订单…
- 事务的传播行为(propagation)
- REQUIRED:如果有事务在运行,当前方法就在这个事务内运行,否则,就会启动一个新的事务,并在自己的事务内运行
- REQUIRES_NEW:当前的方法必须启动新的事务,并在自己的事务内运行,如果有事务在运行,会将它挂起
- SUPPORTS:如果有事务在运行,当前方法就在这个事务内运行,否则它可以不在事务内运行
- NOT_SUPPORTED:当前的方法不应该运行在事务中,如果有运行的事务,将它挂起
- MANDATORY:当前的方法必须运行在事务内部,如果没有运行的事务,就会抛出异常
- NEVER:当前方法不应该运行在事务中,如果有运行的事务,就会抛出异常
- NESTED:如果有事务在运行,当前的方法就应该在这个事务的嵌套事务内运行,否则,就启动一个新的事务,并在它自己的事务内运行
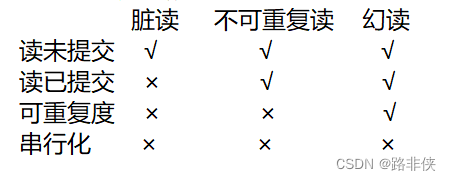
- 事务的隔离级别(isolation)
- 事务注解(Transactional)中的五个属性
- propagation:事务的传播行为
- isolation:事务的隔离级别
- timeout:以秒为单位
- readOnly:默认值是false,如果设置为true,则只能查询
- rollbackFor:回滚,后面指定异常类型,出现异常时则回滚
1.使用注解开发
事务注解(Transactional)可写在类上面,表示类中所有方法都开启事务,但一般不会这么写,因为查询不需要在事务环境下完成,事务要写在业务逻辑中
xml配置文件中
<!--配置数据源-->
    <bean id="druidDataSource" class="com.alibaba.druid.pool.DruidDataSource">
        <property name="driverClassName" value="com.mysql.jdbc.Driver"></property>
        <property name="url" value="jdbc:mysql:///yeonjun"></property>
        <property name="username" value="root"></property>
        <property name="password" value="root"></property>
    </bean>

    <!--配置JdbcTemplate-->
    <bean id="jdbcTemplate" class="org.springframework.jdbc.core.JdbcTemplate">
        <property name="dataSource" ref="druidDataSource"></property>
    </bean>

    <!--开启扫描-->
    <context:component-scan base-package="icu.sunyanshu"></context:component-scan>

    <!--配置事务管理器-->
    <bean id="dataSourceTransactionManager" class="org.springframework.jdbc.datasource.DataSourceTransactionManager">
        <property name="dataSource" ref="druidDataSource"></property>
    </bean>

    <!--开启注解事务-->
    <tx:annotation-driven transaction-manager="dataSourceTransactionManager"/>
接口实现类中
@Repository
public class BankDaoImpl implements BankDao {
    @Autowired
    private JdbcTemplate jdbcTemplate;

    /**
     * 增加钱
     */
    @Override
    public void addMoney() {
        //sql语句
        String sql = "update bank set money=money+? where id=?";
        //调用方法
        jdbcTemplate.update(sql, 100, 1);
    }

    /**
     * 减少钱
     */
    @Override
    public void reduceMoney() {
        //sql语句
        String sql = "update bank set money=money-? where id=?";
        //调用方法
        jdbcTemplate.update(sql, 100, 2);
    }
}
业务逻辑中
@Service
public class BankService {
    @Autowired
    private BankDao bankDao;

    /**
     * propagation:事务的传播行为
     * isolation:事务的隔离级别
     * timeout:以秒为单位
     * readOnly:默认值是false,如果设置为true,则只能查询
     * rollbackFor:回滚,后面指定异常类型
     */
    @Transactional(
            propagation = Propagation.REQUIRED,
            isolation = Isolation.REPEATABLE_READ,
            timeout = 1000,
            readOnly = false,
            rollbackFor = Exception.class
    )
    public void accountMoney() {
        bankDao.reduceMoney();
        System.out.println("-------------");
        int i = 2 / 0;
        bankDao.addMoney();
        System.out.println("转账成功");
    }
}
2.使用xml开发
由于不使用注解,所以在业务逻辑和接口实现类中需要编写getset方法
xml配置文件中
<!--配置数据源-->
    <bean id="druidDataSource" class="com.alibaba.druid.pool.DruidDataSource">
        <property name="driverClassName" value="com.mysql.jdbc.Driver"></property>
        <property name="url" value="jdbc:mysql:///yeonjun"></property>
        <property name="username" value="root"></property>
        <property name="password" value="root"></property>
    </bean>

    <!--配置JdbcTemplate-->
    <bean id="jdbcTemplate" class="org.springframework.jdbc.core.JdbcTemplate">
        <property name="dataSource" ref="druidDataSource"></property>
    </bean>

    <!--创建对象-->
    <bean id="bankServiceNo" class="icu.sunyanshu.service.BankServiceNo">
        <property name="bankDaoNo" ref="bankDaoNoImpl"></property>
    </bean>
    <bean id="bankDaoNoImpl" class="icu.sunyanshu.dao.impl.BankDaoNoImpl">
        <property name="jdbcTemplate" ref="jdbcTemplate"></property>
    </bean>

    <!--配置事务管理器-->
    <bean id="transactionManager" class="org.springframework.jdbc.datasource.DataSourceTransactionManager">
        <property name="dataSource" ref="druidDataSource"></property>
    </bean>

    <!--配置通知-->
    <tx:advice id="txadvice">
        <!--配置事务参数-->
        <tx:attributes>
            <tx:method name="account" propagation="REQUIRED"/>
            <!--假设所有的添加方法都是以save开头并且所有添加方法都需要配置事务参数,那么配置编写如下-->
            <!--<tx:method name="save*" propagation="REQUIRED"/>-->
            <!--假设所有的删除方法都是以del开头并且所有删除方法都需要配置事务参数,那么配置编写如下-->
            <!--<tx:method name="del*" propagation="REQUIRED"/>-->
        </tx:attributes>
    </tx:advice>

    <!--配置aop增强-->
    <aop:config>
        <!--配置切入点-->
        <aop:pointcut id="p" expression="execution(* icu.sunyanshu.service.BankServiceNo.account(..))"/>
        <!--配置切面-->
        <aop:advisor advice-ref="txadvice" pointcut-ref="p"></aop:advisor>
    </aop:config>


 3万+
3万+


 被折叠的 条评论
为什么被折叠?
被折叠的 条评论
为什么被折叠?
 到【灌水乐园】发言


