


文章目录
概述:
springsecurity底层实现为一条过滤器链,就是用户请求进来,判断有没有请求的权限,抛出异常,重定向跳转。
是一个用户权限框架,目标是让用户登入后台的时候可以根据密码和用户名进行登入
是一个安全的认证服务框架,可以帮助我们来简化认证和授权的过程
目标:
实现不同的用户根据自己权限不同获取不同的功能,看到不同菜单.进入后台也需要使用用户名和密码
1、认证和授权概念

现在我们需要思考2个问题:

1:在生产环境下我们如果不登录后台系统就可以完成这些功能操作吗?

答案显然是否定的,要操作这些功能必须首先登录到系统才可以。(用户登录系统–>认证)

2:是不是所有用户,只要登录成功就都可以操作所有功能呢?

答案是否定的,并不是所有的用户都可以操作这些功能。不同的用户可能拥有不同的权限,这就需要进行授权了。(用户登录之后,对每个用户进行授权,通过授权去访问系统中不同的功能–>授权)

认证:authentication,系统提供的用于识别用户身份的功能,通常提供用户名和密码进行登录其实就是在进行认证,认证的目的是让系统知道你是谁。

授权:authorization, 用户认证成功后,需要为用户授权,其实就是指定当前用户可以操作哪些功能。
parent为web-admin的父 web-admin是后台用户管理的表示层模块.
初步配置
1 . web-admin的pom.xml
<spring.security.version>5.2.8.RELEASE</spring.security.version>

<!-- spring security安全框架 -->
<dependency>
    <groupId>org.springframework.security</groupId>
    <artifactId>spring-security-web</artifactId>
    <version>${spring.security.version}</version>
</dependency>
<dependency>
    <groupId>org.springframework.security</groupId>
    <artifactId>spring-security-config</artifactId>
    <version>${spring.security.version}</version>
</dependency>
2. 配置Spring security Filter
<!-- SpringSecurity Filter -->
<!-- DelegatingFilterProxy用于整合第三方框架(代理过滤器,非真正的过滤器,真正的过滤器需要在spring的配置文件) -->
<filter>
  <!--名字必须为这个-->
  <filter-name>springSecurityFilterChain</filter-name>
  <filter-class>org.springframework.web.filter.DelegatingFilterProxy</filter-class>
</filter>
<filter-mapping>
  <filter-name>springSecurityFilterChain</filter-name>
  <url-pattern>/*</url-pattern>
</filter-mapping>
3 . 配置Spring Security
1.使用xml文件配置
2.java注解配置类
两种方式配置效果一样
在
web-admin项目中创建WebSecurityConfig类因为security是默认的登入的页面的
创建WebSecurityConfigurerAdatper实现类
WebSecueityConfig 类
@Configuration   //配置类
@EnableWebSecurity  //开启springSecurity的默认行为
public  class WebSecueityConfig extends WebSecurityConfigurerAdatper(){
}
前四步步配置好了,但是因为资源访问权限是不可以访问的
使用
上面简单的配置是进不去的,所有资源访问受限(包括静态资源)
url自动跳转到了一个默认的登录页面(框架自带的),我们目前没有定义login页面及login controller方法。
但是当前没有账号啊!下面我们测试一个最简单的内存分配用户名密码。
使用内存分配用户名和密码
操作 : WebSecurityConfig
重写configure(AuthenticationManagerBuilder auth)方法
@Overide
protected void configure(AythenticationManagerBuilder auth){
  ayth.inMenmoryAuthentication()
      .withUser("admin")
      .password("{noop}123456")//使用的明文密码
      .roles("admin")
      .authorities("admin.create");
}
但是这样是登入不了的,因为设置了加密方式的,其实是就是缺少解密方法
修改为:
/**
  必须指定加密的方式,上下文一致
*/
@Bean
public BCryptPasswordEncoder passwordEncoder(){
   return new BCryptPasswordEncoder();//设置加密方式,或自动解码
}


@Overide
protected void configure(AythenticationManagerBuilder auth){
  ayth.inMenmoryAuthentication()
      .withUser("admin")
      .password(new BCryptPasswordEncoder().encoder("123456"))//使用的明文密码
      .roles("admin")
      .authorities("admin.create");
}
然后访问你的页面方法可以登入成功但是页面数据不显示例如: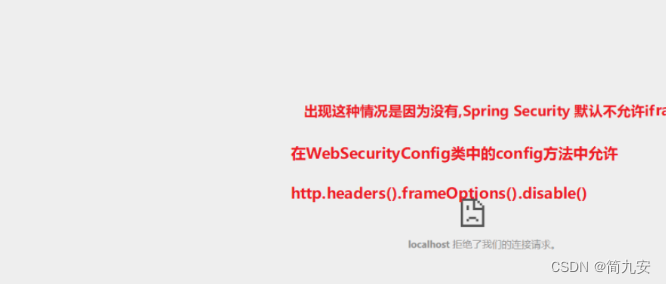
开启iframe嵌套显示
默认Spring Security不允许iframe嵌套显示,我们需要设置
操作类:WebSecurityConfig 重写方法config(HttpSecurity http)
@Overried
protected void configure(HttpSecurity http) throws Exception{
  ///必须调用父类的方法,但是然后设置其自定义的方法,那么这个就必须关闭
  super.configure(http);

  //运行iframe显示
  http.headers().frameOptions().disable();
}
到目前,可以使用内存的密码访问后台,记得使用数据库密码的时候把内存密码注释
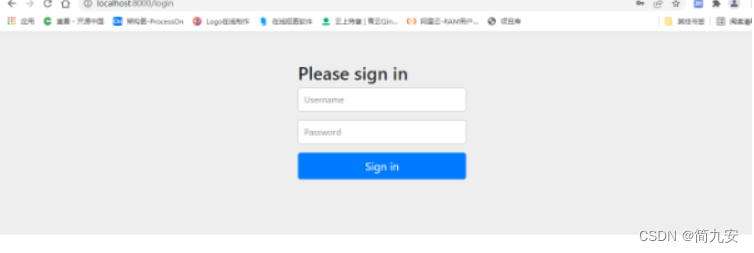
因为刚开始使用的是框架自带的登入页面,也可以设置自定义登入页面
自定义登入和注销
登入
<form class="m-t" role="form" th:action="@{/login_process}" method="post">
                    <label style="color:red;" th:if="${param.error}" th:text="用户名或密码错误"></label>
                    <div class="form-group">
                        <input type="text" name="username" value="admin" class="form-control" placeholder="用户名" required="">
                    </div>
                    <div class="form-group">
                        <input type="password" name="password" value="123456" class="form-control" placeholder="密码" required="">
                    </div>
                    <button type="submit" class="btn btn-primary block full-width m-b">登 录</button>


                    <p class="text-muted text-center"> <a href="javascript:"><small>忘记密码了?</small></a> | <a href="javascript:">注册一个新账号</a>
                    </p>
                </form>
在WebSecurityConfig配置类中重写如下方法configure(HttpSecurity http):
①放行静态资源, ②设置登录页面, ③设置注销
@Override
protected void configure(HttpSecurity http) throws Exception {

  //必须调用父类的方法,但是然后设置其自定义的方法,那么这个就必须关闭
  //super.configure(http);

  //1.运行iframe显示
  http.headers().frameOptions().disable();

  //2.设置资源的放行  资源的访问路径
   http.authorizeRequests() //对资源的请求进行授权
       .antMathchers("/stattic/**","/login")//通过ant风格的路径匹配请求
       .permitAll()//匿名访问  既不需要登录就可以
       .anyRequest()//其他所有请求
       .authenticatied();//需要认证才能访问

  //3.设置登入页面
  http.formLongin()//表单登入页面
      .loginPage("/login")//设置自定义登入的路径
      .usernameParameter("username")//如果登入页面的输入框的name一样就不需要设置
      .passwordParameter("password")
      .loginProcessingUrl("/login_process")//登入的请求路径  和前端设置是一样的,这个不需要自己写
      .defaultSuccessUrl("/")//登入成功页面
      .failureUrl("/login")//登入失败页面

  //4,设置注销功能
   http.logout()
        .logoutUrl(".logout")//注销功能请求路径
        .logoutSuccessUrl("/login");//注销成功后跳转路径
  //5.禁用csrf
    http.csrf.disable();

}
使用数据库密码和用户名
注释掉使用的内存密码和用户名,加密方式不用注释
新建UserDetailsService接口的实现类
spring security支持通过实现UserDetailService接口的方法提供实现用户的authentication(认证)和authorizetion(授权)
没有该接口的实现类,那么会出现登入不进去
@Component
public class UserDetailServiceImpl implement UserDetailService(){

  //如果没有使用Dubbo 那么不需要远程服务,这里@Autowired
  @DubboReference
  private AdminService adminService;  //服务层
  @DubboReference
  private PermissionService permissionService;  //用户权限服务层

  @Overried
  public UserDetail loadUserByUsername(String username) throws UsernameNotFoundException{

    //根据用户名查询用户信息
    Admin admin = adminService.findAdminByUsername(username);
    if(admin == null){
      return null;
    }

    //根据用户的id查询该用户所拥有的权限
    List<String> permissionCodeList = permissionService.findPermissionCodeListByAdminId(admin.getId());

    //因为用户的权限可能会重复  用一个set集合
    Set<GrantedAuthority> authorities = new HashSet<>();
    for(String permissionCode : permissionCodeList){
      authorities.add(new SimpleGrantedAuthority(permissionCode));
    }
    return new User(username,admin.getPassword(),authorities);
  }
}
那么Admin的服务层和mapper都需要写入该方法和sql.权限也一样 举例说明:
在AdminService,AdminServiceImpl,AdminMapper,AdminMapper.xml写方法findAdminByUsername
AdminService接口
Admin findAdminByUsername(String username);
AdminServiceImpl
@Override
public Admin findAdminByUsername(String username) {
    return adminMapper.findAdminByUsername(username);
}
AdminMapper
Admin findAdminByUsername(String username);
添加用户时密码实现加密
找到对应的添加用户的方法,加上:
@Autowired
private BCryptPasswordEncoder passwordEncoder;
@PostMapping("/save")
public String save(Admin admin, Model model){
    //设置密码 这一行是主要代码 写怎么多为了举例说明
 admin.setPassword(passwordEncoder.encode(admin.getPassword()));
    adminService.insert(admin);
    return successPage(model,"新增用户成功");
}
WebSecurityConfig类
@Bean
public BCryptPasswordEncoder passwordEncoder(){
   return new BCryptPasswordEncoder();//设置加密方式,或自动解码
}
//如果这里的返回值是PasswordEncpder 那么下面就的使用PasswordEncoder
后台登入后菜单动态显示
因为用户不一样那么权限也不一样,所以要实现不同的用户登入实现不同的效果
在后台管理的主页面的实现方法加入代码
例如原来是:
@RequestMapping("/")
//例如你的后台进入主页面的方法交index  看情况而定  主要加的代码为方法里面前六行
    public String index(Model model){
      Authentication authentication = SecurityContextHolder.getContext().getAuthenticattion
      User user = (User) authentication.getPrincipal();
      //获取用户名查询用户信息
      Admin admin = adminService.findAdminByUsername(user,getUsername());
      //根据用户的id获取用户的权限列表
      List<Permission> permissionList = permissionService.findPermissionListByAdminId(admin.getById());
      model.addAttribute("admin",admin);
      model.addAttribute("peimissionList",permissionList);
       return "frame/index";
    }
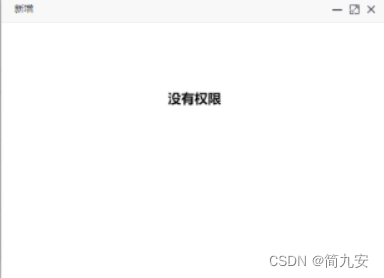
controller方法权限控制
目标:给各个Controller的方法指定对应的操作权限,以角色管理增删改查等为例
没有权限的话不可以使用
在用户的controller层类中方法上加上注解
//没有权限不可以修改
//admin.edit 是根据数据库对应的权限表一致的
 @PreAuthorize("hasAnyAuthority('admin.edit')")
使得没有权限的页面显示抱歉您没有权限
编写一个前端页面
<!DOCTYPE html>
<html>
    <head>
    </head>
    <body style="position: relative;">
        <div style="text-align:center;margin-top: 100px;font-size: 20px;">
            <strong>没有权限</strong>

        </div>
    </body>
</html>
spring-mvc.xml
<mvc:view:controller path="/auth" view-name="frame/auth"/>
实现AccessDeniedHandler接口
public class ZJAccessDeniedHandler implements AccessDeniedHandler{
  @Overried
  public void handle(HttpServletRequest httpServletRequest, HttpServletRespones httpServletRespones,AccessDeniedException e) throwa IOException,ServletException{
    httpServletRespones.sendRedirect("/auth");
  }
}
WebSecurityConfig类
http.exceptionHandling()
        .accessDeniedHandler(new ZJAccessDeniedHandler());
效果:
页面功能按钮权限控制
如:角色管理上面只有查看权限,那么页面新增、修改、删除、分配权限按都不显示。
引入依赖
<thymeleaf-springsecurity5.version>3.0.4.RELEASE</thymeleaf-springsecurity5.version>


<!--用于springsecurity5标签-->
<dependency>
    <groupId>org.thymeleaf.extras</groupId>
    <artifactId>thymeleaf-extras-springsecurity5</artifactId>
    <version>${thymeleaf-springsecurity5.version}</version>
</dependency>
thymeleaf模板引擎配置spring security 标签支持
spring-mvc配置文件
<!--配置模板引擎-->
<bean id="templateEngine" class="org.thymeleaf.spring5.SpringTemplateEngine">
    <!--引用视图解析器-->
    <property name="templateResolver" ref="templateResolver"></property>
    <!-- 添加spring security 标签支持:sec -->
    <property name="additionalDialects">
        <set>
            <bean class="org.thymeleaf.extras.springsecurity5.dialect.SpringSecurityDialect" />
        </set>
    </property>
</bean>
页面控制
在html页面声明spring security标签
<html xmlns:th="http://www.thymeleaf.org"
      xmlns:sec="http://www.thymeleaf.org/extras/spring-security">
在相关的按钮上加上属性
<a class="edit" th:attr="data-id=${item.id}" sec:authorize="hasAuthority('admin.edit')">修改</a>
其实配置文件都是固定的代码
WebSecurityConfigurerAdapter实现类
@Configuration //将当前类标识为配置类
@EnableWebSecurity  //开启SpringSecurity的默认功能
@EnableGlobalMethodSecurity(prePostEnabled=true)  //开启注解的配置权限
public class WebSecurityConfig extends WebSecurityConfigurerAdapter {

   @Bean
   public BCryptPasswordEncoder passwordEncoder(){
       return new BCryptPasswordEncoder();//自定义加密
   }

   //下面使用的是内存的用户,注销  开始使用数据库的用户名
   /*@Override
   protected void configure(AuthenticationManagerBuilder auth) throws Exception {
       //super.configure(auth);
       auth
          .inMemoryAuthentication()
          .withUser("admin")
          //.password("{noop}123456") //写的是明文  这里是写实的,写在内存的用户名和密码
          .password(new BCryptPasswordEncoder().encode("123456"))//加密后的密码
          .roles("admin") //角色默认会加上ROLE_
          .authorities("admin.create");

   }*/

   @Override
   protected void configure(HttpSecurity http) throws Exception {
       //必须调用父类的方法
       //super.configure(http);
       //设置资源的管理规则
       http.authorizeRequests()//对资源进行授权
           .antMatchers("/static/**","/login") //通过ant风格的路径匹配请求
           .permitAll() //默认访问路径
           .anyRequest() //其他所有请求
           .authenticated();//需要认证才可以访问

       //设置自定义访问登入页面
       http.formLogin()
            .loginPage("/login") //设置访问自定义登入页面
            .usernameParameter("username") //设置登入页面的输入框的输入参数
            .passwordParameter("password") //同上,如果和前端页面的name一样,也可以不设置.不一样一定要设置
            .loginProcessingUrl("/login_process") //登入的请求页面
            .defaultSuccessUrl("/")  //登入成功后默认的访问页面
            .failureUrl("/login"); //登入失败后访问页面

       //自定义注销功能
       http.logout()
           .logoutUrl("/logout") //退出登入的请求的页面
           .logoutSuccessUrl("/login");//退出登入成功后访问的页面

       //禁止使用cref功能
       http.csrf().disable();

       //允许iframe嵌套显示
       http.headers().frameOptions().disable();

       //自定义显示403页面的优化
       http.exceptionHandling()
           .accessDeniedHandler(new SHFAccessDeniedHandler());
   }
}
UserDetailsService实现类
需要修改就是AdminService 和 PermissionService
@Component
public class UserDetailsServiceImpl implements UserDetailsService {

    @DubboReference
    private AdminService adminService;

    @DubboReference
    private PermissionService permissionService;


    @Override
    public UserDetails loadUserByUsername(String username) throws UsernameNotFoundException {

        //根据用户的名查询用户信息
        Admin admin = adminService.findAdminByUsername(username);

        //判断是否查询到用户信息
        if (admin == null){
            //说明没有查询到用户信息,那么就返回null
            return null;
        }
        //表示查询到用户信息,那么根据用户的id查询该用户所拥有的权限
        List<String> permissionCodeList = permissionService.findPermissionCodeListByAdminId(admin.getId());
        //因为用户可能会有重复的权限 set集合可以去重
        Set<GrantedAuthority> authorities = new HashSet<>();
        /*这里是什么意思呢???*/
        for (String permissCode : permissionCodeList){
            authorities.add(new SimpleGrantedAuthority(permissCode));
        }
        return new User(username,admin.getPassword(),authorities);
    }
}
AccessDeniedHandler实现类
public class SHFAccessDeniedHandler implements AccessDeniedHandler {
    @Override
    public void handle(HttpServletRequest httpServletRequest, HttpServletResponse httpServletResponse, AccessDeniedException e) throws IOException, ServletException {
        //响应重定向到页面
        httpServletResponse.sendRedirect("/auth");
    }
}
获取用户的权限
//在用户登入后显示的首页中
Authentication authentication = SecurityContextHolder.getContext.getAuthentication();
User user = (User) authentication.getPrincipal();
...//根据项目要求获取信息


 被折叠的 条评论
为什么被折叠?
被折叠的 条评论
为什么被折叠?
 到【灌水乐园】发言


