


BIO 介绍
BIO(Blocking I/O)是一种传统的 I/O 模型,它在处理数据时会阻塞线程,直到操作完成。BIO 主要通过流(Stream)来进行数据传输,通常每个客户端连接都会对应一个独立的线程。
BIO 通过堵塞的方式处理客户端连接,会因为一个客户端没有处理完,导致后面的客户端请求卡住。Explain
public class Server {
    public static void main(String[] args) throws IOException {
        ByteBuffer buf = ByteBuffer.allocate(16);
        ServerSocketChannel ssc = ServerSocketChannel.open();
        ssc.bind(new InetSocketAddress(8080));
        List<SocketChannel> channels = new ArrayList<>();
        while (true) {
            // 堵塞, 等待客户端连接
            System.out.println("connection...");
            SocketChannel sc = ssc.accept();
            System.out.println("connected..." + sc);
            channels.add(sc);
            for (SocketChannel channel : channels) {
                System.out.println("reading...");
                // 堵塞, 等待客户端可读
                channel.read(buf);
                buf.flip();
                ByteBufferUtil.debugAll(buf);
                buf.clear();
            }
        }
    }
}
public class Client {
    public static void main(String[] args) throws IOException {
        SocketChannel sc = SocketChannel.open();
        sc.connect(new InetSocketAddress("127.0.0.1", 8080));
        sc.write(StandardCharsets.UTF_8.encode("hello world"));
        sc.close();
    }
}
通过 configureBlocking(false) 就可以将 SocketChannel 设置为非堵塞的模式,通过非堵塞循环的方式处理请求,就不会因为一个客户端连接不触发可读可写事件,而导致其他客户端一直等待的情况。Explain
public class Server {
    public static void main(String[] args) throws IOException {
        ByteBuffer buf = ByteBuffer.allocate(16);
        ServerSocketChannel ssc = ServerSocketChannel.open();
        // 设置 ServerSocketChannel 为非堵塞模式
        ssc.configureBlocking(false);
        ssc.bind(new InetSocketAddress(8080));
        List<SocketChannel> channels = new ArrayList<>();
        while (true) {
            // 非堵塞, 循环等待客户端连接
            SocketChannel sc = ssc.accept();
            if (sc != null) {
                System.out.println("connected..." + sc);
                // 设置 SocketChannel 为非堵塞模式
                sc.configureBlocking(false);
                channels.add(sc);
            }

            for (SocketChannel channel : channels) {
                // 非堵塞, 循环等待客户端可读
                int read = channel.read(buf);
                if (read > 0) {
                    System.out.println("readed..." + read);
                    buf.flip();
                    ByteBufferUtil.debugAll(buf);
                    buf.clear();
                }
            }
        }
    }
}
NIO 介绍
NIO(New I/O),通常也被理解为 Non-blocking I/O,但它不仅仅包括非阻塞 I/O,还引入了很多新特性和组件,比如缓冲区(Buffer)、通道(Channel)、选择器(Selector)等。这些特性使得 Java NIO 与传统的 Java I/O 有很大的不同。
NIO 通过非阻塞模式的 IO 操作增强性能和可伸缩性,特别是在构建需要高速 IO 的网络应用时。
下面是一个使用 NIO 实现的最简单的服务器和客户端示例。这个示例展示了如何使用 Selector 进行非阻塞的 I/O 操作。简单看一下即可,下面的 NIO 应用示例中会重点介绍每一步的作用,最主要的就是 Selector 事件处理。
public class Server {
    public static void main(String[] args) throws IOException {
        ServerSocketChannel serverSocketChannel = ServerSocketChannel.open();
        serverSocketChannel.bind(new InetSocketAddress(8080));
        serverSocketChannel.configureBlocking(false);

        // 将服务器通道注册到选择器,监听连接事件
        Selector selector = Selector.open();
        serverSocketChannel.register(selector, SelectionKey.OP_ACCEPT);

        while (true) {
            // 阻塞等待事件
            selector.select();

            // 获取所有事件的集合
            Set<SelectionKey> selectionKeys = selector.selectedKeys();
            Iterator<SelectionKey> iterator = selectionKeys.iterator();

            while (iterator.hasNext()) {
                SelectionKey key = iterator.next();

                if (key.isAcceptable()) {
                    // 处理连接事件
                    ServerSocketChannel ssc = (ServerSocketChannel) key.channel();
                    SocketChannel socketChannel = ssc.accept();
                    socketChannel.configureBlocking(false);
                    socketChannel.register(selector, SelectionKey.OP_READ);
                    System.out.println("Connected to " + socketChannel);
                } else if (key.isReadable()) {
                    // 处理读事件
                    SocketChannel socketChannel = (SocketChannel) key.channel();
                    ByteBuffer buffer = ByteBuffer.allocate(256);
                    int bytesRead = socketChannel.read(buffer);
                    if (bytesRead == -1) {
                        socketChannel.close();
                    } else {
                        buffer.flip();
                        System.out.println("Received: " + new String(buffer.array(), 0, buffer.limit()));
                    }
                }

                // 移除处理过的键
                iterator.remove();
            }
        }
    }
}
public class Client {
    public static void main(String[] args) throws IOException {
        SocketChannel socketChannel = SocketChannel.open();
        socketChannel.configureBlocking(false);
        socketChannel.connect(new InetSocketAddress("127.0.0.1", 8080));
        // 等待连接完成
        while (!socketChannel.finishConnect()) {}
        // 发送数据
        ByteBuffer buffer = ByteBuffer.wrap("hello world".getBytes(StandardCharsets.UTF_8));
        socketChannel.write(buffer);
        socketChannel.close();
    }
}
AIO 介绍
AIO (Asynchronous IO),也称为 NIO.2,是在 JDK7 中引入的一种新的 IO 模型。它是对 NIO 的扩展,引入了异步通道的概念,使得 IO 操作可以完全异步执行,从而提高了大规模 IO 处理的性能和可伸缩性。
在 AIO 中,应用程序可以直接向操作系统发起 IO 请求,并立即返回继续执行其他任务。当 IO 操作完成后,操作系统会通知应用程序。
AIO 在 Windows 上的实现非常好,但在 Linux 上的实现较差。Linux 的 AIO 本质上还是多路复用 IO。以下代码仅供参考:
try (AsynchronousFileChannel channel = AsynchronousFileChannel.open(Paths.get("test.txt"), StandardOpenOption.READ)) {
    ByteBuffer bufferDist = ByteBuffer.allocate(16);
    ByteBuffer bufferAttach = ByteBuffer.allocate(16);

    System.out.println("Before reading...");

    // void read(ByteBuffer dst, long position, A attachment, CompletionHandler<Integer,? super A> handler)
    channel.read(bufferDist, 0, bufferAttach, new CompletionHandler<Integer, ByteBuffer>() {
        @Override
        public void completed(Integer result, ByteBuffer attachment) {
            System.out.println("Reading completed: " + result);
            attachment.flip();
            ByteBufferUtil.debugAll(attachment);
            attachment.clear();
        }

        @Override
        public void failed(Throwable exc, ByteBuffer attachment) {
            exc.printStackTrace();
        }
    });

    System.out.println("After reading");
} catch (IOException e) {
    e.printStackTrace();
}

// AsynchronousFileChannel 的 read() 方法绑定的回调函数通过守护线程执行,因此需要等待其执行完毕,否则看不到输出结果
System.in.read();
NIO 和 BIO 在数据传输上的区别
- BIO 是基于流的操作,数据是以字节流的形式进行传输的。每次读取或写入操作都是逐字节进行的,数据按照顺序一个字节一个字节地传输。
- NIO 是基于缓冲区(Buffer)和通道(Channel)的操作。数据首先被读入缓冲区,然后从缓冲区中进行处理。缓冲区是一块内存区域,数据可以在其中进行读写操作。
NIO 多路复用模型
如果每建立一个 Socket 连接,就开启一个线程去处理 Socket,资源消耗非常多,上下文切换成本也非常高,只适合连接数较少的情况。
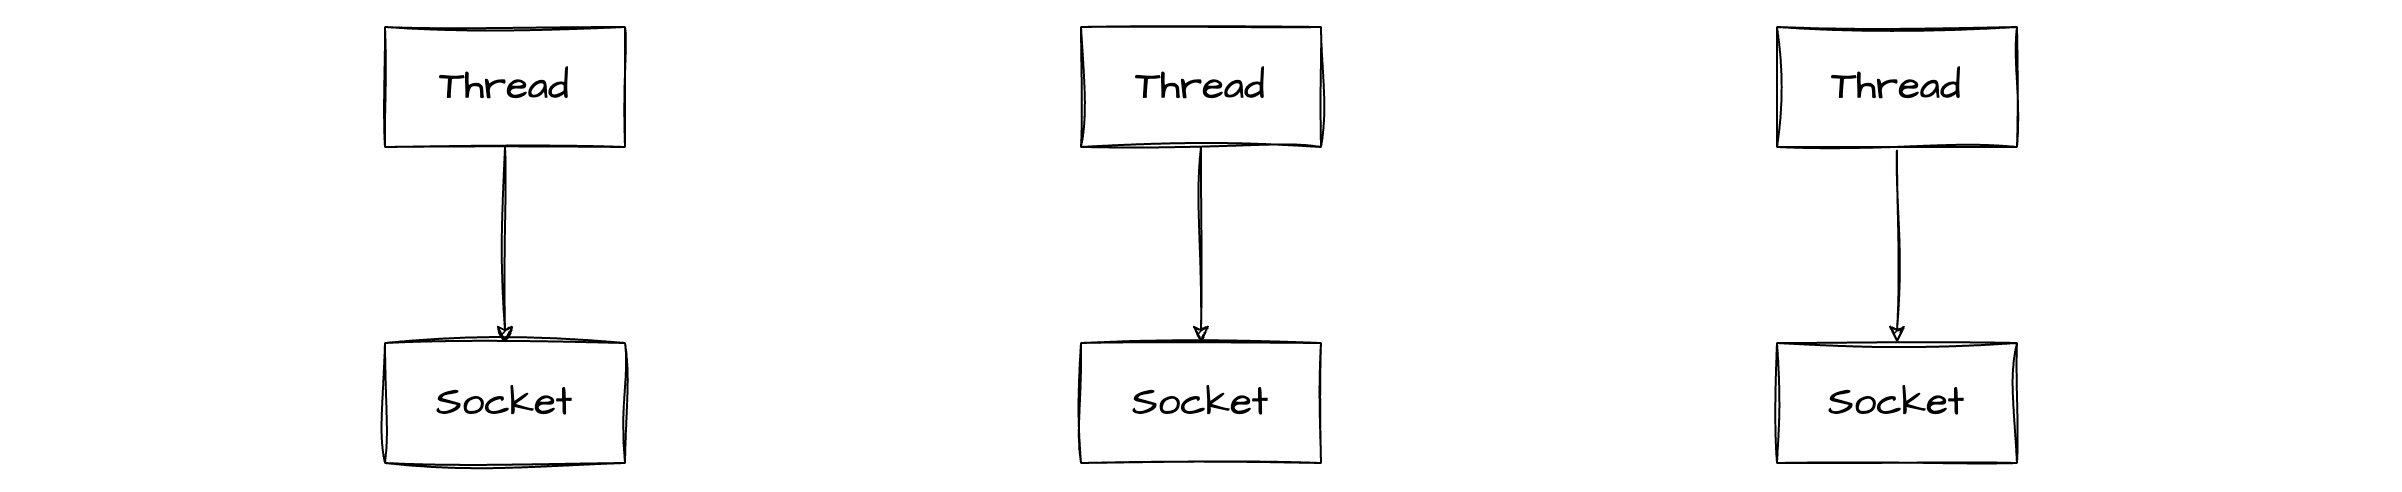
如果通过线程池固定线程资源,会导致其他 Socket 连接被阻塞,用户体验非常不好。早期的 Tomcat 就是采用这种实现方式。为了避免一个 Socket 长期占用线程资源,这种方式只适合短连接的场景(例如:HTTP)。

NIO 通过 Select + Channel 实现了多路复用 IO 的效果。Selector 可以配合一个线程来管理多个 Channel,一个 Channel 对应一个 Socket。Selector 的 select() 方法会阻塞等待 Channel 的读写就绪事件,然后交给线程去处理,从而避免了让一个线程阻塞在一个 Socket 上,可以高效处理多个连接。

ByteBuffer 介绍
ByteBuffer 是 Java NIO 中的一个核心类,用于在通道(Channel)和缓冲区(Buffer)之间传输数据。ByteBuffer 提供了一种高效的方式来处理字节数据,允许直接操作底层的字节数组,并提供了一系列方法来方便地进行数据的读写操作。
创建 ByteBuffer:
allocate()创建的是HeapByteBuffer,存储在 Java 堆内存中,分配速度快,但读写效率低(需要多次拷贝),存在 GC。allocateDirect()创建的是DirectByteBuffer,存储在直接内存中,涉及操作系统的操作,分配速度慢,但读写效率高(少一次拷贝),不存在 GC。
// 创建一个 HeapByteBuffer,容量为 1024B
ByteBuffer buffer = ByteBuffer.allocate(1024);

// 创建一个 DirectByteBuffer,容量为 1024B
ByteBuffer buffer = ByteBuffer.allocateDirect(1024);
写入数据到 ByteBuffer:
buffer.put((byte) 65); // 写入单个字节
buffer.put("Hello".getBytes()); // 写入字节数组
读取数据从 ByteBuffer:
buffer.flip(); // 切换到读模式
byte b = buffer.get(); // 读取单个字节

byte[] bytes = new byte[buffer.remaining()];
buffer.get(bytes); // 读取剩余的所有字节
可以直接访问指定索引处的数据,不会移动 position 的位置:
ByteBuffer buffer = ByteBuffer.allocate(10);
buffer.put(new byte[]{'a', 'b', 'c', 'd', 'e'});
buffer.flip();

System.out.println((char) buffer.get(0)); // a
System.out.println((char) buffer.get(1)); // b
System.out.println((char) buffer.get(2)); // c
标记访问的位置:
ByteBuffer buffer = ByteBuffer.allocate(10);
buffer.put(new byte[]{'a', 'b', 'c', 'd', 'e'});
buffer.flip();

System.out.println((char) buffer.get()); // a
System.out.println((char) buffer.get()); // b
buffer.mark();
System.out.println((char) buffer.get()); // c
System.out.println((char) buffer.get()); // d
buffer.reset();
System.out.println((char) buffer.get()); // c
System.out.println((char) buffer.get()); // d
使用 ByteBuffer 读取文件:
try (FileChannel channel = new FileInputStream("test.txt").getChannel()) {
    // Allocate a new byte buffer
    ByteBuffer buffer = ByteBuffer.allocate(10);
    while (channel.read(buffer) != -1) {
        // Switch to read mode and set limit pointer
        buffer.flip();
        // Read data from buffer
        while (buffer.hasRemaining()) {
            System.out.print((char) buffer.get());
        }
        // Switch to write mode and clear buffer
        buffer.clear();
    }
} catch (IOException e) {
    throw new RuntimeException(e);
}
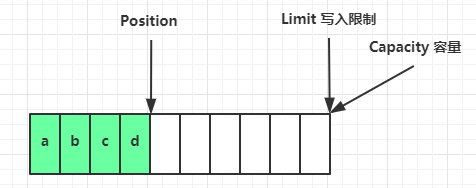
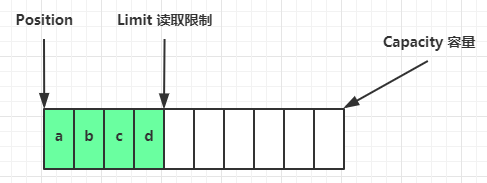
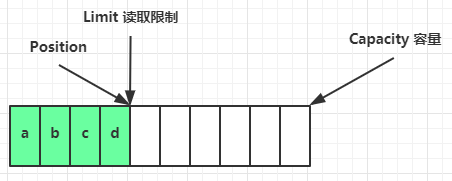
ByteBuffer 结构
ByteBuffer 由 pos、lim、cap 三个关键部分组成,实现读写操作。
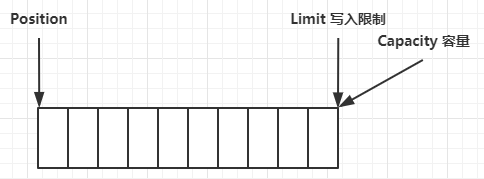
在默认的写模式(W Mode)下,pos 指向当前写入的位置。每次写入一个字节(Byte)到缓冲区(Buffer)中,pos 就会移动。如果此时执行 get() 读取操作,pos 将指向空数据。
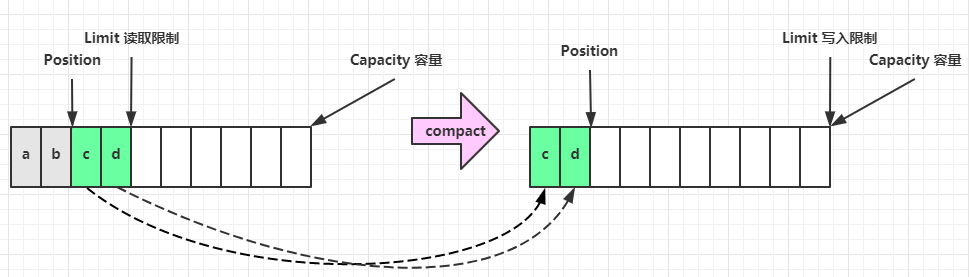
执行 flip() 后,缓冲区从写模式(W Mode)切换为读模式(R Mode),pos 被重置,lim 指向最后一次写入的位置。此时可以调用 get() 读取数据,并移动 pos,只需读取到 lim 的位置即可,不需要读满 cap。
执行 clear() 后,缓冲区从读模式(R Mode)切换为写模式(W Mode),pos 和 lim 被重置,缓冲区被清空。
执行 compact() 操作时,未读完的部分会被向前压缩,然后缓冲区从读模式(R Mode)切换为写模式(W Mode)。与 clear() 不同,compact() 会保留未读取完的数据。请注意区分 clear() 和 compact() 的使用场景。
ByteBuffer 转换
通过 StandardCharsets 的 encode() 和 decode() 实现 String 和 ByteBuffer 之间的转换。
// String to ByteBuffer
ByteBuffer buffer = StandardCharsets.UTF_8.encode("hello");

// ByteBuffer to String
String str = StandardCharsets.UTF_8.decode(buffer).toString();
通过 ByteBuffer 的 wrap 实现 String 和 ByteBuffer 之间的转换。
// String to ByteBuffer
ByteBuffer buffer = ByteBuffer.wrap("hello".getBytes());

// ByteBuffer to String
String str = StandardCharsets.UTF_8.decode(buffer).toString();
通过 ByteBuffer 的 put() 实现 String 和 ByteBuffer 之间的转换,可以直接将 String 转成 byte[] 进行存储。但是这样会移动 pos 的位置,所以在 ByteBuffer 转 String 的过程中,需要先调用 flip() 从写模式 (W Mode) 转换为读模式 (R Mode),重置 pos 的位置。
而 encode() 和 wrap() 底层都是在执行 put() 后帮助我们执行了 flip(),所以不需要我们再去重复执行 flip() 了。
// String to ByteBuffer
ByteBuffer buffer = ByteBuffer.allocate(10);
buffer.put("hello".getBytes());

// ByteBuffer to String
buffer.flip();
String str = StandardCharsets.UTF_8.decode(buffer).toString(); // hello
ByteBuffer 分散读
将一个文件的数据分散读取到多个缓冲区中。
try (FileChannel channel = new RandomAccessFile("test.txt", "r").getChannel()) {
    ByteBuffer b1 = ByteBuffer.allocate(3);
    ByteBuffer b2 = ByteBuffer.allocate(3);
    ByteBuffer b3 = ByteBuffer.allocate(5);

    channel.read(new ByteBuffer[]{b1, b2, b3});

    b1.flip();
    b2.flip();
    b3.flip();

    System.out.println(StandardCharsets.UTF_8.decode(b1)); // 输出: one
    System.out.println(StandardCharsets.UTF_8.decode(b2)); // 输出: two
    System.out.println(StandardCharsets.UTF_8.decode(b3)); // 输出: three
} catch (IOException e) {
    throw new RuntimeException(e);
}
在这个示例中,我们通过 FileChannel 将文件 test.txt 的内容分散读取到三个 ByteBuffer 中,并分别输出它们的内容。
ByteBuffer 聚集写
将多个 Buffer 的数据集中写入到一个 File 中
try (FileChannel channel = new RandomAccessFile("test.txt", "rw").getChannel()) {
    ByteBuffer b1 = StandardCharsets.UTF_8.encode("one");
    ByteBuffer b2 = StandardCharsets.UTF_8.encode("two");
    ByteBuffer b3 = StandardCharsets.UTF_8.encode("three");
    channel.write(new ByteBuffer[]{b1, b2, b3});
} catch (IOException e) {
    throw new RuntimeException(e);
}
以上代码展示了如何将多个 ByteBuffer 的数据写入到一个文件中。使用 FileChannel 可以高效地进行文件操作。
ByteBuffer 粘包问题,半包问题
粘包(Sticky Packet)现象发生在接收数据时,多个数据包粘合在一起作为一个数据包进行处理。这是因为 TCP 为了效率,可能会将多个小的数据包合并为一个大的数据包进行发送,或者接收方在读取数据时,一次读取操作读到了多个数据包的数据。
半包(Partial Packet)现象发生在接收数据时,一个数据包被分成了多个部分进行接收。这可能是因为数据包太大,超过了接收缓冲区的大小,或者接收方读取数据的速度不够快,导致一个完整的数据包被拆分成了多次读取操作。
粘包和半包问题需要在应用层解决,常见的解决方法包括:
- 固定长度:每个数据包固定长度,不足部分用空字节填充。
- 分隔符:在数据包之间添加特殊的分隔符来区分不同的数据包。
- 长度字段:在数据包的头部加上长度字段,指明数据包的长度。
以下是一个示例代码,展示如何处理粘包和半包问题:
import java.io.IOException;
import java.nio.ByteBuffer;

public class PacketHandler {
    public static void main(String[] args) throws IOException {
        ByteBuffer buf = ByteBuffer.allocate(100);
        buf.put("Hi, I'm Harvey\nI'm Bruce\nI'm Ja".getBytes());
        split(buf);
        buf.put("ck\n".getBytes());
        split(buf);
    }

    public static void split(ByteBuffer src) {
        src.flip();
        while (src.hasRemaining()) {
            int startPos = src.position();
            boolean found = false;
            for (int i = src.position(); i < src.limit(); i++) {
                if (src.get(i) == '\n') {
                    int len = i + 1 - startPos;
                    ByteBuffer tar = ByteBuffer.allocate(len);
                    for (int j = 0; j < len; j++) {
                        tar.put(src.get());
                    }
                    tar.flip();
                    ByteBufferUtil.debugAll(tar);
                    found = true;
                    break;
                }
            }
            if (!found) {
                src.position(startPos);
                break;
            }
        }
        src.compact();
    }
}
以下是输出结果示例:
position: [16], limit: [16]
+--------+-------------------------------------------------+----------------+
|00000000| 48 69 2c 20 49 27 6d 20 48 61 72 76 65 79 0a    |Hi, I'm Harvey. |
+--------+-------------------------------------------------+----------------+

position: [11], limit: [11]
+--------+-------------------------------------------------+----------------+
|00000000| 49 27 6d 20 42 72 75 63 65 0a                   |I'm Bruce.      |
+--------+-------------------------------------------------+----------------+

position: [10], limit: [10]
+--------+-------------------------------------------------+----------------+
|00000000| 49 27 6d 20 4a 61 63 6b 0a                      |I'm Jack.       |
+--------+-------------------------------------------------+----------------+
FileChannel 介绍
FileChannel 是 Java NIO 中用于文件 I/O 操作的通道类,提供了比传统基于流的 I/O 更高效的文件操作方式。FileChannel 支持文件的读写、映射、锁定等操作,并且支持随机访问文件。
通过 FileChannel,可以轻松实现文件的复制、传输、映射和锁定等操作。结合 ByteBuffer,FileChannel 使得 Java NIO 在处理文件 I/O 时更加灵活和高效,特别适合大文件和高并发的场景。
FileChannel 的 transferTo() 和 transferFrom() 方法可以在两个通道之间高效地传输数据,利用底层操作系统的零拷贝优化,减少数据从内核空间到用户空间的拷贝,从而提高传输效率。
try (
    FileChannel src = new FileInputStream("src.txt").getChannel();
    FileChannel tar = new FileOutputStream("tar.txt").getChannel()
) {
    // long transferTo(long position, long count, WritableByteChannel target)
    src.transferTo(src.position(), src.size(), tar);
} catch (IOException e) {
    throw new RuntimeException(e);
}
transferTo() 和 transferFrom() 方法一次最多只能传输 2G 数据,因此需要分多次传输完整数据。
try (
    FileChannel src = new FileInputStream("src.txt").getChannel();
    FileChannel tar = new FileOutputStream("tar.txt").getChannel()
) {
    long remaining = src.size();
    while (remaining > 0) {
        remaining -= src.transferTo(src.size() - remaining, remaining, tar);
    }
} catch (IOException e) {
    throw new RuntimeException(e);
}
可以通过 FileInputStream、FileOutputStream 或 RandomAccessFile 来获取 FileChannel。
// 通过 FileInputStream 获取 FileChannel
FileInputStream fis = new FileInputStream("example.txt");
FileChannel readChannel = fis.getChannel();

// 通过 FileOutputStream 获取 FileChannel
FileOutputStream fos = new FileOutputStream("example.txt");
FileChannel writeChannel = fos.getChannel();

// 通过 RandomAccessFile 获取 FileChannel
RandomAccessFile raf = new RandomAccessFile("example.txt", "rw");
FileChannel randomAccessChannel = raf.getChannel();
也可以通过 Files 类的静态方法打开 FileChannel:
Path path = Paths.get("example.txt");
FileChannel fileChannel = FileChannel.open(path, StandardOpenOption.READ, StandardOpenOption.WRITE);
FileChannel 复制文件示例
下面是一个使用 FileChannel 实现的文件复制示例,展示了如何使用 FileChannel 和 ByteBuffer 进行高效的文件读写操作。
import java.io.IOException;
import java.nio.ByteBuffer;
import java.nio.channels.FileChannel;
import java.nio.file.Path;
import java.nio.file.StandardOpenOption;

public class NioFileCopy {
    public static void main(String[] args) {
        Path sourcePath = Path.of("source.txt");
        Path destinationPath = Path.of("destination.txt");

        try (FileChannel sourceChannel = FileChannel.open(sourcePath, StandardOpenOption.READ);
             FileChannel destinationChannel = FileChannel.open(destinationPath, StandardOpenOption.WRITE, StandardOpenOption.CREATE)) {

            ByteBuffer buffer = ByteBuffer.allocate(1024);

            while (sourceChannel.read(buffer) > 0) {
                buffer.flip(); // 切换到读模式
                destinationChannel.write(buffer); // 写入目标文件
                buffer.clear(); // 清空缓冲区,准备下一次读取
            }

            System.out.println("File copied successfully!");

        } catch (IOException e) {
            e.printStackTrace();
        }
    }
}
Files 介绍
Files 是 Java NIO (New I/O) 包中的一个实用类,提供了大量静态方法,用于文件和目录的操作,如创建、删除、复制、移动、读取和写入文件等。Files 类极大地简化了文件系统操作,并提高了操作的灵活性和效率。
Files 统计目录和文件示例
以下示例代码展示了如何使用 Files.walkFileTree() 统计目录和文件的数量:
import java.io.IOException;
import java.nio.file.*;
import java.nio.file.attribute.BasicFileAttributes;
import java.util.concurrent.atomic.AtomicInteger;

public class DirectoryTraversal {

    public static void main(String[] args) throws IOException {
        AtomicInteger countFile = new AtomicInteger();
        AtomicInteger countDir = new AtomicInteger();

        Files.walkFileTree(Paths.get("/Users/HarveySuen/Downloads"), new SimpleFileVisitor<Path>() {
            @Override
            public FileVisitResult preVisitDirectory(Path dir, BasicFileAttributes attrs) throws IOException {
                System.out.println("Directory: " + dir);
                countDir.incrementAndGet();
                return FileVisitResult.CONTINUE;
            }

            @Override
            public FileVisitResult visitFile(Path file, BasicFileAttributes attrs) throws IOException {
                System.out.println("File: " + file);
                countFile.incrementAndGet();
                return FileVisitResult.CONTINUE;
            }
        });

        System.out.println("Total Directories: " + countDir);
        System.out.println("Total Files: " + countFile);
    }
}
Files 统计特定类型文件示例
以下示例代码展示了如何统计特定类型的文件(如 .txt 文件):
import java.io.IOException;
import java.nio.file.*;
import java.nio.file.attribute.BasicFileAttributes;
import java.util.concurrent.atomic.AtomicInteger;

public class CountTxtFiles {

    public static void main(String[] args) throws IOException {
        AtomicInteger countTxtFile = new AtomicInteger();

        Files.walkFileTree(Paths.get("/Users/HarveySuen/Downloads"), new SimpleFileVisitor<Path>() {
            @Override
            public FileVisitResult visitFile(Path file, BasicFileAttributes attrs) throws IOException {
                if (file.toString().endsWith(".txt")) {
                    System.out.println("File: " + file);
                    countTxtFile.incrementAndGet();
                }
                return FileVisitResult.CONTINUE;
            }
        });

        System.out.println("Total .txt Files: " + countTxtFile);
    }
}
Files 删除目录及其内容示例
以下示例代码展示了如何删除一个包含文件的目录:
import java.io.IOException;
import java.nio.file.*;
import java.nio.file.attribute.BasicFileAttributes;

public class DeleteDirectory {

    public static void main(String[] args) throws IOException {
        Files.walkFileTree(Paths.get("/Users/HarveySuen/Downloads/temp"), new SimpleFileVisitor<Path>() {
            @Override
            public FileVisitResult visitFile(Path file, BasicFileAttributes attrs) throws IOException {
                System.out.println("Deleting file: " + file);
                Files.delete(file);
                return FileVisitResult.CONTINUE;
            }

            @Override
            public FileVisitResult postVisitDirectory(Path dir, IOException exc) throws IOException {
                System.out.println("Deleting directory: " + dir);
                Files.delete(dir);
                return FileVisitResult.CONTINUE;
            }
        });
    }
}
删除示例输出
Deleting file: /Users/HarveySuen/Downloads/temp/.DS_Store
Deleting file: /Users/HarveySuen/Downloads/temp/test1/test1.txt
Deleting file: /Users/HarveySuen/Downloads/temp/test1/test2.txt
Deleting file: /Users/HarveySuen/Downloads/temp/test1/test3.txt
Deleting directory: /Users/HarveySuen/Downloads/temp/test1
Deleting file: /Users/HarveySuen/Downloads/temp/test2/test1.txt
Deleting file: /Users/HarveySuen/Downloads/temp/test2/test2.txt
Deleting file: /Users/HarveySuen/Downloads/temp/test2/test3.txt
Deleting directory: /Users/HarveySuen/Downloads/temp/test2
Deleting directory: /Users/HarveySuen/Downloads/temp
Files 拷贝多级目录示例
以下示例代码展示了如何使用 Files.walk() 拷贝一个多级目录:
import java.io.IOException;
import java.nio.file.*;

public class CopyDirectory {

    public static void main(String[] args) throws IOException {
        String src = "/Users/HarveySuen/Downloads/src";
        String tar = "/Users/HarveySuen/Downloads/tar";

        Files.walk(Paths.get(src)).forEach(srcPath -> {
            try {
                Path tarPath = Paths.get(tar, srcPath.toString().substring(src.length()));
                if (Files.isDirectory(srcPath)) {
                    Files.createDirectories(tarPath);
                } else if (Files.isRegularFile(srcPath)) {
                    Files.copy(srcPath, tarPath);
                }
            } catch (IOException e) {
                throw new RuntimeException(e);
            }
        });
    }
}
NIO Selector 监听事件
NIO 提供的 Selector 允许单个线程处理多个 Channel 的 IO 事件,类似于 Multiplexing IO,如果 Channel 有就绪的 IO 事件,就会将事件封装成 SelectionKey 存储到 Set 中,后续只需要遍历该 Set 处理事件即可。每个 IO 操作都采用非阻塞的方式进行处理,当没有可读或可写的数据时,会立即返回,不会一直阻塞。Explain
通过 Selector 监控一个或多个非阻塞模式的 Channel,并且指定每个 Channel 需要关注的事件(例如:OP_ACCEPT, OP_CONNECT, OP_READ, OP_WRITE),封装为 SelectionKey 存储到 SelectionKey[] 中。
SelectionKey key = channel.register(selector, SelectionKey.OP_READ | SelectionKey.OP_WRITE);
当触发事件后,也会将事件封装成 SelectionKey 存储到 Set<SelectionKey> 中。
while (true) {
    // 如果没有事件发生,就会阻塞;如果有事件发生,就会将事件封装成 SelectionKey 存储到 Set<SelectionKey> selectedKeys 中
    selector.select();
    // 遍历 Set<SelectionKey> 处理事件
    Iterator<SelectionKey> iter = selector.selectedKeys().iterator();
}
NIO 应用示例
public class Server {
    public static void main(String[] args) throws IOException {
        ServerSocketChannel ssc = ServerSocketChannel.open();
        ssc.bind(new InetSocketAddress(8080));
        ssc.configureBlocking(false);

        // 通过 Selector 管理多个 Channel
        Selector selector = Selector.open();
        // 将 ServerSocketChannel 注册到 Selector 上,封装为 SelectionKey 存储到 SelectionKey[] 中,绑定 Accept 事件
        SelectionKey sscKey = ssc.register(selector, SelectionKey.OP_ACCEPT);

        while (true) {
            // 如果没有事件发生,就会阻塞;如果有事件发生,就会将事件封装成 SelectionKey 存储到 Set<SelectionKey> selectedKeys 中
            selector.select();
            // 遍历 Set<SelectionKey> 处理事件
            Iterator<SelectionKey> iter = selector.selectedKeys().iterator();
            while (iter.hasNext()) {
                // 获取 SelectionKey,根据事件类型处理事件
                SelectionKey key = iter.next();
                // 将 SelectionKey 从 Set<SelectionKey> 中移除;如果不移除,下次循环依旧会去重复处理该 SelectionKey
                iter.remove();

                // 服务端接收到客户端的连接请求后,就会触发 ServerSocketChannel 对应的 SelectionKey 绑定的 Accept 事件
                // 一般会通过 ServerSocketChannel.accept() 方法接受客户端连接,返回一个新的 SocketChannel,并且绑定 Read 事件,以便读取客户端发送的数据
                if (key.isAcceptable()) {
                    handleAcceptEvent(key);
                }
                // 当客户端的 SocketChannel 完成连接过程时触发,一般会发送一些初始消息给客户端
                else if (key.isConnectable()) {
                    handleConnectEvent(key);
                }
                // 当 SocketChannel 中有新数据可读时,即数据已经从远程端点发送过来并到达本地缓冲区,就会触发该 SocketChannel 对应的 SelectionKey 绑定的 Read 事件
                else if (key.isReadable()) {
                    handleReadEvent(key);
                }
                // 当通道可以写入数据时触发
                else if (key.isWriteable()) {
                    handleWriteEvent(key);
                }
            }
        }
    }

    private static void handleAcceptEvent(SelectionKey key) {
        ServerSocketChannel channel = (ServerSocketChannel) key.channel();
        SocketChannel sc = channel.accept();
        sc.configureBlocking(false);
        sc.register(selector, SelectionKey.OP_READ, ByteBuffer.allocate(16));
    }

    private static void handleConnectEvent(Selection key) {
        SocketChannel clientChannel = (SocketChannel) key.channel();
        // 由于是非堵塞模式, 所以 sc.connect() 可能还没执行完成, 就已经执行到了这一步, 即连接还没有成功建立, 所以必须调用 finishConnect() 方法来完成连接过程
        if (clientChannel.finishConnect()) {
            clientChannel.configureBlocking(false);
            clientChannel.register(key.selector(), SelectionKey.OP_READ);
            ByteBuffer buffer = ByteBuffer.wrap("Hello, Server!".getBytes());
            clientChannel.write(buffer);
        }
    }

    private static void handleReadEvent(SelectionKey key) {
        SocketChannel channel = (SocketChannel) key.channel();
        // 从 SelectionKey 中取出 Attachment
        ByteBuffer buffer = (ByteBuffer) key.attachment();
        try {
            int read = channel.read(buffer);
            if (read == -1) {
                // 如果读不到数据了,就应该将 SelectionKey 从 SelectionKey[] 和 Set<SelectionKey> 中移除,防止下次循环依会去处理该 SelectionKey
                // 如果客户端异常断开,还会触发一次读事件,所以这里通过 if (read == -1) 可以有效防止空读现象
                // channel.close() 和 key.cancel() 都可以将 SelectionKey 从 SelectionKey[] 和 Set<SelectionKey> 中移除
                // channel.close() 会关闭连接的 SocketChannel,key.cancel() 不会关闭连接的 SocketChannel
                key.cancel();
            } else {
                // 处理粘包问题和半包问题,如果读取的内容过长,超出了 ByteBuffer 的 capacity 也没有遇到 '\n',split() 会执行 compact() 进行压缩,压缩后 pos 就和 lim 指向了同一个位置,此时进行扩容
                split(buffer);
                if (buffer.position() == buffer.limit()) {
                    ByteBuffer newBuffer = ByteBuffer.allocate(buffer.capacity() * 2);
                    buffer.flip();
                    newBuffer.put(buffer);
                    key.attach(newBuffer);
                }
            }
        } catch (IOException e) {
            // 如果客户端异常断开,Open JDK 会抛出 IOException,Zulu JDK 不会抛出异常,为了防止异常导致服务端程序崩溃,这里捕获异常,打印异常,并且将 SelectionKey 从 SelectionKey[] 中移除
            e.printStackTrace();
            key.cancel();
        }
    }

    private static void handleWriteEvent(SelectionKey key) {
    }

    public static void split(ByteBuffer src) {
        src.flip();
        while (src.hasRemaining()) {
            int pos = src.position();
            while (src.hasRemaining() && src.get() != '\n');
            int len = src.position() - pos;
            ByteBuffer tar = ByteBuffer.allocate(len);
            src.position(pos);
            tar.put(src.slice().limit(len));
            src.position(pos + len);
            ByteBufferUtil.debugAll(tar);
        }
        src.compact();
    }
}
OP_ACCEPT 事件
OP_ACCEPT 事件在 ServerSocketChannel 处于非阻塞模式并准备好接受新的客户端连接时触发。这意味着如果有客户端尝试建立连接,Selector 会识别到 ServerSocketChannel 上的 OP_ACCEPT 事件。
- OP_ACCEPT 通常用于服务器端,用来接受客户端的连接请求。
- 当 OP_ACCEPT 事件被触发时,服务器可以调用 ServerSocketChannel 的
accept()方法来接受连接,该方法返回一个新的 SocketChannel 对象,代表与客户端的连接。
ServerSocketChannel ssc = ServerSocketChannel.open();
ssc.configureBlocking(false);
ssc.bind(new InetSocketAddress(8080));

Selector sel = Selector.open();
ssc.register(sel, SelectionKey.OP_ACCEPT);

while (true) {
    sel.select();
    Iterator<SelectionKey> iter = sel.selectedKeys().iterator();
    while (iter.hasNext()) {
        SelectionKey key = iter.next();
        iter.remove();
        if (key.isAcceptable()) {
            SocketChannel sc = ssc.accept();
            sc.configureBlocking(false);
            // 处理新的连接
        }
    }
}
OP_CONNECT 事件
OP_CONNECT 事件在 SocketChannel 以非阻塞模式成功连接到服务器时触发。这通常发生在客户端尝试连接服务器并完成连接过程时。
- OP_CONNECT 主要用于客户端,用于监测连接请求的完成。
SocketChannel sc = SocketChannel.open();
sc.configureBlocking(false);
sc.connect(new InetSocketAddress("127.0.0.1", 8080));

Selector sel = Selector.open();
SelectionKey scKey = sc.register(sel, SelectionKey.OP_CONNECT);

while (true) {
    sel.select();
    Iterator<SelectionKey> iter = sel.selectedKeys().iterator();
    while (iter.hasNext()) {
        SelectionKey key = iter.next();
        iter.remove();
        if (key.isConnectable()) {
            SocketChannel channel = (SocketChannel) key.channel();
            // 由于是非阻塞模式, sc.connect() 可能还未完成就执行到这里,因此需要调用 finishConnect() 方法来完成连接过程
            if (channel.finishConnect()) {
                // ...
            }
        }
    }
}
在非阻塞模式下,sc.connect() 可能在连接尚未完成时就返回。因此,需要调用 finishConnect() 方法来完成连接过程。
OP_READ 事件
SocketChannel 中有新数据可读时,即数据已经从远程端点发送过来并到达本地缓冲区,OP_READ 事件会被触发。此时,应用程序可以从 Channel 读取数据而不会阻塞。
- OP_READ 事件触发后,应创建或准备一个
ByteBuffer,然后使用read()从 SocketChannel 中读取数据。继续读取直到没有更多数据可读或read()返回 -1,表示连接已经被远程端点关闭。
ServerSocketChannel ssc = ServerSocketChannel.open();
ssc.configureBlocking(false);
ssc.bind(new InetSocketAddress(8080));

Selector sel = Selector.open();
ssc.register(sel, SelectionKey.OP_ACCEPT);

while (true) {
    sel.select();
    Iterator<SelectionKey> iter = sel.selectedKeys().iterator();
    while (iter.hasNext()) {
        SelectionKey key = iter.next();
        iter.remove();
        if (key.isReadable()) {
            SocketChannel sc = (SocketChannel) key.channel();
            ByteBuffer buf = ByteBuffer.allocate(1024); // 准备缓冲区
            int bytesRead = sc.read(buf); // 读取数据
            if (bytesRead == -1) {
                // 读取完数据或者连接已被远程关闭, 执行 channel.close() 或 key.cancel() 将 SelectionKey 从 SelectionKey[] 中移除
                key.cancel();
            } else {
                buf.flip(); // 为数据处理做准备
                // 处理数据...
            }
        }
    }
}
无论客户端是正常断开还是异常断开,都会触发一次 OP_READ,即我们从 read() 中读取到的是 -1。针对这种情况需要做额外的处理。
if (key.isReadable()) {
    try {
        SocketChannel channel = (SocketChannel) key.channel();
        // 从 SelectionKey 中取出 Attachment
        ByteBuffer buffer = (ByteBuffer) key.attachment();
        int read = channel.read(buffer);
        // 如果读不到数据了,应将 SelectionKey 移除,防止下次循环继续处理该 SelectionKey
        if (read == -1) {
            // 移除 SelectionKey 并关闭连接
            key.cancel();
        } else {
            // 处理 Packet Problem
            split(buffer);
            // 如果读取的内容过长,超出 ByteBuffer 的容量且没有遇到 '\n',split() 会执行 compact() 进行压缩,压缩后 pos 和 lim 指向同一位置,此时进行扩容
            if (buffer.position() == buffer.limit()) {
                ByteBuffer bufferNew = ByteBuffer.allocate(buffer.capacity() * 2);
                buffer.flip();
                bufferNew.put(buffer);
                key.attach(bufferNew);
            }
        }
    } catch (IOException e) {
        // 捕获异常,防止服务端程序崩溃,并移除 SelectionKey
        e.printStackTrace();
        key.cancel();
    }
}
在上述代码中,确保在读取数据时正确处理可能的异常情况,避免因客户端异常断开导致服务端崩溃。
OP_WRITE 事件
OP_WRITE 事件表示 SocketChannel 准备好接受新数据写入,即其内部缓冲区有足够空间进行非阻塞写操作。
- 因为大部分时间写通道都是准备好写入的,所以 OP_WRITE 事件一般只在需要确认能够写入数据时才注册。
- 通常只在写缓冲区满(即上一次写操作没有完全成功)时才注册 OP_WRITE 事件。一旦 OP_WRITE 被触发,你应该尝试再次写入之前未成功写入的数据。数据完全写入后,最好取消对 OP_WRITE 的监听,以避免高 CPU 占用。
ServerSocketChannel ssc = ServerSocketChannel.open();
ssc.configureBlocking(false);
ssc.bind(new InetSocketAddress(8080));

Selector selector = Selector.open();
ssc.register(selector, SelectionKey.OP_ACCEPT);

while (true) {
    selector.select();
    Iterator<SelectionKey> iterator = selector.selectedKeys().iterator();
    while (iterator.hasNext()) {
        SelectionKey key = iterator.next();
        iterator.remove();
        if (key.isWritable()) {
            SocketChannel socketChannel = (SocketChannel) key.channel();

            // 模拟一份数据
            StringBuilder sb = new StringBuilder();
            for (int i = 0; i < 100000000; i++) {
                sb.append("a");
            }
            ByteBuffer buffer = StandardCharsets.UTF_8.encode(sb.toString());

            // SocketChannel 的大小是有限制的, 所以需要循环写入数据
            while (buffer.hasRemaining()) {
                int length = socketChannel.write(buffer);
                System.out.println(length);
            }
        }
    }
}
Attachment 优化写入
如果服务器要发送大量数据给客户端,服务端需要循环调用 SocketChannel 的 write() 方法向网络通道写入数据。这可能会导致网络通道被写满,写满后服务器将无法继续写入,即后续多次写入的长度可能都是 0。这个循环写入 0 的操作非常浪费资源,需要进行优化。
当 int len = sc.write(buf) 写入的长度为 0 时,说明通道已经写满,无法再写入。这种无效的写入非常浪费资源,并且会一直占用单线程资源,需要进行优化。
if (key.isWritable()) {
    SocketChannel socketChannel = (SocketChannel) key.channel();

    // 模拟一份数据
    StringBuilder sb = new StringBuilder();
    for (int i = 0; i < 100000000; i++) {
        sb.append("a");
    }
    ByteBuffer buffer = StandardCharsets.UTF_8.encode(sb.toString());

    // SocketChannel 的大小是有限制的, 所以需要循环写入数据
    while (buffer.hasRemaining()) {
        int length = socketChannel.write(buffer);
        System.out.println(length);
    }
}
261676
1120380
1455836
0
0
0
0
0
1619832
2618788
2463972
0
0
0
0
0
13808412
3495644
0
0
0
0
0
3700496
4527212
41752812
19920868
2193012
0
0
751272
309788
一次事件中没有处理完全部的写入操作,可以再发送一次写事件进行二次写入。通过 Attachment 的方式进行数据共享,避免使用循环写入,不会产生大量无效的写入(len 为 0 的写入事件),高效利用资源。
if (key.isAcceptable()) {
    SocketChannel socketChannel = ssc.accept();
    socketChannel.configureBlocking(false);
    SelectionKey scKey = socketChannel.register(selector, SelectionKey.OP_READ);

    // 准备一份大数据
    StringBuilder sb = new StringBuilder();
    for (int i = 0; i < 100000000; i++) {
        sb.append("a");
    }
    ByteBuffer buffer = StandardCharsets.UTF_8.encode(sb.toString());

    // 向客户端写入数据
    int length = socketChannel.write(buffer);
    System.out.println(length);

    // 如果没有写入完, 就将没写完的数据作为 Attachment 挂到 scKey 上, 并且添加一个 OP_WRITE 事件, 在下次事件中处理
    if (buffer.hasRemaining()) {
        scKey.interestOps(scKey.interestOps() | SelectionKey.OP_WRITE);
        scKey.attach(buffer);
    }
} else if (key.isWritable()) {
    // 从 Attachment 中取出上次没有写完的数据, 再进行写入
    ByteBuffer buffer = (ByteBuffer) key.attachment();
    SocketChannel socketChannel = (SocketChannel) key.channel();
    int length = socketChannel.write(buffer);
    System.out.println(length);
    // 如果全部写完了, 就清除 Attachment 和 Write 事件
    if (!buffer.hasRemaining()) {
        key.attach(null);
        key.interestOps(key.interestOps() & ~SelectionKey.OP_WRITE);
    }
}
261676
932536
703888
12409868
46619588
28609772
3152076
3152076
1045248
1045248
1045248
1022776
SelectorProvider 介绍
SelectorProvider 是 Java NIO 的一个抽象类,用于创建与底层平台相关的 Selector、ServerSocketChannel、SocketChannel、DatagramChannel 等通道及选择器的工厂。它提供了一种机制,使得 Java NIO 可以在不同的平台上拥有不同的实例,以便更好地利用平台特性。
// 获取默认的 SelectorProvider
SelectorProvider provider = SelectorProvider.provider();

// 使用 SelectorProvider 创建 Selector
Selector selector = provider.openSelector();

// 使用 SelectorProvider 创建 ServerSocketChannel
ServerSocketChannel serverSocketChannel = provider.openServerSocketChannel();
ServerSocketChannel.open() 和 Selector.open() 的底层实现都是通过调用 SelectorProvider 的方法来完成的。
public abstract class ServerSocketChannel extends AbstractSelectableChannel implements NetworkChannel {
    public static ServerSocketChannel open() throws IOException {
        return SelectorProvider.provider().openServerSocketChannel();
    }
}
public abstract class Selector implements Closeable {
    public static Selector open() throws IOException {
        return SelectorProvider.provider().openSelector();
    }
}
多线程优化
NIO 采用多路复用 IO 的方式处理事件。在单线程环境下,NIO 只能处理耗时短的任务,无法处理耗时较长的任务,也无法充分利用 CPU 的多核优势,因此需要进行优化。
可以分配一个 Boss 线程来处理客户端连接事件,再单独分配 Worker 线程处理客户端的读写事件,从而高效利用 CPU 的多核优势。
public class Server {
    public static void main(String[] args) throws IOException {
        ServerSocketChannel ssc = ServerSocketChannel.open();
        ssc.configureBlocking(false);
        ssc.bind(new InetSocketAddress(8080));

        Selector boss = Selector.open();
        SelectionKey bossKey = ssc.register(boss, SelectionKey.OP_ACCEPT, null);

        // 准备一批 Woker Thread, 这里就类似于一个线程池
        Worker[] workers = new Worker[4];
        for (int i = 0; i < workers.length; i++) {
            workers[i] = new Worker();
        }
        AtomicInteger idx = new AtomicInteger(0);

        while (true) {
            boss.select();
            Iterator<SelectionKey> iter = boss.selectedKeys().iterator();
            while (iter.hasNext()) {
                SelectionKey key = iter.next();
                iter.remove();

                // Boss Thread 就负责处理客户端的连接事件, 然后分配一个 Worker 去处理可读可写事件
                if (key.isAcceptable()) {
                    SocketChannel sc = ssc.accept();
                    sc.configureBlocking(false);
                    // 采用轮询的方式选择一个 Worker 去处理事件
                    workers[idx.getAndIncrement() % workers.length].register(sc);
                }
            }
        }
    }

    public static class Worker implements Runnable {
        private Selector selector;
        private AtomicBoolean isFirst = new AtomicBoolean(true);
        private ConcurrentLinkedQueue<Runnable> tasks = new ConcurrentLinkedQueue();

        public void register(SocketChannel sc) throws IOException {
            // 第一次进来时创建 selector
            if (isFirst.getAndSet(false)) {
                selector = Selector.open();
                new Thread(this).start();
            }

            // 通过 MQ 实现线程之间的通信, 通知 selector 去进行事件绑定
            tasks.offer(() -> {
                try {
                    sc.register(selector, SelectionKey.OP_READ);
                } catch (ClosedChannelException e) {
                    e.printStackTrace();
                }
            });
            // 子线程启动后, 没有绑定事件, 就会堵塞在 selector.select() 这一步, 需要我们手动唤醒 selector 去从 MQ 中获取消息进行事件绑定
            // 不需要担心 selector.wakeup() 在 selector.select() 之前执行导致无法唤醒的问题, wakeup() 唤醒的方式类似于 LockSupport 的 unpark(), 都是采用 permit 的方式进行唤醒
            selector.wakeup();
        }

        @Override
        public void run() {
            while (true) {
                try {
                    selector.select();

                    // 通过 MQ 获取需要注册的事件进行注册
                    Runnable task = tasks.poll();
                    if (task != null) {
                        task.run();
                    }

                    Iterator<SelectionKey> iter = selector.selectedKeys().iterator();
                    while (iter.hasNext()) {
                        SelectionKey key = iter.next();
                        iter.remove();
                        // 处理可读事件
                        if (key.isReadable()) {
                            SocketChannel channel = (SocketChannel) key.channel();
                            ByteBuffer buffer = ByteBuffer.allocate(16);
                            int len = channel.read(buffer);
                            if (len == -1) {
                                key.channel();
                            } else {
                                buffer.flip();
                                ByteBufferUtil.debugRead(buffer);
                            }
                        }
                        // 处理可写事件
                        else if (key.isWritable) {
                            // ...
                        }
                    }
                } catch (IOException e) {
                    e.printStackTrace();
                }
            }
        }
    }
}
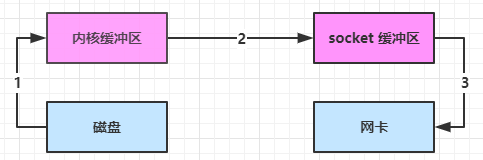
零拷贝
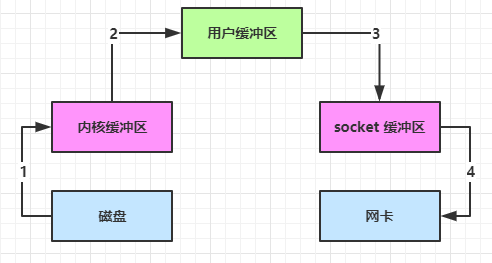
传统的 IO 操作在读取本地文件并传输给客户端时,涉及四次数据拷贝和三次状态切换,步骤非常繁琐。
- 调用
read(),从用户空间切换到内核空间,从磁盘读取数据到内核缓冲区。- Java 本身不具备 IO 读写能力,因此需要从 Java 程序的用户空间切换到内核空间,调用内核的 IO 函数实现 IO。
- 此过程可以利用 DMA (Direct Memory Access) 进行数据传输,不需要 CPU 参与,非常适合数据传输。
- 从内核缓冲区拷贝数据到用户缓冲区,从内核空间切换到用户空间。
- 此过程无法利用 DMA,需要 CPU 参与。
- 调用
write(),从用户缓冲区拷贝数据到 Socket 缓冲区。- 此过程无法利用 DMA,需要 CPU 参与。
- 从内核空间切换到用户空间,从 Socket 缓冲区拷贝数据到 NIC。
- 此过程可以利用 DMA 进行数据传输,不需要 CPU 参与,非常适合数据传输。
RandomAccessFile raf = new RandomAccessFile(new File("test.txt"), "r");
byte[] buf = new byte[16];
raf.read(buf);
socket.getOutputStream().write(buf);
通过 DirectByteBuffer 可以优化上述过程。Java NIO 的 ByteBuffer.allocateDirect() 使用的是操作系统内存,不同于 ByteBuffer.allocate() 使用的是 Java 堆内存,总共涉及三次数据拷贝和三次状态切换。
- DirectByteBuffer 将堆外内存映射到 JVM 内存中直接访问使用,这块内存不受 JVM 垃圾回收的影响,内存地址固定,有助于 IO 操作。
- DirectByteBuffer 对象只维护内存的虚引用,垃圾回收时,DirectByteBuffer 对象被回收,虚引用加入引用队列,通过专门线程访问引用队列,根据虚引用释放堆外内存。
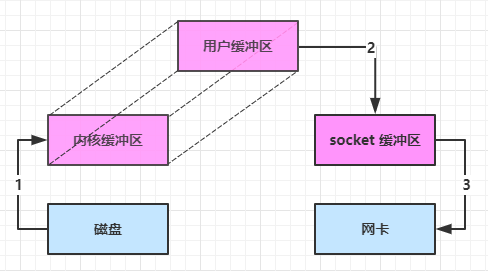
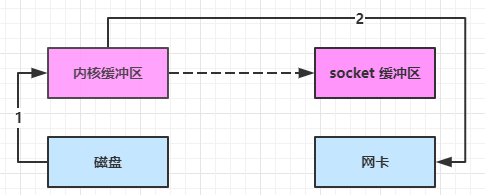
Linux v2.1 提供了 sendFile() 进一步优化,实现了 Zero Copy。Java 对 sendFile() 进行封装得到 transferTo() 和 transferFrom(),方便使用,总共涉及三次数据拷贝和一次状态切换,效率非常高。
- 调用
transferTo(),从用户空间切换到内核空间,使用 DMA 从磁盘读取数据到内核缓冲区。 - 使用 CPU 从内核缓冲区拷贝数据到 Socket 缓冲区。
- 使用 DMA 从 Socket 缓冲区拷贝数据到 NIC。
Linux v2.4 对 sendFile() 进一步优化,对于 Java 的 transferTo() 和 transferFrom(),总共涉及两次数据拷贝和一次状态切换,效率更高。
- 调用
transferTo(),从用户空间切换到内核空间,使用 DMA 从磁盘读取数据到内核缓冲区。 - 使用 DMA 从内核缓冲区拷贝一些偏移量和长度到 Socket 缓冲区,此过程几乎没有损耗。
- 使用 DMA 从内核缓冲区拷贝数据到 NIC。
Zero Copy 并不是真正无拷贝,而是不重复拷贝数据到 JVM 内存中,适合小文件传输。通过 DMA 减少 CPU 压力,降低 CPU 缓存伪共享。


 被折叠的 条评论
为什么被折叠?
被折叠的 条评论
为什么被折叠?
 到【灌水乐园】发言


