


Spring 更简单的读取和存储对象
存储Bean对象
首先要配置.xml文件
<?xml version="1.0" encoding="UTF-8"?>
<beans xmlns="http://www.springframework.org/schema/beans"
       xmlns:xsi="http://www.w3.org/2001/XMLSchema-instance"
       xmlns:content="http://www.springframework.org/schema/context"
       xsi:schemaLocation="http://www.springframework.org/schema/beans
http://www.springframework.org/schema/beans/spring-beans.xsd
http://www.springframework.org/schema/context
https://www.springframework.org/schema/context/spring-context.xsd">
    <content:component-scan base-package="com">
</content:component-scan>
</beans>
在base-packge后填写需要扫描的包
将对象存储到Spring中有两种注解类型:
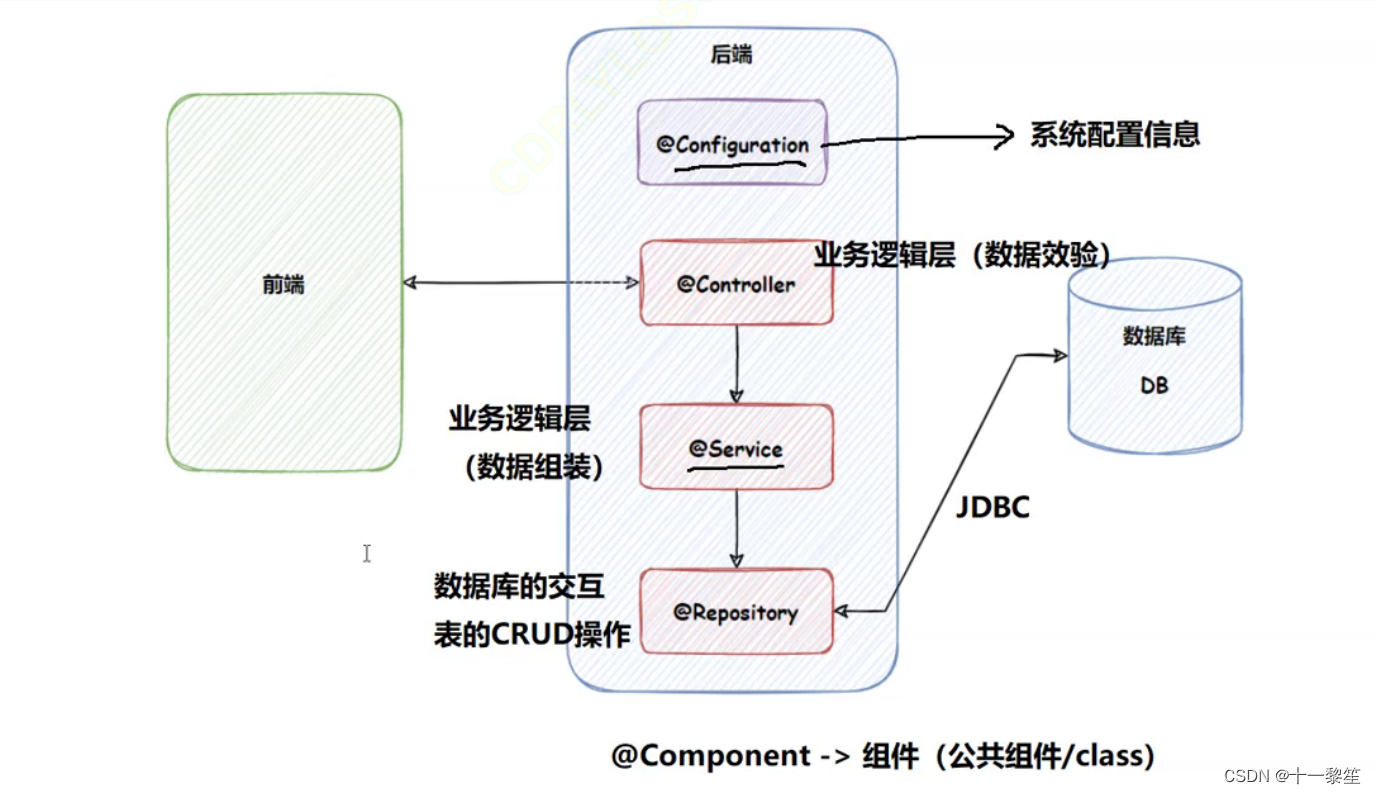
类注解:@Controller、@Service、@Repository、@Component、@Configuration。
1、类注解使用的方法都一样,用Controller举个例子。
package com;

import org.springframework.stereotype.Controller;

@Controller
public class UserController {
    public void sayHi(String name){
        System.out.println("Hi, Controller: " + name);
    }
}
要现在 .xml 中配置好扫描路径,否则无法获取。
获取UserController对象。
import org.springframework.context.ApplicationContext;
import org.springframework.context.support.ClassPathXmlApplicationContext;

public class App1 {
    public static void main(String[] args) {
        //获取对象的上下文
        ApplicationContext context = new ClassPathXmlApplicationContext("spring.xml");
        //从spring中获取存入的对象(id默认的规则是将存入的类首字母小写)
        UserController userController = context.getBean("userController",UserController.class);
        userController.sayHi("Wang");
    }
}
在getBean中要将id的首字母小写。
若名字的前两个字符为大写,则首字母不用小写。
@Controller / @Service / @Repository / @Configuration 等注解的源码中都有一个注解@Component,他们都为 @Component 的子类。
有这么多注解的原因就是为了让程序员看到类注解之后,就能直接了解当前类的⽤途。
⽅法注解:@Bean。
类注解是添加到某个类上的,⽽⽅法注解是放到某个⽅法上的
package com;

import model.User;
import org.springframework.context.annotation.Bean;
import org.springframework.stereotype.Component;

@Component
public class UserBean {

    @Bean(name = "u1") //将对象存入Spring中
    public User user1(){
        //伪代码一个对象
        User user = new User();
        user.setId(1);
        user.setName("三");
        user.setAge(11);
        return user;
    }
}
若未添加@Component 会报错。方法注解需要配合类注解才能存储到Spring中。
Bean后面可以不添加name属性,也可以添加进行重命名,name={},在{}中可以进行命名多个名字。
重命名后,就可以使用该别名进行获取对象。
import model.User;
import org.springframework.context.ApplicationContext;
import org.springframework.context.support.ClassPathXmlApplicationContext;

public class App2 {
    public static void main(String[] args) {
        //获取对象
        ApplicationContext context = new ClassPathXmlApplicationContext("spring.xml");
        //读取方法注解 @Bean 对象
        User user = context.getBean("u1", User.class);
        //使用
        System.out.println(user);
    }
}
获取Bean对象
1、属性注入
属性注⼊是使⽤ @Autowired 实现的,将 Service 类注⼊到 Controller 类中。
service代码如下:
package com.service;

import model.User;
import org.springframework.stereotype.Service;

@Service
public class UserService {
    public User findUserById(int id){
        //伪代码查询数据库,返回用户对象
        User user = new User();
        if(id == 1){
            user.setId(1);
            user.setName("四");
            user.setAge(22);
        }else {
            user.setId(2);
            user.setName("三");
            user.setAge(20);
        }
        return user;
    }
}
Control类代码
package com.controller;

import com.service.UserService;
import model.User;
import org.springframework.beans.factory.annotation.Autowired;
import org.springframework.stereotype.Controller;

@Controller
public class UserController {
    //属性注入 从Spring中获取一个对象,并注入到当前类
    @Autowired
    private UserService userService;

    public User findUserById(Integer id){
        if(null == id){
            return new User();
        }
        return userService.findUserById(id);
    }
}
获取Controllor中的方法
import com.controller.UserController;
import model.User;
import org.springframework.context.ApplicationContext;
import org.springframework.context.support.ClassPathXmlApplicationContext;

public class App {
    public static void main(String[] args) {
        ApplicationContext context = new ClassPathXmlApplicationContext("spring.xml");
        UserController controller= context.getBean("userController", UserController.class);
        User user = controller.findUserById(1);
        System.out.println(user);
    }
}
2、Setter注入
Setter 注⼊和属性的 Setter ⽅法实现比较类似,代码如下:
@Controller
public class UserController2 {
    private UserService userService;
    @Autowired
    public void setUserService(UserService userService){
        this.userService = userService;
    }
    //新建一个方法,在方法里面调用UserService的查询方法,返回用户对象
    public User findUserById(Integer id){
        return userService.findUserById(id);
    }
}
3、构造方法注入
构造⽅法注⼊是在类的构造⽅法中实现注⼊
@Controller
public class UserController3 {
    private UserService userService;

    @Autowired
    private UserController3 (UserService userService){
        this.userService = userService;
    }
    private User findById(int id){
        return userService.findUserById(id);
    }
}
若只当前类里面只有一个构造方法,那么可以省略 @Autowired
三者的优缺点:
属性注⼊的优点是简洁,使⽤⽅便;缺点是只能⽤于 IoC 容器,如果是⾮ IoC 容器不可⽤,并且只有在使⽤的时候才会出现 NPE(空指针异常)。
构造⽅法注⼊是 Spring 推荐的注⼊⽅式,它的缺点是如果有多个注⼊会显得⽐较臃肿,但出现这种情况你应该考虑⼀下当前类是否符合程序的单⼀职责的设计模了,它的优点是通⽤性,在使⽤之前⼀定能把保证注⼊的类不为空。
Setter ⽅式是 Spring 前期版本推荐的注⼊⽅式,但通⽤性不如构造⽅法,所有 Spring 现版本已经 推荐使⽤构造⽅法注⼊的⽅式来进⾏类注⼊了。
对象注入的另一种关键字 @Resource
可以使用属性注入,也可以使用setter方法进行注入,但是不能使用构造方法进行注入,
@Autowried 与 @ Resource 的区别
1、前者来自Spring框架,后者来自JDK
2、作用范围不同,使用@Autowried可以进行属性注入、setter注入、构造器注入,而@Resource不能进行构造器注入
3、·功能不同,@Autowried支持的属性较少,而Resource可以配合更多的属性进行使用,例如可以配合mane属性进行属性,完成对象的别名注入
同一类型中有多个Bean中会报错
多个Bean返回同一类型
@Component
public class UserBean {
    @Bean(name = "u1") //将对象存入Spring中
    public User user1(){
        //伪代码一个对象
        User user = new User();
        user.setId(1);
        user.setName("三");
        user.setAge(11);
        return user;
    }

    @Bean(name = "u2") //将对象存入Spring中
    public User user2(){
        //伪代码一个对象
        User user = new User();
        user.setId(2);
        user.setName("四");
        user.setAge(22);
        return user;
    }
}
当我们去获取时会报错
@Controller
public class UserController4 {
    @Autowired
    private User user;

    public User getUser(){
        return user;
    }
}
解决办法有两种
1、使用@Resource(name=“指定的名称”)。
2、使用注入注解(@Autowired)配合@Qualifier(value=“指定的名称”),value可以省略。


 219
219


 被折叠的 条评论
为什么被折叠?
被折叠的 条评论
为什么被折叠?
 到【灌水乐园】发言


