


【多模态项目实战】-模态表示:基于对应表示的跨模态检索
文章目录
参考:飞桨AI Studio星河社区-【多模态】实战案例:基于对应表示的跨模态检索
1.任务介绍
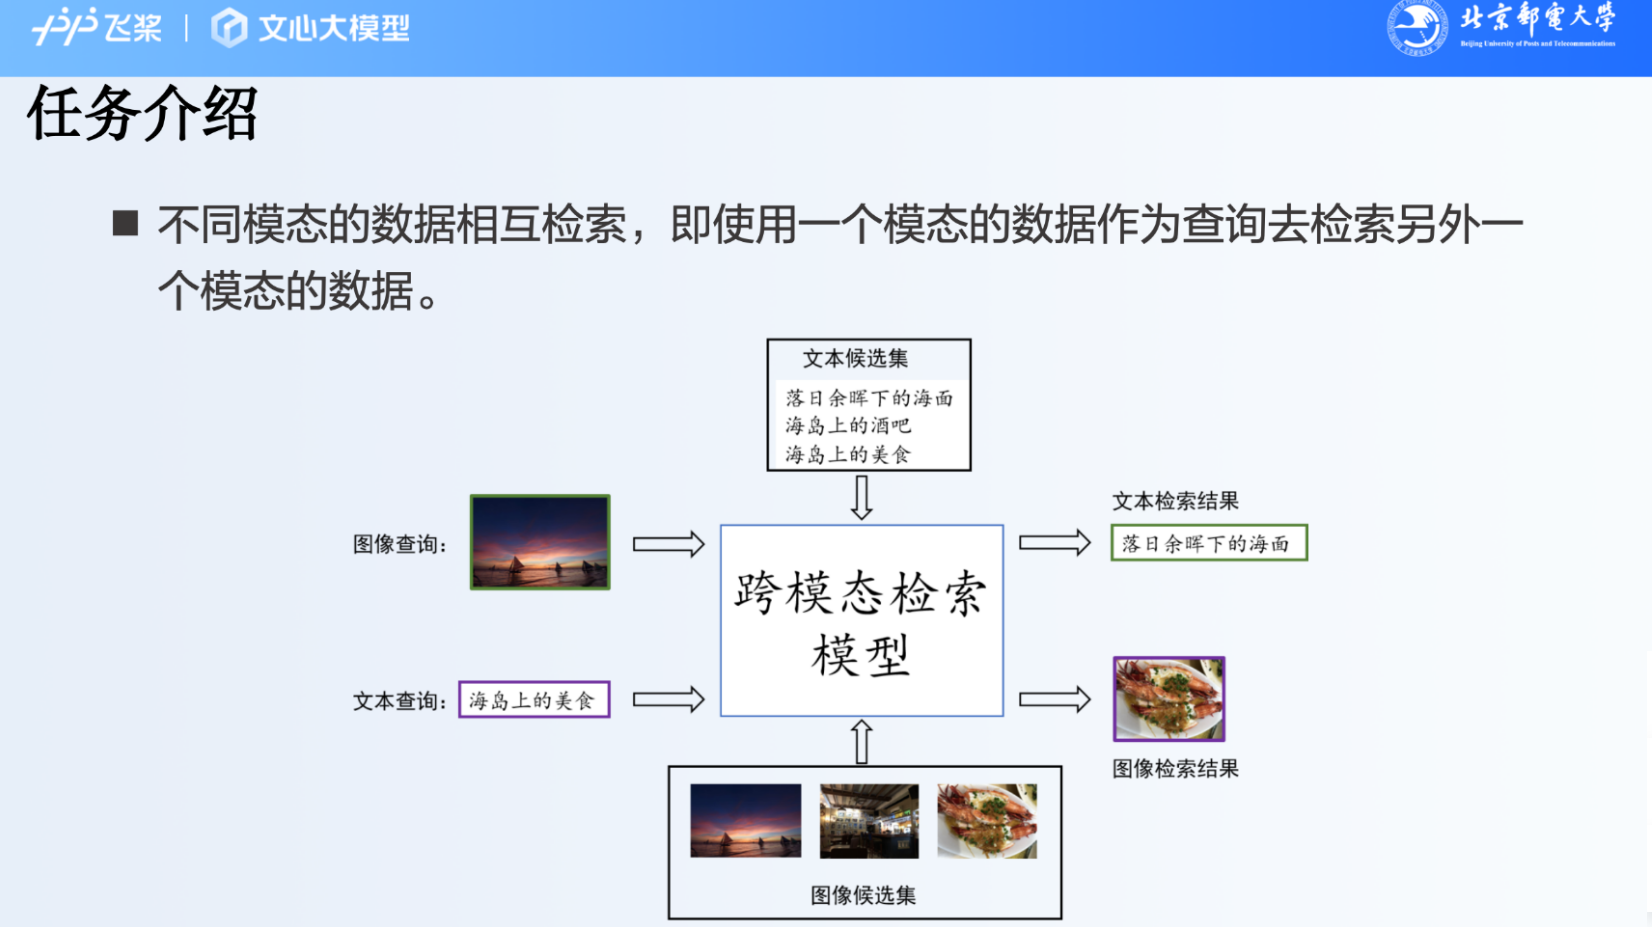
任务说明:基于一个模态的数据,去另一个模态的候选集中进行检索,得到对应的数据
2.跨模态检索技术简介
跨模态检索的关键就是建立不同模态数据之间的关联,更直接地,模型需要能够输出多个模态数据的匹配分数。
如图所示,现有的方法可以被分为两类:
- 对应表示方法:学习图文多模态对应表示,然后直接利用图像和文本的对应表示的距离计算匹配分数;
- 共享表示方法:学习图文多模态共享表示,然后在共享表示层上增加一个或多个网络层直接输出图像和文本的匹配分数。
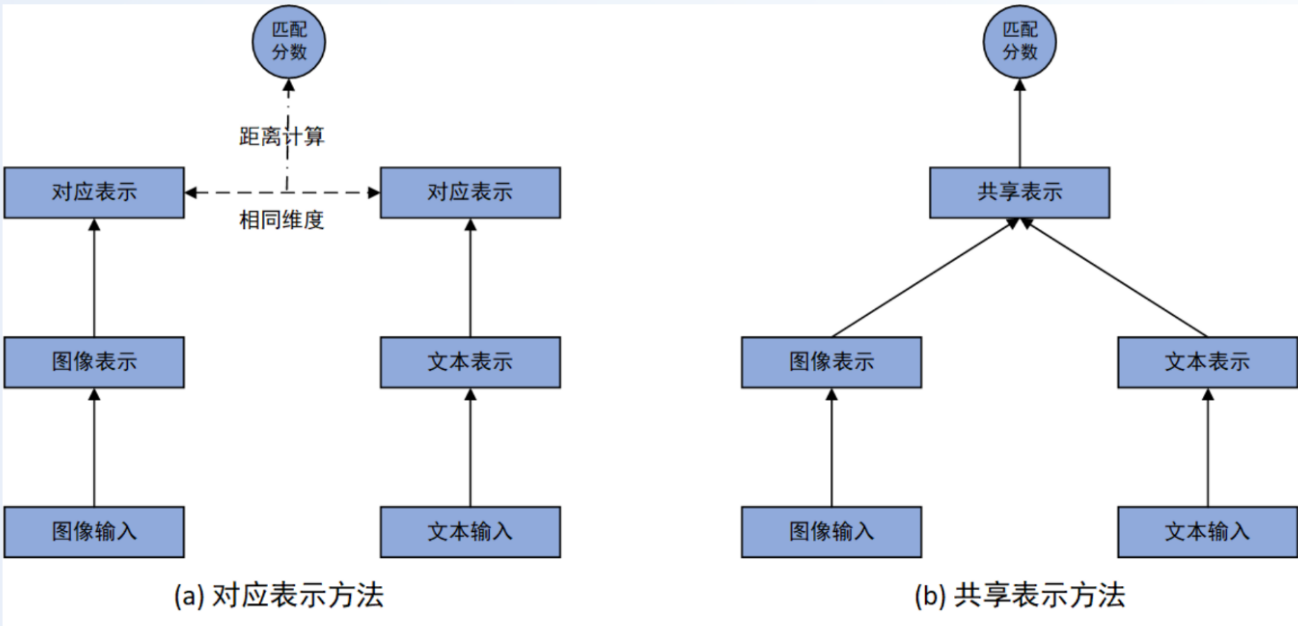
一般而言,和对应表示方法相比,**共享表示方法因为充分融合了图文信息,可以获得更好的性能。**一个直观的理解是给定两个模态的数据,对应表示方法限定了两个模态的关联必须是在没有交互的前提下建立,而共享表示方法则没有该限制。因此,共享表示方法拥有更大的自由度来拟合数据的分布。
然而,共享表示方法的检索非常耗时。例如,在执行以文检图任务中,需要将文本查询和候选集中的每一张图片都成对的输入到模型中,才能得到文本查询与候选集中所有图片的匹配分数。 而对应表示方法只需要提前离线计算好候选集中所有图片的表示,然后在检索时,只需要实时计算文本查询的表示,再利用最近邻检索算法搜索图像最近邻即可。 因此,对应表示方法检索速度快,在实际的跨模态检索中使用更为广泛。
接下来,我们将具体介绍使用对应表示方法的模型VSE++的实战案例,其官方代码见链接。
3.模型训练流程
模型训练的一般流程:
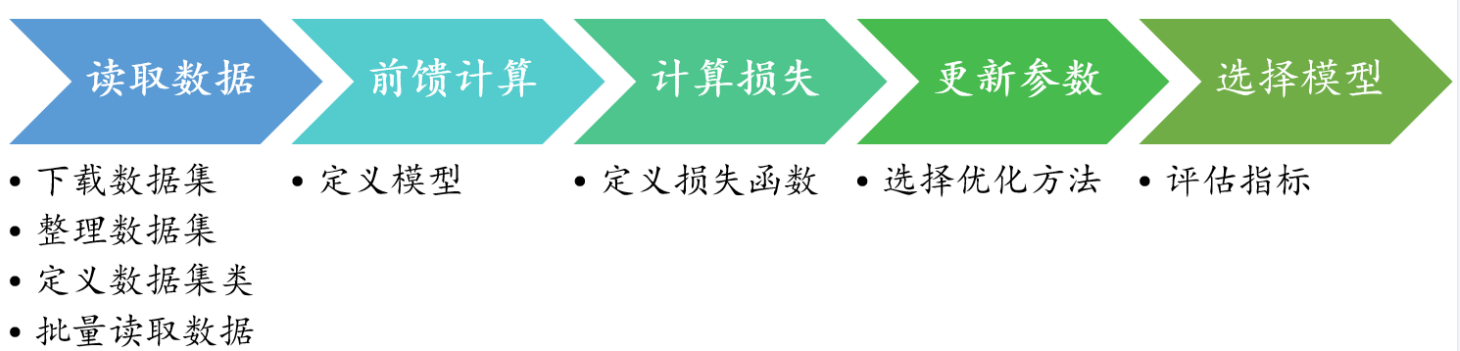
从现代的深度学习框架基础下,模型训练的一般流程,包括读取数据、前馈计算、计算损失、更新参数、选择模型五个步骤。每个步骤需要实现相应的模块。
- 在读取数据阶段,我们首先需要下载数据集,然后对整理数据集的格式,以方便接下来构造数据集类,最后在数据集类的基础上构建能够按批次产生训练、验证和测试数据的对象。
- 在前馈计算阶段,我们需要实现具体的模型,使得模型能够根据输入产生相应的输出。
- 在计算损失阶段,我们需要将模型输出和预期输出进行对比,实现损失函数。
- 在更新参数阶段,我们需要给出具体的参数更新方法,即优化方法;由于现代深度学习框架能够自动计算参数梯度,并实现了绝大多数优化方法,我们通常只需要从中进行选择即可。
- 在选择模型阶段,我们需要实现具体的评估指标,选出在验证集上表现最优的模型参数。
下面,我们将介绍VSE++模型的这些阶段的具体实现,并在最后将这些阶段串联起来,最终实现模型的训练。
3.1读取数据
1)下载数据集🚀
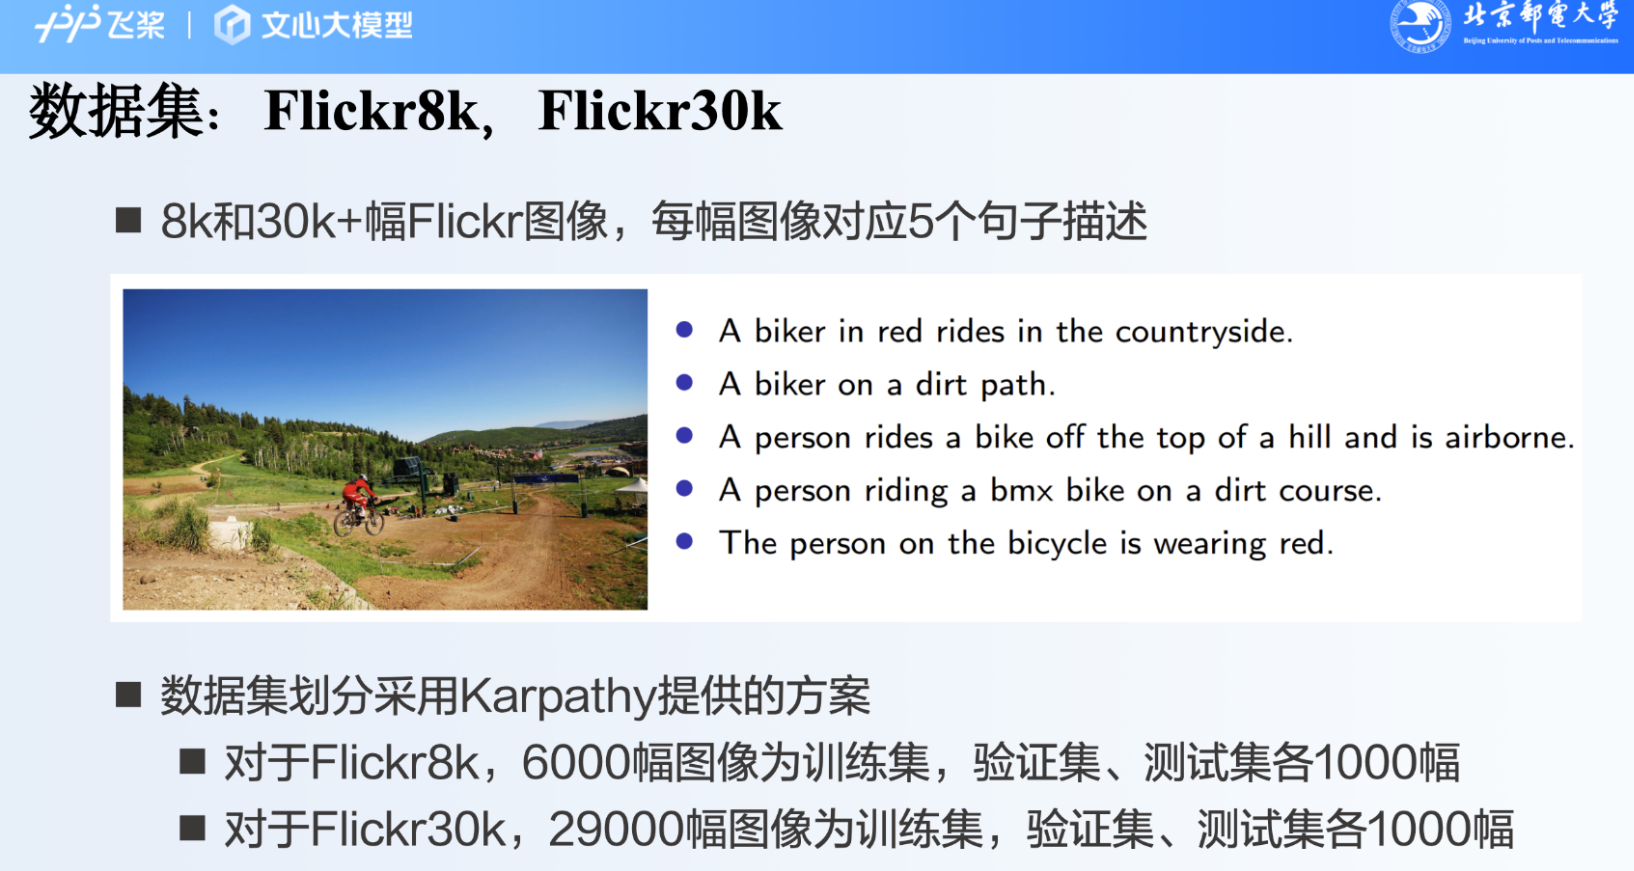
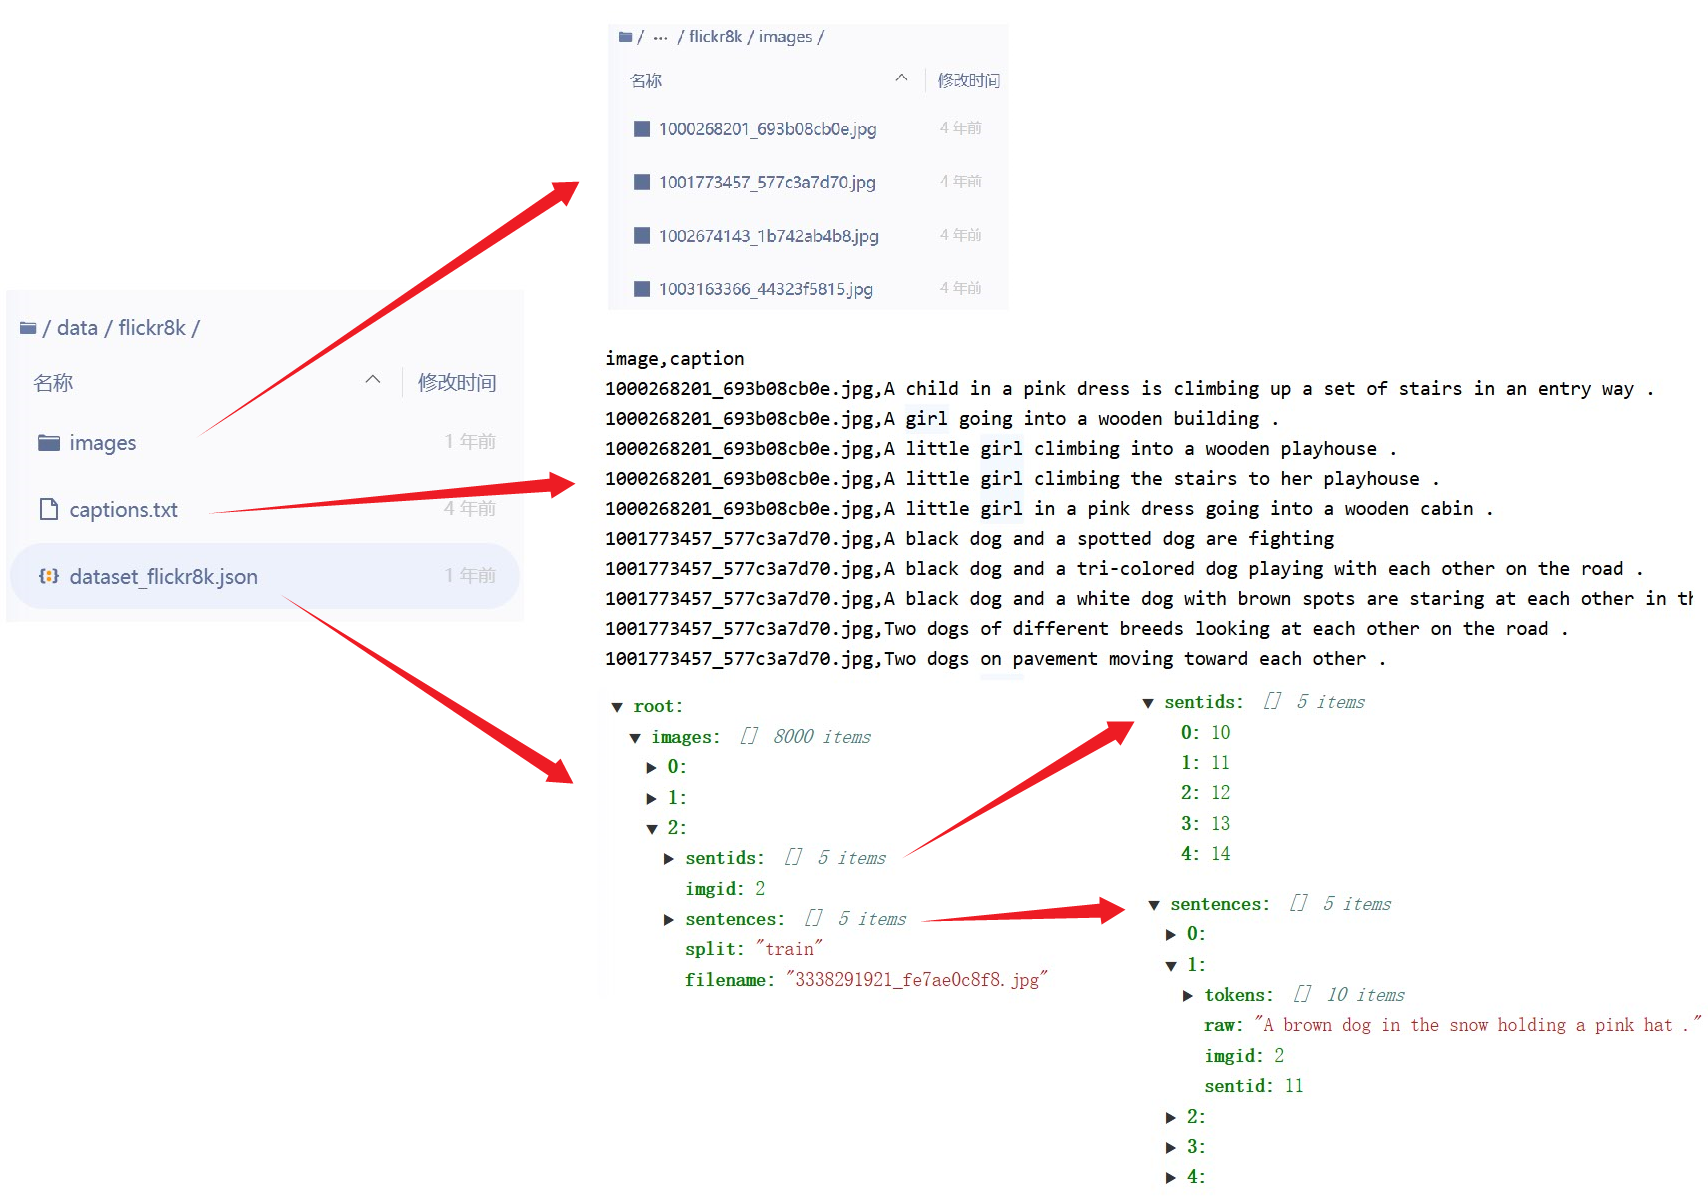
我们使用的数据集为flickr8k(下载地址),下载解压后,我们将其图片放在指定目录(本节的代码中将该目录设置为data/flickr8k)下的images文件夹里。该数据集包括8000张图片,每张图片对应5个句子描述。数据集划分采用Karpathy提供的方法(下载地址),下载解压后,将其中的dataset_flickr8k.json文件拷贝到指定目录下。该划分方法将数据集分成3个子集:6,000张图片和其对应句子描述组成训练集,1,000张图片和描述为验证集,剩余的1,000张图片和描述为测试集。
本项目中,我们已经提供了下载好的数据集,直接运行下面的命令即可。
# 解压数据
!unzip -q ./data/data243982/flickr8k.zip -d ./data/
2)整理数据集
数据集下载完成后,我们需要对其进行处理,以适合之后构造的Paddle数据集类读取。
- 对于文本描述,我们首先构建词典,然后根据词典将文本描述转化为向量。
- 对于图像,我们这里仅记录文件路径。如果机器的内存和硬盘空间就比较大,这里也可以将图片读取并处理成三维数组,这样在模型训练和测试的阶段,就不需要再直接读取图片。
下面是整理数据集的函数的代码。
%matplotlib inline
import os
from os.path import join as pjoin
import json
import random
from collections import defaultdict, Counter
from PIL import Image
from matplotlib import pyplot as plt

def create_dataset(data_dir='./data',
                   dataset='flickr8k',
                   captions_per_image=5,
                   min_word_count=5,
                   max_len=30):
    """
    参数:
        data_dir: 数据存储目录
        dataset:数据集名称
        captions_per_image:每张图片对应的文本描述数
        min_word_count:仅考虑在数据集中(除测试集外)出现5次的词
        max_len:文本描述包含的最大单词数,如果文本描述超过该值,则截断
    输出:
        一个词典文件: vocab.json
        三个数据集文件: train_data.json、 val_data.json、 test_data.json
    """

    karpathy_json_path = pjoin(data_dir, '%s/dataset_flickr8k.json' % dataset)
    image_folder=pjoin(data_dir, '%s/images' % dataset)
    output_folder=pjoin(data_dir, '%s' % dataset)

    with open(karpathy_json_path, 'r') as j:
        data = json.load(j)

    image_paths = defaultdict(list)
    image_captions = defaultdict(list)
    vocab = Counter()

    for img in data['images']:
        split = img['split']
        captions = []
        for c in img['sentences']:
            # 更新词频,测试集在训练过程中是未见数据集,不能统计
            if split != 'test':
                vocab.update(c['tokens'])
            # 不统计超过最大长度限制的词
            if len(c['tokens']) <= max_len:
                captions.append(c['tokens'])
        if len(captions) == 0:
            continue

        path = os.path.join(image_folder, img['filename'])

        image_paths[split].append(path)
        image_captions[split].append(captions)

    # 创建词典,增加占位标识符<pad>、未登录词标识符<unk>、句子首尾标识符<start>和<end>
    words = [w for w in vocab.keys() if vocab[w] > min_word_count]
    vocab = {k: v + 1 for v, k in enumerate(words)}
    vocab['<pad>'] = 0
    vocab['<unk>'] = len(vocab)
    vocab['<start>'] = len(vocab)
    vocab['<end>'] = len(vocab)

    # 存储词典
    with open(os.path.join(output_folder, 'vocab.json'), 'w') as fw:
        json.dump(vocab, fw)

    # 整理数据集
    for split in image_paths:
        imgpaths = image_paths[split]
        imcaps = image_captions[split]

        enc_captions = []

        for i, path in enumerate(imgpaths):
            # 合法性检查,检查图像是否可以被解析
            img = Image.open(path)
            # 如果该图片对应的描述数量不足,则补足
            if len(imcaps[i]) < captions_per_image:
                captions = imcaps[i] + \
                    [random.choice(imcaps[i]) for _ in range(captions_per_image - len(imcaps[i]))]
            # 如果该图片对应的描述数量超了,则随机采样
            else:
                captions = random.sample(imcaps[i], k=captions_per_image)
            assert len(captions) == captions_per_image

            for j, c in enumerate(captions):
                # 对文本描述进行编码
                enc_c = [vocab['<start>']] + [vocab.get(word, vocab['<unk>']) for word in c] + [vocab['<end>']]
                enc_captions.append(enc_c)
        # 合法性检查
        assert len(imgpaths) * captions_per_image == len(enc_captions)

        # 存储数据
        data = {'IMAGES': imgpaths,
                'CAPTIONS': enc_captions}
        with open(pjoin(output_folder, split + '_data.json'), 'w') as fw:
            json.dump(data, fw)

data_dir = './data'
if not os.path.exists(pjoin(data_dir, 'flickr8k', 'vocab.json')):
    create_dataset(data_dir)
这段代码的作用就是构建词典vocab.json和创建数据集文件 train_data.json、 val_data.json、 test_data.json,词典里面是对文本的编码,数据集文件里面有IMAGES和CAPTIONS,IMAGES存放的全是图片的路径,而CAPTIONS字段下存放的是与每张图片对应的文本描述的编码,一张图片有5段描述,所以0-5都是第一张图片的文本描述编码,6-10是第二张图片的文本描述编码,以此类推。
查看:
# 读取词典和验证集
with open(pjoin(data_dir, 'flickr8k/vocab.json'), 'r') as f:
    vocab = json.load(f)
vocab_idx2word = {idx:word for word,idx in vocab.items()}
with open(pjoin(data_dir, 'flickr8k/val_data.json'), 'r') as f:
    data = json.load(f)

# 展示第12张图片,其对应的文本描述序号是60到64
content_img = Image.open(data['IMAGES'][12])
plt.imshow(content_img)
for i in range(5):
    print(' '.join([vocab_idx2word[word_idx] for word_idx in data['CAPTIONS'][12*5+i]]))
输出>:
a dog on a leash shakes while in some water
a dog standing in shallow water on a red leash
a dog splashes in the murky water
a black dog is shaking water off his body
black dog in the water shaking the water off of him

3)定义数据集类
在准备好的数据集的基础上,我们需要进一步定义Paddle Dataset类,以使用Paddle DataLoader类按批次产生数据。Paddle中仅预先定义了图像、文本和语音的单模态任务中常见的数据集类。因此,我们需要定义自己的数据集类。
在Paddle中定义数据集类非常简单,仅需要继承paddle.io.Dataset类,并实现__getitem__和__len__两个函数即可。
from argparse import Namespace
import numpy as np

import paddle
from paddle.io import Dataset, BatchSampler, DataLoader
from paddle.vision import transforms

class ImageTextDataset(Dataset):
    """
    Paddle数据类,用于Paddle DataLoader来按批次产生数据
    """

    def __init__(self, dataset_path, vocab_path, split, captions_per_image=5, max_len=30, transform=None):
        """
        参数:
            dataset_path:json格式数据文件路径
            vocab_path:json格式词典文件路径
            split:train、val、test
            captions_per_image:每张图片对应的文本描述数
            max_len:文本描述包含的最大单词数
            transform: 图像预处理方法
        """
        self.split = split
        assert self.split in {'train', 'val', 'test'}
        self.cpi = captions_per_image
        self.max_len = max_len

        # 载入数据集
        with open(dataset_path, 'r') as f:
            self.data = json.load(f)
        # 载入词典
        with open(vocab_path, 'r') as f:
            self.vocab = json.load(f)

        # PyTorch图像预处理流程
        self.transform = transform

        # Total number of datapoints
        self.dataset_size = len(self.data['CAPTIONS'])

    def __getitem__(self, i):
        # 第i个文本描述对应第(i // captions_per_image)张图片
        img = Image.open(self.data['IMAGES'][i // self.cpi]).convert('RGB')
        if self.transform is not None:
            img = self.transform(img)

        caplen = len(self.data['CAPTIONS'][i])
        caption = paddle.to_tensor(self.data['CAPTIONS'][i]+ [self.vocab['<pad>']] * (self.max_len + 2 - caplen), dtype='int64')

        return img, caption, caplen


    def __len__(self):
        return self.dataset_size
4)批量读取数据
利用刚才构造的数据集类,借助DataLoader类构建能够按批次产生训练、验证和测试数据的对象。
def mktrainval(data_dir, vocab_path, batch_size, workers=0):
    train_tx = transforms.Compose([
        transforms.Resize(256),
        transforms.RandomCrop(224),
        transforms.ToTensor(),
        transforms.Normalize([0.485, 0.456, 0.406], [0.229, 0.224, 0.225])
    ])
    val_tx = transforms.Compose([
        transforms.Resize(256),
        transforms.CenterCrop(224),
        transforms.ToTensor(),
        transforms.Normalize([0.485, 0.456, 0.406], [0.229, 0.224, 0.225])
    ])

    train_set = ImageTextDataset(os.path.join(data_dir, 'train_data.json'),
                                 vocab_path, 'train',  transform=train_tx)
    valid_set = ImageTextDataset(os.path.join(data_dir, 'val_data.json'),
                                 vocab_path, 'val', transform=val_tx)
    test_set = ImageTextDataset(os.path.join(data_dir, 'test_data.json'),
                                 vocab_path, 'test', transform=val_tx)

    train_loader = DataLoader(
        train_set, batch_size=batch_size, shuffle=True, num_workers=workers)

    valid_loader = DataLoader(
        valid_set, batch_size=batch_size, shuffle=False, num_workers=workers, drop_last=False)

    test_loader = DataLoader(
        test_set, batch_size=batch_size, shuffle=False, num_workers=workers, drop_last=False)

    return train_loader, valid_loader, test_loader
3.2定义模型
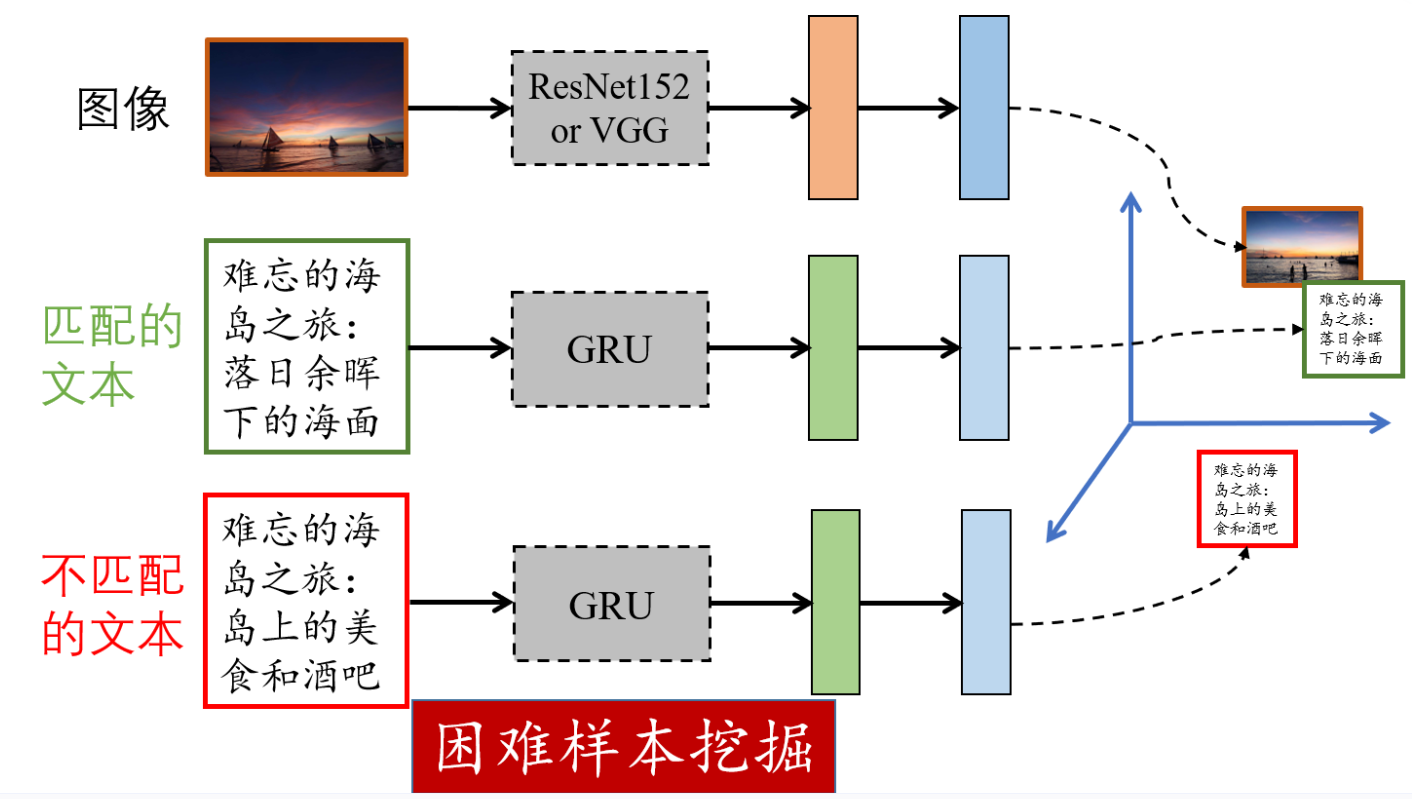
如图所示,VSE++模型是由图像表示提取器和文本表示提取构成,二者将图像和文本映射到对应表示空间。其中,图像表示提取器为在ImageNet数据集上预训练的VGG19或ResNet-152,VGG19和ResNet-152分别输出4096维和2048维的图像特征;文本表示提取器为GRU模型。
1)图像表示提取器
这里使用在ImageNet数据集上预训练过的两个分类模型ResNet-152和VGG19作为图像表示提取器,二者都需要更改其最后一个全连接层(分类层),以输出符合对应表示空间维度的图像表示。需要注意的是,这里对图像表示进行了长度归一化。
from paddle.vision import models
import paddle.nn as nn

class ImageRepExtractor(nn.Layer):
    def __init__(self, embed_size, pretrained_model='resnet152', finetuned=True):
        """
        参数:
            embed_size:对应表示维度
            pretrained_model:图像表示提取器,resnet152或vgg19
            finetuned:是否微调图像表示提取器的参数
        """
        super(ImageRepExtractor, self).__init__()
        if pretrained_model == 'resnet152':
            net = models.resnet152(pretrained=True)
            net = nn.Sequential(*list(net.children())[:-1])
            for param in net.parameters():
                param.requires_grad = finetuned
            fc = nn.Linear(2048, embed_size)
            nn.initializer.XavierNormal(fc.weight)
        elif pretrained_model == 'vgg19':
            net = models.vgg19(pretrained=True)
            net.classifier = nn.Sequential(*list(net.classifier.children())[:-1])
            for param in net.parameters():
                param.requires_grad = finetuned
            # 更改最后一层(fc层)
            fc = nn.Linear(4096, embed_size)
            nn.initializer.XavierNormal(fc.weight)
        else:
            raise ValueError("Unknown image model " + pretrained_model)
        self.net = net
        self.fc = fc

    def forward(self, x):
        out = self.net(x).squeeze()
        out = self.fc(out)
        out = nn.functional.normalize(out)
        return out
2)文本表示提取器
这里使用GRU模型作为文本表示提取器,它的输入层为词嵌入形式,文本表示为最后一个词对应的隐藏层输出。文本表示的维度也和对应表示空间的维度相同且也进行了长度归一化。
class TextRepExtractor(nn.Layer):
    def __init__(self, vocab_size, word_dim, embed_size, num_layers):
        """
        参数:
            vocab_size:词典大小
            word_dim:词嵌入维度
            embed_size:对应表示维度,也是RNN隐藏层维度
            num_layers:RNN隐藏层数
        """
        super(TextRepExtractor, self).__init__()
        self.embed_size = embed_size
        self.embed = nn.Embedding(vocab_size, word_dim, weight_attr=nn.initializer.Uniform(low=-0.1, high=0.1))
        # RNN默认已初始化
        self.rnn = nn.GRU(word_dim, embed_size, num_layers)

    def forward(self, x, lengths):
        x = self.embed(x)
        # 执行GRU的前馈过程会返回两个变量,第二个变量hidden为最后一个词(由length决定)对应的所有隐藏层输出
        output, hidden = self.rnn(x, None, lengths)
        # 最后一个词的最后一个隐藏层输出为hidden[-1]
        out = nn.functional.normalize(hidden[-1])
        return out
3)VSE++模型
有了图像表示提取器和文本表示提取器,我们就很容易构建VSE++模型了。仅需要利用图像表示提取器和文本表示提取器对成对的图像和文本数据输出表示即可。
class VSEPP(nn.Layer):
    def __init__(self, vocab_size, word_dim, embed_size, num_layers, image_model, finetuned=True):
        """
        参数:
            vocab_size: 词表大小
            word_dim: 词嵌入维度
            embed_size: 对应表示维度,也是RNN隐藏层维度
            num_layers: RNN隐藏层数
            image_model: 图像表示提取器,resnet152或vgg19
            finetuned: 是否微调图像表示提取器的参数
        """
        super(VSEPP, self).__init__()
        self.image_extractor = ImageRepExtractor(embed_size, image_model, finetuned)
        self.text_extractor = TextRepExtractor(vocab_size, word_dim, embed_size, num_layers)

    def forward(self, images, captions, cap_lens):
        image_code = self.image_extractor(images)
        text_code = self.text_extractor(captions, cap_lens)
        return image_code, text_code
3.3定义损失函数🚀
对于对应表示法,按照优化目标的不同,可分为
- 基于重构损失的方法
- 基于排序损失的方法
- 基于对抗损失的方法
对于基于排序损失的方法,有两种,一种是Triplet排序损失,一种是N-pair损失。以图检文为例,Triplet排序损失将计算图像与匹配文本与不匹配文本之间的值,要使得图像与匹配文本之间的值大于图像不匹配文本之间的值;而N-pair损失计算的是图像与所有文本之间的值。
VSE++模型采用的是triplet损失函数,CLIP模型采用的是N-pair损失函数。
VSE++模型采用了困难样本挖掘的triplet损失函数,一般而言,挖掘困难样本的方式分为离线挖掘和在线挖掘两种。其中离线挖掘是在训练开始或每一轮训练完成之后,挖掘困难样本;在线挖掘是在每一个批数据里,挖掘困难样本。这里的实现方式为在线挖掘。本部分代码的实现参照了VSE++模型的作者发布的源码。
class TripletNetLoss(nn.Layer):
    def __init__(self, margin=0.2, hard_negative=False):
        super(TripletNetLoss, self).__init__()
        self.margin = margin
        self.hard_negative = hard_negative

    def forward(self, ie, te):
        """
        参数:
            ie:图像表示
            te:文本表示
        """
        scores  = ie.mm(te.t())
        diagonal = paddle.diag(scores).reshape((ie.shape[0], 1))

        d1 = diagonal.expand_as(scores)
        d2 = diagonal.t().expand_as(scores)

        # 图像为锚,不匹配的图文对相似度scores需要比匹配的图文对相似度d1小于一定的间隔值,才不产生损失
        cost_i = (self.margin + scores - d1).clip(min=0)
        # 文本为锚
        cost_t = (self.margin + scores - d2).clip(min=0)

        # 忽略损失矩阵中对角线上的值
        mask = paddle.eye(scores.shape[0]) < 0.5
        cost_i = cost_i * mask
        cost_t = cost_t * mask

        # 寻找困难样本
        if self.hard_negative:
            cost_i = cost_i.max(1)
            cost_t = cost_t.max(0)
        return cost_i.sum() + cost_t.sum()
3.4选择优化方法
我们选用Adam优化算法来更新模型参数,学习速率采用分段衰减方法。
def get_optimizer(model, config):
    """每隔lr_update个轮次,学习速率减小至当前二分之一"""
    scheduler = paddle.optimizer.lr.StepDecay(learning_rate=config.learning_rate,
                                              step_size=config.lr_update * config.batch_size,
                                              gamma=0.5)
    return paddle.optimizer.Adam(parameters=model.parameters(),
                                 learning_rate=scheduler)
3.5评估指标🚀
-
recall@k
该指标是正确答案出现在前K个返回结果的样例占总样例的比例。
这里有4个实例,
假如k=1,这4个实例中有1个出现在前5个中,recall@1=0.25
假如k=5,这4个实例中有2个出现在前5个中,recall@5=0.4
假如k=10,这4个实例中有3个出现在前5个中,recall@10=0.75
-
Median r
Median r指的是使得recall@K>=50%的最小K的取值
还是这4个实例,k=1,recall@1=25%<50%;k=2,recall@2=25%;k=4,recall@4=50%,所以使用Mdian r指标的最小k的取值为4
recall@k衡量有没有出现,Median r衡量的是出现的质量,越早出现越好

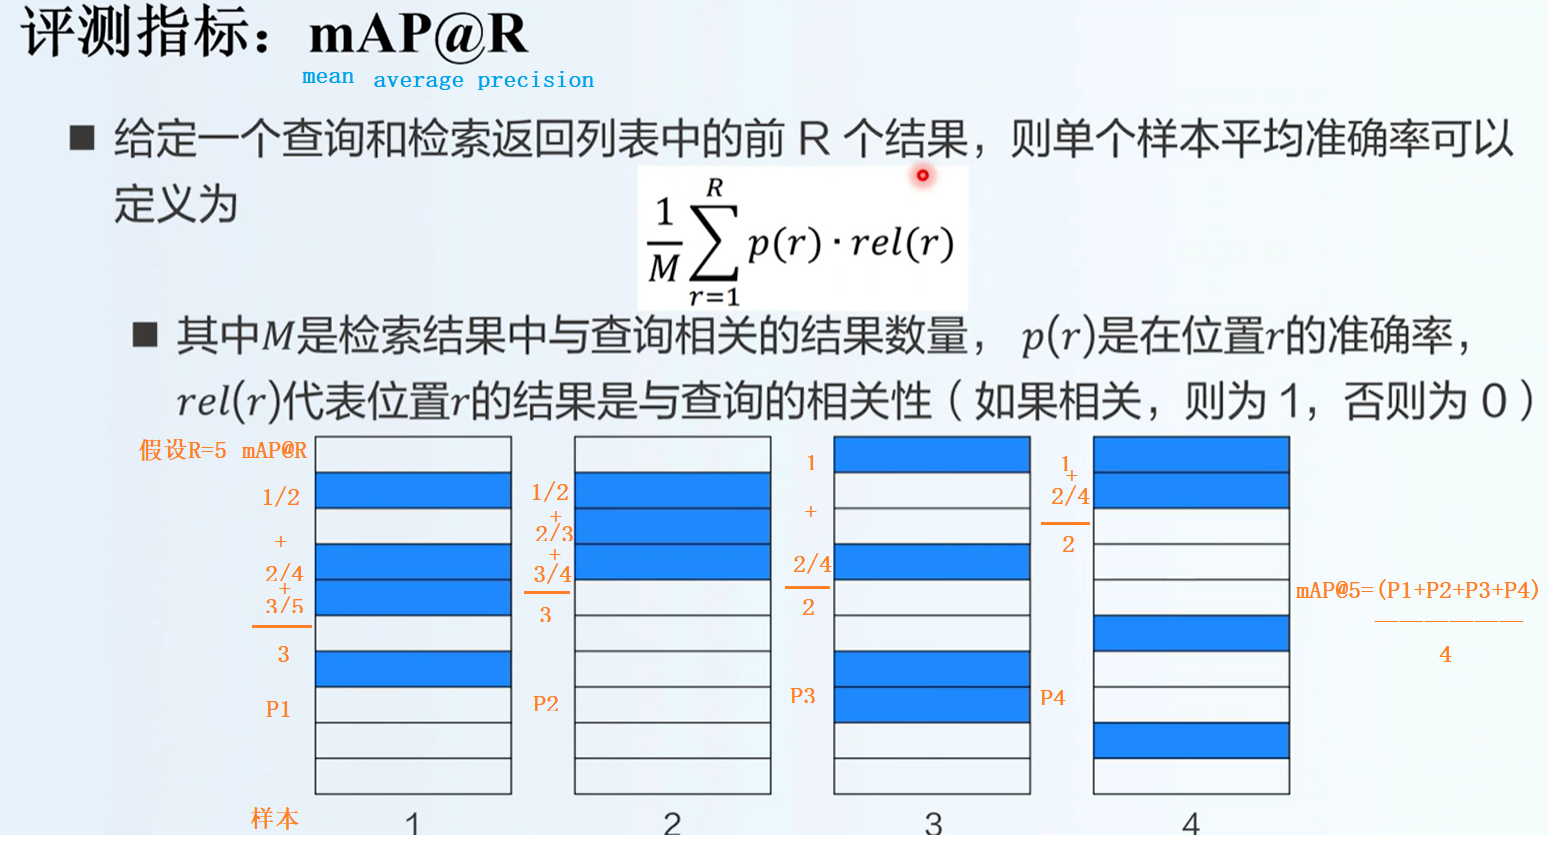
- mAP@R
这里实现了跨模态检索中最常用的评估指标Recall@K。该指标是正确答案出现在前K个返回结果的样例占总样例的比例,比如在以图检文任务中,对于单一图片查询,在文本候选集中搜索它的K个最近邻的文本,如果返回的前K个文本中有至少一个文本和查询图片匹配,则该次查询的分数记为1,否则记为0。Recall@K是测试集中所有查询图片分数的平均。注意这里和推荐系统里Recall@K是完全不一样的,推荐系统里的Recall@K是K个推荐条目中的相关条目数量在所有相关条目数量的占比,衡量的是系统的查全率。
我们首先利用VSE++模型计算图像和文本编码,然后直接计算所有图像编码和所有文本编码之间的点积得到所有图像文本对之间的相似度得分(由于相邻的若干张图片是一张的,所以我们每个固定数量取图片即可),最后利用得分排序计算Recall@K。需要注意的是,对于图像查询,即在以图检文任务中,由于一张图片对应多个文本,我们需要找到和图像对应的排名最靠前的文本的位置。
🤔为什么可以用点积来计算图文的相似度分数?
点积公式:对于两个向量$ \mathbf{a} 和 \mathbf{b} $,点积定义为:
a
⋅
b
=
∥
a
∥
∥
b
∥
cos
(
θ
)
\mathbf{a} \cdot \mathbf{b} = \|\mathbf{a}\| \|\mathbf{b}\| \cos(\theta)
a⋅b=∥a∥∥b∥cos(θ)
其中$ |\mathbf{a}| 和 |\mathbf{b}| 是向量的模(长度), 是向量的模(长度), 是向量的模(长度),\theta$是它们之间的夹角。
相似度与夹角:当两个向量的夹角较小时(即它们的方向相似),点积的值较大;当夹角较大时,点积的值较小。因此,点积可以有效地反映两个向量之间的相似度。
def evaluate(data_loader, model, batch_size, captions_per_image):
    # 模型切换进入评估模式
    model.eval()
    image_codes = None
    text_codes = None
    # device = next(model.parameters()).device
    for i, (imgs, caps, caplens) in enumerate(data_loader):
        with paddle.no_grad():
            image_code, text_code = model(imgs, caps, caplens)
            if image_codes is None:
                image_codes = np.zeros((len(data_loader.dataset), image_code.shape[1]))
                text_codes = np.zeros((len(data_loader.dataset), text_code.shape[1]))
            # 将图文对应表示存到numpy数组中,之后在cpu上计算recall
            image_codes[i*batch_size:i*batch_size+image_code.shape[0]] = image_code
            text_codes[i*batch_size:i*batch_size+image_code.shape[0]] = text_code
    # 模型切换回训练模式
    model.train()
    return calc_recall(image_codes, text_codes, captions_per_image)

def calc_recall(image_codes, text_codes, captions_per_image):
    #之所以可以每隔固定数量取图片,是因为前面对图文数据对输入顺序进行了还原
    # 计算图像和文本之间的相似度分数,使用点积计算(np.dot)
    scores = np.dot(image_codes[::captions_per_image], text_codes.T)
    # 以图检文:按行从大到小排序(对相似度分数进行排序,获取每张图像对应的文本的排名)
    sorted_scores_indices = (-scores).argsort(axis=1)
    (n_image, n_text) = scores.shape
    ranks_i2t = np.zeros(n_image)
    for i in range(n_image):
        # 一张图片对应cpi条文本,找到排名最靠前的文本位置
        min_rank = 1e10
        for j in range(i*captions_per_image,(i+1)*captions_per_image):
            rank = list(sorted_scores_indices[i,:]).index(j)
            if min_rank > rank:
                min_rank = rank
        ranks_i2t[i] = min_rank
    # 以文检图:按列从大到小排序
    sorted_scores_indices = (-scores).argsort(axis=0)
    ranks_t2i = np.zeros(n_text)
    for i in range(n_text):
        rank = list(sorted_scores_indices[:,i]).index(i//captions_per_image)
        ranks_t2i[i] = rank
    # 最靠前的位置小于k,即为recall@k,这里计算了k取1、5、10时的图文互检的recall
    r1_i2t = 100.0 * len(np.where(ranks_i2t<1)[0]) / n_image
    r1_t2i = 100.0 * len(np.where(ranks_t2i<1)[0]) / n_text
    r5_i2t = 100.0 * len(np.where(ranks_i2t<5)[0]) / n_image
    r5_t2i = 100.0 * len(np.where(ranks_t2i<5)[0]) / n_text
    r10_i2t = 100.0 * len(np.where(ranks_i2t<10)[0]) / n_image
    r10_t2i = 100.0 * len(np.where(ranks_t2i<10)[0]) / n_text
    return r1_i2t, r1_t2i, r5_i2t, r5_t2i, r10_i2t, r10_t2i
3.6训练模型
训练模型过程可以分为读取数据、前馈计算、计算损失、更新参数、选择模型五个步骤。
模型训练的具体方案为一共训练45论,初始学习速率为0.00002,每15轮将学习速率变为原数值的1/2。
# 设置模型超参数和辅助变量
config = Namespace(
    captions_per_image = 5,
    batch_size = 16,
    word_dim = 300,
    embed_size = 1024,
    num_layers = 1,
    image_model = 'resnet152', # or vgg19
    finetuned = True,
    learning_rate = 0.00002,
    lr_update = 15,
    min_learning_rate = 0.000002,
    margin = 0.2,
    hard_negative = True,
    num_epochs = 5,
    grad_clip = 2,
    evaluate_step = 60, # 每隔多少步在验证集上测试一次
    checkpoint = None, # 如果不为None,则利用该变量路径的模型继续训练
    best_checkpoint = './model/vsepp/best_flickr8k.ckpt', # 验证集上表现最优的模型的路径
    last_checkpoint = './model/vsepp/last_flickr8k.ckpt' # 训练完成时的模型的路径
)

# 设置GPU信息
# os.environ['CUDA_VISIBLE_DEVICES'] = '3'
# device = paddle.device("cuda" if paddle.cuda.is_available() else "cpu")
# device='cpu'

# 数据
vocab_path = pjoin(data_dir, 'flickr8k/vocab.json')
train_loader, valid_loader, test_loader = mktrainval(pjoin(data_dir, 'flickr8k'), vocab_path, config.batch_size)

# 模型
with open(vocab_path, 'r') as f:
    vocab = json.load(f)

# 随机初始化 或 载入已训练的模型
start_epoch = 0
checkpoint = config.checkpoint
if checkpoint is None:
    model = VSEPP(len(vocab),
                  config.word_dim,
                  config.embed_size,
                  config.num_layers,
                  config.image_model,
                  config.finetuned)
else:
    checkpoint = paddle.load(checkpoint)
    start_epoch = checkpoint['epoch'] + 1
    model = checkpoint['model']


# 优化器
optimizer = get_optimizer(model, config)

# 将模型拷贝至GPU,并开启训练模式
# model.to(device)
model.train()

# 损失函数
loss_fn = TripletNetLoss(config.margin, config.hard_negative)

best_res = 0
print("开始训练")
fw = open('log.txt', 'w')
for epoch in range(start_epoch, config.num_epochs):

    for i, (imgs, caps, caplens) in enumerate(train_loader):
        optimizer.clear_grad()
        # 1. 前馈计算
        image_code, text_code = model(imgs, caps, caplens)
        # 2. 计算损失
        loss = loss_fn(image_code, text_code)
        loss.backward()

        # 梯度截断
        if config.grad_clip > 0:
            nn.utils.clip_grad_norm_(model.parameters(), config.grad_clip)

        # 3. 更新参数
        optimizer.step()

        state = {
                'epoch': epoch,
                'step': i,
                'model': model.state_dict(),
                'optimizer': optimizer.state_dict()
                }

        if (i+1) % config.evaluate_step == 0:
            r1_i2t, r1_t2i, r5_i2t, r5_t2i, r10_i2t, r10_t2i = \
                evaluate(valid_loader, model, config.batch_size, config.captions_per_image)
            recall_sum = r1_i2t + r1_t2i + r5_i2t + r5_t2i + r10_i2t + r10_t2i
            # 4. 选择模型
            if best_res < recall_sum:
                best_res = recall_sum
                paddle.save(state, config.best_checkpoint)
            paddle.save(state, config.last_checkpoint)
            print('epoch: %d, step: %d, loss: %.2f, \
                  I2T R@1: %.2f, T2I R@1: %.2f,  \
                  I2T R@5: %.2f, T2I R@5: %.2f, \
                  I2T R@10: %.2f, T2I R@10: %.2f,' %
                  (epoch, i+1, loss.item(), r1_i2t, r1_t2i, r5_i2t, r5_t2i, r10_i2t, r10_t2i))
            fw.write('epoch: %d, step: %d, loss: %.2f, \
                  I2T R@1: %.2f, T2I R@1: %.2f,  \
                  I2T R@5: %.2f, T2I R@5: %.2f, \
                  I2T R@10: %.2f, T2I R@10: %.2f \n' %
                  (epoch, i+1, loss.item(), r1_i2t, r1_t2i, r5_i2t, r5_t2i, r10_i2t, r10_t2i))
            fw.flush()

checkpoint = paddle.load(config.best_checkpoint)
# model = checkpoint['model']
model.set_state_dict(checkpoint['model'])  # 从检查点中加载模型参数
r1_i2t, r1_t2i, r5_i2t, r5_t2i, r10_i2t, r10_t2i = \
    evaluate(test_loader, model, config.batch_size, config.captions_per_image)
print("Evaluate on the test set with the model that has the best performance on the validation set")
print('Epoch: %d, \
      I2T R@1: %.2f, T2I R@1: %.2f, \
      I2T R@5: %.2f, T2I R@5: %.2f, \
      I2T R@10: %.2f, T2I R@10: %.2f' %
      (checkpoint['epoch'], r1_i2t, r1_t2i, r5_i2t, r5_t2i, r10_i2t, r10_t2i))
fw.write('Epoch: %d, \
      I2T R@1: %.2f, T2I R@1: %.2f, \
      I2T R@5: %.2f, T2I R@5: %.2f, \
      I2T R@10: %.2f, T2I R@10: %.2f \n' %
      (checkpoint['epoch'], r1_i2t, r1_t2i, r5_i2t, r5_t2i, r10_i2t, r10_t2i))
fw.close()
fw.flush()
3.7推理/测试
以测试集中的一张图片为例:
import json
import paddle
from PIL import Image
import numpy as np
import os

# 假设您已经定义了必要的类,例如YourModelClass
# 这里假设您有一个模型类 VSEPP
# from your_model_file import VSEPP  # 替换为您的模型类的实际导入


# 1. 加载测试数据
data_dir = './data/flickr8k'
with open(os.path.join(data_dir, 'val_data.json'), 'r') as f:
    test_data = json.load(f)
# 读取词典
with open(pjoin(data_dir, 'vocab.json'), 'r') as f:
    vocab = json.load(f)
vocab_idx2word = {idx:word for word,idx in vocab.items()}


# 加载图片
# 选择一张图片的索引
image_index = 12  # 选择第一张图片,您可以根据需要更改索引

test_image_paths = test_data['IMAGES']
test_captions = test_data['CAPTIONS']

#  加载图片
image_path = test_image_paths[image_index]
image = Image.open(image_path)
plt.imshow(image)

#  输出原始描述
print("原始描述:")
for i in range(5):
    print(' '.join([vocab_idx2word[word_idx] for word_idx in data['CAPTIONS'][image_index*5+i]]))


# 2. 加载训练好的模型
checkpoint = paddle.load('./model/vsepp/best_flickr8k.ckpt')  # 替换为您的模型路径

# 创建模型实例
model = VSEPP(len(vocab),
              config.word_dim,
              config.embed_size,
              config.num_layers,
              config.image_model,
              config.finetuned)  # 根据您的模型参数进行初始化

# 加载模型的状态字典
model.set_state_dict(checkpoint['model'])  # 从检查点中加载模型参数


# 定义图像预处理
val_tx = transforms.Compose([
    transforms.Resize(256),
    transforms.CenterCrop(224),
    transforms.ToTensor(),
    transforms.Normalize([0.485, 0.456, 0.406], [0.229, 0.224, 0.225])
])

# 3.处理图像
image = val_tx(image)  # 使用验证集的预处理
# print(image.shape)
image = image.unsqueeze(0)  # 添加批次维度
# print(image.shape)

# 4. 进行推理
model.eval()  # 设置模型为评估模式
with paddle.no_grad():
    image_code = model.image_extractor(image)  # 直接调用图像提取器


# 6. 计算文本表示
text_codes = []
for caption in test_captions:  # 获取所有文本描述
    caption_tensor = paddle.to_tensor(caption, dtype='int64').unsqueeze(0)  # 添加批次维度
    caption_length = paddle.to_tensor([len(caption)], dtype='int64')  # 将长度转换为张量
    text_code = model.text_extractor(caption_tensor, caption_length)  # 获取文本表示
    text_codes.append(text_code)

text_codes = paddle.concat(text_codes, axis=0)  # 合并所有文本表示

# 7. 计算相似度
similarity_scores = image_code.mm(text_codes.t())  # 使用矩阵乘法计算图像与文本之间的相似度
similarity_scores = similarity_scores.numpy().flatten()  # 转换为numpy数组并展平

# 8. 排序和选择
top_k = 5  # 选择前5个最相关的描述
top_k_indices = similarity_scores.argsort()[-top_k:][::-1]  # 获取前K个索引

# 9. 输出结果
print("\n与图像最相关的描述:")
for i in top_k_indices:
    print(' '.join([vocab_idx2word[word_idx] for word_idx in test_captions[i]]), f" (相似度: {similarity_scores[i]:.4f})")
输出>:
原始描述:
a dog standing in shallow water on a red leash
a dog on a leash shakes while in some water
a dog splashes in the murky water
a black dog is shaking water off his body
black dog in the water shaking the water off of him
与图像最相关的描述:a yellow dog is swimming in the water (相似度: 0.6102)
dog swimming in the water with a stick (相似度: 0.6067)
a black dog with a tennis ball in its mouth swims through water (相似度: 0.5834)
a dog with yellow fur swims neck deep in water (相似度: 0.5600)
big black dog swimming in the ocean with something in his mouth (相似度: 0.5558)
因为训练次数不够多,所以效果还不太好,但输入输出没问题,是想要的效果。


 被折叠的 条评论
为什么被折叠?
被折叠的 条评论
为什么被折叠?
 到【灌水乐园】发言


