


Spring容器介绍
简介:
- Spring是一个开源免费的框架 , 容器 .
- Spring是一个针对bean的生命周期进行管理的轻量级的框架 , 非侵入式的 .
- 控制反转 IoC , 面向切面 Aop
- 对事物的支持 , 对框架的支持
- 解决企业应用开发的复杂性
*Spring是一个轻量级的控制反转(IoC)和面向切面(AOP)的容器(框架)*
底层结构图:
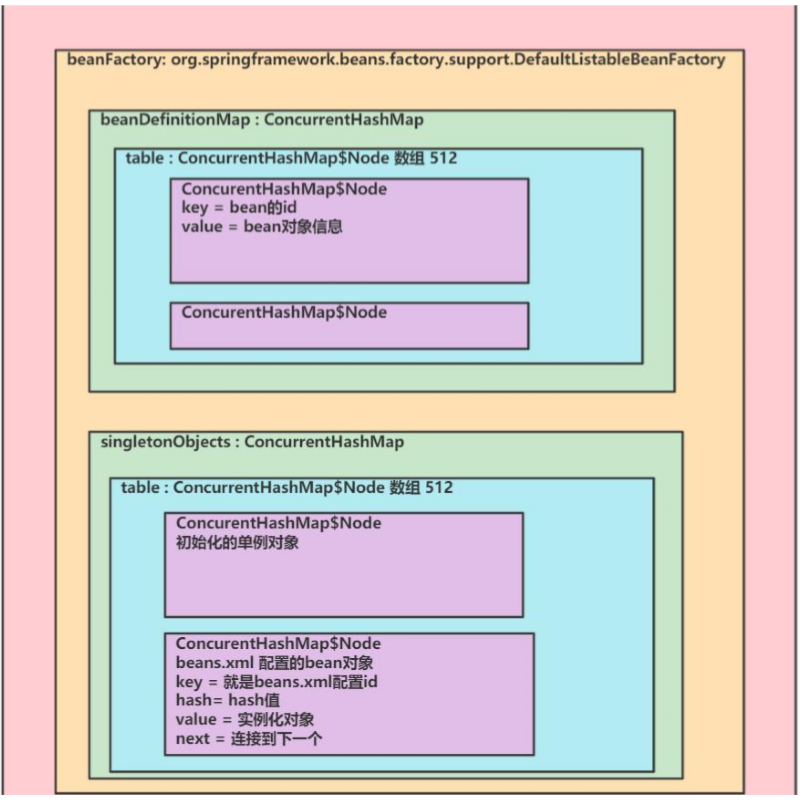
Bean 实例化基本流程:
Spring容器在进行初始化时,会将xml配置的的信息封装成一个BeanDefinition对象,所有的BeanDefinition存储到一个名为beanDefinitionMap的Map集合中去,Spring框架在对该Map进行遍历,使用反射创建Bean实例对象,创建好的Bean对象存储在一个名为singletonObjects的Map集合中,当调用getBean方法时则最终从该Map集合中取出Bean实例对象返回
Maven工程项目的Spring依赖
<!--spring5依赖-->
<dependency>
  <groupId>org.springframework</groupId>
  <artifactId>spring-context</artifactId>
  <version>5.2.6.RELEASE</version>
</dependency>
实例化
@ComponentScan
public class Application {
    public static void main(String[] args) {
        /*启动容器 ,并自动加载包Application下的Bean(在Bean内且引用Spring注解的类)*/
        ApplicationContext context = new AnnotationConfigApplicationContext(Application.class);
        /*从容器中获取msgService服务*/
        MessageService msgService = context.getBean(MessageService.class);

        System.out.println(msgService.getMessage());
    }
}
基于xml的Bean配置
导入Spring开发ioc的基本包(也可以选择配置Maven)
- spring-expression-5.3.8.jar
- spring-core-5.3.8.jar
- spring-context-5.3.8.jar
- spring-beans-5.3.8.jar
导入spring写日志需要的包
- commons-logging-1.1.3.jar
配置javaBean
完整的标签
<bean id="" name="" class="" scope="" lazy-init="" init-method="" destroy-method=""
abstract="" autowire="" factory-bean="" factory-method=""></bean>
根据类型或Id获取Bean
java类代码
public class Monster {
    private String name;
    private String skill;

    //get、set 有参无参构造 toString省略
}
xml配置
<?xml version="1.0" encoding="UTF-8"?>
<beans xmlns="http://www.springframework.org/schema/beans"
       xmlns:xsi="http://www.w3.org/2001/XMLSchema-instance" xmlns:util="http://www.springframework.org/schema/util"
       xsi:schemaLocation="http://www.springframework.org/schema/beans http://www.springframework.org/schema/beans/spring-beans.xsd http://www.springframework.org/schema/util https://www.springframework.org/schema/util/spring-util.xsd">

    <!--
    1.配置Monster对象的JavaBean
    2.在本xml中可以配置多个Bean
    3.bean表示一个java对象

    class属性用于指定类的全路径 ->spring底层使用反射创建(故java对象必须要有无参构造器)
    id属性表示该bean在spring容器中的id。通过id可以获取到该对象
    <property name="name" value="悟空"/>用于给该对象的属性赋值
    -->
    <bean class="com.wang.spring.bean.Monster" id="monster01">
        <property name="name" value="悟空"/>
        <property name="skill" value="金箍棒"/>
    </bean>

</beans>
java测试
public class test {
    @Test
    public void getMonster(){
        //创建容器 ApplicationContext  该容器和容器配置文件关联
        ApplicationContext ioc = new ClassPathXmlApplicationContext("beans.xml");
        //根据id获取Bean:通过getBean() 获取id对应的对象
        Object monster01 = ioc.getBean("monster01");

        //根据类型获取Bean: 类型获取需要保证同一类型的bean只能有一个
        Object monster02 = ioc.getBean( Monster.class);
        System.out.println((Monster)monster01);

        //也可以直接获取 Monster 的bean,无需强转
        Monster monster011 = ioc.getBean("monster01", Monster.class);
        System.out.println(monster011);
    }
}
根据构造器配置Bean
XML配置
<?xml version="1.0" encoding="UTF-8"?>
<beans xmlns="http://www.springframework.org/schema/beans"
       xmlns:xsi="http://www.w3.org/2001/XMLSchema-instance" xmlns:util="http://www.springframework.org/schema/util"
       xsi:schemaLocation="http://www.springframework.org/schema/beans http://www.springframework.org/schema/beans/spring-beans.xsd http://www.springframework.org/schema/util https://www.springframework.org/schema/util/spring-util.xsd">

    <!--
    1.constructor-arg标签可以指定使用构造器的参数
    2.index表示构造器的第几个参数,从0开始
    3.除了可以通过index,还可以通过name、Type来指定参数方式(原理:类构造器参数列表不能有完全相同的类型、顺序)
	<constructor-arg value="八戒" name="name"/>
    <constructor-arg value="钉耙" type="java.lang.String"/>
    -->
    <bean class="com.wang.spring.bean.Monster" id="monster02">
        <constructor-arg value="八戒" index="0"/>
        <constructor-arg value="钉耙" index="1"/>
    </bean>
</beans>
java测试
public class test {
    @Test
    public void getMonster(){

        //创建容器 ApplicationContext  该容器和容器配置文件关联
        ApplicationContext ioc = new ClassPathXmlApplicationContext("beans.xml");
        //直接获取 Monster 的bean,无需强转
        Monster monster02 = ioc.getBean("monster02", Monster.class);
        System.out.println(monster02);
    }
}
注意:本方法会调用无参构造器和有参构造器故无参有参都要有
根据P名称空间配置Bean
XML
<?xml version="1.0" encoding="UTF-8"?>
<beans xmlns="http://www.springframework.org/schema/beans"
       xmlns:xsi="http://www.w3.org/2001/XMLSchema-instance" xmlns:util="http://www.springframework.org/schema/util"
       xmlns:p="http://www.springframework.org/schema/p"
       xsi:schemaLocation="http://www.springframework.org/schema/beans http://www.springframework.org/schema/beans/spring-beans.xsd http://www.springframework.org/schema/util https://www.springframework.org/schema/util/spring-util.xsd">

    <!--
    1.选择p,alt+enter  会自动添加 xmlns:p
    -->
    <bean class="com.wang.spring.bean.Monster" id="monster03"
          p:name="唐僧"
          p:skill="锡杖">
    </bean>
</beans>
java测试同上
ref 引入/注入其他Bean对象(依赖注入)
在Spring的Ioc容器,可以通过ref(Reference:引入参考)来实现Bean对象的相互引用
java类代码
package com.wang.spring.dao;
public class MonsterDaoImpl {
    //构造器
    public MonsterDaoImpl() {
        System.out.println("monsterDaoImpl 构造器被执行");
    }
    //方法
    public void add(){
        System.out.println("monsterDaoImpl add方法被执行");
    }
}
package com.wang.spring.server;
import com.wang.spring.dao.MonsterDaoImpl;
public class MonsterServerImpl {
    private MonsterDaoImpl monsterDao;
    //add方法
    public void add(){
        System.out.println("MonsterServer add方法被执行");
        //调用 MonsterDaoImpl 的add方法
        monsterDao.add();
    }

    //get、set
    public MonsterDaoImpl getMonsterDao() {
        return monsterDao;
    }
    public void setMonsterDao(MonsterDaoImpl monsterDao) {
        this.monsterDao = monsterDao;
    }
}
XML配置
    <!--配置 MonsterDaoImpl 对象-->
    <bean id="monsterDao" class="com.wang.spring.dao.MonsterDaoImpl"></bean>

    <!--配置 MonsterServer 对象
     1. ref="monsterDaoImpl" 表示 MonsterServerImpl对象,其属性monsterDao引用的是id=monsterDao 的对象
     2.这里就体现出spring容器的依赖注入
     3.spring容器是作为一个整体执行,所以对配置的顺序没有要求
    -->
    <bean id="monsterServer" class="com.wang.spring.server.MonsterServerImpl">
        <property name="monsterDao" ref="monsterDao"/>
    </bean>
Java测试
public class test {
    @Test
    public void getMonster(){

        //创建容器 ApplicationContext  该容器和容器配置文件关联
        ApplicationContext ioc = new ClassPathXmlApplicationContext("beans.xml");
        //直接获取 MonsterServerImpl 的bean,无需强转
        MonsterServerImpl monsterServer = ioc.getBean("monsterServer", MonsterServerImpl.class);
        monsterServer.add();
    }
}

/**测试结果:
 * monsterDaoImpl 构造器被执行
 * MonsterServer add方法被执行
 * monsterDaoImpl add方法被执行
 */
引入/注入内部Bean对象
在spring的Ioc容器中,可以直接配置内部bean
Jvav类代码同上
xml配置
    <!--配置 MonsterServer 对象 使用内部配置的bean-->
    <bean id="monsterServer" class="com.wang.spring.server.MonsterServerImpl">
        <!--自己配置一个内部的bean 表示属性monsterDao的值是 MonsterDaoImpl对象-->
        <property name="monsterDao" >
            <bean class="com.wang.spring.dao.MonsterDaoImpl"/>
        </property>
    </bean>
java测试代码同上
引入/注入集合、数组
Java类代码
public class Master {
    private String name;
    private List<Monster> monsterList;
    private Map<String, Monster> monsterMap;
    private Set<Monster> monsterSet;
    private String[] monsterName;

    // 这 个 Properties 是 Hashtable 的 子 类 , 是 key-value的形式
    // 这 里 Properties key和value都是String
    private Properties pros;


    //构造方法和get/set及toString ......
}
给list集合属性注入值
<!-- 给集合属性注入值-->
    <bean id="master" class="com.wang.spring.bean.Master">
        <!--给普通string属性注入值-->
        <property name="name" value="吴承恩"/>

        <!--给list注入值 注入了俩个-->
        <property name="monsterList">
            <list>
                <ref bean="monster01"/>
                <ref bean="monster02"/>
            </list>
        </property>

    </bean>
给Map集合属性注入值
    <bean id="master" class="com.wang.spring.bean.Master">
        <property name="monsterMap">
            <map>
                <!-- map 里面是一对一对的entry 每个entry都是一个k-v -->
                <entry>
                    <key>
                        <value>monster_map01</value>
                    </key>
                    <ref bean="monster01"/>
                </entry>

                <entry>
                    <key>
                        <value>monster_map02</value>
                    </key>
                    <ref bean="monster02"/>
                </entry>
            </map>
        </property>
    </bean>
给Set属性注入值
    <bean id="master" class="com.wang.spring.bean.Master">
        <property name="monsterSet">
            <set>
                <ref bean="monster01"/>
                <ref bean="monster02"/>
            </set>
        </property>
    </bean>
给数组属性注入值
    <bean id="master" class="com.wang.spring.bean.Master">
        <property name="monsterName">
            <array>
                <value>齐天大圣</value>
                <value>天蓬元帅</value>
            </array>
        </property>
    </bean>
给Properties属性注入值
    <bean id="master" class="com.wang.spring.bean.Master">
        <!-- Properties属性结构k-v kv都是String-->
        <property name="pros">
            <props>
                <!-- key="userName"定义k  root是v-->
                <prop key="userName">root</prop>
                <prop key="paswword">123456</prop>
            </props>
        </property>
    </bean>
通过util名称空间创建list
在spring的Ioc容器中,可以通过util名称空间创建list集合
用本方法是为了代码复用
xml配置
    <!--util是为了代码复用 类似于java的方法-->
    <util:list id="list">
        <ref bean="monster01"/>
        <ref bean="monster02"/>
    </util:list>


    <bean class="com.wang.spring.bean.Master" id="master">
        <!--引用定义的util-->
        <property name="monsterList" ref="list"/>
    </bean>
级联属性赋值
spring的Ioc容器,可以直接给对象属性的属性赋值,即级联属性赋值
对象属性的属性—给A类对象的B类属性 的 属性赋值
	<!--配置Dept对象-->
	<bean id="dept" class="com.hspedu.spring.beans.Dept"/>

	<!--配置 Emp对象-->
	<beanid="emp"class="com.hspedu.spring.beans.Emp">
        <property name="name" value="jack"/>
        <property name="dept"ref="dept"/>
        <!--给Dept类的属性赋值-->
        <property name="dept.name" value="Java 开发部"/>
	</bean>
通过静态工厂获取Bean
java类-静态工厂代码
public class MyBeanFactory {
    private static final Map<String, Monster> monsterMap = new HashMap<>();
    //创建实例
    static {
        monsterMap.put("monster_01", new Monster("悟空", "金箍棒"));
        monsterMap.put("monster_02", new Monster("八戒", "九齿钉耙"));

    }
    //  获取实例的方法
    public static Monster getMonster(String key){
        return monsterMap.get(key);
    }
}
xml配置
 <!--通过静态工厂来获取bean对象
    1.配置monster对象
    2.class 是静态工厂全路径
    3.factory-method 表示是指定静态工厂哪个方法返回对象
    4.<constructor-arg value="monster_01"/>   value 是指定要返回哪个静态工厂的对象  若value不变,则获取的对象也不变
    -->
    <bean id="monsterFactory" class="com.wang.spring.bean.MyBeanFactory" factory-method="getMonster">
            <constructor-arg value="monster_01"/>
        </bean>
java测试
        //创建容器 ApplicationContext  该容器和容器配置文件关联
        ApplicationContext ioc = new ClassPathXmlApplicationContext("beans.xml");
        //直接获取bean
        Monster monster01= ioc.getBean("monsterFactory", Monster.class);
        System.out.println(monster01);
通过实例工厂获取Bean
java类-实例工厂代码
public class MyBeanFactory {
    private  final Map<String, Monster> monsterMap = new HashMap<>();
    //创建实例
     {
        monsterMap.put("monster_01", new Monster("悟空", "金箍棒"));
        monsterMap.put("monster_02", new Monster("八戒", "九齿钉耙"));

    }
    //  获取实例的方法
    public  Monster getMonster(String key){
        return monsterMap.get(key);
    }
}
xml配置
    <!--配置实例工厂对象-->
    <bean id="monsterFactory" class="com.wang.spring.bean.MyBeanFactory"/>

    <!--通过实例工厂,配置monster对象
    1.factory-bean 指定使用哪个实例工厂对象返回bean
    2.factory-method 指定使用实例工厂对象的哪个方法返回bean
    3.<constructor-arg value="monster_01"/>  value 是指定要返回实例工厂的哪个monster对象-->
    <bean id="myBeanFactory" factory-bean="monsterFactory" factory-method="getMonster">
        <constructor-arg value="monster_01"/>
    </bean>
java测试
        //创建容器 ApplicationContext  该容器和容器配置文件关联
        ApplicationContext ioc = new ClassPathXmlApplicationContext("beans.xml");
        //直接获取bean
        Monster monster01= ioc.getBean("myBeanFactory", Monster.class);
        System.out.println(monster01);
通过FactoryBean获取对象 [重点]
java代码
//实现FactoryBean接口 <Monster>是类型
public class MyFactoryBean implements FactoryBean<Monster> {
    //配置时指定获取的对象的key值
    private String key;

    //初始化
    private Map<String,Monster> monsterMap=new HashMap<>();
    {
        monsterMap.put("monster_01", new Monster("悟空", "金箍棒"));
        monsterMap.put("monster_02", new Monster("八戒", "九齿钉耙"));
    }

    //获取对象
    @Override
    public Monster getObject() throws Exception {
        return this.monsterMap.get(key);
    }
    //获取对象类型
    @Override
    public Class<?> getObjectType() {
        return Monster.class;
    }
    //是否单例
    @Override
    public boolean isSingleton() {
        return true;
    }

//get、set方法
}
xml配置
    <!-- 配置monster对象 通过FactoryBean
    1.class 指定使用的FactoryBean
    2.key表示就是MyFactoryBean 属性key
    3.value就是你要获取的对象对应的key (初始化在hashMap中的对象)-->
    <bean id="myFactoryBean" class="com.wang.spring.bean.MyFactoryBean">
        <property name="Key" value="monster_01"/>
    </bean>
java测试
        //创建容器 ApplicationContext  该容器和容器配置文件关联
        ApplicationContext ioc = new ClassPathXmlApplicationContext("beans.xml");
        //直接获取bean
        Monster monster01= ioc.getBean("myFactoryBean", Monster.class);
        System.out.println(monster01);
Bean配置信息重用(继承)
xml配置
    <!-- 配置Monster对象
    1.如果bean指定了 abstract="true" 表示该bean对象是被用于继承 且本bean不能被获取/实例化-->
    <bean id="monsterAbstract" class="com.wang.spring.bean.Monster" abstract="true">
        <property name="name" value="悟空"/>
        <property name="skill" value="金箍棒"/>
    </bean>

    <!--配置Monster对象 继承于monsterAbstract
	1.parent 指定继承的bean-->
    <bean id="monster" class="com.wang.spring.bean.Monster" parent="monsterAbstract"/>
Bean的单例和多实例
在spring的Ioc容器中,默认是安装单例创建的,即配置一个bean对象猴,ioc容器只会创建一个bean实例。
如果我们希望ioc容器配置的某个bean对象,是以多个实例形式创建的,则可以通过 scope=“prototype” 来指定
xml配置
    <!-- 配置Monster对象
    1.  scope 默认是="singleton"单例 。若scope设为="prototype"则多实例
     2.若bean设置为单例的 当程序员执行getBean时,返回的是同一个对象
     3.若bean设置为多时例的 当程序员执行getBean时,每次返回的都是新对象-->
    <bean id="monsterAbstract" class="com.wang.spring.bean.Monster" scope="prototype" >
        <property name="name" value="悟空"/>
        <property name="skill" value="金箍棒"/>
    </bean>
bean配置默认是单例的,在启动容器时,默认就会创建
当设置为多实例后,该bean是在getBean时才创建
如果是单例,同时希望在getBean时才创建 ,可以指定懒加载 lazy-init=“true” (默认是false)
xml配置
    <!--懒加载-->
    <bean id="monsterAbstract" class="com.wang.spring.bean.Monster" scope="singleton" lazy-init="true" >
        <property name="name" value="悟空"/>
        <property name="skill" value="金箍棒"/>
    </bean>
Bean的生命周期
bean对象创建是由JVM机完成的,然后执行以下方法:
- 执行构造器
- 执行set方法
- 调用bean的初始化方法(需要配置)
- 使用bean
- 当容器关闭时,调用bean的销毁方法(需要配置)
Java类代码
public class House {
    private String name;

    //初始化
    public void init() {
        System.out.println("House 的初始化方法init被执行");
    }

    //销毁
    public void destory() {
        System.out.println("House 的销毁方法destory被执行");
    }

    //省略一系列有参、无参构造;get、set方法;tostring方法;
}
xml配置
    <!--配置bean的初始化方法和销毁方法 演示bean生命周期
    1.init-method="init" 指定bean的初始化方法,在setter方法后执行
    2.destroy-method="destory" 指定bean销毁方法,在容器关闭时执行
    3.初始化和销毁方法执行的时机,由spring容器来控制-->
    <bean class="com.wang.spring.bean.House" id="house"
          init-method="init"
          destroy-method="destory">
        <property name="name" value="汤臣一品"/>
    </bean>
java测试
        //创建容器 ApplicationContext  该容器和容器配置文件关联
        ApplicationContext ioc = new ClassPathXmlApplicationContext("beans.xml");
        //直接获取bean
        House house = ioc.getBean("house", House.class);
        System.out.println(house);

        /*
         * 关闭容器
         * 1.ioc的编译类型为ApplicationContext 运行类型为 ClassPathXmlApplicationContext
         * 2.ApplicationContext没有close方法,所以无法直接调用
         * 3.又因 ClassPathXmlApplicationContext 实现了 ConfigurableApplicationContext
         * 4.ConfigurableApplicationContext 有close方法,故将ioc强转后调用close
         */
        ((ConfigurableApplicationContext) ioc).close();

/** 执行结果
 * House 的无参构造被调用           --执行构造
 * House 的setName被调用           --执行setter
 * House 的初始化方法init被执行      --执行初始化
 * House{name='汤臣一品'}          --使用bean
 * House 的销毁方法destory被执行     --销毁
 */
Bean后置处理器
在spring容器中,可以配置bean的后置处理器
该处理器/对象会在bean初始化方法调用前和初始化方法调用后被调用 —AOP
程序员可以在后置处理器中编写自己的代码
java后置处理器代码
// 配置Bean后置处理器 需要实现BeanPostProcessor接口
public class MyBeanPostProcessor implements BeanPostProcessor {

    /**
     * 什么时候调用:在init初始化方法之前
     * @param bean  传入的、在ioc容器中创建/配置的bean
     * @param beanName 传入的、在ioc容器中创建/配置的bean 的Id
     * @return 程序员对传入的bean进行修改/处理后 返回
     * @throws BeansException
     */
    @Override
    public Object postProcessBeforeInitialization(Object bean, String beanName) throws BeansException {
        System.out.println("postProcessBeforeInitialization 被调用");

        //判断如果类型是House 将其name改为中南海 (改的是所有的House)
        if(bean instanceof House){
            ((House)bean).setName("中南海");
        }
        return bean;
    }

    /**
     * 什么时候调用:在init初始化方法之后
     * @param bean  传入的、在ioc容器中创建/配置的bean
     * @param beanName 传入的、在ioc容器中创建/配置的bean 的Id
     * @return 程序员对传入的bean进行修改/处理后 返回
     * @throws BeansException
     */
    @Override
    public Object postProcessAfterInitialization(Object bean, String beanName) throws BeansException {
        System.out.println("postProcessAfterInitialization 被调用");
        return bean;
    }
}
xml配置
    <!--配置house对象-->
    <bean class="com.wang.spring.bean.House" id="house" init-method="init" destroy-method="destory">
        <property name="name" value="汤臣一品"/>
    </bean>

    <!--配置后置处理器对象 MyBeanPostProcessor
    1.当我们在xml中配置后置处理器对象,这时后置处理器就会作用在该容器的对象中(xml中所以创建的bean)-->
    <bean class="com.wang.spring.bean.MyBeanPostProcessor" id="myBeanPostProcessor"/>
java测试
        //创建容器 ApplicationContext  该容器和容器配置文件关联
        ApplicationContext ioc = new ClassPathXmlApplicationContext("beans.xml");
        //直接获取bean
        House house = ioc.getBean("house", House.class);
        System.out.println(house);
		//销毁
        ((ConfigurableApplicationContext) ioc).close();

/** 执行结果
 House 的无参构造被调用
 House 的setName被调用
 postProcessBeforeInitialization 被调用
 House 的初始化方法init被执行
 postProcessAfterInitialization 被调用
 House{name='中南海'}
 House 的销毁方法destory被执行
 */
通过配置文件properties配置Bean
properties文件
#属性文件有中文时,需要转换为unicode码 否则乱码
#name=悟空
name=\u609f\u7a7a
#skill=金箍棒
skill=\u91d1\u7b8d\u68d2
xml配置
    <!--指定属性的配置文件
    1.location="classpath:myproperties.properties" 表示指定的属性配置文件 要携带classpath
    -->
    <context:property-placeholder location="classpath:myproperties.properties"/>


    <!-- 配置Monster文件
    1.通过 指定属性的配置文件 给Monster对象赋值
    2.这时我们的属性值通过${属性名} 这里的属性民是 properties文件中的k
    -->
    <bean class="com.wang.spring.bean.Monster" id="monster">
        <property name="name" value="${name}"/>
        <property name="skill" value="${skill}"/>
    </bean>
自动装配Bean
自动装配 需要配置
- autowire=“byType” 类型自动装配 --容器中不能同时存在两个相同类型bean对象
- autowire=“byName” 名字自动装配 --会根据这个对象的属性的setXxx()中的Xxx来找容器中对象的Id
java代码
package com.wang.spring.dao;
public class MonsterDaoImpl {
    //有参无参构造器
}


//----------MonsterServerImpl中有MonsterDaoImpl类型的属性--------------------------------------------
package com.wang.spring.server;
public class MonsterServerImpl {
    private MonsterDaoImpl monsterDao;

    //get、set
}
xml配置
    <!--配置MonsterDaoImpl对象-->
    <bean class="com.wang.spring.dao.MonsterDaoImpl" id="monsterDao"/>


    <!--配置 MonsterServerImpl 对象
    1.autowire="byType" 表示在创建MonsterServerImpl时,通过类型给对象的属性自动完成赋值
    2.比如MonsterServerImpl 对象有 private MonsterDaoImpl monsterDao;
    就会在容器中去找 有没有 MonsterDaoImpl 类型对象,如果有,自动装配。
    3.如果是按照类型自动装配,则容器中不能同时存在两个MonsterDaoImpl类型对象-->
    <bean class="com.wang.spring.server.MonsterServerImpl" id="monsterServer" autowire="byType"/>
java测试
        //创建容器 ApplicationContext  该容器和容器配置文件关联
        ApplicationContext ioc = new ClassPathXmlApplicationContext("beans.xml");
        //直接获取bean
        MonsterServerImpl monsterServer = ioc.getBean("monsterServer", MonsterServerImpl.class);
		//输出属性值 若没自动装配则null 若有自动装配 则输出对象哈希值
        System.out.println(monsterServer.getMonsterDao());  //com.wang.spring.dao.MonsterDaoImpl@6cc558c6
Spring EL表达式配置Bean
java代码
package com.wang.spring.bean;

public class SpELBean {
    private String name;
    private Monster monster;
    private String monsterName;
    private String crySound;
    private String bookName;
    private Double result;

    //自定义方法
    public String cry(String sound) {
        return "发出 " + sound + "叫声...";
    }
    public static String read(String bookName) {
        return "正在看 " + bookName;
    }

    //省略了有参无参构造、getset方法、toString方法
}
xml配置
    <!-- spring el表 达 式-->
    <bean id="spELBean" class="com.wang.spring.bean.SpELBean">
        <!--sp el给字面量 -->
        <property name="name" value="吴承恩"/>
        <!-- sp el 引用其它bean -->
        <property name="monster" value="#{monster01}"/>
        <!-- sp el 引用其它bean的属性值 -->
        <property name="monsterName" value="#{monster02.name}"/>
        <!-- sp el 调用普通方法赋值-->
        <property name="crySound" value="#{spELBean.cry('喵喵的..')}"/>
        <!-- sp el 调用静态方法赋值-->
        <property name="bookName" value="#{T(com.wang.spring.bean.SpELBean).read(' 西游记')}"/>
        <!-- sp el 通过运算赋值-->
        <property name="result" value="#{89*1.2}"/>
    </bean>

	<!--省略了 id为 monster01 和 monster02 的对象-->
基于注解的Bean配置
注解本质是XML配置 注解的作用是简化Bean配置
导入包(也可以选择配置Maven)
- spring-aop-5.3.8.jar
配置文件自动扫描包
在xml文件中添加
    <!--配置自动扫描的包,注意需要加入context名称空间
    1. base-package 指定一个或多个包名,扫描指定包及其子包下使用注解的类-->
    <context:component-scan base-package="com.wang.spring.annotation"/>
也可以使用注解
- @Configuration 标注当前类是配置类 ,代替xml文件+@Component
- @ComponentScan({“xxx”}) 配置文件包扫描路径,等同于 <context:component-scan base-package=“xxx”/>
- @PropertySource(“classpath:xxx”) 指定属性文件 ,等同于 <context:property-placeholder location=“classpath:xxx”/>
@Configuration
@ComponentScan({"com.ithema"})
@PropertySource("classpath:jdbc.properties")
public class ApplicationContextConfig{
}
xml配置扫描包注意事项:
- 必须在 Spring 配置文件中指定"自动扫描的包",IOC 容器才能够检测到当前项目中哪些类被标识了注解, 注意到导入context名称空间
<!-- 配置自动扫描的包  可以使用通配符*来指定 ,比如 com.hspedu.spring.* 表示-->
<context:component-scanbase-package="com.hspedu.spring.component"/>
-
Spring的IOC容器不能检测一个使用了@Controller注解的类到底是不是一个真正的控 制器。注解的名称是用于程序员自己识别当前标识的是什么组件。其它的@Service @Repository 也是一样的道理 [也就是说spring的IOC容器只要检查到注解就会生成对象, 但是这个注解的含义spring 不会识别,注解是给程序员编程方便看的]
-
只扫描满足要求的类 【使用的少,不想扫描,不写注解就可以】
<!--resource-pattern="User*.class":  表示只扫描 com.hspedu.spring.component 包下 User开头的类 -->
<context:component-scan base-package="com.hspedu.spring.component" resource-pattern="User*.class"/>
- 排除哪些类 【如果希望排除某个包/子包下的某种类型的注解,可以通过exclude-filter 指定】
<!--exclude-filter 指定要排除的哪些类
    type 指定要排除的方式  type="annotation"表示按照注解来排除
	expression 指定要排除的注解的全路径-->
<context:exclude-filter type="annotation" expression="org.springframework.stereotype.Service"/>
</context>
- 指定自动扫描哪些注解类【按照自己的方式指定要扫描的注解的类】
<!--
	1.use-default-filters="false" 表示不再使用默认的过滤机制
	2.context:include-filter 表示只扫描指定的注解的类
	3.type 指定方式  type="annotation"表示按照注解来指定
	4.expression 指定要扫描的注解的全路径-->
<context:component-scan base-package="com.hspedu.spring.component" use-default-filters="false"> 			<context:include-filter type="annotation" expression="org.springframework.stereotype.Service"/> 		<context:include-filter type="annotation" expression="org.springframework.stereotype.Controller"/> </context:component-scan>
- 指定注解类Id 【默认是类名首字母小写,但也可以使用value属性手动指定Id】
@Controller(value="userAction01")
@Controller("userAction01")
组件注解
基于注解的方式配置bean,主要是项目开发中的组件,比如Controller、Service、Dao
使用@Component注解代替<bean>标签
当Bean不在某一层(既不属于业务层,也不是web层又不是dao层),又需要Spring进行维护,使用Component
组件注解的形式有:
- @Component 表示当前注解标识的是一个组件,等同于 其下三个注解都是其衍生注解
- @Controller 表示当前注解表示的是一个控制器,通常用于Servlet (web层)
- @Service 表示当前注解标识的是一个处理业务逻辑的类,通常用于Service类
- @Repository 标识当前注解标识的是一个持久化层的类,通常用于Dao类
@Component  //等同于<bean id="userDao" class="com.tihema.dao.impl.UserDaoImpl">
public class UserDaoImpl implements UserDao{}

@Repository("userDao")
public class UserDaoImpl implements UserDao{}

@Service("userService")
public class UserServiceImpl implements UserService{}

@Controller("userService")
public class UserController{}
引入注入注解
Bean依赖注入的注解,主要是使用注解的方式替代xml的<property>标签完成属性的注入操作
- @Value 使用在字段或方法上注入普通数据
- @Autowired 使用在字段或方法上,根据类型注入引入数据
- @Qualifier 使用在字段或方法上,结合 @Autowired,根据名称注入
- @Resource 使用在字段或方法上,根据类型或名称注入 【常用】
Value注解
@Value("zhangsan")   //等同于 <property name="username" value="zhangsan"/>
private String username;

@Value("list")
public void setUsername(String username){
    this.username=username;
}
Autowired 注解 【根据类型进行注入,如果有同一类型的Bean有多个,尝试根据名字进行二次匹配,匹配不成功再报错 过时】
@Autowired   //等同于 <bean class=" " id=" " autowire="byType"/>
public void xxx(UserDao userDao){
    this.userDao=userDao;
}

@Autowired
public void xxx(List<UserDao> userDaoList){
    this.userDaoList=userDaoList;
}
Qualifier注解 【配合Autowired使用 指定注入名字为userDao的Bean】
@Autowired
@Qualifier("userDao")  //等同于  <property name="userDao"> <qualifier value="userDao" /> </property>
private UserDao userDao;
Resource注解【 相当于Autowired+Qualifier 常用】
@Resource(name="userDao")  //名字匹配
private UserDao userDao;

@Resource(type=UserDao.class)  //类型匹配(类型必须唯一)
private UserDao userDao;

@Resource    //先根据名字注入,如果匹配不上,再根据类型注入,再匹配不成功则报错
private UserDao userDao;
Bean标签属性注解
注意:在使用本标签时,必须在组件注解下
bean标签属性注解:
- @Scope 类或被@Bean标注的方法上使用,标注bean为单例或多例【singleton/prototype】,等同于
- @Lazy 类或被@Bean标注的方法上使用,标注bean是否延迟加载【true/false】,等同于
- @PostConstruct 在方法上使用,标注bean实例化后执行的方法【即初始化方法】,等同于
- @PreDestory 在方法上使用,标注bean销毁前执行方法,等同于
Scope注解【默认 singleton,即单例】
@Component
@Scope("prototype") //等同于 <bean id=" " class=" " scope="prototype" >
public class User{}

@Component
@Scope//等同于 <bean id=" " class=" " scope="singleton" >
public class User{}
Lazy注解【默认false,即非延迟加载,容器启动立即实例化】
@Component
@Lazy(true)  //等同于 <bean id="" class=" " lazy-init="true" >
public class MyBean {}
PostConstruct注解 【标注初始化方法,容器实例化立即执行,类似于静态代码块】
@PostConstruct  //等同于 <bean init-method="init">
public void init() {}
PreDestory注解 【标注bean销毁后执行的方法,容器销毁后执行】
@PreDestory  //等同于  <bean destroy-method="destory">
public void destory() {}
Boot启动类注解
Boot启动方式确定扫包范围注解:
- @EnableAutoConfiguration 该注解会根据现有的类路径下的配置和约定,自动加载和配置所需的bean和其他组件
- @ComponentScan(" ") 指定要扫描的组件的基础包路径。它会自动扫描并注册带有特定注解的组件
- @SpringBootApplication 该注解等同于@EnableAutoConfiguration+@ComponentScan(" ")
- 本方法一般不用
@EnableAutoConfiguration
@ComponentScan("com.youkeda.comment") //等同于<context:component-scan base-package="com.youkeda.comment"/>
public class CommentApplication {
	public static void main(String[] args) {
		SpringApplication.run(CommentApplication.class, args);
	}
}
- 一般使用
/**
*@SpringBootApplication 组合了
*                       @EnableAutoConfiguration
*                       @ComponentScan
**/
@SpringBootApplication
public class CommentApplication {
	public static void main(String[] args) {
		SpringApplication.run(CommentApplication.class, args);
	}
}
【重点】 注解配置Bean的机制模拟
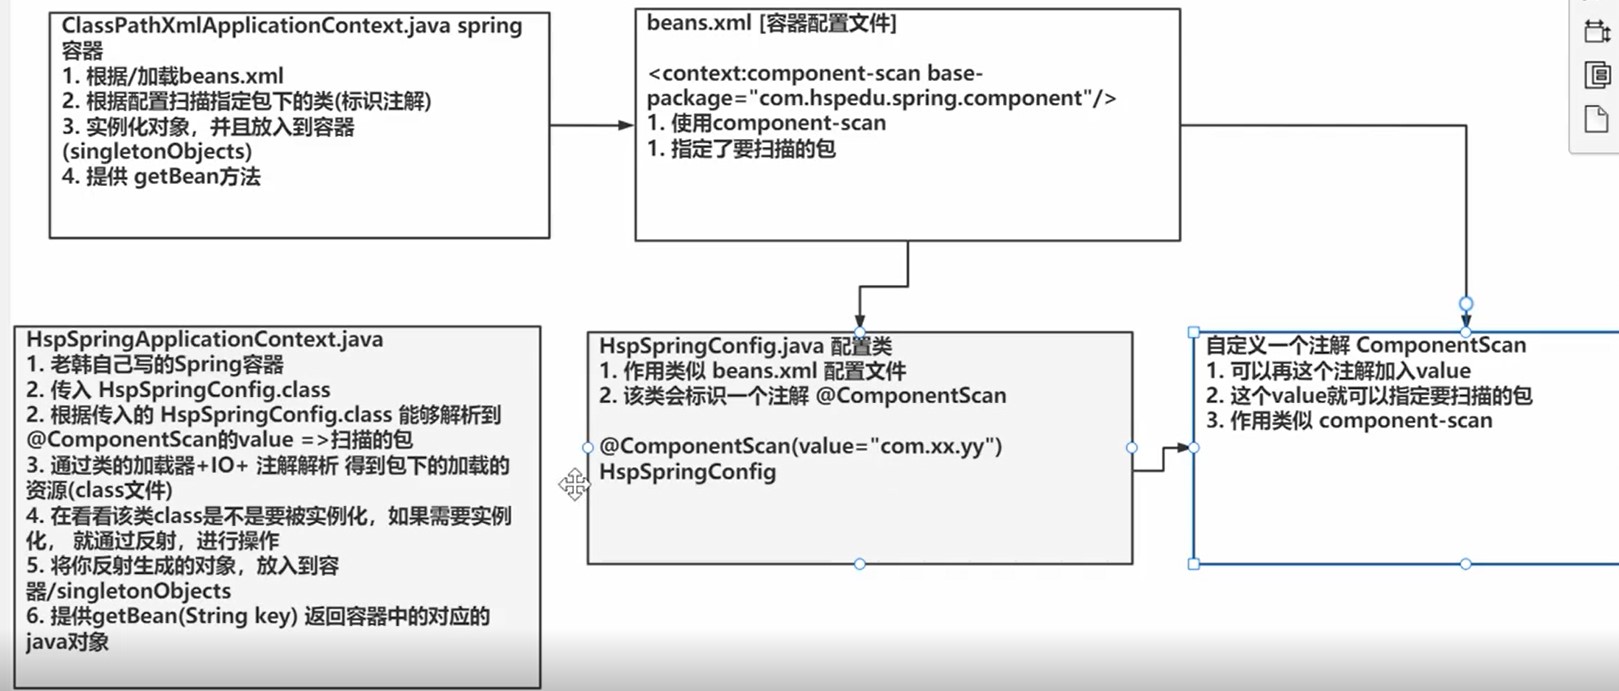
模拟Ioc容器工作流程(简易)
package com.wang.spring.annotation;

import com.wang.spring.mybean.ComponentScan;

import org.springframework.stereotype.Component;
import org.springframework.stereotype.Controller;
import org.springframework.stereotype.Repository;
import org.springframework.stereotype.Service;

import java.io.File;
import java.net.URL;
import java.util.Map;
import java.util.concurrent.ConcurrentHashMap;

/**
 * @author: 汪邦龙
 * @version: 1.0
 * @date: 2023/8/6 10:20
 * 模拟Ioc容器
 */
public class ApplicationContext {
    //接收传入的class对象
    private Class configClass;

    //ioc容器 ,用于存放反射后创建的对象
    private ConcurrentHashMap<String, Object> ioc = new ConcurrentHashMap<>();


    //构造:用于接收传入的配置类class,得到配置类配置的要扫描的包
    public ApplicationContext(Class configClass) {
        this.configClass = configClass;
        System.out.println("this.configClass=" + configClass);

        //获取要扫描的包
        //1.先得到配置了配置的 @ComponentScan("com.wang.spring.annotation") 注意此处ComponentScan是自定义的
        ComponentScan componentScan =
                (ComponentScan) this.configClass.getDeclaredAnnotation(ComponentScan.class);
        //2.通过componentScan得到value ==>即要扫描的包
        String path = componentScan.value();
        System.out.println("要扫描的包-path=" + path);

        //得到要扫描包下的所有.class文件
        //1.先得到类加载器(只有得到类加载器才能得到out根目录)
        ClassLoader classLoader = ApplicationContext.class.getClassLoader();
        //2.通过类加载器获取到要扫描包的url  注:getResource("") 只能写路径斜杠分隔,不能点分隔
        path = path.replace(".", "/");
        URL resource = classLoader.getResource(path);
        System.out.println("resource=" + resource);
        //3.将要加载的.class 路径下文件进行遍历
        File file = new File(resource.getFile());
        //4.判断是否是目录
        if (file.isDirectory()) {
            File[] files = file.listFiles();
            for (File file1 : files) {
                String absolutePath = file1.getAbsolutePath();
                System.out.println("absolutePath=" + absolutePath);
                //此时获取 C:\Users\admin\...\com\wang\spring\annotation\UserServiceImpl.class


                //需要得到 com.wang.spring.annotation.UserServiceImpl.class
                //1.过滤,只允许.class文件进入
                if (absolutePath.endsWith(".class")) {
                    //2.获取到类名
                    String className =
                            absolutePath.substring(absolutePath.lastIndexOf("\\") + 1,
                                    absolutePath.indexOf(".class"));
                    System.out.println("className=" + className);
                    //3.获取类全限定名
                    String classFullName = path.replace("/", ".") + "." + className;
                    System.out.println("classFullName=" + classFullName);


                    //判断该 .class文件是不是需要注入到容器 即判断是否有组件注解
                    try {
                        //1.得到该类的class对象
                        Class<?> aClass = Class.forName(classFullName);
                        //2.判断
                        if (aClass.isAnnotationPresent(Component.class) ||
                                aClass.isAnnotationPresent(Controller.class) ||
                                aClass.isAnnotationPresent(Service.class) ||
                                aClass.isAnnotationPresent(Repository.class)) {


                            //可以反射创建对象,放入容器了
                            Class<?> aClass1 = Class.forName(classFullName);
                            Object o = aClass1.newInstance();
                            ioc.put(className, o);
                        }
                    } catch (Exception e) {
                        throw new RuntimeException(e);
                    }
                }
            }
        }
    }

    //输出ioc容器中的数据
    public void getIocHashMap() {
        for (Map.Entry<String, Object> stringObjectEntry : ioc.entrySet()) {
            System.out.println("ioc=" + " k: " + stringObjectEntry.getKey() + " v: " + stringObjectEntry.getValue());
        }
    }
}
测试
public class test {
    public static void main(String[] args) {
        //传入 SpringConfig 配置类 拿到配置类的class
        ApplicationContext ioc=new ApplicationContext(SpringConfig.class);
        ioc.getIocHashMap();
    }
}
输出容器所有Bean
	ApplicationContext ioc=new ApplicationContext(SpringConfig.class);

	String[] beanDefinitionNames = ioc.getBeanDefinitionNames();
		for (String beanDefinitionName : beanDefinitionNames) {
			System.out.println("beanDefinitionName="+beanDefinitionName);
		}
面向切面AOP
AOP底层支撑----动态代理+反射+动态绑定…
导入AOP编程需要的包
- com.springsource.net.sf.cglib-2.2.0.jar
- com.springsource.org.aopalliance-1.0.0.jar
- com.springsource.org.aspsctij.weaver-1.6.8.RELEASE.jar
- spring-aspects-5.3.8.jar
动态代理【重要】
动态代理解决思想:在调用方法时,使用反射机制,根据方法去决定调用哪个对象方法。
代理模式是一种设计模式,提供了对目标对象额外的访问方式,即通过代理对象访问目标对象,这样可以在不修改原目标对象的前提下,提供额外的功能操作,扩展目标对象的功能
静态代理: 在编译时就已经实现,编译完成后代理类是一个实际的class文件
动态代理: 在运行时动态生成的,即编译完成后没有实际的class文件,而是在运行时动态生成类字节码,并加载到JVM中
使用JDK动态代理的步骤:
- 创建接口,定义目标类要完成的功能(也就是目标接口,你要通过代理执行的目标类)
- 创建接口的实现类
- 通过Proxy类的newProxyInstance方法来实例化我们需要的类
- 创建InvocationHandler接口的实现类,在invoke方法中完成代理类的功能
- 使用Proxy类的静态方法,创建代理对象
1.创建接口
/**
 * 接口,该接口有run方法
 */
public interface Vehicle {
    public void run();
}
2.创建接口的实现类
/**
 * 实现子类
 */
public class Car implements Vehicle{
    @Override
    public void run() {
        System.out.println("这是Car第一句");
        System.out.println("这是Car第二句");
        System.out.println("这是Car第三句");
    }
}
创建一个返回代理对象的类
3.通过Proxy类的newProxyInstance方法来实例化我们需要的类
4,.创建InvocationHandler接口的实现类,在invoke方法中完成代理类的功能
/**
 * 该类可以提供一个方法,返回一个代理对象
 */
public class VehicleProxyProvider {
    //定义一个属性 用于接受传过来的对象
    //target_vehicle 表示真正要执行的对象 要求这个对象的类实现Vehicle接口
    private Vehicle target_vehicle;

    //构造器
    public VehicleProxyProvider(Vehicle target_vehicle) {
        this.target_vehicle = target_vehicle;
    }

    //编写一个方法,返回代理对象
    public Vehicle getProxy() {

        //第一步:得到类加载器
        ClassLoader classLoader = target_vehicle.getClass().getClassLoader();

        //第二步骤:得到将来要代理的对象(被执行的对象)的接口信息
        Class<?>[] interfaces = target_vehicle.getClass().getInterfaces();

        //第三步:创建调用处理器对象 InvocationHandler   反射包下面 java.long.ref
        /*
         * 1.invoke 方法是将来执行我们 target_vehicle的 方法时,会调用到
         * 2.Object proxy 表示代理对象
         * 3.Method method 通过代理对象调用方法时,的哪个方法  代理对象.run()
         * 4.Object[] args 表示在调用方法时(代理对象.run(xxx)) 传入的参数xxx
         * 5.rterun 表示代理对象.run(xxx) 执行后的结果
         * */
        InvocationHandler invocationHandler = new InvocationHandler() {
            @Override
            public Object invoke(Object proxy, Method method, Object[] args) throws Throwable {
                System.out.println("invoke方法 第一句");
                //这里是反射技术 方法.对象
                Object invoke = method.invoke(target_vehicle, args);
                System.out.println("invoke方法 最末句");
                return invoke;
            }
        };

		//第四步:通过Proxy类的newProxyInstance方法来实例化我们需要的类,并作为方法返回
        /*
        public static Object newProxyInstance(ClassLoader loader,
                                          Class<?>[] interfaces,
                                          InvocationHandler h)

        1.Proxy.newProxyInstance() 可以返回一个代理对象
        2.ClassLoader loader 类的加载器
        3.Class<?>[] interfaces 将来要代理的对象(被执行的对象)的接口信息
        4.InvocationHandler h 调用处理器对象  有一个非常重要的方法invoke
        */
        Vehicle proxy = (Vehicle) Proxy.newProxyInstance(classLoader, interfaces, invocationHandler);

        return proxy;
    }

}
测试类
5.使用Proxy类的静态方法,创建代理对象
/**
 * 测试
 */
public class TestVehicle {
    @Test
    public void proxyRun() {
        //创建对象
        Vehicle vehicle = new Car();
        //创建VehicleProxyProvider对象 将要代理的对象 vehicle传入
        VehicleProxyProvider vehicleProxyProvider = new VehicleProxyProvider(vehicle);

        //获取代理对象,该对象可以代理执行方法
        //1.proxy 编译类型Vehicle 运行类型 代理类型(Car)
        Vehicle proxy = vehicleProxyProvider.getProxy();
        proxy.run();

    }
}
/** 执行结果
 * invoke方法 第一句
 * 这是Car第一句
 * 这是Car第二句
 * 这是Car第三句
 * invoke方法 最末句
 */
AOP编程
AOP思想:创建一个切面类,切面类的任意方法 可以插入到任意类的任意方法的位置(方法执行前、后、异常、finally),如图:
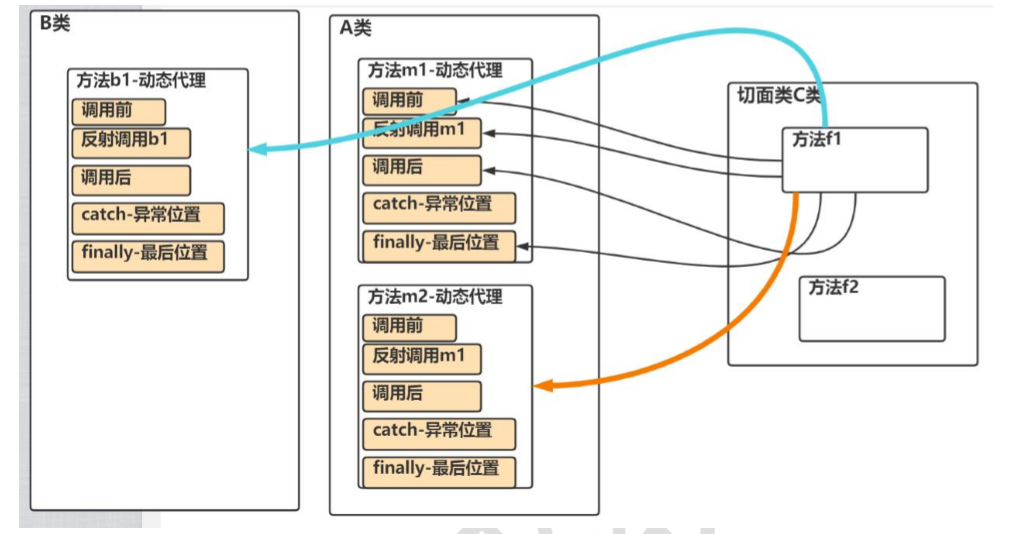
当我们需要为分散的对象引入公共行为的时候,面向对象则显得无能为力,例如日志、事务功能往往水平的分散在所有对象层次中,在面向对象设计中,它导致了大量代码重复,不利于各个模块的重用。
AOP将程序中的交叉业务逻辑封装成一个切面,然后注入到目标对象中去。Aop可以对某个对象或某些对象的功能进行增强,使得可以在执行某个方法之前额外做一些事情,执行之后又额外做一些事情。

AOP编程说明
1.需要引入核心的aspect包
2.在切面中声明通知方法
1).前置通知:@Before
2).返回通知:@AfterReturning
3).异常通知:@AfterThrowing --发生了异常才调用
4).后置通知:@After --在finally中执行,也叫最终通知
5).环绕通知:@Around
接口
/**
 * service接口
 */
public interface SmartAnimalableService {
    public float getSum(float f1, float f2);
    public float getSub(float f1, float f2);

}
子类
/**
 * @Component 注入到容器
 */
@Component
public class SmartDog implements SmartAnimalableService {
    @Override
    public float getSum(float f1, float f2) {
        System.out.println("SmartDog.getSum = " + (f1 + f2));
        return f1 + f2;
    }
    @Override
    public float getSub(float f1, float f2) {
        System.out.println("SmartDog.getSub = " + (f1 - f2));
        return f1 - f2;
    }
}
切面
/**
 * 切面类
 * @Component 表注入容器
 * @Aspect 表这是一个切面类
 */
@Aspect
@Component
public class SmartAnimalAspect {

    //前置 方法名字不重要,自己自定义的
    //1. @Before(value ="execution( )") 指定切入到哪个类的哪个方法 格式:访问修饰符 返回类型 全限定名.方法名(参数列表类型)
    //2. JoinPoint joinPoint 在底层执行时,由AspectJ切面框架,会给该切入方法传入一个连接点对象JoinPoint
    @Before(value ="execution(public float com.wang.spring.aop.SmartDog.getSum(float,float ))")
    public void before(JoinPoint joinPoint){
        //通过连接点对象,可以获取方法签名(方法的参数的顺序和类型)
        Signature signature = joinPoint.getSignature();
        //通过方法签名获取数据并输出
        System.out.println("aop-方法执行前-日志-方法名-"+signature.getName() +"参数"+ Arrays.asList(joinPoint.getArgs()));

    }
}
xml
    <!--配置自动扫描的包,注意需要加入context名称空间 也可以在测试类上添加 @ComponentScan("com.wang.spring.aop ") 代替xml配置-->
    <context:component-scan base-package="com.wang.spring.aop"/>

    <!--开启基于注解的AOP功能 也可以在切面类上添加 @EnableAspectJAutoProxy 代替xml配置 -->
    <aop:aspectj-autoproxy/>
测试
    @Test
    public void test() {
        ApplicationContext ioc = new ClassPathXmlApplicationContext("beans.xml");

        //如果是通过全注解完成的aop,则可以使用以下:
        //ApplicationContext ioc = new AnnotationConfigApplicationContext("com.wang.spring.aop")
        SmartAnimalableService bean = ioc.getBean(SmartAnimalableService.class);

        bean.getSum(2, 3);
    }
注意:
- SmartAnimalableService bean = ioc.getBean(SmartAnimalableService.class); 通过接口类型获取注入的对象–就是代理对象
- 切面方法要非静态方法
- @Before(value=“execution(com.hspedu.aop.proxy.SmartDog.(…))”) 切入表达式的更多配置,比如使用模糊配置
- @Before(value=“execution(**.*(…))”) 表示所有访问权限,所有包的下所有有类的所方法,都会被执行该前置通知方法
- 当 spring 容器开启了aop:aspectj-autoproxy/, 我们获取注入的对象, 需要以接口的类型来获取, 因为你注入的对象.getClass() 已经是代理类型 了
- 当 spring 容器开启了 aop:aspectj-autoproxy/, 我们获 取注入的对象, 也可以通过id来获取, 但是也要转成接口类型.
- @Before(value=“execution(*com.proxy.SmartDog() || com.towproxy.SmartDog())”) 配置多个
切入表达式
切入点表达式,作用:通过表达式的方式定位一个或多个具体的连接点
语法格式
execution([权限修饰符] [返回类型] [全类名/简单类名].[方法名]([参数列表]))
| 表达式 | execution( * com.wang.spring.aop.SmartDog.*(…)) |
|---|---|
| 含义 | SmartDog 接口中声明的所有方法。 第一个”*"表示任意修饰符及任意返回值。 第二个”*“表任意方法。 ”…"表匹配任意数量、类型的参数。 若目标类、接口、切面类在同一包,可写简单类名。 |
| 表达式 | execution(public * com.wang.spring.aop.SmartDog. * (… )) |
| 含义 | SmartDog 接口中声明的所有公共方法。 |
| 表达式 | execution( String com.wang.spring.aop.SmartDog. * (… ))* |
| 含义 | SmartDog 接口中声明的所有返回值为String的方法。 |
| 表达式 | execution(public String com.wang.spring.aop.SmartDog. * (String, … )) |
| 含义 | SmartDog 接口中声明的所有第一个参数为String,返回值为String的公共方法。 |
| 表达式 | execution(public String com.wang.spring.aop.SmartDog. * (String, String )) |
| 含义 | SmartDog 接口中声明的所有两个参数都是String,返回值为String的公共方法。 |
| 表达式 | execution( * . add (… ) || * * . sub (… ) )* |
| 含义 | 在AspectJ中,切入点表达式可以用”&&“,”||“,”!“等操作符结合 "&&"同时满足多个条件。匹配同时满足条件A和B的切入点:within(com.example…) && execution( doSomething(…)) "!"对条件进行取反。匹配不满足条件A的切入点:!within(com.example.util…*) |
返回通知获取结果
返回通知:即把showSuccessEndLog方法切入到目标方法执行完毕后的地方
1.如果希望目标方法执行的结果返回给切入方法,可以增加一个属性,比如 returning = “ref” 同时在切入方法增加形参 Object ref
    @AfterReturning(value ="execution(public float com.wang.spring.aop.SmartDog.getSum(float,float ))",
                    returning = "ref")
    public  void showSuccessEndLog(JoinPoint joinPoint,Object ref){
        System.out.println(ref);
    }
异常通知获取异常信息
异常通知:即把 showExceptionLog 方法切入到目标方法执行发生异常的catch{}
1.如果希望获取异常信息,可以增加一个属性 throwing = “thr” 同时在切入方法增加形参 Exception thr
    @AfterThrowing(value ="execution(public float com.wang.spring.aop.SmartDog.getSum(float,float ))",
                   throwing = "thr")
    public  void showExceptionLog(JoinPoint joinPoint,Exception thr){

        System.out.println(thr);
    }
环绕通知
了解-后续补充
切入点表达式重用
定义一个切入点,在后面使用时可以直接引用,提高复用性
	//定义一个切入点
	@Pointcut(value = "execution(public float com.wang.spring.aop.SmartDog.getSum(float,float ))")
    public void myPointCat(){}

	//使用
    @AfterThrowing(value ="myPointCat()",throwing = "thr")
    public  void showExceptionLog(JoinPoint joinPoint,Exception thr){

        System.out.println(thr);
    }
XML配置AOP
java代码和上面AOP编程代码一致,去除注解
主要看xml配置
    <!--    配置一个切面类对象bean-->
    <bean id="smartAnimalAspect" class="com.wang.spring.aop.SmartAnimalAspect"/>


    <!--    配置为切面类-->
    <aop:config>
        <!--配置统一切入点-->
        <aop:pointcut id="myPointCut" expression="execution(public float com.wang.spring.aop.SmartDog.getSum(float,float))"/>

        <!--指定切面对象 配置前置通知,有返回异常的异常通知
        1.order 当存在多个切面,order属性可以控制切面的执行顺序。order值越小,优先级越高,即该切面会被先执行
        2.method 是切面类的方法
        3.pointcut-ref 表示要插入的切入点
        4.throwing 代表获取异常的返回值 其他通知有其他的写法 将结果返回给 method="showExceptionLog"-->
        <aop:aspect ref="smartAnimalAspect" order="1">
            <!--配置前置通知-->
            <aop:before method="before"  pointcut-ref="myPointCut"/>
            <!--有返回异常的异常通知-->
            <aop:after-throwing method="showExceptionLog" throwing="thr" pointcut-ref="myPointCut"/>

        </aop:aspect>
    </aop:config>
JdbcTemplate 操作数据库
当程序员使用Spring框架做项目时,Spring提供了一个操作数据库(表)功能强大的类JdbcTemplate。我们可以提供ioc容器来配置一个JdbcTemplate对象,使得完成对数据库表各种操作。
JdbcTemplate是Spring提供的访问数据库的技术,可以将JDBC的常用操作封装为模板对象
JdbcTemplate 配置环境
1.导入 spring-jdbc 、mysql-connector-java 、spring-orm 的Maven依赖
2.创建 Spring 配置文件 src/main/resources/jdbc.properties
jdbc.username=root
jdbc.password=123456
#8以上是 com.mysql.cj.jdbc.Driver 8以下是 com.mysql.jdbc.Driver
jdbc.driver=com.mysql.cj.jdbc.Driver
#高版本有SSL,这里useSSL=false将SSL关闭,serverTimezone=GMT%2B8设置字符集
jdbc.url=jdbc:mysql://localhost:3306/wbldb?serverTimezone=GMT%2B8&useSSL=false
3.在 src/main/resources/ +包名下创建 JdbcTemplate.xml文件 (本次无java实例,直接resources下创建即可)
    <!--    引入外部配置文件-->
    <context:property-placeholder location="classpath:jdbc.properties"/>

    <!--    配置数据源对象- dataSource  mysql-connector-java 包下的数据源-->
    <bean id="dataSource" class="org.springframework.jdbc.datasource.DriverManagerDataSource">
        <property name="username" value="${jdbc.username}"/>
        <property name="password" value="${jdbc.password}"/>
        <property name="driverClassName" value="${jdbc.driver}"/>
        <property name="url" value="${jdbc.url}"/>
    </bean>

    <!--   配置jdbcTemplate对象, spring-jdbc包下,用于对数据库操作 -->
    <bean id="jdbcTemplate" class="org.springframework.jdbc.core.JdbcTemplate">
        <!--  给jdbc对象配置dataSource属性-->
        <property name="dataSource" ref="dataSource"/>
    </bean>
4.测试
    public static void main(String[] args) throws SQLException {

        ApplicationContext ioc = new
                ClassPathXmlApplicationContext("classpath:com/wang/spring/jdbc/JdbcTemplate.xml");

        //获取jdbcTemplate对象,通过 jdbcTemplate 操作数据库
        JdbcTemplate jdbcTemplate = ioc.getBean("jdbcTemplate", JdbcTemplate.class);

        System.out.println(jdbcTemplate);
    }
通过 jdbcTemplate 添加数据
测试
    public static void main(String[] args) throws SQLException {

        ApplicationContext ioc = new
                ClassPathXmlApplicationContext("classpath:com/wang/spring/jdbc/JdbcTemplate.xml");

        //通过 jdbcTemplate 对数据库数据进行操作
        JdbcTemplate jdbcTemplate = ioc.getBean("jdbcTemplate", JdbcTemplate.class);

        //方式1
        jdbcTemplate.update("INSERT INTO monster VALUES(700, '红孩儿', '喷火')");

        //方式二
        String sql="INSERT INTO monster VALUES(?, ?, ?)";
        jdbcTemplate.update(sql,800,"大圣","闹天宫");
    }
通过 jdbcTemplate 修改数据
测试
    public static void main(String[] args) throws SQLException {

        ApplicationContext ioc = new
                ClassPathXmlApplicationContext("classpath:com/wang/spring/jdbc/JdbcTemplate.xml");

        //通过 jdbcTemplate 对数据库数据进行操作
        JdbcTemplate jdbcTemplate = ioc.getBean("jdbcTemplate", JdbcTemplate.class);

        //修改数据
        String sql="UPDATE monster SET name=?,skill=? WHERE id=?";
        jdbcTemplate.update(sql,"八戒","吃东西",600);
    }
通过 jdbcTemplate 批量处理
批量添加数据
    public static void main(String[] args) throws SQLException {

        ApplicationContext ioc = new
                ClassPathXmlApplicationContext("classpath:com/wang/spring/jdbc/JdbcTemplate.xml");

        //通过 jdbcTemplate 对数据库数据进行操作
        JdbcTemplate jdbcTemplate = ioc.getBean("jdbcTemplate", JdbcTemplate.class);

        String sql="INSERT INTO monster VALUES(?, ?, ?)";
        //准备参数
        List<Object[]> objects = new ArrayList<>();
        objects.add(new Object[]{"1001","吴锦","效率"});
        objects.add(new Object[]{"1002","王五","低能"});
        //添加
        jdbcTemplate.batchUpdate(sql,objects);
    }
查询结果封装为对象/集合
对象
public class Monster {
    private Integer monsterId;
    private String monsterName;
    private String monsterSkill;

    //省略了get、set、无参有参构造、toString方法
}
查询结果封装为对象
    public static void main(String[] args) throws SQLException {

        ApplicationContext ioc = new
                ClassPathXmlApplicationContext("classpath:com/wang/spring/jdbc/JdbcTemplate.xml");

        //通过 jdbcTemplate 对数据库数据进行操作
        JdbcTemplate jdbcTemplate = ioc.getBean("jdbcTemplate", JdbcTemplate.class);

        String sql = "SELECT id AS monsterId, name AS monsterName, skill AS monsterSkill FROM monster WHERE id=?";

        //使用 RowMapper 接口来对返回的数据进行一个封装 ==》底层使用的反射-->setter
        RowMapper<Monster> rowMapper = new BeanPropertyRowMapper<>(Monster.class);

        //查询并以对象形式返回
        Monster monster = jdbcTemplate.queryForObject(sql, rowMapper,1001);
        System.out.println(monster);
    }
查询结果封装为对象集合
    public static void main(String[] args) throws SQLException {

        ApplicationContext ioc = new
                ClassPathXmlApplicationContext("classpath:com/wang/spring/jdbc/JdbcTemplate.xml");

        //通过 jdbcTemplate 对数据库数据进行操作
        JdbcTemplate jdbcTemplate = ioc.getBean("jdbcTemplate", JdbcTemplate.class);

        String sql = "SELECT id AS monsterId, name AS monsterName, skill AS monsterSkill FROM monster WHERE id>?";
        //使用 RowMapper 接口来对返回的数据进行一个封装 ==》底层使用的反射-->setter
       RowMapper<Monster> rowMapper = new BeanPropertyRowMapper<>(Monster.class);
        //查询输出
        List<Monster> query = jdbcTemplate.query(sql, rowMapper,100);
        for (Monster monster : query) {
            System.out.println(monster);
        }
    }
查询结果返回某一行一列
例如只想查询id为100的妖怪的名字
    public static void main(String[] args) throws SQLException {

        ApplicationContext ioc = new
                ClassPathXmlApplicationContext("classpath:com/wang/spring/jdbc/JdbcTemplate.xml");

        //通过 jdbcTemplate 对数据库数据进行操作
        JdbcTemplate jdbcTemplate = ioc.getBean("jdbcTemplate", JdbcTemplate.class);

        //只查询某一行列的数据
        String sql = "SELECT  name  FROM monster WHERE id>?";
        String name = jdbcTemplate.queryForObject(sql, String.class, 1001);

        System.out.println(name);
    }
具名参数
使用Map传入具名参数完成操作,比如添加 螃蟹精. :name 就是具名参数形式需要使 用NamedParameterJdbcTemplate 类
1.在xml中增加配置
    <!--配置 NamedParameterJdbcTemplate 支撑具名参数-->
    <bean id="namedParameterJdbcTemplate"
          class="org.springframework.jdbc.core.namedparam.NamedParameterJdbcTemplate">
        <!--  这里需要关联数据源,通过构造器设置-->
        <constructor-arg name="dataSource" ref="dataSource"/>
    </bean>
2.测试
    public static void main(String[] args) throws SQLException {

        ApplicationContext ioc = new
                ClassPathXmlApplicationContext("classpath:com/wang/spring/jdbc/JdbcTemplate.xml");

        NamedParameterJdbcTemplate namedParameterJdbcTemplate =
                ioc.getBean("namedParameterJdbcTemplate", NamedParameterJdbcTemplate.class);

        String sql="INSERT INTO monster VALUES(:id, :name,:skill)";

        //创建map  k和sql语句的具名参数一致 用于匹配
        HashMap<String, Object> map = new HashMap<>();
        map.put("id",1003);
        map.put("name","吴亦凡");
        map.put("skill","牢饭");

        // 添加
        namedParameterJdbcTemplate.update(sql,map);
    }
封装具名参数
使用 sqlparametersoruce 来封装具名参数
    public static void main(String[] args) throws SQLException {

        ApplicationContext ioc = new
                ClassPathXmlApplicationContext("classpath:com/wang/spring/jdbc/JdbcTemplate.xml");

        NamedParameterJdbcTemplate namedParameterJdbcTemplate =
                ioc.getBean("namedParameterJdbcTemplate", NamedParameterJdbcTemplate.class);

        String sql="INSERT INTO monster VALUES(:id, :name,:skill)";

        //封装具名参数
        Monster monster = newMonster(900, "狐狸精", "狐媚之术");
        SqlParameterSource source = new BeanPropertySqlParameterSource(monster);

        // 添加
        namedParameterJdbcTemplate.update(sql, source);
    }
事务
后续补充…


 219
219

 被折叠的 条评论
为什么被折叠?
被折叠的 条评论
为什么被折叠?
 到【灌水乐园】发言


