


Tarojs在3.6.16版本兼容了微信小程序的隐私协议
涉及4个新增接口(作用同微信官方文档相关方法):
-
Taro.requirePrivacyAuthorize(模拟隐私接口调用,用作调试)
-
Taro.openPrivacyContract(跳转至隐私协议页面)
-
Taro.onNeedPrivacyAuthorization(监听隐私接口需要用户授权事件)
-
Taro.getPrivacySetting(查询隐私授权情况)
阅读文档可知,微信判断授权的是看用户有木有点击过<button open-type="agreePrivacyAuthorization">
第一步:升级Tarojs版本
第二步:需要根据实现方式搭配不同的接口。
- 可以通过在app.ts中的onLoad/onShow里使用监听隐私接口需要用户授权事件,再调用全局弹窗组件确认
- 或者在一开始(登录后)就查询隐私授权情况,若未进行授权就弹窗让用户确认(本文使用的方法)
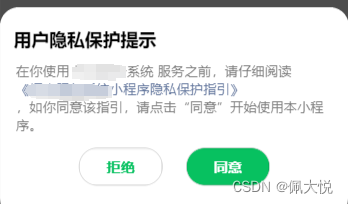
弹窗部分代码
    <nut-popup
      position="bottom"
      teleport="#app"
      round
      v-model:visible="showPrivacy"
      style="height: 470rpx"
    >
      <div
        style="
          margin: 45rpx 30rpx 0rpx 30rpx;
          font-weight: 600;
          font-size: 40rpx;
        "
      >
        用户隐私保护提示
      </div>
      <div
        style="margin: 25rpx 35rpx 0rpx 35rpx; color: #7f7f7f; font-size: 15px"
      >
        在你使用 XXX系统 服务之前,请仔细阅读
        <a style="color: #65789e" @click="showPrivacyAuthorization"
          >《XXX小程序隐私保护指引》</a
        >
        ,如你同意该指引,请点击“同意”开始使用本小程序。
      </div>
      <div style="width: 100%; text-align: center; margin-top: 30rpx">
        <button
          style="
            display: inline-block;
            width: 182rpx;
            color: #07c160;
            font-size: 16px;
            font-weight: 600;
          "
          @click="showPrivacy = false"
        >
          拒绝
        </button>
        <button
          style="
            display: inline-block;
            width: 182rpx;
            margin-left: 50rpx;
            background-color: #07c160;
            color: white;
            font-size: 16px;
            font-weight: 600;
          "
          id="agree-btn"
          open-type="agreePrivacyAuthorization"
          @agreeprivacyauthorization="handleAgreePrivacyAuthorization"
        >
          同意
        </button>
      </div>
    </nut-popup>
效果预览
ts部分代码
<script lang="ts" setup>

 const showPrivacy = ref<boolean>(false);

// 登录执行完成后,页面跳转之前
// 查询隐私授权情况
 Taro.getPrivacySetting({
    complete: (res: any) => {
      // 用户需要同意隐私协议
      // 打开弹窗
      if (res.needAuthorization) {
         showPrivacy.value = true;
      } else {
      // 用户已经同意过隐私协议,所以不需要再弹出隐私协议
      // 跳转页面
         Taro.reLaunch({ url: "/pages/my/index" });
      }
     },
 });


// “同意”按钮的点击事件
const handleAgreePrivacyAuthorization = () => {
  showPrivacy.value = false;
  Taro.reLaunch({ url: "/pages/my/index" });
};


// 打开小程序隐私保护指引
const showPrivacyAuthorization = () => {
  Taro.openPrivacyContract({
    complete: (res) => {
      console.log("打开了小程序隐私保护指引", res);
    },
  });
};

</script>


 1190
1190


 被折叠的 条评论
为什么被折叠?
被折叠的 条评论
为什么被折叠?
 到【灌水乐园】发言


