


写完论文了,来把评论的前端部分补一下。
前端的实现思路是自己摸索出来的,没找到可以符合自己需求的参考,有问题或者有优化的建议欢迎指正。
思路分析
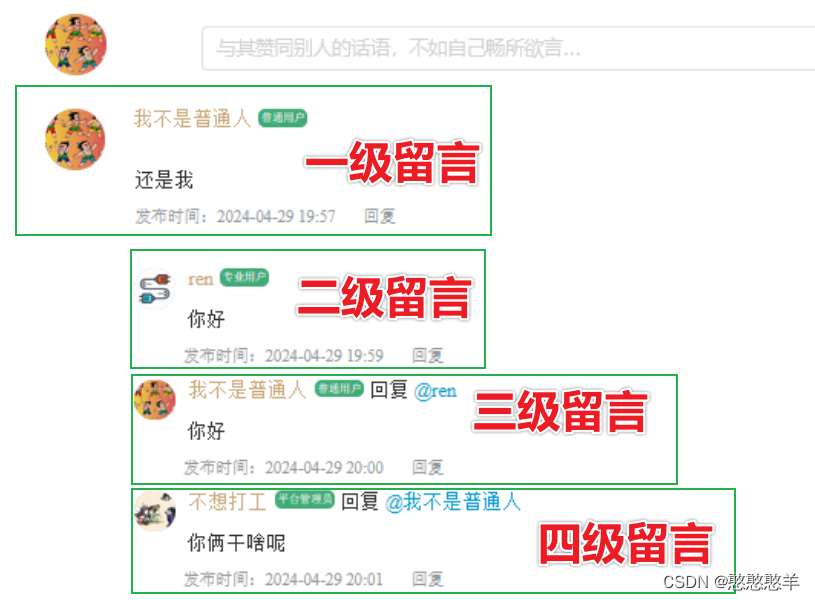
当时写完后端的时候就在思考应该怎么处理响应数据才能做到多级评论的展示,感觉应该 不复杂,但是经验有限,写起来有些吃力。
本来我只用了一个组件,然后在里面实现多级的嵌套,但是发现这样使得单个文件比较臃肿,而且逻辑比较复杂。
于是我拆分了一下,两个组件,一个父组件、一个子组件。父组件只展示顶级留言,子组件展示所有子留言,但是这没有解决二级与三级以上留言的区分。
最终的版本,一个父组件,两个子组件。父组件同样只展示顶级留言,但是父组件中引入了两个子组件,分别展示了二级留言和三级以上留言,三级以上留言使用了递归来实现。
实现如图
封装组件
每一个组件都是单文件组件,模板、逻辑、样式都在同一个文件,但是这里为了让大家更清楚的浏览,将三个部分拆开展示。
父组件
模板
为了解读代码方便,将解释贴在了每段代码前方,建议按照从上至下的顺序去理解代码,根据这个顺序去看对应的逻辑实现。
难点:
- 父子组件传值
- 回复框的定位:控制回复框仅在当前点击的留言下方出现
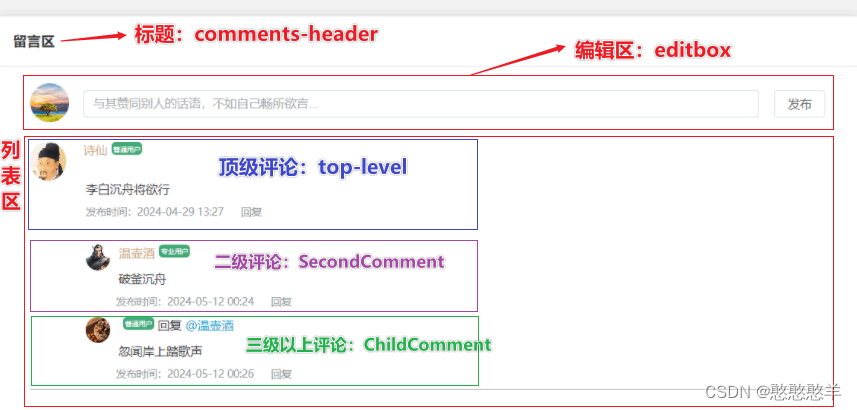
<template>
  <div class="comments">
    <el-card>
      <template #header>
        <div class="comments-header">
          <h3>留言区</h3>
        </div>
      </template>

      <!-- 编辑区
      		1. 左侧:显示当前登录用户头像
      		2. 中间:输入框,使用 v-model 收集用户输入的内容 comment
      		3. 右侧:在 handlePublish 方法中请求新增留言接口
       -->
      <div class="editbox">
        <div class="editbox-left">
          <el-avatar :size="45" :src="userInfo.avatar" />
        </div>
        <div class="editbox-middle">
          <el-input
            placeholder="与其赞同别人的话语,不如自己畅所欲言..."
            v-model="comment"
          ></el-input>
        </div>
        <div class="editbox-right">
          <el-button @click="handlePublish(comment)">发布</el-button>
        </div>
      </div>

      <!-- 列表区
      		1. 遍历分页获取的留言列表,并设置唯一的 key 值
      		2. 顶级留言包括:头像、昵称、角色名标签、留言内容、发布时间
      		3. 点击 “回复” 会触发事件 handleReply,同时传入两个参数:当前被回复留言的根ID、当前被回复留言的直接父级ID
      			a. 这两个参数用于给【即将发布的留言】设置根ID与直接父级ID,做到 “回复框的定位”
      			b. 对于二级留言,这两个值传入顶级留言本身的ID就行
       -->
      <div class="listbox" v-for="(item, index) in commentsList" :key="index">
        <!-- 顶级留言:这没什么好说的,就直接展示遍历的结果 -->
        <div class="top-level">
          <div class="listbox-top-user">
            <el-avatar :size="45" :src="item.userImg" />
            <p>
              <span>{{ item.createdBy }}</span>
              <span>{{ item.roleName }}</span>
            </p>
          </div>
          <div class="listbox-middle-root">{{ item.comment }}</div>
          <div class="listbox-bottom">
            <span>发布时间:{{ item.createdAt }}</span>
            <span @click="handleReply(item.id, item.id)">回复</span>
          </div>
        </div>

         <!-- 子留言区
        		1. 这里没有使用在二级组件中引入三级以上组件的方式,因为当时开发的时候感觉传值有点麻烦
        		2. 使用两个子组件同级的形式

	         子留言:二级
	          		1. 判断顶层留言是否存在二级子留言,是则引入 SecondComment 子组件
	          		2. 父组件传递参数:二级评论 item.children
	          		3. 处理 “回复” 功能,使用同一个方法实现(handleReply),这里的根ID和直接父ID是子组件传过来的
	          		4. handle-reply 是子组件中声明需要抛出的事件,@handle-reply 代表监听子组件的自定义事件
         -->
        <div v-if="item.children && item.children.length">
          <SecondComment
            :secondComments="item.children"
            @handle-reply="handleReply"
            style="margin-left: 0"
          />

          <!-- 子留言:三级
          		1. 因为使用的同级结构,所以需要先遍历每一个二级留言,判断其下是否存在子留言,是则引入 ChildComment 子组件。
          		2. 必须要遍历二级留言并设置唯一的 key !!无法直接获取 item.children.children !!!(原因有点忘了...)
          		3. 同样要给子组件传递参数:三级评论 child.children
          		4. 同时将二级留言的发表人昵称传递给子组件,用于非二级留言的子留言显示 “ @nickname ”
          		5. 同样拥有 “回复” 功能,使用同一个方法实现(handleReply),这里的根ID和直接父ID是子组件传过来的
          		6. 子组件中声明的抛出事件(to-reply)不能与其他组件重复
           -->
          <template
            v-for="(child, childIndex) in item.children"
            :key="childIndex"
          >
            <template v-if="child.children && child.children.length">
              <ChildComment
                :childComments="child.children"
                :parentName="child.createdBy"
                @to-reply="handleReply"
                style="margin-left: 65px"
              />
            </template>
          </template>
        </div>

        <!-- 回复框
        		1. 使用一个变量 showReply 来控制显示隐藏
        		2. 同时使用变量 showReplyIndex 用来确定是在哪条留言下显示回复框,否则点击 “回复” 会在所有留言下都出现回复框
        		3. 当 handleReply 方法被触发时,改变 showReply 和 showReplyIndex 的值
        		4. 使用 replyComment 收集回复框输入的内容,当触发 handlePublish 方法时作为参数传进去
         -->
        <div
          class="reply-box-container"
          v-show="showReplyIndex === item.id && showReply"
        >
          <div class="replybox" id="reply-box">
            <div class="replybox-left">
              <el-avatar :size="30" :src="userInfo.avatar" />
            </div>
            <div class="replybox-middle">
              <el-input placeholder="回复" v-model="replyComment"></el-input>
            </div>
            <div class="replybox-right">
              <el-button @click="handlePublish(replyComment)">提交</el-button>
            </div>
          </div>
        </div>
      </div>
      <!-- 分页器:这也是一个单独的组件,此处不做深究,有机会会再出一篇封装分页组件的文章 -->
      <PageQuery
        :total="total"
        :pageNum="getCommentForm.pageNum"
        :pageSize="getCommentForm.pageSize"
        @page-size="handlePageSize"
        @page-num="handlePageNum"
      />
    </el-card>
  </div>
</template>
代码对应结构参考:
逻辑
<script setup>
import { ref, onMounted, reactive } from "vue";
import { getCommentListApi, postAddCommentApi } from "@/api/common";
import PageQuery from "@/components/common/PageQuery.vue";
import ChildComment from "@/components/front/ChildComment.vue";
import { useUserStore } from "@/stores/useUserStore";
import SecondComment from "@/components/front/SecondComment.vue";

const { userInfo } = useUserStore();
// 收集 “编辑区” 的输入内容
const comment = ref("");
// 收集 “回复框” 的输入内容
const replyComment = ref("");
// 存储请求回来的数据总数
const total = ref(0);
// 存储请求回来的留言列表
const commentsList = ref();
// 控制回复框的索引
const showReplyIndex = ref(0);
// 控制回复框的显示隐藏
const showReply = ref(false);

onMounted(() => {
  getCommentList();
});

// 接收父组件传过来的值——在别的文件中使用留言组件,则改文件为留言组件的父组件
const props = defineProps({
// 关联主体ID
  momentId: {
    type: Number,
    required: true,
  },
  postAddCommentForm: {
    type: Object,
    required: true,
  },
});

// 请求当前主体的评论列表
const getCommentForm = reactive({
  pageNum: 1,
  pageSize: 10,
  // ChildPageNum: 1,
  // ChildPageSize: 2,
  momentId: props.momentId,
});

/**
 * 获取留言列表
 */
const getCommentList = async () => {
  try {
    // 封装参数
    const res = await getCommentListApi(getCommentForm);
    total.value = res.data.total;
    commentsList.value = res.data.items;
  } catch (error) {}
};

/**
 * 显示 回复编辑框
 */
const handleReply = (rootCommentId, parentId) => {
  // 解决只在 当前点击项下 显示回复框
  showReplyIndex.value = rootCommentId;
  // 控制显示隐藏
  showReply.value = !showReply.value;

  const replyBox = document.querySelector(".reply-box-container");
  // 更新回复编辑框的属性,作为参数传给父组件
  // 这里使用到一个知识点:自定义属性
  // 因为需要实现绑定某回复框并使其含有rootCommentId和parentId,发送新增子留言请求时需要这两个参数
  replyBox.setAttribute("data-parent-comment-id", parentId);
  replyBox.setAttribute("data-root-comment-id", rootCommentId);
};

/**
 * 发布/回复 评论
 */
const handlePublish = async (comment) => {
  // 封装请求体:数据从父组件来
  const params = {
    comment: comment,
    momentId: props.postAddCommentForm.momentId,
    commentType: props.postAddCommentForm.commentType,
    rootCommentId: null,
    parentId: null,
    replyComment: "",
  };

  // 子评论 添加属性
  const replyBox = document.querySelector(".reply-box-container");
  if (replyBox) {
    // 获取根评论ID
    const rootCommentId = replyBox.getAttribute("data-root-comment-id");
    // 获取直接父评论ID
    const parentId = replyBox.getAttribute("data-parent-comment-id");

    params.rootCommentId = rootCommentId;
    params.parentId = parentId;
  }

  // 发送请求
  try {
    const res = await postAddCommentApi(params);
    ElMessage.success(res.msg);
    getCommentList();
    // 【问题】发布评论后,输入框中的值没有消失
  } catch (error) {
    console.log("🚀 ~ handlePublish ~ error:", error);
  }
};

/**
 * 分页器--当前页的数据量
 */
const handlePageSize = (pageSizeVal) => {
  getCommentForm.pageSize = pageSizeVal.pageSize;
  getCommentList();
};

/**
 * 分页器--切换页码
 */
const handlePageNum = (pageNumVal) => {
  getCommentForm.pageNum = pageNumVal.pageNum;
  getCommentList();
};
</script>
样式
<style lang="scss" scoped>
@import "@/assets/css/var.scss";

// 留言区
.comments {
  margin-top: 30px;
  margin-bottom: 100px;

  .el-card {
    width: 80%;
    margin: 20px auto;
  }

  .editbox,
  .listbox {
    margin: 0px 20px 20px 20px;
    display: flex;
  }

  // 编辑区
  .editbox {
    justify-content: space-between;
    align-items: center;
    .editbox-middle {
      width: 85%;
    }
  }

  // 列表展示区
  .listbox {
    flex-direction: column;
    border-bottom: 1px solid rgb(189, 187, 187);

    // 时间 + 回复
    .listbox-bottom {
      font-size: 12px;
      color: #9499a0;
      margin: 10px 0 10px 65px;
      display: flex;

      span {
        display: block;
        margin-right: 20px;
      }

       // 这里 color 换成普通颜色表示即可
      span:last-child:hover {
        cursor: pointer;
        color: $title-color;
      }
    }

    // 信息条
    .listbox-top-user {
      display: flex;

      // 个人信息
      p {
        margin-left: 20px;
        width: 100%;
        position: relative;

        span:first-child {
          color: $second-text;
        }
        // 身份标签
        span:last-child {
          margin-left: 5px;
          font-size: 8px;
          padding: 2px;
          background-color: $title-color;
          color: white;
          border-radius: 5px;
          position: absolute;
        }
      }
    }

    // 顶级评论
    .top-level {
      // 根评论内容
      .listbox-middle-root {
        margin-left: 65px;
      }
    }

    // 回复评论输入框
    .replybox {
      margin: 10px 0 20px 65px;
      display: flex;
      justify-content: space-between;
      align-items: center;
      width: 60%;

      .replybox-middle {
        width: 75%;
      }
    }

    // 展示更多
    .view-more {
      margin-left: 65px;
      font-size: 12px;
      color: #9499a0;
    }

    .view-more span:hover,
    .view-less span:hover {
      cursor: pointer;
      color: $title-color;
    }

    // 展示更少
    .view-less {
      font-size: 12px;
      color: #9499a0;
      margin-left: 37px;
    }
  }
}
</style>
子组件——二级留言
模板
<!-- 二级评论 -->

<template>
  <div v-if="props.secondComments && props.secondComments.length">
    <div
      class="sub-reply-container"
      id="child-reply"
      v-for="(child, childIndex) in props.secondComments"
      :key="childIndex"
    >
      <div class="listbox-top-user">
        <el-avatar :size="30" :src="child.userImg" />
        <p>
          <span>{{ child.createdBy }}</span>
          <span>{{ child.roleName }}</span>
        </p>
      </div>
      <div class="listbox-middle-root">{{ child.comment }}</div>
      <div class="listbox-bottom">
        <span>发布时间:{{ child.createdAt }}</span>
        <!-- 回复的是二级评论 -->
        <span @click="handleReply(child.parentId, child.id)">回复</span>
      </div>
    </div>
  </div>
</template>
逻辑
<script setup>
// 接收父组件传过来的值:二级留言
const props = defineProps({
  secondComments: {
    type: Array,
    default: [],
  },
});

// 声明需要抛出的事件
const emit = defineEmits(["handle-reply"]);

const handleReply = (rootCommentId, parentId) => {
  // 【注意】这里不以对象形式包裹发送,会导致嵌套;因为父组件中回复一级评论与子级评论共用一个传值方法
  emit("handle-reply", rootCommentId, parentId);
};
</script>
样式
<style lang="scss" scoped>
@import "../../assets/css/_var.scss";

.sub-reply-container {
  margin: 20px 0 0 65px;

  .listbox-top-user {
    display: flex;

    p {
      margin-left: 10px;
      width: 100%;

      // 姓名条
      span:first-child {
        color: $second-text;
      }

      // 身份标签
      span:nth-child(2) {
        margin-left: 5px;
        font-size: 8px;
        padding: 2px;
        background-color: $title-color;
        color: white;
        border-radius: 5px;
        position: relative;
        bottom: 4px;
      }
    }
  }

  .listbox-middle-root,
  .listbox-bottom {
    margin-left: 38px;
  }

  .listbox-bottom {
    font-size: 12px;
    color: #9499a0;
    margin: 10px 0 10px 35px;
    display: flex;

    span {
      display: block;
      margin-right: 20px;
    }

    span:last-child:hover {
      cursor: pointer;
      color: $title-color;
    }
  }
}
</style>
子组件——三级留言以上
模板
<!-- 三级及以上评论 -->
<template>
  <div class="sub-reply-container" v-if="childComments && childComments.length">
    <div class="sub-reply" v-for="(child, index) in childComments" :key="index">
      <!-- 渲染内容 -->
      <div class="listbox-top-user">
        <el-avatar :size="30" :src="child.userImg" />
        <p>
          <span>{{ child.createdBy }}</span>
          <span>{{ child.roleName }}</span>
          回复
          <span>@{{ parentName }}</span>
        </p>
      </div>
      <div class="listbox-middle-root">{{ child.comment }}</div>
      <div class="listbox-bottom">
        <span>发布时间:{{ child.createdAt }}</span>
        <span @click="handleReply(child.rootCommentId, child.id)">回复</span>
      </div>

      <!-- 递归地渲染子评论的子评论:调用自己 -->
      <ChildComment
        :childComments="child.children"
        :parentName="child.createdBy"
        @to-reply="handleReply"
      />
    </div>
  </div>
</template>
逻辑
<script setup>
// 接收父组件传过来的值
const props = defineProps({
  childComments: {
    type: Array,
    default: [],
  },
  parentName: {
    type: String,
    reequire: true,
  }
});
const childComments = props.childComments;
const parentName = props.parentName;

// console.log("🚀 ~ parentName:", parentName);
// console.log("🚀 ~ childComments:", childComments);

// 声明需要抛出的事件
const emit = defineEmits(["to-reply"]);

const handleReply = (rootCommentId, parentId) => {
  // 【注意】这里不以对象形式包裹发送,会导致嵌套;父组件中回复一级评论与子级评论共用一个传值方法
  emit("to-reply", rootCommentId, parentId);
};
</script>
样式
<style lang="scss" scoped>
@import "../../assets/css/_var.scss";

.listbox-top-user {
  display: flex;

  p {
    margin-left: 10px;
    width: 100%;

    // 姓名条
    span:first-child {
      color: $second-text;
    }

    // 身份标签
    span:nth-child(2) {
      margin-left: 5px;
      font-size: 8px;
      padding: 2px;
      background-color: $title-color;
      color: white;
      border-radius: 5px;
      position: relative;
      bottom: 4px;
    }

    // 父级姓名条
    span:last-child {
      color: #0c9dd2;
    }
  }
}

.listbox-middle-root,
.listbox-bottom {
  margin-left: 38px;
}

.listbox-bottom {
  font-size: 12px;
  color: #9499a0;
  margin: 10px 0 10px 35px;
  display: flex;

  span {
    display: block;
    margin-right: 20px;
  }

  span:last-child:hover {
    cursor: pointer;
    color: $title-color;
  }
}
</style>
两个子组件没有太多额外说明,其实把父组件看懂了,子组件挺简单的,关键地方我都写了注释。有疑问可以在评论区提出,看到会回复的。
留言组件的使用
在药材详情页中使用:
  <!-- 留言区
  		使用时只需要传两个参数:评论类型、当前关联主体ID(就是谁被留言了,就传谁的ID)
   -->
  <Comment
    :momentId="getMedicineId"
    :postAddCommentForm="postAddCommentForm"
  />
相关代码
import { useRoute } from "vue-router";
import { reactive } from "vue";
import Comment from "@/components/front/Comment.vue";

const route = useRoute();
// 接收通过路由跳转传过来的资讯ID,默认变为字符串
const getMedicineId = Number(route.query.medicineId);

// 请求发布评论的请求体
const postAddCommentForm = reactive({
  comment: "",
  momentId: Number(getMedicineId),
  commentType: 1,
  rootCommentId: null,
  parentId: null,
  replyComment: "",
});
// 其实,这里好像可以不用封成一个对象了,单独把 commentType 传过去就行,感兴趣的同学可以试试(记得相应的把留言组件中接收的地方也改一下)
在方剂下进行留言, commentType设置为2;在资讯下进行留言, commentType设置为3;同时传入主体ID即可完成整个留言组件的调用。
以上实现均为个人思考后做出来了,代码还有欠缺,也有优化的地方,大佬路过莫喷。但是欢迎大家提出建议!!


 1万+
1万+

 被折叠的 条评论
为什么被折叠?
被折叠的 条评论
为什么被折叠?
 到【灌水乐园】发言


