


注:适用版本(Harmony OS NEXT / 5.0 / API 12+ )
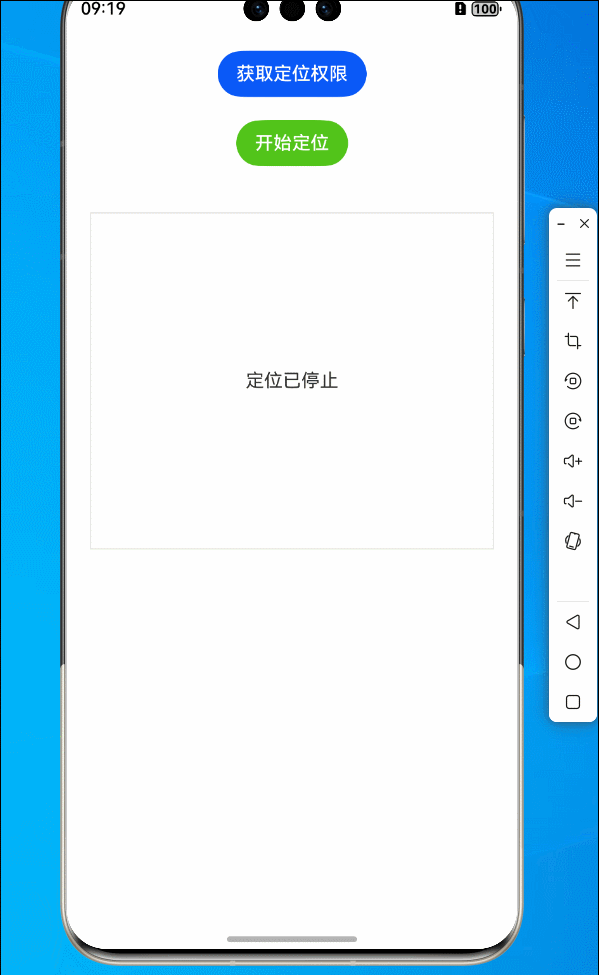
一、效果展示
二、实现逻辑
-
获取权限管理
通过 abilityAccessCtrl 模块实现动态权限申请,遵循最小化授权原则(仅请求 APPROXIMATELY_LOCATION 和 LOCATION 权限),并在异步回调中通过 authResults 统一校验授权状态。这一层确保功能符合系统安全规范,避免因权限缺失导致服务中断
-
定位服务封装
将定位核心逻辑(如请求参数配置、事件监听)抽象为 LocationService 静态类
-
数据流向清晰化
locationChange 事件触发 → 回调函数捕获位置对象 → 更新 text_locationResult 状态变量 → 触发 UI 重渲染。形成 「事件→数据→视图」 单向数据流,保障可预测性
-
异常监控
try-catch 块包裹关键操作(如权限请求、事件注册),结合 hilog 日志工具输出错误详情,便于快速定位问题。
三、源码
1、静态源码
// 导入所需的模块
import { geoLocationManager } from '@kit.LocationKit'; // 用于管理地理位置功能
import { abilityAccessCtrl, Permissions } from '@kit.AbilityKit'; // 用于权限管理
import { hilog } from '@kit.PerformanceAnalysisKit'; // 用于日志记录

// LocationService类封装了与定位相关的操作
class LocationService {
  // 请求定位权限
  static async requestPermissions(): Promise<boolean> {
    // 定义需要的权限列表
    const permissions: Array<Permissions> = ['ohos.permission.APPROXIMATELY_LOCATION', 'ohos.permission.LOCATION'];
    // 创建权限管理对象
    const atManager = abilityAccessCtrl.createAtManager();
    try {
      // 向用户请求权限
      const result = await atManager.requestPermissionsFromUser(getContext(), permissions);
      // 检查所有权限是否都被授予
      return result.authResults.every(status => status === 0);
    } catch (err) {
      // 如果请求失败,抛出错误
      throw new Error(`requestPermissionsFromUser failed: ${JSON.stringify(err)}`);
    }
  }

  // 开始定位跟踪
  static startLocationTracking(callback: (location: geoLocationManager.Location) => void) {
    // 定义定位请求参数
    const requestInfo: geoLocationManager.LocationRequest = {
      'scenario': geoLocationManager.LocationRequestScenario.DAILY_LIFE_SERVICE, // 定位场景
      'priority': geoLocationManager.LocationRequestPriority.FIRST_FIX, // 定位优先级
      'timeInterval': 1, // 时间间隔
      'distanceInterval': 0, // 距离间隔
      'maxAccuracy': 0 // 最大精度
    };
    try {
      // 注册位置变化监听器
      geoLocationManager.on('locationChange', requestInfo, callback);
    } catch (err) {
      // 如果启动定位失败,抛出错误
      throw new Error(`startLocationTracking failed: ${JSON.stringify(err)}`);
    }
  }

  // 停止定位跟踪
  static stopLocationTracking(callback: (location: geoLocationManager.Location) => void) {
    // 取消位置变化监听器
    geoLocationManager.off('locationChange', callback);
  }

  // ... 其他定位相关方法 ...
}

// 定义定位页面组件
@Entry
@Component
struct PositioningPage {
  @State text_locationResult: string = ''; // 用于显示定位结果的文本
  @State isTracking: boolean = false; // 标记是否正在定位

  // 构建页面布局
  build() {
    Column({ space: 20 }) {
      // 权限获取按钮
      Button('获取定位权限')
        .type(ButtonType.Capsule) // 设置按钮样式为胶囊形状
        .onClick(async () => {
          try {
            // 请求定位权限
            const granted = await LocationService.requestPermissions();
            // 根据权限请求结果更新显示文本
            this.text_locationResult = granted ? '权限获取成功' : '权限获取失败';
          } catch (err) {
            // 如果请求失败,处理错误
            this.handleError(err);
          }
        })

      // 定位控制按钮
      Row({ space: 20 }) {
        Button(this.isTracking ? '停止定位' : '开始定位')
          .type(ButtonType.Capsule) // 设置按钮样式为胶囊形状
          .backgroundColor(this.isTracking ? '#ff4d4f' : '#52c41a') // 根据定位状态设置按钮背景色
          .onClick(() => {
            if (this.isTracking) {
              // 如果正在定位,停止定位
              LocationService.stopLocationTracking(this.locationChange);
              this.text_locationResult = '定位已停止';
            } else {
              try {
                // 如果未在定位,开始定位
                LocationService.startLocationTracking(this.locationChange);
                this.text_locationResult = '定位已开始';
              } catch (err) {
                // 如果启动定位失败,处理错误
                this.handleError(err);
              }
            }
            // 切换定位状态
            this.isTracking = !this.isTracking;
          })
      }

      // 结果显示区域
      Scroll() {
        Text(this.text_locationResult)
          .fontSize(16) // 设置文本字体大小
          .textAlign(TextAlign.Start) // 设置文本对齐方式
          .padding(10) // 设置文本内边距
      }
      .height('40%') // 设置滚动区域高度
      .width('100%') // 设置滚动区域宽度
      .border({ width: 1, color: '#d9d9d9' }) // 设置边框样式
      .margin({ top: 20 }) // 设置上边距
    }
    .padding(20) // 设置列的内边距
    .width('100%') // 设置列的宽度
    .height('100%') // 设置列的高度
  }

  // 处理位置变化的回调函数
  private locationChange = (location: geoLocationManager.Location) => {
    // 更新定位结果文本
    this.updateLocationResult(`当前位置: ${location.latitude},${location.longitude}`);
    // 记录调试日志
    hilog.debug(0x0000, 'testTag', 'locationChange: %{public}s', JSON.stringify(location));
  }

  // 更新定位结果文本
  private updateLocationResult(result: string) {
    // 在结果文本前添加时间戳
    this.text_locationResult = `${new Date().toLocaleTimeString()}: ${result}\n${this.text_locationResult}`;
  }

  // 处理错误信息
  private handleError(err: Error) {
    // 记录错误日志
    hilog.error(0x0000, 'testTag', `Error: ${err.message}`);
    // 更新显示文本为错误信息
    this.text_locationResult = `错误: ${err.message}`;
  }
}
2、权限源码
 "requestPermissions": [
      {
        "name": "ohos.permission.INTERNET"
      },
      {
        "name": "ohos.permission.LOCATION",
        "reason": "$string:EntryAbility_label",
        "usedScene": {

        }
      },
      {
        "name": "ohos.permission.APPROXIMATELY_LOCATION",
        "reason": "$string:EntryAbility_label",
        "usedScene": {

        }
      }
    ],
四、源码详细分析
const permissions: Permissions[] = [
  'ohos.permission.APPROXIMATELY_LOCATION', // 必须声明于config.json
  'ohos.permission.LOCATION' // 精确定位需同时申请
];

// 动态请求实现
static async requestPermissions() {
  const atManager = abilityAccessCtrl.createAtManager();
  const result = await atManager.requestPermissionsFromUser(
    getContext(), // 关键:依赖Ability上下文
    permissions
  );
  return result.authResults.every(status => status === 0); // 0为授权成功
}
-
双层权限体系:鸿蒙要求同时申请粗略+精确定位权限
-
运行时请求:通过
createAtManager创建权限管理器实例 -
上下文依赖:
getContext()必须能获取到有效的Ability上下文 -
结果验证:
authResults数组顺序需与请求权限顺序一致
const requestInfo: geoLocationManager.LocationRequest = {
  scenario: LocationRequestScenario.DAILY_LIFE_SERVICE, // 场景策略
  priority: LocationRequestPriority.FIRST_FIX,          // 定位策略
  timeInterval: 1,      // 单位:秒(实际受系统策略限制)
  distanceInterval: 0,   // 单位:米(0表示仅时间间隔生效)
  maxAccuracy: 0         // 精度要求(0为最高)
};
| 参数 | 可选值 | 影响维度 | 推荐场景 |
|---|---|---|---|
scenario | UN_SET / NAVIGATION /DAILY_LIFE_SERVICE | 系统资源分配策略 | 导航场景选NAVIGATION |
priority | ACCURACY / FIRST_FIX / LOW_POWER | 首次定位速度与精度 | 快速定位用FIRST_FIX |
timeInterval | ≥1 (秒) | 最小更新间隔 | 结合业务需求调整 |
distanceInterval | ≥0 (米) | 位移触发阈值 |
五、错误的处理
1、错误一(展示)
产生原因:系统获取了定位权限,但手机并没有开启定位功能
解决方法:打开手机定位权限
2、错误二(展示)
产生原因:未配置系统的权限管理(module.json5)
解决方法:配置系统定位权限
参考文档:通用错误码-API参考概述 - 华为HarmonyOS开发者
六、总结
这功能就像给你的手机装了个“小雷达”,主要做三件事:
-
先问权限:
用之前会弹窗问用户“我要用你的位置哈,行不?”,用户同意了才能继续,跟微信要定位发位置是一个道理。 -
开关定位:
点“开始定位”按钮,手机就开始偷偷干活——每隔1秒或者动一下就记下你现在的经纬度(比如北纬30度,东经120度),然后把这些数字显示在屏幕上。不想用了就点“停止”,立马省电不耗流量。 -
实时显示+记录:
只要开着定位,屏幕上就会像刷朋友圈一样,从上往下滚动显示最新的位置记录。哪里出错了(比如没开GPS),也会直接大字报提醒“出问题啦,具体原因是XXX”。
核心就一句话:先要权限再干活,点按钮就开/关定位,位置变就刷新屏幕,出问题直接告诉你哪儿不对劲。


 被折叠的 条评论
为什么被折叠?
被折叠的 条评论
为什么被折叠?
 到【灌水乐园】发言


