


yaml文件
1、yaml数据格式


把之前的properties和yaml文件删除掉,只用yml文件
server:
  port: 80

likes:
  - game
  - music
  - sleep

likes2: [game,music,sleep]

user1:
  - name: zhangsan
    age: 18
  - name: lisi
    age: 20

user2:
    -
      name: zhangsan
      age: 18
    -
      name: lisi
      age: 20

user3: [{name:zhangsan,age:18},{name:lisi,age:20}]

country: china
province: Hubei
city: Wuhan

dog:
    name: wangcai
    age: 1
语法规则

2、读取yaml单一数据
package com.example.controller;

import org.springframework.beans.factory.annotation.Value;
import org.springframework.web.bind.annotation.GetMapping;
import org.springframework.web.bind.annotation.RequestMapping;
import org.springframework.web.bind.annotation.RestController;

//rest模式
@RestController
@RequestMapping("/books")
public class BookController {

    //读取yaml文件中的单一数据
    @Value("${country}")
    private String country1;

    //注意dog下的属性没有-符号
    @Value("${dog.name}")
    private String name1;

    @Value("${likes[1]}")
    private String like1;

    @GetMapping
    public  String gerById(){
        System.out.println("SpringBoot is running···");
        System.out.println("country1:"+country1);
        System.out.println("like1:"+like1);
        return "SpringBoot is running···";
    }
}
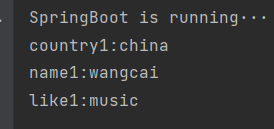
运行,打开浏览器,输入网址http://localhost:80/books,返回控制台看见如下图

3、yaml文件中的变量引用

转义字符
4、读取yaml文件全部属性数据
package com.example.controller;

import org.springframework.beans.factory.annotation.Autowired;
import org.springframework.beans.factory.annotation.Value;
import org.springframework.core.env.Environment;
import org.springframework.web.bind.annotation.GetMapping;
import org.springframework.web.bind.annotation.RequestMapping;
import org.springframework.web.bind.annotation.RestController;

//rest模式
@RestController
@RequestMapping("/books")
public class BookController {

    //读取yaml文件中的单一数据
    @Value("${country}")
    private String country1;

    //注意dog下的属性没有-符号
    @Value("${dog.name}")
    private String name1;

    @Value("${likes[1]}")
    private String like1;

    //使用自动装配将所有的数据封装到一个对象Environment中
    @Autowired
    private Environment env;


    @GetMapping
    public  String gerById(){
        System.out.println("SpringBoot is running···");
        System.out.println("country1:"+country1);
        System.out.println("name1:"+name1);
        System.out.println("like1:"+like1);
        System.out.println("--------------------------");
        System.out.println(env.getProperty("dog.name"));
        System.out.println(env.getProperty("likes[1]"));
        return "SpringBoot is running···";
    }
}


5、读取yamml文件引用数据类型属性数据
在yaml文件中添加数据
#创建类,用于封装下面的数据
#由Spring替我们加载数据对象 一定要告诉Spring加载这组信息
#使用时候从Spring中直接获取信息使用
datasource:
  driver: com.mysql.cj.jdbc.Driver
  url: jdbc:mysql://localhost:3306
  root: root
  password: 123456
在example包下创建文件MyDatasource
package com.example;

import org.springframework.boot.context.properties.ConfigurationProperties;
import org.springframework.stereotype.Component;

//1、定义数据模型封装yaml文件中对应的数据
//2、定义由spring管控的Bean
@Component
//3.指定加载的数据
@ConfigurationProperties("datasource")
public class MyDatasource {
    /*
    datasource:
        driver: com.mysql.cj.jdbc.Driver
        url: jdbc:mysql://localhost:3306
        root: root
        password: 123456
     */
    private String driver;
    private String url;
    private String root;
    private String password;


    //添加toString()方法
    //添加所有属性的getter和setter方法
package com.example.controller;

import com.example.MyDatasource;
import org.springframework.beans.factory.annotation.Autowired;
import org.springframework.beans.factory.annotation.Value;
import org.springframework.core.env.Environment;
import org.springframework.web.bind.annotation.GetMapping;
import org.springframework.web.bind.annotation.RequestMapping;
import org.springframework.web.bind.annotation.RestController;

//rest模式
@RestController
@RequestMapping("/books")
public class BookController {

    //读取yaml文件中的单一数据
    @Value("${country}")
    private String country1;

    //注意dog下的属性没有-符号
    @Value("${dog.name}")
    private String name1;

    @Value("${likes[1]}")
    private String like1;

    //使用自动装配将所有的数据封装到一个对象Environment中
    @Autowired
    private Environment env;

    @Autowired
    private MyDatasource myDatasource;

    @GetMapping
    public  String gerById(){
        System.out.println("SpringBoot is running···");
        System.out.println("country1:"+country1);
        System.out.println("name1:"+name1);
        System.out.println("like1:"+like1);
        System.out.println("--------------------------");
        System.out.println(env.getProperty("dog.name"));
        System.out.println(env.getProperty("likes[1]"));
        System.out.println("--------------------------");
        System.out.println(myDatasource);
        return "SpringBoot is running···";
    }
}


 2515
2515


 被折叠的 条评论
为什么被折叠?
被折叠的 条评论
为什么被折叠?
 到【灌水乐园】发言


