


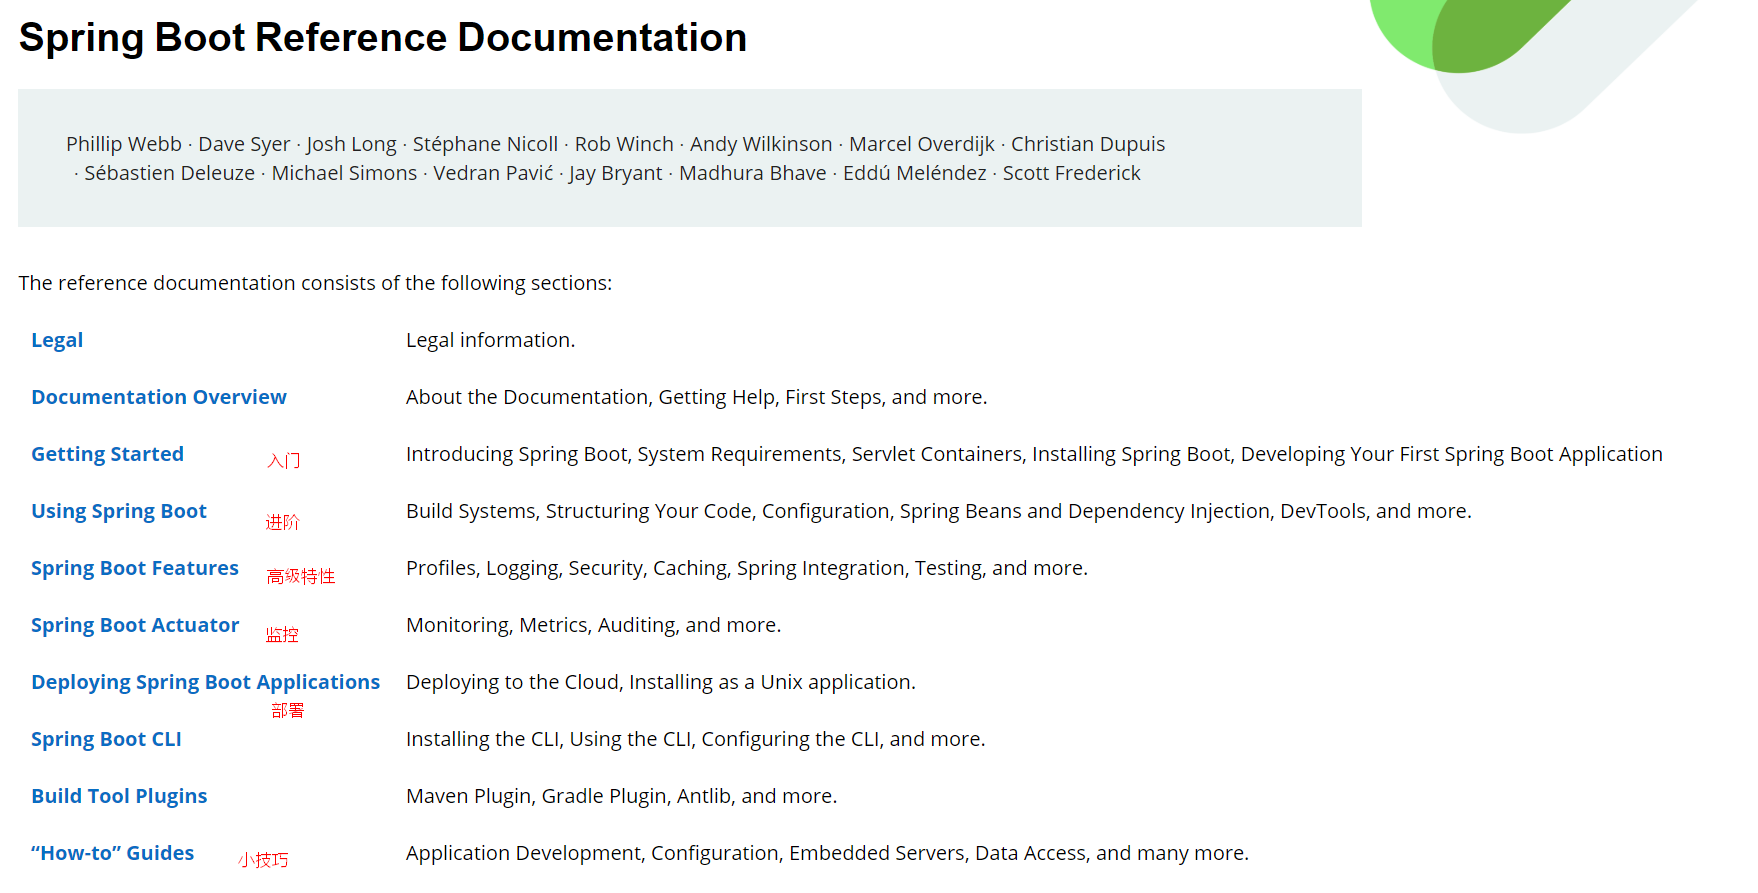
1、SpringBoot优点(官网 spring.io)
- Create stand-alone Spring applications
-
- 创建独立Spring应用
- Embed Tomcat, Jetty or Undertow directly (no need to deploy WAR files)
-
- 内嵌web服务器,内含Tomcat
- Provide opinionated 'starter' dependencies to simplify your build configuration
-
- 自动starter依赖,简化构建配置,一个依赖包含所以需要的依赖
- Automatically configure Spring and 3rd party libraries whenever possible
-
- 自动配置Spring以及第三方功能
- Provide production-ready features such as metrics, health checks, and externalized configuration
-
- 提供生产级别的监控、健康检查及外部化配置
- Absolutely no code generation and no requirement for XML configuration
-
- 无代码生成、无需编写XML
SpringBoot是整合Spring技术栈的一站式框架
SpringBoot是简化Spring技术栈的快速开发脚手架
第一个程序HelloWold
pom.xml文件
<?xml version="1.0" encoding="UTF-8"?>
<project xmlns="http://maven.apache.org/POM/4.0.0"
xmlns:xsi="http://www.w3.org/2001/XMLSchema-instance"
xsi:schemaLocation="http://maven.apache.org/POM/4.0.0 http://maven.apache.org/xsd/maven-4.0.0.xsd">
<modelVersion>4.0.0</modelVersion>
<groupId>org.example</groupId>
<artifactId>SpringBoot</artifactId>
<version>1.0-SNAPSHOT</version>
<parent>
<groupId>org.springframework.boot</groupId>
<artifactId>spring-boot-starter-parent</artifactId>
<version>2.5.0</version>
</parent>
<properties>
<mysql.version>5.1.47</mysql.version>
</properties>
<dependencies>
<dependency>
<groupId>org.springframework.boot</groupId>
<artifactId>spring-boot-starter-web</artifactId>
</dependency>
<dependency>
<groupId>mysql</groupId>
<artifactId>mysql-connector-java</artifactId>
</dependency>
</dependencies>
</project>
主程序
package com;

import org.springframework.boot.SpringApplication;
import org.springframework.boot.autoconfigure.SpringBootApplication;
/**
 @SpringBootApplication 标志主程序,这是一个springboot应用
 */
@SpringBootApplication
public class MainApplication {
    public static void main(String[] args) {
        //固定写法
        SpringApplication.run(MainApplication.class,args);
    }
}
controller
package com.controller;

import org.springframework.stereotype.Controller;
import org.springframework.web.bind.annotation.RequestMapping;
import org.springframework.web.bind.annotation.ResponseBody;
import org.springframework.web.bind.annotation.RestController;

@RestController
//@ResponseBody
//@Controller
public class HelloController {


    @RequestMapping("/hello")
    public String hello(){
        return "hello,SpringBoot2";
    }
}
application.properties 配置文件(Spring Boot有默认的配置,即使什么都不写)
默认扫描主程序下的包和主程序所在包
-
- 想要改变扫描路径,@SpringBootApplication(scanBasePackages="com.atguigu")
-
-
- 或者@ComponentScan 指定扫描路径
-
2、容器功能
2.1、组件添加
1、@Configuration
默认是Full模式 @Configuration(proxyBeanMethods = true)
- 基本使用
- Full模式与Lite模式
- 配置
类组件之间无依赖关系用Lite模式加速容器启动过程,减少判断 - 配置类组件之间有依赖关系,方法会被调用得到之前单实例组件,用Full模
package com.config;

import com.pojo.Pet;
import com.pojo.User;
import org.springframework.beans.factory.annotation.Configurable;
import org.springframework.context.annotation.Bean;
import org.springframework.context.annotation.Configuration;

/**
 *  * 1、配置类里面使用@Bean标注在方法上给容器注册组件,默认也是单实例的  即proxyBeanMethods = true  如果容器中存在不会重新创建保证单实例
 *  * 2、配置类本身也是组件
 *  * 3、proxyBeanMethods:代理bean的方法
 *  *      Full(proxyBeanMethods = true)、【保证每个@Bean方法被调用多少次返回的组件都是单实例的】
 *  *      Lite(proxyBeanMethods = false)【每个@Bean方法被调用多少次返回的组件都是新创建的】
 *  *      组件依赖必须使用Full模式默认。其他默认是否Lite模式
 */
@Configuration(proxyBeanMethods = false)      //告诉SpringBoot这是一个配置文件
public class MyConfig {

    @Bean
    public User user01(){
        User user = new User("zhangsan", 18);
//        user.setPet(tomcat());
        user.setPet(new Pet("daojun"));
        return user;
    }
    @Bean
    public Pet tomcat(){
        return new Pet("tomcat");
    }
}
 * 4、@Import({User.class, DBHelper.class})
 *      给容器中自动创建出这两个类型的组件、默认组件的名字就是全类名
 *
 *
 *
 */
@Import导入组件
@Conditional
条件装配:满足Conditional指定的条件,则进行组件注入
@Conditional()
@ConditionalOnBean(name = tomcat)   //有tomcat组件执行操作
@ImportResource 可以通过这个注解导入xml文件
@ImportResource("classpath:beans.xml")2、@Component、@Controller、@Service、@Repository 加入到容器中
3、绑定配置信息
3.1@Component //加入到ioc容器中 和 @ConfigurationProperties(prefix = "mycar")
@Data
@AllArgsConstructor
@NoArgsConstructor

@Component //加入到ioc容器中
@ConfigurationProperties(prefix = "mycar")

public class Car {
    private String name;
    private int price;
}

application.properties  配置文件

mycar.name="BYD"
mycar.price=1
3.2 @EnableConfigurationProperties(Car.class) 和 @ConfigurationProperties(prefix = "mycar")
@EnableConfigurationProperties(Car.class)

配置文件中  myconfig  即声明为SpringBoot的配置文件  @Configuration

加上要绑定核心配置文件内容的类上

@ConfigurationProperties(prefix = "mycar")
3.3 两种绑定配置文件的区别
注入容器的方式不同
@SpringBootApplication 原理
(详情https://www.yuque.com/atguigu/springboot/qb7hy2
基础入门-03自动装配原理)
@SpringBootConfiguration
@EnableAutoConfiguration
@ComponentScan(
    excludeFilters = {@Filter(
    type = FilterType.CUSTOM,
    classes = {TypeExcludeFilter.class}
), @Filter(
    type = FilterType.CUSTOM,
    classes = {AutoConfigurationExcludeFilter.class}
)}
)


@SpringBootConfiguration  底层就是一个配置文件  @Configuration

@ComponentScan  指定扫描哪些,Spring注解

核心
@EnableAutoConfiguration

        @AutoConfigurationPackage
        @Import({AutoConfigurationImportSelector.class})

包含127个配置信息类,但是会按需开启配置 (@Conditional)
总结:
- SpringBoot先加载所有的自动配置类 xxxxxAutoConfiguration
- 每个自动配置类按照条件进行生效,默认都会绑定配置文件指定的值。xxxxProperties里面拿。xxxProperties和配置文件进行了绑定
- 生效的配置类就会给容器中装配很多组件
- 只要容器中有这些组件,相当于这些功能就有了
- 定制化配置
-
- 用户直接自己@Bean替换底层的组件
- 用户去看这个组件是获取的配置文件什么值就去修改。(https://docs.spring.io/spring-boot/docs/current/reference/html/application-properties.html#application-properties.data)
xxxxxAutoConfiguration ---> 组件 ---> xxxxProperties里面拿值 ----> application.properties
3.4、最佳实践
- 引入场景依赖
- 查看自动配置了哪些(选做)
-
- 自己分析,引入场景对应的自动配置一般都生效了
- 配置文件中debug=true开启自动配置报告。Negative(不生效)\Positive(生效)
- 是否需要修改
-
- 参照文档修改配置项
-
- 自定义加入或者替换组件
-
-
- @Bean、@Component。。。
-
-
- 自定义器 XXXXXCustomizer;
- ......
工具
<!--热更新   ctrl+f9-->
        <dependency>
            <groupId>org.springframework.boot</groupId>
            <artifactId>spring-boot-devtools</artifactId>
            <optional>true</optional>
        </dependency>
yaml
key: value
key: [ value,value] list
key ; {key:value,key:value } Map
实例
@Data
public class Person {

    private String userName;
    private Boolean boss;
    private Date birth;
    private Integer age;
    private Pet pet;
    private String[] interests;
    private List<String> animal;
    private Map<String, Object> score;
    private Set<Double> salarys;
    private Map<String, List<Pet>> allPets;
}

@Data
public class Pet {
    private String name;
    private Double weight;
}
# yaml表示以上对象
person:
userName: zhangsan
boss: false
birth: 2019/12/12 20:12:33
age: 18
pet:
name: tomcat
weight: 23.4
interests: [篮球,游泳]
animal:
- jerry
- mario
score:
english:
first: 30
second: 40
third: 50
math: [131,140,148]
chinese: {first: 128,second: 136}
salarys: [3999,4999.98,5999.99]
allPets:
sick:
- {name: tom}
- {name: jerry,weight: 47}
health: [{name: mario,weight: 47}]配置提示
自定义的类和配置文件绑定一般没有提示。 所以添加以下配置
       <dependency>
            <groupId>org.springframework.boot</groupId>
            <artifactId>spring-boot-configuration-processor</artifactId>
            <optional>true</optional>
        </dependency>


 <build>
        <plugins>
            <plugin>
                <groupId>org.springframework.boot</groupId>
                <artifactId>spring-boot-maven-plugin</artifactId>
                <configuration>
                    <excludes>
                        <exclude>
                            <groupId>org.springframework.boot</groupId>
                            <artifactId>spring-boot-configuration-processor</artifactId>
                        </exclude>
                    </excludes>
                </configuration>
            </plugin>
        </plugins>
    </build>
2、简单功能分析
2.1、静态资源访问
1、静态资源目录
只要静态资源放在类路径下: called /static (or /public or /resources or /META-INF/resources
访问 : 当前项目根路径/ + 静态资源名

原理: 静态映射/**。
请求进来,先去找Controller看能不能处理。不能处理的所有请求又都交给静态资源处理器。静态资源也找不到则响应404页面
改变默认的静态资源路径
spring:
  mvc:
    static-path-pattern: /res/**    静态资源添加前缀  会导致welcomepage失效 favicon.ico失效


  resources:
    static-locations: [classpath:/haha/]     改静态资源路径的包
Rest风格
- Rest风格支持(使用HTTP请求方式动词来表示对资源的操作)
-
- 以前:/getUser 获取用户 /deleteUser 删除用户 /editUser 修改用户 /saveUser 保存用户 太过麻烦
- 现在: /user GET-获取用户 DELETE-删除用户 PUT-修改用户 POST-保存用户 还有patch
- 核心Filter;HiddenHttpMethodFilter
-
-
- 用法: 表单method=post,隐藏域 _method=put
- SpringBoot中手动开启
-
spring:
  mvc:
    hiddenmethod:
      filter:
        enabled: true
-
    @RequestMapping(value = "/user",method = RequestMethod.GET)
    public String getUser(){
        return "GET-张三";
    }

    @RequestMapping(value = "/user",method = RequestMethod.POST)
    public String saveUser(){
        return "POST-张三";
    }


    @RequestMapping(value = "/user",method = RequestMethod.PUT)
    public String putUser(){
        return "PUT-张三";
    }

    @RequestMapping(value = "/user",method = RequestMethod.DELETE)
    public String deleteUser(){
        return "DELETE-张三";
    }


<form action="/user" method="post">
    <input type="hidden" name="_method" value="delete">
    <input value="delete" type="submit">
</form>
<form action="/user" method="post">
    <input type="hidden" name="_method" value="put">
    <input value="put" type="submit">
</form>
<form action="/user" method="post">
    <input type="hidden" name="_method" value="patch">
    <input value="patch" type="submit">
</form>

  rest原理
     在表单中只能提交get和post请求,所以在表单中通过post提交附带name="_method" value="put"
在底层嵌套替换原来的请求方式
    spring.mvc.hiddenmethod.filter.enabled=true  手动开启后生效
    @Bean
    @ConditionalOnMissingBean(HiddenHttpMethodFilter.class)
    @ConditionalOnProperty(prefix = "spring.mvc.hiddenmethod.filter", name = "enabled", matchIfMissing = false)
    public OrderedHiddenHttpMethodFilter hiddenHttpMethodFilter() {
        return new OrderedHiddenHttpMethodFilter();
    }
    @RequestMapping(value = "/user",method = RequestMethod.GET)
    @GetMapping("/user")
    两者可以相互替换

    点进@getMapping可以看见
    @RequestMapping(
    method = {RequestMethod.GET}
    )
    public @interface GetMapping
自定义rest风格提交名称 将 _method 改成自己想要的
package com.example.boot.configer;

import org.springframework.context.annotation.Bean;
import org.springframework.context.annotation.Configuration;
import org.springframework.web.filter.HiddenHttpMethodFilter;

@Configuration
public class Myconfiger {
    @Bean
    public HiddenHttpMethodFilter hiddenHttpMethodFilter(){
        //自己写 HiddenHttpMethodFilter 注册到容器中 springboot默认的就不生效
        HiddenHttpMethodFilter methodFilter = new HiddenHttpMethodFilter();
        methodFilter.setMethodParam("_m");
        return methodFilter;
    }
}
2、请求映射原理

SpringMVC功能分析都从 org.springframework.web.servlet.DispatcherServlet-》doDispatch()
protected void doDispatch(HttpServletRequest request, HttpServletResponse response) throws Exception {
        HttpServletRequest processedRequest = request;
        HandlerExecutionChain mappedHandler = null;
        boolean multipartRequestParsed = false;

        WebAsyncManager asyncManager = WebAsyncUtils.getAsyncManager(request);

        try {
            ModelAndView mv = null;
            Exception dispatchException = null;

            try {
                processedRequest = checkMultipart(request);
                multipartRequestParsed = (processedRequest != request);

                // 找到当前请求使用哪个Handler(Controller的方法)处理
                mappedHandler = getHandler(processedRequest);

                //HandlerMapping:处理器映射。/xxx->>xxxx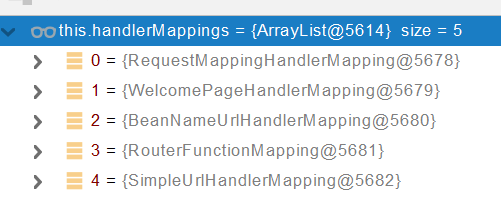
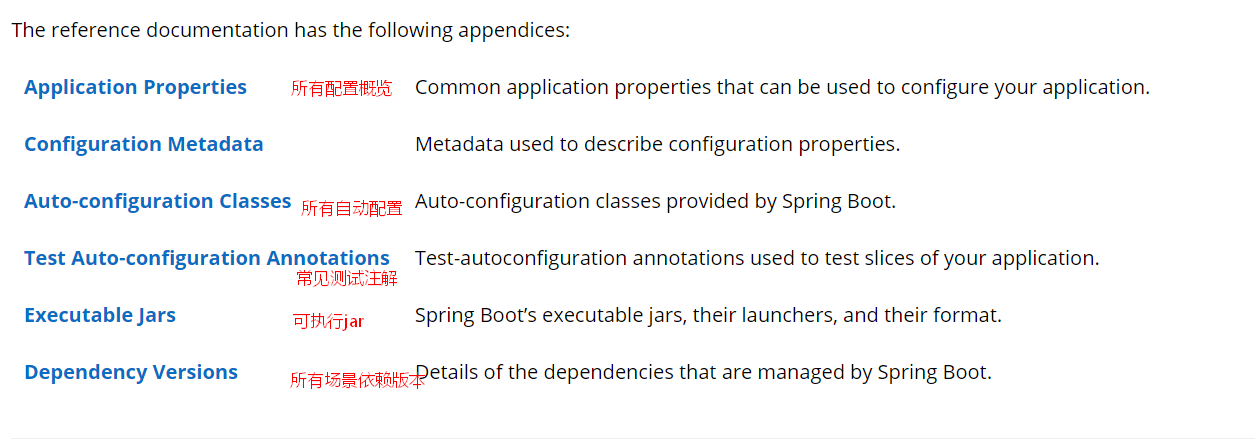
RequestMappingHandlerMapping:保存了所有@RequestMapping 和handler的映射规则。
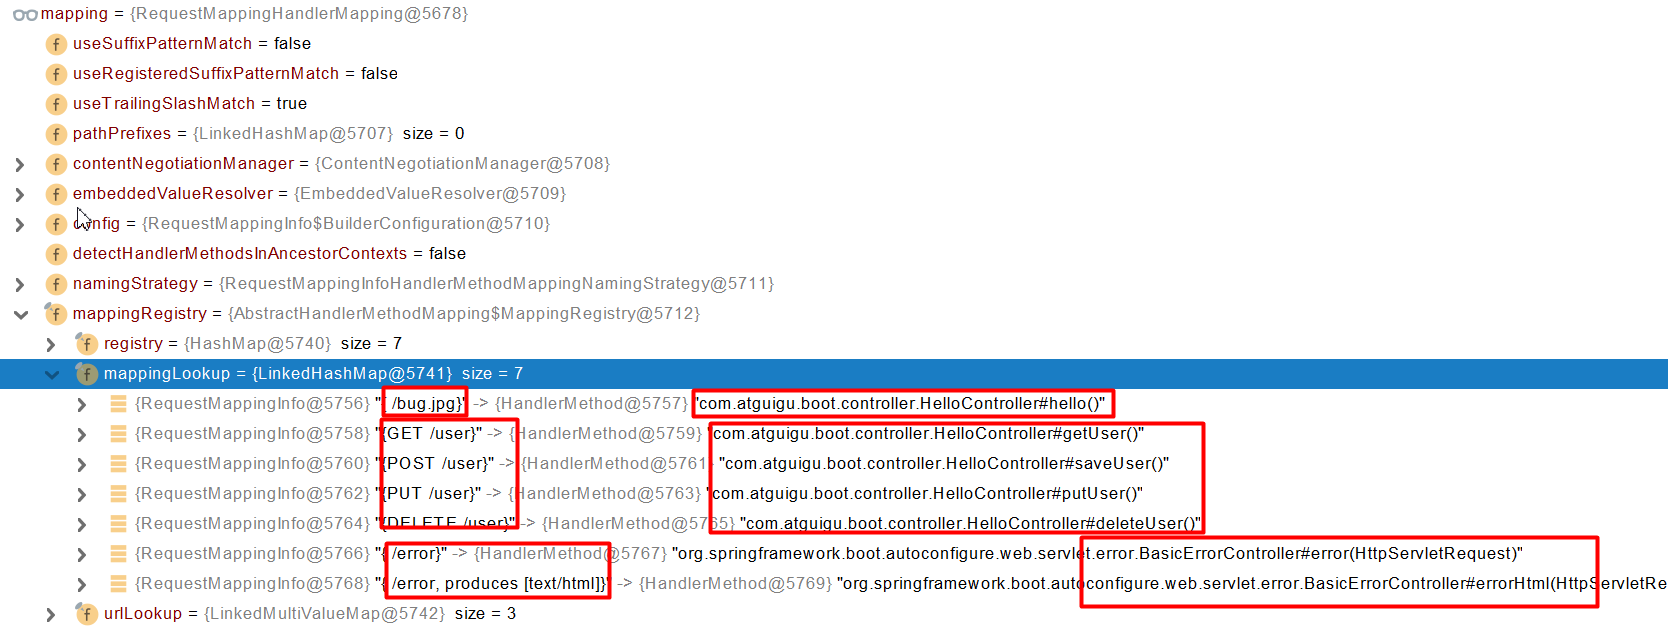
所有的请求映射都在HandlerMapping中。
- SpringBoot自动配置欢迎页的 WelcomePageHandlerMapping 。访问 /能访问到index.html;
- SpringBoot自动配置了默认 的 RequestMappingHandlerMapping
- 请求进来,挨个尝试所有的HandlerMapping看是否有请求信息。
-
- 如果有就找到这个请求对应的handler
- 如果没有就是下一个 HandlerMapping
1、普通参数与基本注解
1.1、注解:
@PathVariable、@RequestHeader、@ModelAttribute、@RequestParam、@MatrixVariable、@CookieValue、@RequestBody
@PathVariable Map<String,String> m
 可以将参数列表中的值自动装入map中,map的类型必须是<String,String>

@RequestHeader 获取请求头  用Map<String,String>可以自动添加全部请求头加入map中

@RequestParam 获取请求路径中参数  用Map<String,String>可以自动添加全部请求头加入map中

@CookieValue("Idea-57038b6e") String cookie

@RequestBody获取表单  请求体中的信息  {"count":"id=user&pwd=123"}
@RestController
public class parameterController {
@GetMapping("/user/{id}/owner/{username}")
public Map<String,Object> getCar(@PathVariable("id") int id, @PathVariable("username") String name,@PathVariable Map<String,String> m){
//@PathVariable Map<String,String> m 可以将参数列表中的值自动装入map中,map的类型必须是<String,String>
Map<String,Object> map = new HashMap<>();
map.put("id",id);
map.put("username",name);
map.put("m",m);
return map;
}
@GetMapping("/user2/{id}/owner/{username}")
public Map<String,String> getCar2(@PathVariable("id") int id, @PathVariable("username") String name,@RequestHeader Map<String,String> m){
//@RequestHeader 获取请求头 用Map<String,String>可以自动添加全部请求头加入map中
return m;
}
@GetMapping("/user4")
public Map<String,String> getCar3(@RequestParam("id") int id, @RequestParam("username") String name,@RequestParam Map<String,String> m){
//@RequestHeader 获取请求头 用Map<String,String>可以自动添加全部请求头加入map中
return m;
}
@GetMapping("/user5")
public Map<String,String> cooki(@CookieValue("Idea-57038b6e") String cookie){
Map<String,String> map = new HashMap<>();
map.put("cookie",cookie);
return map;
}
@PostMapping("/user6")
public Map post(@RequestBody String count){
//获取表单 请求体中的信息 {"count":"id=user&pwd=123"}
Map<String,String> map = new HashMap<>();
String[] split = count.split("&");
for (String s : split) {
System.out.println(s);
}
map.put("count",count);
return map;
}
}<a href="/user/2/owner/zhangsan">/user/{id}/owner/{username}</a>
<a href="/user2/2/owner/zhangsan">/user2/{id}/owner/{username}</a>
<a href="/user4?id=3&username=laowang">/user2/{id}/owner/{username}</a>
<a href="/user5">/user5</a>
<form action="/user6" method="post">
id <input type="text" name="id"><br>
pwd <input type="text" name="pwd"><br>
<input type="submit">
</form>@RequestAttribute 取request里面的属性attribute
@MatrixVariable 矩阵变量
    //  /boss/2;low=zhangsan;list=list1,list2/3;low=lisi
    @GetMapping("/boss/{bossId}/{empId}")
    public Map<String,Object> pathvalue(@MatrixVariable(value = "low",pathVar = "bossId") String low,
                                        @MatrixVariable("list") List<String> list,
                                        @PathVariable("bossId") int bossId,
                                        @PathVariable("empId") int empId){
//        @MatrixVariable 矩阵变量   与路径携带参数区别   矩阵变量必须依靠在路径变量中即{bossId}中
//        使用矩阵变量必须手动开启  实现WebMvcConfigurer中configurePathMatch方法
//        矩阵变量中有相同的名字时添加路径变量确保唯一性
        Map<String,Object> map = new HashMap<>();

        map.put("low",low);
        map.put("list",list);
        map.put("bossId",bossId);
        map.put("empId",empId);


        return map;
    }
手动开启
@Bean
    public WebMvcConfigurer webMvcConfigurer(){
        return new WebMvcConfigurer() {
            @Override
            public void configurePathMatch(PathMatchConfigurer configurer) {
                UrlPathHelper urlPathHelper = new UrlPathHelper();
                urlPathHelper.setRemoveSemicolonContent(false);
                configurer.setUrlPathHelper(urlPathHelper);
            }
        };
    }
各种类型参数原理
通过请求路径信息,获取方法名,属性值,所标注的注解类型,在底层通过注解解析器挨个遍历尝试解析器能否解析,可以解析,确定参数的值
在目标方法完成后,将所有的数据都放在 ModelAndViewContainer;包含要去的页面地址View。还包含Model数据。
参数中Map和Model的值可以通过request.getAttribute取出,原理是map、model里面的数据会被放在request的请求域,在底层会取出里面的值放入request请求域里面
protected void exposeModelAsRequestAttributes(Map<String, Object> model,
            HttpServletRequest request) throws Exception {

    //model中的所有数据遍历挨个放在请求域中
        model.forEach((name, value) -> {
            if (value != null) {
                request.setAttribute(name, value);
            }
            else {
                request.removeAttribute(name);
            }
        });
    }
pojo的封装使用
页面提交的请求数据(get,post)可以和对象属性相互对应
@PostMapping("/user7")
    public User pojo(User user){
        return user;
    }
<form action="/user7" method="post">
name <input type="text" name="name"><br>
age <input type="text" name="age"><br>
pet.name <input type="text" name="pet.name"><br>
<input type="submit">
</form>原理:判断方法参数是否为简单数据类型,是复杂类型则创建一个全为Null的复杂类型(pojo),通过converters将请求参数的值转换成需要的类型并绑定到pojo类型的属性上
判断是否为普通类型
public static boolean isSimpleValueType(Class<?> type) {
        return (Void.class != type && void.class != type &&
                (ClassUtils.isPrimitiveOrWrapper(type) ||
                Enum.class.isAssignableFrom(type) ||
                CharSequence.class.isAssignableFrom(type) ||
                Number.class.isAssignableFrom(type) ||
                Date.class.isAssignableFrom(type) ||
                Temporal.class.isAssignableFrom(type) ||
                URI.class == type ||
                URL.class == type ||
                Locale.class == type ||
                Class.class == type));
    }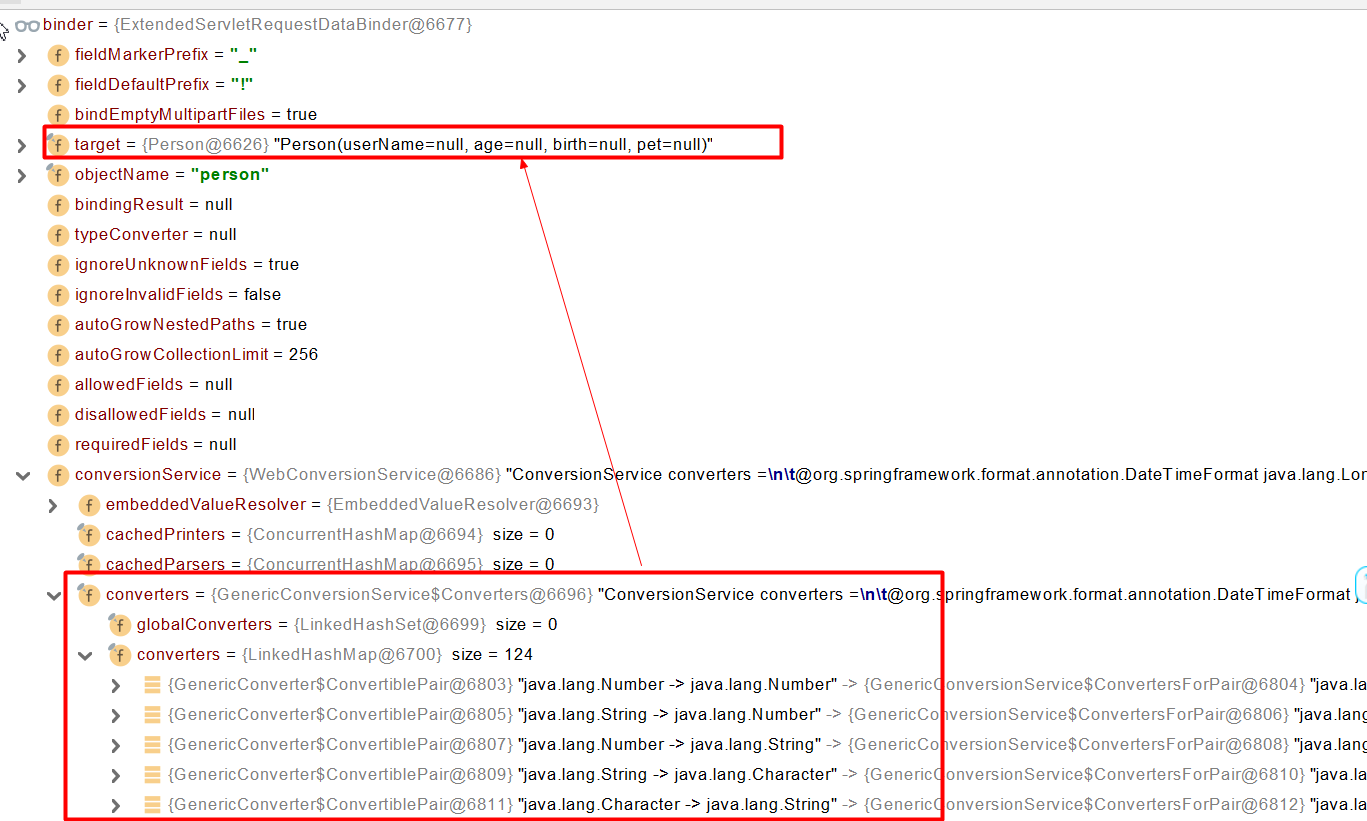
添加自定义格式化器 converters
添加自定义格式化器  自定义转换        pet.name,pat.age

            @Override
            public void addFormatters(FormatterRegistry registry) {
                registry.addConverter(new Converter<String, Pet>() {

                    @Override
                    public Pet convert(String s) {
                        if (!StringUtils.isEmpty(s)){
                            String[] split = s.split(",");
                            Pet pet = new Pet();
                            pet.setName(split[0]);
                            pet.setAge(Integer.parseInt(split[1]));
                            return pet;
                        }
                        return null;
                    }
                });
            }
<form action="/user8" method="post">
name <input type="text" name="name"><br>
age <input type="text" name="age"><br>
pet.name和pet.age <input type="text" name="pet" value="阿猫,3"><br>
<input type="submit">
</form>给前端自动返回json数据
导入start-web依赖
@ResponseBody
    @GetMapping("/test/user")
    public User test(){
        User user = new User();
        user.setName("狗俊");
        user.setAge(17);
        return user;
    }
原理 通过返回值转换器,遍历找到可处理的消息转换器转换成json数据
具体
RequestResponseBodyMethodProcessor 可以处理返回值标了@ResponseBody 注解的。
利用 MessageConverters 进行处理 将数据写为json
内容协商(浏览器默认会以请求头的方式告诉服务器他能接受什么样的内容类型
服务器最终根据自己自身的能力,决定服务器能生产出什么样内容类型的数据,
SpringMVC会挨个遍历所有容器底层的 HttpMessageConverter ,看谁能处理?
-
- 1、得到MappingJackson2HttpMessageConverter可以将对象写为json
- 2、利用MappingJackson2HttpMessageConverter将对象转为json再写出去。
默认的MessageConverters
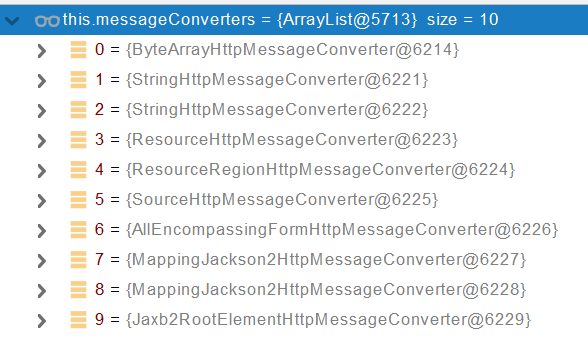
0 - 只支持Byte类型的
1 - String
2 - String
3 - Resource
4 - ResourceRegion
5 - DOMSource.class \ SAXSource.class) \ StAXSource.class \StreamSource.class \Source.class
6 - MultiValueMap
7 - true
8 - true
9 - 支持注解方式xml处理的。
2、内容协商
内容协商包含响应数据和响应页面
响应数据
根据客户端接收能力不同,返回不同媒体类型的数据。
客户端发送可以接受的类型
text/html,application/xhtml+xml,application/xml;q=0.9,
image/avif,image/webp,image/apng,*/*;q=0.8,
application/signed-exchange;v=b3;q=0.9
服务器可以向客户端返回的类型 由选中的类型决定@ResponseBody/导入xml依赖,多种结果则看权重
双方的类型相互匹配找到客户端接收,服务器可产生的,找到最佳匹配
开启浏览器请求参数的内容协商功能
spring:
  mvc:
    contentnegotiation:
      favor-parameter: true
http://localhost:8080/test/user?format=json
http://localhost:8080/test/user?format=xml
确定客户端接收什么样的内容类型;
1、Parameter策略优先确定是要返回json数据(获取请求头中的format的值)

2、最终进行内容协商返回给客户端json即可。
自定义返回值类型 ( 返回值;返回值)
http://localhost:8080/test/user?format=gg
//自定义返回值类型  通过第三方发送
            @Override
            public void extendMessageConverters(List<HttpMessageConverter<?>> converters) {
                converters.add(new GuiguMessageConverter());
            }

            /**
             * 自定义内容协商策略  自定义返回值类型  format发送
             * @param configurer
             */
            @Override
            public void configureContentNegotiation(ContentNegotiationConfigurer configurer) {
                Map<String, MediaType> mediaTypes=new HashMap<>();
                mediaTypes.put("json",MediaType.APPLICATION_JSON);
                mediaTypes.put("xml",MediaType.APPLICATION_XML);
                mediaTypes.put("gg",MediaType.parseMediaType("application/x-guigu"));
                ParameterContentNegotiationStrategy strategy = new ParameterContentNegotiationStrategy(mediaTypes);
                HeaderContentNegotiationStrategy headerContentNegotiationStrategy = new HeaderContentNegotiationStrategy();
                configurer.strategies(Arrays.asList(strategy,headerContentNegotiationStrategy));
            }
/**
* 自定义的Converter
*/
public class GuiguMessageConverter implements HttpMessageConverter<User> {
@Override
public boolean canRead(Class<?> clazz, MediaType mediaType) {
return false;
}
@Override
public boolean canWrite(Class<?> clazz, MediaType mediaType) {
return clazz.isAssignableFrom(User.class);
}
/**
* 服务器要统计所有MessageConverter都能写出哪些内容类型
*
* application/x-guigu
* @return
*/
@Override
public List<MediaType> getSupportedMediaTypes() {
return MediaType.parseMediaTypes("application/x-guigu");
}
@Override
public User read(Class<? extends User> clazz, HttpInputMessage inputMessage) throws IOException, HttpMessageNotReadableException {
return null;
}
@Override
public void write(User person, MediaType contentType, HttpOutputMessage outputMessage) throws IOException, HttpMessageNotWritableException {
//自定义协议数据的写出
String data = person.getName()+";"+person.getAge()+";";
//写出去
OutputStream body = outputMessage.getBody();
body.write(data.getBytes());
}
}
5、视图解析与模板引擎
视图解析:SpringBoot默认不支持 JSP,需要引入第三方模板引擎技术实现页面渲染
导入依赖
        <dependency>
            <groupId>org.springframework.boot</groupId>
            <artifactId>spring-boot-starter-thymeleaf</artifactId>
        </dependency>
页面规则 放在指定位置
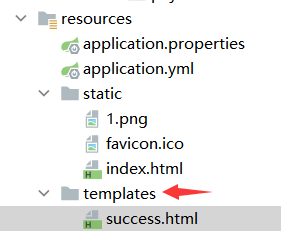
    public static final String DEFAULT_PREFIX = "classpath:/templates/";

    public static final String DEFAULT_SUFFIX = ".html";  //xxx.html
html中添加命名空间
<html lang="en" xmlns:th="http://www.thymeleaf.org"><!DOCTYPE html>
<html lang="en" xmlns:th="http://www.thymeleaf.org">
<head>
<meta charset="UTF-8">
<title>Title</title>
</head>
<body>
<h1 th:text="${msg}">哈哈</h1>
<h2>
<a href="www.taobao.com" th:href="${link}">百度</a>
<a href="www.taobao.com" th:href="@{link}">百度</a>
</h2>
</body>
</html>@GetMapping("/view")
public String test(Model model){
model.addAttribute("msg","Hello World");
model.addAttribute("link","http://www.baidu.com");
return "success";
}基于thymeleaf 的后台管理系统模板 web-admin
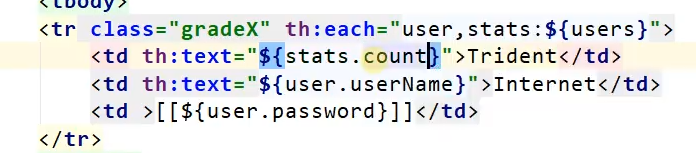
行内取值 [ [ $ { } ] ]

     <div id="comdiv">
    <link href="css/style.css" th:href="@{/css/style.css}" rel="stylesheet">
    <link href="css/style-responsive.css" th:href="@{/css/style-responsive.css}" rel="stylesheet">

    <!-- HTML5 shim and Respond.js IE8 support of HTML5 elements and media queries -->
    <!--[if lt IE 9]>
    <script th:src="@{/js/html5shiv.js}"></script>
    <script th:src="@{/js/respond.min.js}"></script>
    <![endif]-->
    </div>


<link th:replace="common :: #comdiv">

th:replace  去除link加上div


<link th:include="common :: #comdiv">

th:include  去除div保留link
遍历

1、视图解析原理流程
1、目标方法处理的过程中,所有数据都会被放在 ModelAndViewContainer 里面。包括数据和视图地址
2、方法的参数是一个自定义类型对象(从请求参数中确定的),把他重新放在 ModelAndViewContainer
3、任何目标方法执行完成以后都会返回 ModelAndView(数据和视图地址)。
所有的视图解析器根据方法的String返回值依次尝试得到 View 对象【定义了页面的渲染逻辑】
view.render(mv.getModelInternal(), request, response); 视图对象调用自定义的render进行页面渲染工作
- RedirectView 如何渲染【重定向到一个页面】
- 1、获取目标url地址
- 2、response.sendRedirect(encodedURL);
返回值以 forward: 开始-->
转发request.getRequestDispatcher(path).forward(request, response);
拦截器
自定义拦截器,将拦截器注册到容器中
public class LoginInterceptor implements HandlerInterceptor {
    @Override
    public boolean preHandle(HttpServletRequest request, HttpServletResponse response, Object handler) throws Exception {
        HttpSession session = request.getSession();
        if (session.getAttribute("loginInfo") != null){
            return true;
        }else {
            request.setAttribute("msg","请先登录");
            request.getRequestDispatcher("/").forward(request,response);
            return false;
        }
    }
}
@Configuration
public class MyConfiger implements WebMvcConfigurer {
    @Override
    public void addInterceptors(InterceptorRegistry registry) {
        registry.addInterceptor(new LoginInterceptor())
                .addPathPatterns("/**")     //  /** 拦截所以资源,包括静态资源
                 .excludePathPatterns("/","/login","/css/**","/fonts/**","/images/**","/js/**","favicon.ico");
    }
}

文件上传
enctype="multipart/form-data"  必须写
                   <div class="panel-body">
                        <form role="form" method="post" th:action="@{/upload}" enctype="multipart/form-data">
                            <div class="form-group">
                                <label for="exampleInputEmail1">Email</label>
                                <input type="email" name="email" class="form-control" id="exampleInputEmail1" placeholder="Enter email">
                            </div>
                            <div class="form-group">
                                <label for="exampleInputPassword1">name</label>
                                <input type="text" name="username" class="form-control" id="exampleInputPassword1" placeholder="Password">
                            </div>
                            <div class="form-group">
                                <label for="exampleInputFile">headerImg</label>
                                <input type="file" name="headerImg" id="exampleInputFile">
                            </div>
                            <div class="form-group">
                                <label for="exampleInputFile">headerImg</label>
                                <input type="file" name="photos" multiple>
<!--                                  multiple  多文件-->
                            </div>
                            <div class="checkbox">
                                <label>
                                    <input type="checkbox"> Check me out
                                </label>
                            </div>
                            <button type="submit" class="btn btn-primary">Submit</button>
                        </form>

                    </div>
MultipartFile 自动封装上传的文件
   /**
     * MultipartFile 自动封装上传的文件
     * @param email
     * @param username
     * @param headerImg
     * @param photos
     * @return
     * @throws IOException
     */
    @PostMapping("/upload")
    public String uplode(@RequestParam("email") String email, @RequestParam("username") String username,
                         @RequestPart("headerImg") MultipartFile headerImg,
                         @RequestPart("photos") MultipartFile[] photos) throws IOException {
        log.info("上传的消息:email{},username{},headerIng{},photos{}",email,username,headerImg.getSize(),photos.length);
        if (!headerImg.isEmpty()){
            String filename = headerImg.getOriginalFilename();
            headerImg.transferTo(new File("D:\\game\\"+filename));
        }

        if (photos.length>0){
            for (MultipartFile photo : photos) {
                if (!photo.isEmpty()){
                    String filename = photo.getOriginalFilename();
                    photo.transferTo(new File("D:\\game\\"+filename));
                }
            }
        }
        return "main";
    }
文件上传原理
文件上传自动配置类-MultipartAutoConfiguration-MultipartProperties
自动配置好了 StandardServletMultipartResolver 【文件上传解析器】
- 原理步骤
-
- 1、请求进来使用文件上传解析器判断(isMultipart)并封装(resolveMultipart,返回MultipartHttpServletRequest)文件上传请求
- 2、参数解析器来解析请求中的文件内容封装成MultipartFile
- 3、将request中文件信息封装为一个Map;MultiValueMap<String, MultipartFile>
FileCopyUtils。实现文件流的拷贝
默认错误处理机制
默认规则
- 默认情况下,Spring Boot提供
/error处理所有错误的映射 - 对于机器客户端,它将生成JSON响应,其中包含错误,HTTP状态和异常消息的详细信息。对于浏览器客户端,响应一个“ whitelabel”错误视图,以HTML格式呈现相同的数据
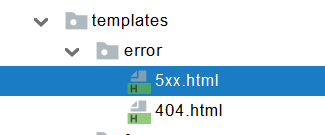
- error/下的4xx,5xx页面会被自动解析,可以放在templates下也可以放在static下
2、定制错误处理逻辑
- 自定义错误页
-
- error/404.html error/5xx.html;有精确的错误状态码页面就匹配精确,没有就找 4xx.html;如果都没有就触发白页
- 默认情况下没有能处理异常的解释器,会触发/error请求使 白页或者json返回
- @ControllerAdvice+@ExceptionHandler处理全局异常;底层是 ExceptionHandlerExceptionResolver 支持的
- @ResponseStatus+自定义异常 ;底层是 ResponseStatusExceptionResolver ,把responsestatus注解的信息底层调用 response.sendError(statusCode, resolvedReason);tomcat发送的/error
- Spring底层的异常,如 参数类型转换异常;DefaultHandlerExceptionResolver 处理框架底层的异常。
- 3、异常处理组件
-
- 容器中的组件:类型:BasicErrorController --> id:basicErrorController(json+白页 适配响应)
-
-
- 处理默认 /error 路径的请求;页面响应 new ModelAndView("error", model);
- 容器中有组件 View->id是error;(响应默认错误页)
- 容器中放组件 BeanNameViewResolver(视图解析器);按照返回的视图名作为组件的id去容器中找View对象。
-
-
- 容器中的组件:类型:DefaultErrorViewResolver -> id:conventionErrorViewResolver
-
-
- 如果发生错误,会以HTTP的状态码 作为视图页地址(viewName),找到真正的页面
- error/404、5xx.html
-
4、异常处理步骤流程
1、执行目标方法,目标方法运行期间有任何异常都会被catch、而且标志当前请求结束;并且用 dispatchException,保存catch得到的异常
2、进入视图解析流程(页面渲染)
processDispatchResult(processedRequest, response, mappedHandler, mv, dispatchException); 有异常时,mv为空,异常保存在了dispatchException中
3、mv = processHandlerException;处理handler发生的异常,处理完成返回ModelAndView;
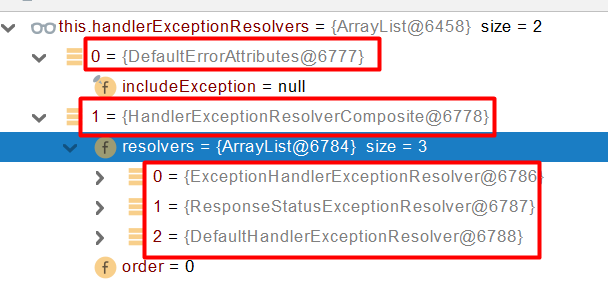
- 1、遍历所有的 handlerExceptionResolvers,看谁能处理当前异常【HandlerExceptionResolver处理器异常解析器】
- 2、系统默认的 异常解析器;
-
- 1、DefaultErrorAttributes先来处理异常。定义一些属性如状态码,错误信息等异常信息保存到request域,并且返回null;
- 2、默认没有任何人能处理异常,所以异常会被抛出
-
-
- 1、如果没有任何人能处理最终底层就会发送 /error 请求。会被底层的BasicErrorController处理
- 2、解析错误视图;遍历所有的 ErrorViewResolver 看谁能解析。

https://www.yuque.com/atguigu/springboot- 3、默认的 DefaultErrorViewResolver ,作用是把响应状态码作为错误页的地址,error/500.html
- 4、模板引擎最终响应这个页面 error/500.html
-
9、Web原生组件注入(Servlet、Filter、Listener)
1、使用Servlet API
@ServletComponentScan(basePackages = "com.atguigu.admin") :指定原生Servlet组件都放在那里
@WebServlet(urlPatterns = "/my"):效果:直接响应,没有经过Spring的拦截器?
@WebFilter(urlPatterns={"/css/*","/images/*"})
@WebListener
推荐可以这种方式;
实例
@WebServlet(urlPatterns = "/my")
public class MyServlet extends HttpServlet {

    @Override
    protected void doGet(HttpServletRequest req, HttpServletResponse resp) throws ServletException, IOException {
        resp.getWriter().write("6666");
    }
}


@Slf4j
@WebFilter(urlPatterns = {"/css/*","/my"})
public class MyFilter implements Filter {
    @Override
    public void init(FilterConfig filterConfig) throws ServletException {
        log.info("MyFilter初始化完成");
    }

    @Override
    public void doFilter(ServletRequest servletRequest, ServletResponse servletResponse, FilterChain filterChain) throws IOException, ServletException {
        log.info("MyFilter工作");
        filterChain.doFilter(servletRequest,servletResponse);  //放行
    }

    @Override
    public void destroy() {
        log.info("MyFilter销毁");
    }
}


@Slf4j
@WebListener
public class MyListener implements ServletContextListener {
    @Override
    public void contextInitialized(ServletContextEvent sce) {
        //监听项目初始化
        log.info("MyListener:项目初始化完成");
    }

    @Override
    public void contextDestroyed(ServletContextEvent sce) {
        log.info("MyListener:项目销毁");
    }
}


@ServletComponentScan(basePackages = "com.example.webadmin")
@SpringBootApplication
public class WebAdminApplication {

    public static void main(String[] args) {
        SpringApplication.run(WebAdminApplication.class, args);
    }

}
2、使用RegistrationBean
ServletRegistrationBean, FilterRegistrationBean, and ServletListenerRegistrationBean
@Configuration
public class MyRegistConfig {

    @Bean
    public ServletRegistrationBean myServlet(){
        MyServlet myServlet = new MyServlet();

        return new ServletRegistrationBean(myServlet,"/my","/my02");
    }


    @Bean
    public FilterRegistrationBean myFilter(){

        MyFilter myFilter = new MyFilter();
//        return new FilterRegistrationBean(myFilter,myServlet());
        FilterRegistrationBean filterRegistrationBean = new FilterRegistrationBean(myFilter);
        filterRegistrationBean.setUrlPatterns(Arrays.asList("/my","/css/*"));
        return filterRegistrationBean;
    }

    @Bean
    public ServletListenerRegistrationBean myListener(){
        MySwervletContextListener mySwervletContextListener = new MySwervletContextListener();
        return new ServletListenerRegistrationBean(mySwervletContextListener);
    }
}
11、定制化原理
1、定制化的常见方式
- 修改配置文件;
- xxxxxCustomizer;
- 编写自定义的配置类 xxxConfiguration;+ @Bean替换、增加容器中默认组件;视图解析器
- Web应用 编写一个配置类实现 WebMvcConfigurer 即可定制化web功能;+ @Bean给容器中再扩展一些组件
2、原理分析套路
场景starter - xxxxAutoConfiguration - 导入xxx组件 - 绑定xxxProperties -- 绑定配置文件项
06、数据访问
1、SQL
1、数据源的自动配置-HikariDataSource
JdbcTemplateAutoConfiguration: JdbcTemplate的自动配置,可以来对数据库进行crud
        <dependency>
            <groupId>org.springframework.boot</groupId>
            <artifactId>spring-boot-starter-data-jdbc</artifactId>
        </dependency>
        <dependency>
            <groupId>mysql</groupId>
            <artifactId>mysql-connector-java</artifactId>
            <version>5.1.47</version>
        </dependency>
Long aLong = jdbcTemplate.queryForObject("select count(*) from books", Long.class);
log.info("查到的数据{}",aLong);yml
spring:
  datasource:
    driver-class-name: com.mysql.jdbc.Driver
    url: jdbc:mysql://localhost:3366/ssmbuild
    password: 123456
    username: root
2、使用Druid数据源
1、druid官方github地址
https://github.com/alibaba/druid
使用官方starter方式
1、引入druid-starter
        <dependency>
            <groupId>com.alibaba</groupId>
            <artifactId>druid-spring-boot-starter</artifactId>
            <version>1.1.17</version>
        </dependency>
监控页等功能 /druid 进入监控页
spring:
  datasource:
    driver-class-name: com.mysql.jdbc.Driver
    url: jdbc:mysql://localhost:3366/ssmbuild
    password: 123456
    username: root

    druid:
      aop-patterns: com.atguigu.admin.*  #监控SpringBean
      filters: stat,wall     # 底层开启功能,stat(sql监控),wall(防火墙)

        # 配置监控页功能
      stat-view-servlet:
        enabled: true
        login-username: admin
        login-password: 123

      web-stat-filter:
        enabled: true
        url-pattern: /*
        exclusions: '*.js,*.gif,*.jpg,*.png,*.css,*.ico,/druid/*'

      filter:
        stat: # 对上面filters里面的stat的详细配置
          slow-sql-millis: 1000
          logSlowSql: true
          enabled: true
        wall:
          enabled: true
          config:
            drop-table-allow: false
SpringBoot配置示例
https://github.com/alibaba/druid/tree/master/druid-spring-boot-starter
3、整合MyBatis操作
starter
SpringBoot官方的Starter:spring-boot-starter-*
第三方的: *-spring-boot-starter
        <dependency>
            <groupId>org.mybatis.spring.boot</groupId>
            <artifactId>mybatis-spring-boot-starter</artifactId>
            <version>2.1.4</version>
        </dependency>
Mapper: 只要我们写的操作MyBatis的接口标准了 @Mapper 就会被自动扫描进来
- 导入mybatis官方starter
- 编写mapper接口。标准@Mapper注解
- 编写sql映射文件并绑定mapper接口
- 在application.yaml中指定Mapper配置文件的位置,以及指定全局配置文件的信息 (建议;配置在mybatis.configuration)
实体类
@Data
@AllArgsConstructor
@NoArgsConstructor
public class Books {
    private int bookID;
    private String bookName;;
    private int bookCounts;
    private String detail;

}
@Mapper
public interface BooksMapper {

    public Books getBooks(int id);
}
<?xml version="1.0" encoding="UTF8" ?>
<!DOCTYPE mapper
        PUBLIC "-//mybatis.org//DTD Mapper 3.0//EN"
        "http://mybatis.org/dtd/mybatis-3-mapper.dtd">
<!--namespace=绑定一个对应的Dao/Mapper接口-->
<mapper namespace="com.example.webadmin.mapper.BooksMapper">
    <select id="getBooks" resultType="com.example.webadmin.pojo.Books">
        select * from Books where bookID=#{id}
    </select>

</mapper>
@Service
public class BooksService implements BooksMapper {
@Autowired
BooksMapper booksMapper;
@Override
public Books getBooks(int id) {
Books books = booksMapper.getBooks(id);
return books;
}
}
    @Autowired
    BooksService booksService;

    @ResponseBody
    @GetMapping("/book")
    public Books getBooks(@RequestParam("id") int id){
        Books books = booksService.getBooks(id);
        return books;
    }
mybatis:
mapper-locations: classpath:mybatis/mapper/*.xml
configuration:
map-underscore-to-camel-case: true
注解版
@Select("select * from Books where bookID=#{id}")
    public Books getBooks2(int id);
@Service
public class BooksService implements BooksMapper {
@Autowired
BooksMapper booksMapper;
@Override
public Books getBooks2(int id) {
Books books = booksMapper.getBooks(id);
return books;
}
}
    @Autowired
    BooksService booksService;


    @ResponseBody
    @GetMapping("/book2")
    public Books getBooks2(@RequestParam("id") int id){
        Books books = booksService.getBooks2(id);
        return books;
    }
最佳实战:
- 引入mybatis-starter
- 配置application.yaml中,指定mapper-location位置即可
- 编写Mapper接口并标注@Mapper注解
- 简单方法直接注解方式
- 复杂方法编写mapper.xml进行绑定映射
- @MapperScan("com.atguigu.admin.mapper") 简化,其他的接口就可以不用标注@Mapper注解


 494
494


 被折叠的 条评论
为什么被折叠?
被折叠的 条评论
为什么被折叠?
 到【灌水乐园】发言


