


Spring IoC
1. IoC 控制反转
-
控制反转是一种思想。
-
控制反转是为了降低程序耦合度,提高程序扩展力,达到OCP原则,达到DIP原则。
-
控制反转,反转的是什么?
-
- 将对象的创建权利交出去,交给第三方容器负责。
- 将对象和对象之间关系的维护权交出去,交给第三方容器负责。
- 将对象的创建权利交出去,交给第三方容器负责。
-
控制反转这种思想如何实现呢?
-
- DI(Dependency Injection):依赖注入
以前我们创建对象都是new出来的,比如:User user = new User();
而现在我们把这些类交给Spring容器,让Spring容器进行管理,我们只需要在需要对象的时候从里面拿出来。
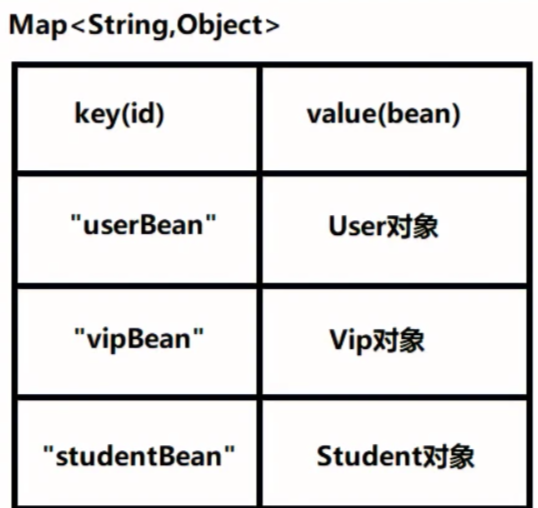
拓展:Spring容器中是用map来存所有的对象,key就是我们自己设置的对象名,value是容器自己创建的对象
2. Spring IoC — 基于XML
2.1 Spring框架部署
2.1.1 导入依赖
    <dependencies>
        <!--spring-context-->
        <dependency>
            <groupId>org.springframework</groupId>
            <artifactId>spring-context</artifactId>
            <version>5.3.9</version>
        </dependency>

        <!--测试-->
        <dependency>
            <groupId>junit</groupId>
            <artifactId>junit</artifactId>
            <version>4.13.2</version>
            <scope>test</scope>
        </dependency>

        <!--log4j日志-->
        <dependency>
            <groupId>org.apache.logging.log4j</groupId>
            <artifactId>log4j-core</artifactId>
            <version>2.19.0</version>
        </dependency>
        <dependency>
            <groupId>org.apache.logging.log4j</groupId>
            <artifactId>log4j-slf4j2-impl</artifactId>
            <version>2.19.0</version>
        </dependency>
    </dependencies>
2.1.2 创建Spring配置文件
通过配置文件"告诉"Spring容器创建什么对象,给对象属性赋什么值
- 在resources目录下创建名为
spring.xml的文件(文件名是可以自定义的)
<?xml version="1.0" encoding="UTF-8"?>
<beans xmlns="http://www.springframework.org/schema/beans"
       xmlns:xsi="http://www.w3.org/2001/XMLSchema-instance"
       xsi:schemaLocation="http://www.springframework.org/schema/beans http://www.springframework.org/schema/beans/spring-beans.xsd">


</beans>
2.2 使用IOC
2.2.1 创建实体类
public class User {
    private String name;
    private Integer age;
    private Date birth;
}
2.2.2 在配置文件中配置实体类
<bean id="user" class="com.bean.User" />
id:自定义id名,后续根据这个id获取这个对象
class:需要创建的实体类的全限定名
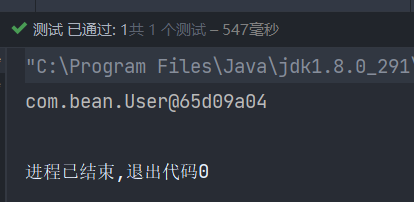
2.2.3 测试
public class UserTest {
    @Test
    public void testUser() {
        //初始化spring容器,把配置文件中的所有bean创建好对象,放在spring容器中,等待被使用。
        //如果配置文件中,在配置实体类不是单例模式,而是写的<bean id="user" class="com.bean.User" scope="prototype" />,这个语句就只会初始化容器,并不会创建对象,只有在调用对象的时候才会创建
        ApplicationContext applicationContext = new ClassPathXmlApplicationContext("spring.xml");
        //调用spring容器中id为user的对象
        User user = applicationContext.getBean("user", User.class);
        System.out.println(user);
    }
}
2.3 DI依赖注入
- 依赖注入实际上就是赋值
- 常见的依赖注入方法有两种
- set注入(前提条件:有对应的set方法)
- 构造注入(前提条件:有对应的构造方法)
2.3.1 set注入
1. 注入简单类型
使用Value
简单类型:
- 基本数据类型
- 基本数据类型对应的包装类
- Date
Date不推荐使用简单类型的注入方法,推荐使用引用类型的注入方法
因为必须写成Fri Sep 30 15:26:38 CST 2022这种格式,就显得有点麻烦
在User的基础上添加每个对象对应的set、get方法,并重写toString方法
public String getName() {
    return name;
}

public void setName(String name) {
    this.name = name;
}

public Integer getAge() {
    return age;
}

public void setAge(Integer age) {
    this.age = age;
}

public Date getBirth() {
    return birth;
}

public void setBirth(Date birth) {
    this.birth = birth;
}
@Override
public String toString() {
    return "User{" +
        "name='" + name + '\'' +
        ", age=" + age +
        ", birth=" + birth +
        '}';
}
修改配置文件
<bean id="user" class="com.bean.User"  >
    <!--name:属性名称,实际上是根据set方法变换而来   value:给这个名称赋值-->
   <property name="name" value="张三"/>
   <property name="age" value="20"/>
</bean>
初始化spring容器,创建User对象的之后,对这个对象的值进行赋值
注意:创建对象和赋值是两个环节
测试
public class UserTest {
    @Test
    public void testUser() {
        ApplicationContext applicationContext = new ClassPathXmlApplicationContext("spring.xml");
        User user = applicationContext.getBean("user", User.class);
        System.out.println(user);
    }
}
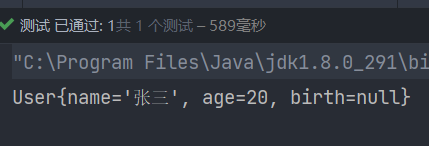
这儿我没有对Date类型的birth注入值,后续在注入引用类型的使用演示。
2. 注入引用类型
注入引用类型:使用ref,引用其他bean的id
一个User有一个Account,此时User对象中就有一个Account对象
创建Account实体类,修改User
public class Account {
    private Integer num;

    public Integer getNum() {
        return num;
    }

    public void setNum(Integer num) {
        this.num = num;
    }

    @Override
    public String toString() {
        return "Account{" +
                "num=" + num +
                '}';
    }
}
public class User {
    private String name;
    private Integer age;
    private Date birth;
    private Account account;

    public Account getAccount() {
        return account;
    }

    public void setAccount(Account account) {
        this.account = account;
    }

    public String getName() {
        return name;
    }

    public void setName(String name) {
        this.name = name;
    }

    public Integer getAge() {
        return age;
    }

    public void setAge(Integer age) {
        this.age = age;
    }

    public Date getBirth() {
        return birth;
    }

    public void setBirth(Date birth) {
        this.birth = birth;
    }

    @Override
    public String toString() {
        return "User{" +
                "name='" + name + '\'' +
                ", age=" + age +
                ", birth=" + birth +
                ", account=" + account +
                '}';
    }
}
修改配置文件
<!--User-->
<bean id="user" class="com.bean.User"  >
   <property name="name" value="张三"/>
   <property name="age" value="20"/>
   <property name="birth" ref="birth"/>
   <property name="account" ref="account"/>
 </bean>
<!--日期-->
<bean id="birth" class="java.util.Date"/>
<!--Account-->
<bean id="account" class="com.bean.Account">
   <property name="num" value="1001"/>
</bean>
测试
public class UserTest {
    @Test
    public void testUser() {
        ApplicationContext applicationContext = new ClassPathXmlApplicationContext("spring.xml");
        User user = applicationContext.getBean("user", User.class);
        System.out.println(user);
    }
}

3. 注入数组
接下来就只演示配置文件中该怎么写
- 简单类型数组
<bean id="user" class="com.bean.User">
        <property name="favariteFoods">
            <array>
                <value>鸡排</value>
                <value>汉堡</value>
                <value>鹅肝</value>
            </array>
        </property>
    </bean>
- 引用类型
 <bean id="goods1" class="com.powernode.spring6.beans.Goods">
        <property name="name" value="西瓜"/>
    </bean>

    <bean id="goods2" class="com.powernode.spring6.beans.Goods">
        <property name="name" value="苹果"/>
    </bean>

    <bean id="order" class="com.bean.Order">
        <property name="goods">
            <array>
                <!--这里使用ref标签即可-->
                <ref bean="goods1"/>
                <ref bean="goods2"/>
            </array>
        </property>
    </bean>
4. 注入集合
- List(简单类型使用Value,反之使用ref)
 <bean id="peopleBean" class="com.bean.People">
        <property name="names">
            <list>
                <value>铁锤</value>
                <value>张三</value>
                <value>张三</value>
                <value>张三</value>
                <value>狼</value>
            </list>
        </property>
    </bean>
- set
<bean id="peopleBean" class="com.bean.People">
    <property name="phones">
        <set>
            <!--非简单类型可以使用ref,简单类型使用value-->
            <value>110</value>
            <value>110</value>
            <value>120</value>
            <value>120</value>
            <value>119</value>
            <value>119</value>
        </set>
    </property>
</bean>
- map
<bean id="peopleBean" class="com.powernode.spring6.beans.People">
    <property name="addrs">
        <map>
            <!--如果key不是简单类型,使用 key-ref 属性-->
            <!--如果value不是简单类型,使用 value-ref 属性-->
            <entry key="1" value="北京大兴区"/>
            <entry key="2" value="上海浦东区"/>
            <entry key="3" value="深圳宝安区"/>
        </map>
    </property>
</bean>
2.3.4 构造注入
修改User和Account两个实体类
-
User
public class User { private String name; private Integer age; private Date birth; private Account account; public User(String name, Integer age, Date birth, Account account) { this.name = name; this.age = age; this.birth = birth; this.account = account; } public User() { } @Override public String toString() { return "User{" + "name='" + name + '\'' + ", age=" + age + ", birth=" + birth + ", account=" + account + '}'; } } -
Account
public class Account {
    private Integer num;

    public Account() {
    }

    public Account(Integer num) {
        this.num = num;
    }

    @Override
    public String toString() {
        return "Account{" +
                "num=" + num +
                '}';
    }
}
修改配置文件
<bean id="user" class="com.bean.User">
    <!--依次匹配构造函数中的字段-->
    <constructor-arg value="张三"/>
    <constructor-arg value="20"/>
    <constructor-arg ref="birth"/>
    <constructor-arg ref="account"/>
</bean>

<bean id="birth" class="java.util.Date"/>

<bean id="account" class="com.bean.Account">
    <constructor-arg value="1001"/>
</bean>
测试
public class UserTest {
    @Test
    public void testUser() {
        ApplicationContext applicationContext = new ClassPathXmlApplicationContext("spring.xml");
        User user = applicationContext.getBean("user", User.class);
        System.out.println(user);
    }
}

3. Spring IoC —基于注解
3.1 Spring框架部署
-
导入依赖
-
创建Spring配置文件
<?xml version="1.0" encoding="UTF-8"?>
<beans xmlns="http://www.springframework.org/schema/beans"
       xmlns:xsi="http://www.w3.org/2001/XMLSchema-instance"
       xmlns:context="http://www.springframework.org/schema/context"
       xsi:schemaLocation="http://www.springframework.org/schema/beans http://www.springframework.org/schema/beans/spring-beans.xsd http://www.springframework.org/schema/context https://www.springframework.org/schema/context/spring-context.xsd">
    <!--扫描com这个包下的所有类,把使用了注解的类创建出来并装进容器进行管理-->
    <context:component-scan base-package="com"/>
</beans>
3.2 声明Bean的注解
负责声明Bean的注解,常见的包括四个:
- @Component
- @Controller
- @Service
- @Repository
通过源码可以看到,@Controller、@Service、@Repository这三个注解都是@Component注解的别名。
也就是说:这四个注解的功能都一样。用哪个都可以。
为了增强程序的可读性,建议:
- 控制器类上使用:@Controller
- service类上使用:@Service
- dao类上使用:@Repository
他们都是只有一个value属性。value属性用来指定bean的id,也就是bean的名字。
如果我们不指定value,就默认是类名,把首字母小写
3.3 负责注入的注解
使用上面的注解可以把类交给容器管理,接下来我们看怎么给属性或者构造方法赋值
- @Value
- @Autowired
- @Qualifier
- @Resource
3.3.1 @Value
给简单类型进行赋值,即使不提供set方法,也可以实现注入
也可以在构造方法中使用@Value()
@Component
public class User {
    @Value("李四")
    private String name;
    @Value("15")
    private Integer age;
    private Date birth;
    private Account account;

  //  public User(@Value("李四") String name,@Value("15") Integer age) {
  //      this.name = name;
  //      this.age = age;
  // }

    @Override
    public String toString() {
        return "User{" +
                "name='" + name + '\'' +
                ", age=" + age +
                ", birth=" + birth +
                ", account=" + account +
                '}';
    }
}
测试结果

3.3.2 @Autowired与@Qualifier
@Autowired注解可以用来注入非简单类型,默认根据类型装配。
要么单独使用@Autowired,根据类型匹配;要么两个同时使用,根据名称匹配,绝对不能单独使用@Qualifier
什么时候使用@Autowired?
- UserService中有个UserDao属性,并且只有一个UserDao的实现类UserDaoImpl,就可以直接使用
什么时候两个同时使用?
- UserService中有个UserDao属性,但是一个UserDao有多个实现类UserDaoImpl1和UserDaoImpl2,这个时候我们就要结合使用,并且在@Qualifier里面要指明使用那个实现类
@Service
public class AccountService {
	//只有一个实现类
     @Autowired()
     private AccountDao accountDao;
---------------------------------------------------------
    //有多个实现类 ,要根据名字和类型,指定用哪个实现类
    @Autowired()
    @Qualifier("accountImpl2")//指定使用那个实现类
    private AccountDao accountDao;
}
3.3.3 @Resource
- 属性注解,也用于声明属性自动装配
- 默认装配方式为byName,如果根据byName没有找到对应的bean,则继续根据byType寻找对应的bean,根据byType如果依然没有找到Bean或者找到不止一个类型匹配的bean,则抛出异常。
- 同理:有两个实现类,也是要指定使用那个实现
4.全注解开发
把spring.xml转换成注解形式
@Configuration
@ComponentScan("com")//指定要扫描的包名
public class SpringConfig {
}
测试类有所不同
@Test
public void testNoXML(){
    AnnotationConfigApplicationContext applicationContext = new AnnotationConfigApplicationContext(SpringConfig.class);
    User user = applicationContext.getBean("user", User.class);
    System.out.println(user);
}


 20万+
20万+


 被折叠的 条评论
为什么被折叠?
被折叠的 条评论
为什么被折叠?
 到【灌水乐园】发言


