


实验目的
- 掌握4*4矩阵乘法运算的编程实现;
- 掌握平移、比例、旋转三种基本三维几何变换矩阵生成;
- 掌握正交投影图的生成和绘制方法。
实验要求
- 三维坐标系的原点位于屏幕中心,X轴水平向右,Y轴垂直向上,Z轴垂直于坐标屏幕,指向屏幕外;
- 设计实现三维图形变换类,具有平移、比例、旋转三维几何变换功能,以及正交投影变换功能;
- 使用实验二的直线类绘制正四面体的三维线框模型,要求体心位于坐标原点,使正四面体同时绕Y轴匀速旋转,并相对于体心点来回缩放;
- 使用双缓冲机制,绘制正四面体三维线框模型的二维正交投影图,要求投影到XOY平面。
实验步骤
1、打开直线扫描转换实验工程文件
2、建立头文件(CP3Edge.h)
代码如下:
#pragma once

//三维齐次坐标顶点类
class CP3
{
public:
	CP3();
	virtual~CP3();
	CP3(double, double, double);
public:
	double x;
	double y;
	double z;
	double w;
};

//边表类
class CEdge
{
public:
	CEdge();
	virtual~CEdge();
	void SetPointIndex(int, int);
public:
	int Start;
	int End;
};
3、建立源文件(CP3Edge.cpp)
//#include "stdafx.h"
#include "pch.h"
#include "CP3Edge.h"

CP3::CP3()
{
	x = 0.0;
	y = 0.0;
	z = 0.0;
	w = 1.0;
}

CP3::~CP3()
{}

CP3::CP3(double x, double y, double z)
{
	this->x = x;
	this->y = y;
	this->z = z;
	this->w = 1.0;
}

//边表类
CEdge::CEdge()
{
	Start = 0;
	End = 0;
}

CEdge::~CEdge()
{}

void CEdge::SetPointIndex(int start, int end)
{
	Start = start;
	End = end;
}
4、新建三维图形几何变换类CTrans3D.h头文件
#pragma once
#include "Line.h"
#include "CP3Edge.h"


class CTrans3D //三维几何变换
{
public:
	CTrans3D();
	virtual~CTrans3D();
	void SetPoints(CP3*, int);
	void Identity();
	void Translate(double, double, double);//平移变换
	void RotateX(double);//绕X轴旋转变换
	void RotateY(double);//绕Y轴旋转变换
	void RotateZ(double);//绕Z轴旋转变换
	void Scale(double, double, double);//比例变换
	void ProjXOY();//正交投影变换
protected:
	void MultiMatrix();//矩阵相乘
public:
	double m_aT[4][4];
	CP3* m_p3Points;
	CP2* m_p2Screen;
	int m_iNum;
};
5、建立三维图形几何变换类CTrans3D.cpp源文件
//#include "stdafx.h"
#include "pch.h"
#include "CTrans3D.h"
#include "math.h"
#define PI 3.14159

CTrans3D::CTrans3D()
{}

CTrans3D::~CTrans3D()
{
	if (m_p2Screen)
	{
		delete[]m_p2Screen;
		m_p2Screen = NULL;
	}
	if (m_p3Points)
	{
		delete[]m_p3Points;
		m_p3Points = NULL;
	}
}


void CTrans3D::SetPoints(CP3* p, int n)
{
	m_p3Points = new CP3[n];
	for (int i = 0; i < n; i++)
		m_p3Points[i] = p[i];
	m_iNum = n;
}

void CTrans3D::Identity()//单位矩阵
{
	m_aT[0][0] = 1.0; m_aT[0][1] = 0.0; m_aT[0][2] = 0.0; m_aT[0][3] = 0.0;
	m_aT[1][0] = 0.0; m_aT[1][1] = 1.0; m_aT[1][2] = 0.0; m_aT[1][3] = 0.0;
	m_aT[2][0] = 0.0; m_aT[2][1] = 0.0; m_aT[2][2] = 1.0; m_aT[2][3] = 0.0;
	m_aT[3][0] = 0.0; m_aT[3][1] = 0.0; m_aT[3][2] = 0.0; m_aT[3][3] = 1.0;
}

void CTrans3D::Translate(double tx, double ty, double tz)//平移变化矩阵
{
	Identity();
	m_aT[3][0] = tx;
	m_aT[3][1] = ty;
	m_aT[3][2] = tz;
	MultiMatrix();
}

void CTrans3D::Scale(double sx, double sy, double sz)//比例变换矩阵
{
	Identity();
	m_aT[0][0] = sx;
	m_aT[1][1] = sy;
	m_aT[2][2] = sz;
	MultiMatrix();
}

void CTrans3D::RotateX(double beta)//绕X轴旋转变换矩阵
{
	Identity();
	double rad = beta * PI / 180;
	m_aT[1][1] = cos(rad); m_aT[1][2] = sin(rad);
	m_aT[2][1] = -sin(rad); m_aT[2][2] = cos(rad);
	MultiMatrix();
}
void CTrans3D::RotateY(double beta)//绕Y轴旋转变换矩阵
{
	Identity();
	double rad = beta * PI / 180;
	m_aT[0][0] = cos(rad); m_aT[0][2] = -sin(rad);
	m_aT[2][0] = sin(rad); m_aT[2][2] = cos(rad);
	MultiMatrix();
}

void CTrans3D::RotateZ(double beta)//绕Z轴旋转变换矩阵
{

	Identity();
	double rad = beta * PI / 180;
	m_aT[0][0] = cos(rad); m_aT[0][1] = sin(rad);
	m_aT[1][0] = -sin(rad); m_aT[1][1] = cos(rad);
	MultiMatrix();
}

void CTrans3D::ProjXOY()//正交投影变换
{
	m_p2Screen = new CP2[m_iNum];
	for (int i = 0; i < m_iNum; i++)
	{
		m_p2Screen[i].x = m_p3Points[i].x;
		m_p2Screen[i].y = m_p3Points[i].y;
	}
}

void CTrans3D::MultiMatrix()//矩阵相乘
{
	CP3* PNew = new CP3[m_iNum];
	for (int i = 0; i < m_iNum; i++)
	{
		PNew[i] = m_p3Points[i];
	}
	for (int j = 0; j < m_iNum; j++)
	{
		m_p3Points[j].x = PNew[j].x * m_aT[0][0] + PNew[j].y * m_aT[1][0] + PNew[j].z * m_aT[2][0] + PNew[j].w * m_aT[3][0];
		m_p3Points[j].y = PNew[j].x * m_aT[0][1] + PNew[j].y * m_aT[1][1] + PNew[j].z * m_aT[2][1] + PNew[j].w * m_aT[3][1];
		m_p3Points[j].z = PNew[j].x * m_aT[0][2] + PNew[j].y * m_aT[1][2] + PNew[j].z * m_aT[2][2] + PNew[j].w * m_aT[3][2];
		m_p3Points[j].w = PNew[j].x * m_aT[0][3] + PNew[j].y * m_aT[1][3] + PNew[j].z * m_aT[2][3] + PNew[j].w * m_aT[3][3];
	}
	delete[]PNew;
}
6、建立正四面体的点表和边表
在"TestView.h"头文件里添加存储点表和边表的成员变量
// MFCApplication1View.h: CMFCApplication1View 类的接口
//

#pragma once
#include"CP3Edge.h"

class CMFCApplication1View : public CView
{
protected: // 仅从序列化创建
	CMFCApplication1View() noexcept;
	DECLARE_DYNCREATE(CMFCApplication1View)
		// 特性
public:
	CMFCApplication1Doc* GetDocument() const;

	// 操作
public:
	void BuildPointEdge();//建立正四面体的点表和边表
	// 重写
public:
	virtual void OnDraw(CDC* pDC);  // 重写以绘制该视图
	virtual BOOL PreCreateWindow(CREATESTRUCT& cs);
protected:
	virtual BOOL OnPreparePrinting(CPrintInfo* pInfo);
	virtual void OnBeginPrinting(CDC* pDC, CPrintInfo* pInfo);
	virtual void OnEndPrinting(CDC* pDC, CPrintInfo* pInfo);
	CP3 P[4];//点表
	CEdge E[6];//边表


	// 实现
public:
	virtual ~CMFCApplication1View();
#ifdef _DEBUG
	virtual void AssertValid() const;
	virtual void Dump(CDumpContext& dc) const;
#endif

protected:

	// 生成的消息映射函数
protected:
	afx_msg void OnFilePrintPreview();
	afx_msg void OnRButtonUp(UINT nFlags, CPoint point);
	afx_msg void OnContextMenu(CWnd* pWnd, CPoint point);
	DECLARE_MESSAGE_MAP()
};

#ifndef _DEBUG  // MFCApplication1View.cpp 中的调试版本
inline CMFCApplication1Doc* CMFCApplication1View::GetDocument() const
{
	return reinterpret_cast<CMFCApplication1Doc*>(m_pDocument);
}
#endif
7、在"TestView.cpp"源文件中添加建立正四面体的点表和边表函数的实现
CMFCApplication1View::CMFCApplication1View() noexcept
{
	// TODO: 在此处添加构造代码

	BuildPointEdge();//建立正四面体的点表和边表

}

void CMFCApplication1View::BuildPointEdge()
{
	double d = 400;//立方体边长为a
	//点表
	P[0].x =  d / 2; P[0].y =  d / 2; P[0].z =  d / 2;
	P[1].x =  d / 2; P[1].y = -d / 2; P[1].z = -d / 2;
	P[2].x = -d / 2; P[2].y = -d / 2; P[2].z =  d / 2;
	P[3].x = -d / 2; P[3].y =  d / 2; P[3].z = -d / 2;
	//边表
	E[0].SetPointIndex(0, 1);
	E[1].SetPointIndex(0, 2);
	E[2].SetPointIndex(0, 3);
	E[3].SetPointIndex(1, 2);
	E[4].SetPointIndex(1, 3);
	E[5].SetPointIndex(2, 3);
}
void CMFCApplication1View::OnDraw(CDC* pDC)
{
	CMFCApplication1Doc* pDoc = GetDocument();
	ASSERT_VALID(pDoc);
	if (!pDoc)
		return;

	// TODO: 在此处为本机数据添加绘制代码
	//1、设置绘图坐标系:原点为View视图区域中心,X轴正向水平向右,Y轴正向垂直向上
	CRect rect;
	GetClientRect(&rect);// 获得客户区矩形的大小
	pDC->SetMapMode(MM_ANISOTROPIC);//自定义坐标系
	pDC->SetWindowExt(rect.Width(), rect.Height());//设置窗口比例
	pDC->SetViewportExt(rect.Width(), -rect.Height());//设置视区比例,且x轴向右,y轴向上(记得改变方向)
	pDC->SetViewportOrg(rect.Width() / 2, rect.Height() / 2);// 设置客户区中心为坐标系原点


	// 2、双缓冲机制绘制
	CDC MemDC; // 内存DC
	CBitmap NewBitmap, * pOldBitmap; // 内存中承载的临时位图
	MemDC.CreateCompatibleDC(pDC); // 建立与屏幕DC兼容的MemDC
	NewBitmap.CreateCompatibleBitmap(pDC, rect.Width(), rect.Height()); //创建兼容位图
	pOldBitmap = MemDC.SelectObject(&NewBitmap); // 将兼容位图选入MemDC
	MemDC.FillSolidRect(rect, pDC->GetBkColor()); // 按原来背景填充客户区,否则是黑色
	MemDC.SetMapMode(MM_ANISOTROPIC); //MemDC 自定义坐标系与pDC相同
	MemDC.SetWindowExt(rect.Width(), rect.Height());
	MemDC.SetViewportExt(rect.Width(), -rect.Height());
	MemDC.SetViewportOrg(rect.Width() / 2, rect.Height() / 2);

	CLine* line = new CLine;//动态创建直线绘制类对象
	// 绘制坐标轴
	line->SetLineColor(RGB(0, 0, 0)); //黑色
	line->MoveTo(CP2(-rect.Width() / 2, 0)); //X轴
	line->LineTo(CP2(rect.Width() / 2, 0), &MemDC);
	line->MoveTo(CP2(0, -rect.Height() / 2)); //Y轴
	line->LineTo(CP2(0, rect.Height() / 2), &MemDC);

	//3、旋转、缩放、正交投影变换
	CTrans3D tans;
	tans.SetPoints(P, 4);
	static float s = 1.0;
	static float step = 0.01;
	//在.5~2.0之间缩放
	if (s >= 2.0 || s <= 0.5) {
		step = -step;
	}
	s += step;
	tans.Scale(s, s, s);
	//绕Y轴匀速逆时针旋转
	static float theta = 0.0;
	theta += 1.0;
	if (theta >= 360.0) {
		theta = 0.0;
	}
	tans.RotateY(theta);
	//二维正交投影
	tans.ProjXOY();
	//===========================

	//4、绘制动态旋转和缩放的四面体三维线框图的二维正交投影图
	for (int i = 0; i < 6; i++) {
		line->SetLineColor(RGB(0, 0,255));//绿色
		line->MoveTo(tans.m_p2Screen[E[i].Start]);
		line->LineTo(tans.m_p2Screen[E[i].End], &MemDC);
	}
	delete line;

	//4、将内存位图拷贝到屏幕
	pDC->BitBlt(-rect.Width() / 2, -rect.Height() / 2, rect.Width(), rect.Height(), &MemDC, -rect.Width() / 2, -rect.Height() / 2, SRCCOPY);
	MemDC.SelectObject(pOldBitmap);
	NewBitmap.DeleteObject();
	Invalidate(FALSE);//强制重绘
}
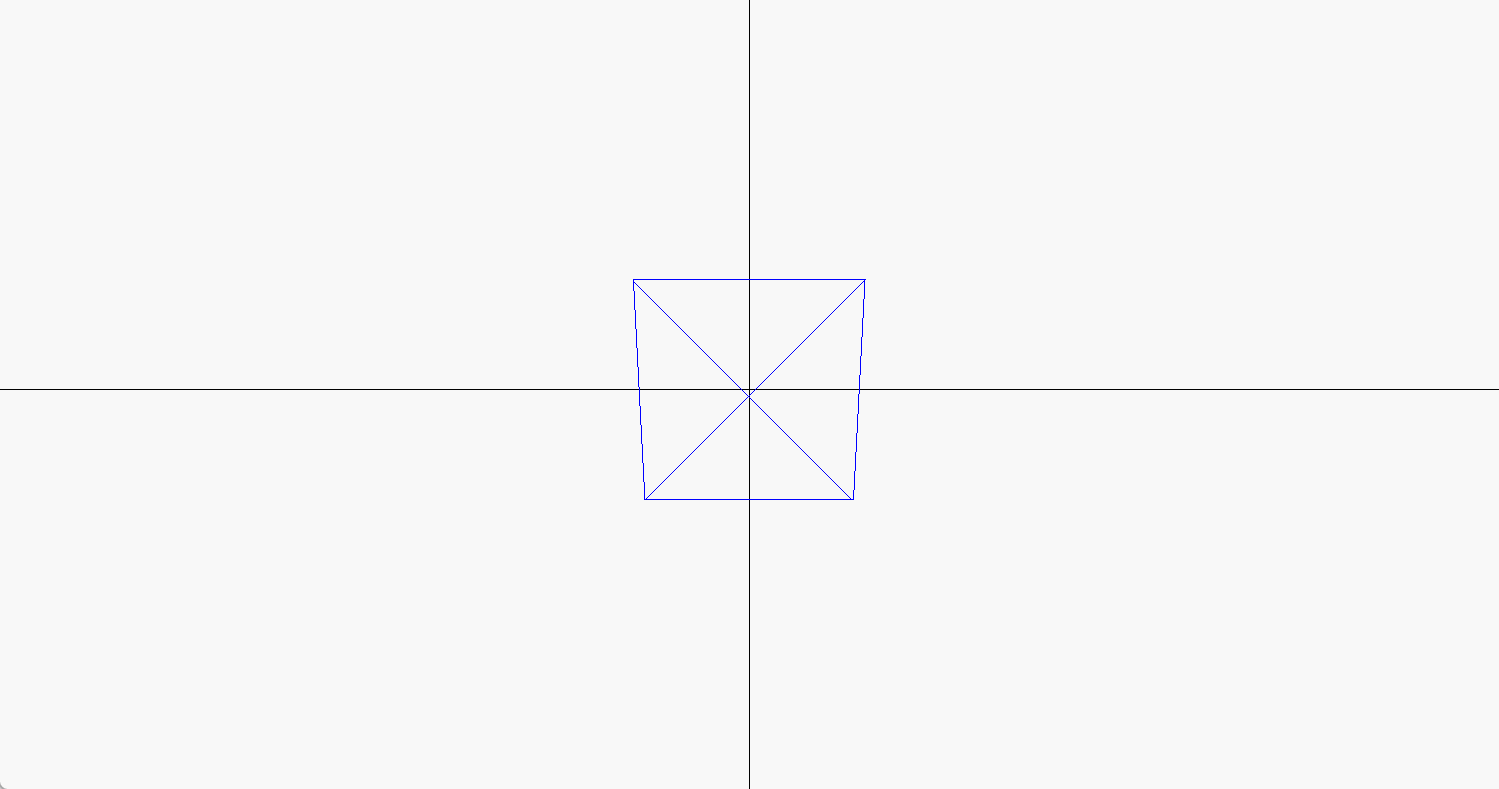
实验结果


 4491
4491


 被折叠的 条评论
为什么被折叠?
被折叠的 条评论
为什么被折叠?
 到【灌水乐园】发言


