


环境配置
Java不像Python,光有IDEA和MySQL是不够的,还需要个MySQL驱动,因为我MySQL是8版本的,
所以我驱动也用8版本。
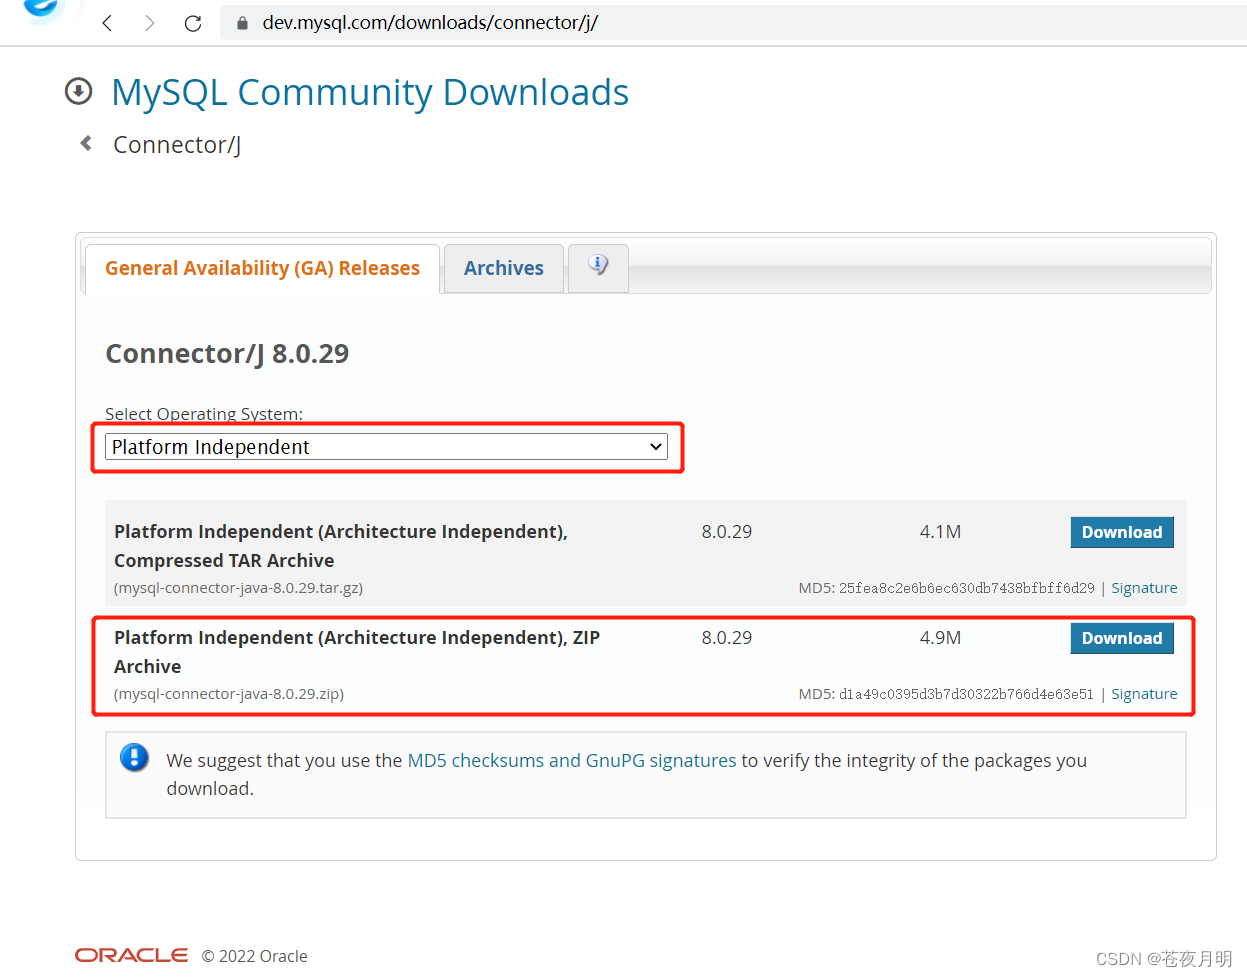
选 platform independent,点进去ZIP的Download
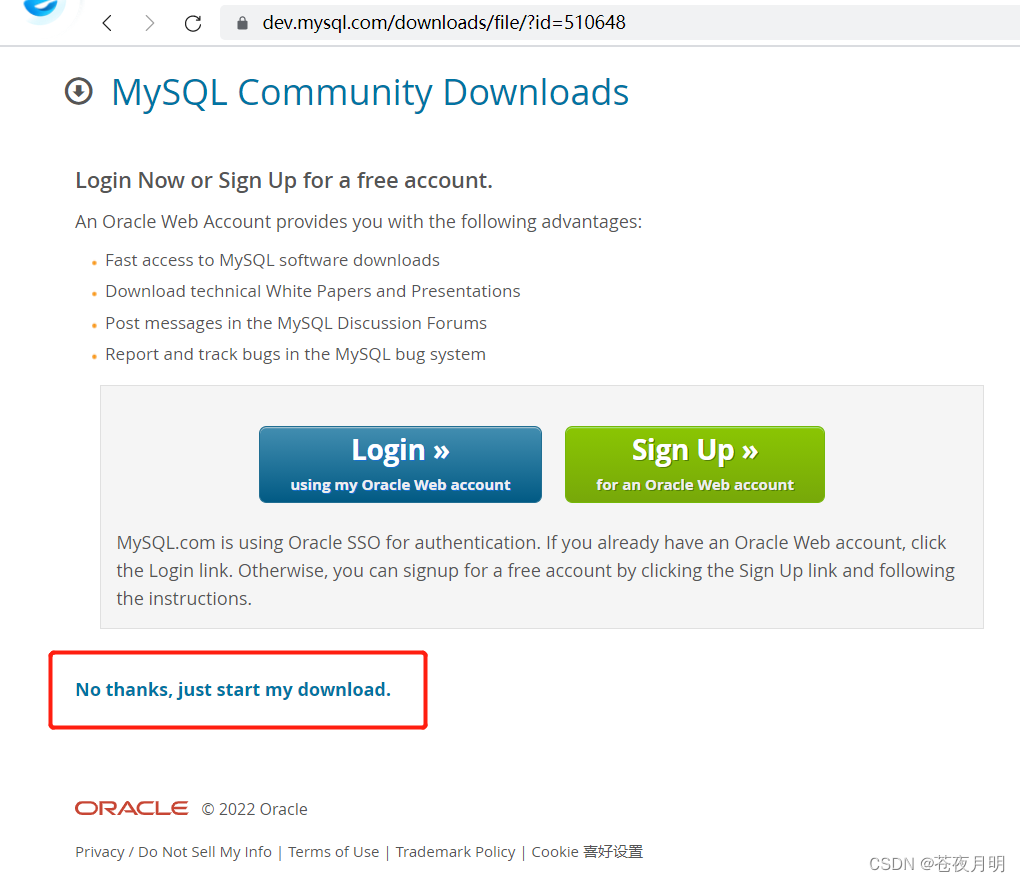
直接下载即可
下载好后就是一个这样的文件

解压后里面是这样
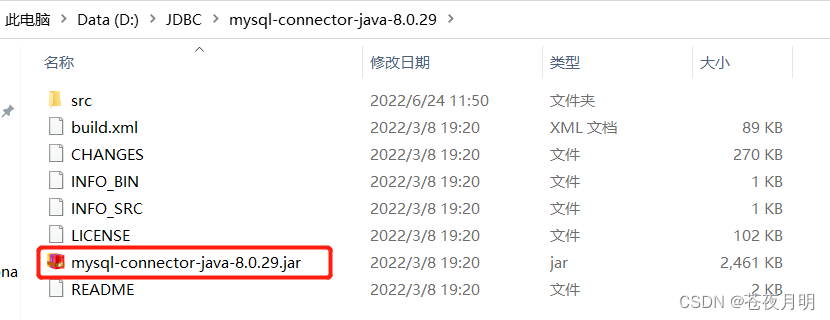
这个就是我们驱动用的 jar 包
接着就可以导入了
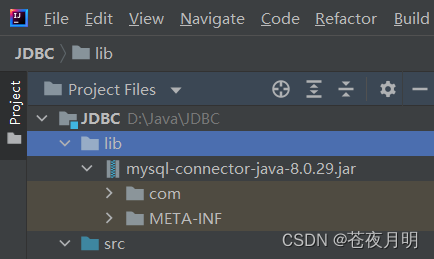
在想操作JDBC的 module 下创建一个lib Directory(与src同级)
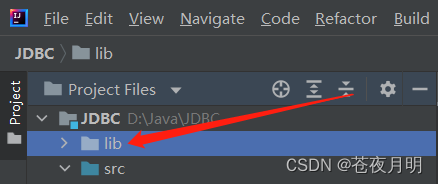
最后,把jar包放进lib里即可
连接
连接须知:
-
jdbc:mysql:协议 -
localhost:ip地址 -
3306:默认MySQL的端口号
test:数据库名(一般只改它)
方法一:用Driver连接
// 1.创建驱动
Driver driver = new com.mysql.cj.jdbc.Driver();
// 2.写url和info,作为连接的参数
String url = "jdbc:mysql://localhost:3306/数据库名";
// 将用户名和密码封装在Properties中
Properties info = new Properties();
info.setProperty("user","root");
info.setProperty("password","自己的密码");
// 3.使用driver进行链接
Connection conn = driver.connect(url,info);
完整代码:
package JDBC基础.连接;

import java.sql.Connection;
import java.sql.Driver;
import java.sql.SQLException;
import java.util.Properties;

public class Connection1 {
    public static void main(String[] args) throws SQLException {

        Driver driver = new com.mysql.cj.jdbc.Driver();

        String url = "jdbc:mysql://localhost:3306/test";
        Properties info = new Properties();
        info.setProperty("user","root");
        info.setProperty("password","MQ20201008");

        Connection conn = driver.connect(url,info);

        System.out.println(conn);
    }
}

如果运行出这样类似的东西就说明连接成功了!
方法二:用DriverManager连接⭐(用它的简化版)
// 1.创建驱动
Driver driver = new com.mysql.cj.jdbc.Driver();
// 2.写url、user、password,作为连接的参数
String url = "jdbc:mysql://localhost:3306/数据库名";
String user = "root";
String password = "自己的密码";
// 3.注册驱动
DriverManager.registerDriver(driver);
// 4.获取连接
Connection conn = DriverManager.getConnection(url,user,password);
完整代码:
package JDBC基础.连接;

import java.sql.Connection;
import java.sql.Driver;
import java.sql.DriverManager;
import java.sql.SQLException;

public class Connection2 {
    public static void main(String[] args) throws SQLException {

        // 创建驱动
        Driver driver = new com.mysql.cj.jdbc.Driver();

        String url = "jdbc:mysql://localhost:3306/test";
        String user = "root";
        String password = "MQ20201008";

        // 注册驱动
        DriverManager.registerDriver(driver);

        // 获取连接
        Connection conn = DriverManager.getConnection(url,user,password);

        System.out.println(conn);
    }
}
但是嘞,我后来发现,有的驱动内部已经写好了,不必显式的注册驱动了。因为在DriverManager的源码中已经存在静态代码块,实现了驱动的注册。
所以可以简化代码:
package JDBC基础.连接;

import java.sql.Connection;
import java.sql.Driver;
import java.sql.DriverManager;
import java.sql.SQLException;

public class Connection2 {
    public static void main(String[] args) throws SQLException {

        String url = "jdbc:mysql://localhost:3306/test";
        String user = "root";
        String password = "MQ20201008";

        // 获取连接
        Connection conn = DriverManager.getConnection(url,user,password);

        System.out.println(conn);
    }
}
增
增删改的操作是一样的,只有细微处的sql不一样。
详细操作:
-
获取数据库的连接
-
预编译sql语句,返回PreparedStatement的实例
-
填充占位符
-
执行
-
资源的关闭
先分步看:
// 1.获取数据库的连接
String url = "jdbc:mysql://localhost:3306/test";
String user = "root";
String password = "MQ20201008";

Connection conn = DriverManager.getConnection(url,user,password);
// 2.预编译sql语句,返回PreparedStatement的实例
String sql ="insert into customers(name,email,birth)values(?,?,?)"; // ?:占位符
PreparedStatement ps = conn.prepareStatement(sql);
// 3.填充占位符
ps.setString(1,"哪吒");
ps.setString(2,"nezha@gmail.com");
SimpleDateFormat sdf = new SimpleDateFormat("yyyy-MM-dd");    // 这两步看着麻烦,其实不然
Date date = sdf.parse("1000-01-01");	// 这两步都是为下面做铺垫
ps.setDate(3,new java.sql.Date(date.getTime()));	// 主要是日期类型数据麻烦
// 4.执行
ps.execute();
// 5.资源关闭
ps.close();
conn.close();
完整代码:
// 1.获取数据库的连接
String url = "jdbc:mysql://localhost:3306/test";
String user = "root";
String password = "MQ20201008";

Connection conn = DriverManager.getConnection(url,user,password);


// 2.预编译sql语句,返回PreparedStatement的实例
String sql ="insert into customers(name,email,birth)values(?,?,?)"; // ?:占位符
PreparedStatement ps = conn.prepareStatement(sql);


// 3.填充占位符
ps.setString(1,"哪吒");
ps.setString(2,"nezha@gmail.com");
SimpleDateFormat sdf = new SimpleDateFormat("yyyy-MM-dd");    // 这两步看着麻烦,其实不然
Date date = sdf.parse("1000-01-01");	// 这两步都是为下面做铺垫
ps.setDate(3,new java.sql.Date(date.getTime()));	// 主要是日期类型数据麻烦


// 4.执行
ps.execute();


// 5.资源关闭
ps.close();
conn.close();
要加 try-catch-finally 做异常处理:
package JDBC基础.增删改;

import com.mysql.cj.jdbc.Driver;

import java.sql.Connection;
import java.sql.DriverManager;
import java.sql.PreparedStatement;
import java.sql.SQLException;
import java.text.ParseException;
import java.text.SimpleDateFormat;
import java.util.Date;

public class insert1 {
    public static void main(String[] args) throws SQLException {

        Connection conn = null;
        PreparedStatement ps = null;
        try {
            // 1.获取数据库的连接
            String url = "jdbc:mysql://localhost:3306/test";
            String user = "root";
            String password = "MQ20201008";

            conn = DriverManager.getConnection(url,user,password);


            // 2.预编译sql语句,返回PreparedStatement的实例
            String sql ="insert into customers(name,email,birth)values(?,?,?)"; // ?:占位符
            ps = conn.prepareStatement(sql);


            // 3.填充占位符
            ps.setString(1,"哪吒");
            ps.setString(2,"nezha@gmail.com");
            SimpleDateFormat sdf = new SimpleDateFormat("yyyy-MM-dd");
            Date date = sdf.parse("1000-01-01");
            ps.setDate(3,new java.sql.Date(date.getTime()));


            // 4.执行
            ps.execute();
        } catch (SQLException | ParseException e) {
            e.printStackTrace();
        } finally {
            // 5.资源关闭
            assert ps != null;
            ps.close();
            conn.close();
        }

    }
}
增加数据成功!
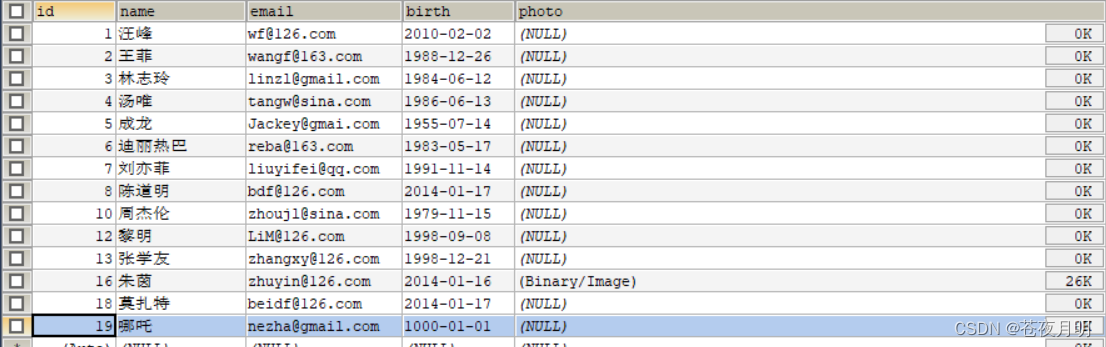
删
先分步看:
// 1.获取数据库的连接
String url = "jdbc:mysql://localhost:3306/test";
String user = "root";
String password = "MQ20201008";

conn = DriverManager.getConnection(url,user,password);
// 2.预编译sql语句,返回PreparedStatement的实例
String sql ="delete from customers where id = ?"; // ?:占位符
ps = conn.prepareStatement(sql);
// 3.填充占位符
ps.setInt(1,22);
// 4.执行
ps.execute();
// 5.资源关闭
ps.close();
conn.close();
完整代码:
// 1.获取数据库的连接
String url = "jdbc:mysql://localhost:3306/test";
String user = "root";
String password = "MQ20201008";

conn = DriverManager.getConnection(url,user,password);


// 2.预编译sql语句,返回PreparedStatement的实例
String sql ="delete from customers where id = ?"; // ?:占位符
ps = conn.prepareStatement(sql);


// 3.填充占位符
ps.setInt(1,22);


// 4.执行
ps.execute();


// 5.资源关闭
ps.close();
conn.close();
要加 try-catch-finally 做异常处理:
package JDBC基础.增删改;

import com.mysql.cj.jdbc.Driver;

import java.sql.Connection;
import java.sql.DriverManager;
import java.sql.PreparedStatement;
import java.sql.SQLException;

public class delete1 {
    public static void main(String[] args) throws SQLException {

        Connection conn = null;
        PreparedStatement ps = null;
        try {
            // 1.获取数据库的连接
            String url = "jdbc:mysql://localhost:3306/test";
            String user = "root";
            String password = "MQ20201008";

            conn = DriverManager.getConnection(url,user,password);

            System.out.println(conn);


            // 2.预编译sql语句,返回PreparedStatement的实例
            String sql ="delete from customers where id = ?"; // ?:占位符
            ps = conn.prepareStatement(sql);


            // 3.填充占位符
            ps.setInt(1,22);


            // 4.执行
            ps.execute();
        } catch (SQLException e) {
            e.printStackTrace();
        } finally {
            // 5.资源关闭
            assert ps != null;
            ps.close();
            conn.close();
        }

    }
}
删之前:
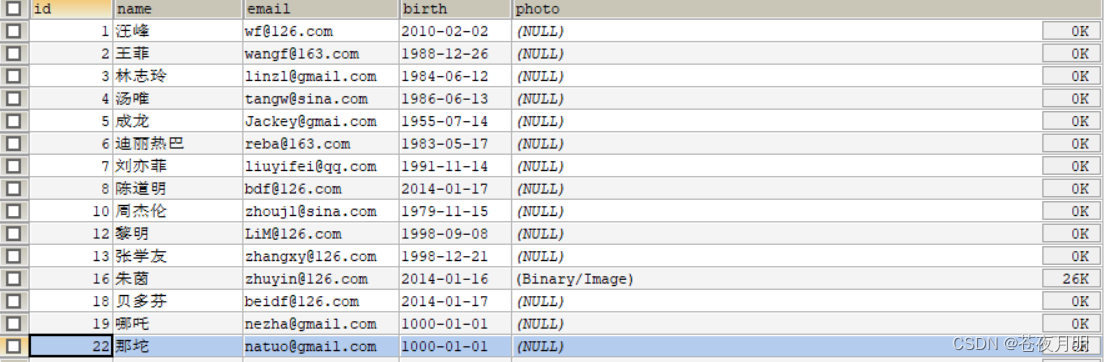
删之后:
删除数据成功!
改
先分步看:
// 1.获取数据库的连接
String url = "jdbc:mysql://localhost:3306/test";
String user = "root";
String password = "MQ20201008";

conn = DriverManager.getConnection(url,user,password);
// 2.预编译sql语句,返回PreparedStatement的实例
String sql = "update customers set name = ? where id = ?";
ps = conn.prepareStatement(sql);
// 3.填充占位符
ps.setString(1,"贝多芬");
ps.setInt(2,18);
// 4.执行
ps.execute();
// 5.资源关闭
ps.close();
conn.close();
完整代码:
// 1.获取数据库的连接
String url = "jdbc:mysql://localhost:3306/test";
String user = "root";
String password = "MQ20201008";

conn = DriverManager.getConnection(url,user,password);


// 2.预编译sql语句,返回PreparedStatement的实例
String sql = "update customers set name = ? where id = ?";
ps = conn.prepareStatement(sql);


// 3.填充占位符
ps.setString(1,"贝多芬");
ps.setInt(2,18);


// 4.执行
ps.execute();


// 5.资源关闭
ps.close();
conn.close();
要加 try-catch-finally 做异常处理:
package JDBC基础.增删改;

import java.sql.*;

public class update1 {
    public static void main(String[] args) throws SQLException {
        Connection conn = null;
        PreparedStatement ps = null;

        try {
            // 1.获取数据库的连接
            String url = "jdbc:mysql://localhost:3306/test";
            String user = "root";
            String password = "MQ20201008";

            conn = DriverManager.getConnection(url,user,password);

            System.out.println(conn);

            // 2.预编译sql语句,返回PreparedStatement的实例
            String sql = "update customers set name = ? where id = ?";
            ps = conn.prepareStatement(sql);

            // 3.填充占位符
            ps.setString(1,"贝多芬");
            ps.setInt(2,18);

            // 4.执行
            ps.execute();
        } catch (SQLException e) {
            e.printStackTrace();
        } finally {
            // 5.资源关闭
            assert ps != null;
            ps.close();
            conn.close();
        }


    }
}
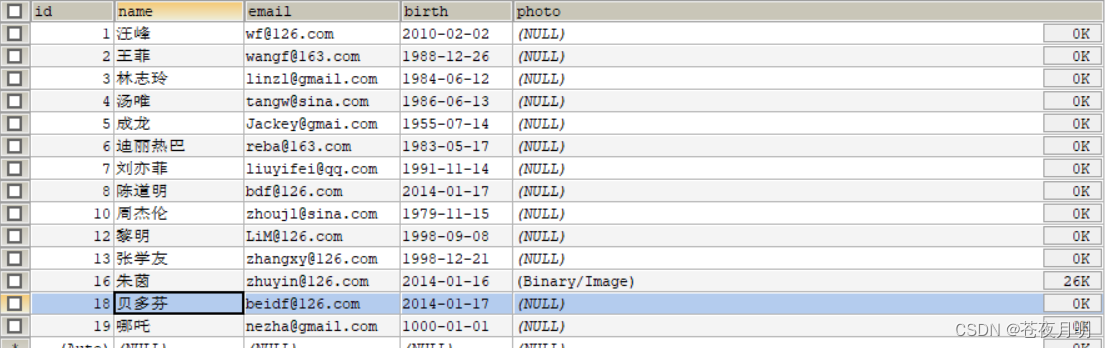
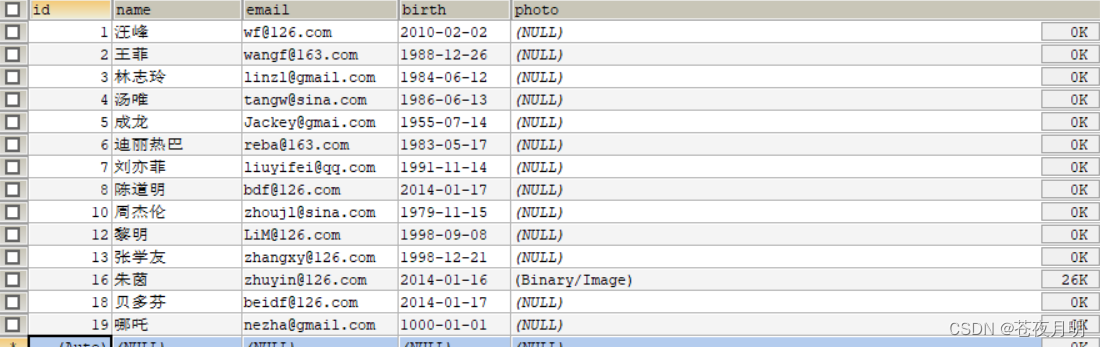
修改数据成功!
查
查和增删改有些不一样,在于增删改没有返回值,而查有返回值,需要处理返回得到的数据集。
先分步看:
// 1.获取数据库的连接
String url = "jdbc:mysql://localhost:3306/test";
String user = "root";
String password = "MQ20201008";

Connection conn = DriverManager.getConnection(url, user, password);
// 2.预编译sql语句,返回PreparedStatement的实例
String sql = "select id,name,email,birth from customers where id = ?"; // ?:占位符
PreparedStatement ps = conn.prepareStatement(sql);
// 3.填充占位符
ps.setInt(1,1);
// 4.执行,并返回结果集
ResultSet  resultSet=  ps.executeQuery();
// 5.处理结果集
if (resultSet.next()) {

    // 5.1获取当前这条数据的各个字段
    int id = resultSet.getInt(1);
    String name = resultSet.getString(2);
    String email = resultSet.getString(3);
    Date birth = resultSet.getDate(4);

    // 方式一:直接打印
	//System.out.println("id = "+id+"  name = "+name+"  email = "+email+"  birth = "+birth);

    // 5.2方式二:将数据封装为一个对象
    Customer customer = new Customer(id, name, email, birth);
    System.out.println(customer);

}
// 6.资源关闭
ps.close();
conn.close();
resultSet.close();
ORM编程思想(object relational mapping):
-
一个
数据表对应一个java类 -
表中的
一条记录对应java类的一个对象 -
表中的
一个字段对应java类的一个属性
这时候需要造一个Customer类,满足方式二的需求:
package JDBC基础.查;

import java.sql.Date;

public class Customer {

    private int id;
    private String name;
    private String email;
    private Date birth;

	// 空参构造器
    public Customer() {
    }

	// 全参构造器
    public Customer(int id, String name, String email, Date birth) {
        this.id = id;
        this.name = name;
        this.email = email;
        this.birth = birth;
    }

    public int getId() {
        return id;
    }

    public void setId(int id) {
        this.id = id;
    }

    public String getName() {
        return name;
    }

    public void setName(String name) {
        this.name = name;
    }

    public String getEmail() {
        return email;
    }

    public void setEmail(String email) {
        this.email = email;
    }

    public Date getBirth() {
        return birth;
    }

    public void setBirth(Date birth) {
        this.birth = birth;
    }

	// 重写toString方法,为之后打印结果做铺垫
    @Override
    public String toString() {
        return "Customer{" +
                "id=" + id +
                ", name='" + name + '\'' +
                ", email='" + email + '\'' +
                ", birth=" + birth +
                '}';
    }
}
定眼一看是个JavaBean
完整代码:
// 1.获取数据库的连接
String url = "jdbc:mysql://localhost:3306/test";
String user = "root";
String password = "MQ20201008";

Connection conn = DriverManager.getConnection(url, user, password);


// 2.预编译sql语句,返回PreparedStatement的实例
String sql = "select id,name,email,birth from customers where id = ?"; // ?:占位符
PreparedStatement ps = conn.prepareStatement(sql);


// 3.填充占位符
ps.setInt(1,1);


// 4.执行,并返回结果集
ResultSet  resultSet=  ps.executeQuery();


// 5.处理结果集
if (resultSet.next()) {

    // 5.1获取当前这条数据的各个字段
    int id = resultSet.getInt(1);
    String name = resultSet.getString(2);
    String email = resultSet.getString(3);
    Date birth = resultSet.getDate(4);

    // 方式一:直接打印
	//System.out.println("id = "+id+"  name = "+name+"  email = "+email+"  birth = "+birth);

    // 5.2方式二:将数据封装为一个对象
    Customer customer = new Customer(id, name, email, birth);
    System.out.println(customer);

}


// 6.资源关闭
ps.close();
conn.close();
resultSet.close();
要加 try-catch-finally 做异常处理:
package JDBC基础.查;

import com.mysql.cj.jdbc.Driver;

import java.sql.*;

public class select1 {
    public static void main(String[] args) throws SQLException {

        // 1.获取数据库的连接
        String url = "jdbc:mysql://localhost:3306/test";
        String user = "root";
        String password = "MQ20201008";

        Connection conn = DriverManager.getConnection(url, user, password);


        // 2.预编译sql语句,返回PreparedStatement的实例
        String sql = "select id,name,email,birth from customers where id = ?"; // ?:占位符
        PreparedStatement ps = conn.prepareStatement(sql);


        //3.填充占位符
        ps.setInt(1,1);


        // 4.执行,并返回结果集
        ResultSet  resultSet=  ps.executeQuery();


        // 5.处理结果集
        if (resultSet.next()) {

            // 5.1获取当前这条数据的各个字段
            int id = resultSet.getInt(1);
            String name = resultSet.getString(2);
            String email = resultSet.getString(3);
            Date birth = resultSet.getDate(4);

            // 方式一:直接打印
		    //System.out.println("id = "+id+"  name = "+name+"  email = "+email+"  birth = "+birth);

            // 5.2方式二:将数据封装为一个对象
            Customer customer = new Customer(id, name, email, birth);
            System.out.println(customer);

        }


        // 6.资源关闭
        ps.close();
        conn.close();
        resultSet.close();

    }
}

toString方法是这样写的,所以打印出来就长这样。
查找数据成功!


 974
974


 被折叠的 条评论
为什么被折叠?
被折叠的 条评论
为什么被折叠?
 到【灌水乐园】发言


