


模板组件
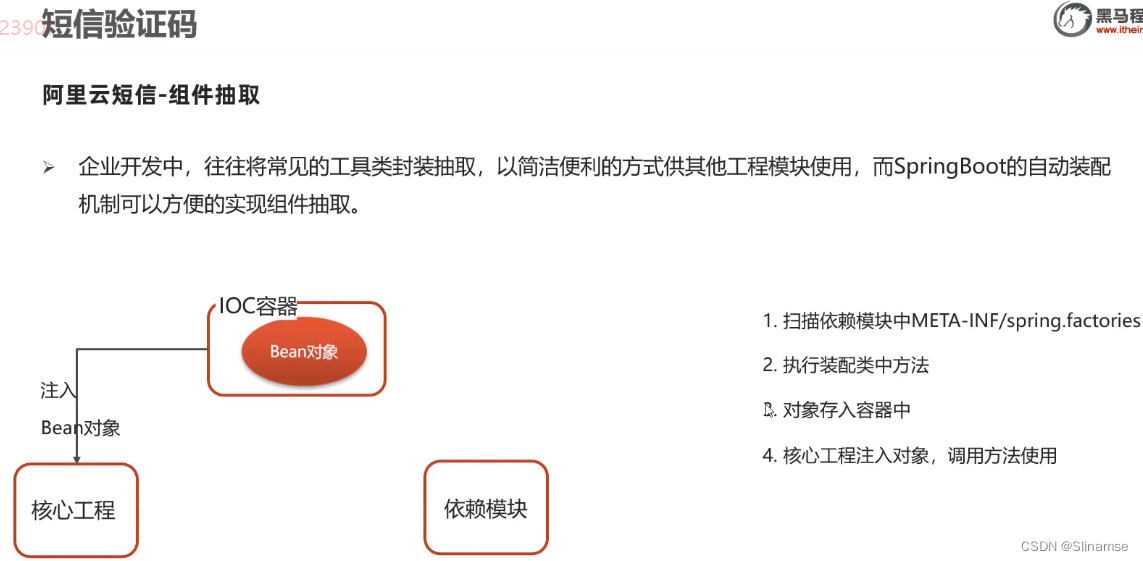
企业开发中,往往将常见工具类封装抽取,以简洁便利的方式供其他工程模块使用。而SpringBoot的自动装配机制可以方便的实现组件抽取。SpringBoot执行流程如下
-
扫描依赖模块中META-INF/spring.factories
-
执行装配类中方法
-
对象存入容器中
-
核心工程注入对象,调用方法使用
配置类
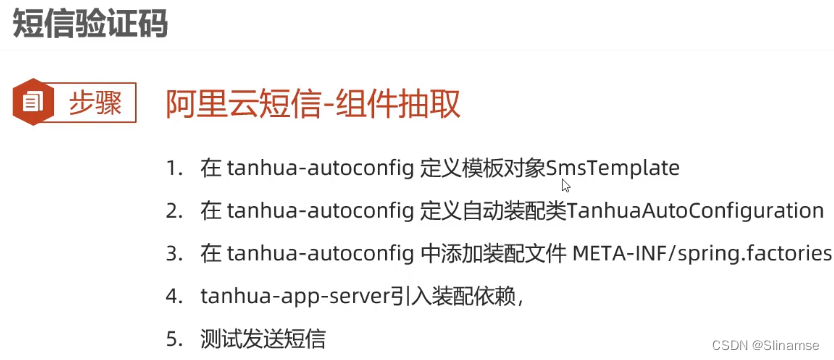
tanhua-autoconfig模块创建配置信息类SmsProperties
@Data
@ConfigurationProperties(prefix = "tanhua.sms")
public class SmsProperties {
private String accessKey;
private String secret;
private String signName;
private String templateCode;
}发送短信模板对象
tanhua-autoconfig>模块创建模板对象发送信息
package com.tanhua.autoconfig.template;
import com.aliyun.dysmsapi20170525.Client;
import com.aliyun.dysmsapi20170525.models.SendSmsRequest;
import com.aliyun.dysmsapi20170525.models.SendSmsResponse;
import com.aliyun.teaopenapi.models.Config;
import com.tanhua.autoconfig.properties.SmsProperties;
/**
* @author Administrator
*/
public class SmsTemplate {
private SmsProperties smsProperties;
public SmsTemplate(SmsProperties smsProperties) {
this.smsProperties = smsProperties;
}
/**
* 发送验证码短信
*
* @param mobile
* @param code
*/
public void sendSms(String mobile, String code) {
try {
Config config = new Config()
.setAccessKeyId(smsProperties.getAccessKey())
.setAccessKeySecret(smsProperties.getSecret());
// 访问的域名
config.endpoint = "dysmsapi.aliyuncs.com";
Client client = new Client(config);
SendSmsRequest sendSmsRequest = new SendSmsRequest()
.setPhoneNumbers(mobile)
.setSignName(smsProperties.getSignName())
.setTemplateCode(smsProperties.getTemplateCode())
.setTemplateParam("{\"code\":\"" + code + "\"}");
// 复制代码运行请自行打印 API 的返回值
SendSmsResponse response = client.sendSms(sendSmsRequest);
if ("OK".equals(response.getBody().getCode())) {
System.out.println("验证码发送成功");
}
System.out.println(response.getBody().getMessage());
} catch (Exception e) {
e.printStackTrace();
}
}
}自动装配类
tanhua-autoconfig模块创建自动装配的配置类
package com.tanhua.autoconfig;
import com.tanhua.autoconfig.properties.SmsProperties;
import com.tanhua.autoconfig.template.SmsTemplate;
import org.springframework.boot.context.properties.EnableConfigurationProperties;
import org.springframework.context.annotation.Bean;
/**
* @author Administrator
*/
@EnableConfigurationProperties({
SmsProperties.class
})
public class TanhuaAutoConfiguration {
@Bean
public SmsTemplate smsTemplate(SmsProperties smsProperties) {
return new SmsTemplate(smsProperties);
}
}
自动装配配置
根据自动装配原则,在tanhua-autoconfig模块创建/META-INF/spring.factories文件
org.springframework.boot.autoconfigure.EnableAutoConfiguration=com.tanhua.autoconfig.TanhuaAutoConfiguration测试
tanhua-app-server工程加入短信配置
tanhua:
  sms:
    signName: 物流云商
    templateCode: SMS_106590012
    accessKey: LTAI5tHLKGSXAC7fuGgRJktH
secret: rRTJlzc04PlOiFjj552dA4ejDuRPiotanhua-app-server工程编写单元测试类
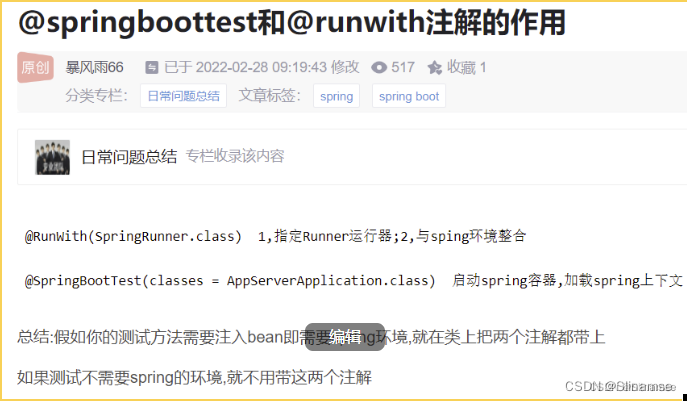
@RunWith(SpringRunner.class)
@SpringBootTest(classes = AppServerApplication.class)
public class SmsTemplateTest {
//注入
@Autowired
private SmsTemplate smsTemplate;
//测试
@Test
public void testSendSms() {
smsTemplate.sendSms("xxxxxxxxxxx","4567");
}
}
正常的企业开发返回值一般会有一个对象来包裹,这个对象叫做ResponseEntity,这个对象是Spring提供的返回值对象
JWT
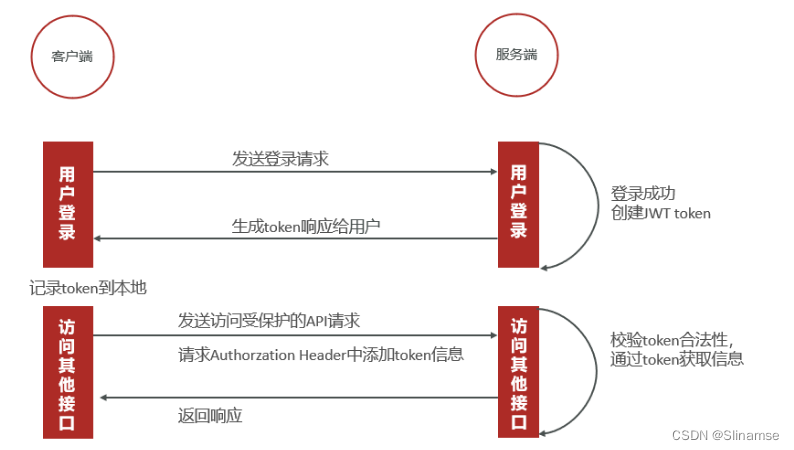
JSON Web token简称JWT, 是用于对应用程序上的用户进行身份验证的标记。也就是说, 使用 JWTS 的应用程序不再需要保存有关其用户的 cookie 或其他session数据。此特性便于可伸缩性, 同时保证应用程序的安全
格式
-
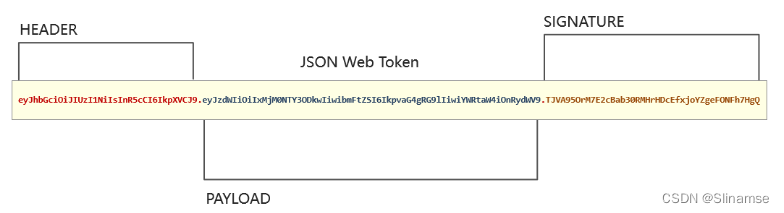
JWT就是一个字符串,经过加密处理与校验处理的字符串,形式为:A.B.C
-
A由JWT头部信息header加密得到
-
B由JWT用到的身份验证信息json数据加密得到
-
C由A和B加密得到,是校验部分
流程
示例
导入依赖:
<dependency>
    <groupId>io.jsonwebtoken</groupId>
    <artifactId>jjwt</artifactId>
    <version>0.9.1</version>
</dependency>
编写测试用例:
@Test
public void testCreateToken() {
//生成token
//1 准备数据
Map map = new HashMap();
map.put("id",1);
map.put("mobile","13800138000");
//2 使用JWT的工具类生成token
long now = System.currentTimeMillis();
String token = Jwts.builder()
.signWith(SignatureAlgorithm.HS512, "itcast") //指定加密算法
.setClaims(map) //写入数据
.setExpiration(new Date(now + 30000)) //失效时间
.compact();
System.out.println(token);
}
//解析token
/**
* SignatureException : token不合法
* ExpiredJwtException:token已过期
*/
@Test
public void testParseToken() {
String tokentest = "eyJhbGciOiJIUzUxMiJ9.eyJtb2JpbGUiOiIxMzgwMDEzODAwMCIsImlkIjoxLCJleHAiOjE2MTgzOTcxOTV9.2lQiovogL5tJa0px4NC-DW7zwHFqZuwhnL0HPAZunieGphqnMPduMZ5TtH_mxDrgfiskyAP63d8wzfwAj-MIVw";
try {
Claims claims = Jwts.parser()
.setSigningKey("itcast")
.parseClaimsJws(tokentest)
.getBody();
Object id = claims.get("id");
Object mobile = claims.get("mobile");
System.out.println(id + "--" + mobile);
}catch (ExpiredJwtException e) {
System.out.println("tokentest已过期");
}catch (SignatureException e) {
System.out.println("tokentest不合法");
}
}通过解析Token得知,如果抛出SignatureException异常表示token不合法,如果抛出ExpiredJwtException异常表示token已过期
设置密钥和生成密钥一致
JWT工具类
tanhua-commons 模块创建JWT工具类
package com.tanhua.utils;
import io.jsonwebtoken.Claims;
import io.jsonwebtoken.Jwts;
import io.jsonwebtoken.SignatureAlgorithm;
import org.apache.commons.lang3.StringUtils;
import java.io.UnsupportedEncodingException;
import java.util.Base64;
import java.util.Date;
import java.util.Map;
/**
* @author Administrator
*/
public class JwtUtils {
/**
* TOKEN的有效期1小时(S)
*/
private static final int TOKEN_TIME_OUT = 1 * 3600;
/**
* 加密KEY
*/
private static final String TOKEN_SECRET = "itcast";
/**
* 生成Token
*
* @param params
* @return
* @throws UnsupportedEncodingException
*/
public static String getToken(Map params) {
long currentTime = System.currentTimeMillis();
try {
return Jwts.builder()
//加密方式与秘钥
.signWith(SignatureAlgorithm.HS512, Base64.getEncoder().encode(TOKEN_SECRET.getBytes("UTF-8")))
//过期时间戳
.setExpiration(new Date(currentTime + TOKEN_TIME_OUT * 1000))
.addClaims(params)
.compact();
} catch (UnsupportedEncodingException e) {
e.printStackTrace();
}
return null;
}
/**
* 获取Token中的claims信息
*/
public static Claims getClaims(String token) {
try {
return Jwts.parser()
.setSigningKey(Base64.getEncoder().encode(TOKEN_SECRET.getBytes("UTF-8")))
.parseClaimsJws(token).getBody();
} catch (UnsupportedEncodingException e) {
e.printStackTrace();
return null;
}
}
/**
* 是否有效 true-有效,false-失效
*/
public static boolean verifyToken(String token) {
if (StringUtils.isEmpty(token)) {
return false;
}
try {
Claims claims = Jwts.parser()
.setSigningKey(Base64.getEncoder().encode(TOKEN_SECRET.getBytes("UTF-8")))
.parseClaimsJws(token)
.getBody();
} catch (Exception e) {
return false;
}
return true;
}
}可能存在的问题
序列化异常

注意 : Dubbo的传输需要将对象序列化为字节在网络上传输 , 实体类需要实现
Serializable
代码优化
抽取BasePojo
为了简化实体类中created和updated字段,抽取BasePojo
@Data
public abstract class BasePojo implements Serializable {
@TableField(fill = FieldFill.INSERT) //自动填充
private Date created;
@TableField(fill = FieldFill.INSERT_UPDATE)
private Date updated;
}自动填充
对于created和updated字段,每次操作都需要手动设置。为了解决这个问题,mybatis-plus支持自定义处理器的形式实现保存更新的自动填充
package com.tanhua.dubbo.server.handler;

import com.baomidou.mybatisplus.core.handlers.MetaObjectHandler;
import org.apache.ibatis.reflection.MetaObject;
import org.springframework.stereotype.Component;

import java.util.Date;

@Component
public class MyMetaObjectHandler implements MetaObjectHandler {

    @Override
    public void insertFill(MetaObject metaObject) {
        Object created = getFieldValByName("created", metaObject);
        if (null == created) {
            //字段为空,可以进行填充
            setFieldValByName("created", new Date(), metaObject);
        }

        Object updated = getFieldValByName("updated", metaObject);
        if (null == updated) {
            //字段为空,可以进行填充
            setFieldValByName("updated", new Date(), metaObject);
        }
    }

    @Override
    public void updateFill(MetaObject metaObject) {
        //更新数据时,直接更新字段
        setFieldValByName("updated", new Date(), metaObject);
    }
}
哪个服务调用数据库哪个服务就要配置handler
阿里云OSS
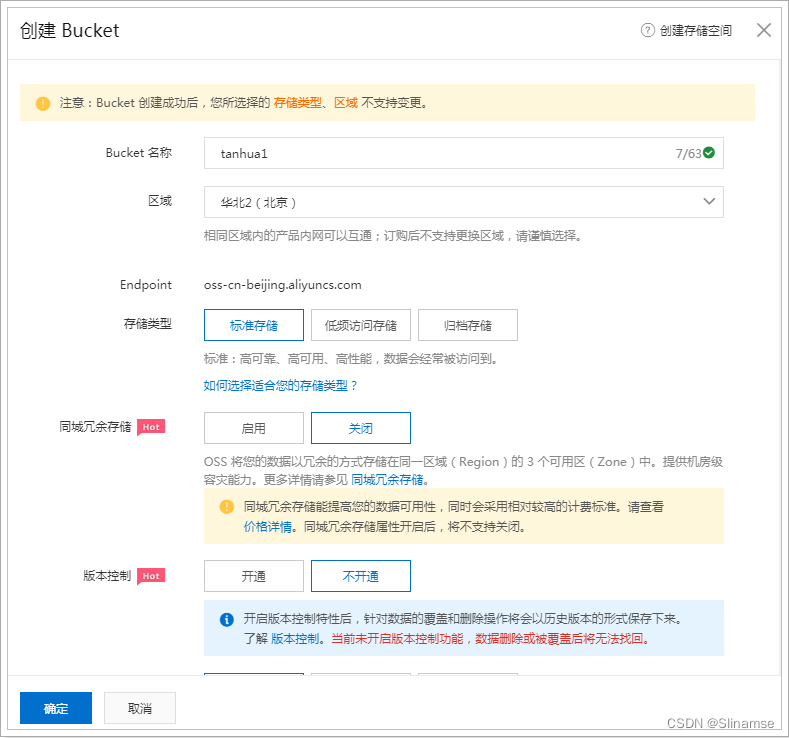
创建Bucket
使用OSS,首先需要创建Bucket,Bucket翻译成中文是水桶的意思,把存储的图片资源看做是水,想要盛水必须得有桶,就是这个意思了。
进入控制台,https://oss.console.aliyun.com/overview
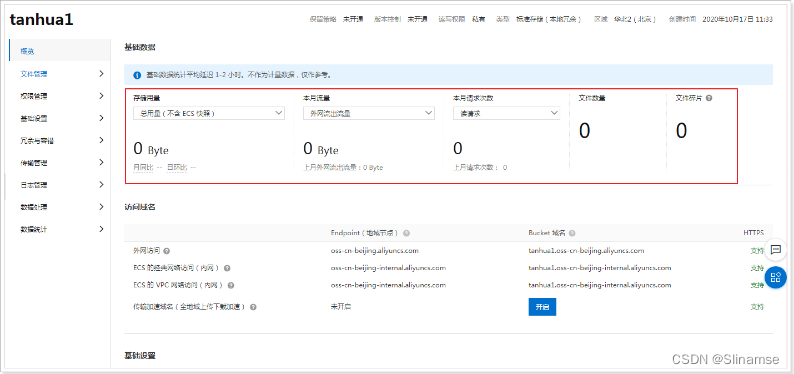
选择Bucket后,即可看到对应的信息,如:url消耗流量等 :
抽取模板工具
和发送短信类似,阿里云OSS也是采用自定义工具的形式进行封装
OssProperties
tanhua-autoconfig创建配置类
@Data
@ConfigurationProperties(prefix = "tanhua.oss")
public class OssProperties {
private String accessKey;
private String secret;
private String bucketName;
private String url; //域名
private String endpoint;
}OssTemplate
tanhua-autoconfig创建模板对象
package com.tanhua.autoconfig.template;
import com.aliyun.oss.OSS;
import com.aliyun.oss.OSSClientBuilder;
import com.tanhua.autoconfig.properties.OssProperties;
import java.io.InputStream;
import java.text.SimpleDateFormat;
import java.util.Date;
import java.util.UUID;
public class OssTemplate {
private OssProperties ossProperties;
public OssTemplate(OssProperties ossProperties) {
this.ossProperties = ossProperties;
}
public String upload(String filename, InputStream is) {
// yourEndpoint填写Bucket所在地域对应的Endpoint。以华东1(杭州)为例,Endpoint填写为https://oss-cn-hangzhou.aliyuncs.com。
String endpoint = ossProperties.getEndpoint();
// 阿里云主账号AccessKey拥有所有API的访问权限,风险很高。强烈建议您创建并使用RAM账号进行API访问或日常运维,请登录 https://ram.console.aliyun.com 创建RAM账号。
String accessKeyId = ossProperties.getAccessKey();
String accessKeySecret = ossProperties.getSecret();
// 创建OSSClient实例。
OSS ossClient = new OSSClientBuilder().build(endpoint, accessKeyId, accessKeySecret);
String storePath = new SimpleDateFormat("yyyy/MM/dd").format(new Date()) + "/" + UUID.randomUUID() + filename.substring(filename.lastIndexOf("."));
System.out.println(storePath);
// 依次填写Bucket名称(例如examplebucket)和Object完整路径(例如exampledir/exampleobject.txt)。Object完整路径中不能包含Bucket名称。
ossClient.putObject(ossProperties.getBucketName(), storePath, is);
String url = ossProperties.getUrl() + storePath;
// 关闭OSSClient。
ossClient.shutdown();
return url;
}
}TanhuaAutoConfiguration
tanhua-autoconfig的TanhuaAutoConfiguration加入配置
@EnableConfigurationProperties({
SmsProperties.class,
OssProperties.class
})
public class TanhuaAutoConfiguration {
@Bean
public SmsTemplate smsTemplate(SmsProperties properties) {
return new SmsTemplate(properties);
}
@Bean
public OssTemplate ossTemplate(OssProperties properties) {
return new OssTemplate(properties);
}
}测试
tanhua-app-server加入配置内容,并测试
tanhua:
  oss:
    accessKey: LTAI4GKgob9vZ53k2SZdyAC7
    secret: LHLBvXmILRoyw0niRSBuXBZewQ30la
    endpoint: oss-cn-beijing.aliyuncs.com
    bucketName: tanhua001
    url: https://tanhua001.oss-cn-beijing.aliyuncs.com/
编写测试类
@RunWith(SpringRunner.class)
@SpringBootTest(classes = AppServerApplication.class)
public class OssTest {
@Autowired
private OssTemplate template;
@Test
public void testTemplateUpload() throws FileNotFoundException {
String path = "C:\\Users\\lemon\\Desktop\\课程资源\\02-完善用户信息\\03-资料\\2.jpg";
FileInputStream inputStream = new FileInputStream(new File(path));
String imageUrl = template.upload(path, inputStream);
System.out.println(imageUrl);
}
}百度人脸识别
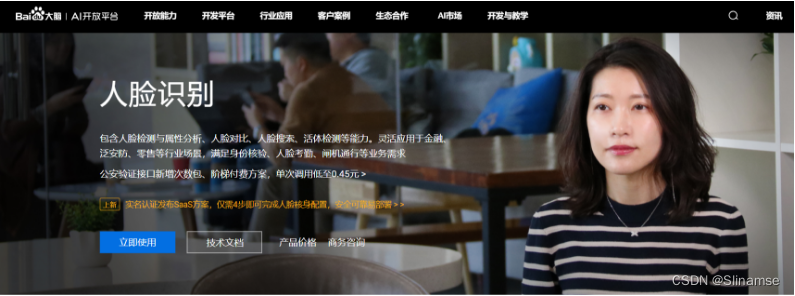
人脸识别(Face Recognition)基于图像或视频中的人脸检测分析和比对技术,提供对您已获授权前提下的私有数据的人脸检测与属性分析人脸对比人脸搜索活体检测等能力。灵活应用于金融泛安防零售等行业场景,满足身份核验人脸考勤闸机通行等业务需求
概述
地址:https://ai.baidu.com/tech/face
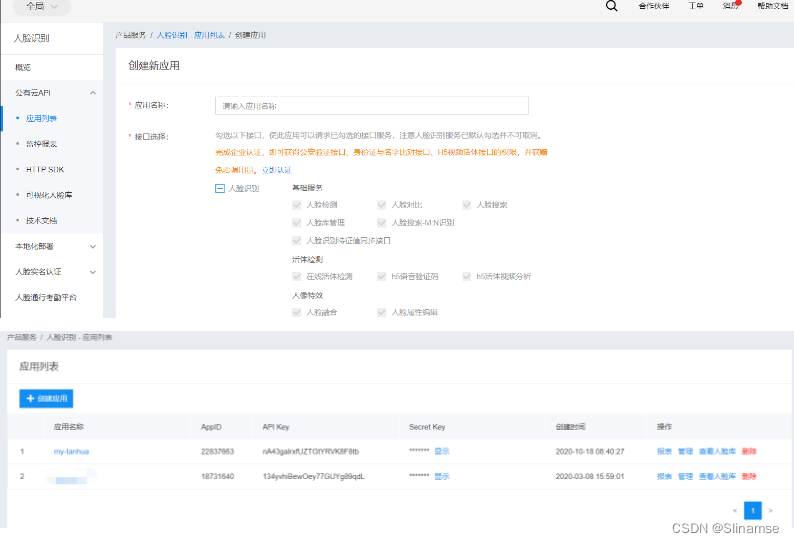
创建应用
按需创建应用
抽取模板工具
AipFaceProperties
tanhua-autoconfig中添加配置对象
package com.tanhua.autoconfig.properties;
import com.baidu.aip.face.AipFace;
import lombok.Data;
import org.springframework.boot.context.properties.ConfigurationProperties;
import org.springframework.context.annotation.Bean;
@Data
@ConfigurationProperties("tanhua.aip")
public class AipFaceProperties {
private String appId;
private String apiKey;
private String secretKey;
@Bean
public AipFace aipFace() {
AipFace client = new AipFace(appId, apiKey, secretKey);
// 可选:设置网络连接参数
client.setConnectionTimeoutInMillis(2000);
client.setSocketTimeoutInMillis(60000);
return client;
}
}spring中@Bean是可以不配合@Configuration单独使用的
加了@Configuration和不加有本质上有什么区别的?
当在配置类中一个@Bean 使用方法的方式引用另一个Bean如果不加注解就会重复加载Bean 如果加了@Configuration 则会在这里创建cglib代理,当调用@Bean方法时会先检测容器中是否存在
AipFaceTemplate
tanhua-autoconfig中创建AipFaceTemplate
package com.tanhua.autoconfig.template;
import com.baidu.aip.face.AipFace;
import org.json.JSONObject;
import org.springframework.beans.factory.annotation.Autowired;
import java.util.HashMap;
public class AipFaceTemplate {
@Autowired
private AipFace client;
/**
* 检测图片中是否包含人脸
* true:包含
* false:不包含
*/
public boolean detect(String imageUrl) {
// 调用接口
String imageType = "URL";
HashMap<String, String> options = new HashMap<String, String>();
options.put("face_field", "age");
options.put("max_face_num", "2");
options.put("face_type", "LIVE");
options.put("liveness_control", "LOW");
// 人脸检测
JSONObject res = client.detect(imageUrl, imageType, options);
System.out.println(res.toString(2));
Integer error_code = (Integer) res.get("error_code");
return error_code == 0;
}
}TanhuaAutoConfiguration
@EnableConfigurationProperties({
//其他略
AipFaceProperties.class
})
public class TanhuaAutoConfiguration {
//其他略
@Bean
public AipFaceTemplate aipFaceTemplate() {
return new AipFaceTemplate();
}
}模板类测试
tanhua-app-server加入百度AI的配置信息
tanhua:
  aip:
    appId: 24021388
    apiKey: ZnMTwoETXnu4OPIGwGAO2H4G
    secretKey: D4jXShyinv5q26bUS78xRKgNLnB9IfZh
编写单元测试类
@SpringBootTest(classes = AppServerApplication.class)
@RunWith(SpringRunner.class)
public class AipFaceTemplateTest {
@Autowired
private AipFaceTemplate aipFaceTemplate ;
@Autowired
private AipFaceTemplate template;
@Test
public void detectFace() {
String image = "https://tanhua001.oss-cn-beijing.aliyuncs.com/2021/04/19/a3824a45-70e3-4655-8106-a1e1be009a5e.jpg";
boolean detect = template.detect(image);
System.out.println(detect);
}
}@RequestHeader获取请求头信息
BeanUtils.copyProperties(userInfo,userinfoVo)只会copy同类型的属性!
VO对象
在实际开发过程中经常可能会有实体类字段和客户端要求的返回数据字段 数量/类型/名称 不一致的情况,这种情况我们可以定义Vo对象 , 通过Vo对象封装数据返回给客户端

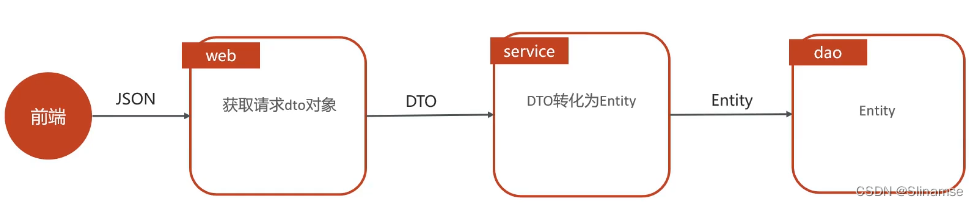
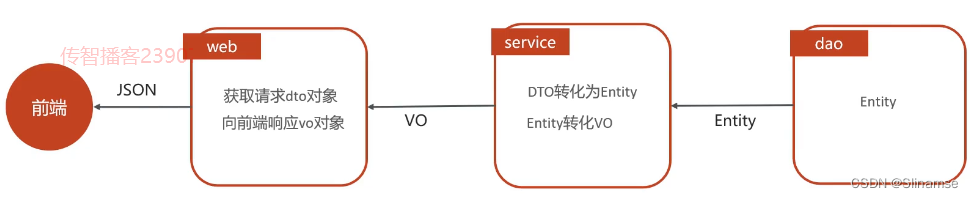
vo字段的字段名称和类型完全与接口文档保持一直 , 返回数据时, 我们需要把POJO对象中的数据, 复制到Vo中
统一token处理
代码存在的问题
每一个控制方法中都需要解析token , 获取当前用户id , 代码重复度比较高
-
重复性的登录验证
-
繁琐的token获取及解析
解决方案
基于ThreadLocal + 拦截器的形式统一处理
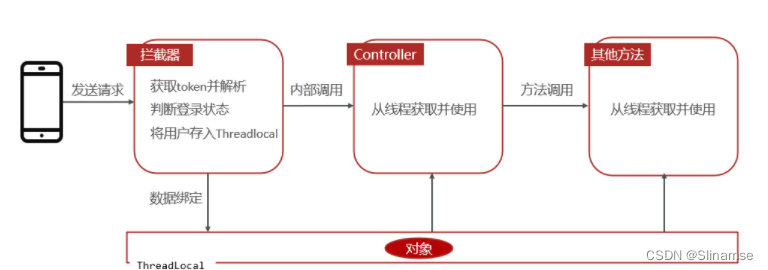
拦截器(Interceptor)
-
是一种动态拦截方法调用的机制;
-
类似于Servlet 开发中的过滤器Filter,用于对处理器进行前置处理和后置处理。

ThreadLocal
-
线程内部的存储类,赋予了线程存储数据的能力。
-
线程内调用的方法都可以从ThreadLocal中获取同一个对象。
-
多个线程中ThreadLocal数据相互隔离
Threadlocal使用方法很简单
ThreadLocal<T> threadLocal = new ThreadLocal<T>();
threadLocal.set() //将数据绑定到当前线程
threadLocal.get() //从当前线程中获取数据
代码实现
ThreadLocal工具类
定义ThreadLocal工具类,仅需要调用set方法即可将数据存入ThreadLocal中
package com.tanhua.server.interceptor;
import com.tanhua.model.domain.User;
/**
* @author Administrator
*/
public class UserHolder {
private static ThreadLocal<User> tl = new ThreadLocal<User>();
/**
* 保存数据到线程
*/
public static void set(User user) {
tl.set(user);
}
/**
* 获取线程中的用户信息
*/
public static User get() {
return tl.get();
}
/**
* 从当前线程,获取用户对象的id
*/
public static Long getUserId() {
if (tl.get() == null) {
return null;
}
return tl.get().getId();
}
/**
* 从当前线程,获取用户对象的手机号码
*/
public static String getMobile() {
if (tl.get() == null) {
return null;
}
return tl.get().getMobile();
}
/**
* 移除线程中数据
*/
public static void remove() {
tl.remove();
}
}定义拦截器
定义拦截器,在前置拦截方法preHandle中解析token并验证有效性,如果失效返回状态码401。如果有效,解析User对象,存入ThreadLocal中
package com.tanhua.server.interceptor;
import com.tanhua.model.domain.User;
import com.tanhua.utils.JwtUtils;
import io.jsonwebtoken.Claims;
import io.jsonwebtoken.Jwt;
import org.apache.commons.lang3.StringUtils;
import org.springframework.http.HttpStatus;
import org.springframework.web.servlet.handler.HandlerInterceptorAdapter;
import javax.servlet.http.HttpServletRequest;
import javax.servlet.http.HttpServletResponse;
/**
* @author Administrator
*/
public class TokenInterceptor extends HandlerInterceptorAdapter {
@Override
public boolean preHandle(HttpServletRequest request, HttpServletResponse response, Object handler) throws Exception {
//1、获取请求头
String token = request.getHeader("Authorization");
//2、使用工具类,判断token是否有效
boolean verifyToken = JwtUtils.verifyToken(token);
//3、如果token失效,返回状态码401,拦截
if(!verifyToken) {
response.setStatus(401);
return false;
}
//4、如果token正常可用,放行
//解析token,获取id和手机号码,
Claims claims = JwtUtils.getClaims(token);
String mobile = (String) claims.get("mobile");
Integer id = (Integer) claims.get("id");
//构造User对象,存入Threadlocal
User user = new User();
user.setId(Long.valueOf(id));
user.setMobile(mobile);
UserHolder.set(user);
return true;
}
//清空
@Override
public void afterCompletion(HttpServletRequest request, HttpServletResponse response, Object handler, Exception ex) throws Exception {
UserHolder.remove();
}
}注册拦截器
拦截器需要注册到MVC容器中
/**
* @author Administrator
*/
@Configuration
public class WebConfig implements WebMvcConfigurer {
@Override
public void addInterceptors(InterceptorRegistry registry) {
registry.addInterceptor(new TokenInterceptor())
.addPathPatterns("/**")
.excludePathPatterns("/user/login", "/user/loginVerification");
}
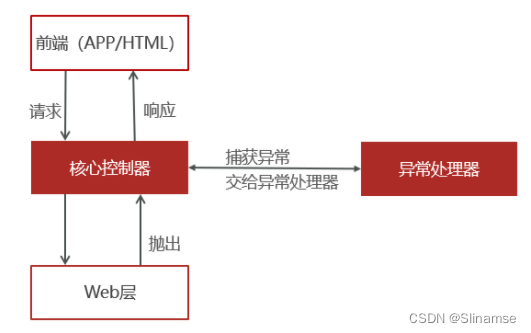
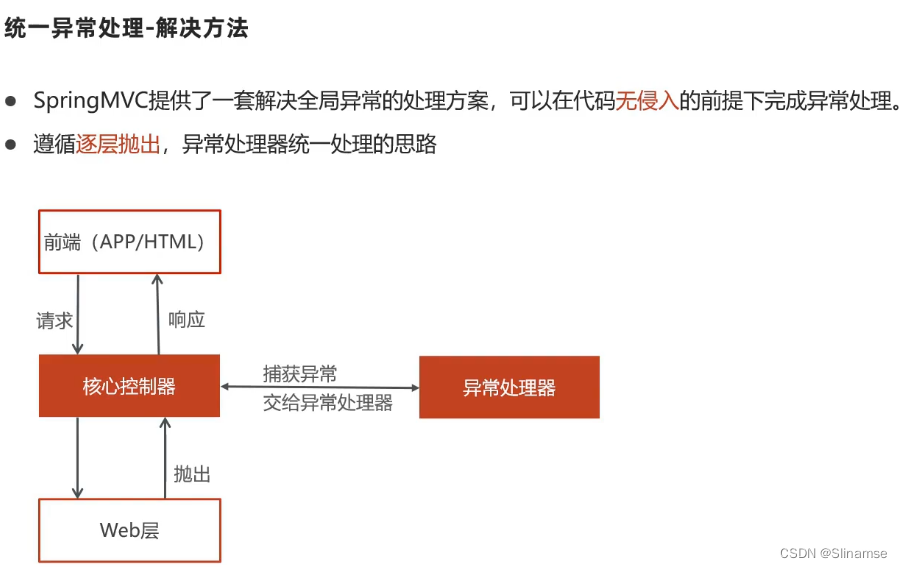
}统一异常处理
软件开发过程中,不可避免的是需要处理各种异常,常见的形式就是逐层向上抛出,web层进行处理。使用try {...} catch {...}很方便就能对异常做到业务处理
-
冗余代码多,影响代码可读性
-
异常处理和业务代码耦合
解决方案
SpringMVC提供了一套解决全局异常的处理方案,可以在代码无侵入的前提下完成异常处理。遵循逐层抛出,异常处理器统一处理的思路

代码实现
项目中可能存在不可预知的各种异常,如:空指针,数组越界等。针对这类异常,可以直接在异常处理器中统一处理;
还有一类是可预知的错误,如图片不合法,验证码错误等等。这类错误也可以理解为业务异常,可以通过自定义异常类来处理;
业务异常对象
为了方便操作,将一些常见的业务错误封装到ErrorResult对象中
@Data
@NoArgsConstructor
@AllArgsConstructor
@Builder
public class ErrorResult {
private String errCode = "999999";
private String errMessage;
public static ErrorResult error() {
return ErrorResult.builder().errCode("999999").errMessage("系统异常稍后再试").build();
}
public static ErrorResult fail() {
return ErrorResult.builder().errCode("000001").errMessage("发送验证码失败").build();
}
public static ErrorResult loginError() {
return ErrorResult.builder().errCode("000002").errMessage("验证码失效").build();
}
public static ErrorResult faceError() {
return ErrorResult.builder().errCode("000003").errMessage("图片非人像,请重新上传!").build();
}
public static ErrorResult mobileError() {
return ErrorResult.builder().errCode("000004").errMessage("手机号码已注册").build();
}
public static ErrorResult contentError() {
return ErrorResult.builder().errCode("000005").errMessage("动态内容为空").build();
}
public static ErrorResult likeError() {
return ErrorResult.builder().errCode("000006").errMessage("用户已点赞").build();
}
public static ErrorResult disLikeError() {
return ErrorResult.builder().errCode("000007").errMessage("用户未点赞").build();
}
public static ErrorResult loveError() {
return ErrorResult.builder().errCode("000008").errMessage("用户已喜欢").build();
}
public static ErrorResult disloveError() {
return ErrorResult.builder().errCode("000009").errMessage("用户未喜欢").build();
}
}业务异常类
自定义业务异常类,针对业务错误之间抛出业务异常即可
/**
* 自定义异常类
*/
@Data
public class BusinessException extends RuntimeException {
private ErrorResult errorResult;
public BusinessException(ErrorResult errorResult) {
super(errorResult.getErrMessage());
this.errorResult = errorResult;
}
}/**
* 自定义异常类
*/
@Data
public class BusinessException extends RuntimeException {
private ErrorResult errorResult;
public BusinessException(ErrorResult errorResult) {
super(errorResult.getErrMessage());
this.errorResult = errorResult;
}
}异常处理器

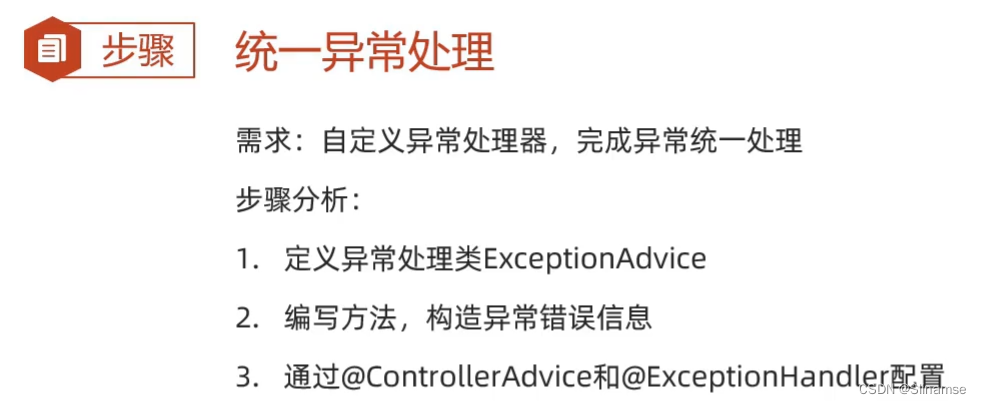
/**
 * 自定义统一异常处理
 *  1、通过注解,声明异常处理类
 *  2、编写方法,在方法内部处理异常,构造响应数据
 *  3、方法上编写注解,指定此方法可以处理的异常类型
 */
@ControllerAdvice
public class ExceptionAdvice {

    //处理业务异常
    @ExceptionHandler(BusinessException.class)
    public ResponseEntity handlerException(BusinessException be) {
        be.printStackTrace();
        ErrorResult errorResult = be.getErrorResult();
        return ResponseEntity.status(HttpStatus.INTERNAL_SERVER_ERROR).body(errorResult);
    }

    //处理不可预知的异常
    @ExceptionHandler(Exception.class)
    public ResponseEntity handlerException1(Exception be) {
        be.printStackTrace();
        return ResponseEntity.status(HttpStatus.INTERNAL_SERVER_ERROR).body(ErrorResult.error());
    }
}
UserInfoMapper
在UserInfoMapper中编写查询方法
public interface UserInfoMapper extends BaseMapper<UserInfo> {

    @Select("select * from tb_user_info where id in (\n" +
            "  SELECT black_user_id FROM tb_black_list where user_id=#{userId}\n" +
            ")")
    IPage<UserInfo> findBlackList(@Param("pages") Page pages, @Param("userId") Long userId);
}
配置分页插件
IPage是mybatisplus内置的分页配置bean!
tanhua-dubbo-db引导类开启mybatis-plus分页插件支持
@Bean
public MybatisPlusInterceptor mybatisPlusInterceptor() {
    MybatisPlusInterceptor interceptor = new MybatisPlusInterceptor();
    interceptor.addInnerInterceptor(new PaginationInnerInterceptor(DbType.MYSQL));
    return interceptor;
}
使用mybatis-plus的分页:
-
创建分页对象:Page,指定当前页和每页查询条数
-
基础查询:mapper.selectPage(page,查询条件)
-
自定义查询:Ipage 方法名称(Page对象,xxx查询条件)
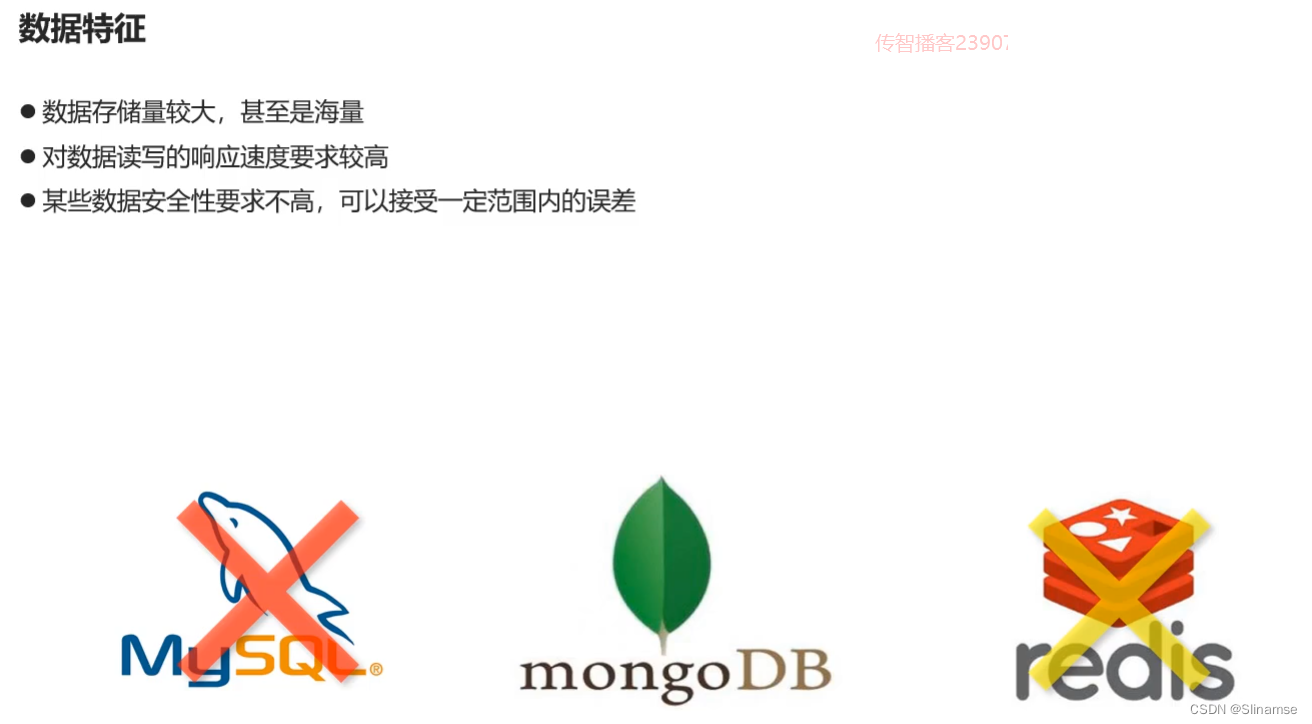
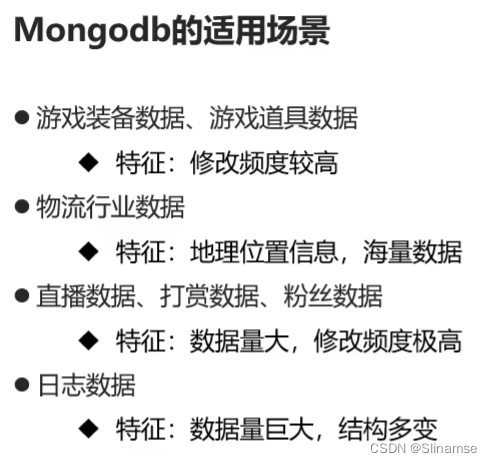
MongoDB简介
对于社交类软件的功能,我们需要对它的功能特点做分析:
-
数据量会随着用户数增大而增大
-
读多写少
-
价值较低
-
非好友看不到其动态内容
-
地理位置的查询
-
……
针对以上特点,我们来分析一下:
-
mysql:关系型数据库(效率低)
-
redis:redis缓存(微博,效率高,数据格式不丰富,占用内存大)
-
对于数据量大而言,显然不能够使用关系型数据库进行存储,我们需要通过MongoDB进行存储
-
对于读多写少的应用,需要减少读取的成本
-
比如说,一条SQL语句,单张表查询一定比多张表查询要快
-
探花交友
-
mongodb:存储业务数据(圈子,推荐的数据,小视频数据,点赞,评论等)
-
redis:承担的角色是缓存层(提升查询效率)
-
mysql:存储和核心业务数据,账户
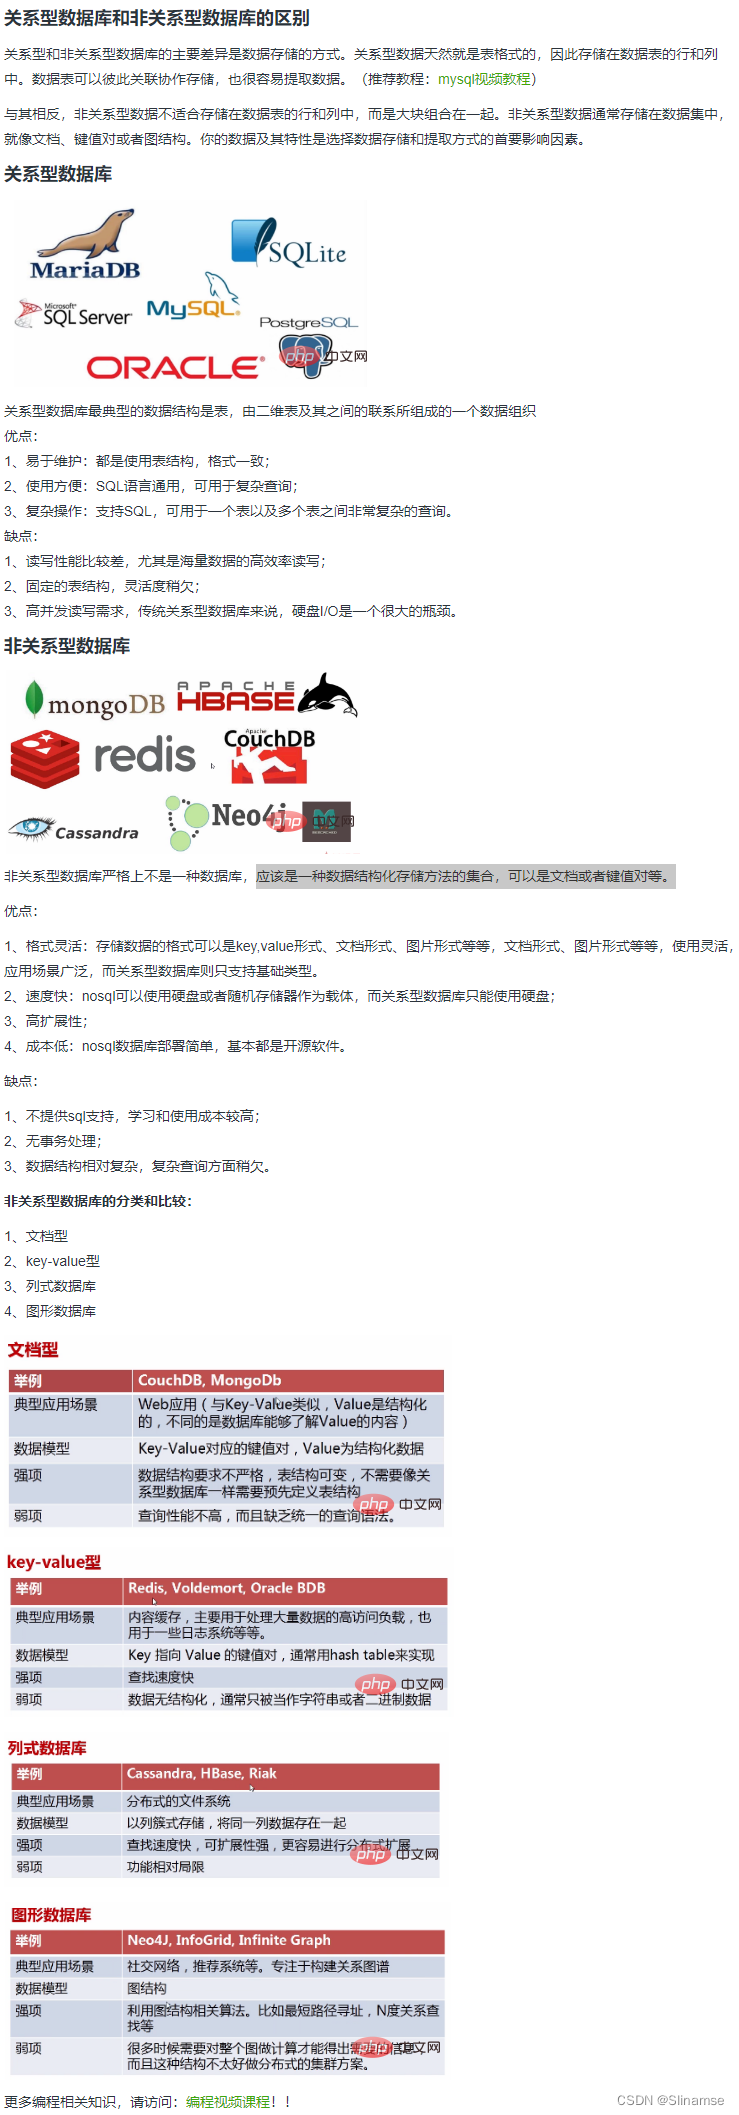
MongoDB简介
MongoDB:是一个高效的非关系型数据库(不支持表关系:只能操作单表)
MongoDB是一个基于分布式文件存储的数据库。由C++语言编写。旨在为WEB应用提供可扩展的高性能数据存储解决方案。
MongoDB是一个介于关系数据库和非关系数据库之间的产品,是非关系数据库当中功能最丰富,最像关系数据库的,它支持的数据结构非常松散,是类似json的bson格式,因此可以存储比较复杂的数据类型。
MongoDB最大的特点是它支持的查询语言非常强大,其语法有点类似于面向对象的查询语言,几乎可以实现类似关系数据库单表查询的绝大部分功能,而且还支持对数据建立索引。
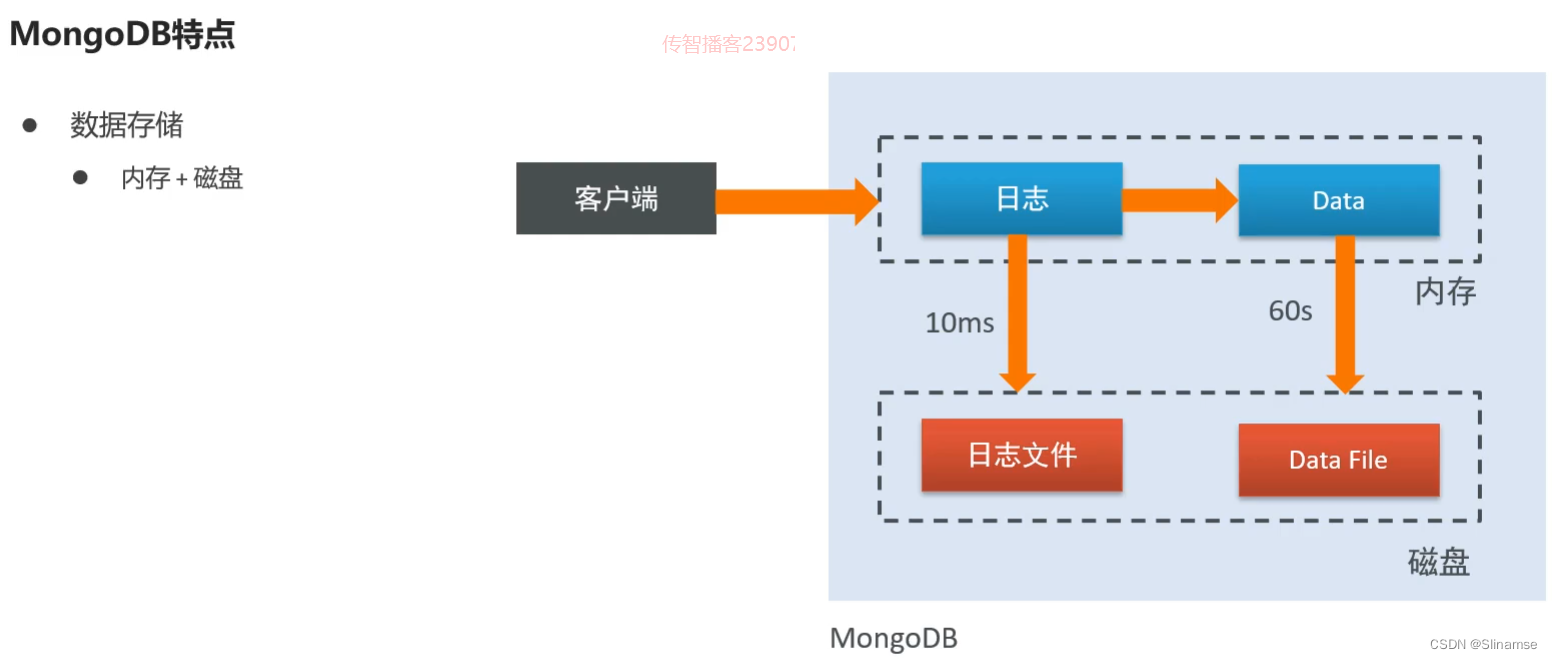
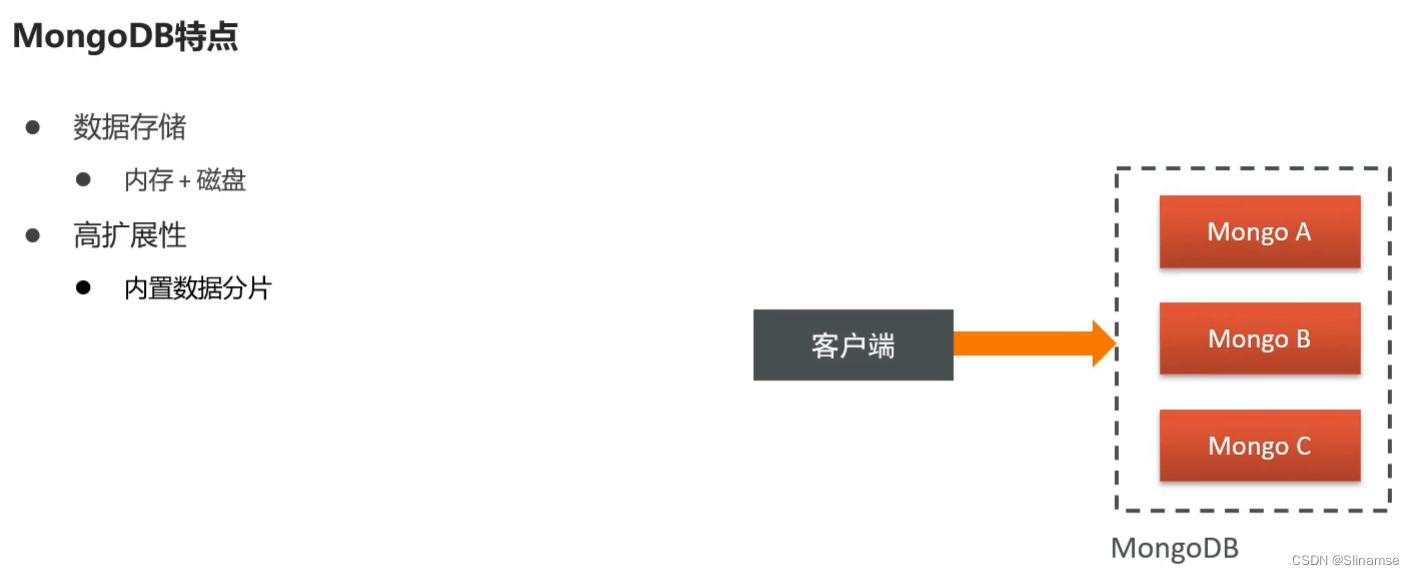
MongoDB的特点
MongoDB 最大的特点是他支持的查询语言非常强大,其语法有点类似于面向对象的查询语言,几乎可以实现类似关系数据库单表查询的绝大部分功能,而且还支持对数据建立索引。它是一个面向集合的,模式自由的文档型数据库。具体特点总结如下:
-
面向集合存储,易于存储对象类型的数据
-
模式自由
-
支持动态查询
-
支持完全索引,包含内部对象
-
支持复制和故障恢复
-
使用高效的二进制数据存储,包括大型对象(如视频等)
-
自动处理碎片,以支持云计算层次的扩展性
-
支持 Python,PHP,Ruby,Java,C,C#,Javascript,Perl及C++语言的驱动程 序, 社区中也提供了对Erlang及.NET 等平台的驱动程序
-
文件存储格式为 BSON(一种 JSON 的扩展)
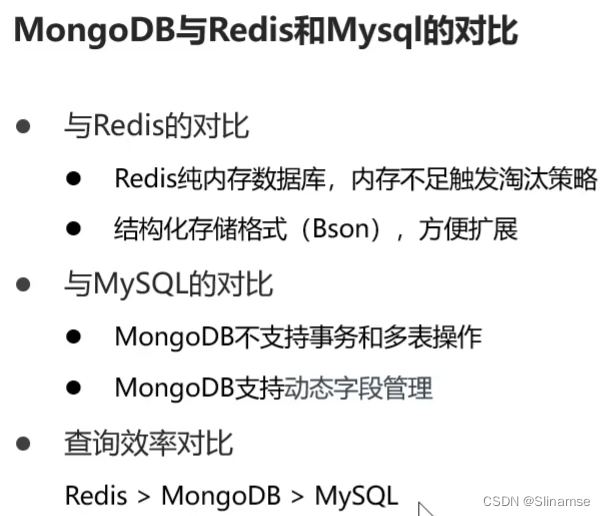
MYSQL : 用于存储安全性要求比较高的数据
REDIS : 存储数据格式简单 , 并且查询非常多的数据(用户缓存)
MONGDB : 用户存储海量数据, 并且数据的安全性要求不高
通过docker安装MongoDB
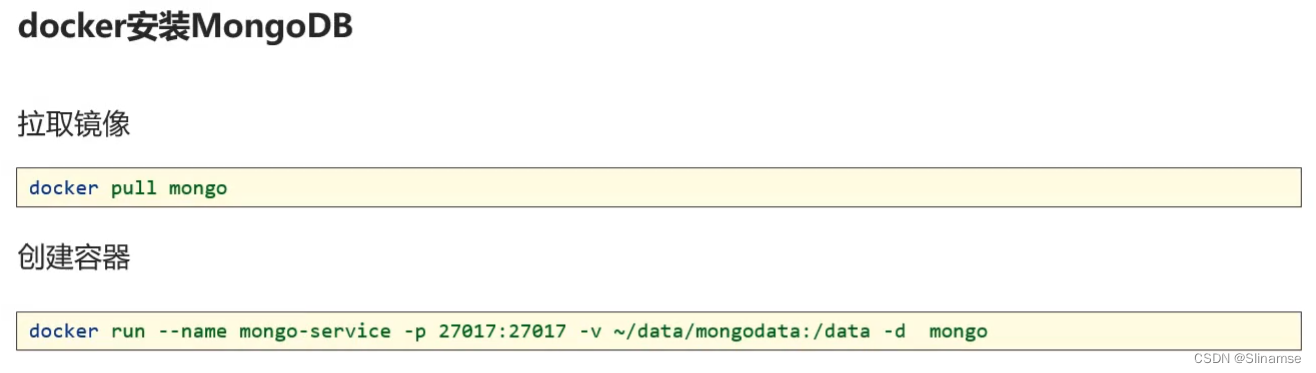
在课程资料的虚拟机中已经提供了MongoDB的镜像和容器,我们只需要使用简单的命令即可启动
#进入base目录
cd /root/docker-file/base/
#批量创建启动容器,其中已经包含了redis,zookeeper,mongodb容器
docker-compose up -d
#查看容器
docker ps -a
可以看到mongoDB已经启动,对外暴露了27017的操作端口
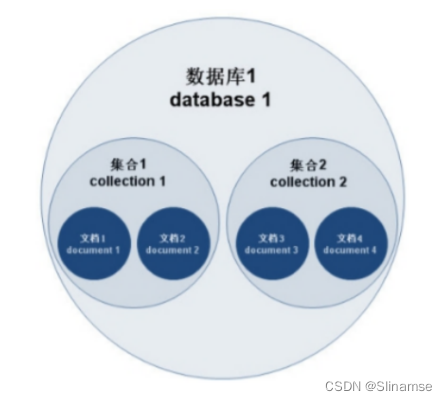
MongoDB体系结构
MongoDB 的逻辑结构是一种层次结构。主要由: 文档(document) 集合(collection) 数据库(database)这三部分组成的。逻辑结构是面 向用户的,用户使用 MongoDB 开发应用程序使用的就是逻辑结构。
-
MongoDB 的文档(document),相当于关系数据库中的一行记录。
-
多个文档组成一个集合(collection),相当于关系数据库的表。
-
多个集合(collection),逻辑上组织在一起,就是数据库(database)。
-
一个 MongoDB 实例支持多个数据库(database)。 文档(document) 集合(collection) 数据库(database)的层次结构如下图:
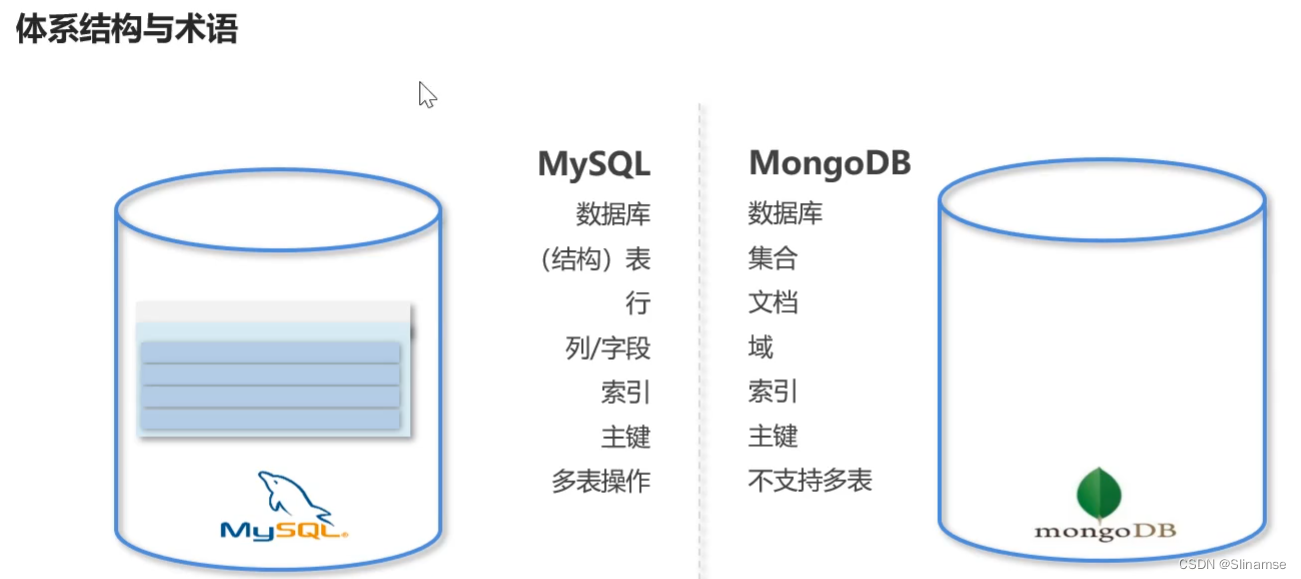
为了更好的理解,下面与SQL中的概念进行对比:
| SQL术语/概念 | MongoDB术语/概念 | 解释/说明 |
|---|---|---|
| database | database | 数据库 |
| table | collection | 数据库表/集合 |
| row | document | 表中的一条数据 |
| column | field | 数据字段/域 |
| index | index | 索引 |
| table joins | 表连接,MongoDB不支持 | |
| primary key | primary key | 主键,MongoDB自动将_id字段设置为主键 |
数据类型
-
数据格式:BSON {aa:bb}
-
null:用于表示空值或者不存在的字段,{“x”:null}
-
布尔型:布尔类型有两个值true和false,{“x”:true}
-
数值:shell默认使用64为浮点型数值。{“x”:3.14}或{“x”:3}。对于整型值,可以使用 NumberInt(4字节符号整数)或NumberLong(8字节符号整数), {“x”:NumberInt(“3”)}{“x”:NumberLong(“3”)}
-
字符串:UTF-8字符串都可以表示为字符串类型的数据,{“x”:“呵呵”}
-
日期:日期被存储为自新纪元依赖经过的毫秒数,不存储时区,{“x”:new Date()}
-
正则表达式:查询时,使用正则表达式作为限定条件,语法与JavaScript的正则表达式相 同,{“x”:/[abc]/}
-
数组:数据列表或数据集可以表示为数组,{“x”: [“a“,“b”,”c”]}
-
内嵌文档:文档可以嵌套其他文档,被嵌套的文档作为值来处理,{“x”:{“y”:3 }}
-
对象Id:对象id是一个12字节的字符串,是文档的唯一标识,{“x”: objectId() }
-
二进制数据:二进制数据是一个任意字节的字符串。它不能直接在shell中使用。如果要 将非utf-字符保存到数据库中,二进制数据是唯一的方式。
MongoDB入门
数据库以及表的操作
#查看所有的数据库
> show dbs

#通过use关键字切换数据库
> use admin

#创建数据库
#说明:在MongoDB中,数据库是自动创建的,通过use切换到新数据库中,进行插入数据即可自动创建数据库
> use testdb

> show dbs #并没有创建数据库

> db.user.insert({id:1,name:'zhangsan'})  #插入数据

> show dbs

#查看表
> show tables

> show collections

#删除集合(表)
> db.user.drop()
true  #如果成功删除选定集合,则 drop() 方法返回 true,否则返回 false。

#删除数据库
> use testdb #先切换到要删除的数据中

> db.dropDatabase()  #删除数据库#查看所有的数据库
> show dbs

#通过use关键字切换数据库
> use admin

#创建数据库
#说明:在MongoDB中,数据库是自动创建的,通过use切换到新数据库中,进行插入数据即可自动创建数据库
> use testdb

> show dbs #并没有创建数据库

> db.user.insert({id:1,name:'zhangsan'})  #插入数据

> show dbs

#查看表
> show tables

> show collections

#删除集合(表)
> db.user.drop()
true  #如果成功删除选定集合,则 drop() 方法返回 true,否则返回 false。

#删除数据库
> use testdb #先切换到要删除的数据中

> db.dropDatabase()  #删除数据库
新增数据
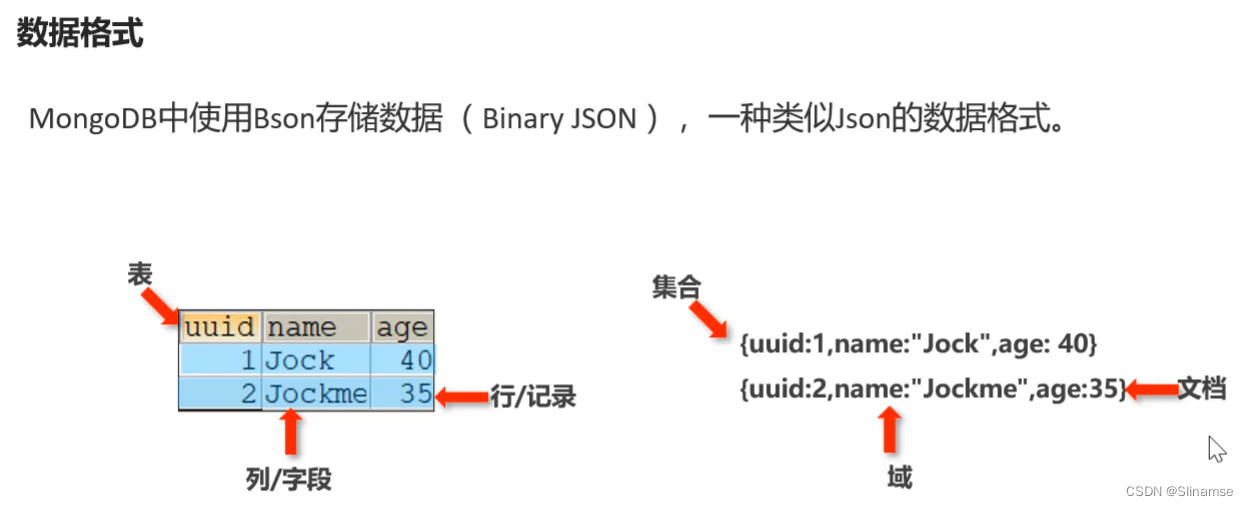
在MongoDB中,存储的文档结构是一种类似于json的结构,称之为bson(全称为:Binary JSON)。
#插入数据
#语法:db.表名.insert(json字符串)

> db.user.insert({id:1,username:'zhangsan',age:20})

> db.user.find()  #查询数据
更新数据
update() 方法用于更新已存在的文档。语法格式如下:
db.collection.update(
   <query>,
   <update>,
   [
     upsert: <boolean>,
     multi: <boolean>,
     writeConcern: <document>
   ]
)
参数说明:
-
query : update的查询条件,类似sql update查询内where后面的。
-
update : update的对象和一些更新的操作符(如$,$inc.$set)等,也可以理解为sql update查询内set后面的
-
upsert : 可选,这个参数的意思是,如果不存在update的记录,是否插入objNew,true为插入,默认是false,不插入。
-
multi : 可选,mongodb 默认是false,只更新找到的第一条记录,如果这个参数为true,就把按条件查出来多条记录全部更新。
-
writeConcern :可选,抛出异常的级别。
#查询全部
> db.user.find()

#更新数据
> db.user.update({id:1},{$set:{age:22}})

#注意:如果这样写,会删除掉其他的字段
> db.user.update({id:1},{age:25})

#更新不存在的字段,会新增字段
> db.user.update({id:2},{$set:{sex:1}}) #更新数据

#更新不存在的数据,默认不会新增数据
> db.user.update({id:3},{$set:{sex:1}})

#如果设置第一个参数为true,就是新增数据
> db.user.update({id:3},{$set:{sex:1}},true)
3.4 删除数据
通过remove()方法进行删除数据,语法如下:
db.collection.remove(
   <query>,
   {
     justOne: <boolean>,
     writeConcern: <document>
   }
)
参数说明:
-
query :(可选)删除的文档的条件。
-
justOne : (可选)如果设为 true 或 1,则只删除一个文档,如果不设置该参数,或使用默认值 false,则删除所有匹配条件的文档。
-
writeConcern :(可选)抛出异常的级别。
实例:
#删除数据
> db.user.remove({})

#插入4条测试数据
db.user.insert({id:1,username:'zhangsan',age:20})
db.user.insert({id:2,username:'lisi',age:21})
db.user.insert({id:3,username:'wangwu',age:22})
db.user.insert({id:4,username:'zhaoliu',age:22})

> db.user.remove({age:22},true)

#删除所有数据
> db.user.remove({})
查询数据
MongoDB 查询数据的语法格式如下:
db.user.find([query],[fields])-
query :可选,使用查询操作符指定查询条件
-
fields :可选,使用投影操作符指定返回的键。查询时返回文档中所有键值, 只需省略该参数即可(默认省略)。
条件查询:
| 操作 | 格式 | 范例 | RDBMS中的类似语句 |
|---|---|---|---|
| 等于 | {<key>:<value>} | db.col.find({"by":"黑马程序员"}).pretty() | where by = '黑马程序员' |
| 小于 | {<key>:{$lt:<value>}} | db.col.find({"likes":{$lt:50}}).pretty() | where likes < 50 |
| 小于或等于 | {<key>:{$lte:<value>}} | db.col.find({"likes":{$lte:50}}).pretty() | where likes <= 50 |
| 大于 | {<key>:{$gt:<value>}} | db.col.find({"likes":{$gt:50}}).pretty() | where likes > 50 |
| 大于或等于 | {<key>:{$gte:<value>}} | db.col.find({"likes":{$gte:50}}).pretty() | where likes >= 50 |
| 不等于 | {<key>:{$ne:<value>}} | db.col.find({"likes":{$ne:50}}).pretty() | where likes != 50 |
实例:
#插入测试数据
db.user.insert({id:1,username:'zhangsan',age:20})
db.user.insert({id:2,username:'lisi',age:21})
db.user.insert({id:3,username:'wangwu',age:22})
db.user.insert({id:4,username:'zhaoliu',age:22})

db.user.find()  #查询全部数据
db.user.find({},{id:1,username:1})  #只查询id与username字段
db.user.find().count()  #查询数据条数
db.user.find({id:1}) #查询id为1的数据
db.user.find({age:{$lte:21}}) #查询小于等于21的数据
db.user.find({$or:[{id:1},{id:2}]}) #查询id=1 or id=2

#分页查询:Skip()跳过几条,limit()查询条数
db.user.find().limit(2).skip(1)  #跳过1条数据,查询2条数据
db.user.find().sort({id:-1}) #按照id倒序排序,-1为倒序,1为正序
索引
索引通常能够极大的提高查询的效率,如果没有索引,MongoDB在读取数据时必须扫描集合中的每个文件并选取那些符合查询条件的记录。
这种扫描全集合的查询效率是非常低的,特别在处理大量的数据时,查询可以要花费几十秒甚至几分钟,这对网站的性能是非常致命的。
索引是特殊的数据结构,索引存储在一个易于遍历读取的数据集合中,索引是对数据库表中一列或多列的值进行排序的一种结构
#创建索引
> db.user.createIndex({'age':1})

#查看索引
> db.user.getIndexes()
[
	{
		"v" : 2,
		"key" : {
			"_id" : 1
		},
		"name" : "_id_",
		"ns" : "testdb.user"
	}
]
#说明:1表示升序创建索引,-1表示降序创建索引。
执行计划
MongoDB 查询分析可以确保我们建议的索引是否有效,是查询语句性能分析的重要工具。
#插入1000条数据
for(var i=1;i<1000;i++)db.user.insert({id:100+i,username:'name_'+i,age:10+i})

#查看执行计划
> db.user.find({age:{$gt:100},id:{$lt:200}}).explain()

#测试没有使用索引
> db.user.find({username:'zhangsan'}).explain()

#winningPlan:最佳执行计划
#"stage" : "FETCH", #查询方式,常见的有COLLSCAN/全表扫描 IXSCAN/索引扫描 FETCH/根据索引去检索文档 SHARD_MERGE/合并分片结果 IDHACK/针对_id进行查询
SpringData-Mongo
Spring-data对MongoDB做了支持,使用spring-data-mongodb可以简化MongoDB的操作,封装了底层的mongodb-driver。
地址:https://spring.io/projects/spring-data-mongodb
使用Spring-Data-MongoDB很简单,只需要如下几步即可:
-
导入起步依赖
-
编写配置信息
-
编写实体类(配置注解 @Document,@Id)
-
操作mongodb
-
注入MongoTemplate对象,完成CRUD操作
-
编写Repository接口,注入接口完成基本Crud操作
-
4.1 环境搭建
第一步,导入依赖:
<parent>
    <groupId>org.springframework.boot</groupId>
    <artifactId>spring-boot-starter-parent</artifactId>
    <version>2.3.9.RELEASE</version>
</parent>

<dependencies>
    <dependency>
         <groupId>org.springframework.boot</groupId>
         <artifactId>spring-boot-starter-data-mongodb</artifactId>
    </dependency>
    <dependency>
        <groupId>org.springframework.boot</groupId>
        <artifactId>spring-boot-starter-test</artifactId>
        <scope>test</scope>
    </dependency>
</dependencies>
第二步,编写application.yml配置文件
spring:
  data:
    mongodb:
      uri: mongo://192.168.136.160:27017
第三步,编写启动类
package com.tanhua.mongo;

import org.springframework.boot.SpringApplication;
import org.springframework.boot.autoconfigure.SpringBootApplication;

@SpringBootApplication
public class MongoApplication {

    public static void main(String[] args) {
        SpringApplication.run(MongoApplication.class, args);
    }
}
4.2 完成基本操作
第一步,编写实体类
package com.tanhua.mongo.domain;

import lombok.AllArgsConstructor;
import lombok.Data;
import lombok.NoArgsConstructor;
import org.bson.types.ObjectId;
import org.springframework.data.mongodb.core.mapping.Document;

@Data
@AllArgsConstructor
@NoArgsConstructor
@Document(value="person")
public class Person {

    @Id
    private ObjectId id;
    @Field("username")
    private String name;
    private int age;
    private String address;

}
第二步,通过MongoTemplate完成CRUD操作
package cn.itcast.mongo.test;

import cn.itcast.mongo.MongoApplication;
import cn.itcast.mongo.domain.Person;
import org.bson.types.ObjectId;
import org.junit.Test;
import org.junit.runner.RunWith;
import org.springframework.beans.factory.annotation.Autowired;
import org.springframework.boot.test.context.SpringBootTest;
import org.springframework.data.mongodb.core.MongoTemplate;
import org.springframework.data.mongodb.core.query.Criteria;
import org.springframework.data.mongodb.core.query.Query;
import org.springframework.data.mongodb.core.query.Update;
import org.springframework.test.context.junit4.SpringRunner;

import java.util.List;

@RunWith(SpringRunner.class)
@SpringBootTest(classes = MongoApplication.class)
public class MongoTest {

    /**
     * SpringData-mongodb操作
     *    1 配置实体类
     *    2 实体类上配置注解(配置集合和对象间的映射关系)
     *    3 注入MongoTemplate对象
     *    4 调用对象方法,完成数据库操作
     */
    @Autowired
    private MongoTemplate mongoTemplate;

    //保存
    @Test
    public void testSave() {
        for (int i = 0; i < 10; i++) {
            Person person = new Person();
            person.setId(ObjectId.get()); //ObjectId.get():获取一个唯一主键字符串
            person.setName("张三"+i);
            person.setAddress("北京顺义"+i);
            person.setAge(18+i);

            mongoTemplate.save(person);
        }
    }

    //查询-查询所有
    @Test
    public void testFindAll() {
        List<Person> list = mongoTemplate.findAll(Person.class);
        for (Person person : list) {
            System.out.println(person);
        }
    }

    @Test
    public void testFind() {
        //查询年龄小于20的所有人
        Query query = new Query(Criteria.where("age").lt(20)); //查询条件对象
        //查询
        List<Person> list = mongoTemplate.find(query, Person.class);

        for (Person person : list) {
            System.out.println(person);
        }
    }

    /**
     * 分页查询
     */
    @Test
    public void testPage() {
        Criteria criteria = Criteria.where("age").lt(30);
        //1 查询总数
        Query queryCount = new Query(criteria);
        long count = mongoTemplate.count(queryCount, Person.class);
        System.out.println(count);
        //2 查询当前页的数据列表, 查询第二页,每页查询2条
        Query queryLimit = new Query(criteria)
                .limit(2)//设置每页查询条数
                .skip(2) ; //开启查询的条数 (page-1)*size
        List<Person> list = mongoTemplate.find(queryLimit, Person.class);
        for (Person person : list) {
            System.out.println(person);
        }
    }


    /**
     * 更新:
     *    根据id,更新年龄
     */
    @Test
    public void testUpdate() {
        //1 条件
        Query query = Query.query(Criteria.where("id").is("5fe404c26a787e3b50d8d5ad"));
        //2 更新的数据
        Update update = new Update();
        update.set("age", 20);
        mongoTemplate.updateFirst(query, update, Person.class);
    }

    @Test
    public void testRemove() {
        Query query = Query.query(Criteria.where("id").is("5fe404c26a787e3b50d8d5ad"));
        mongoTemplate.remove(query, Person.class);
    }
}
启动报错
当我们在项目中引入了MongoDB依赖之后启动tanhua-dubbo-db项目和tanhua-app-server项目时会报如下错误
原因 : 实体类模块中引入了MongoDB的依赖,根据自动装配的原理
tanhua-dubbo-db和tanhua-app-server中会自动查找默认MongoDB的地址(localhost:27017),而本地没有开启Mongo所以连接失败。解决方案 :
tanhua-dubbo-db和tanhua-app-server中排除掉MongoDB 自动配置类即可
@SpringBootApplication(exclude = {
     MongoAutoConfiguration.class,
     MongoDataAutoConfiguration.class
})
@MapperScan("com.tanhua.dubbo.mapper")
public class DubboDbApplication {
    ......
}
同理 : 在tanhua-app-server项目中排除MongoDB 自动配置类即可
tanhua-app-server
在tanhua-app-server的TanhuaController和TanhuaService中添加方法
TanhuaController
/**
 * 分页查询推荐好友列表
 */
@GetMapping("/recommendation")
public ResponseEntity recommendation(RecommendUserDto dto) {
    PageResult pr = tanhuaService.recommendation(dto);
    return ResponseEntity.ok(pr);
}
这里传递的是请求参数而不是请求体body参数,所有不需要RequestBody进行转化,但条件是dto属性名要和参数名保持一致
tanhua-dubbo-mongo
在tanhua-dubbo-mongo模块的RecommendUserApiImpl中实现查询推荐用户列表方法
//分页查询
public PageResult queryRecommendUserList(Integer page, Integer pagesize, Long toUserId) {
    //构建Query对象
    Query query = new Query(Criteria.where("toUserId").is(toUserId));
    //总记录数
    Long count = mongoTemplate.count(query, RecommendUser.class);
    //配置分页参数
    query.skip((page-1) * pagesize)
        .limit(pagesize)
        .with(Sort.by(Sort.Order.desc("score")));
    //查询数据列表
    List<RecommendUser> recommendUsers = mongoTemplate.find(query, RecommendUser.class);
    return new PageResult(page, pagesize, count, recommendUsers);
}
tanhua-dubbo-db
在tanhua-dubbo-db模块的UserInfoApiImpl中实现根据推荐用户id集合和条件查询用户信息的方法
@Override
public Map<Long, UserInfo> findByIds(List<Long> userIds, UserInfo info) {
    QueryWrapper qw = new QueryWrapper();
    //1、用户id列表
    qw.in("id",userIds);
    //2、添加筛选条件
    if(info != null) {
        if(info.getAge() != null) {
            qw.lt("age",info.getAge());
        }
        if(!StringUtils.isEmpty(info.getGender())) {
            qw.eq("gender",info.getGender());
        }
        if(!StringUtils.isEmpty(info.getNickname())) {
            qw.like("nickname",info.getNickname());
        }
    }
    List<UserInfo> list = userInfoMapper.selectList(qw);
    Map<Long, UserInfo> map = CollUtil.fieldValueMap(list, "id");
    return map;
}
CollUtill.fieldValueMap能够将list集合元素的某一个属性作为键值,元素作为值构造成一个Map集合
CollUtill.getFieldValues能够将list集合元素的某一个属性提取出来构造成一个新的list集合
mongo主键自增
在保存动态的时候需要有一个pid字段 , 该字段是一个唯一自增的值, 用于后期的动态推荐,但是Mongodb没有自增的机制,需要实现自增的方式有两种:Redis或者MongoDB
IdWorker工具类
在tanhua-dubbo-mongo中配置工具类IdWorker
package com.tanhua.dubbo.utils;


import com.tanhua.model.mongo.Sequence;
import org.springframework.beans.factory.annotation.Autowired;
import org.springframework.data.mongodb.core.FindAndModifyOptions;
import org.springframework.data.mongodb.core.MongoTemplate;
import org.springframework.data.mongodb.core.query.Criteria;
import org.springframework.data.mongodb.core.query.Query;
import org.springframework.data.mongodb.core.query.Update;
import org.springframework.stereotype.Component;

@Component
public class IdWorker {

    @Autowired
    private MongoTemplate mongoTemplate;

    public Long getNextId(String collName) {
        Query query = new Query(Criteria.where("collName").is(collName));
        Update update = new Update();
        //对某一个字段进行数字操作,inc是加几
        update.inc("seqId", 1);

        FindAndModifyOptions options = new FindAndModifyOptions();
        //如果不存在则会保存一条数据
        options.upsert(true);
        //每次返回最新的数据内容
        options.returnNew(true);
        //先进行修改,然后把最新的修改数据返回
        Sequence sequence = mongoTemplate.findAndModify(query, update, options, Sequence.class);
        return sequence.getSeqId();
    }
}
注入IdWorker,调用内部的getNextId即可获取唯一的数字ID
MovementController
package com.tanhua.server.controller;
import com.tanhua.model.mongo.Movement;
import com.tanhua.model.vo.MovementsVo;
import com.tanhua.model.vo.PageResult;
import com.tanhua.model.vo.VisitorsVo;
import com.tanhua.server.service.CommentsService;
import com.tanhua.server.service.MovementService;
import org.springframework.beans.factory.annotation.Autowired;
import org.springframework.http.ResponseEntity;
import org.springframework.web.bind.annotation.*;
import org.springframework.web.multipart.MultipartFile;
import java.io.IOException;
import java.util.List;
@RestController
@RequestMapping("/movements")
public class MovementController {
@Autowired
private MovementService movementService;
/**
* 发布动态
*/
@PostMapping
public ResponseEntity movements(Movement movement,
MultipartFile imageContent[]) throws IOException {
movementService.publishMovement(movement,imageContent);
return ResponseEntity.ok(null);
}
}@RequestBody主要用来接收前端传递给后端的json字符串中的数据的(请求体中的数据的);
GET方式无请求体,所以使用@RequestBody接收数据时,前端不能使用GET方式提交数据,而是用POST方式进行提交。
在后端的同一个接收方法里,@RequestBody与@RequestParam可以同时使用,@RequestBody最多只能有一个,而@RequestParam()可以有多个。
注:一个请求,只有一个RequestBody;一个请求,可以有多个RequestParam。
为什么有的需要加@requestBody,有的不需要。加与不加的区别如下:
使用@requestBody.当请求content_type为:application/json类型的请求,数据类型为json时, json格式如下:{“aaa”:“111”,“bbb”:“222”}
不使用@requestBody.当请求content_type为:application/x-www-form-urlencoded类型的或multipart/form-data时,数据格式为aaa=111&bbb=222。
form-data
就是http请求中的multipart/form-data,它会将表单的数据处理为一条消息,以标签为单元,用分隔符分开。既可以上传键值对,也可以上传文件。当上传的字段是文件时,会有Content-Type来表名文件类型;content-disposition,用来说明字段的一些信息;
由于有boundary隔离,所以multipart/form-data既可以上传文件,也可以上传键值对,它采用了键值对的方式,所以可以上传多个文件。
form-data和x-www-form-urlencode的区别
x-www-form-urlencoded
就是application/x-www-from-urlencoded,会将表单内的数据转换为键值对,比如,name=java&age = 23
multipart/form-data与x-www-form-urlencoded区别
multipart/form-data:既可以上传文件等二进制数据,也可以上传表单键值对,只是最后会转化为一条信息; x-www-form-urlencoded:只能上传键值对,并且键值对都是间隔分开的。
movement.setId(ObjectId.get());mongodb会自动生成id,也可以利用内置的工具类手动设置
异步处理优化
问题 :
-
在
MovementApiImpl类中发布动态方法中 , 需要保存好友时间线数据 , 如果用户的好友比较多, 则需要插入的数据比较多, 效率低下
解决 : 可以采用异步线程池, 开启线程来异步保存好友时间线数据 , 提高保存的效率
-
将需要异步执行的代码抽取成独立的方法
-
在方法上使用
@Async标注该方法是一个异步调用方法 -
在项目启动引导类上开启异步支持
@EnableAsync
开启异步支持
@SpringBootApplication
@EnableAsync //开启异步处理的支持
public class DubboMongoApplication {

    public static void main(String[] args) {
        SpringApplication.run(DubboMongoApplication.class,args);
    }
}
异步处理类
在tanhua-dubbo-mongo模块创建异步处理的TimeLineService
package com.tanhua.dubbo.service;

import com.tanhua.model.mongo.Friend;
import com.tanhua.model.mongo.MovementTimeLine;
import org.bson.types.ObjectId;
import org.springframework.beans.factory.annotation.Autowired;
import org.springframework.data.mongodb.core.MongoTemplate;
import org.springframework.data.mongodb.core.query.Criteria;
import org.springframework.data.mongodb.core.query.Query;
import org.springframework.scheduling.annotation.Async;
import org.springframework.stereotype.Service;

import java.util.List;

@Component
public class TimeLineService {

    @Autowired
    private MongoTemplate mongoTemplate;

    @Async //底层使用多线程实现
    public void saveTimeLine(Long userId, ObjectId movementId) {
        //1、查询当前用户的好友数据
        Criteria criteria = Criteria.where("userId").is(userId);
        Query query = Query.query(criteria);
        List<Friend> friends = mongoTemplate.find(query, Friend.class);
        //2、循环好友数据,构建时间线数据存入数据库
        for (Friend friend : friends) {
            MovementTimeLine timeLine = new MovementTimeLine();
            timeLine.setMovementId(movementId);
            timeLine.setUserId(friend.getUserId());
            timeLine.setFriendId(friend.getFriendId());
            timeLine.setCreated(System.currentTimeMillis());
            mongoTemplate.save(timeLine);
        }
    }
}
调用异步方法
修改tanhua-dubbo-mongo的publish方法
@DubboService
public class MovementApiImpl implements MovementApi {

    @Autowired
    private MongoTemplate mongoTemplate;

    @Autowired
    private IdWorker idWorker;

    @Autowired
    private TimeLineService timeLineService;

    @Override
    public void publish(Movement movement) {
        //1. 保存动态数据
        movement.setPid(idWorker.getNextId("movement"));
        movement.setCreated(System.currentTimeMillis());
        mongoTemplate.save(movement);
        //2. 保存好友时间线数据
        timeLineService.saveTimeLine(movement.getUserId(), movement.getId());
    }
}
使用mongodb插入数据时,每个document中必须有一个_id字段,且可以是任意类型,但如果没有单独设置_id字段,mongo会自动生成一个_id字段,类型是ObjectId
toHexString方法将ObjectID id作为24字节十六进制字符串表示返回
基于LIst实现分页处理
String[] values = redisValue.split(",");
//判断当前页的起始条数是否小于数组总数
if((page-1)*pageSize < values.length){
             List<Long> pids = Arrays.stream(values).skip((page-1)*pageSize).limit(pageSize)
                   .map(e->Long.valueOf(e))
                   .collect(Collectors.toList());
}
MongoDB获取随机数据
//随机查询多条数据
    @Override
    public List<Movement> randomMovements(Integer pageSize) {
        //1.创建统计对象,设置统计参数,随机采样函数
        TypedAggregation aggregation = Aggregation.newAggregation(Movement.class,Aggregation.sample(pageSize));
        //2.调用mongoTemplate统计参数,将统计结果设置到某一个对象中,因为统计结果有可能只是总数
        AggregationResults<Movement> results = mongoTemplate.aggregate(aggregation,Movement.class);
        //3.获取统计结果
        return results.getMappedResults();
    }
findAndModify方法的好处是能够在更新之后得到最终的更新结果,不需要再去查询一遍,提高代码效率
Query query = Query.query(Criteria.where("id").is(comment.getPublishId()));
        Update update = new Update();
        if(comment.getCommentType()== CommentType.LIKE.getType()){
            update.inc("likeCount",1);
        }else if(comment.getCommentType()== CommentType.COMMENT.getType()){
            update.inc("commentCount",1);
        }else{
            update.inc("loveCount",1);
        }
        //设置更新的一些参数
        FindAndModifyOptions options = new FindAndModifyOptions();
        //每次返回最新的数据内容
        options.returnNew(true);

        Movement modify = mongoTemplate.findAndModify(query,update,options,Movement.class);
查询条件参数的类型必须一致,不然查询不到数据
publishId类型为ObjectId
movementId类型为String
转化为ObjectId类型:
new ObjectId(movementId)@Override
public List<Comment> findByMovementId(Integer page, Integer pageSize, String movementId) {
//1.构造查询条件
Criteria criteria = new Criteria("publishId").is(new ObjectId(movementId));
Query query = Query.query(criteria).skip((page-1)*pageSize).limit(pageSize).with(Sort.by(Sort.Order.desc("created")));
//2.查询数据
List<Comment> commentlist = mongoTemplate.find(query,Comment.class);
return null;
}枚举类,Java 枚举是一个特殊的类,一般表示一组常量,比如一年的 4 个季节,一个年的 12 个月份,一个星期的 7 天,方向有东南西北等。
Java 枚举类使用 enum 关键字来定义,各个常量使用逗号 , 来分割。
/**
 * java枚举
 */
public class Enum {
    public static void main(String[] args) {
        System.out.println(Season.SPRING);
        System.out.println(Season.SUMMER);
        System.out.println(Season.AUTUMN);
        System.out.println(Season.WINTER);
    }
}

// 定义的枚举类
enum Season {
    // 枚举定义的常量对象必须在最前面
    SPRING("春天","万物复苏"),
    SUMMER("夏天","烈日炎炎"),
    AUTUMN("秋天","硕果累累"),
    WINTER("冬天","寒冷刺骨");

    private String name;
    private String desc;

    private Season(String name, String desc) {
        this.name = name;
        this.desc = desc;
    }

    public String getName() {
        return name;
    }

    public String getDesc() {
        return desc;
    }

    @Override
    public String toString() {
        return "Season{" +
                "name='" + name + '\'' +
                ", desc='" + desc + '\'' +
                '}';
    }
}
输出:
Season{name='春天', desc='万物复苏'}
Season{name='夏天', desc='烈日炎炎'}
Season{name='秋天', desc='硕果累累'}
Season{name='冬天', desc='寒冷刺骨'}
enum是没有构造函数的,准确的来说是没有public类型的构造函数, 它的构造函数只能是private类型的;enum是单例模式;enum中有一个values方法来获取枚举实例对象数组;
package com.tanhua.model.enums;

/**
 * 评论类型:1-点赞,2-评论,3-喜欢
 */
public enum CommentType {

    LIKE(1), COMMENT(2), LOVE(3);

    int type;

    CommentType(int type) {
        this.type = type;
    }

    public int getType() {
        return type;
    }
}
使用枚举的目的就是规范和限制好参数类型
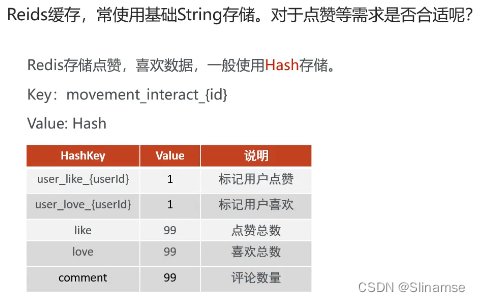
String key = Constants.MOVEMENTS_INTERACT_KEY + movementId;
String hashKey = Constants.MOVEMENT_LIKE_HASHKEY + UserHolder.getUserId();
redisTemplate.opsForHash().put(key,hashKey,"1");
redisTemplate.opsForHash().delete(key,hashKey);
redisTemplate.opsForHash().hasKey(key,hashKey)
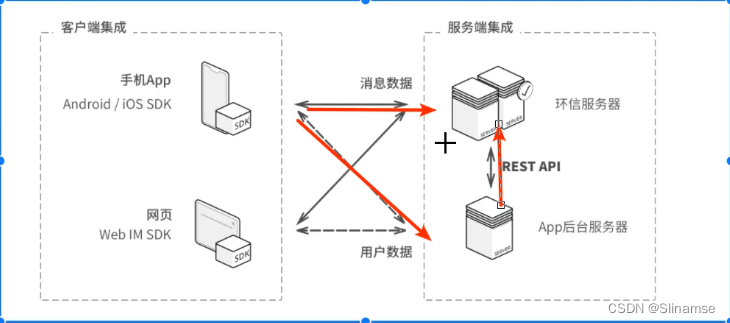
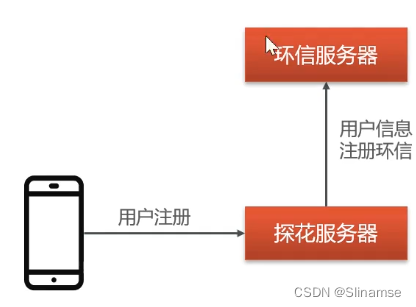
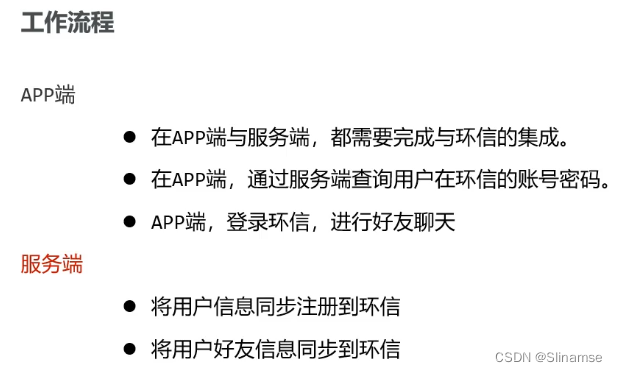
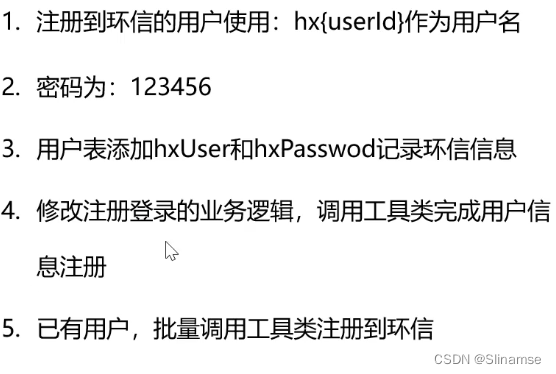
- 客户端用户注册
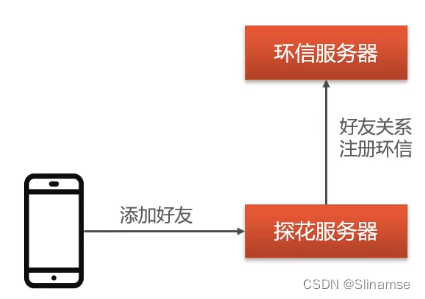
- 注册用户好友关系(联系人)
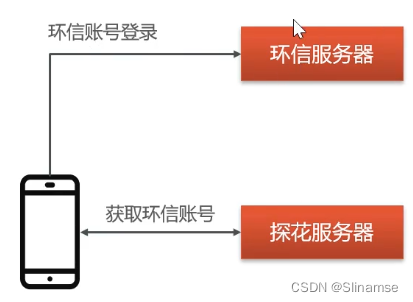
- 客户端获取环信身份信息
环信账号是环信服务器分配的,不是我们自己的
环信账号登录跟我们自己的服务器没有关系
- 手机端在线聊天
在线聊天和自己的服务器没有关系,全部借助的是环信服务器
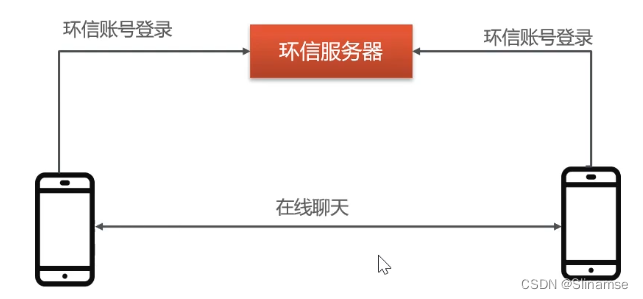
自己的服务器主要是为了提供数据,而真正的即时通讯全部在客户端完成

<dependency>
    <groupId>com.easemob.im</groupId>
    <artifactId>im-sdk-core</artifactId>
    <version>0.6.6</version>
</dependency>

application.yml
tanhua:
sms:
signName: 阿里云短信测试
templateCode: SMS_154950909
accessKey: LTAI5t6zUveJvtgW7GY12ifQ
secret: Zo7FBZBy1MMGOXnZmGuXDK3OdYZ3ZP
oss:
accessKey: LTAI5t6zUveJvtgW7GY12ifQ
secret: Zo7FBZBy1MMGOXnZmGuXDK3OdYZ3ZP
bucketName: tanhua0000000000
url: https://tanhua0000000000.oss-cn-beijing.aliyuncs.com/
endpoint: oss-cn-beijing.aliyuncs.com
aip:
appId: 27588261
apiKey: 3mm0CKLDhL8DkU6GkVU247Wz
secretKey: lTYGjV9njEETcjSzZw7dT09Lal6t3Dfm
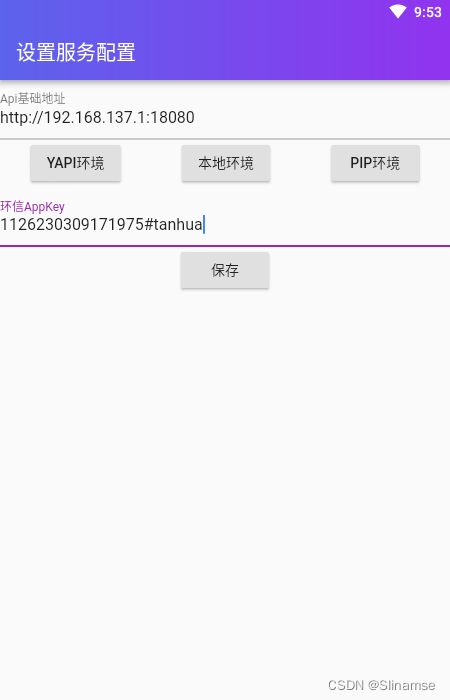
huanxin:
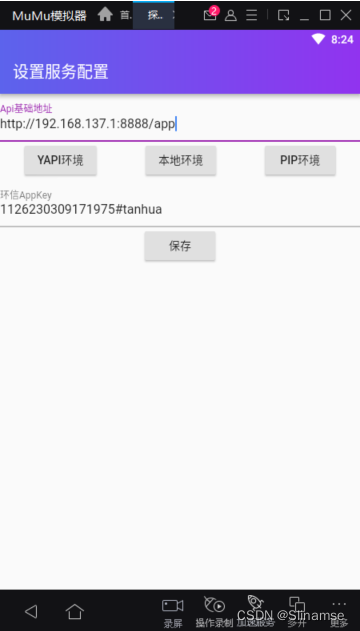
appkey: 1126230309171975#tanhua
clientId: YXA6HoIxGf6BRsWo7HMTGBwy0g
clientSecret: YXA6PP7FAAcRjDQc6gAClFJkGNR2khcHuanXinProperties
@Data
@ConfigurationProperties(prefix = "tanhua.huanxin")
public class HuanXinProperties {
    private String appkey;
    private String clientId;
    private String clientSecret;
}
HuanXinTemplate
@Slf4j
public class HuanXinTemplate {

    private EMService service;

    public HuanXinTemplate(HuanXinProperties properties) {
        EMProperties emProperties = EMProperties.builder()
                .setAppkey(properties.getAppkey())
                .setClientId(properties.getClientId())
                .setClientSecret(properties.getClientSecret())
                .build();
        service = new EMService(emProperties);
    }

    //创建环信用户
    public Boolean createUser(String username,String password) {
        try {
            //创建环信用户
            service.user().create(username.toLowerCase(), password)
                    .block();
            return true;
        }catch (Exception e) {
            e.printStackTrace();
            log.error("创建环信用户失败~");
        }
        return false;
    }

    //添加联系人
    public Boolean addContact(String username1,String username2) {
        try {
            //创建环信用户
            service.contact().add(username1,username2)
                    .block();
            return true;
        }catch (Exception e) {
            log.error("添加联系人失败~");
        }
        return false;
    }

    //删除联系人
    public Boolean deleteContact(String username1,String username2) {
        try {
            //创建环信用户
            service.contact().remove(username1,username2)
                    .block();
            return true;
        }catch (Exception e) {
            log.error("删除联系人失败~");
        }
        return false;
    }

    //发送消息
    public Boolean sendMsg(String username,String content) {
        try {
            //接收人用户列表
            Set<String> set = CollUtil.newHashSet(username);
            //文本消息
            EMTextMessage message = new EMTextMessage().text(content);
            //发送消息  from:admin是管理员发送
            service.message().send("admin","users",
                    set,message,null).block();
            return true;
        }catch (Exception e) {
            log.error("删除联系人失败~");
        }
        return false;
    }
}
TanhuaAutoConfiguration
@EnableConfigurationProperties({
        SmsProperties.class,
        OssProperties.class,
        AipFaceProperties.class,
        HuanXinProperties.class
})
public class TanhuaAutoConfiguration {
    @Bean
    public SmsTemplate smsTemplate(SmsProperties properties){
        return new SmsTemplate(properties);
    }
    @Bean
    public OssTemplate ossTemplate(OssProperties properties){
        return new OssTemplate(properties);
    }
    @Bean
    public AipFaceTemplate faceTemplate(){
        return new AipFaceTemplate();
    }
    @Bean
    public HuanXinTemplate huanXinTemplate(HuanXinProperties properties){
        return new HuanXinTemplate(properties);
    }
}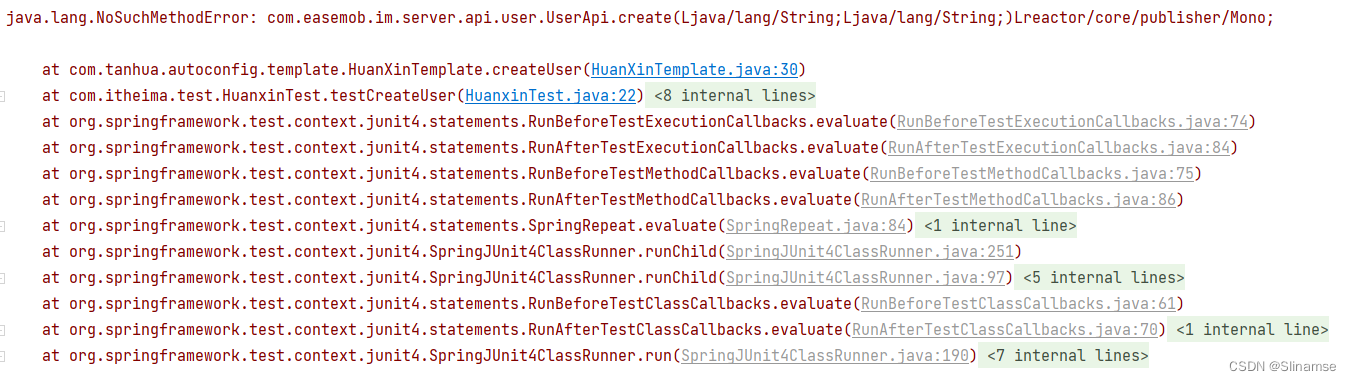
原因:环信通信的API依赖放到了父级pom.xml,而没有放到autoconfig模块的pom.xml
WHY?
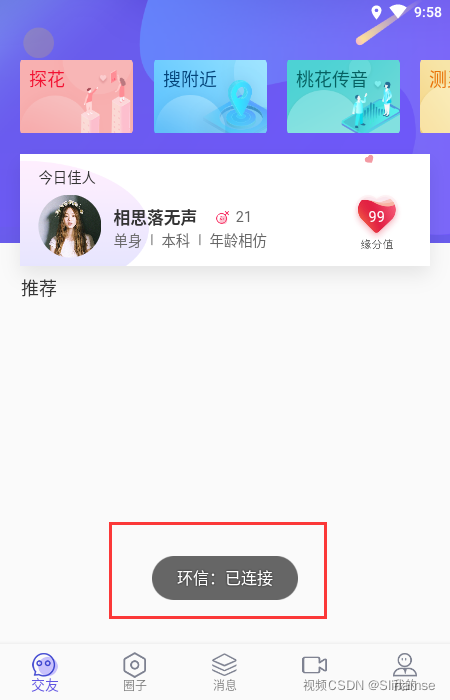
注意:
客户端的环信appkey要和服务端的环信appkey保持一致
必须登录的是在环信已经注册了的用户
测试

我们暂时通过环信的控制台进行发送:
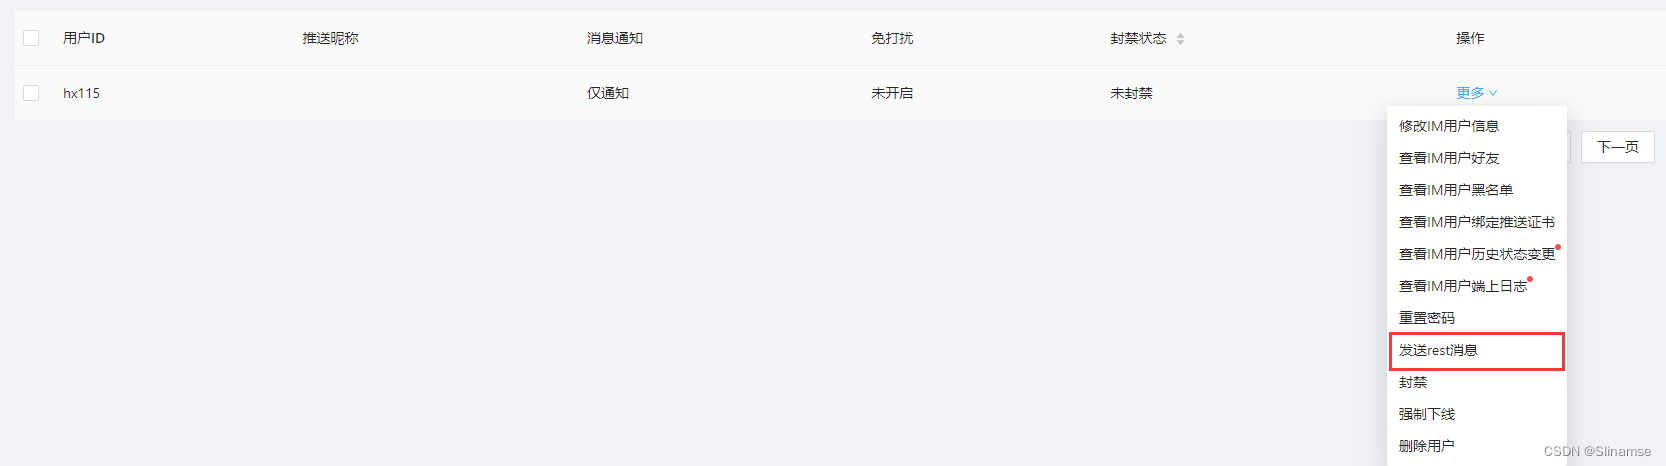
消息格式内容:
{"userId":106,"huanXinId":"hx106","nickname":"黑马小妹","strangerQuestion":"你喜欢去看蔚蓝的大海还是去爬巍峨的高山?","reply":"我喜欢秋天的落叶,夏天的泉水,冬天的雪地,只要有你一切皆可~"}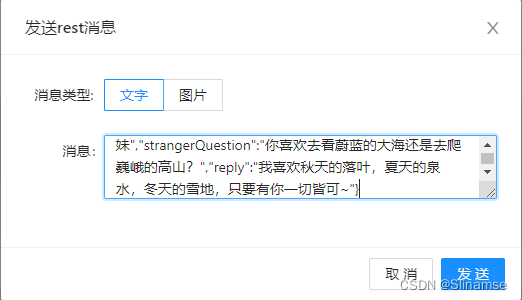
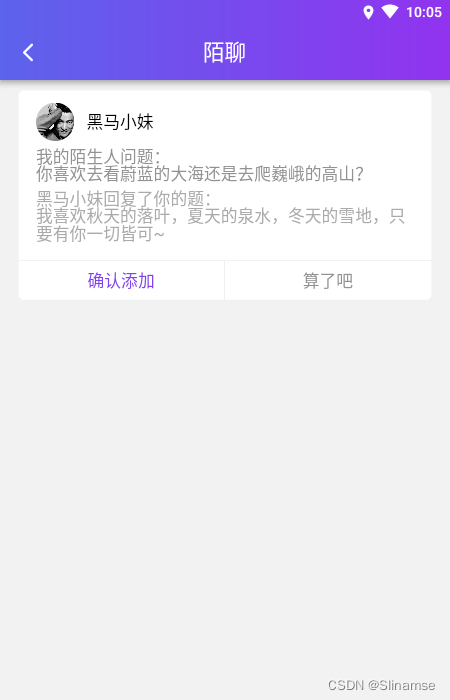
目前还存在的问题就是,发送的消息与用户信息匹配不上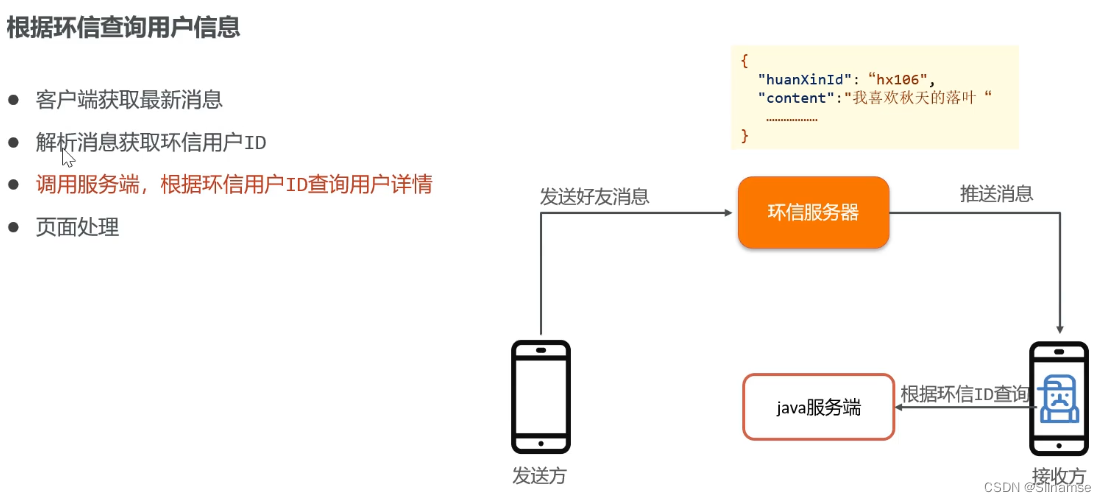
按照条件随机查找并过滤数据
@Override
public List<RecommendUser> queryCardList(Long userId, int i) {
//1.查询喜欢不喜欢的用户ID
List<UserLike> userLikeList = mongoTemplate.find(Query.query(Criteria.where("userId").is(userId)), UserLike.class);
List<Long> likeUserIdList = CollUtil.getFieldValues(userLikeList,"likeUserId",Long.class);
//2.构造查询推荐用户的条件
Criteria criteria = Criteria.where("toUserId").is(userId).and("userId").nin(likeUserIdList);
//3.使用统计函数,随机获取推荐的用户列表
TypedAggregation aggregation = Aggregation.newAggregation(RecommendUser.class,
Aggregation.match(criteria),
Aggregation.sample(i));
AggregationResults<RecommendUser> results = mongoTemplate.aggregate(aggregation,RecommendUser.class);
//4.获取统计结果
return results.getMappedResults();
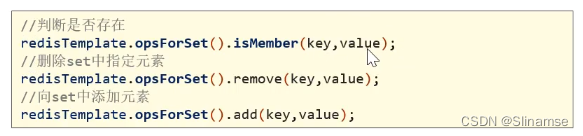
}操作redis中的set
mongodb更新操作
//如果存在,更新
Update update = Update.update("isLike",isLike)
                .set("updated",System.currentTimeMillis());
mongoTemplate.updateFirst(query,update,UserLike.class);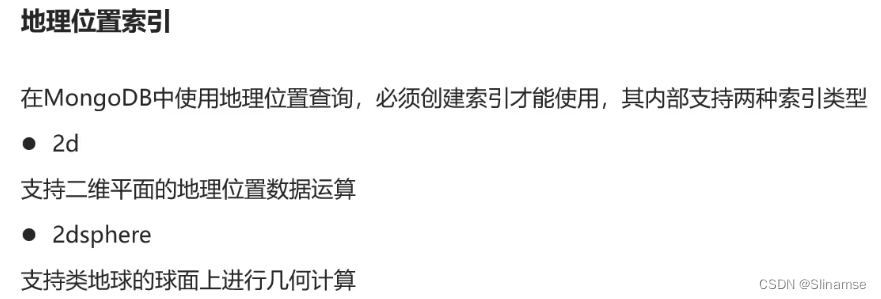
实体类
@Data
@AllArgsConstructor
@NoArgsConstructor
@Document("places")
@CompoundIndex(name = "location_index", def = "{'location': '2dsphere'}")
public class Places {

    private ObjectId id;

    private String title;

    private String address;

    private GeoJsonPoint location;
}
注意:GeoJsonPoint对象不支持序列化
查询当前坐标附近的目标
@Test
public void testNear() {
    //构造坐标点
    GeoJsonPoint point = new GeoJsonPoint(116.404, 39.915);
    //构造半径
    Distance distanceObj = new Distance(1, Metrics.KILOMETERS);
    //画了一个圆圈
    Circle circle = new Circle(point, distanceObj);
    //构造query对象
    Query query = Query.query(Criteria.where("location").withinSphere(circle));
    //省略其他内容
    List<Places> list = mongoTemplate.find(query, Places.class);
    list.forEach(System.out::println);
}
查询并获取距离
//查询附近且获取间距
@Test
public void testNear1() {
//1. 构造中心点(圆点)
GeoJsonPoint point = new GeoJsonPoint(116.404, 39.915);
//2. 构建NearQuery对象
NearQuery query = NearQuery.near(point, Metrics.KILOMETERS).maxDistance(1, Metrics.KILOMETERS);
//3. 调用mongoTemplate的geoNear方法查询
GeoResults<Places> results = mongoTemplate.geoNear(query, Places.class);
//4. 解析GeoResult对象,获取距离和数据
for (GeoResult<Places> result : results) {
Places places = result.getContent();
double value = result.getDistance().getValue();
System.out.println(places+"---距离:"+value + "km");
}
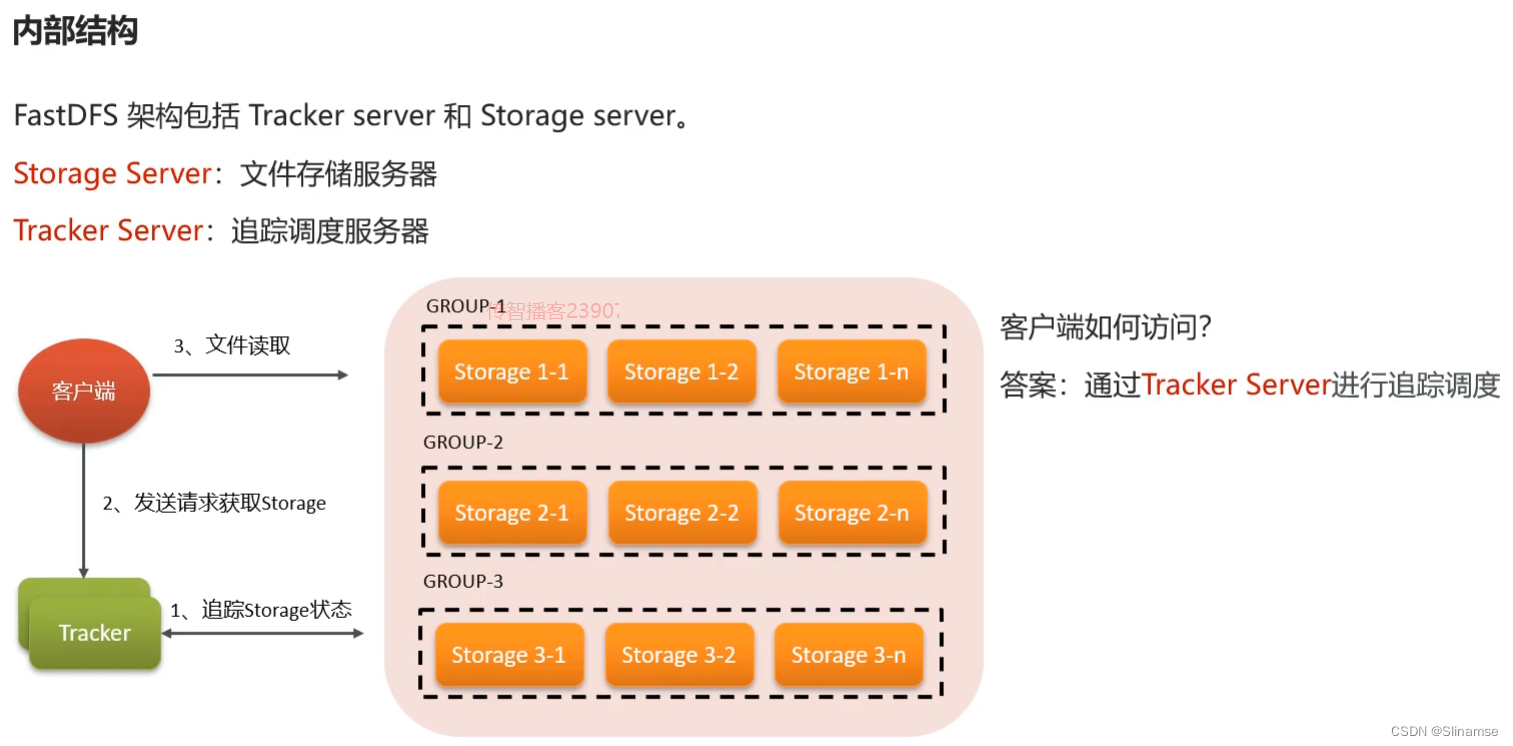
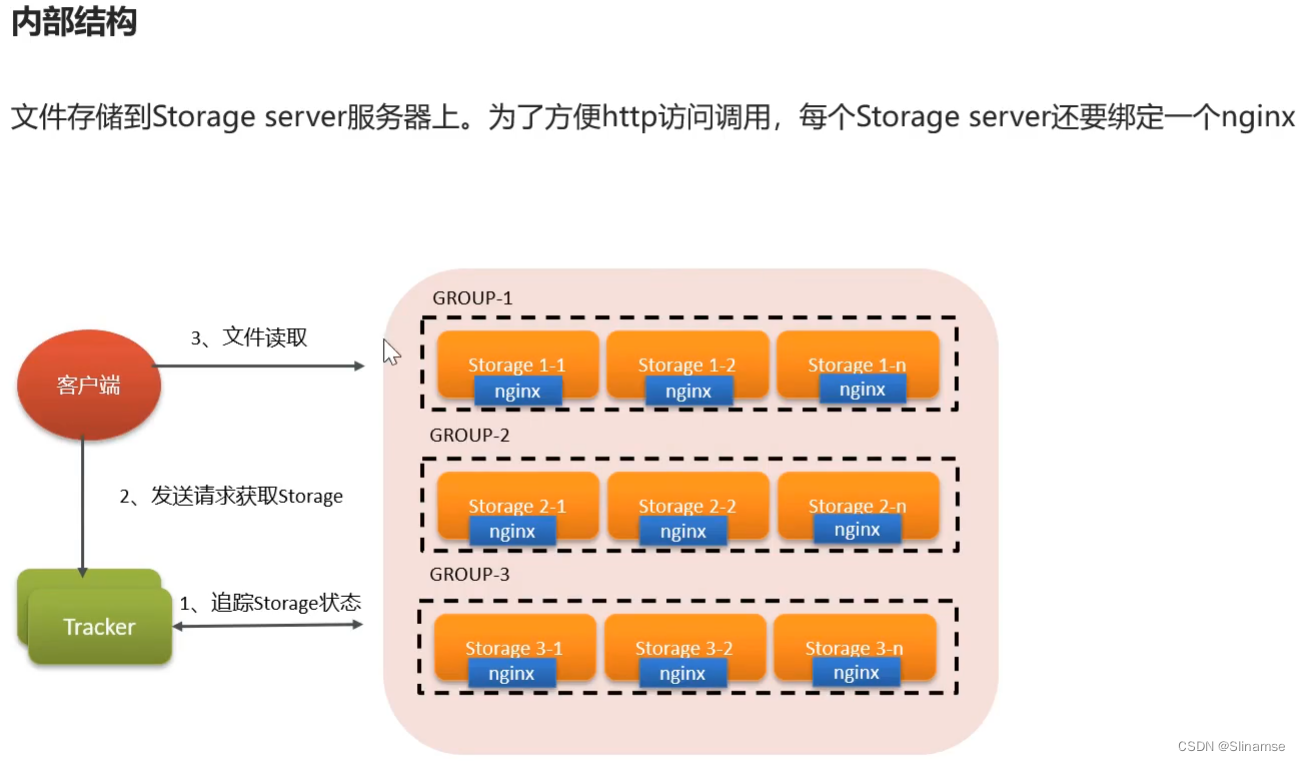
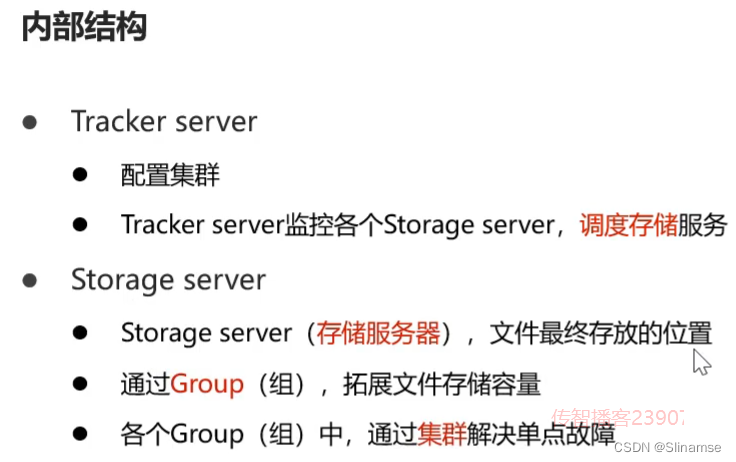
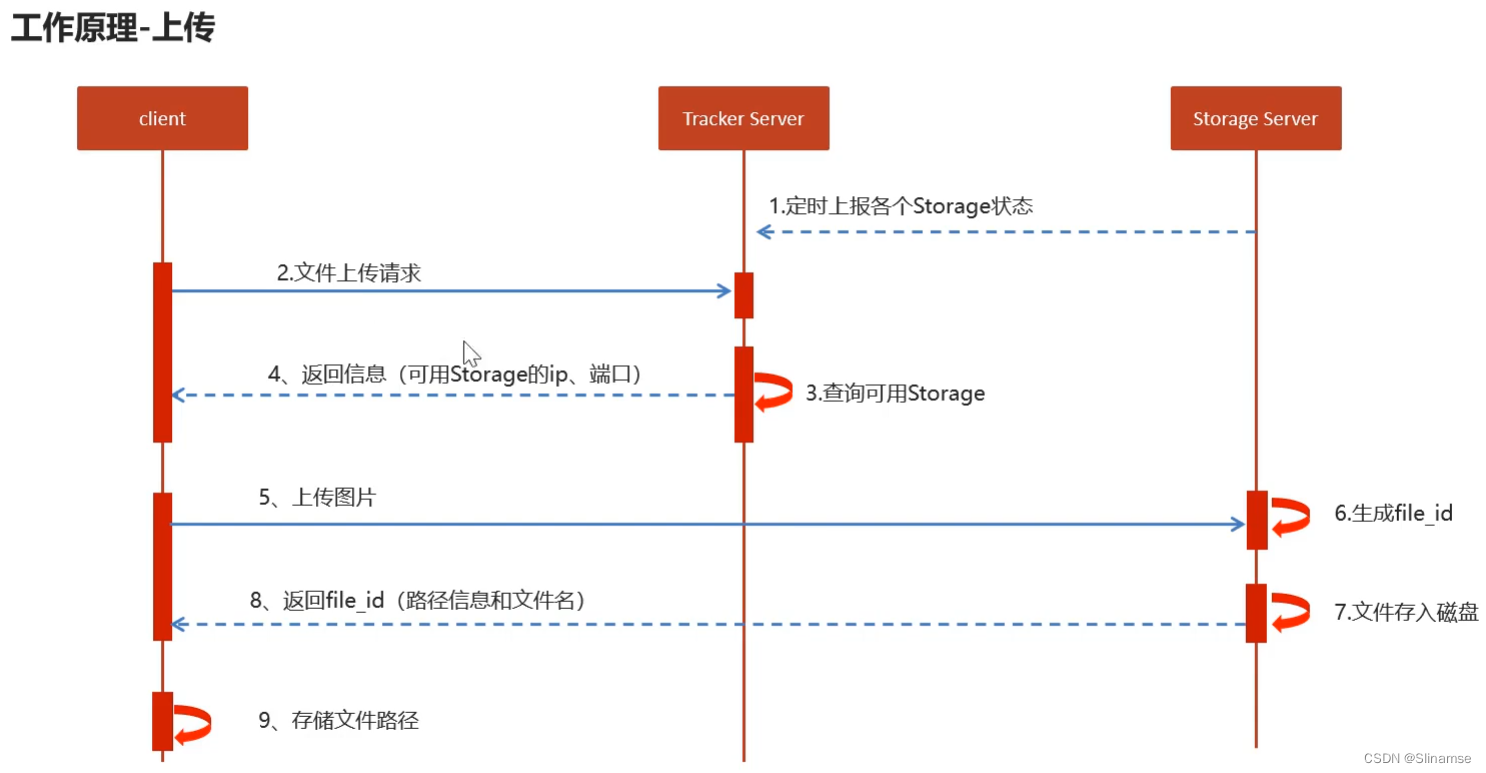
}文件存储FastDFS

导入依赖
找到tanhua-app-server的pom文件,打开fastdfs的依赖如下
<dependency>
    <groupId>com.github.tobato</groupId>
    <artifactId>fastdfs-client</artifactId>
    <version>1.26.7</version>
    <exclusions>
        <exclusion>
            <groupId>ch.qos.logback</groupId>
            <artifactId>logback-classic</artifactId>
        </exclusion>
    </exclusions>
</dependency>
application.yml
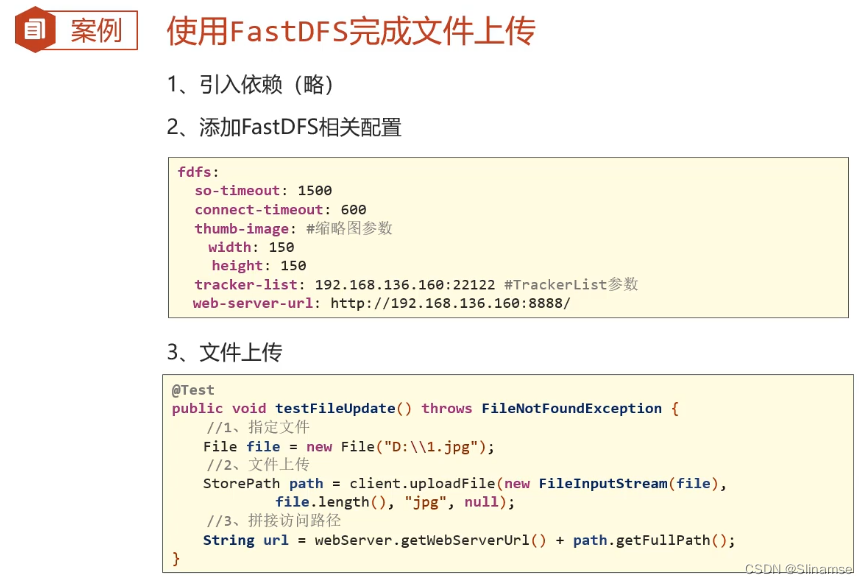
找到tanhua-app-server的application.yml,添加FastDFS的配置
# 分布式文件系统FDFS配置
fdfs:
so-timeout: 1500
connect-timeout: 600
#缩略图生成参数
thumb-image:
width: 150
height: 150
#TrackerList参数,支持多个
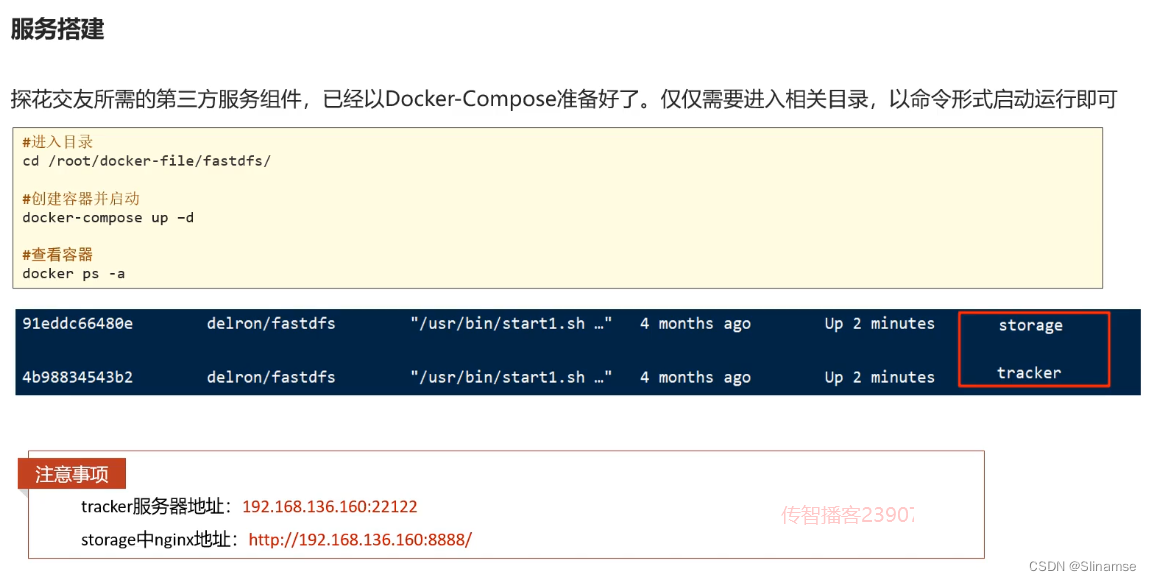
tracker-list: 192.168.136.160:22122
web-server-url: http://192.168.136.160:8888/测试
@RunWith(SpringRunner.class)
@SpringBootTest(classes = TanhuaServerApplication.class)
public class TestFastDFS {

    //从调度服务器获取,一个目标存储服务器,上传
    @Autowired
    private FastFileStorageClient client;

    @Autowired
    private FdfsWebServer webServer;// 获取存储服务器的请求URL

    @Test
    public void testFileUpdate() throws FileNotFoundException {
 		//1. 指定文件
        File file = new File("D:\\1.jpg");
		//2. 文件上传
        StorePath path = client.uploadFile(new FileInputStream(file),
                file.length(), "jpg", null);
		//3. 拼接访问路径
        String url = webServer.getWebServerUrl() + path.getFullPath();
    }
}
@Autowired自动装配对象和new对象的区别
@Autowired相当于setter,在注入之前,对象已经实例化,是在这个接口注解的时候实例化的;
而new只是实例化一个对象,而且new的对象不能调用注入的其他类
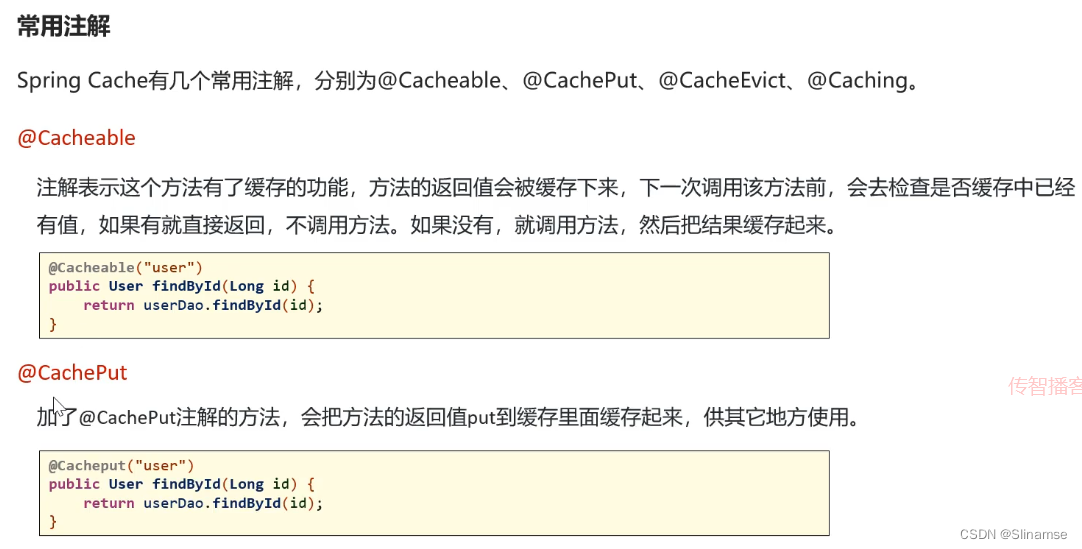
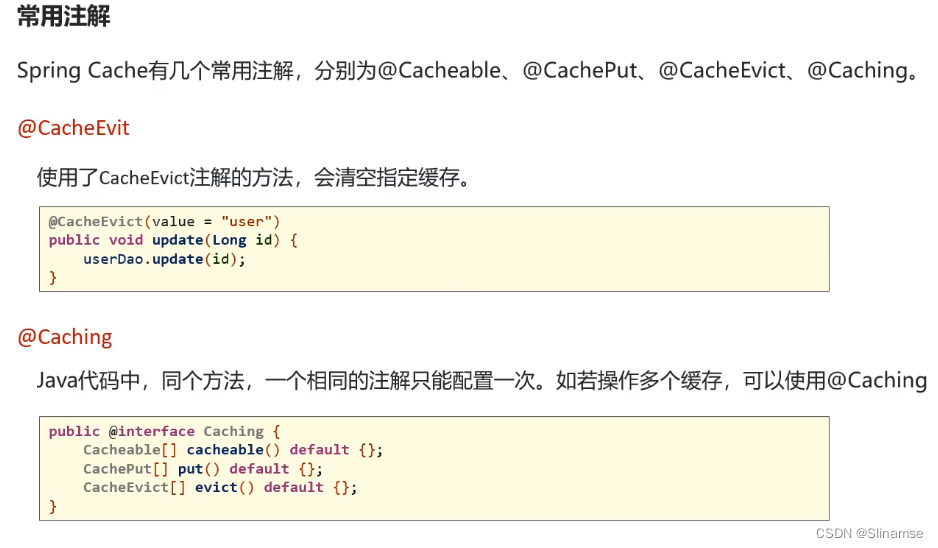
SpringCache
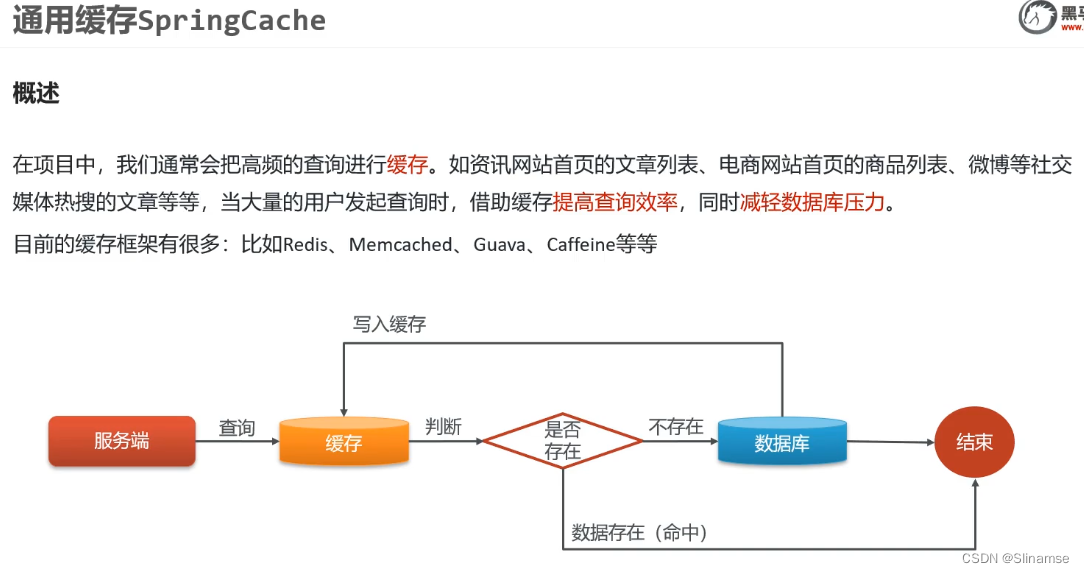

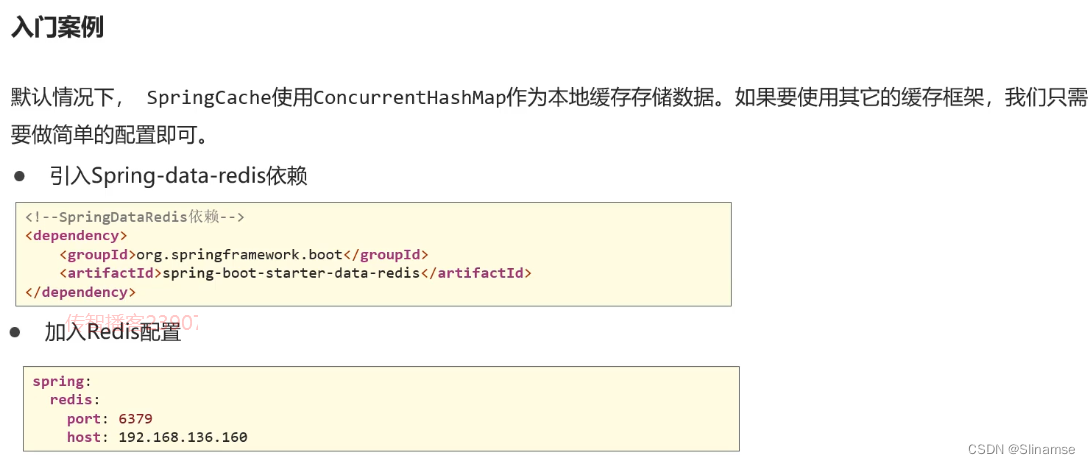
设置缓存失效时间
@Configuration
public class RedisCacheConfig {
//设置失效时间
private static final Map<String, Duration> cacheMap;
static {
cacheMap = ImmutableMap.<String, Duration>builder().put("videos", Duration.ofSeconds(30L)).build();
}
//配置RedisCacheManagerBuilderCustomizer对象
@Bean
public RedisCacheManagerBuilderCustomizer redisCacheManagerBuilderCustomizer() {
return (builder) -> {
//根据不同的cachename设置不同的失效时间
for (Map.Entry<String, Duration> entry : cacheMap.entrySet()) {
builder.withCacheConfiguration(entry.getKey(),
RedisCacheConfiguration.defaultCacheConfig().entryTtl(entry.getValue()));
}
};
}
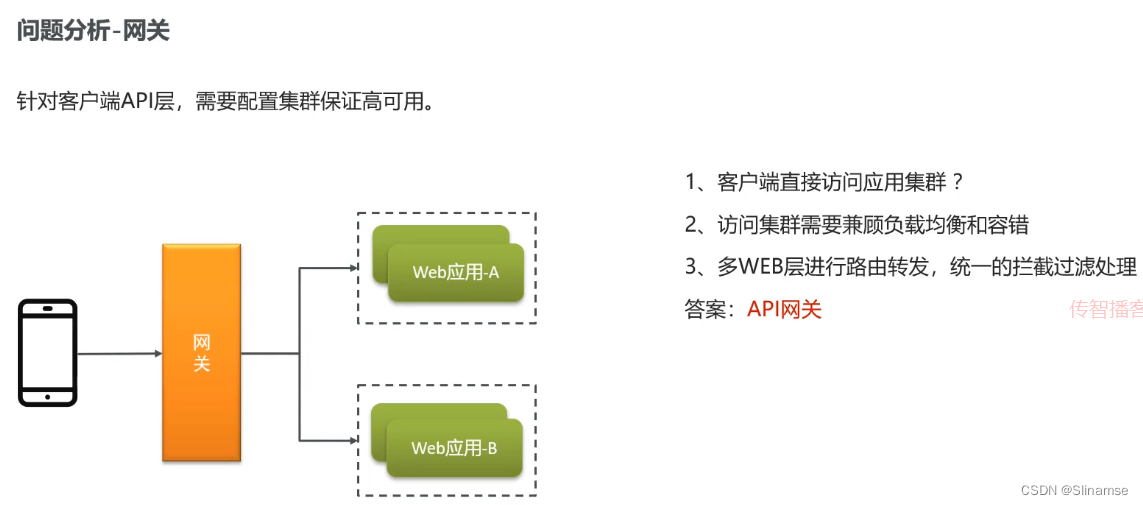
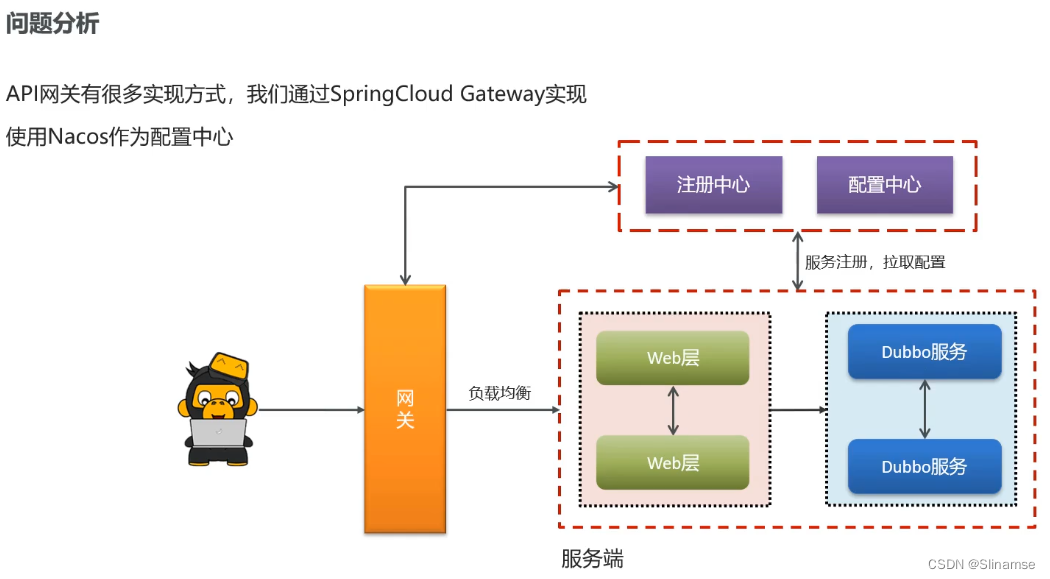
}网关
引导类
在tanhua-gateway模块配置引导类
@SpringBootApplication
public class GatewayApplication {

    public static void main(String[] args) {
        SpringApplication.run(GatewayApplication.class, args);
    }
}
跨域问题配置类
/**
 * 跨域支持
 */
@Configuration
public class CorsConfig {

    @Bean
    public CorsWebFilter corsFilter() {
        CorsConfiguration config = new CorsConfiguration();
        config.addAllowedMethod("*");
        config.addAllowedOrigin("*");
        config.addAllowedHeader("*");
        UrlBasedCorsConfigurationSource source =
                new UrlBasedCorsConfigurationSource(new PathPatternParser());
        source.registerCorsConfiguration("/**", config);
        return new CorsWebFilter(source);
    }
}
配置文件
server:
port: 8888
spring:
application:
name: tanhua-gateway
cloud:
nacos:
discovery:
server-addr: 192.168.136.160:8848
gateway:
globalcors:
add-to-simple-url-handler-mapping: true
corsConfigurations:
'[/**]':
allowedHeaders: "*"
allowedOrigins: "*"
allowedMethods:
- GET
- POST
- DELETE
- PUT
- OPTION
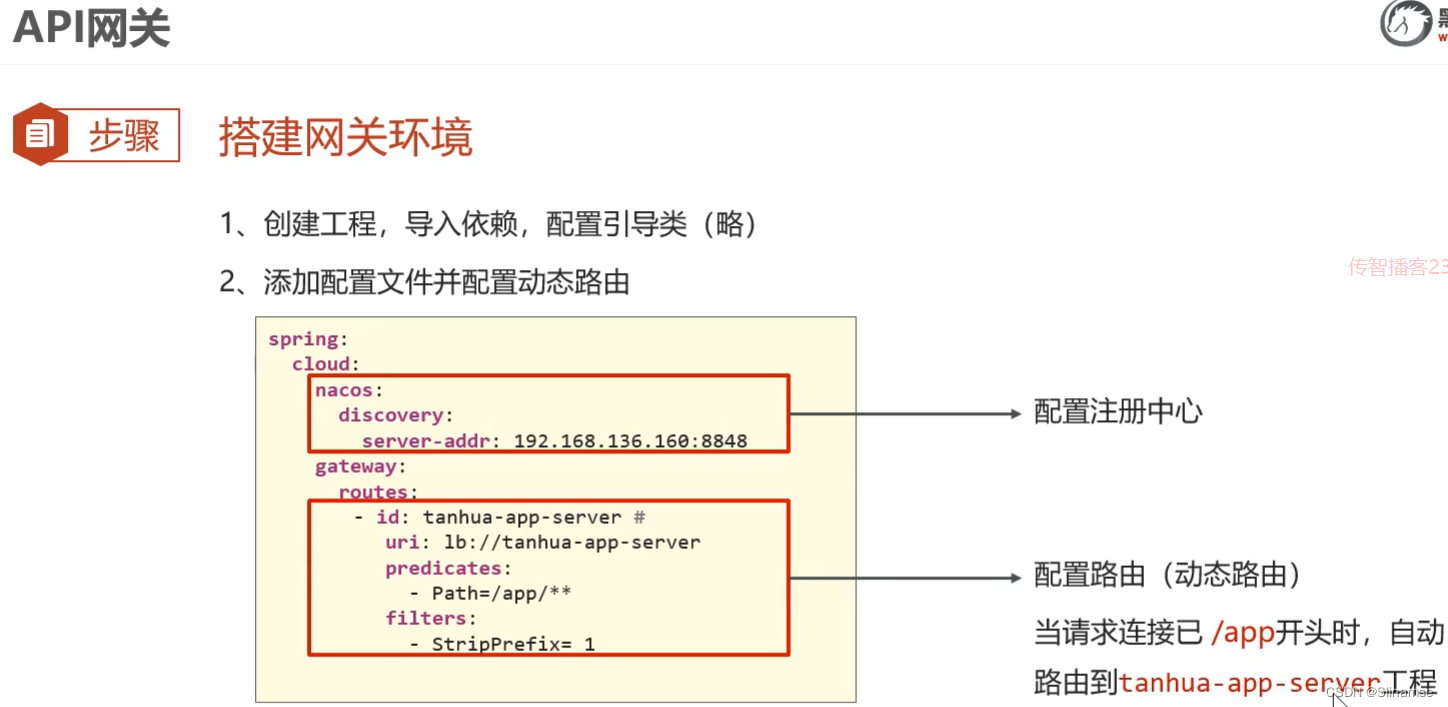
routes:
# 手机端访问
- id: tanhua-app-server
uri: lb://tanhua-app-server
predicates:
- Path=/app/**
filters:
- StripPrefix= 1
# 管理后台
- id: tanhua-admin
uri: lb://tanhua-admin
predicates:
- Path=/admin/**
filters:
- StripPrefix= 1
#自定义配置,定义不需要校验token的连接
gateway:
excludedUrls: /user/login,/user/loginVerification,/system/users/verification,/system/users/login以前是直接访问到tanhua-app-server,现在是先访问网关再通过网关路径匹配路由访问
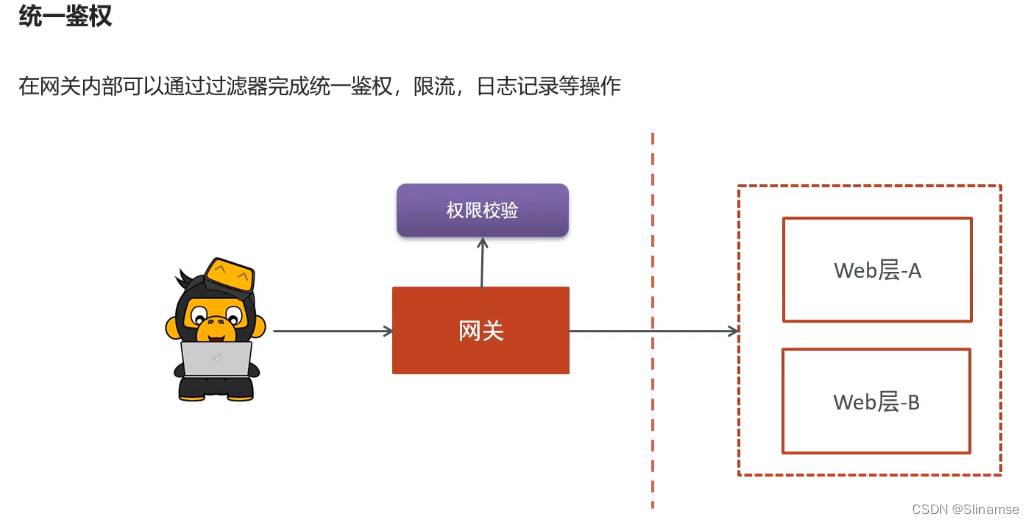
网关过滤器
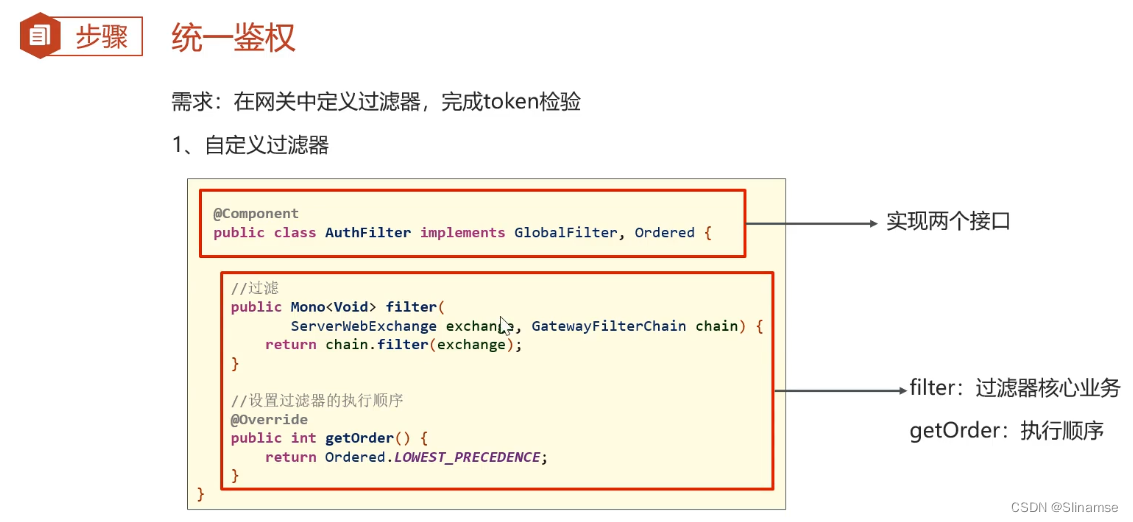
@Component
public class AuthFilter implements GlobalFilter, Ordered {
@Value("${gateway.excludedUrls}")
private List<String> excludedUrls;//需要配置不校验的连接
//过滤器核心业务代码
@Override
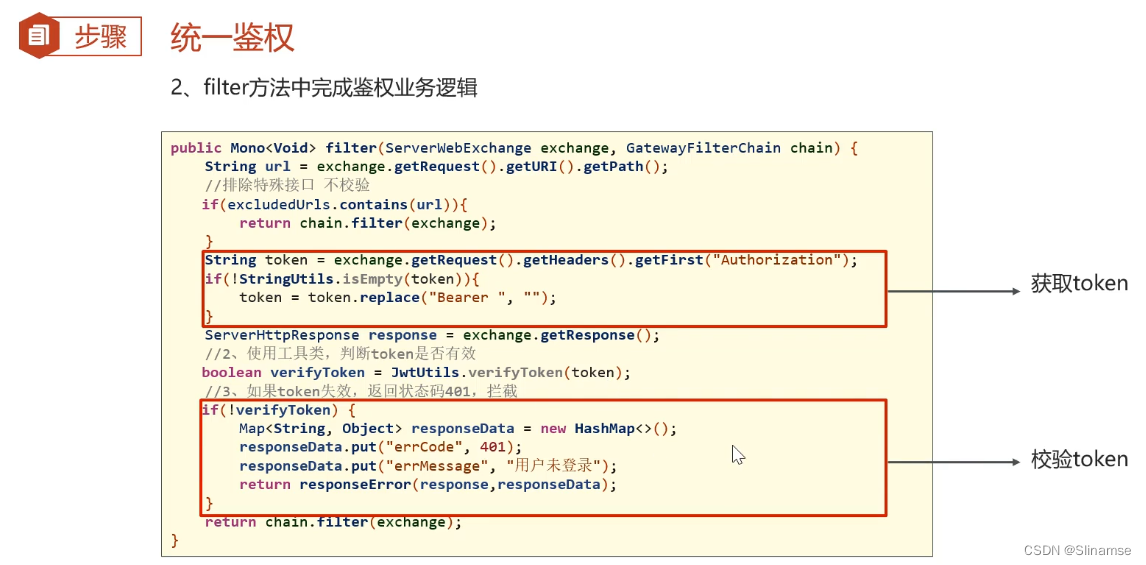
public Mono<Void> filter(ServerWebExchange exchange, GatewayFilterChain chain) {
//1.排除不需要权限检验的连接
String path = exchange.getRequest().getURI().getPath();//当前请求连接
if(excludedUrls.contains(path)){
return chain.filter(exchange);
}
//2.获取toen并校验
String token = exchange.getRequest().getHeaders().getFirst("Authorization");
if(!StringUtils.isEmpty(token)){
token = token.replaceAll("Bearer","");
}
boolean verifyToken = JwtUtils.verifyToken(token);
//3.如果校验失败,响应错误状态:401
if(!verifyToken){
Map<String,Object> responseData = new HashMap<>();
responseData.put("errCode",401);
responseData.put("errMessage","用户未登录");
return responseError(exchange.getResponse(),responseData);
}
return chain.filter(exchange);
}
//响应错误数据
private Mono<Void> responseError(ServerHttpResponse response, Map<String, Object> responseData){
// 将信息转换为 JSON
ObjectMapper objectMapper = new ObjectMapper();
byte[] data = new byte[0];
try {
data = objectMapper.writeValueAsBytes(responseData);
} catch (JsonProcessingException e) {
e.printStackTrace();
}
// 输出错误信息到页面
DataBuffer buffer = response.bufferFactory().wrap(data);
response.setStatusCode(HttpStatus.UNAUTHORIZED);
response.getHeaders().add("Content-Type", "application/json;charset=UTF-8");
return response.writeWith(Mono.just(buffer));
}
//配置执行顺序
@Override
public int getOrder() {
return Ordered.LOWEST_PRECEDENCE;
}
}
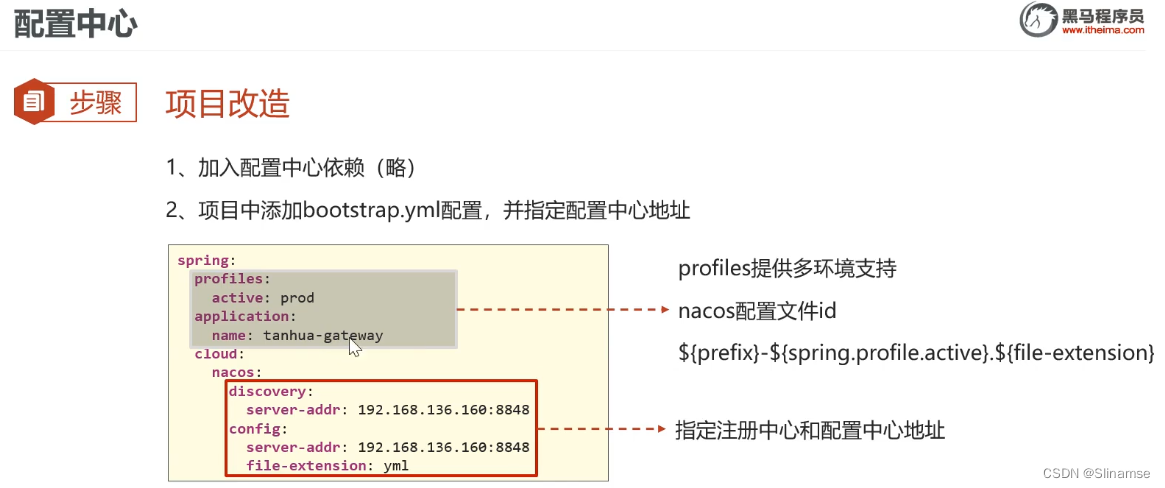
在tanhua-gateway模块中添加引导文件bootstrap.yml,并设置
server:
  port: 8888
spring:
  profiles:
    active: prod
  application:
    name: tanhua-gateway
  cloud:
    nacos:
      discovery:
        server-addr: 192.168.136.160:8848
      config:
        server-addr: 192.168.136.160:8848
        file-extension: yml
springboot会优先读取bootstrap.yml的配置
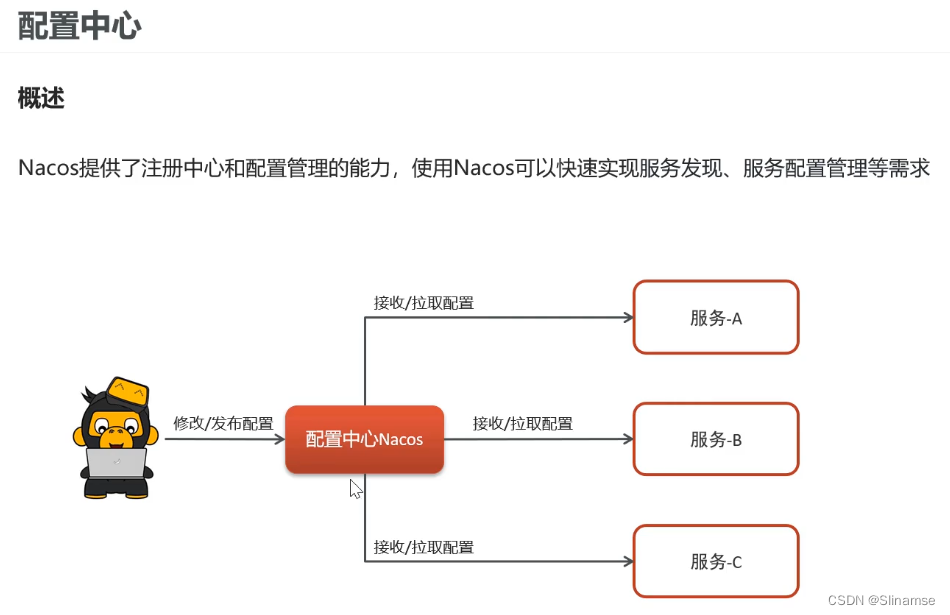
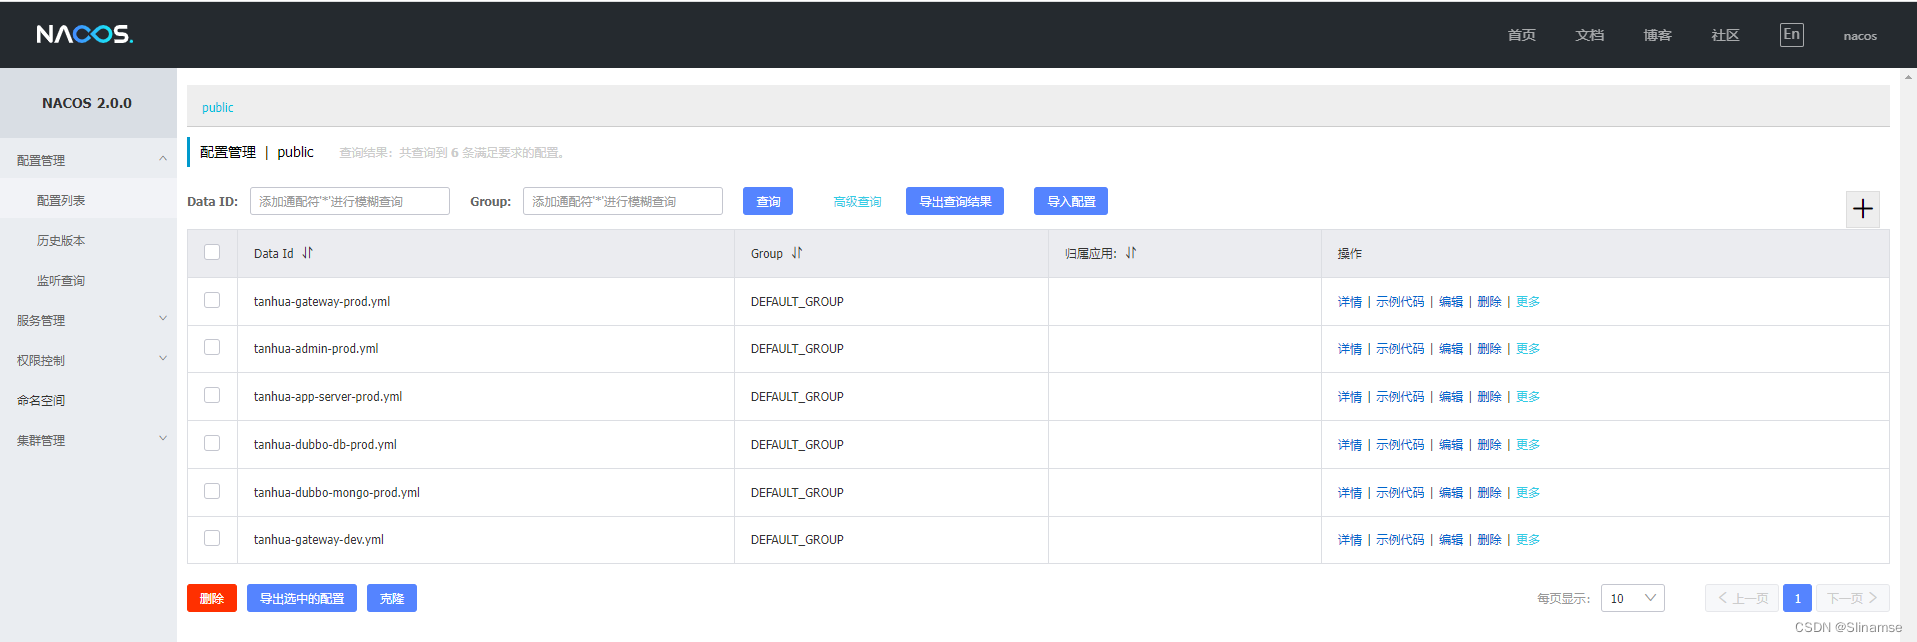
服务就会读取nacos中的配置了,后面就可以通过nacos修改服务配置
获取验证码图片
//获取验证码图片
    @GetMapping("/verification")
    public void verification(String uuid,HttpServletResponse response) throws IOException{
        //1.生成验证码对象
        LineCaptcha captcha = CaptchaUtil.createLineCaptcha(299,97);
        //2.验证码存入Redis
        String code = captcha.getCode();
        redisTemplate.opsForValue().set(Constants.CAP_CODE+uuid,code);
        //3.输出验证码图片
        captcha.write(response.getOutputStream());
    }
出现问题
重启DubooMongoApplication服务报错
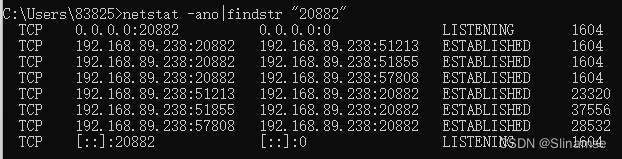
org.apache.dubbo.rpc.RpcException: Fail to start server(url: dubbo://192.168.89.238:20882/com.tanhua.dubbo.api.VisitorsApi?anyhost=true&application=tanhua-dubbo-mongo&bind.ip=192.168.89.238&bind.port=20882&channel.readonly.sent=true&codec=dubbo&deprecated=false&dubbo=2.0.2&dynamic=true&generic=false&heartbeat=60000&interface=com.tanhua.dubbo.api.VisitorsApi&methods=save,findByUserId&pid=18680&qos.enable=false&release=2.7.8&side=provider×tamp=1679624784821) Failed to bind NettyServer on /192.168.89.238:20882, cause: Address already in use: bind
at org.apache.dubbo.rpc.protocol.dubbo.DubboProtocol.createServer(DubboProtocol.java:348) ~[dubbo-2.7.8.jar:2.7.8]
at org.apache.dubbo.rpc.protocol.dubbo.DubboProtocol.openServer(DubboProtocol.java:320) ~[dubbo-2.7.8.jar:2.7.8]
at org.apache.dubbo.rpc.protocol.dubbo.DubboProtocol.export(DubboProtocol.java:303) ~[dubbo-2.7.8.jar:2.7.8]
at org.apache.dubbo.rpc.protocol.ProtocolListenerWrapper.export(ProtocolListenerWrapper.java:64) ~[dubbo-2.7.8.jar:2.7.8]
at org.apache.dubbo.rpc.protocol.ProtocolFilterWrapper.export(ProtocolFilterWrapper.java:155) ~[dubbo-2.7.8.jar:2.7.8]
at org.apache.dubbo.qos.protocol.QosProtocolWrapper.export(QosProtocolWrapper.java:66) ~[dubbo-2.7.8.jar:2.7.8]
at org.apache.dubbo.rpc.Protocol$Adaptive.export(Protocol$Adaptive.java) ~[dubbo-2.7.8.jar:2.7.8]
at org.apache.dubbo.registry.integration.RegistryProtocol.lambda$doLocalExport$2(RegistryProtocol.java:255) ~[dubbo-2.7.8.jar:2.7.8]
at java.util.concurrent.ConcurrentHashMap.computeIfAbsent(ConcurrentHashMap.java:1660) ~[na:1.8.0_202]
at org.apache.dubbo.registry.integration.RegistryProtocol.doLocalExport(RegistryProtocol.java:253) ~[dubbo-2.7.8.jar:2.7.8]
at org.apache.dubbo.registry.integration.RegistryProtocol.export(RegistryProtocol.java:205) ~[dubbo-2.7.8.jar:2.7.8]
at org.apache.dubbo.rpc.protocol.ProtocolListenerWrapper.export(ProtocolListenerWrapper.java:62) ~[dubbo-2.7.8.jar:2.7.8]
at org.apache.dubbo.rpc.protocol.ProtocolFilterWrapper.export(ProtocolFilterWrapper.java:153) ~[dubbo-2.7.8.jar:2.7.8]
at org.apache.dubbo.qos.protocol.QosProtocolWrapper.export(QosProtocolWrapper.java:64) ~[dubbo-2.7.8.jar:2.7.8]
at org.apache.dubbo.rpc.Protocol$Adaptive.export(Protocol$Adaptive.java) ~[dubbo-2.7.8.jar:2.7.8]
at org.apache.dubbo.config.ServiceConfig.doExportUrlsFor1Protocol(ServiceConfig.java:492) ~[dubbo-2.7.8.jar:2.7.8]
at org.apache.dubbo.config.ServiceConfig.doExportUrls(ServiceConfig.java:325) ~[dubbo-2.7.8.jar:2.7.8]
at org.apache.dubbo.config.ServiceConfig.doExport(ServiceConfig.java:300) ~[dubbo-2.7.8.jar:2.7.8]
at org.apache.dubbo.config.ServiceConfig.export(ServiceConfig.java:206) ~[dubbo-2.7.8.jar:2.7.8]
at org.apache.dubbo.config.bootstrap.DubboBootstrap.lambda$exportServices$15(DubboBootstrap.java:1103) ~[dubbo-2.7.8.jar:2.7.8]
at java.util.HashMap$Values.forEach(HashMap.java:981) ~[na:1.8.0_202]
at org.apache.dubbo.config.bootstrap.DubboBootstrap.exportServices(DubboBootstrap.java:1090) ~[dubbo-2.7.8.jar:2.7.8]
at org.apache.dubbo.config.bootstrap.DubboBootstrap.start(DubboBootstrap.java:901) ~[dubbo-2.7.8.jar:2.7.8]
at org.apache.dubbo.config.spring.context.DubboBootstrapApplicationListener.onContextRefreshedEvent(DubboBootstrapApplicationListener.java:59) ~[dubbo-2.7.8.jar:2.7.8]
at org.apache.dubbo.config.spring.context.DubboBootstrapApplicationListener.onApplicationContextEvent(DubboBootstrapApplicationListener.java:52) ~[dubbo-2.7.8.jar:2.7.8]
at org.apache.dubbo.config.spring.context.OneTimeExecutionApplicationContextEventListener.onApplicationEvent(OneTimeExecutionApplicationContextEventListener.java:40) ~[dubbo-2.7.8.jar:2.7.8]
at org.springframework.context.event.SimpleApplicationEventMulticaster.doInvokeListener(SimpleApplicationEventMulticaster.java:172) ~[spring-context-5.2.9.RELEASE.jar:5.2.9.RELEASE]
at org.springframework.context.event.SimpleApplicationEventMulticaster.invokeListener(SimpleApplicationEventMulticaster.java:165) ~[spring-context-5.2.9.RELEASE.jar:5.2.9.RELEASE]
at org.springframework.context.event.SimpleApplicationEventMulticaster.multicastEvent(SimpleApplicationEventMulticaster.java:139) ~[spring-context-5.2.9.RELEASE.jar:5.2.9.RELEASE]
at org.springframework.context.support.AbstractApplicationContext.publishEvent(AbstractApplicationContext.java:404) ~[spring-context-5.2.9.RELEASE.jar:5.2.9.RELEASE]
at org.springframework.context.support.AbstractApplicationContext.publishEvent(AbstractApplicationContext.java:361) ~[spring-context-5.2.9.RELEASE.jar:5.2.9.RELEASE]
at org.springframework.context.support.AbstractApplicationContext.finishRefresh(AbstractApplicationContext.java:898) ~[spring-context-5.2.9.RELEASE.jar:5.2.9.RELEASE]
at org.springframework.context.support.AbstractApplicationContext.refresh(AbstractApplicationContext.java:554) ~[spring-context-5.2.9.RELEASE.jar:5.2.9.RELEASE]
at org.springframework.boot.web.servlet.context.ServletWebServerApplicationContext.refresh(ServletWebServerApplicationContext.java:143) ~[spring-boot-2.3.4.RELEASE.jar:2.3.4.RELEASE]
at org.springframework.boot.SpringApplication.refresh(SpringApplication.java:758) [spring-boot-2.3.4.RELEASE.jar:2.3.4.RELEASE]
at org.springframework.boot.SpringApplication.refresh(SpringApplication.java:750) [spring-boot-2.3.4.RELEASE.jar:2.3.4.RELEASE]
at org.springframework.boot.SpringApplication.refreshContext(SpringApplication.java:397) [spring-boot-2.3.4.RELEASE.jar:2.3.4.RELEASE]
at org.springframework.boot.SpringApplication.run(SpringApplication.java:315) [spring-boot-2.3.4.RELEASE.jar:2.3.4.RELEASE]
at org.springframework.boot.SpringApplication.run(SpringApplication.java:1237) [spring-boot-2.3.4.RELEASE.jar:2.3.4.RELEASE]
at org.springframework.boot.SpringApplication.run(SpringApplication.java:1226) [spring-boot-2.3.4.RELEASE.jar:2.3.4.RELEASE]
at com.tanhua.dubbo.DubboMongoApplication.main(DubboMongoApplication.java:16) [classes/:na]
Caused by: org.apache.dubbo.remoting.RemotingException: Failed to bind NettyServer on /192.168.89.238:20882, cause: Address already in use: bind
at org.apache.dubbo.remoting.transport.AbstractServer.<init>(AbstractServer.java:77) ~[dubbo-2.7.8.jar:2.7.8]
at org.apache.dubbo.remoting.transport.netty4.NettyServer.<init>(NettyServer.java:77) ~[dubbo-2.7.8.jar:2.7.8]
at org.apache.dubbo.remoting.transport.netty4.NettyTransporter.bind(NettyTransporter.java:35) ~[dubbo-2.7.8.jar:2.7.8]
at org.apache.dubbo.remoting.Transporter$Adaptive.bind(Transporter$Adaptive.java) ~[dubbo-2.7.8.jar:2.7.8]
at org.apache.dubbo.remoting.Transporters.bind(Transporters.java:56) ~[dubbo-2.7.8.jar:2.7.8]
at org.apache.dubbo.remoting.exchange.support.header.HeaderExchanger.bind(HeaderExchanger.java:44) ~[dubbo-2.7.8.jar:2.7.8]
at org.apache.dubbo.remoting.exchange.Exchangers.bind(Exchangers.java:70) ~[dubbo-2.7.8.jar:2.7.8]
at org.apache.dubbo.rpc.protocol.dubbo.DubboProtocol.createServer(DubboProtocol.java:346) ~[dubbo-2.7.8.jar:2.7.8]
... 40 common frames omitted
Caused by: java.net.BindException: Address already in use: bind
at sun.nio.ch.Net.bind0(Native Method) ~[na:1.8.0_202]
at sun.nio.ch.Net.bind(Net.java:433) ~[na:1.8.0_202]
at sun.nio.ch.Net.bind(Net.java:425) ~[na:1.8.0_202]
at sun.nio.ch.ServerSocketChannelImpl.bind(ServerSocketChannelImpl.java:223) ~[na:1.8.0_202]
at io.netty.channel.socket.nio.NioServerSocketChannel.doBind(NioServerSocketChannel.java:134) ~[netty-all-4.1.59.Final.jar:4.1.59.Final]
at io.netty.channel.AbstractChannel$AbstractUnsafe.bind(AbstractChannel.java:550) ~[netty-all-4.1.59.Final.jar:4.1.59.Final]
at io.netty.channel.DefaultChannelPipeline$HeadContext.bind(DefaultChannelPipeline.java:1334) ~[netty-all-4.1.59.Final.jar:4.1.59.Final]
at io.netty.channel.AbstractChannelHandlerContext.invokeBind(AbstractChannelHandlerContext.java:506) ~[netty-all-4.1.59.Final.jar:4.1.59.Final]
at io.netty.channel.AbstractChannelHandlerContext.bind(AbstractChannelHandlerContext.java:491) ~[netty-all-4.1.59.Final.jar:4.1.59.Final]
at io.netty.channel.DefaultChannelPipeline.bind(DefaultChannelPipeline.java:973) ~[netty-all-4.1.59.Final.jar:4.1.59.Final]
at io.netty.channel.AbstractChannel.bind(AbstractChannel.java:248) ~[netty-all-4.1.59.Final.jar:4.1.59.Final]
at io.netty.bootstrap.AbstractBootstrap$2.run(AbstractBootstrap.java:356) ~[netty-all-4.1.59.Final.jar:4.1.59.Final]
at io.netty.util.concurrent.AbstractEventExecutor.safeExecute(AbstractEventExecutor.java:164) ~[netty-all-4.1.59.Final.jar:4.1.59.Final]
at io.netty.util.concurrent.SingleThreadEventExecutor.runAllTasks(SingleThreadEventExecutor.java:472) ~[netty-all-4.1.59.Final.jar:4.1.59.Final]
at io.netty.channel.nio.NioEventLoop.run(NioEventLoop.java:500) ~[netty-all-4.1.59.Final.jar:4.1.59.Final]
at io.netty.util.concurrent.SingleThreadEventExecutor$4.run(SingleThreadEventExecutor.java:989) ~[netty-all-4.1.59.Final.jar:4.1.59.Final]
at io.netty.util.internal.ThreadExecutorMap$2.run(ThreadExecutorMap.java:74) ~[netty-all-4.1.59.Final.jar:4.1.59.Final]
at io.netty.util.concurrent.FastThreadLocalRunnable.run(FastThreadLocalRunnable.java:30) ~[netty-all-4.1.59.Final.jar:4.1.59.Final]
at java.lang.Thread.run(Thread.java:748) ~[na:1.8.0_202]错误原因:192.168.89.238:20882端口号莫名被占用
解决方案一:更改服务配置,将dubbo服务端口改成其他的,如20883
uri: mongodb://192.168.136.160:27017/tanhua
dubbo:
  protocol:
    name: dubbo
    port: 20883
  registry:
    address: spring-cloud://localhost
  scan:
    base-packages: com.tanhua.dubbo.api  #dubbo中包扫描
解决方案二:杀死当前192.168.89.238:20882端口进程
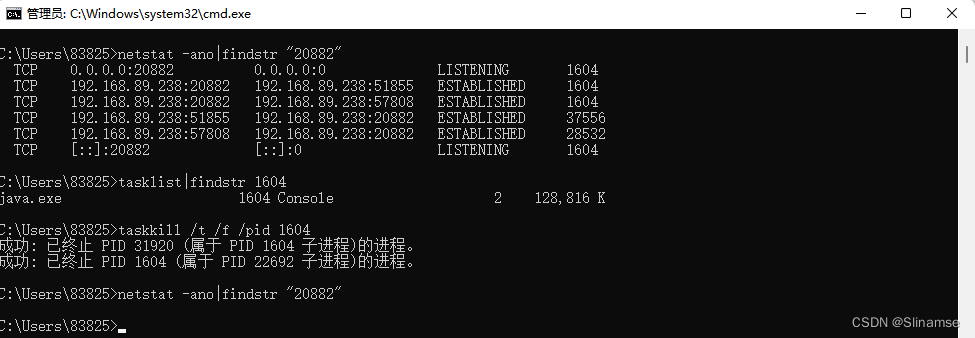
启动成功

mybatis-plus直接查询分页数据
@Override
    public IPage<UserInfo> findAll(Integer page, Integer pageSize) {
        //1.构建分页参数
        Page pages = new Page(page,pageSize);
        //2.查询数据
        IPage iPage = userInfoMapper.selectPage(pages,null);

        return iPage;
    }
mongodb追加查询条件
@Override
    public List<Movement> findMovements(Integer page, Integer pagesize, Long uid, Long state) {
        //1.构造查询条件
        Query query = new Query();
        Criteria criteria = new Criteria();
        if(uid != null){
            query.addCriteria(Criteria.where("userId").is(uid));
        }
        if(state != null){
            query.addCriteria(Criteria.where("state").is(state));
        }
        query = query.skip((page-1)*pagesize)
                .limit(pagesize)
                .with(Sort.by(Sort.Order.desc("created")));
        //2.根据条件查询动态数据
        List<Movement> movementList = mongoTemplate.find(query,Movement.class);
        return movementList;
    }
冻结解冻用户需要添加UserInfo字段userStatus,但是修改后就与数据库不映射了,所以需要设置不映射此属性
public class UserInfo extends BasePojo implements Serializable {
    /**
     * 由于userinfo表和user表之间是一对一关系
     * userInfo的id来源于user表的id
     */
    @TableId(type = IdType.INPUT)
    private Long id; //用户id
    private String nickname; //昵称
    private String avatar; //用户头像
    private String birthday; //生日
    private String gender; //性别
    private Integer age; //年龄
    private String city; //城市
    private String income; //收入
    private String education; //学历
    private String profession; //行业
    private Integer marriage; //婚姻状态
    private String tags; //用户标签:多个用逗号分隔
    private String coverPic; // 封面图片
    //不映射此属性
    @TableField(exist = false)
    private String userStatus = "1";
}
在redis中设置数据保存时间
redisTemplate.opsForValue().set(key,value,days,TimeUnit.MINUTES);将String数据类型转换为Integer数据类型
Integer freezingTime = Integer.valueOf(params.get("freezingTime").toString());将JSON字符串转换为Map集合
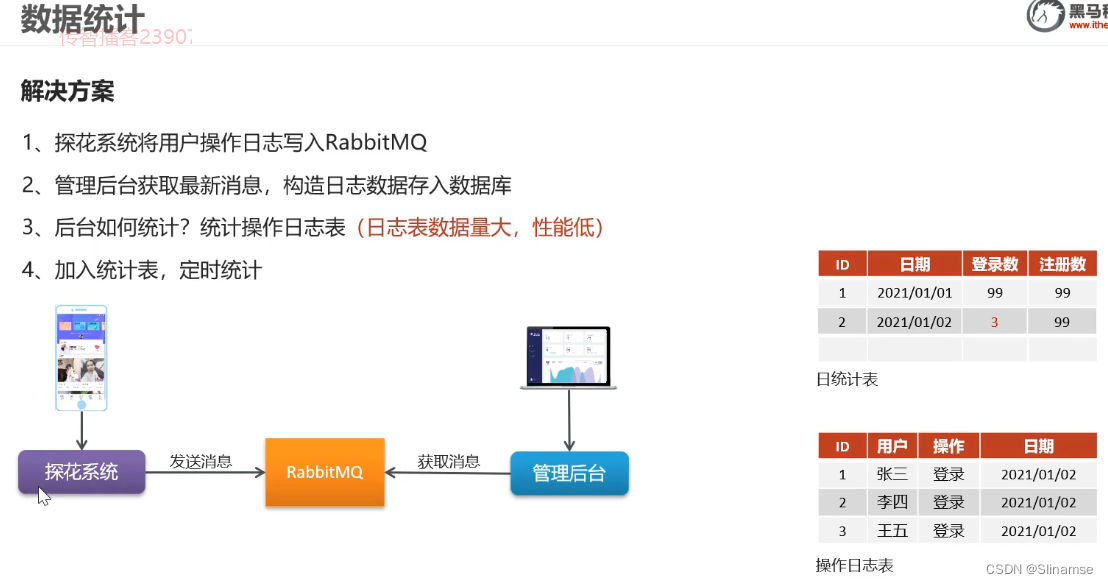
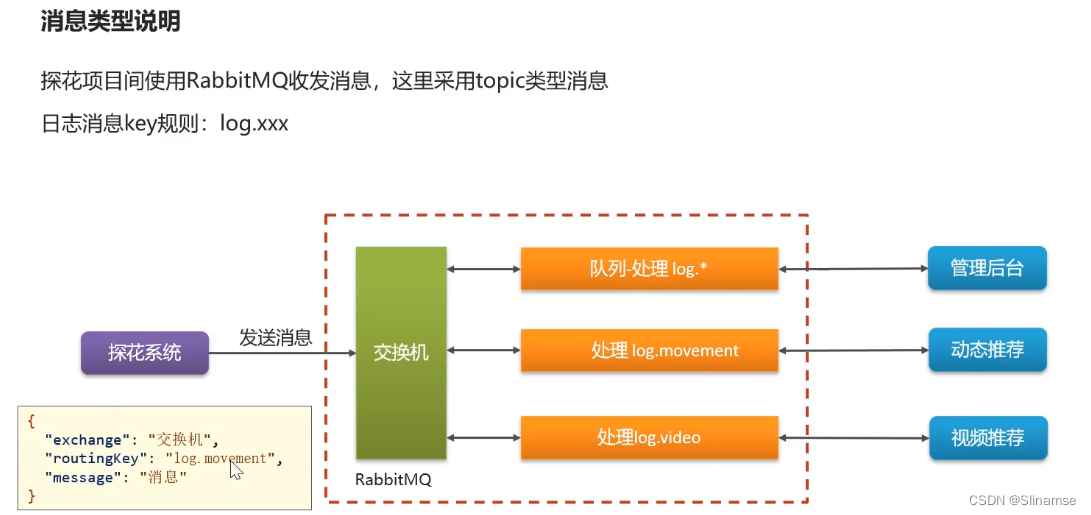
Map map = JSON.parseObject(value,Map.class);RabbitMQ
RabbitMQ能将用户日志数据业务与系统进行解耦,用户日志数据业务也可能会异常从而影响系统
pom.xml
<!--RabbitMQ-->
<dependency>
<groupId>org.springframework.boot</groupId>
<artifactId>spring-boot-starter-amqp</artifactId>
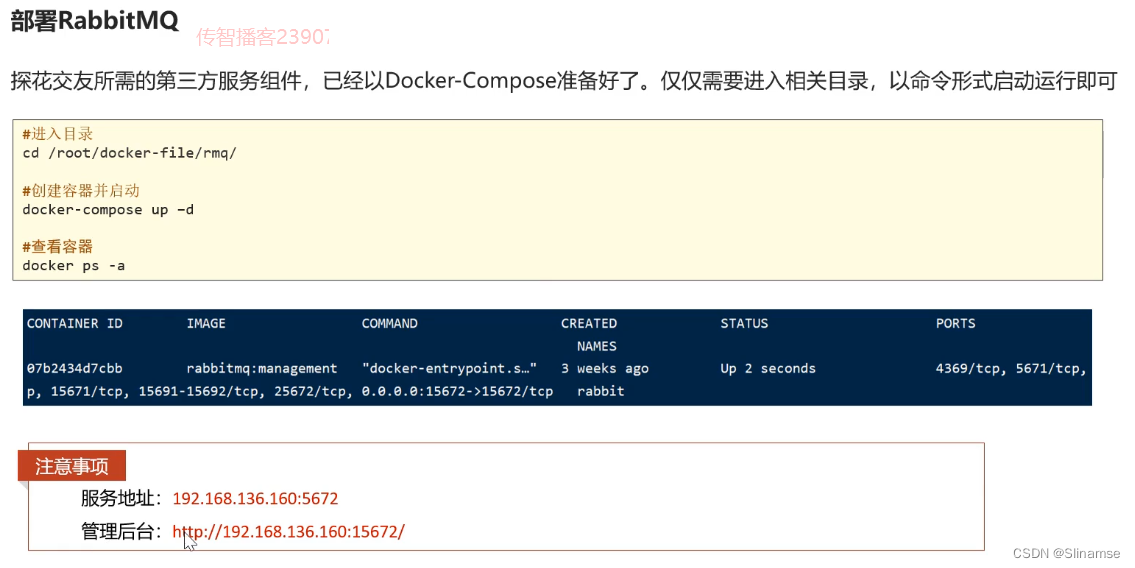
</dependency>application.yml
spring:
application:
name: tanhua-app-server
rabbitmq:
host: 192.168.136.160
port: 5672
username: guest
password: guest
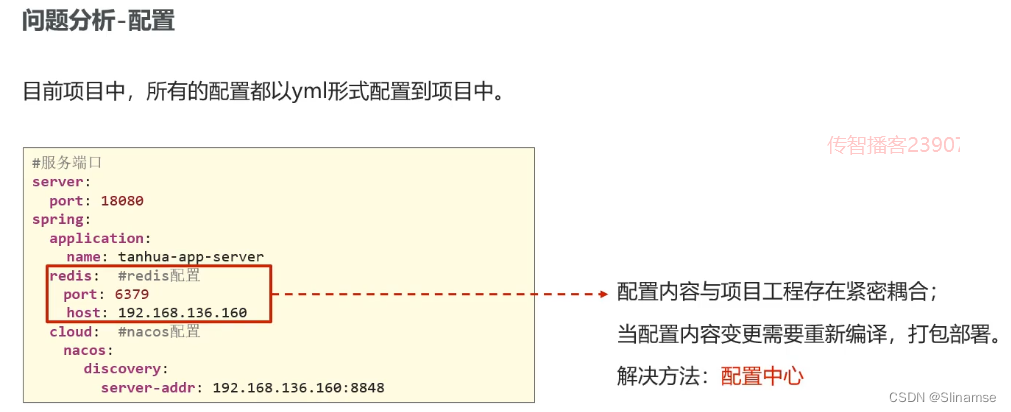
redis: #redis配置
port: 6379
host: 192.168.136.160
cloud: #nacos配置
nacos:
discovery:
server-addr: 192.168.136.160:8848
servlet:
multipart:
max-file-size: 500MB
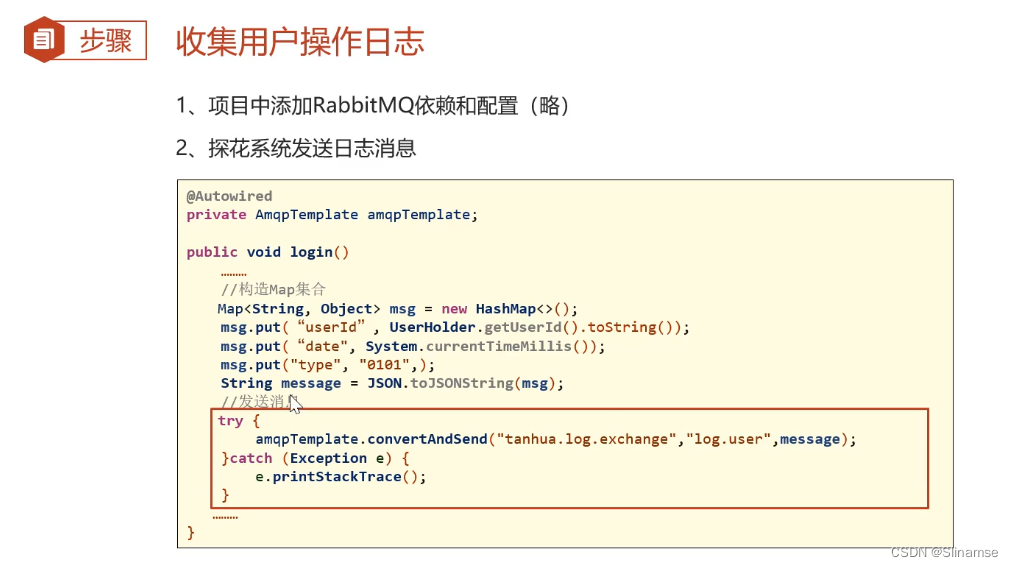
max-request-size: 500MB 在tanhua-app-server模块中配置发送消息的工具类
@Service
public class MqMessageService {

    @Autowired
    private AmqpTemplate amqpTemplate;

    //发送日志消息
    public void sendLogMessage(Long userId,String type,String key,String busId) {
        try {
            Map map = new HashMap();
            map.put("userId",userId.toString());
            map.put("type",type);
            map.put("logTime",new SimpleDateFormat("yyyy-MM-dd").format(new Date()));
            map.put("busId",busId);
            String message = JSON.toJSONString(map);
            amqpTemplate.convertAndSend("tanhua.log.exchange", "log."+key,message);
        } catch (AmqpException e) {
            e.printStackTrace();
        }
    }

    //发送动态审核消息
    public void sendAudiMessage(String movementId) {
        try {
            amqpTemplate.convertAndSend("tanhua.audit.exchange",  "audit.movement",movementId);
        } catch (AmqpException e) {
            e.printStackTrace();
        }
    }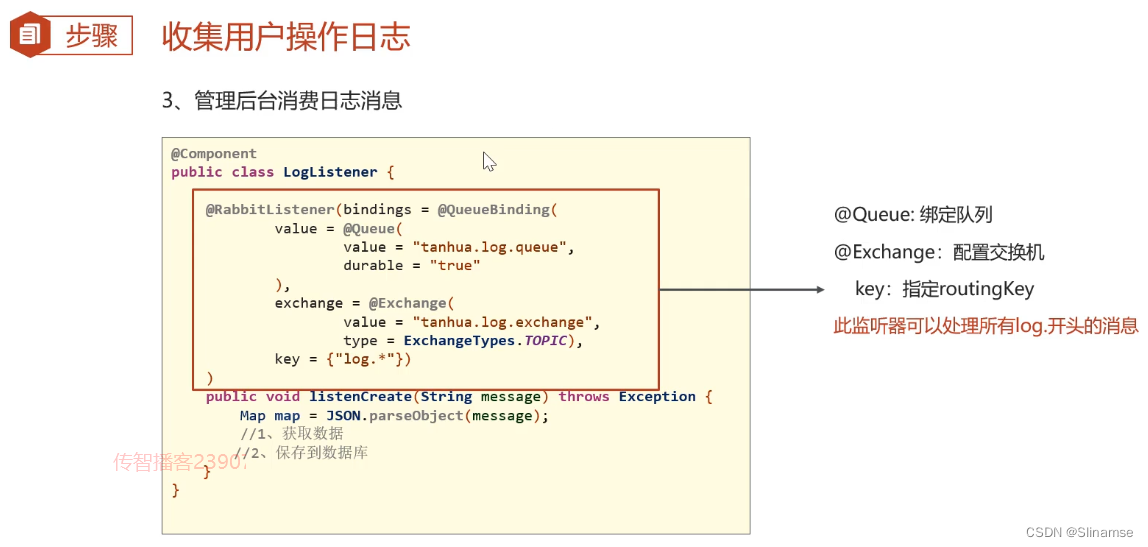
} 在tanhua-admin模块中配置监听器
@Autowired
    private LogMapper logMapper;

    @RabbitListener(bindings = @QueueBinding(
            value = @Queue(
                    value = "tanhua.log.queue",
                    durable = "true"
            ),
            exchange = @Exchange(
                    value = "tanhua.log.exchange",
                    type = ExchangeTypes.TOPIC),
            key = {"log.*"})
    )
    public void log(String message){
        Map map = JSON.parseObject(message);
        map.forEach((k,v)-> System.out.println(k+"-"+v));
        //1.获取数据
        Log log = new Log();
        log.setUserId((Long) map.get("userId"));
        log.setLogTime((String) map.get("logTime"));
        log.setType((String) map.get("type"));
        //2.保存到数据库
        logMapper.insert(log);
    }

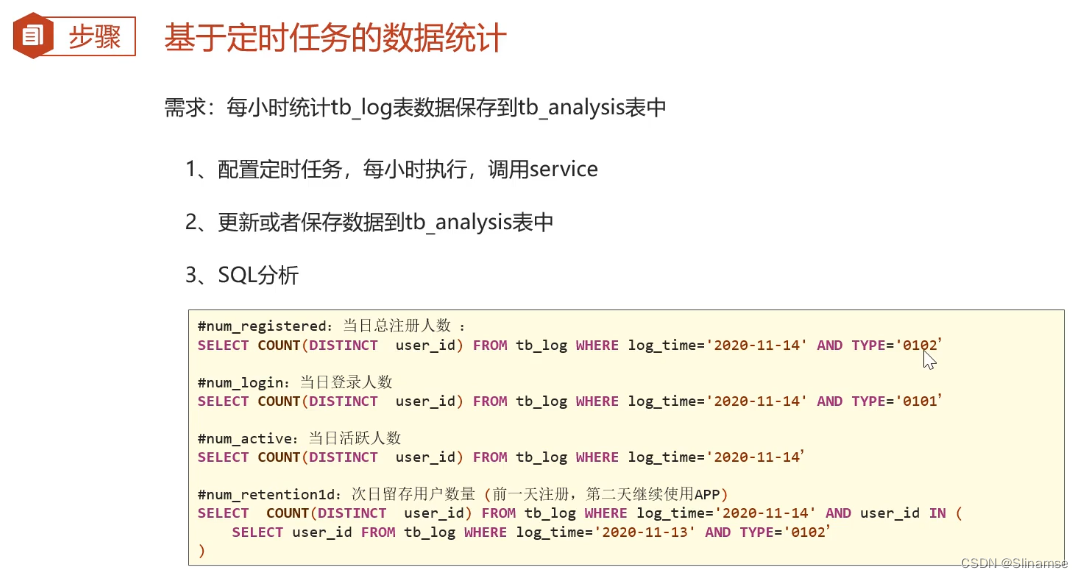
遇到问题,tb_analysis插入不了数据,也不报错
//如果不存在则保存
analysis = new Analysis();
analysis.setRecordDate(new SimpleDateFormat("yyyy-MM-dd").parse(todayStr));
analysis.setNumRegistered(registerCount);
analysis.setNumLogin(loginCount);
analysis.setNumActive(activeCount);
analysis.setNumRetention1d(retention1DayCount);
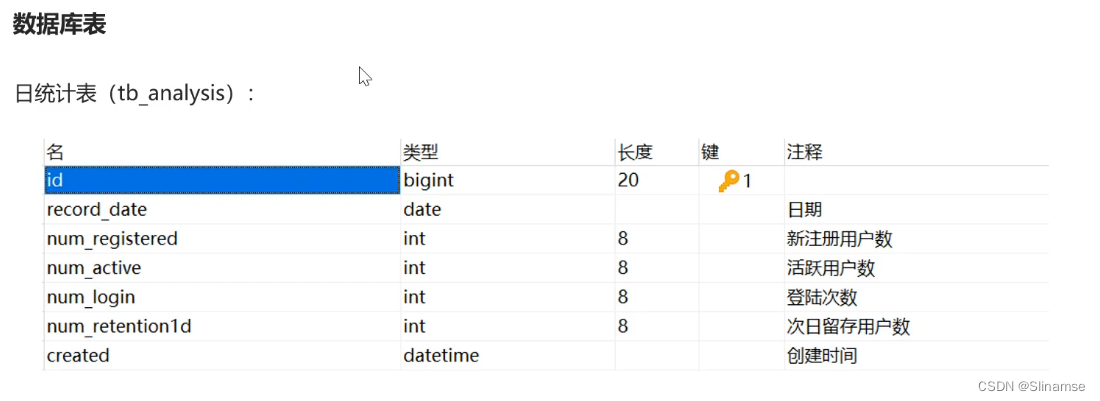
analysisMapper.insert(analysis);@Data
@NoArgsConstructor
@AllArgsConstructor
@Builder
public class Analysis extends BasePojo {
private Long id;
/**
* 日期
*/
private Date recordDate;
/**
* 新注册用户数
*/
private Integer numRegistered = 0;
/**
* 活跃用户数
*/
private Integer numActive = 0;
/**
* 登陆次数
*/
private Integer numLogin = 0;
/**
* 次日留存用户数
*/
private Integer numRetention1d = 0;
private Date created;
private Date updated;
}原因:数据库tb_analysis表设计有问题,没有向created字段,updated字段注入值,但表中的设计要求不能为null

解决
1.往created字段,updated字段注入值
2.改变表的设计,created字段,updated字段可以为null

内容审核
内容安全是识别服务,支持对图片、视频、文本、语音等对象进行多样化场景检测,有效降低内容违规风险。
目前很多平台都支持内容检测,如阿里云、腾讯云、百度AI、网易云等国内大型互联网公司都对外提供了API。
按照性能和收费来看,探花交友项目使用的就是阿里云的内容安全接口,使用到了图片和文本的审核。
阿里云内容审核
准备工作
1,前往阿里云官网注册账号
2,打开云盾内容安全产品试用页面,单击立即开通,正式开通服务
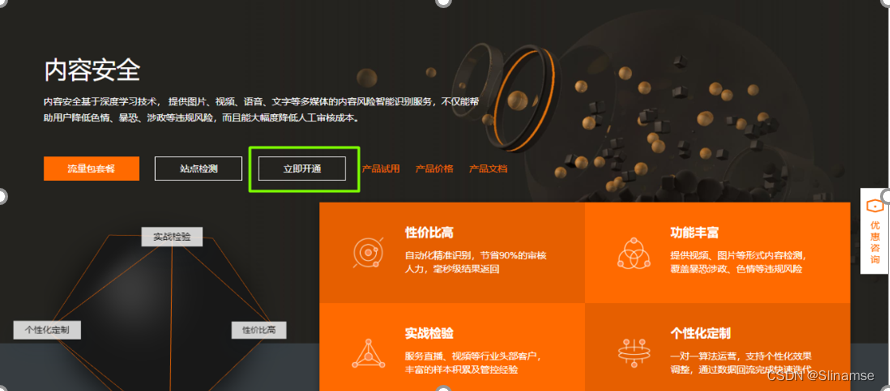
3,在AccessKey管理页面管理您的AccessKeyID和AccessKeySecret
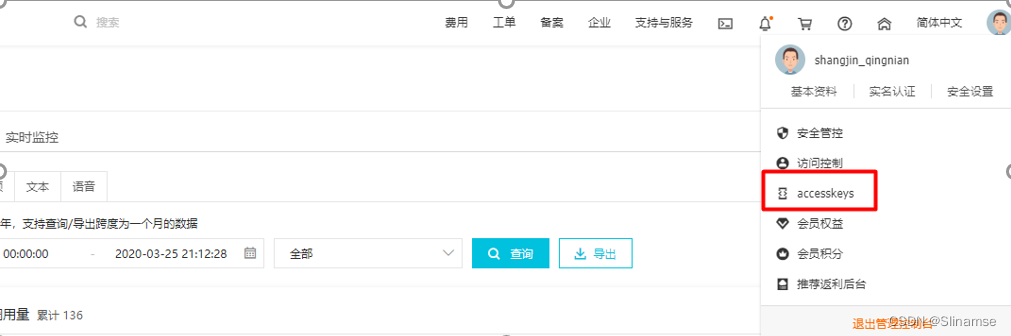
文本内容垃圾检测
文本垃圾内容检测:点击访问
文本垃圾内容Java SDK: 点击访问
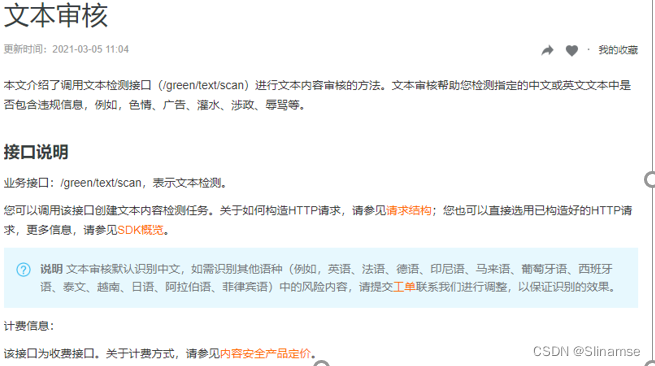
图片审核
图片垃圾内容Java SDK: 如何使用JavaSDK接口检测图片是否包含风险内容_内容安全-阿里云帮助中心
抽取工具
GreenProperties
@Data
@ConfigurationProperties("tanhua.green")
public class GreenProperties {
/**
* 账号
*/
String accessKeyID;
/**
* 密钥
*/
String accessKeySecret;
/**
* 场景
*/
String scenes;
}AliyunGreenTemplate
@Slf4j
public class AliyunGreenTemplate {
private IAcsClient client;
private GreenProperties greenProperties;
public AliyunGreenTemplate(GreenProperties greenProperties) {
this.greenProperties = greenProperties;
try {
IClientProfile profile = DefaultProfile
.getProfile("cn-shanghai", greenProperties.getAccessKeyID(), greenProperties.getAccessKeySecret());
DefaultProfile
.addEndpoint("cn-shanghai", "cn-shanghai", "Green", "green.cn-shanghai.aliyuncs.com");
client = new DefaultAcsClient(profile);
} catch (Exception e) {
e.printStackTrace();
log.error("Green配置缺失,请补充!");
}
}
/**
* 阿里云文本内容检查
*
* @param content
* @return map key - suggestion内容
* pass:文本正常,可以直接放行,
* review:文本需要进一步人工审核,
* block:文本违规,可以直接删除或者限制公开
* value - 通过,或 出错原因
* @throws Exception
*/
public Map<String, String> greenTextScan(String content) throws Exception {
TextScanRequest textScanRequest = new TextScanRequest();
textScanRequest.setAcceptFormat(FormatType.JSON); // 指定api返回格式
textScanRequest.setHttpContentType(FormatType.JSON);
textScanRequest.setMethod(MethodType.POST); // 指定请求方法
textScanRequest.setEncoding("UTF-8");
textScanRequest.setRegionId("cn-shanghai");
List<Map<String, Object>> tasks = new ArrayList<>();
Map<String, Object> task1 = new LinkedHashMap<>();
task1.put("dataId", UUID.randomUUID().toString());
/**
* 待检测的文本,长度不超过10000个字符
*/
task1.put("content", content);
tasks.add(task1);
JSONObject data = new JSONObject();
/**
* 检测场景,文本垃圾检测传递:antispam
**/
data.put("scenes", Arrays.asList("antispam"));
data.put("tasks", tasks);
log.info("检测任务内容:{}", JSON.toJSONString(data, true));
textScanRequest.setHttpContent(data.toJSONString().getBytes("UTF-8"), "UTF-8", FormatType.JSON);
// 请务必设置超时时间
textScanRequest.setConnectTimeout(3000);
textScanRequest.setReadTimeout(6000);
// 返回结果内容
Map<String, String> resultMap = new HashMap<>();
try {
HttpResponse httpResponse = client.doAction(textScanRequest);
if (!httpResponse.isSuccess()) {
new RuntimeException("阿里云文本内容检查出现异常!");
}
JSONObject scrResponse = JSON.parseObject(new String(httpResponse.getHttpContent(), "UTF-8"));
log.info("检测结果内容:{}", JSON.toJSONString(scrResponse, true));
if (200 != scrResponse.getInteger("code")) {
new RuntimeException("阿里云文本内容检查出现异常!");
}
JSONArray taskResults = scrResponse.getJSONArray("data");
for (Object taskResult : taskResults) {
if (200 != ((JSONObject) taskResult).getInteger("code")) {
new RuntimeException("阿里云文本内容检查出现异常!");
}
JSONArray sceneResults = ((JSONObject) taskResult).getJSONArray("results");
for (Object sceneResult : sceneResults) {
String scene = ((JSONObject) sceneResult).getString("scene");
String label = ((JSONObject) sceneResult).getString("label");
String suggestion = ((JSONObject) sceneResult).getString("suggestion");
log.info("最终内容检测结果,suggestion = {},label={}", suggestion, label);
// 设置默认错误返回内容
resultMap.put("suggestion", suggestion);
if (suggestion.equals("review")) {
resultMap.put("reson", "文章内容中有不确定词汇");
log.info("返回结果,resultMap={}", resultMap);
return resultMap;
} else if (suggestion.equals("block")) {
String reson = "文章内容中有敏感词汇";
if (label.equals("spam")) {
reson = "文章内容中含垃圾信息";
} else if (label.equals("ad")) {
reson = "文章内容中含有广告";
} else if (label.equals("politics")) {
reson = "文章内容中含有涉政";
} else if (label.equals("terrorism")) {
reson = "文章内容中含有暴恐";
} else if (label.equals("abuse")) {
reson = "文章内容中含有辱骂";
} else if (label.equals("porn")) {
reson = "文章内容中含有色情";
} else if (label.equals("flood")) {
reson = "文章内容灌水";
} else if (label.equals("contraband")) {
reson = "文章内容违禁";
} else if (label.equals("meaningless")) {
reson = "文章内容无意义";
}
resultMap.put("reson", reson);
log.info("返回结果,resultMap={}", resultMap);
return resultMap;
}
}
}
resultMap.put("suggestion", "pass");
resultMap.put("reson", "检测通过");
} catch (Exception e) {
log.error("阿里云文本内容检查出错!");
e.printStackTrace();
new RuntimeException("阿里云文本内容检查出错!");
}
log.info("返回结果,resultMap={}", resultMap);
return resultMap;
}
/**
* 阿里云图片内容安全
*/
public Map imageScan(List<String> imageList) throws Exception {
IClientProfile profile = DefaultProfile
.getProfile("cn-shanghai", greenProperties.getAccessKeyID(), greenProperties.getAccessKeySecret());
ImageSyncScanRequest imageSyncScanRequest = new ImageSyncScanRequest();
// 指定api返回格式
imageSyncScanRequest.setAcceptFormat(FormatType.JSON);
// 指定请求方法
imageSyncScanRequest.setMethod(MethodType.POST);
imageSyncScanRequest.setEncoding("utf-8");
//支持http和https
imageSyncScanRequest.setProtocol(ProtocolType.HTTP);
JSONObject httpBody = new JSONObject();
/**
* 设置要检测的场景, 计费是按照该处传递的场景进行
* 一次请求中可以同时检测多张图片,每张图片可以同时检测多个风险场景,计费按照场景计算
* 例如:检测2张图片,场景传递porn、terrorism,计费会按照2张图片鉴黄,2张图片暴恐检测计算
* porn: porn表示色情场景检测
*/
httpBody.put("scenes", Arrays.asList(greenProperties.getScenes().split(",")));
/**
* 如果您要检测的文件存于本地服务器上,可以通过下述代码片生成url
* 再将返回的url作为图片地址传递到服务端进行检测
*/
/**
* 设置待检测图片, 一张图片一个task
* 多张图片同时检测时,处理的时间由最后一个处理完的图片决定
* 通常情况下批量检测的平均rt比单张检测的要长, 一次批量提交的图片数越多,rt被拉长的概率越高
* 这里以单张图片检测作为示例, 如果是批量图片检测,请自行构建多个task
*/
List list = new ArrayList();
for (String imageUrl : imageList) {
JSONObject task = new JSONObject();
task.put("dataId", UUID.randomUUID().toString());
// 设置图片链接。
task.put("url", imageUrl);
task.put("time", new Date());
list.add(task);
}
httpBody.put("tasks",list);
imageSyncScanRequest.setHttpContent(org.apache.commons.codec.binary.StringUtils.getBytesUtf8(httpBody.toJSONString()),
"UTF-8", FormatType.JSON);
/**
* 请设置超时时间, 服务端全链路处理超时时间为10秒,请做相应设置
* 如果您设置的ReadTimeout小于服务端处理的时间,程序中会获得一个read timeout异常
*/
imageSyncScanRequest.setConnectTimeout(3000);
imageSyncScanRequest.setReadTimeout(10000);
HttpResponse httpResponse = null;
try {
httpResponse = client.doAction(imageSyncScanRequest);
} catch (Exception e) {
e.printStackTrace();
}
Map<String, String> resultMap = new HashMap<>();
//服务端接收到请求,并完成处理返回的结果
if (httpResponse != null && httpResponse.isSuccess()) {
JSONObject scrResponse = JSON.parseObject(org.apache.commons.codec.binary.StringUtils.newStringUtf8(httpResponse.getHttpContent()));
System.out.println(JSON.toJSONString(scrResponse, true));
int requestCode = scrResponse.getIntValue("code");
//每一张图片的检测结果
JSONArray taskResults = scrResponse.getJSONArray("data");
if (200 == requestCode) {
for (Object taskResult : taskResults) {
//单张图片的处理结果
int taskCode = ((JSONObject) taskResult).getIntValue("code");
//图片要检测的场景的处理结果, 如果是多个场景,则会有每个场景的结果
JSONArray sceneResults = ((JSONObject) taskResult).getJSONArray("results");
if (200 == taskCode) {
for (Object sceneResult : sceneResults) {
String scene = ((JSONObject) sceneResult).getString("scene");
String label = ((JSONObject) sceneResult).getString("label");
String suggestion = ((JSONObject) sceneResult).getString("suggestion");
//根据scene和suggetion做相关处理
//do something
System.out.println("scene = [" + scene + "]");
System.out.println("suggestion = [" + suggestion + "]");
System.out.println("suggestion = [" + label + "]");
if (!suggestion.equals("pass")) {
resultMap.put("suggestion", suggestion);
resultMap.put("label", label);
return resultMap;
}
}
} else {
//单张图片处理失败, 原因视具体的情况详细分析
log.error("task process fail. task response:" + JSON.toJSONString(taskResult));
return null;
}
}
resultMap.put("suggestion", "pass");
return resultMap;
} else {
/**
* 表明请求整体处理失败,原因视具体的情况详细分析
*/
log.error("the whole image scan request failed. response:" + JSON.toJSONString(scrResponse));
return null;
}
}
return null;
}
}TanhuaAutoConfiguration
@Bean
//通过@ConditionalOnProperty控制配置类是否生效,可以将配置与代码进行分离,实现了更好的控制配置.
@ConditionalOnProperty(prefix = "tanhua.green",value = "enable", havingValue = "true")
public AliyunGreenTemplate aliyunGreenTemplate(GreenProperties properties) {
    return new AliyunGreenTemplate(properties);
}
配置文件
tanhua:
  green:
    enable: true
    accessKeyID: LTAI5t6zUveJvtgW7GY12ifQ
    accessKeySecret: Zo7FBZBy1MMGOXnZmGuXDK3OdYZ3ZP
    scenes: porn,terrorism #色情,暴力
测试
@RunWith(SpringRunner.class)
@SpringBootTest
public class GreenTemplateTest {

    @Autowired
    private AliyunGreenTemplate template;

    @Test
    public void test()throws Exception{
        //Map<String,String> map = template.greenTextScan("今天是个好日子");
        //map.forEach((k,v)-> System.out.println(k+"--"+v));//suggestion--pass reson--检测通过
        //Map<String,String> map = template.greenTextScan("本校小额贷款,安全、快捷、方便、无抵押,随机随贷,当天放款,上门服务");
        //map.forEach((k,v)-> System.out.println(k+"--"+v));//suggestion--block reson--文章内容违禁
        List<String> list = new ArrayList<>();
        list.add("'http://images.china.cn/site1000/2018-03/17/dfd4002e-f965-4e7c-9e04-6b72c601d952.jpg");//政治人物
        Map<String, String> map = template.imageScan(list);
        System.out.println("------------");
        map.forEach((k, v) -> System.out.println(k + "--" + v));//suggestion--block label--politics
    }
}
根据日期查询数据
public Analysis querySummary(Date now) {
        //根据当前时间查询Analysis数据
        LambdaQueryWrapper<Analysis> qw = Wrappers.<Analysis>lambdaQuery();
        qw.eq(Analysis::getRecordDate,DateUtil.format(now,"yyyy-MM-dd"));
        return analysisMapper.selectOne(qw);
    }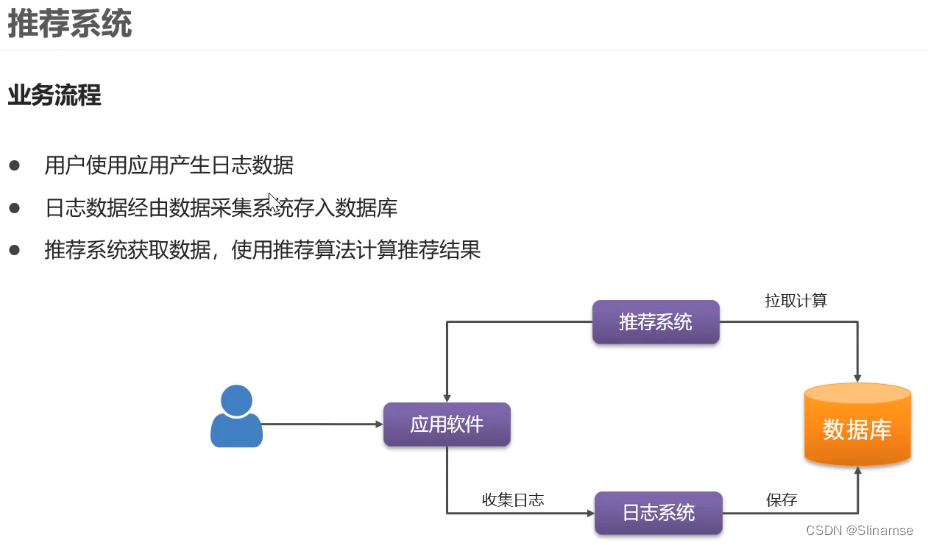

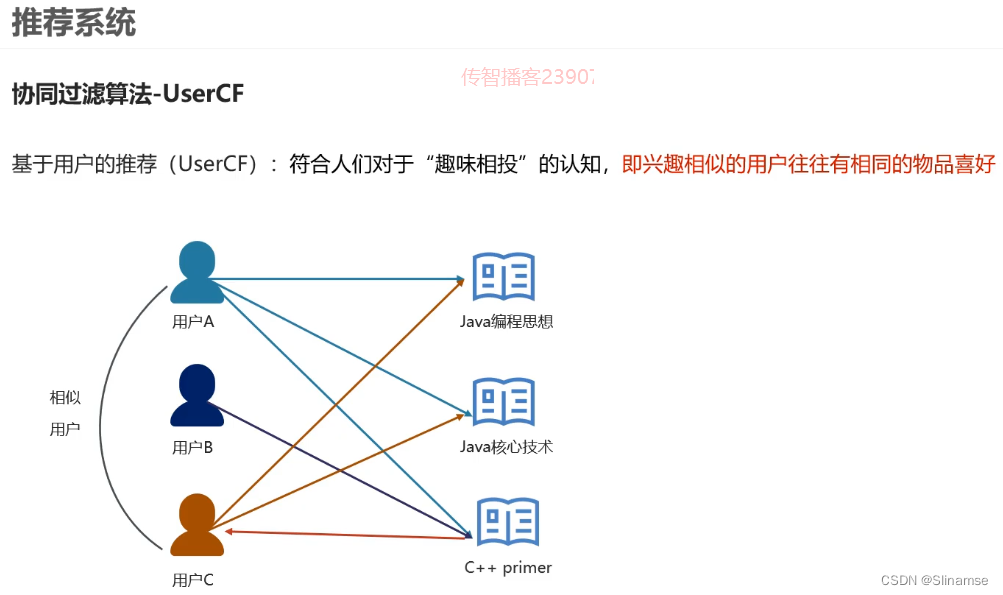
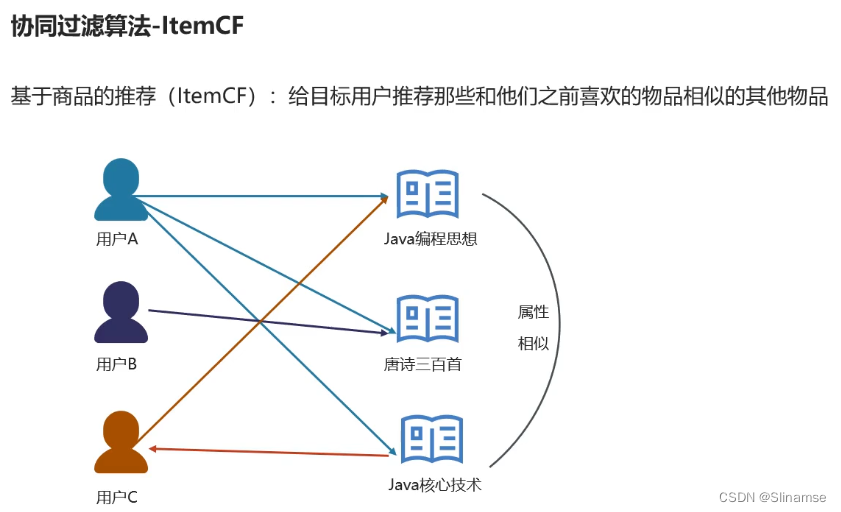
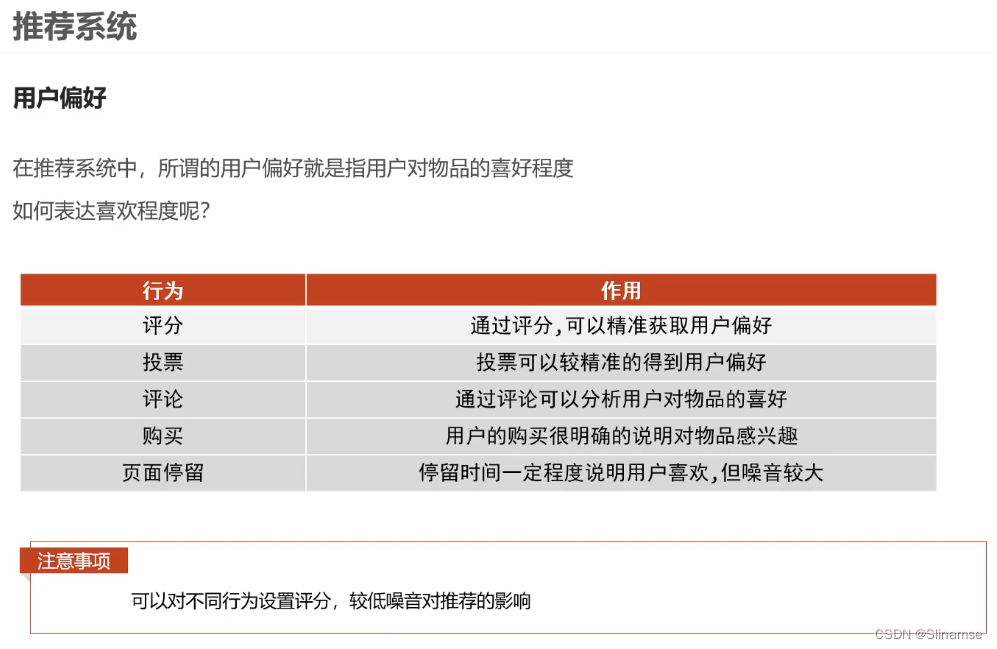
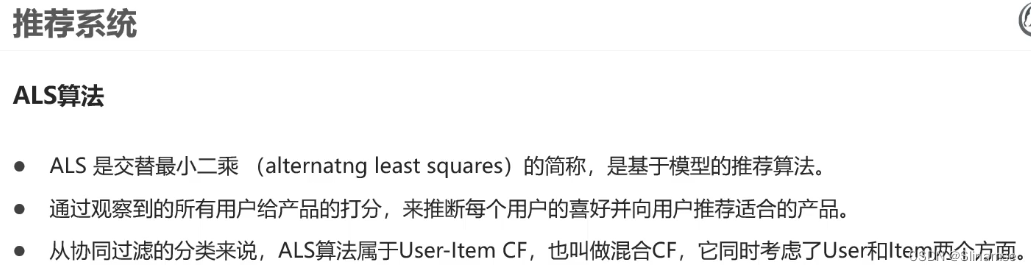
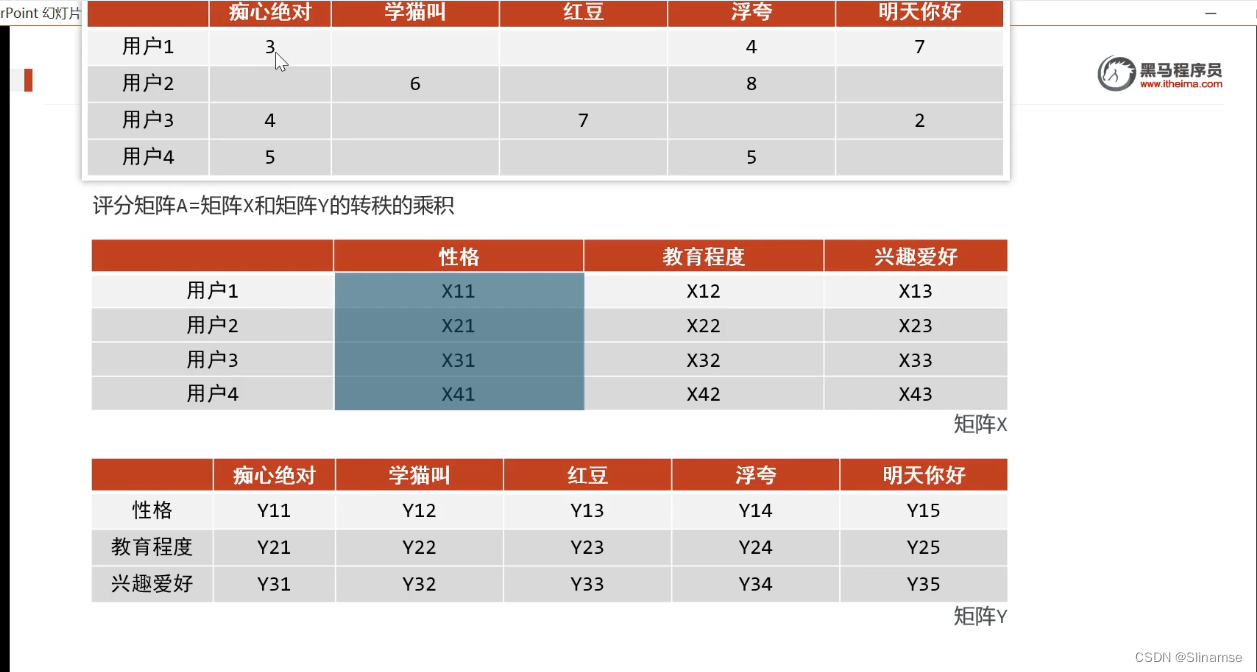

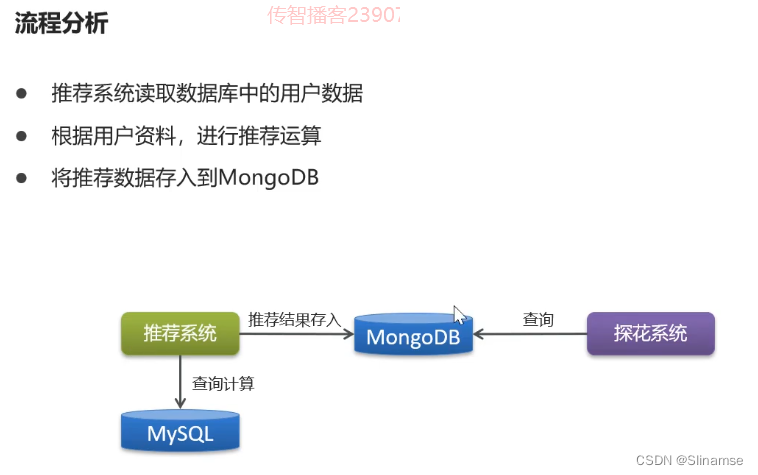
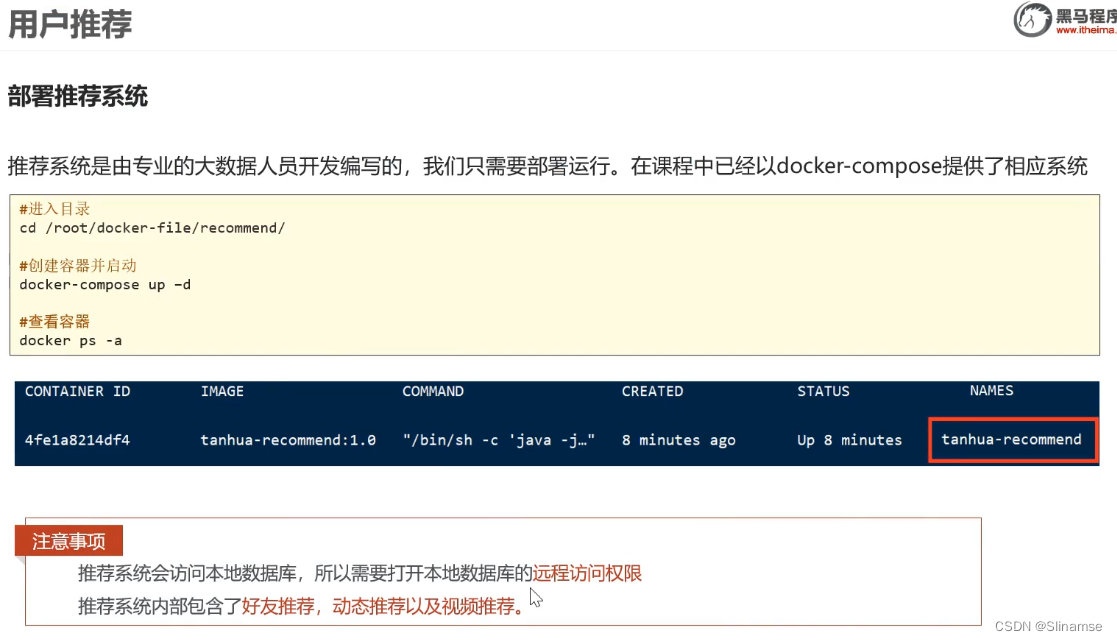
update user set host = '%' where user = 'root';
#或者
GRANT ALL PRIVILEGES ON *.* TO '登录id'@'%' IDENTIFIED BY '登录密码' WITH GRANT OPTION;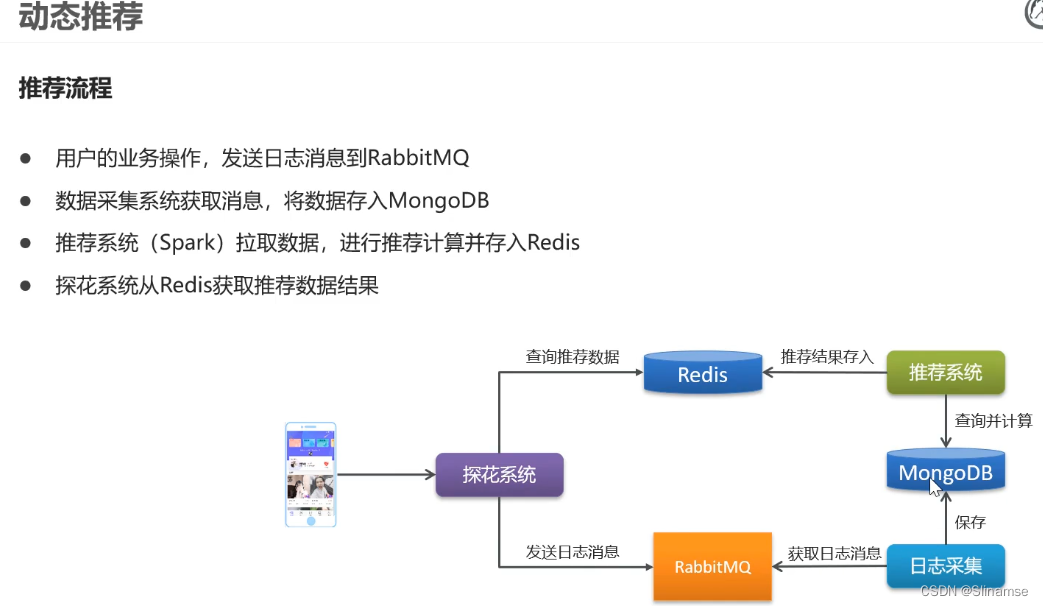
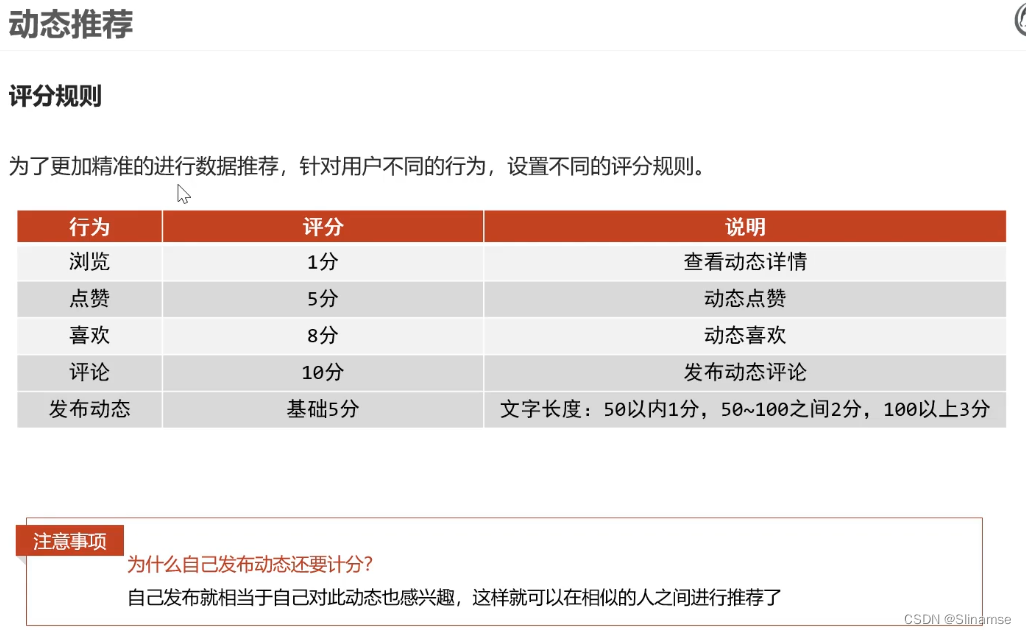
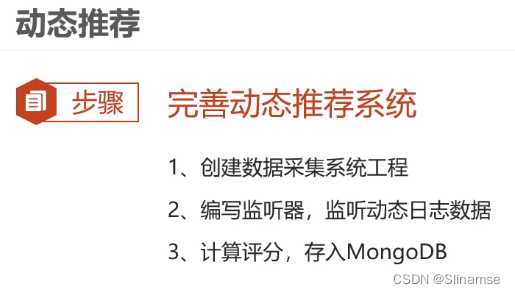
接收消息的工作需要新创建tanhua-recommend工程,在此工程中完成相关的操作。
创建tanhua-recommend工程
<dependencies>
    <dependency>
        <groupId>com.itheima</groupId>
        <artifactId>tanhua-model</artifactId>
        <version>1.0-SNAPSHOT</version>
    </dependency>
    <!--RabbitMQ-->
    <dependency>
        <groupId>org.springframework.boot</groupId>
        <artifactId>spring-boot-starter-amqp</artifactId>
    </dependency>
    <dependency>
        <groupId>cn.hutool</groupId>
        <artifactId>hutool-all</artifactId>
        <version>5.4.3</version>
    </dependency>
</dependencies>
配置文件
application.yml
spring:
  rabbitmq:
    host: 192.168.136.160
    port: 5672
    username: guest
    password: guest
  data:
    mongodb:
      uri: mongodb://192.168.136.160:27017/tanhua
RecommendMovementListener
@Component
public class RecommendMovementListener {

    /**
     * 获取动态的日志消息
     * 转化评分
     * 构造评分对象,存入MongoDB
     */
    @Autowired
    private MongoTemplate mongoTemplate;

    @RabbitListener(bindings = @QueueBinding(
            value = @Queue(
                    value = "tanhua.log.queue",
                    durable = "true"
            ),
            exchange = @Exchange(
                    value = "tanhua.log.exchange",
                    type = ExchangeTypes.TOPIC),
            key = {"log.movement"})
    )
    public void recommend(String message) throws Exception {
        //1.解析数据
        Map map = (Map) JSON.parse(message);
        Long userId = Long.valueOf(map.get("userId").toString());
        String type = (String) map.get("type");
        String date = (String) map.get("logTime");
        String movementId = (String) map.get("busId");
        //2.构造MovementScore,设置评分
        Movement movement = mongoTemplate.findById(movementId,Movement.class);
        if(movement != null){
            MovementScore ms = new MovementScore();
            ms.setUserId(userId);
            ms.setMovementId(movement.getPid());
            ms.setDate(System.currentTimeMillis());
            ms.setScore(getScore(type,movement));
            //3.保存到数据库
            mongoTemplate.save(ms);
        }
    }

    private static Double getScore(String type,Movement movement) {
        //0201为发动态  基础5分 50以内1分,50~100之间2分,100以上3分
        //0202为浏览动态, 1
        //0203为动态点赞, 5
        //0204为动态喜欢, 8
        //0205为评论,     10
        //0206为动态取消点赞, -5
        //0207为动态取消喜欢   -8
        Double score = 0d;
        switch (type) {
            case "0201":
                score = 5d;
                score += movement.getMedias().size();
                int length = StrUtil.length(movement.getTextContent());
                if (length >= 0 && length < 50) {
                    score += 1;
                } else if (length < 100) {
                    score += 2;
                } else {
                    score += 3;
                }
                break;
            case "0202":
                score = 1d;
                break;
            case "0203":
                score = 5d;
                break;
            case "0204":
                score = 8d;
                break;
            case "0205":
                score = 10d;
                break;
            case "0206":
                score = -5d;
                break;
            case "0207":
                score = -8d;
                break;
            default:
                break;
        }
        return score;
    }
}


 9616
9616


 被折叠的 条评论
为什么被折叠?
被折叠的 条评论
为什么被折叠?
 到【灌水乐园】发言


