


Spring
Spring jdbcTemplate
1.1JdbcTemplate概述
它是spring框架中提供的一个对象,是对原始繁琐的JdbcAPI对象的简单封装。spring框架为我们提供了很多的操作模板类。
1.2JdbcTemplate开发步骤
①导入spring-jdbc和spring-tx坐标
        <dependency>
            <groupId>org.springframework</groupId>
            <artifactId>spring-jdbc</artifactId>
            <version>5.2.6.RELEASE</version>
        </dependency>
        <dependency>
            <groupId>org.springframework</groupId>
            <artifactId>spring-tx</artifactId>
            <version>5.2.6.RELEASE</version>
        </dependency>
②创建数据库表和实体
此处省略,创建对象和创建一个表相信大家都会,我创建的是一个Account对象,里面有name和money俩个属性,数据类型分别是String类型和Double类型;数据库的表也是account表,表中字段是varchar属性的name,和double属性的money
③创建JdbcTemplate对象
    @Test
    //测试JdbcTemplate开发步骤
    public void test1() throws PropertyVetoException {
        //创建数据源对象
        ComboPooledDataSource dataSource=new ComboPooledDataSource();
        dataSource.setDriverClass("com.mysql.jdbc.Driver");
        dataSource.setJdbcUrl("jdbc:mysql://localhost:3306/test");
        dataSource.setUser("root");
        dataSource.setPassword("root");
        JdbcTemplate jdbcTemplate=new JdbcTemplate();
        //设置数据源对象  知道数据库在哪里
        jdbcTemplate.setDataSource(dataSource);
        //执行操作
        int tom = jdbcTemplate.update("insert into account values (?,?)", "Tom", 5000);
        System.out.println(tom);
    }
}
④执行数据库操作
        //执行操作
        int tom = jdbcTemplate.update("insert into account values (?,?)", "Tom", 5000);
        System.out.println(tom);
1.3spring容器产生模板对象代码实现
    <!--数据源对象-->
    <bean id="dataSource" class="com.mchange.v2.c3p0.ComboPooledDataSource">
        <property name="driverClass" value="com.mysql.jdbc.Driver"></property>
        <property name="jdbcUrl" value="jdbc:mysql://localhost:3306/test"></property>
        <property name="user" value="root"></property>
        <property name="password" value="root"></property>
    </bean>

    <!--jdbc模板对象-->
    <bean id="jdbcTemplate" class="org.springframework.jdbc.core.JdbcTemplate">
        <property name="dataSource" ref="dataSource"></property>
    </bean>
    @Test
    //测试Spring产生jdbcTemp;ate对象
    public void test2(){
        ApplicationContext app=new ClassPathXmlApplicationContext("application.xml");
        JdbcTemplate bean = app.getBean(JdbcTemplate.class);
        int count = bean.update("insert into account values (?,?)", "zhangsan", 5000);
        System.out.println(count);
    }
1.4抽取jdbc.properties文件
写一个jdbc.properties文件,在里面写上连接数据库的参数
<?xml version="1.0" encoding="UTF-8"?>
<beans xmlns="http://www.springframework.org/schema/beans"
       xmlns:xsi="http://www.w3.org/2001/XMLSchema-instance"
       xmlns:context="http://www.springframework.org/schema/context"//引入context命名空间代码
       xsi:schemaLocation="http://www.springframework.org/schema/beans http://www.springframework.org/schema/beans/spring-beans.xsd
        http://www.springframework.org/schema/context http://www.springframework.org/schema/context/spring-context.xsd">//引入context命名空间代码

    <!--加载properties-->
    <context:property-placeholder location="classpath:jdbc.properties"></context:property-placeholder>
    <!--数据源对象-->
    <bean id="dataSource" class="com.mchange.v2.c3p0.ComboPooledDataSource">
        <property name="driverClass" value="${driver}"></property>
        <property name="jdbcUrl" value="${url}"></property>
        <property name="user" value="${user}"></property>
        <property name="password" value="${password}"></property>
    </bean>

    <!--jdbc模板对象-->
    <bean id="jdbcTemplate" class="org.springframework.jdbc.core.JdbcTemplate">
        <property name="dataSource" ref="dataSource"></property>
    </bean>
</beans>
1.5对数据的更新操作
利用spring提供的内核进行测试
@RunWith(SpringJUnit4ClassRunner.class)//这里RunWith注解代表的是谁来跑这个测试类,这里是用spring提供的内核来跑
@ContextConfiguration("classpath:application.xml")//指定配置文件或配置类
public class TemplateTest {
    @Autowired//使用在字段上用于根据类型依赖注入
    private JdbcTemplate jdbcTemplate;
    @Test
    public void testUpdate(){
        jdbcTemplate.update("update account set money=? where name=?",10000,"tom");//更新数据库
    }
}
1.6对数据的删除操作
    @Test
    public void testDelete(){
        jdbcTemplate.update("delete from account where name=?","tom");
    }
1.7对数据库进行查询操作
①查询全部
    @Test
    public void testQuestAll(){
        List<Account> query = jdbcTemplate.query("select * from account", new BeanPropertyRowMapper<Account>(Account.class));
        System.out.println(query);
    }
②查询表中一个的全部信息
    @Test
    public void testQuestOne(){
        Account tom = jdbcTemplate.queryForObject("select * from account where name=?", new BeanPropertyRowMapper<Account>(Account.class), "lisi");
        System.out.println(tom);
    }
③查询表中的单个数据
    @Test
    public void testQuest(){
        Long count=jdbcTemplate.queryForObject("select count(*) from account",Long.class);
        System.out.println(count);
    }
总结:
更新操作:
jdbcTempate.update(sql,params)
查询操作:
jdbcTemplate.query(sql,Mapper,params)
jdbcTemplate.queryForObject(sql,Mapper,params)
SpringMVC拦截器
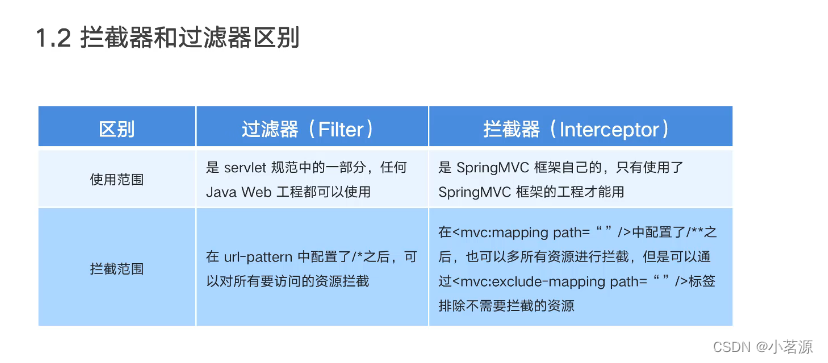
1.1拦截器(interceptor)的作用
SpringMVC的拦截器类似于Servlet开发中的过滤器Filter,用于对处理器进行预处理和后处理
将拦截器按一定顺序联结成一条链,这条链称为拦截器(interceptor Chain)。在访问被拦截的方法或字段时,拦截器链中的拦截器就会按其之前定义的顺序被调用。拦截器也是AOP思想的具体体现。
自定义拦截器很简单,只有如下三步:
重点,注意点:千万不要忘记在web.xml里面忘记配置 ,这个是springmvc的核心,不配置这个是找不到注解中的路径的,只能在web里面找路径。
  <!--SpringMVC的前端控制器-->
  <servlet>
    <servlet-name>DispatcherServlet</servlet-name>
    <servlet-class>org.springframework.web.servlet.DispatcherServlet</servlet-class>
    <init-param>
      <param-name>contextConfigLocation</param-name>
      <param-value>classpath:spring-mvc.xml</param-value>
    </init-param>
    <load-on-startup>2</load-on-startup>
  </servlet>
  <servlet-mapping>
    <servlet-name>DispatcherServlet</servlet-name>
    <url-pattern>/</url-pattern>
  </servlet-mapping>
目标方法:
@Controller
public class TargetController {

    @RequestMapping("/target")
    public ModelAndView show(){
        System.out.println("目标程序执行......");
        ModelAndView modelAndView=new ModelAndView();
        modelAndView.addObject("name","itcast");
        modelAndView.setViewName("shu");
        System.out.println("jajja");
        return modelAndView;
    }
}
① 创建拦截器类实现HandlerInterceptor
public class MyInterceptor implements HandlerInterceptor {
    @Override
    //在目标方法执行之前 执行
    public boolean preHandle(HttpServletRequest request, HttpServletResponse response, Object handler) throws Exception {
        System.out.println("preHandle执行了");
        return true;//返回true代表放行,放回felse不放行
    }

    //在目标方法执行之后 视图对象放回之前执行(return modelAndView之前执行)
    @Override
    public void postHandle(HttpServletRequest request, HttpServletResponse response, Object handler, ModelAndView modelAndView) throws Exception {
        System.out.println("postHandle执行了");
        //这里可以改变返回的视图
    }

    //在流程都执行完了 执行
    @Override
    public void afterCompletion(HttpServletRequest request, HttpServletResponse response, Object handler, Exception ex) throws Exception {
        System.out.println("afterCompletion执行了");
    }
}
② 配置拦截器
    <!--配置拦截器-->
    <mvc:interceptors>
        <mvc:interceptor>
            <mvc:mapping path="/**"/>
            <bean class="com.itheima.interceptor.MyInterceptor"></bean>
        </mvc:interceptor>
    </mvc:interceptors>
③ 测试拦截器的拦截效果
结果:
preHandle执行了
目标程序执行......
jajja
postHandle执行了
afterCompletion执行了
④拦截器的小应用
package com.itheima.interceptor;

import org.springframework.web.servlet.HandlerInterceptor;
import org.springframework.web.servlet.ModelAndView;

import javax.servlet.http.HttpServletRequest;
import javax.servlet.http.HttpServletResponse;

public class MyInterceptor implements HandlerInterceptor {
    @Override
    //在目标方法执行之前 执行
    public boolean preHandle(HttpServletRequest request, HttpServletResponse response, Object handler) throws Exception {
        System.out.println("preHandle执行了");
        String param = request.getParameter("param");
        if ("yes".equals(param)){
            return true;//后面有param并且等于yes,继续执行
        }else {
            request.getRequestDispatcher("/shu.jsp").forward(request,response);//如果不满足上面条件就执行转发新的页面,后面程序就不执行了
            return false;
        }
    }

    //在目标方法执行之后 视图对象放回之前执行
    @Override
    public void postHandle(HttpServletRequest request, HttpServletResponse response, Object handler, ModelAndView modelAndView) throws Exception {
        modelAndView.addObject("name","yangming");//更改模型中的数据
        System.out.println("postHandle执行了");
    }

    //在流程都执行完了 执行
    @Override
    public void afterCompletion(HttpServletRequest request, HttpServletResponse response, Object handler, Exception ex) throws Exception {
        System.out.println("afterCompletion执行了");
    }
}
了解:假如写了俩个拦截器,俩个拦截器执行结果:
执行结果:
preHandle执行了
preHandle222执行了
目标程序执行......
jajja
postHandle执行了
postHandle222执行了
afterCompletion执行了
afterCompletion222执行了
哪个拦截器配置在上面哪个先执行第一部分,然后返回执行第二个拦截器的第一部分,按照此顺序依次执行。
SpringMVC异常处理
1.1异常处理的思路
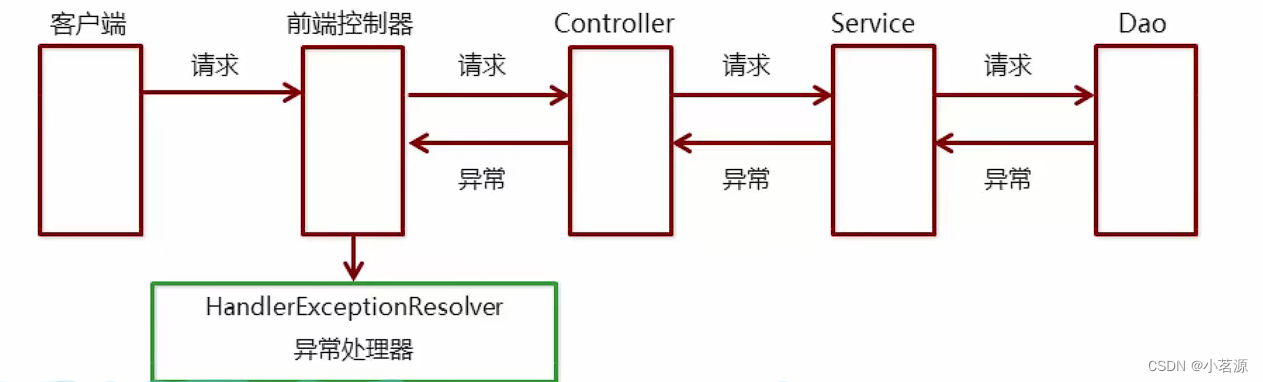
系统中异常包括俩类:编译时异常和运行时异常RuntimeException,前者通过捕获异常从而获取异常信息,后者主要通过规范代码开发,测试等手段减少运行时异常的发生。
系统的Dao,Service,Controller出现都通过throws Exception向上抛出,最后由SpringMVC前端控制器交由异常处理器进行异常处理,如下图:
1.2
① 使用SpringMVC提供的简单异常处理器SimpleMappingExceptionResolver
② 实现Spring的异常处理接口HandlerExceptionResolver自定义自己的异常处理器
1.3简单异常处理器SimpleMappingException Resolver
在我们的项目运行过程中,无法完全避免出现一些位置的运行时异常(比如NullPointerException ),而恰恰我们并没有对该异常进行处理,那么就会将此异常抛向用户。 当用户浏览页面时突然眼前蹦出一堆看不懂的,可想而知用户的体验度是非常差的,而如果简单的配置一下异常处理的话可以在spring-mvc.xml中进行配置异常后跳转的页面。(在xml里面大部分都是处理运行时异常,编译时异常在程序中就可以处理,不过编译时异常也可以通过上抛,在spring-mvc.xml进行相应的异常配置)。
SpringMvc已经定义好了该类型转换器,在使用时可以根据项目情况进行相应异常与视图的映射配置
spring-mvc.xml
<!--配置简单映射异常处理器-->
    <!--配置简单映射异常处理器-->
    <bean class="org.springframework.web.servlet.handler.SimpleMappingExceptionResolver">
        <property name="defaultErrorView" value="error"/>//此处是如果下面的异常都没有匹配到发生的异常,就执行默认错误视图
        <property name="exceptionMappings">
            <map>
                <entry key="com.itheima.exception.MyException" value="error"/>//key后面是异常类型,value接的是错误视图
                <entry key="java.lang.ClassCastException" value="error"/>
            </map>
        </property>
    </bean>
1.4自定义异常处理步骤
① 创建异常处理器类实现HandlerExceptionResolver
public class MyExceptionResolver implements HandlerExceptionResolver {

   /*
        参数Exception:异常对象
        返回ModelAndView 跳转到错误视图信息
    */
    @Override
    public ModelAndView resolveException(HttpServletRequest request, HttpServletResponse response, Object handler, Exception e) {
        ModelAndView modelAndView=new ModelAndView();
        if (e instanceof MyException){
            modelAndView.addObject("info","自定义异常");
        }else if (e instanceof ClassCastException){
            modelAndView.addObject("info","类转换异常");
        }
        modelAndView.setViewName("error");
        return modelAndView;
    }
② 配置异常处理器
spring-mvc.xml
<!--自定义异常处理器-->
<bean class="com.itheima.resolver.MyExceptionResolver"/>
③ 编写异常页面
<%@ page contentType="text/html;charset=UTF-8" language="java" %>
<html>
<head>
    <title>Title</title>
</head>
<body>
    <h1>通用异常错误提示</h1>
    <h1>${info}</h1>
</body>
</html>
④ 测试异常跳转
@RequextMapping(value="/show")
public String show() throws FileNotFountException,MyException{
	System.out.println("show running.....");
	// demoService.show1();
	demoService.show5();
	return "index";
}
1.SPring的AOP简介
1.1 什么是AOP
AOP为Aspect Oriented Programming的缩写,意思为面向切面编程,是通过预编译方式和运行期动态代理实现程序功能的统一维护的一种技术。
AOP是OOP的延续,是软件开发中的一个热点,也是Spring框架中的一个重要内容,是函数式编程的一种衍生范型。利用AOP可以对业务逻辑的各个部分进行隔离,从而使得业务逻辑各个部分的耦合度降低,提高程序的可重用性,同时提高了开发效率。
1.2AOP的作用及其优势
① 作用:在程序运行期间,在不修改源码的情况下对方法进行功能增强。
② 优势:减少重复代码,提高开发效率,并且便于维护。
1.3 AOP的动态代理技术
常用的动态代理技术
① JDK代理:基于接口的动态代理技术
使用动态代理有三个要点,
- 必须实现 InvocationHandler 接口,表明该类是一个动态代理执行类。
- InvocationHandler 接口内有一实现方法如下: public Object invoke(Object proxy, Method method, Object[] args) 。使用时需要重写这个方法
- 获取代理类,需要使用 Proxy.newProxyInstance(Clas loader, Class[] interfaces, InvocationHandler h) 这个方法去获取Proxy对象(Proxy 类类型的实例)。
注意到 Proxy.newProxyInstance 这个方法,它需要传入 3 个参数。解析如下:
// 第一个参数,是类的加载器
// 第二个参数是委托类的接口类型,证代理类返回的是同一个实现接口下的类型,保持代理类与抽象角色行为的一致
// 第三个参数就是代理类本身,即告诉代理类,代理类遇到某个委托类的方法时该调用哪个类下的invoke方法
Proxy.newProxyInstance(Class loader, Class<?>[] interfaces, InvocationHandler h)
再来看看 invoke 方法,用户调用代理对象的什么方法,实质上都是在调用处理器的
invoke 方法,通过该方法调用目标方法,它也有三个参数:
// 第一个参数为 Proxy 类类型实例,如匿名的 $proxy 实例
// 第二个参数为委托类的方法对象
// 第三个参数为委托类的方法参数
// 返回类型为委托类某个方法的执行结果
public Object invoke(Object proxy, Method method, Object[] args)
案例:
//TargetInterface接口:
public interface TargetInterface {
    public void save();
}
//Target目标对象:
public class Target implements TargetInterface{
    @Override
    public void save() {
        System.out.println("sava running.....");
    }
}
//增强类
public class Advice {
    public void before(){
        System.out.println("前置增强.....");
    }
    public void after(){
        System.out.println("后置增强.....");
    }
}
//测试类
public class ProxyText {
    public static void main(String[] args) {
        //目标对象
        Target target=new Target();
        //增强对象
        Advice advice=new Advice();
        //返回值 就是动态代理生成的代理对象
        TargetInterface proxy=(TargetInterface) Proxy.newProxyInstance(
                target.getClass().getClassLoader(), //目标对象的类加载器
                target.getClass().getInterfaces(), //目标对象相同的接口字节码对象数组
                new InvocationHandler() {
                    //调用代理对象的任何方法 实质执行的都是invoke方法
                    @Override
                    public Object invoke(Object o, Method method, Object[] objects) throws Throwable {
                        //前置增强
                        advice.before();
                        Object invoke = method.invoke(target, args);//执行目标方法
                        advice.after();
                        return invoke;
                    }
                }

        );
        proxy.save();
    }
}
②cglib代理:基于父类的动态代理技术
案例:
//目标类
public class Target{
    public void save() {
        System.out.println("sava running.....");
    }
}
//增强类
public class Advice {
    public void before(){
        System.out.println("前置增强.....");
    }
    public void after(){
        System.out.println("后置增强.....");
    }
}
public class ProxyText {
    public static void main(String[] args) {
        //目标对象
        Target target=new Target();
        //增强对象
        Advice advice=new Advice();
        //返回值 就是动态代理生成的代理对象  基于cglib
        //1.创建增强器
        Enhancer enhancer=new Enhancer();
        //2.设置父类(目标)
        enhancer.setSuperclass(Target.class);
        //3.设置回调
        enhancer.setCallback(new MethodInterceptor() {
            @Override
            public Object intercept(Object proxy, Method method, Object[] objects, MethodProxy methodProxy) throws Throwable {
                advice.before();//执行前置
                Object invoke=method.invoke(target,args);//执行目标
                advice.after();//执行后置
                return invoke;
            }
        });
        //4.创建代理对象
        Target proxy =(Target) enhancer.create();
        //5.调用方法,实际上是执行的目标方法的save()
        proxy.save();
    }
}
Spring的AOP简介
1.4AOP相关概念
(1)横切关注点:对哪些方法进行拦截,拦截后怎么处理,这些关注点称之为横切关注点
(2)Aspect(切面):通常是一个类,里面可以定义切入点和通知(要点)
(3)JointPoint(连接点):程序执行过程中明确的点,一般是方法的调用。被拦截到的点,因为Spring只支持方法类型的连接点,所以在Spring中连接点指的就是被拦截到的方法,实际上连接点还可以是字段或者构造器
(4)Advice(通知):AOP在特定的切入点上执行的增强处理,有before(前置),after(后置),afterReturning(最终),afterThrowing(异常),around(环绕)(要点)
(5)Pointcut(切入点):就是带有通知的连接点,在程序中主要体现为书写切入点表达式(要点)
(6)weave(织入):将切面应用到目标对象并导致代理对象创建的过程(要点)
(7)introduction(引入):在不修改代码的前提下,引入可以在运行期为类动态地添加一些方法或字段
(8)AOP代理(AOP Proxy):AOP框架创建的对象,代理就是目标对象的加强。Spring中的AOP代理可以使JDK动态代理,也可以是CGLIB代理,前者基于接口,后者基于子类
(9)目标对象(Target Object): 包含连接点的对象。也被称作被通知或被代理对象。POJO
1.5 知识要点
① aop:面向切面编程
② aop底层实现:基于JDK的动态代理和基于Cglib的动态代理
③ aop的重点概念:
Pointcut(切入点):被增强的方法
Advice(通知/增强):封装增强业务逻辑的方法
Aspect(切面):切点+通知
Weaving(织入):将切点与通知结合的过程
④开发明确事项:
谁是切点(切点表达式配置)
谁是通知(切面类中的增强方法)
将切点和通知进行织入配置
1.6AOP的快速入门
① 导入AOP相关坐标
<dependency>
      <groupId>org.aspectj</groupId>
      <artifactId>aspectjweaver</artifactId>
      <version>1.8.4</version>
    </dependency>
② 创建目标接口和目标类(内部有切点)
接口类:
public interface TargetInterface {
    public void save();
}
目标类:
public class Target implements TargetInterface {
    @Override
    public void save() {
        System.out.println("sava running.....");
    }
}
③ 创建切面类(内部有增强方法)
public class MyAspect {
    public void before(){
        System.out.println("前置增强.....");
    }
}
④ 将目标类和切面类的对象创建权交给spring
<?xml version="1.0" encoding="UTF-8"?>
<beans xmlns="http://www.springframework.org/schema/beans"
       xmlns:xsi="http://www.w3.org/2001/XMLSchema-instance"
       xmlns:aop="http://www.springframework.org/schema/aop"
       xsi:schemaLocation="http://www.springframework.org/schema/beans http://www.springframework.org/schema/beans/spring-beans.xsd
           http://www.springframework.org/schema/aop http://www.springframework.org/schema/aop/spring-aop.xsd">
//需要导入aop命名空间
<!--配置目标对象-->
    <bean id="target" class="com.itheima.proxy.aop.Target"></bean>

    <!--切面对象-->
    <bean id="myAspect" class="com.itheima.proxy.aop.MyAspect"></bean>
⑤ 在applicationContext.xml中配置织入关系
 <!--配置织入,告诉spring框架哪些方法(切点)进行哪些方法增强(前置,后置)-->
    <aop:config>
        <!--声明切面-->
        <aop:aspect ref="myAspect">
            <!--切面,切点+通知-->
            <aop:before method="before" pointcut="execution(public void com.itheima.proxy.aop.Target.save())"></aop:before>
        </aop:aspect>
    </aop:config>
⑥ 测试代码
//测试类:
@RunWith(SpringJUnit4ClassRunner.class)
@ContextConfiguration("classpath:application.xml")
public class AopTest {

    @Autowired
    private TargetInterface target;
    @Test
    public void test1(){
        target.save();
    }
}
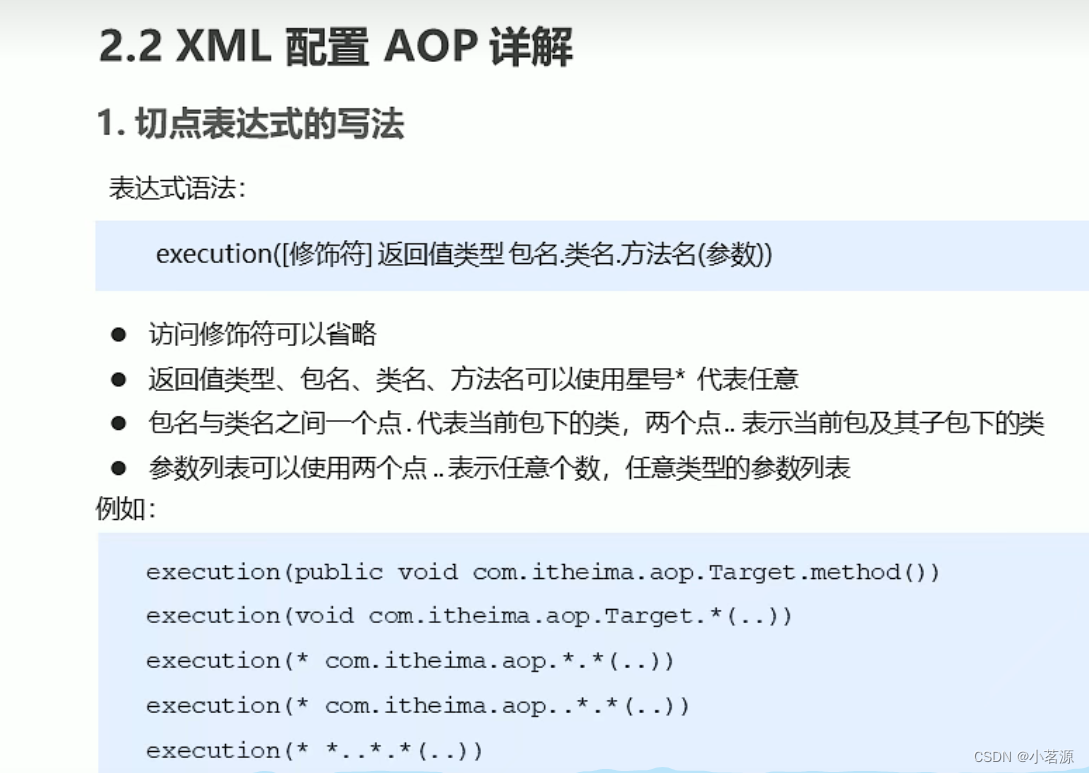
1.切点表达式的语法:
2.通知的类型:
通知的配置语法:
<app:通知类型 method=“切面类中的方法名” pointcut=“切点表达式”></aop通知类型>
① 前置通知 aop:before 用于配置前置通知。指定增强的方法在切入点方法之前执行。
<aop:before method="before" pointcut="execution(* com.itheima.proxy.aop.*.*(..))"></aop:before>
public class MyAspect {
    public void before(){
        System.out.println("前置增强.....");
    }
② 后置通知 aop:after-returning 用于配置后置通知。指定增强的方法在切入点方法之后执行。
<aop:after-returning method="afterRunning" pointcut="execution(* com.itheima.proxy.aop.*.*(..))"></aop:after-returning>
    public void afterRunning(){
        System.out.println("后置增强.....");
    }
③ 环绕通知 aop:around 用于配置环绕通知,指定增强的方法在切入点方法之前和之后都执行。
<aop:around method="around" pointcut="execution(* com.itheima.proxy.aop.*.*(..))"></aop:around>
    public Object around(ProceedingJoinPoint pjp) throws Throwable {
        System.out.println("环绕前增强......");
        Object proceed=pjp.proceed();
        System.out.println("环绕后增强......");
        return proceed;
    }
④ 异常抛出通知 aop:throwing 用于配置异常抛出通知,指定增强的方法在出现异常时执行。
<aop:after-throwing method="afterThrowing" pointcut="execution(* com.itheima.proxy.aop.*.*(..))"></aop:after-throwing>
    public void afterThrowing(){
        System.out.println("异常抛出增强.......");
    }
⑤ 最终通知 aop:after 用于配置最终通知,无论增强方式执行是否有异常都会执行
<aop:after method="after" pointcut="execution(* com.itheima.proxy.aop.*.*(..))"></aop:after>
    public void after(){
        System.out.println("最后增强......");
    }
3.切点表达式的抽取
<!--抽取切点表达式-->
<aop:pointcut id="myPointcut" expression="execution(* com.itheima.proxy.aop.*.*(..))"/>
<aop:around method="around" pointcut-ref="myPointcut"></aop:around>
1.7 注解方式实现AOP
基于注解的aop开发步骤:
① 创建目标接口和目标类(内部有切点)
③ 将目标类和切面类的对象创建权交给spring
//目标类:
@Controller("target")
public class Target implements TargetInterface {
    @Override
    public void save() {
        System.out.println("sava running.....");
    }
}
//接口:
public interface TargetInterface {
    public void save();
}
② 创建切面类(内部有增强方法)
④ 在切面类中使用注解配置织入关系
//切面类:
@Controller("myAspect")
@Aspect//这个注解是告诉spring这个类为切面类
public class MyAspect {
    @Before("execution(* com.itheima.proxy.conn.*.*(..))")//<!--切面,切点,通知-->告诉spring这个方法为前置增强方法
    public void before(){
        System.out.println("前置增强.....");
    }
⑤ 在配置文件中开启组件扫描和AOP的自动代理
//上面要引入aop和context的空间
<!--组件扫描-->
    <context:component-scan base-package="com.itheima.proxy.conn"></context:component-scan>
    <!--aop自动代理-->
    <aop:aspectj-autoproxy/>
⑥ 测试
@RunWith(SpringJUnit4ClassRunner.class)
@ContextConfiguration("classpath:applicationContext-conn.xml")
public class AopTest1 {
    @Autowired
    private TargetInterface target;

    @Test
    public void go(){
        target.save();
    }
}

注解抽取切点表达式:
@Controller("myAspect")
@Aspect
public class MyAspect {
    @Before("pointcut()")
    //通过pointcut()方法拿到注入里面的execution(* com.itheima.proxy.conn.*.*(..))
    public void before(){
        System.out.println("前置增强.....");
    }

    @Pointcut("execution(* com.itheima.proxy.conn.*.*(..))")
   //这里的注解表示,将execution(* com.itheima.proxy.conn.*.*(..))注入到pointcut()方法中
    public void pointcut(){

    }
Spring 的事务控制
一.基于xml的声明方式
声明事物的控制要点:
pom.xml文件配置:
 <dependency>
      <groupId>org.springframework</groupId>
      <artifactId>spring-tx</artifactId>
      <version>5.2.6.RELEASE</version>
    </dependency>
    <dependency>
      <groupId>org.aspectj</groupId>
      <artifactId>aspectjweaver</artifactId>
      <version>1.8.4</version>
    </dependency>
① 平台事物管理器配置
  <!--配置平台事务管理器-->
    <bean id="transactionManger" class="org.springframework.jdbc.datasource.DataSourceTransactionManager">
        <property name="dataSource" ref="dataSource"></property>
    </bean>
② 事物通知的配置
<!--通知 事务的增强-->
    <tx:advice id="txAdvice" transaction-manager="transactionManger">
        <tx:attributes>
            <tx:method name="*"/>
        </tx:attributes>
    </tx:advice>
③ 事物aop织入的配置
 <!--配置事务的aop织入-->
    <aop:config>
        <aop:advisor advice-ref="txAdvice" pointcut="execution(* com.itheima.service.impl..*.*(..))"></aop:advisor>
    </aop:config>
完整案例:
AccountController控制类:
public class AccountController {
    public static void main(String[] args) {
        ApplicationContext app=new ClassPathXmlApplicationContext("applicationContext.xml");
        AccountService accountService=app.getBean(AccountService.class);
        accountService.transfer("zhangsan","lisi",500);
    }
}
domain包下的Account类:
public class Account {
    private String name;
    private double money;

    public String getName() {
        return name;
    }

    public void setName(String name) {
        this.name = name;
    }

    public double getMoney() {
        return money;
    }

    public void setMoney(double money) {
        this.money = money;
    }
}
service包下的AccountService接口类:
public interface AccountService {
    public void transfer(String outMan,String inMan,double money);
}
service包下的子包impl下的AccountServiceImpl类:
public class AccountServiceImpl implements AccountService {
    private AccountDao accountDao;
    public void setAccountDao(AccountDao accountDao){
        this.accountDao=accountDao;
    }
    @Override
    public void transfer(String outMan, String inMan, double money) {
        accountDao.out(outMan,money);
        accountDao.in(inMan,money);
    }
}
dao包下的AccountDao接口类:
public interface AccountDao {
    public void out(String outMan,double money);
    public void in(String inMan,double money);
}
dao包下的子包的impl包下的AccountDaoImpl:
public class AccountDaoImpl implements AccountDao {
    private JdbcTemplate jdbcTemplate;
    public void setJdbcTemplate(JdbcTemplate jdbcTemplate){
        this.jdbcTemplate=jdbcTemplate;
    }

    @Override
    public void out(String outMan, double money) {
        jdbcTemplate.update("update account set money=money-? where name=?",money,outMan);
    }

    @Override
    public void in(String inMan, double money) {
        jdbcTemplate.update("update account set money=money+? where name=?",money,inMan);
    }
}
resources包下的xml文件:
<?xml version="1.0" encoding="UTF-8"?>
<beans xmlns="http://www.springframework.org/schema/beans"
       xmlns:xsi="http://www.w3.org/2001/XMLSchema-instance"
       xmlns:aop="http://www.springframework.org/schema/aop"
       xmlns:tx="http://www.springframework.org/schema/tx"
       xsi:schemaLocation="http://www.springframework.org/schema/beans http://www.springframework.org/schema/beans/spring-beans.xsd
        http://www.springframework.org/schema/aop  http://www.springframework.org/schema/aop/spring-aop.xsd
        http://www.springframework.org/schema/tx http://www.springframework.org/schema/tx/spring-tx.xsd">
//引入top和tx命名空间

    <bean id="dataSource" class="com.mchange.v2.c3p0.ComboPooledDataSource">
        <property name="driverClass" value="com.mysql.jdbc.Driver"/>
        <property name="jdbcUrl" value="jdbc:mysql://localhost:3306/test"/>
        <property name="user" value="root"/>
        <property name="password" value="root"/>
    </bean>

    <bean id="AccountDao" class="com.itheima.proxy.dao.impl.AccountDaoImpl">
        <property name="jdbcTemplate" ref="jdbcTemplate"></property>
    </bean>

    <bean id="AccountService" class="com.itheima.proxy.Service.impl.AccountServiceImpl">
        <property name="accountDao" ref="AccountDao"></property>
    </bean>
    <!--目标对象 内部的方法就是切点-->
    <bean id="jdbcTemplate" class="org.springframework.jdbc.core.JdbcTemplate">
        <property name="dataSource" ref="dataSource"/>
    </bean>

    <!--配置平台事务管理器-->
    <bean id="transactionManger" class="org.springframework.jdbc.datasource.DataSourceTransactionManager">
        <property name="dataSource" ref="dataSource"></property>
    </bean>

    <!--通知 事务的增强-->
    <tx:advice id="txAdvice" transaction-manager="transactionManger">
        <tx:attributes>
            <tx:method name="*"/>
        </tx:attributes>
    </tx:advice>

    <!--配置事务的aop织入-->
    <aop:config>
        <aop:advisor advice-ref="txAdvice" pointcut="execution(* com.itheima.service.impl..*.*(..))"></aop:advisor>
    </aop:config>
</beans>
当然还需要自己准备一张表,表中俩个属性一个String类型的name,一个double类型的age。
基于注解的声明控制事物的方式
基于上面的代码进行改进:
//首先将自己自定义的类,进行注解配置Dao类:
  @Repository("accountDao")
public class AccountDaoImpl implements AccountDao {

    @Autowired
    private JdbcTemplate jdbcTemplate;
Service类:
@Service("accountService")
public class AccountServiceImpl implements AccountService {
    @Autowired
    private AccountDao accountDao;

      @Transactional(isolation= Isolation.DEFAULT)
    public void transfer(String outMan, String inMan, double money) {
        accountDao.out(outMan,money);
        accountDao.in(inMan,money);
    }
}
    <!--通知 事务的增强-->
    <tx:advice id="txAdvice" transaction-manager="transactionManger">
        <tx:attributes>
            <tx:method name="*"/>
        </tx:attributes>
    </tx:advice>

    <!--配置事务的aop织入-->
    <aop:config>
        <aop:advisor advice-ref="txAdvice" pointcut="execution(* com.itheima.service.impl..*.*(..))"></aop:advisor>
    </aop:config>
这上面的配置可以直接在方法上面用 @Transactional注解来代替
 @Transactional(isolation= Isolation.DEFAULT)
    public void transfer(String outMan, String inMan, double money) {
        accountDao.out(outMan,money);
        accountDao.in(inMan,money);
    }
}
这里表示为这个方法开启了事物
要想上面的@Transactional注解能够使用,必须引入aop命名空间,然后进行事务的注解驱动
    <tx:annotation-driven transaction-manager="transactionManger"></tx:annotation-driven>
当然其他的自定义要被识别也需要引入context类,进行组件扫描:
<!--配置组件扫描-->
    <context:component-scan base-package="com.itheima"></context:component-scan>
@Transactional(isolation= Isolation.DEFAULT)
public void transfer(String outMan, String inMan, double money) {
    accountDao.out(outMan,money);
    accountDao.in(inMan,money);
}
}
```xml
    <!--通知 事务的增强-->
    <tx:advice id="txAdvice" transaction-manager="transactionManger">
        <tx:attributes>
            <tx:method name="*"/>
        </tx:attributes>
    </tx:advice>

    <!--配置事务的aop织入-->
    <aop:config>
        <aop:advisor advice-ref="txAdvice" pointcut="execution(* com.itheima.service.impl..*.*(..))"></aop:advisor>
    </aop:config>
这上面的配置可以直接在方法上面用 @Transactional注解来代替
 @Transactional(isolation= Isolation.DEFAULT)
    public void transfer(String outMan, String inMan, double money) {
        accountDao.out(outMan,money);
        accountDao.in(inMan,money);
    }
}
这里表示为这个方法开启了事物
要想上面的@Transactional注解能够使用,必须引入aop命名空间,然后进行事务的注解驱动
    <tx:annotation-driven transaction-manager="transactionManger"></tx:annotation-driven>
当然其他的自定义要被识别也需要引入context类,进行组件扫描:
<!--配置组件扫描-->
    <context:component-scan base-package="com.itheima"></context:component-scan>


 642
642


 被折叠的 条评论
为什么被折叠?
被折叠的 条评论
为什么被折叠?
 到【灌水乐园】发言


