


目录
1.前端发送的请求,是如何请求到后端的?

这是因为nginx进行了反向代理,就是将前端发送的动态请求由nginx转发到后端服务器。

nginx反向代理的好处:
(1)提高访问速度。在浏览器请求nginx时,会在nginx里面进行缓存,如果下次请求的接口相同,可以直接加载缓存,不用再请求后端服务器。
(2)负载均衡。所谓负载均衡,就是将大量的请求按照我们指定的方式均衡的分配给集群中的每台服务器。
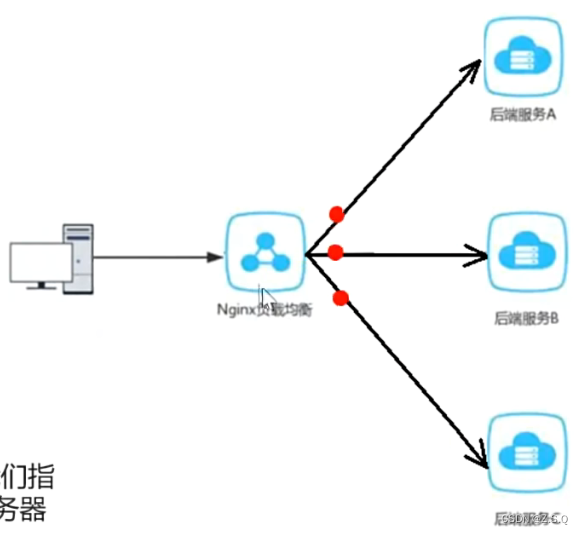
(3)保证后端服务的安全。在实际开发中,后端服务不能暴露给互联网,不对外开放。
2.日期格式解决
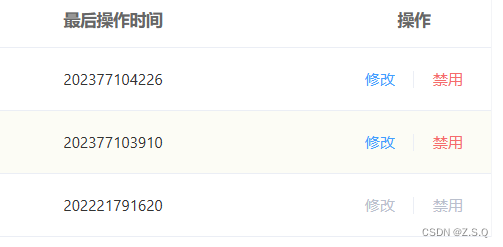
方式一:在属性上加上注解,对日期进行格式化。但是这种只能对一个属性进行操作,对于较多存在时间属性的实体类来说较为繁琐。
![]()
方式二:在WebMvcConfiguration中扩展Spring MVC的消息转换器,统一对日期类型进行格式化处理。
protected void extendMessageConverters(List<HttpMessageConverter<?>> converters){
    log.info("开始扩展消息转换器...");
    //创建一个消息转换器对象
    MappingJackson2HttpMessageConverter cr = new MappingJackson2HttpMessageConverter();
    //设置对象转换器,可以将java对象转为json字符串
    cr.setObjectMapper(new JacksonObjectMapper());
    //将自己定义的转换器放入spring mvc 框架容器中
    converters.add(0,cr);
}
3.Swagger介绍
Swagger是一款RESTFUL接口的文档在线自动生成+功能测试功能软件。官网:API Documentation & Design Tools for Teams | Swagger
Knife4j是为Java MVC框架集成Swagger生成Api文档的增强解决方案。使用方式如下:
(1).导入 knife4j 的maven坐标
<dependency>
            <groupId>com.github.xiaoymin</groupId>
            <artifactId>knife4j-spring-boot-starter</artifactId>
            <version>3.0.2</version>
</dependency>
(2).在配置类中加入 knife4j 相关配置
    //通过knife4j生成接口文档
    @Bean
    public Docket docket1() {
        log.info("准备生成接口文档...");
        ApiInfo apiInfo = new ApiInfoBuilder()
                .title("苍穹外卖项目接口文档")
                .version("2.0")
                .description("苍穹外卖项目接口文档")
                .build();
        Docket docket = new Docket(DocumentationType.SWAGGER_2)
                .groupName("管理端接口")
                .apiInfo(apiInfo)
                .select()                               //管理端controller所在包的路径
                .apis(RequestHandlerSelectors.basePackage("com.sky.controller.admin"))
                .paths(PathSelectors.any())
                .build();
        return docket;
} (3).设置静态资源映射,否则接口文档页面无法访问
    //设置静态资源映射
    protected void addResourceHandlers(ResourceHandlerRegistry registry) {
        log.info("开始设置静态资源映射...");
        //访问地址:http://ip:port/doc.html
        registry.addResourceHandler("/doc.html").addResourceLocations("classpath:/META-INF/resources/");
        registry.addResourceHandler("/webjars/**").addResourceLocations("classpath:/META-INF/resources/webjars/");
    }
4.公共字段自动填充
由于本项目是基于mybatis的,所以不能用@TableField(mybatisplus提供的)。基于注解@TableField进行字段填充的方法:瑞吉外卖公共字段填充
(1) 自定义直接AutoFill,用于标识需要进行公共字段自动填充的方法。
/**
 * 自定义注解,用于标识方法需要进行字段自动填充处理
 */
//指定该注解只能加在方法上面
@Target(ElementType.METHOD)
@Retention(RetentionPolicy.RUNTIME)
public @interface AutoFill {
	//数据库操作类型:UPDATE INSERT
	OperationType value();
}

public enum OperationType {

    //更新操作
    UPDATE,

    //插入操作
    INSERT

}
(2)自定义切面类AutoFillAspect,统一拦截加入AutoFill注解的方法,通过反射为公共字段赋值
@Slf4j
@Aspect
@Component
public class AutoFillAspect {

	//切入点
	@Pointcut("execution(* com.sky.mapper.*.*(..)) &&
    @annotation(com.sky.annotation.AutoFill)")
	public void autoFillPointCut(){

	}

	//前置通知,在通知中进行公共字段填充
	@Before("autoFillPointCut()")
	public void autoFill(JoinPoint joinPoint){
		log.info("开始进行公共字段填充...");
		//获取到当前被拦截的方法上的数据库操作类型
		MethodSignature signature = (MethodSignature) joinPoint.getSignature();//方法签名对象
		AutoFill autoFill = signature.getMethod().getAnnotation(AutoFill.class);//获得方法上的注解对象
		OperationType operationType = autoFill.value();//获得数据库操作类型

		//获取当前被拦截方法的参数--实体类,约束实体类为第一个参数
		Object[] args = joinPoint.getArgs();//获得全部参数
		if (args == null || args.length == 0) return;

		Object entity = args[0];//得到实体类

		//准备赋值的数据
		LocalDateTime now = LocalDateTime.now();
		Long currentId = BaseContext.getCurrentId();

		//根据当前不同的操作类型,为对应的属性通过反射来赋值
		if (operationType == OperationType.INSERT){
			//为四个公共字段赋值
			try {
				Method setCreateTime = entity.getClass().getDeclaredMethod(AutoFillConstant.SET_CREATE_TIME, LocalDateTime.class);
				Method setUpdateTime = entity.getClass().getDeclaredMethod(AutoFillConstant.SET_UPDATE_TIME, LocalDateTime.class);
				Method setCreateUser = entity.getClass().getDeclaredMethod(AutoFillConstant.SET_CREATE_USER, Long.class);
				Method setUpdateUser = entity.getClass().getDeclaredMethod(AutoFillConstant.SET_UPDATE_USER, Long.class);

				//通过反射为对象属性赋值
				setCreateTime.invoke(entity, now);
				setUpdateTime.invoke(entity, now);
				setCreateUser.invoke(entity, currentId);
				setUpdateUser.invoke(entity, currentId);
			} catch (Exception e) {
				e.printStackTrace();
			}

		}else if (operationType == OperationType.UPDATE){
			//为两个公共字段赋值
			try {
				Method setCreateUser = entity.getClass().getDeclaredMethod(AutoFillConstant.SET_CREATE_USER, Long.class);
				Method setUpdateUser = entity.getClass().getDeclaredMethod(AutoFillConstant.SET_UPDATE_USER, Long.class);

				setCreateUser.invoke(entity, currentId);
				setUpdateUser.invoke(entity, currentId);
			} catch (Exception e) {
				e.printStackTrace();
			}
		}
	}
}
5.图片上传和下载
课程中的图片保存在了阿里云平台,所以要借助阿里云平台进行文件上传和下载。由于本人未注册阿里云账号,所以对于在学习中没有使用图片。如果想学习对于本地图片上传和下载的见:
6.微信登录
6.1HttpClient使用
HttpClient可以提供高效的、最新的、功能丰富的支持HTTP协议的客户端编程工具包,并且支持HTTP协议最新的版本和建议。
<dependency>
    <groupId>org.apache.httpcomponents</groupId>
    <artifactId>httpclient</artifactId>
    <version>4.5.13</version>
</dependency>
发送请求的步骤:1.创建httpClient对象。2.创建http请求对象,get或post。3.创建httpClient的execute方法发送请求。
(1)Get请求
	@Test
	void testGet() throws IOException {
		//创建httpClient对象
		CloseableHttpClient httpClient = HttpClients.createDefault();

		//创建请求对象
		HttpGet httpGet = new HttpGet("http://localhost:8080/user/shop/status");

		//发送
		CloseableHttpResponse response = httpClient.execute(httpGet);

		//解析数据
		//获取状态码
		int statusCode = response.getStatusLine().getStatusCode();
		System.out.println("状态码为:" + statusCode);

		//获取请求体
		HttpEntity entity = response.getEntity();
		String body = EntityUtils.toString(entity);
		System.out.println("请求体是:" + body);

		//关闭资源
		response.close();
		httpClient.close();
	}
(2)Post请求
    @Test
	void testPost() throws IOException {
		//创建httpclient对象
		CloseableHttpClient httpClient = HttpClients.createDefault();
		//创建请求对象
		HttpPost httpPost = new HttpPost("http://localhost:8080/admin/employee/login");

		EmployeeLoginDTO employeeLoginDTO = new EmployeeLoginDTO("admin","123456");
		String loginJson = JSON.toJSONString(employeeLoginDTO);

		StringEntity stringEntity = new StringEntity(loginJson);
		//指定请求编码方式
		stringEntity.setContentEncoding("UTF-8");
		//数据传输的数据格式
		stringEntity.setContentType("application/json");
		httpPost.setEntity(stringEntity);

		//发送请求
		CloseableHttpResponse response = httpClient.execute(httpPost);

		//解析数据
		//获取状态码
		int statusCode = response.getStatusLine().getStatusCode();
		System.out.println("状态码为:" + statusCode);

		//获取请求体
		HttpEntity entity = response.getEntity();
		String body = EntityUtils.toString(entity);
		System.out.println("请求体是:" + body);

		//关闭资源
		response.close();
		httpClient.close();
	}
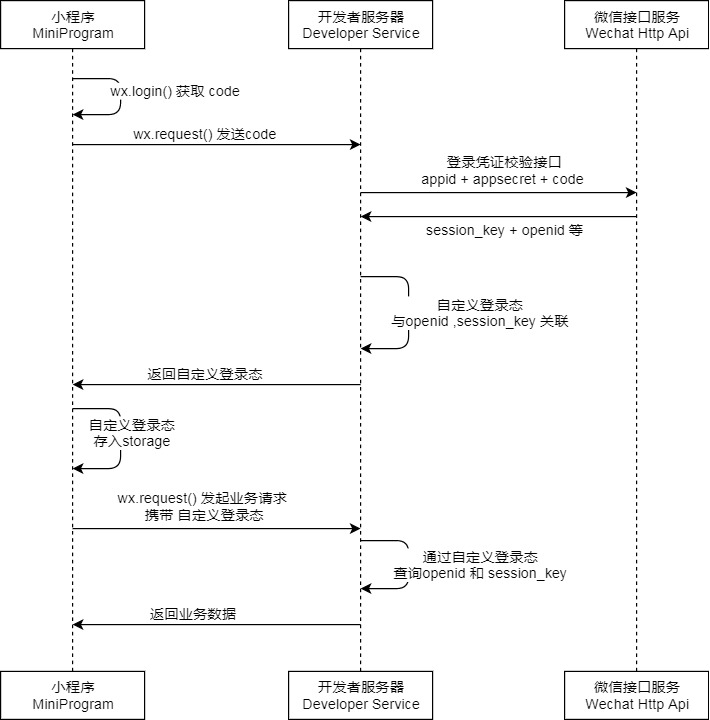
6.2微信登录流程
    @PostMapping("/login")
	@ApiOperation("微信登录")
	public Result<UserLoginVO> login(@RequestBody UserLoginDTO userLoginDTO){

		User user = userService.wxLogin(userLoginDTO);

		//为微信用户生成jwt令牌
		HashMap<String, Object> claims = new HashMap<>();
		claims.put(JwtClaimsConstant.USER_ID, user.getId());
		String token = JwtUtil.createJWT(this.jwt.getUserSecretKey(), this.jwt.getUserTtl(), claims);

		UserLoginVO userLoginVO = UserLoginVO.builder()
				.id(user.getId())
				.openid(user.getOpenid())
				.token(token)
				.build();

		return Result.success(userLoginVO);
	}

    @Override
	public User wxLogin(UserLoginDTO userLoginDTO) {
		//调用微信接口服务,获得当前微信用户的openId
		Map<String, String> map = new HashMap<>();
		map.put("appid", weChatProperties.getAppid());
		map.put("secret", weChatProperties.getSecret());
		map.put("js_code", userLoginDTO.getCode());
		map.put("grant_type","authorization_code");

		String json = HttpClientUtil.doGet(WX_LOGIN, map);

		String openid = JSON.parseObject(json).getString("openid");

		//判断openId是否为空,如果为空表示登录失败,抛出业务异常
		if (openid == null) throw new LoginFailedException(MessageConstant.LOGIN_FAILED);
		//判断当前用户是否为新用户
		User user = userMapper.getUserByOpenId(openid);

		if (user != null) return user;
		//是新用户,自动完成注册
		user = User.builder().openid(openid).createTime(LocalDateTime.now()).build();
		userMapper.insertUser(user);
		//返回用户对象
		return user;
	}
7.Spring Cache
Spring Cache 是一个框架,实现了基于注解的缓存功能,只需要简单地加一个注解,就能实现缓存功能。
| 注解 | 说明 |
| @EnableCaching | 开启缓存注解功能,通常加在启动类上。 |
| @Cacheable | 在方法执行前查询缓存中是否有数据,如果有数据,则返回缓存中的数据;如果没有缓存数据,调用方法并将返回值放到缓存中。 |
| @CachePut | 将方法的返回值放到缓存中。 |
| @CacheEvict | 将一条或多条数据从缓存中删除。 |
8.Spring Task
cron表达式其实就是一个字符串,通过cron表达式可以定义任务触发的时间。构成规则:分为6或7个域,由空格分隔开,每个域代表一个含义,分别为:秒、分钟、小时、日、月、周、年(可选)
cron表达式在线生成器:在线Cron表达式生成器
	//处理未付款的超时订单
	@Scheduled(cron = "0 * * * * ? ")//每分钟触发一次
	public void processTimeOutOrder(){
		log.info("定时处理超时订单:{}", LocalDateTime.now());

		//当前时间减去15分钟
		LocalDateTime time = LocalDateTime.now().plusMinutes(-15);

		//查询超时订单
		List<OrderVO> orderVOList = orderMapper.queryOrdersByStatusAndTime(Orders.PENDING_PAYMENT,time);

		if (orderVOList != null && orderVOList.size() > 0){
			//修改订单状态为取消,
			for (OrderVO orderVO : orderVOList) {
				orderVO.setStatus(Orders.CANCELLED);
				orderVO.setCancelReason("用户未付款,订单自动取消");
				orderVO.setCancelTime(LocalDateTime.now());
				orderMapper.updataStatusByCancel(orderVO);
			}
		}

	}

	//处理一直处于派送中的订单
	@Scheduled(cron = "0 0 1 * * ?")//每天凌晨一点触发一次
	public void processDeliveryOrder(){
		log.info("定时处理处于派送中的订单:{}", LocalDateTime.now());

		//当前时间减去1小时
		LocalDateTime time = LocalDateTime.now().plusHours(-1);

		//查询超时订单
		List<OrderVO> orderVOList = orderMapper.queryOrdersByStatusAndTime(Orders.DELIVERY_IN_PROGRESS,time);

		if (orderVOList != null && orderVOList.size() > 0){
			//修改订单状态为取消,
			for (OrderVO orderVO : orderVOList) {
				orderVO.setStatus(Orders.COMPLETED);
				orderMapper.updataStatusByComplete(orderVO);
			}
		}

	}
9.WebSocket
WebSocket 是基于 TCP 的一种新的网络协议。它实现了浏览器与服务器全双工通信——浏览器和服务器只需要完成一次握手,两者之间就可以创建持久性的连接, 并进行双向数据传输。
HTTP协议和WebSocket协议对比:①HTTP是短连接,WebSocket是长连接。②HTTP通信是单向的,基于请求响应模式。WebSocket支持双向通信。③HTTP和WebSocket底层都是TCP连接
应用场景:视频聊天、网页聊天、体育实况更新等。


 3287
3287


 被折叠的 条评论
为什么被折叠?
被折叠的 条评论
为什么被折叠?
 到【灌水乐园】发言


