


Vue
基于MVVM思想,实现数据的双向绑定,将编程的关注点放到数据上
Vue快速入门
1、新建HTML页面,引入Vue.js文件
链接:https://pan.baidu.com/s/1VUxtuGOVUAtKRGQf1JGWAA
提取码:0630
如果是在vscode中则需要
在控制台下载vue
npm install vue@2
找到list下的vue.js
2.在JS代码区域,创建Vue核心对象,进行数据绑定
new Vue({
el:"#app",
data(){
return
username:""
}
})
3.编写视图
<div id="app">
    <input name="username" v-model="username">
    {{username}}
</div>
<!DOCTYPE html>
<html lang="en">
<head>
    <meta charset="UTF-8">
    <title>Title</title>
</head>
<body>
<div id="app">

    <input v-model="username">
    <!--插值表达式-->
    {{username}}

</div>
<script src="js/vue.js"></script>
<script>
    new Vue({

        el:"#app",
        data(){
            return{
                username:""
            }
        }
        // data:function () {
        //     return{
        //         username:""
        //     }
        // }

    })
</script>
</body>
</html>
Vue常用指令:
| 指令 | 作用 |
|---|---|
| v-bind | 为HTML标签绑定属性值,如设置href,css样式等 |
| v-model | 在表单元素上创建双向数据绑定 |
| v-on | 为HTML标签绑定事件 |
| v-if | 条件性的渲染某元素,判定为true时渲染,否则不渲染 |
| v-else | |
| v-else-if | |
| v-show | 根据条件展示某元素,区别在于切换的是display属性的值 |
| v-for | 列表渲染 |
v-bind:
<!DOCTYPE html>
<html lang="en" xmlns:v-bind="http://www.w3.org/1999/xhtml">
<head>
    <meta charset="UTF-8">
    <title>Title</title>
</head>
<body>
<div id="app">

 <a :href="url">点击一下</a>
<a v-bind:href="url">点击一下</a>

</div>
<script src="js/vue.js"></script>
<script>
    new Vue({

        el:"#app",
        data(){
            return{
                username:"",
                url:"https:\\www.baidu.com"
            }
        }
        // data:function () {
        //     return{
        //         username:""
        //     }
        // }

    })
</script>
</body>
</html>
v-bind对class,style进行绑定
<span style="color: red ; font-size: 70px">你好</span>
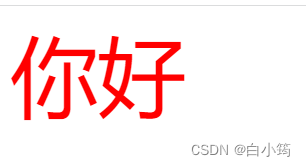
动态绑定它的颜色和字体大小
<body>
<script src="./node_modules/vue/dist/vue.js"></script>

<div id="app">
<span v-bind:style="{color: colors , fontSize: fontSizes}">你好</span>

</div>
    <script>

let l=new Vue({

el:"#app",
data: {
    colors:'red',
    fontSizes:'30px'
}

});

    </script>
</body>
v-on:
<!DOCTYPE html>
<html lang="en" xmlns:v-bind="http://www.w3.org/1999/xhtml" xmlns:v-on="http://www.w3.org/1999/xhtml">
<head>
    <meta charset="UTF-8">
    <title>Title</title>
</head>
<body>
<div id="app">

<input type="button" value="一个按钮" v-on:click="show()">


</div>
<script src="js/vue.js"></script>
<script>
    new Vue({

        el:"#app",
        data(){
            return{
                username:"",
                url:"https:\\www.baidu.com"
            }
                },
        methods:{
            show(){
                alert("我被点了")
            }
        }
    })
</script>
</body>
</html>
定义了一个这样的页面

<div id="app">
<div style="border:1px red solid;padding: 20px">大Div


    <div style="border: blue solid;padding: 20px">小Div<br>
        <a href="http://www.baidu.com">去百度</a>

    </div>
</div>


</div>
使用v-on绑定事件
<div id="app">
<div style="border:1px red solid;padding: 20px" v-on:click="hello">大Div


    <div style="border: blue solid;padding: 20px"@click="hello">小Div<br>
        <a href="http://www.baidu.com">去百度</a>

    </div>
</div>


</div>
    <script>

let l=new Vue({

el:"#app",
data: {
    colors:'red',
    fontSizes:'30px'
},
methods: {
    hello(){
        alert("点击了")
    }
},

});

    </script>
当我们点击了小div,此时由于冒泡会出现两次弹窗
阻止事件冒泡,可以使用事件修饰符
stop:阻止事件冒泡到父元素
prevent:阻止默认事件的发生
capture:使用事件捕获模式
self:只有元素自身触发事件才执行
once:只执行一次
"@click.stop="hello"
点击去百度后,实现不跳转到百度界面
<a href="http://www.baidu.com" @click.prevent>去百度</a>
当我们点击大Div后,实现再点击就不会弹框
<div style="border:1px red solid;padding: 20px" v-on:click.once="hello">大Div
v-if:
<!DOCTYPE html>
<html lang="en" xmlns:v-bind="http://www.w3.org/1999/xhtml" xmlns:v-on="http://www.w3.org/1999/xhtml">
<head>
<meta charset="UTF-8">
<title>Title</title>
</head>
<body>
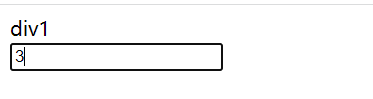
<div id="app">
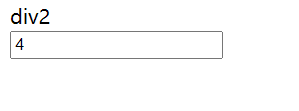
<div v-if="count==3">div1</div>
<div v-else-if="count==4">div2</div>
<div v-else>div3</div>
<input v-model="count">
</div>
<script src="js/vue.js"></script>
<script>
new Vue({
el:"#app",
data(){
return{
username:"",
url:"https:\\www.baidu.com",
count:3
}
}
})
</script>
</body>
</html>
v-show:
<!DOCTYPE html>
<html lang="en" xmlns:v-bind="http://www.w3.org/1999/xhtml" xmlns:v-on="http://www.w3.org/1999/xhtml">
<head>
    <meta charset="UTF-8">
    <title>Title</title>
</head>
<body>
<div id="app">

    <div v-if="count==3">div1</div>
    <div v-else-if="count==4">div2</div>
    <div v-else>div3</div>
    <hr>
    <div v-show="count==3">div4</div>
<input v-model="count">
</div>
<script src="js/vue.js"></script>
<script>
    new Vue({

        el:"#app",
        data(){
            return{
                username:"",
                url:"https:\\www.baidu.com",
                count:3
            }
        }

    })
</script>
</body>
</html>

v-for:
<!DOCTYPE html>
<html lang="en" xmlns:v-bind="http://www.w3.org/1999/xhtml" xmlns:v-on="http://www.w3.org/1999/xhtml">
<head>
    <meta charset="UTF-8">
    <title>Title</title>
</head>
<body>
<div id="app">
    <div v-for="addr in addrs">{{addr}}</div>
    <div v-for="(addr,i) in addrs">{{i}}--{{addr}}</div>

</div>
<script src="js/vue.js"></script>
<script>
    new Vue({

        el:"#app",
        data(){
            return{
                username:"",
                url:"https:\\www.baidu.com",
                count:3,
                addrs:["北京","上海","西安"]
            }
        }

    })
</script>
</body>
</html>

按键修饰符

记住所有的KeyCode比较困难,所以Vue为最常用的案件提供了别名:
enter,tab,delete,esc,space,up,down,left,right
<div id="app">
<div style="border:1px red solid;padding: 20px" v-on:click.once="hello">大Div


    <div style="border: blue solid;padding: 20px"@click.stop="hello">小Div<br>
        <a href="http://www.baidu.com" @click.prevent>去百度</a>

    </div>
</div>
<input type="text" v-model="num" v-on:keyup.up="num++" @keyup.down="num--">
num的值为:{{num}}
</div>
    <script>

let l=new Vue({

el:"#app",
data: {
    num:'1',
    colors:'red',
    fontSizes:'30px'
},
methods: {
    hello(){
        alert("点击了")
    }
},

});
当我们点击了上键num会加1,点击下键num会减1
<input type="text" v-model="num" v-on:keyup.up="num++" @keyup.down="num--" @click.ctrl="num=10">
当我们按住ctrl键点击文本框,num会等于10
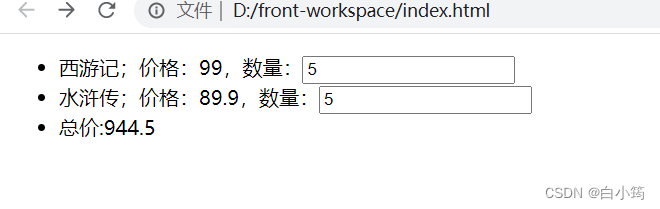
计算属性和侦听器
<div id="app">
<ul>
<li>西游记;价格:{{xyjPrice}},数量:<input type="number" v-model="xyjNum"></li>
<li>水浒传;价格:{{shzPrice}},数量:<input type="number" v-model="shzNum"></li>
<li>总价:{{totalPrice}}</li>
</ul>


</div>


<script>

let a=new Vue({

el:"#app",
data:{
    xyjPrice:99.0,
    shzPrice:89.9,
    xyjNum:1,
    shzNum:2
},
computed: {
 totalPrice(){
     return this.xyjPrice*this.xyjNum+this.shzNum*this.shzPrice
 }
}


});


</script>
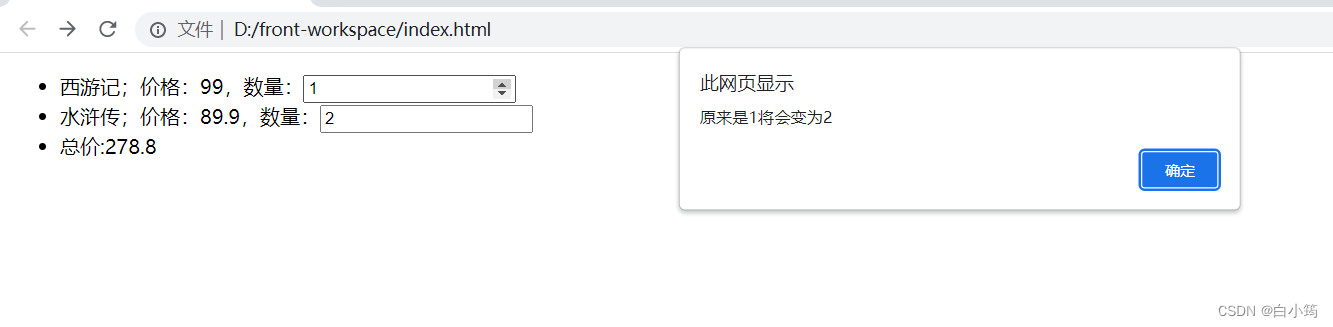
侦听器:
在vue里面添加监听器
watch: {
 xyjNum:function(newVal,oldVal){
     alert("原来是"+oldVal+"将会变为"+newVal)
 }
}
监听xjyNum的变化
点击西游记的数量添加后
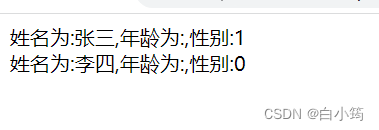
过滤器
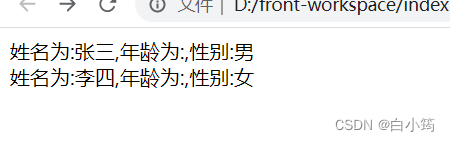
<div id="app">

    <span v-for="user in users">姓名为:{{user.name}},年龄为:{{user.age}},性别:{{user.sex}}</br></span>

</div>


<script>

let a=new Vue({

el:"#app",
data:{
    users:[
 {id:1,name:"张三",sex:1},
 {id:2,name:"李四",sex:0}

    ]

}

});


</script>
添加过滤器使得性别变为对应的汉字
<div id="app">

    <span v-for="user in users">姓名为:{{user.name}},年龄为:{{user.age}},性别:{{user.sex | sexFilter }}</br></span>

</div>


<script>

let a=new Vue({

el:"#app",
data:{
    users:[
 {id:1,name:"张三",sex:1},
 {id:2,name:"李四",sex:0}

    ]

},
filters:{
    sexFilter(sex){
        if(sex==1){
            return "男";
        }
        else{
            return "女";
        }
    }
}


});


</script>
这样定义的是局部过滤器
下面来定义一个全局过滤器
<div id="app">

    <span v-for="user in users">姓名为:{{user.name}},年龄为:{{user.age}},性别:{{user.sex |globalFilter }}</br></span>

</div>


<script>

//定义一个全局过滤器
Vue.filter("globalFilter",function(sex){
    if(sex==1){
            return "男";
        }
        else{
            return "女";
        }
})

let a=new Vue({

el:"#app",
data:{
    users:[
 {id:1,name:"张三",sex:1},
 {id:2,name:"李四",sex:0}

    ]

}


});
</script>
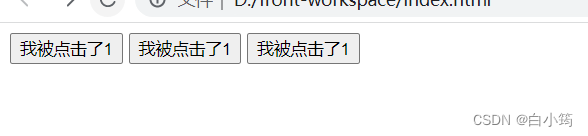
组件化基础
- 全局声明一个组件
        <script src="./node_modules/vue/dist/vue.js"></script>

    <div id="app">

            <button v-on:click="count++">我被点击了{{count}} </button>

            <counter></counter>
            <counter></counter>
    </div>


<script>

//全局注册一个组件
    Vue.component("counter",{
        template:'<button v-on:click="count++">我被点击了{{count}}</button>',
        data() {
            return {
                count:1
            }
        }
    });

    new Vue({

el:"#app",
data:{
    count:1
}


    });


</script>
全局定义个组件可以在任何Vue实例都可以使用组件名称来使用组件
data是一个函数
- 局部声明一个组件
  <div id="app">

            <button v-on:click="count++">我被点击了{{count}} </button>

            <button-counter></button-counter>
    </div>


<script>


//局部声明一个组件
var buttonCounter={

template:'<button v-on:click="count++">我被点击了===={{count}}</button>',
data(){
    return {
        count:1
    }
}

};

    new Vue({

el:"#app",
data:{
    count:1
},
components:{
    'button-counter':buttonCounter
}


    });


</script>
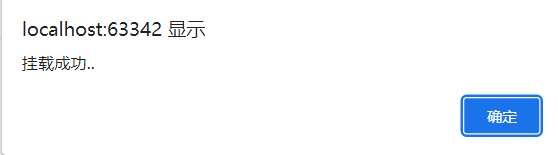
Vue生命周期
生命周期的八个阶段
mounted:挂载完成,Vue初始化完成,HTML页面渲染成功
mounted方法自动执行
mouned(){
}
<!DOCTYPE html>
<html lang="en" xmlns:v-bind="http://www.w3.org/1999/xhtml" xmlns:v-on="http://www.w3.org/1999/xhtml">
<head>
    <meta charset="UTF-8">
    <title>Title</title>
</head>
<body>
<div id="app">


</div>
<script src="js/vue.js"></script>
<script>
    new Vue({

        el:"#app",
        data(){
            return{

            }
        },
        mounted(){
            alert("挂载成功..")
        }

    })
</script>
</body>
</html>
案例:使用Vue简化品牌列表
由于之前采用的是字符串拼接的方式显示数据
<!DOCTYPE html>
<html lang="en">
<head>
    <meta charset="UTF-8">
    <title>Title</title>
</head>
<body>
<div id="app">


<a href="addBrand.html"><input type="button" value="新增"></a><br>

<hr>
<table id="brandTable" border="1" cellspacing="0" width="100%">

    <tr>
        <th>序号</th>
        <th>品牌名称</th>
        <th>企业名称</th>
        <th>排序</th>
        <th>品牌介绍</th>
        <th>状态</th>
        <th>操作</th>
    </tr>

    <tr v-for="(brand,i) in brands" align="center">
        <td>{{i+1}}}</td>
        <td>{{brand.brandName}}</td>
        <td>{{brand.companyName}}</td>
        <td>{{brand.ordered}}</td>
        <td>{{brand.description}}</td>
        <td>{{brand.status}}</td>
        <td><a href="#">修改</a> <a href="#">删除</a></td>
    </tr>


    </tr>
</table>
</div>
<script src="js/axios-0.18.0.js"></script>
<script src="js/vue.js"></script>
<script>
    new Vue({
        el:"#app",
        data(){
            return{
                brands:[]
            }

        },
        mounted(){
            //页面加载完成后,发送异步请求发送数据
         var _this=this;
            axios({
                method:"get",
                url:"http://localhost:8080/brand-demo//selectAllServlet"
            }).then(function (resp) {

               _this.brands=resp.data;


            })

        }

    })


</script>
</body>


</html>

新增品牌:

具体实现:
<!DOCTYPE html>
<html lang="en">

<head>
    <meta charset="UTF-8">
    <title>添加品牌</title>
</head>
<body>
<div id="app">

<h3>添加品牌</h3>
<form action="" method="post">
    品牌名称:<input id="brandName" v-model="brand.brandName" name="brandName"><br>
    企业名称:<input id="companyName"  v-model="brand.companyName"  name="companyName"><br>
    排序:<input id="ordered"   v-model="brand.ordered" name="ordered"><br>
    描述信息:<textarea rows="5" cols="20" id="description"  v-model="brand.description" name="description"></textarea><br>
    状态:
    <input type="radio" name="status"  v-model="brand.status" value="0">禁用
    <input type="radio" name="status" v-model="brand.status"  value="1">启用<br>

    <input type="button" id="btn"  @click="submitForm" value="提交">
</form>
</div>
<script src="js/axios-0.18.0.js"></script>
<script src="js/vue.js"></script>
<script>

    new Vue({
        el:"#app",
        data(){
            return{
                brand:{}
            }
        },
        methods:{
            submitForm(){
                //发送AJAX请求
                var _this=this;
                axios({
           method:"post",
           url:"http://localhost:8080/brand-demo/addServlet",
           data:this.brand

       }).then(function (resp) {
           if (resp.data=="success") {

               //跳转页面
               location.href="http://localhost:8080/brand-demo//brand.html";

           }

       })
   }

            }


    })


</script>
</body>
</html>


 4616
4616


 被折叠的 条评论
为什么被折叠?
被折叠的 条评论
为什么被折叠?
 到【灌水乐园】发言


