


🐱🐉🐱🐉🐱🐉 博学、慎思、笃行谓之学🐾🐾🐾
🌈博客主页👉白小筠
SpringMVC环境搭建——配置文件版
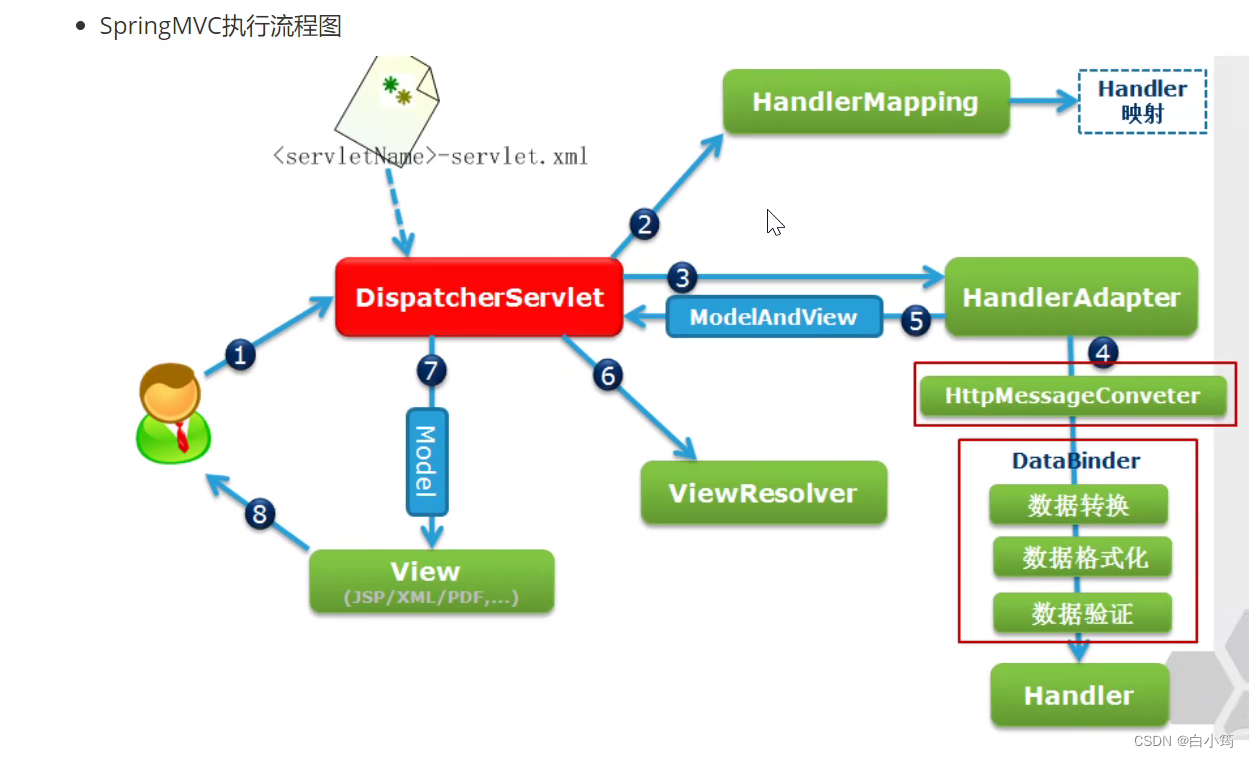
① 用户发送HTTP请求传递给DispatcherServlet
② 接收HTTP请求后,DispatcherServlet 查询 HandlerMapping 映射地址来调用相应的控制器(Controller)
③ 该控制器接受请求并调用基于使用GET或POST方法相应的服务方法。
④ 执行对应的业务逻辑
⑤ 执行完业务逻辑后返回视图名给DispatcherServlet
⑥ DispatcherServlet将需要帮助的ViewResolver从找到对应该请求所定义的视图
⑦ 找到对应的视图之后,DispatcherServlet传递对应的模型数据填充到所请求的页面,形成最终展示给用户的视图
1、创建一个Contrroller
public class UserController implements Controller {
    @Override
    public ModelAndView handleRequest(HttpServletRequest httpServletRequest, HttpServletResponse httpServletResponse) throws Exception {
        String name = httpServletRequest.getParameter("name");
        String pwd = httpServletRequest.getParameter("pwd");

//ModelAndView用来返回响应结果
       ModelAndView modelAndView=new ModelAndView();
      modelAndView.setViewName("success");
        return modelAndView;
    }
}
2、在resource下创建一个springmvc-common.xml配置文件
配置地址和controller的映射关系(/user)
<beans xmlns="http://www.springframework.org/schema/beans"
       xmlns:xsi="http://www.w3.org/2001/XMLSchema-instance"
       xmlns:context="http://www.springframework.org/schema/context"

       xsi:schemaLocation="http://www.springframework.org/schema/beans
        http://www.springframework.org/schema/beans/spring-beans.xsd
       ">


    <!--注入handler映射对象-->
    <bean class="org.springframework.web.servlet.handler.BeanNameUrlHandlerMapping"></bean>
    <!--配置地址和controller的关系-->
    <bean name="/user" class="com.aiit.controller.UserController"></bean>

</beans>
3、在Web.xml中配置前置控制器,加载springMVC配置文件
<?xml version="1.0" encoding="UTF-8"?>
<web-app xmlns="http://xmlns.jcp.org/xml/ns/javaee"
         xmlns:xsi="http://www.w3.org/2001/XMLSchema-instance"
         xsi:schemaLocation="http://xmlns.jcp.org/xml/ns/javaee http://xmlns.jcp.org/xml/ns/javaee/web-app_4_0.xsd"
         version="4.0">

    <servlet>
        <servlet-name>dispatcherServlet</servlet-name>
        <servlet-class>org.springframework.web.servlet.DispatcherServlet</servlet-class>
        <init-param>
            <param-name>contextConfigLocation</param-name>
            <param-value>classpath:springmvc-common.xml</param-value>
        </init-param>
    </servlet>

    <servlet-mapping>
        <servlet-name>dispatcherServlet</servlet-name>
        <url-pattern>/</url-pattern>
    </servlet-mapping>

</web-app>
视图解析器
可以给返回的页面名称自动补充前缀和后缀
    <bean class="org.springframework.web.servlet.view.InternalResourceViewResolver">
<!--        前缀-->
        <property name="prefix" value="/"></property>
<!--        后缀-->
        <property name="suffix" value=".jsp"></property>

    </bean>
ModelAndView本质是转发,将值存入request作用域中
部分注解版
在springmvc-common.xml中
因为使用注解,所以要先开启注解扫描
springmvc-common.xml文件中开启包扫描和mvc:annotation-driven
<beans xmlns="http://www.springframework.org/schema/beans"
       xmlns:xsi="http://www.w3.org/2001/XMLSchema-instance"
       xmlns:context="http://www.springframework.org/schema/context"
       xmlns:mvc="http://www.springframework.org/schema/mvc"
       xsi:schemaLocation="http://www.springframework.org/schema/beans
       http://www.springframework.org/schema/beans/spring-beans-4.2.xsd
    http://www.springframework.org/schema/mvc
    http://www.springframework.org/schema/mvc/spring-mvc-4.2.xsd
    http://www.springframework.org/schema/context
    http://www.springframework.org/schema/context/spring-context-4.2.xsd">


    <context:component-scan base-package="com.aiit"></context:component-scan>
    <mvc:annotation-driven></mvc:annotation-driven>


</beans>
web.xml中
<?xml version="1.0" encoding="UTF-8"?>
<web-app xmlns="http://xmlns.jcp.org/xml/ns/javaee"
         xmlns:xsi="http://www.w3.org/2001/XMLSchema-instance"
         xsi:schemaLocation="http://xmlns.jcp.org/xml/ns/javaee http://xmlns.jcp.org/xml/ns/javaee/web-app_4_0.xsd"
         version="4.0">

    <servlet>
        <servlet-name>dispatcherServlet</servlet-name>
        <servlet-class>org.springframework.web.servlet.DispatcherServlet</servlet-class>
        <init-param>
            <param-name>contextConfigLocation</param-name>
            <param-value>classpath:springmvc-common.xml</param-value>
        </init-param>
    </servlet>
    //将所有的请求,都交给SpringMVC

    <servlet-mapping>
        <servlet-name>dispatcherServlet</servlet-name>
        <url-pattern>/</url-pattern>
    </servlet-mapping>

</web-app>
controller中
@Controller
@RequestMapping("/demo")
public class DemoController {
    @GetMapping("/login")
    public  String login(){
        System.out.println("登录");
        return null;
    }
}


 1041
1041


 被折叠的 条评论
为什么被折叠?
被折叠的 条评论
为什么被折叠?
 到【灌水乐园】发言


