


官方文档
https://www.relation-graph.com/#/docs/start
首先需要下载依赖
npm i relation-graph
其次如果没有全局引入relation-graph就需要在组件中引入
import RelationGraph from 'relation-graph';或者
![]()
然后就可以在你的模板中使用relation-graph组件
<RelationGraph ref="graphRef" :options="graphOptions" :on-node-expand="onNodeExpand" :on-node-click="onNodeClick" style="width: 100%;height: 100%;"></RelationGraph><div v-for="(item, index) in dataList" :id="'boxContent'+index" style="width: 150px;padding: 10px;word-break: break-all;position: absolute;top: -2000px;">
{{ item.context }}
</div>这段代码主要因为设计样式与组件原定的样式有差异,只能写定位absolute独立出去,这样自定义的模板结构才能和relation定义的标签居中显示,但又因为在下述渲染方法中拿不到内容的高度,从而计算不了top的高度,所以取巧在template中写固定样式拿到高,进行动态调整内容与relation-graph组件定义的标签居中
graphOptions: {
   debug: false,
   'layout':
   {
     'label': '树',
     'layoutName': 'tree',
     'layoutClassName': 'seeks-layout-center',
     'from': 'bottom',
     // 通过这4个属性来调整 tree-层级距离&节点距离
     'min_per_width': 400,
     'max_per_width': undefined,
     'min_per_height': undefined,
     'max_per_height': 150,
     'levelDistance': '', // 如果此选项有值,则优先级高于上面那4个选项
   },
     'defaultNodeShape': 1,
     'defaultNodeWidth': 200,
     'defaultNodeBorderWidth': 0,
     'defaultLineColor': '#AFAFB0',
     'defaultNodeColor': '#076C99',
     'defaultNodeFontColor': '#FFF',
     'useAnimationWhenRefresh': true,
     "defaultJunctionPoint": "tb",
     "defaultLineShape": 6,
     'disableDragNode': true,
     "defaultLineColor": "#12a5e8",
   },
上述为realtion-graph的一些基础配置,然后再mounted进行调用渲染方法
以下则为relation-graph的自定义的html代码和动态获取所有节点和处理节点之间所对应的关系,以及对节点所对应的操作。
async setGraphData() {
      const __graph_json_data = {
        rootId: "",
        nodes: [],
        lines: [],
      };
      await routerDetail({...参数}).then((res) => {
        if (res.data.code == 0) {
          this.dataList = res.data.data;
          __graph_json_data.rootId = this.dataList[0].id;//赋值根节点,根据后端接口返回类型来
          this.$nextTick(() => {
            this.dataList.forEach((item, index) => {
              item.height =((document.getElementById("boxContent"+index). getBoundingClientRect().height -46)/2)*-1+"px"; //计算需要top的高度
              let obj = {
                html: `<div class="relationBox">
                        <div class="relationBoxTop">
                          <i class="${ item.icon }" style="font-size: 32px;color: #12a5e8"></i>
                        </div>
                        <div class="boxContent" id="${ 'boxContent' + index }" style="top: ${ item.height };">
                          <div class="routeContext">
                            <div class="routeTitle">${ item.title }</div>
                            <div class="routeTime">${ item.time }</div>
                          </div>
                          <div class="routeTime">${ item.context }</div>
                          <a class="routeTime el-icon-download" style="float: right;display: ${ item.a ? "" : "none" }"></a>
                        </div>
                      </div>`,//插入自定义html代码
              };
              __graph_json_data.nodes.push({ ...obj, id: item.id }); //获取所有节点
              if (item.relation && item.relation.length) {
                item.relation.forEach((ite) => {
                  __graph_json_data.lines.push({ from: ite, to: item.id });
                });//处理数据关联节点之间的关系
              }
            });
          });
        } else {
          this.$message.error(res.data.msg);
        }
      });
      //console.log(JSON.stringify(__graph_json_data));
      this.g_loading = false;
      this.$refs.graphRef.setJsonData(__graph_json_data, (graphInstance) => {
        // 这些写上当图谱初始化完成后需要执行的代码
        this.dataList.forEach((item,index)=>{
          const btn = document.getElementById("boxContent"+index);
          let that = this;
          btn.addEventListener("click", function () {
            that.dataList.forEach((ite,idx)=>{
              const btn2 = document.getElementById("boxContent"+idx);
              btn2.className = 'boxContent';
            })
            btn.className = 'boxContentColor';
          });//此处为操作dom元素,点击区域改变样式
        })
        let fullScreen = document.getElementsByClassName('c-mb-button')[0];
        fullScreen.addEventListener('click',function(){
          setTimeout(()=>{
            that.$nextTick(()=>{
              that.$refs.graphRef.refresh();
            })
          },50)
        })//这段代码主要是为了在点击全屏按钮时重新刷新视图
      });
    },
下方则为需要的样式:
<style lang="scss">
.relationBox {
font-size: 12px;
display: flex;
cursor: pointer;
.relationBoxTop {
display: flex;
justify-content: center;
width: 50px;
height: 30px;
line-height: 30px;
}
//初始样式
.boxContent {
padding: 10px;
box-sizing: border-box;
position: absolute;
left: 60px;
background: rgba(247, 247, 247, 0.8);
width: 300px;
word-break: break-all;
border-radius: 5px;
.routeContext {
display: flex;
align-items: center;
justify-content: space-between;
margin-bottom: 5px;
.routeTitle {
font-size: 14px;
color: #27ace9;
font-weight: 700;
}
}
.routeTime {
color: #ccc;
}
}
//点击区域显示的样式
.boxContentColor {
padding: 10px;
box-sizing: border-box;
position: absolute;
left: 60px;
background: #27ace9;
color: #fff;
width: 300px;
word-break: break-all;
border-radius: 5px;
.routeContext {
display: flex;
align-items: center;
justify-content: space-between;
margin-bottom: 5px;
.routeTitle {
font-size: 14px;
color: #fff;
font-weight: 700;
}
}
.routeTime {
color: #fff;
}
}
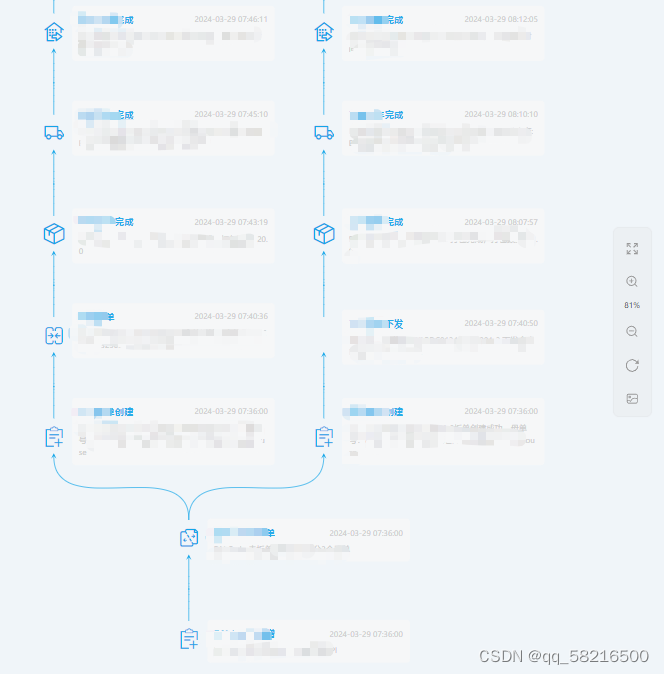
}大致效果如图展示


 5307
5307


 被折叠的 条评论
为什么被折叠?
被折叠的 条评论
为什么被折叠?
 到【灌水乐园】发言


