


Hexo+Github博客搭建教程
注意,这篇文章篇幅较长,主要针对新手,每一步很详细,所以可能会显得比较啰嗦,所以建议基础比较好小伙伴根据目录选择自己感兴趣的部分跳着看,不要文章没看,上来先喷一下!谢谢*[Math Processing Error]⊙o⊙*。
教程内容随意复制使用,引用的话请加一个参考链接,谢谢!
🌈前言
😊前置想法
去年在博客园注册了自己的第一个博客,当时初衷就是想拿来作为自己的在线笔记本,做做学习记录,分享一
些学到的东西,使用第三方提供的博客服务其实也挺方便,现在市面上提供类似服务的博客网站也很多,如
CSDN,博客园,简书等平台,可以直接在上面发表,用户交互做的好,写的文章百度也能搜索的到。但是缺
点是比较不自由,会受到平台的各种限制和恶心的广告,个性化不足。而自己购买域名和服务器,搭建博客的
成本实在是太高了,不光是说这些购买成本,单单是花力气去自己搭这么一个网站,还要定期的维护它,对于
我们大多数人来说,也是没有这样的精力和时间。那么,我们能不能自己定制一个自己喜欢的个性化博客,同
时也不用付出太高的成本啦?
🔎后置选择
这就引出了第三种选择,基于开源框架搭建博客,然后直接在github page平台上托管我们的博客。这样就
可以安心的来写作,又不需要定期维护,基于这个想法,今年8月初暑假在家的的时候开始搭建第一个属于自
己的独立博客,前后断续弄了近一周,到现在稍微有点模样了。我想可能有很多小伙伴应该也想过搭建一个自
己的博客,当然,网上也有一堆详细教程。写这篇博客的目的大概有两个,第一个是当做自己的搭建记录,方
便以后自己随时查看提示修改,第二个是稍稍总结一下具体的搭建步骤以及一些支持个性化定制的博客源码修
改的教程,稍稍分享一下这些修改经验,当然,更多的一些个性化操作需要你自己以后在这个基础上慢慢去摸
索,有些写的不太好的地方还希望看到的小伙伴多多包涵。
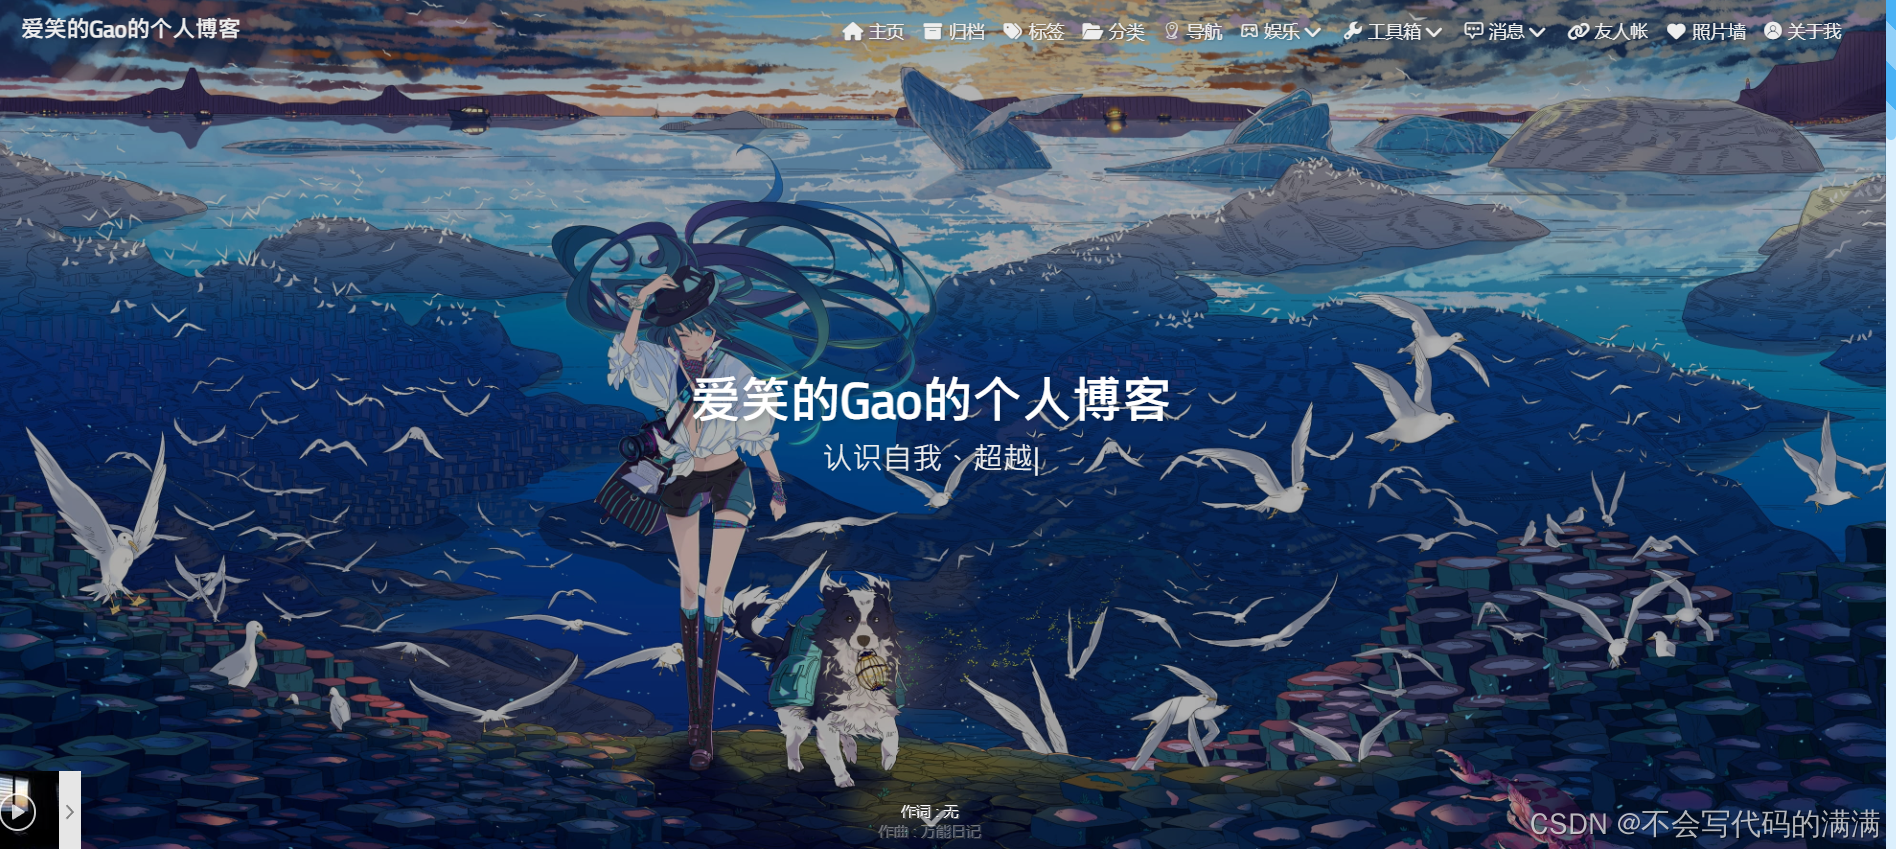
博客初步的页面效果可以看一下我的博客:爱笑的Gao的个人博客,欢迎大家支持访问。
本博客基于Hexo,所以首先要了解一下我们搭建博客所要用到的框架。Hexo是高效的静态网站生成框架,它基于Node.js,快速,简单且功能强大,是搭建博客的首选框架。大家可以进入hexo官网进行详细查看,因为Hexo的创建者是台湾人,对中文的支持很友好,可以选择中文进行查看。通过Hexo,你可以直接使用Markdown语法来撰写博客。相信很多小伙伴写工程都写过README.md文件吧,对,就是这个格式的!写完后只需两三条命令即可将生成的网页上传到github或者coding等代码管理托管平台,然后别人就可以浏览你的博客网页啦。是不是很简单?你无需关心网页源代码的具体生成细节,只需要用心写好你的博客文章内容就行了。
简单总结:
Hexo,产品成熟,使用简单,功能强大,有着丰富的插件资源可供使用者调用,像发布后台 ,搜索系统,评论系统,支持Markdown嵌入语法,相册功能等类似诉求,但是也需要自己去折腾一下,后续我们一步一步介绍。
教程大致分三个部分,
- 第一部分:
hexo的初级搭建还有部署到github page上,以及个人域名的绑定。 - 第二部分:
hexo的基本配置,更换主题,实现多终端工作,以及在coding page部署实现国内外分流 - 第三部分:
hexo添加各种功能,包括搜索的SEO,阅读量统计,访问量统计和评论系统等。
🌈第一部分 搭建
hexo的初级搭建还有部署到github page上,以及个人域名的绑定。
Hexo搭建步骤
- 1.安装
Git - 2.安装
Node.js - 3.安装
Hexo - 4.
GitHub创建个人仓库 - 5.生成
SSH添加到GitHub - 6.将
hexo部署到GitHub - 7.设置个人域名
- 8.发布文章
1. 安装Git
为了把本地的网页文件上传到github上面去,需要用到工具———Git[下载地址]。Git是目前世界上最先进的分布式版本控制系统,可以有效、高速的处理从很小到非常大的项目版本管理。Git非常强大,建议每个人都去了解一下。廖雪峰老师的Git教程写的非常好,大家可以看一下。Git教程
**windows:**到git官网上下载.exe文件,Download git,安装选项还是全部默认,只不过最后一步添加路径时选择Use Git from the Windows Command Prompt,这样我们就可以直接在命令提示符里打开git了。
顺便说一下,
windows在git安装完后,就可以直接使用git bash来敲命令行了,不用自带的cmd,cmd有点难用。
**linux:**对linux来说实在是太简单了,因为最早的git就是在linux上编写的,只需要一行代码
sudo apt-get install git
安装完成后在命令提示符中输入git --version来查看一下版本验证是否安装成功。
2. 安装nodejs
Hexo是基于node.js编写的,所以需要安装一下node.js和里面的npm工具。
**windows:**下载稳定版或者最新版都可以Node.js,安装选项全部默认,一路点击Next。
最后安装好之后,按Win+R打开命令提示符,输入node -v和npm -v,如果出现版本号,那么就安装成功了。
**linux:**命令行安装:
sudo apt-get install nodejs
sudo apt-get install npm
不过不推荐命令行安装,有时候有问题,建议直接到nodejs官网去下载,如下所示:

然后解压到你指定的文件夹即可,比如我解压到我系统的 C:\Program Files\nodejs\New Folder目录下了,如图:

注意本压缩包是
.tar.xz格式的,需要两次解压
配置一下环境变量
sudo vim /etc/profile
Bash
复制下面两行到刚打开的profile文件最底部(注意node的安装地址/home/shw/MySoftwares/node-v12.8.0-linux-x64换成自己的):
export NODE_HOME=/home/shw/MySoftwares/node-v12.8.0-linux-x64
export PATH=$PATH:$NODE_HOME/bin
Bash
保存后退出,再执行下面命令将环境变量生效:
source /etc/profile
Bash
将目录软链接到全局环境下(命令后面的/usr/local/bin/node是固定的)
sudo ln -s /home/shw/MySoftwares/node-v12.8.0-linux-x64/node /usr/local/bin/node
sudo ln -s /home/shw/MySoftwares/node-v12.8.0-linux-x64/npm /usr/local/bin/npm
这样安装好了以后使用npm安装的包(比如:ionic serve),使用包的命令时可能会提示找不到命令,没关系,在用户目录下终端执行下面命令*[Math Processing Error]固定写法*:
echo -e "export PATH=$(npm prefix -g)/bin:$PATH" >> ~/.bashrc && source ~/.bashrc
这样我们在所有用户下,都可以使用npm,也可以使用npm安装的包的命令。成功的将nodejs安装并配置到全局环境下。
安装完后,打开命令行终端,输入:
node -v
npm -v
检查一下有没有安装成功
添加国内镜像源
如果没有梯子的话,可以使用阿里的国内镜像进行加速。
npm config set registry https://registry.npm.taobao.org
3. 安装Hexo
前面git和nodejs安装好后,就可以安装hexo了,你可以先创建一个文件夹MyBlog,用来存放自己的博客文件,然后cd到这个文件夹下(或者在这个文件夹下直接右键git bash打开)。
比如我的博客文件都存放在D:\Study\MyBlog目录下。
在该目录下右键点击Git Bash Here,打开git的控制台窗口,以后我们所有的操作都在git控制台进行,就不用Windows自带的cmd了。
定位到该目录下,输入npm install -g hexo-cli安装Hexo。可能会有几个报错,无视它就行。
npm install -g hexo-cli
安装完后输入hexo -v验证是否安装成功。
至此hexo就安装完了。
接下来初始化一下hexo,即初始化我们的网站,进入我们主题根目录Hexo,输入hexo init初始化文件夹
hexo init
这个Hexo可以自己取什么名字都行,然后,接着输入npm install安装必备的组件。
新建完成后,指定文件夹Hexo目录下有:
node_modules:依赖包public:存放生成的页面scaffolds:生成文章的一些模板source:用来存放你的文章themes:主题**_config.yml:博客的配置文件**
这样本地的网站配置也弄好啦,输入hexo g生成静态网页,然后输入hexo s打开本地服务器,
hexo g
hexo server(或者简写:hexo s))

按ctrl+c关闭本地服务器。
4. 注册Github账号创建个人仓库
接下来就去注册一个github账号,用来存放我们的网站。大多数小伙伴应该都有了吧,作为一个合格的程序猿(媛)还是要有一个的。
打开https://github.com/,新建一个项目仓库New repository,如下所示:

要创建一个和你用户名相同的仓库,后面加.[http://github.io,只有这样,将来要部署到
GitHub page的时候,才会被识别,也就是http://xxxx.github.io,其中xxx就是你注册GitHub的用户名。例如我的:http://gaoziman.github.io
5. 生成SSH添加到GitHub
生成SSH添加到GitHub,连接Github与本地。
右键打开git bash,然后输入下面命令:
git config --global user.name "yourname"
git config --global user.email "youremail"
注意:第一次使用git后需要将用户名和邮箱进行初始化
这里的yourname输入你的GitHub用户名,youremail输入你GitHub的邮箱。这样GitHub才能知道你是不是对应它的账户。例如我的:
git config --global user.name "gaiolan"
git config --global user.email "2942892675@qq.com"
可以用以下两条,检查一下你有没有输对
git config user.name
git config user.email
然后创建SSH,一路回车
ssh,简单来讲,就是一个秘钥,其中,id_rsa是你这台电脑的私人秘钥,不能给别人看的,id_rsa.pub是公共秘钥,可以随便给别人看。把这个公钥放在GitHub上,这样当你链接GitHub自己的账户时,它就会根据公钥匹配你的私钥,当能够相互匹配时,才能够顺利的通过git上传你的文件到GitHub上。
ssh-keygen -t rsa -C "youremail"
这个时候它会告诉你已经生成了.ssh的文件夹。在你的电脑中找到这个文件夹。或者git bash中输入
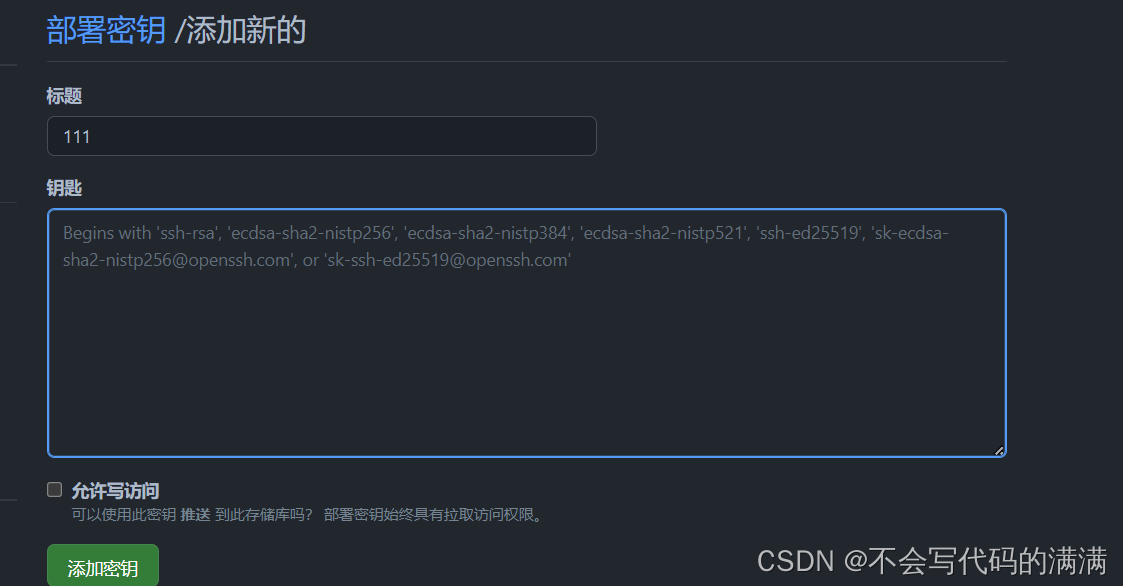
cat ~/.ssh/id_rsa.pub
将输出的内容复制到框中,点击确定保存。
打开github,在头像下面点击settings,再点击SSH and GPG keys,新建一个SSH,名字随便取一个都可以,把你的id_rsa.pub里面的信息复制进去。如图:
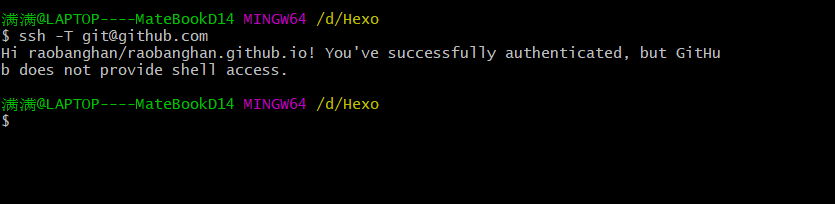
在git bash输入ssh -T git@github.com,如果如下图所示,出现你的用户名,那就成功了。
6. 将hexo部署到GitHub
这一步,我们就可以将hexo和GitHub关联起来,也就是将hexo生成的文章部署到GitHub上,打开博客根目录下的_config.yml文件,这是博客的配置文件,在这里你可以修改与博客配置相关的各种信息。
修改最后一行的配置:
deploy:
  type: git
  repository: https://github.com/gaoziman/gaoziman.github.io.git
  branch: master
repository修改为你自己的github项目地址即可就是部署时,告诉工具,将生成网页通过git方式上传到你对应的链接仓库中。
这个时候需要先安装deploy-git ,也就是部署的命令,这样你才能用命令部署到GitHub。
npm install hexo-deployer-git --save
然后
hexo clean
hexo generate
hexo deploy
其中 hexo clean清除了你之前生成的东西,也可以不加。 hexo generate顾名思义,生成静态文章,可以用 hexo g缩写 ,hexo deploy部署文章,可以用hexo d缩写
注意
deploy时可能要你输入username和password。
得到下图就说明部署成功了,过一会儿就可以在http://yourname.github.io 这个网站看到你的博客了!!

7. 设置个人域名
现在你的个人网站的地址是yourname.github.io,如果觉得这个网址逼格不太够,这就需要你设置个人域名了。但是需要花钱。
不过,这一步不是必要的,如果目前还不想买域名可以先跳过,继续看后面的,以后想买域名了在还看这块
首先你得购买一个专属域名,xx云都能买,看你个人喜好了。
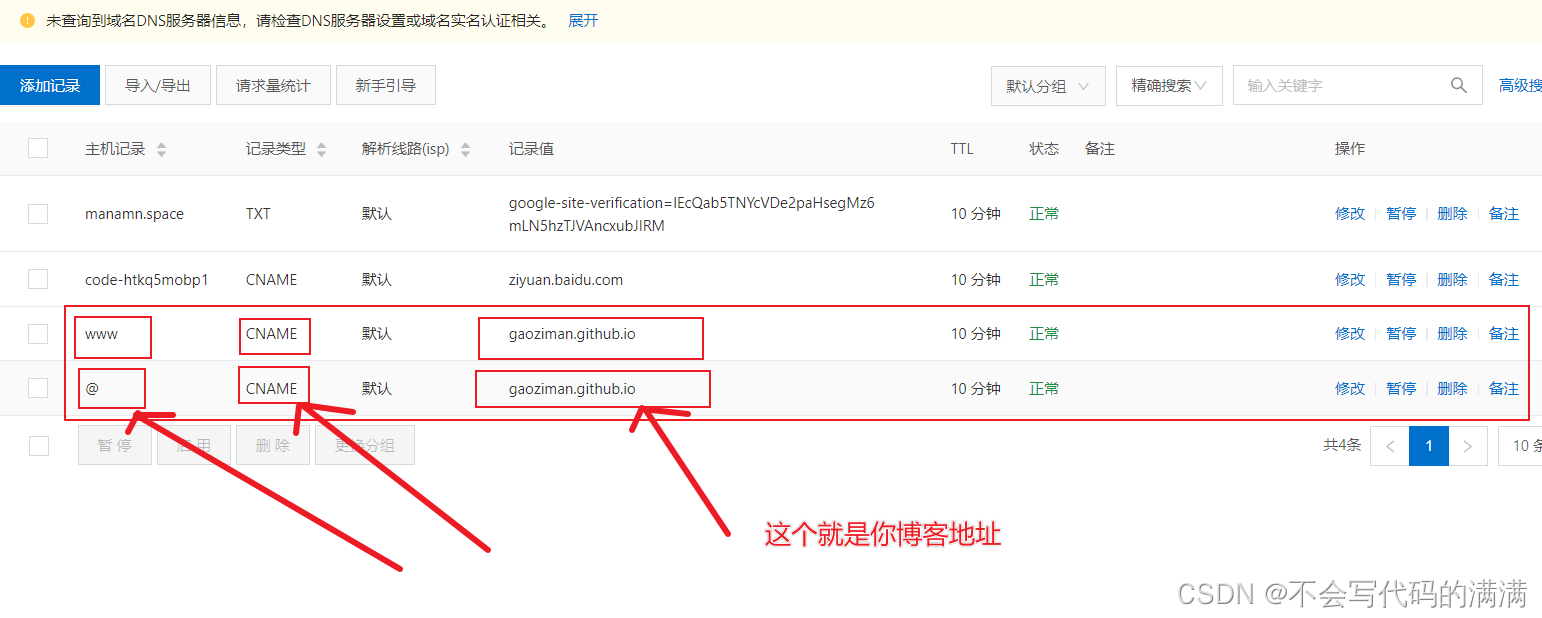
这篇以腾讯云为例,阿里云官网购买:

然后实名认证后进入腾讯云控制台,点云解析进去,找到你刚买的域名,点进去添加两条解析记录,如下图所示:
然后打开你的github博客项目,点击settings,拉到下面Custom domain处,填上你自己的域名,保存:
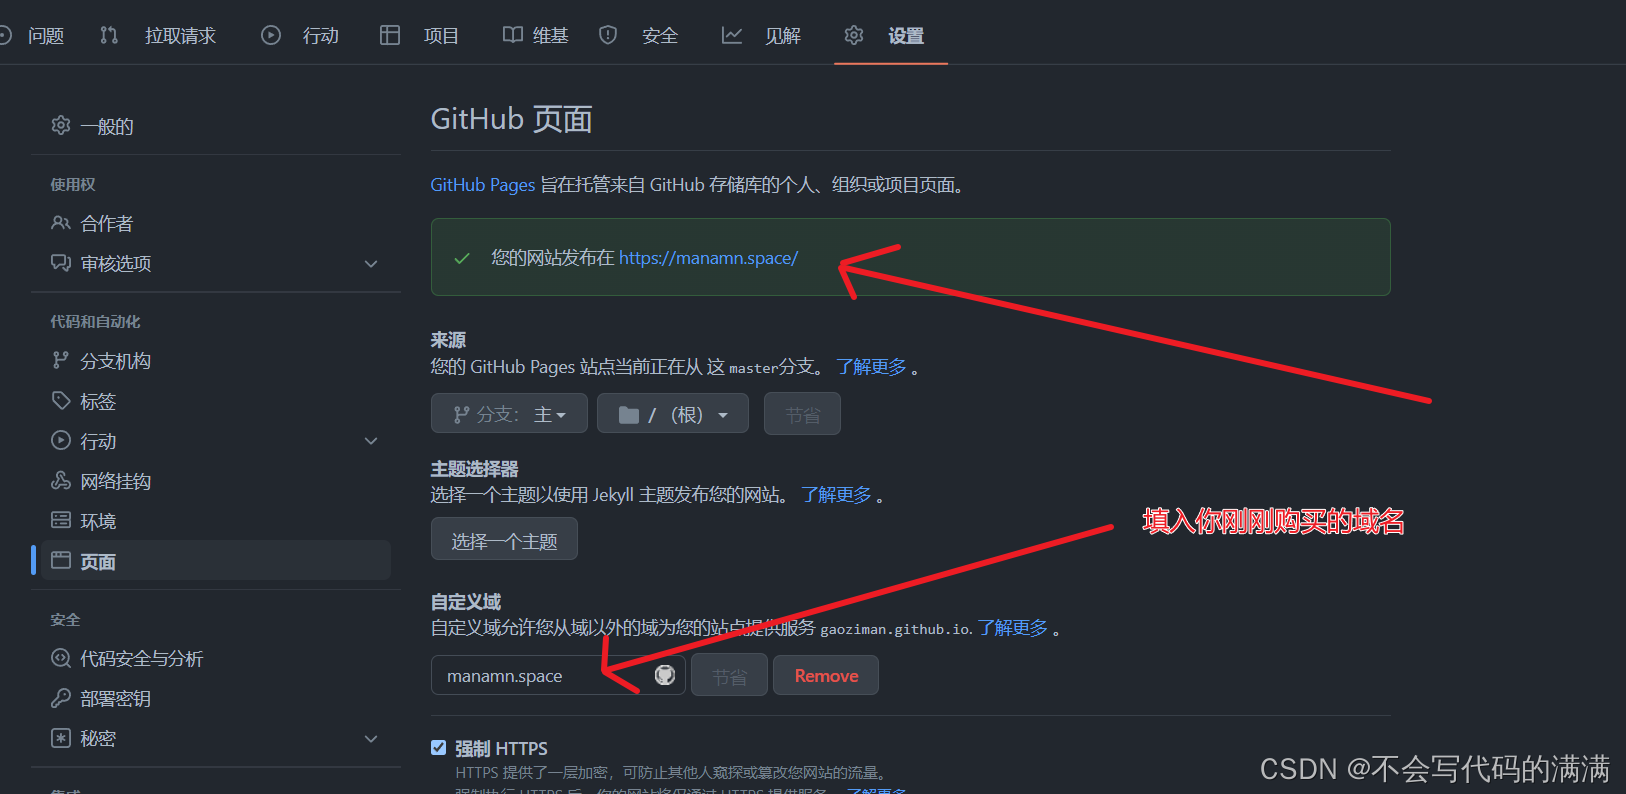
这时候你的项目根目录应该会出现一个名为CNAME的文件了。如果没有的话,打开你本地博客/source目录,我的是D:\Study\MyBlog\source,新建CNAME文件,注意没有后缀。然后在里面写上你的域名,保存。最后运行hexo g、hexo d上传到github。
过不了多久,再打开你的浏览器,输入你自己的专属域名,就可以看到搭建的网站啦!
8. 写文章、发布文章
首先在博客根目录下右键打开git bash,安装一个扩展npm i hexo-deployer-git。
然后输入hexo new post "我的第一篇博客",新建一篇文章。
然后打开D:\Hexo\source\_posts的目录,可以发现下面多了一个文件夹和一个.md文件,一个用来存放你的图片等数据,另一个就是你的文章文件啦。
你可以会直接在vscode里面编写markdown文件,可以实时预览,也可以用用其他编辑md文件的软件的工具编写。
编写完markdown文件后,根目录下输入hexo g生成静态网页,然后输入hexo s可以本地预览效果,最后输入hexo d上传到github上。这时打开你的github.io主页就能看到发布的文章啦。
到这儿基本第一部分就完成了,已经完整搭建起一个比较简陋的个人博客了,接下来我们就可以对我们的博客进行个性化定制了。
🌈第二部 定制主题
我们要定制自己的博客的话,首先就要来了解一下Hexo博客的一些目录和文件的作用,以及如何平滑更换漂亮的主题模板并加入自己的定制源代码实现个性化定制
1. Hexo相关目录文件
1.1 博客目录构成介绍
我们博客的目录结构如下:
- node_modules
- public
- scaffolds
- source
    - _data
    - _posts
    - about
    - archives
    - categories
    - friends
    - tags
- themes
node_modules是node.js各种库的目录,public是生成的网页文件目录,scaffolds里面就三个文件,存储着新文章和新页面的初始设置,source是我们最常用到的一个目录,里面存放着文章、各类页面、图像等文件,themes存放着主题文件,一般也用不到。
我们平时写文章只需要关注source/_posts这个文件夹就行了。
1.2 hexo基本配置
在文件根目录下的_config.yml,就是整个hexo框架的配置文件了。可以在里面修改大部分的配置。详细可参考官方的配置描述。
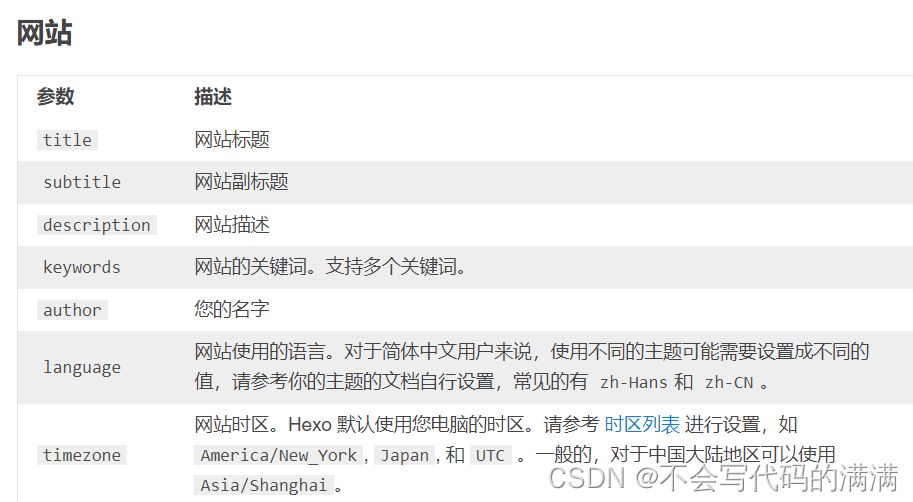
1.2.1 网站
参数描述title网站标题subtitle网站副标题description网站描述author您的名字language网站使用的语言timezone网站时区。Hexo 默认使用您电脑的时区。时区列表。比如说:America/New_York, Japan, 和 UTC 。
其中,description主要用于SEO,告诉搜索引擎一个关于您站点的简单描述,通常建议在其中包含您网站的关键词。author参数用于主题显示文章的作者。
1.2.2 网址
参数描述url网址root网站根目录 permalink文章的永久链接格式permalink_defaults永久链接中各部分的默认值
在这里,你需要把url改成你的网站域名。
permalink,也就是你生成某个文章时的那个链接格式。
比如我新建一个文章叫temp.md,那么这个时候他自动生成的地址就是http://yoursite.com/2022/05/08/temp。
以下是官方给出的示例,关于链接的变量还有很多,需要的可以去官网上查找 永久链接 。
参数结果:year/:month/:day/:title/2019/08/10/hello-world :year-:month-:day-:title.html 2019-08-10-hello-world.html :category/:titlefoo/bar/hello-world
再往下翻,中间这些都默认就好了。
theme: landscap
theme就是选择什么主题,也就是在themes这个文件夹下,在官网上有很多个主题,默认给你安装的是lanscape这个主题。当你需要更换主题时,在官网上下载,把主题的文件放在themes文件夹下,再修改这个主题参数就可以了。
1.2.3 Front-matter
Front-matter 是md文件最上方以 ---分隔的区域,用于指定个别文件的变量,举例来说:
title: Hexo+Github博客搭建记录
date: 2022-05-08 15:15:44
下是预先定义的参数,您可在模板中使用这些参数值并加以利用。
参数描述layout布局title标题date建立日期updated更新日期comments开启文章的评论功能tags标签(不适用于分页)categories分类(不适用于分页)permalink覆盖文章网址
其中,分类和标签需要区别一下,分类具有顺序性和层次性,也就是说Foo,Bar不等于Bar,Foo;而标签没有顺序和层次。
---
title: Hexo+Github博客搭建记录
date: 2022-05-08 15:15:44
author: 爱笑的Gao
img: /medias/banner/7.jpg
coverImg: /medias/banner/7.jpg
top: true
cover: true
toc: true
password: 5f15b28ffe43f8be4f239bdd9b69af9d80dbafcb20a5f0df5d1677a120ae9110
mathjax: true
summary: 这是你自定义的文章摘要内容,如果这个属性有值,文章卡片摘要就显示这段文字,否则程序会自动截取文章的部分内容作为摘要
tags:
- Hexo
- Github
- 博客
categories:
- 软件安装与配置
---
1.2.4 layout(布局)
1.2.4.1 post
当你每一次使用代码
hexo new XXX
它其实默认使用的是post这个布局,也就是在source文件夹下的_post里面。
Hexo有三种默认布局:post、page和draft,它们分别对应不同的路径,而您自定义的其他布局和post相同,都将储存到source/_posts文件夹。
而new这个命令其实是:
hexo new [layout] <title>
只不过这个layout默认是post罢了。
1.2.4.2 page
如果你想另起一页,那么可以使用
hexo new page newpage
系统会自动给你在source文件夹下创建一个newpage文件夹,以及newpage文件夹中的index.md,这样你访问的newpage对应的链接就是http://xxx.xxx/newpage
1.2.4.3 draft
draft是草稿的意思,也就是你如果想写文章,又不希望被看到,那么可以
hexo new draft newdraft
这样会在source/_draft中新建一个newdraft.md文件,如果你的草稿文件写的过程中,想要预览一下,那么可以使用
hexo server --draft
在本地端口中开启服务预览。
如果你的草稿文件写完了,想要发表到post中,
hexo publish draft newdraft
就会自动把newdraft.md发送到post中。
2. 更换主题
我们在了解Hexo博客文件基础之后,知道主题文件就放在themes文件下,那么我们就可以去Hexo官网下载喜欢的主题,复制进去然后修改参数即可。
网上大多数主题都是github排名第一的Next主题,但是我个人不是很喜欢,我在网上看到一个主题感觉还不错:hexo-theme-matery,地址在传送门。这个主题看着比较漂亮,并且响应式比较友好,点起来很舒服,功能也比较很多。
当然,人各有异,这个主题风格也不一定是你喜欢,那么你也可以跟着这教程类似的方法替换成你喜欢的就行了。
特性:
- 简单漂亮,文章内容美观易读
- butterfly 设计
- 响应式设计,博客在桌面端、平板、手机等设备上均能很好的展现
- 首页轮播文章及每天动态切换
Banner图片 - 瀑布流式的博客文章列表(文章无特色图片时会有
24张漂亮的图片代替) - 时间轴式的归档页
- 词云的标签页和雷达图的分类页
- 丰富的关于我页面(包括关于我、文章统计图、我的项目、我的技能、相册等)
- 可自定义的数据的友情链接页面
- 支持文章置顶和文章打赏
- 支持
MathJax TOC目录- 可设置复制文章内容时追加版权信息
- 可设置阅读文章时做密码验证
- Gitalk、Gitment、Valine 和 Disqus 评论模块(推荐使用
Gitalk) - 集成了不蒜子统计、谷歌分析(
Google Analytics)和文章字数统计等功能 - 支持在首页的音乐播放和视频播放功能
他的介绍文档写得非常的详细,还有中英文两个版本。效果图如下:
首先先按照文档教程安装一遍主题,然后是可以正常打开的,如果你是一般使用的话,基本没啥问题了。不过有些地方有些地方可以根据你自己的习惯和喜好修改一下, 下面记录一下我这个博客修改了的一些地方。
2.1 新建文章模板修改
首先为了新建文章方便,我们可以修改一下文章模板,建议将/scaffolds/post.md修改为如下代码:
---
title: {{ title }}
date: {{ date }}
author:
img:
coverImg:
top: false
cover: false
toc: true
mathjax: false
password:
summary:
tags:
categories:
---
这样新建文章后 一些Front-matter参数不用你自己补充了,修改对应信息就可以了。
2.2 添加404页面
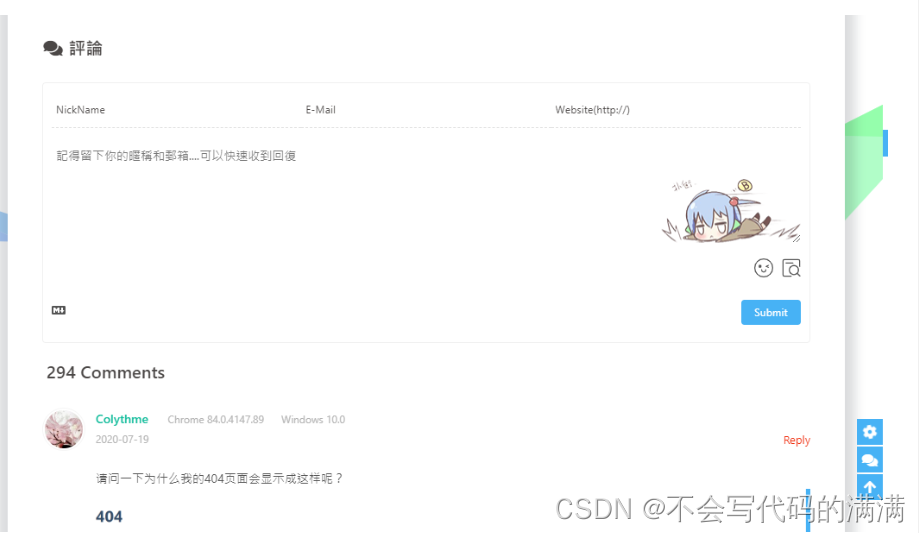
原来的主题没有404页面,我们加一个。首先在/source/目录下新建一个404.md,内容如下:
title: 404
date: 2019-08-5 16:41:10
type: "404"
layout: "404"
description: "Oops~,我崩溃了!找不到你想要的页面 :("
然后在/themes/butterfly/layout/目录下新建一个404.ejs文件,内容如下:
<style type="text/css">
    /* don't remove. */
    .about-cover {
        height: 75vh;
    }
</style>

<div class="bg-cover pd-header about-cover">
    <div class="container">
        <div class="row">
            <div class="col s10 offset-s1 m8 offset-m2 l8 offset-l2">
                <div class="brand">
                    <div class="title center-align">
                        404
                    </div>
                    <div class="description center-align">
                        <%= page.description %>
                    </div>
                </div>
            </div>
        </div>
    </div>
</div>

<script>
    // 每天切换 banner 图.  Switch banner image every day.
    $('.bg-cover').css('background-image', 'url(/medias/banner/' + new Date().getDay() + '.jpg)');
</script>
2.3“关于”页面增加简历(可选)
修改/themes/matery/butterfly/about.ejs,找到<div class="card">标签,然后找到它对应的</div>标签,接在后面新增一个card,语句如下:
<div class="card">
<div class="card-content">
<div class="card-content article-card-content">
<div class="title center-align" data-aos="zoom-in-up">
<i class="fa fa-address-book"></i> <%- __('myCV') %>
</div>
<div id="articleContent" data-aos="fade-up">
<%- page.content %>
</div>
</div>
</div>
</div>
Html
这样就会多出一张card,然后可以在/source/about/index.md下面写上你的简历了,当然这里的位置随你自己设置,你也可以把简历作为第一个card。
2.4 数学公式渲染和代码高亮
2.4.1 解决mathjax与代码高亮的冲突
如果你按照教程安装了代码高亮插件hexo-prism-plugin,单独使用是没有问题的,但如果你又使用了mathjax,并且按照网上教程,安装kramed插件并修改了js文件里的正则表达式(为了解决markdown和mathjax的语法冲突),那你的代码就无法高亮了。解决方法很简单,别用kramed插件了,还用原来自带的marked插件,直接改它的正则表达式就行了。
2.4.2 加数学公式显示
打开/themes/matery/layout中的post.ejs文件,在最下方粘贴如下代码:
<script type="text/javascript" src="http://cdn.mathjax.org/mathjax/latest/MathJax.js?config=default"></script>
Javascript
由于markdown语法与mathjax语法存在冲突,所以还需要修改源文件。
打开/node_modules/marked/lib中的marked.js文件,第539行的escape:处替换成:
escape: /^$[`*\[\]()#$+\-.!_>])/
第553行的em:处替换成:
em: /^\*((?:\*\*|[\s\S])+?)\*(?!\*)/
这时在文章里写数学公式基本没有问题了,但是要注意:
数学公式中如果出现了连续两个{,中间一定要加空格!
举个例子:
行内公式:[Math Processing Error]y=f(x)
代码:
$y = f(x)$
行间公式:
[Math Processing Error]y=fg1(x)
代码:
\\[y = {f_{ {g_1}}}(x)\\]
注意上面花括号之间有空格!
2.5 增加建站时间
效果图 :

-
编辑
themes\Butterfly\layout\includes\footer.pug文件,插入以下代码:注意与
if同级
#running-time
-
编辑
_config.butterfly.yml文件在
inject->bottom下面添加如下内容:
- <script>setInterval(()=>{let create_time=Math.round(new Date("2020-3-21-20:14:00").getTime()/1000);let timestamp=Math.round((new Date().getTime()+8*60*60*1000)/1000);let second=timestamp-create_time;let time=new Array(0,0,0,0,0);if(second>=365*24*3600){time[0]=parseInt(second/(365*24*3600));second%=365*24*3600}if(second>=24*3600){time[1]=parseInt(second/(24*3600));second%=24*3600}if(second>=3600){time[2]=parseInt(second/3600);second%=3600}if(second>=60){time[3]=parseInt(second/60);second%=60}if(second>0){time[4]=second}currentTimeHtml='小破站已经安全运行 '+time[0]+' 年 '+time[1]+' 天 '+time[2]+' 时 '+time[3]+' 分 '+time[4]+' 秒';var elementById=document.getElementById('running-time');if(elementById){elementById.innerHTML=currentTimeHtml}},1000);</script>
2.6 修改不蒜子初始化计数
因为不蒜子至今未开放注册,所以没办法在官网修改初始化,只能自己动手了。和上一条一样,我们在/themes/butterfly/layout/_partial里的footer.ejs文件最后加上:
<script>
    $(document).ready(function () {

        var int = setInterval(fixCount, 50);  // 50ms周期检测函数
        var pvcountOffset = 80000;  // 初始化首次数据
        var uvcountOffset = 20000;

        function fixCount() {
            if (document.getElementById("busuanzi_container_site_pv").style.display != "none") {
                $("#busuanzi_value_site_pv").html(parseInt($("#busuanzi_value_site_pv").html()) + pvcountOffset);
                clearInterval(int);
            }
            if ($("#busuanzi_container_site_pv").css("display") != "none") {
                $("#busuanzi_value_site_uv").html(parseInt($("#busuanzi_value_site_uv").html()) + uvcountOffset); // 加上初始数据
                clearInterval(int); // 停止检测
            }
        }
    });
</script>
然后把上面几行有段代码:
<% if (theme.busuanziStatistics && theme.busuanziStatistics.totalTraffic) { %>
<span id="busuanzi_container_site_pv">
<i class="fa fa-heart-o"></i>
本站总访问量 <span id="busuanzi_value_site_pv" class="white-color"></span>
</span>
<% } %>
<% if (theme.busuanziStatistics && theme.busuanziStatistics.totalNumberOfvisitors) { %>
<span id="busuanzi_container_site_uv">
人次, 访客数 <span id="busuanzi_value_site_uv" class="white-color"></span> 人.
</span>
<% } %>
Html
修改为:
<% if (theme.busuanziStatistics && theme.busuanziStatistics.totalTraffic) { %>
<span id="busuanzi_container_site_pv" style='display:none'>
<i class="fa fa-heart-o"></i>
本站总访问量 <span id="busuanzi_value_site_pv" class="white-color"></span>
</span>
<% } %>
<% if (theme.busuanziStatistics && theme.busuanziStatistics.totalNumberOfvisitors) { %>
<span id="busuanzi_container_site_uv" style='display:none'>
人次, 访客数 <span id="busuanzi_value_site_uv" class="white-color"></span> 人.
</span>
<% } %>
其实就是增加了两个style='display:none'而已。
2.7 添加首页磁贴
效果图 :

其实二步就行了,不用像网上有些教程那么复杂。
**第一步:**安装插件,在博客根目录[Blogroot]下打开终端,运行以下指令:
npm install hexo-butterfly-categories-card --save
第二步: 添加配置信息,以下为写法示例
在站点配置文件_config.yml或者主题配置文件_config.butterfly.yml中添加
# hexo-butterfly-categories-card
# see https://akilar.top/posts/a9131002/
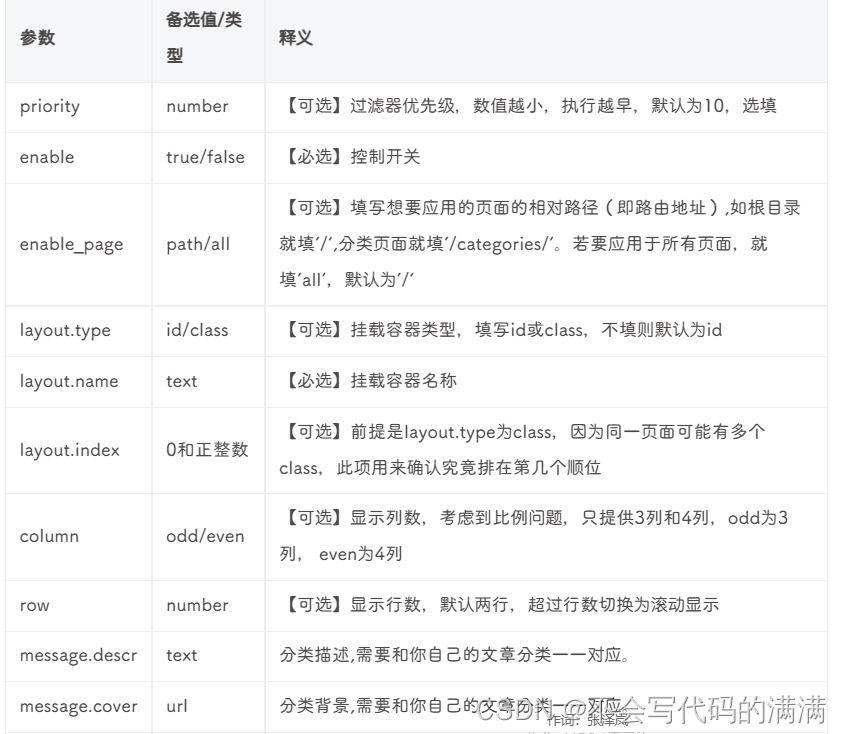
categoryBar:
enable: true # 开关
priority: 5 #过滤器优先权
enable_page: / # 应用页面
layout: # 挂载容器类型
type: id
name: recent-posts
index: 0
column: odd # odd:3列 | even:4列
row: 1 #显示行数,默认两行,超过行数切换为滚动显示
message:
- descr: Ubuntu指南
cover: https://npm.elemecdn.com/akilar-candyassets/image/cover1.webp
- descr: 玩转Win10
cover: https://npm.elemecdn.com/akilar-candyassets/image/cover2.webp
- descr: 长篇小说连载
cover: https://npm.elemecdn.com/akilar-candyassets/image/cover3.webp
- descr: 个人日记
cover: https://npm.elemecdn.com/akilar-candyassets/image/cover4.webp
- descr: 诗词歌赋
cover: https://npm.elemecdn.com/akilar-candyassets/image/cover5.webp
- descr: 杂谈教程
cover: https://npm.elemecdn.com/akilar-candyassets/image/cover6.webp
custom_css: https://npm.elemecdn.com/hexo-butterfly-categories-card@1.0.0/lib/categorybar.css
第三步:参数释义
然后hexo g再hexo s就能预览出效果了。
2.8 添加评论插件
由于这个主题自带了gittalk、gitment、valine等评论插件,所以我们只需要对应插件参数就行了,这个博客用的是valine,如下:
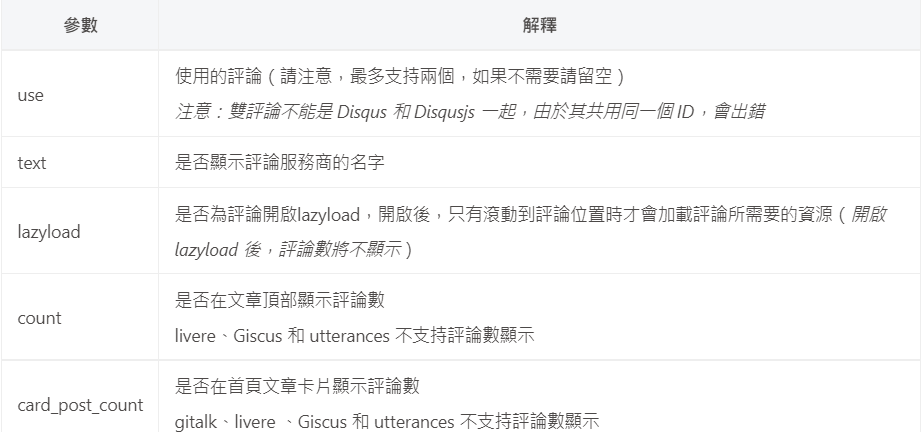
從3.0.0開始,開啟評論需要在comments-use中填寫你需要的評論。
支持雙評論顯示,只需要配置兩個評論(第一個為默認顯示)
comments:
  # Up to two comments system, the first will be shown as default
  # Choose: Disqus/Disqusjs/Livere/Gitalk/Valine/Waline/Utterances/Facebook Comments/Twikoo
  use: Valine,Disqus
  text: true # Display the comment name next to the button
  # lazyload: The comment system will be load when comment element enters the browser's viewport.
  # If you set it to true, the comment count will be invalid
  lazyload: true
  count: true # Display comment count in top_img
  card_post_count: false # Display comment count in Home Page
单评论
双评论

显示test

不显示test
当然也可以用其他评论插件,只需要配置对应项就是了,不是自带的可以照着网上的教程自己弄一个,类似的文章有很多,可以搜索关键字就行了。
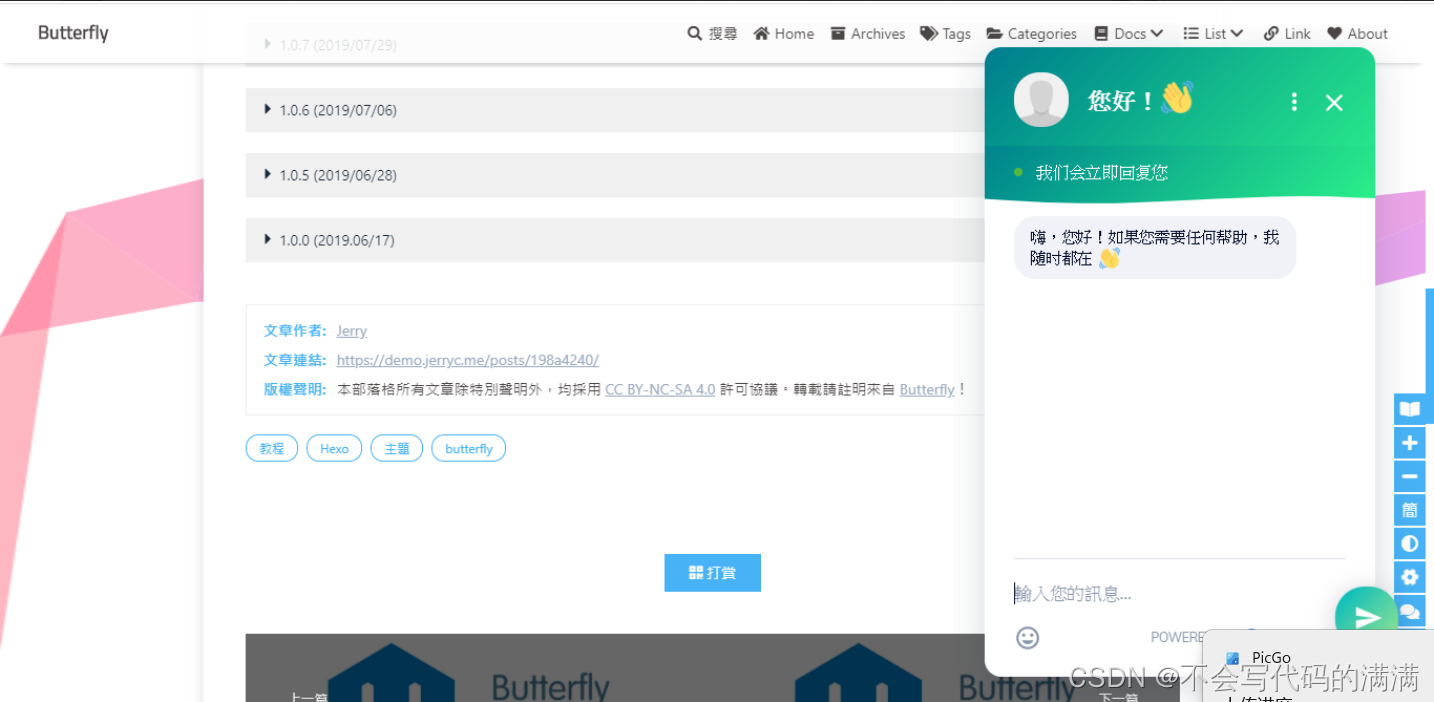
2.9 添加在线聊天功能
从3.0开始,Butterfly主题内置了多种在綫聊天工具。你可以选择开启一种,方便你与访客的交流。
{% tabs test1 %}
这些工具都提供了一个按钮可以打开/关闭聊天窗口。
主题也提供了一个集合主题特色的按钮来替换这些工具本身的按钮,这个聊天按钮将会出现在右下角里。
你只需要把chat_btn打开就行。
修改 主题配置文件
配置chatra,需要知道Public key
打开chatra并註册账号。
你可以在Preferences中找到Public key
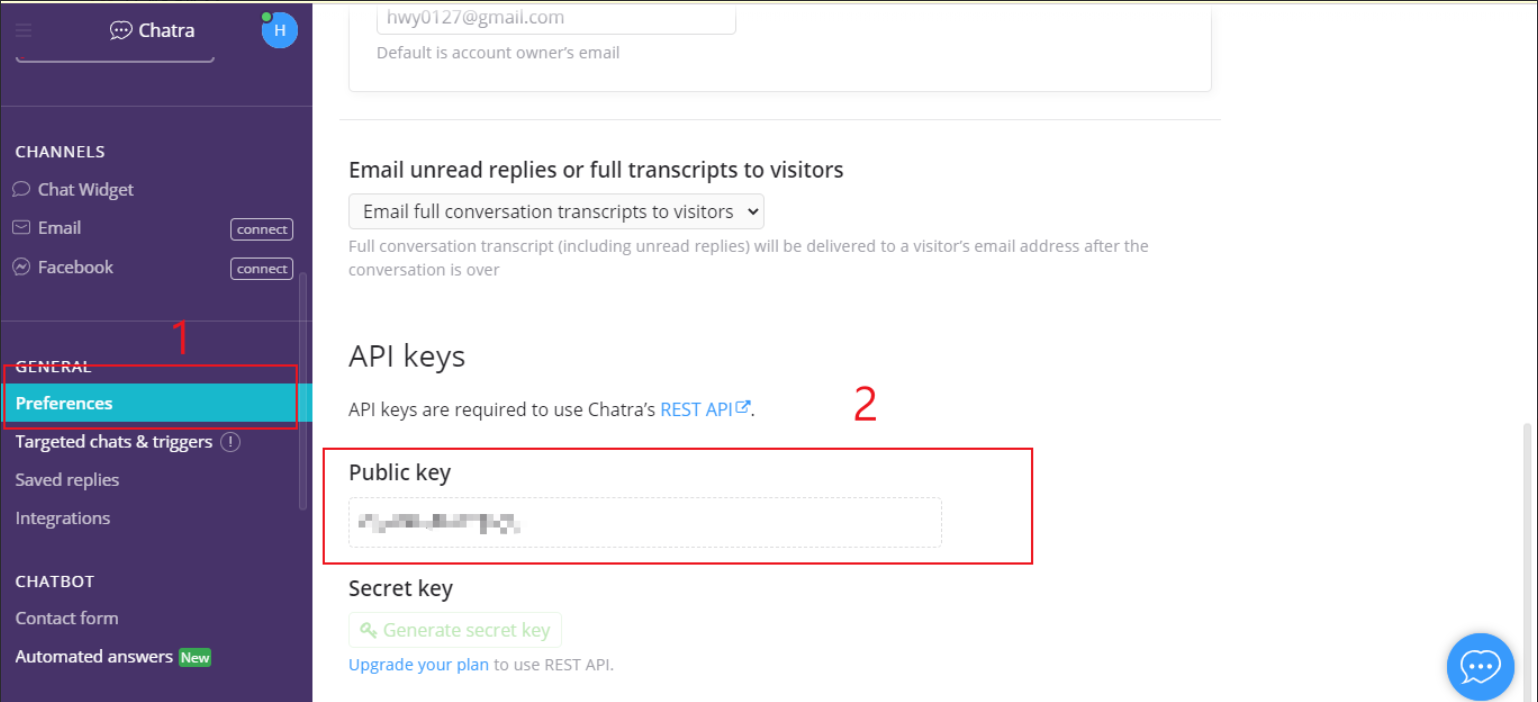
修改 主题配置文件
# chatra
# https://chatra.io/
chatra:
  enable: true
  id: xxxxxxxx
chatra的样式你可以Chat Widget自行配置
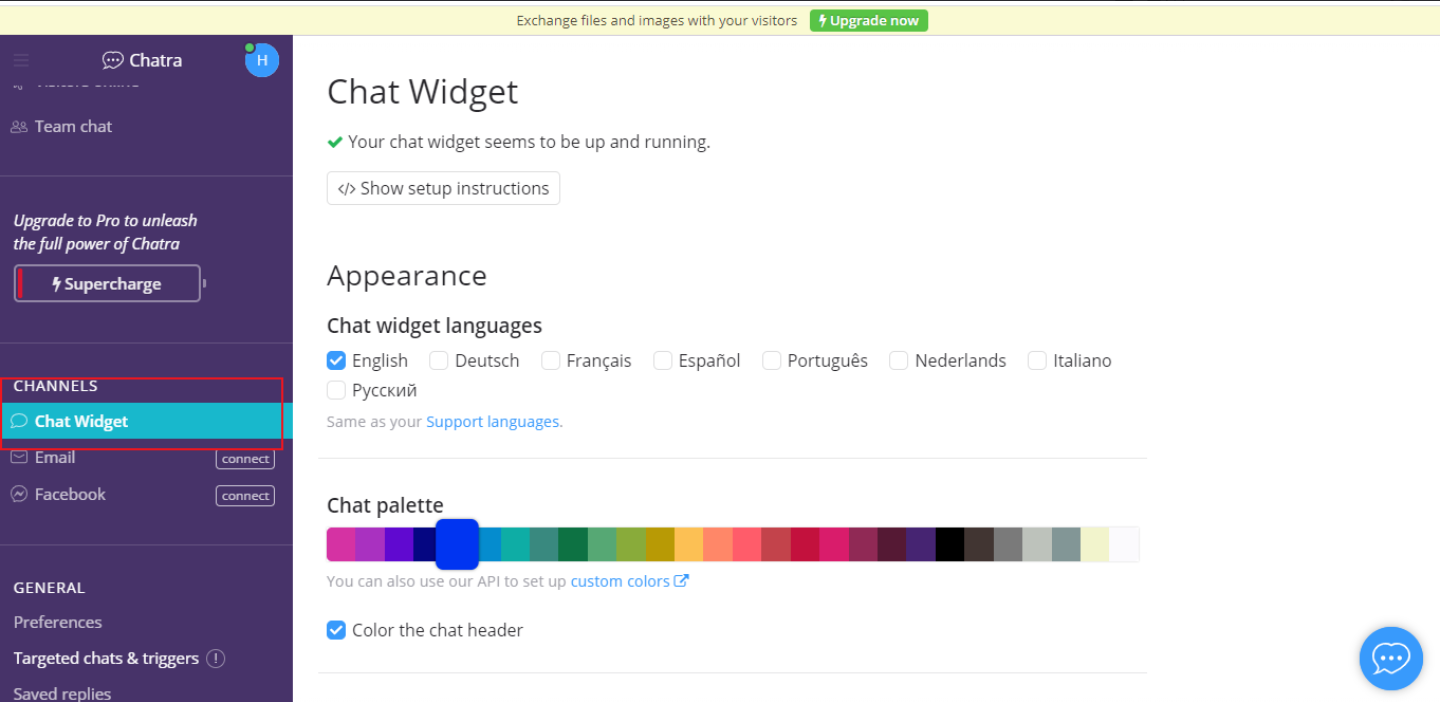
Demo

配置tidio,需要知道Public key
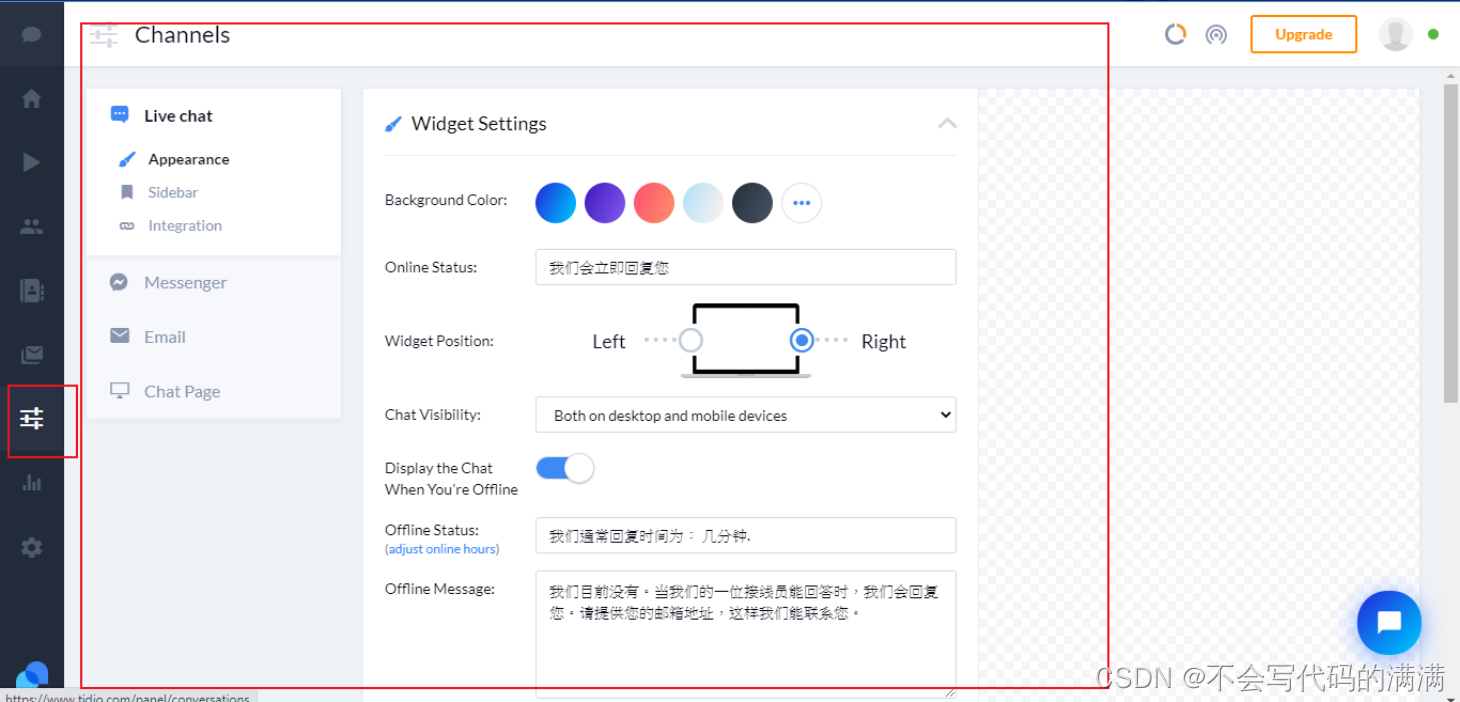
打开tidio并註册账号。
你可以在Preferences > Developer中找到Public key
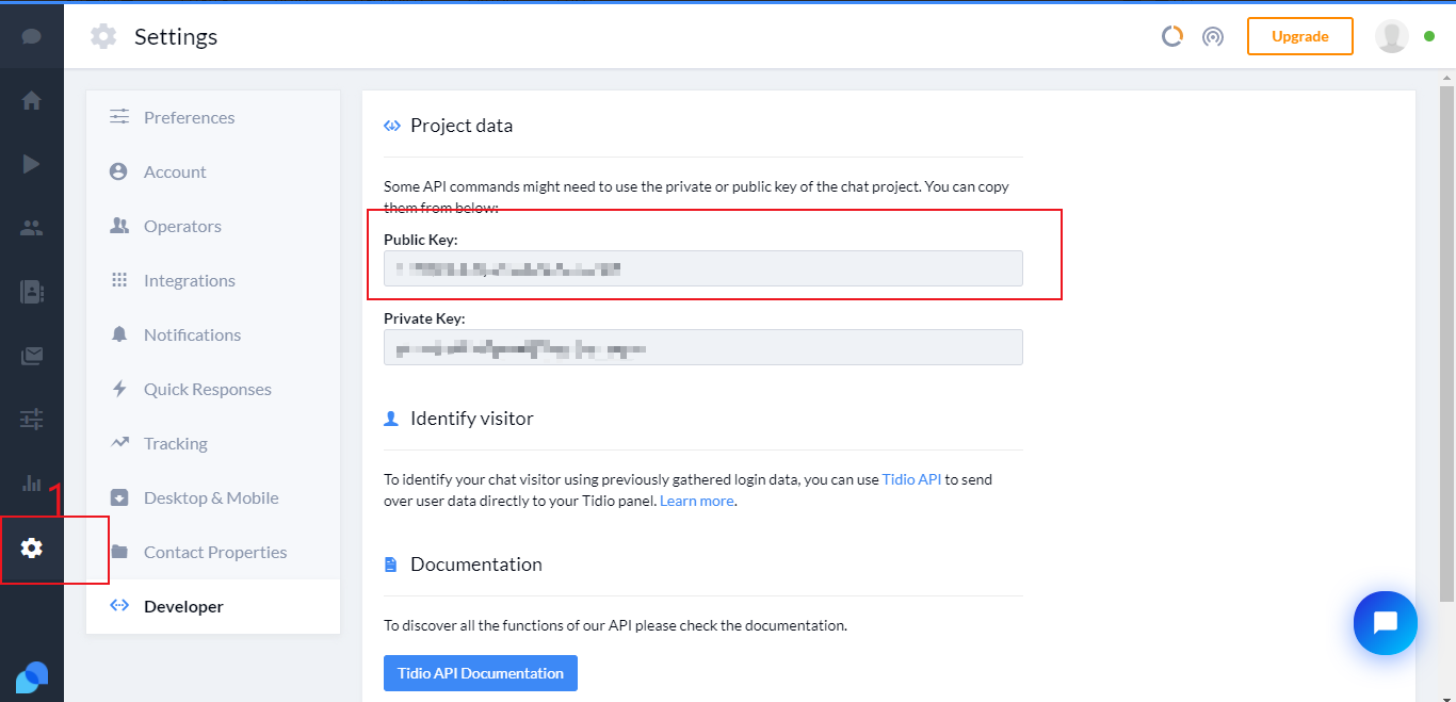
修改 主题配置文件
# tidio
# https://www.tidio.com/
tidio:
  enable: true
  public_key: XXXX
tidio的样式你可以Channels自行配置
Demo
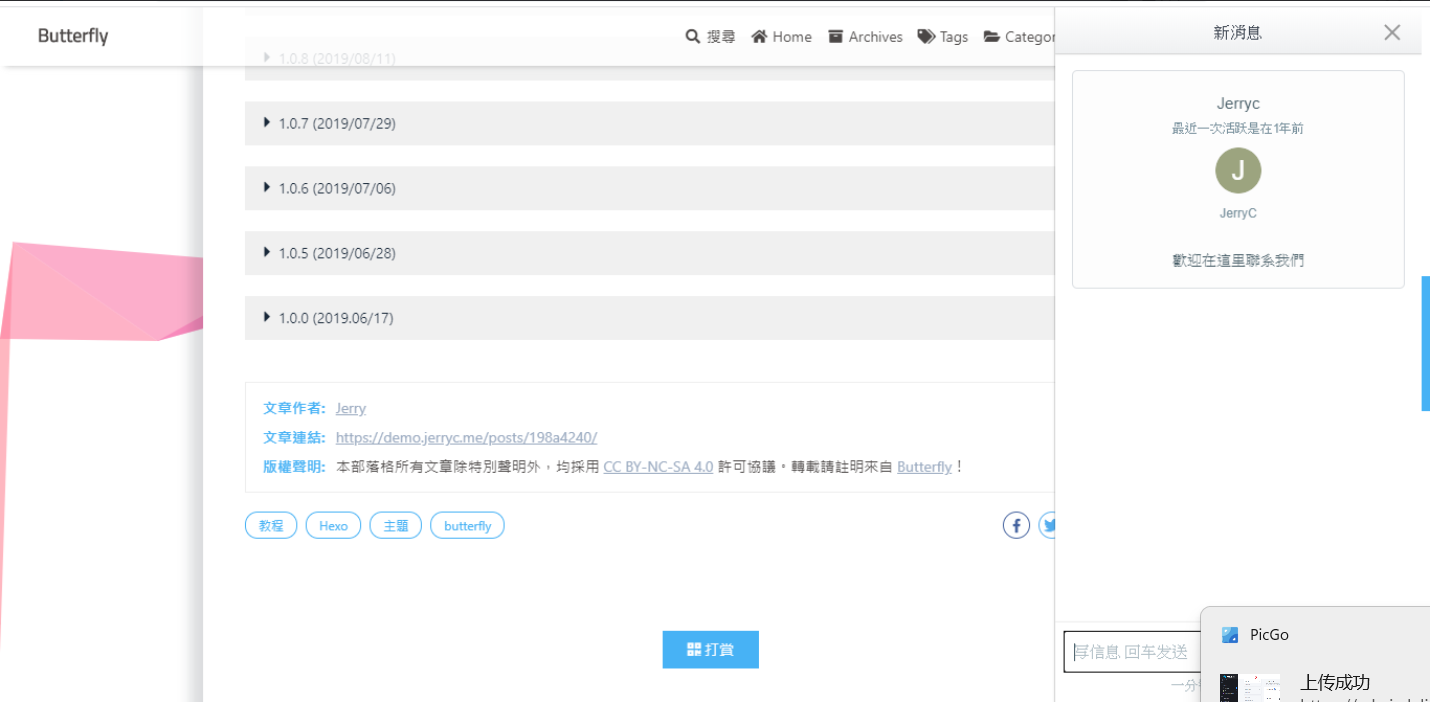
打开daovoice和註册帐号
找到你的app id
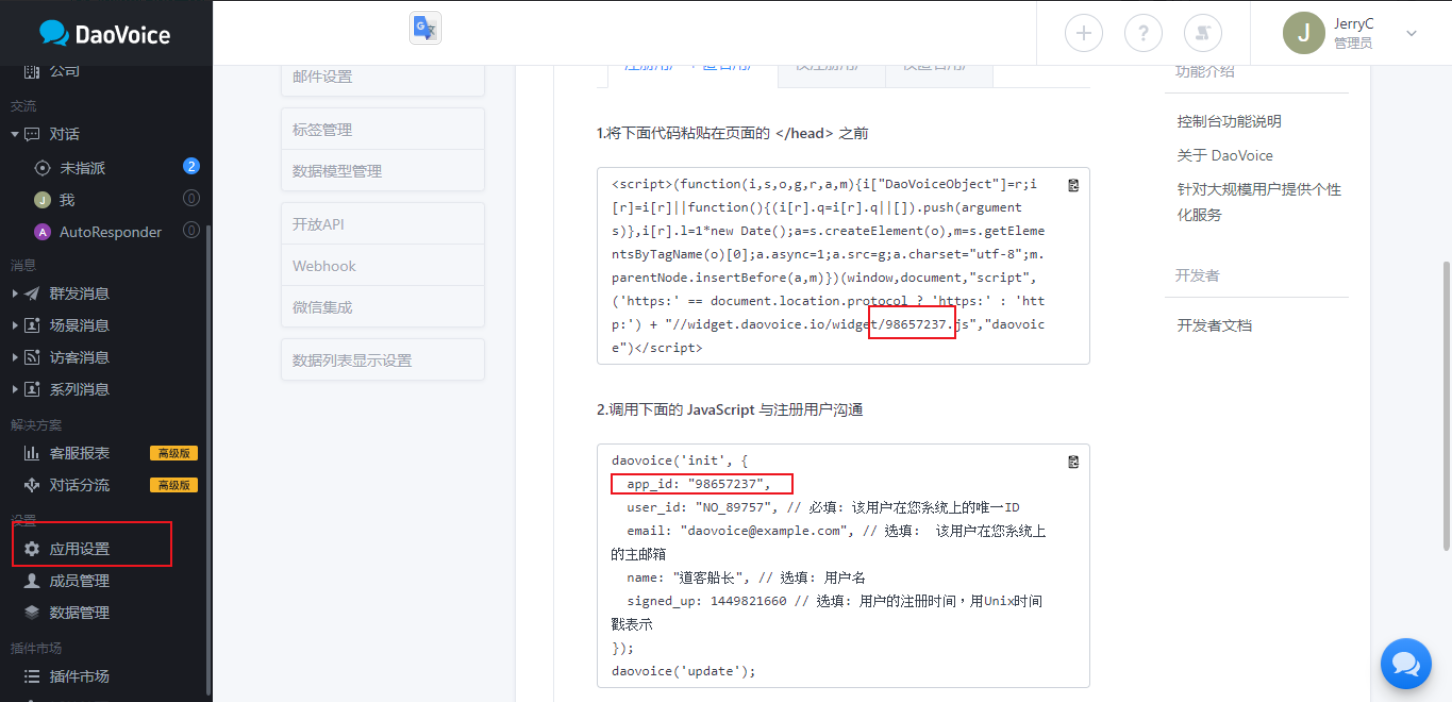
修改 主题配置文件
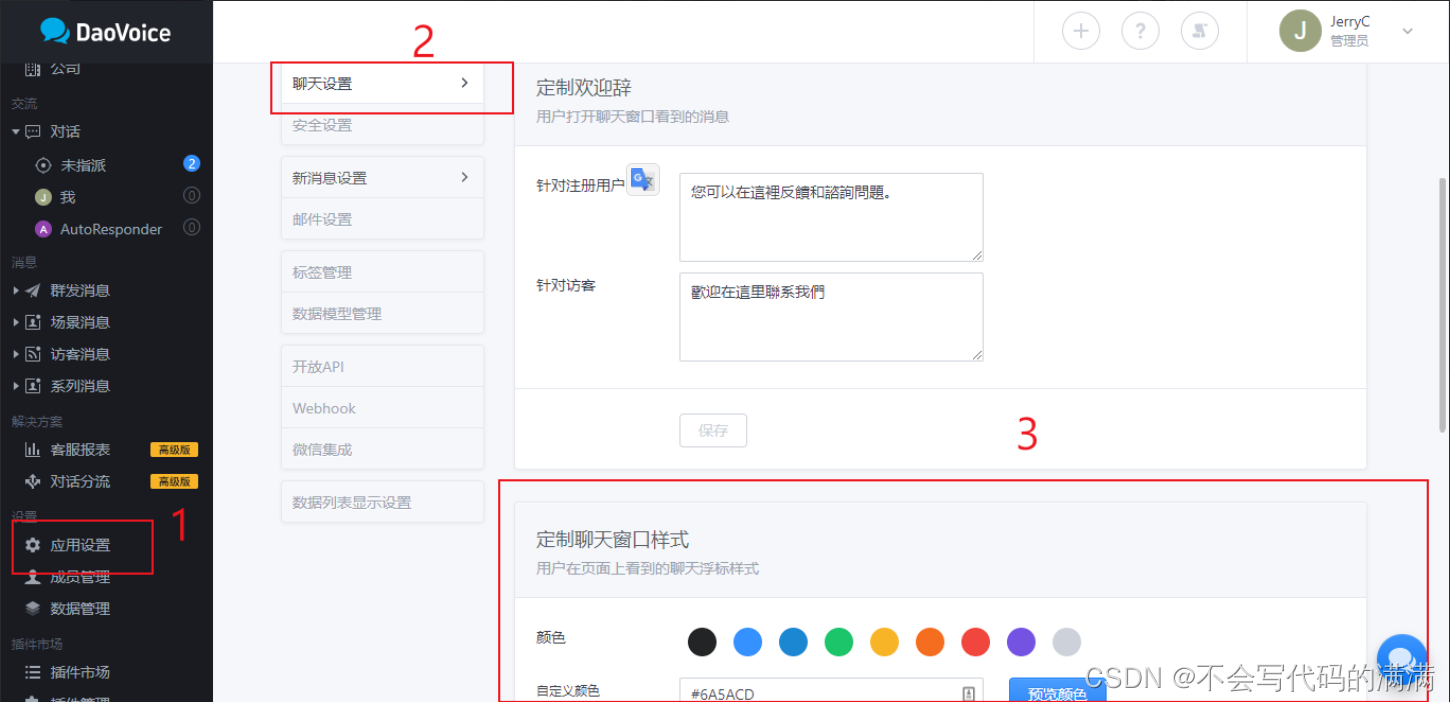
Demo
{% endtabs %}
2.10 添加看板娘
写在最前
最早的时候看别人的博客很多都有一个可爱的看板娘,然后就找了教程给自己也整了一个。因为找到的教程都
是稂莠不齐的,原作者自己说的也略显含糊(其实是我自己看不懂)。总之秉承着一如既往的小白风格。把网
上的教程做个整合。
效果图:
- 以
Butterfly主题为例,在[Blogroot]\themes\butterfly\source\目录下打开终端,输入
git clone https://github.com/stevenjoezhang/live2d-widget.git live2d-widget
这行指令的意思就是
clone这个项目到source路径下并重命名为live2d-widget。~~emm,貌似本来就叫live2d-widget。反正算是一个踩坑点。~~如果是用下载项目压缩包,解压后放到这里的,也记得把文件夹更名为live2d-widget。
- 找到路径
[Blogroot]\themes\butterfly\source\live2d-widget\autoload.js,打开autoload.js,修改内容:
- const live2d_path = "https://cdn.jsdelivr.net/gh/stevenjoezhang/live2d-widget/";
+ const live2d_path = "/live2d-widget/";
此处引用一下参考教程原话:
autoload.js中的注释的绝对地址指的是,将资源打包放到[Blogroot]/theme/next/source中后,以[Blogroot]/theme/next/source为根目录(/)的绝对路径。
- 在
Butterfly的主题配置文件[Blogroot]\_config.butterfly.yml中,
butterfly主题其实自带fontawesome依赖,无需引入
    # Inject
    # Insert the code to head (before '</head>' tag) and the bottom (before '</body>' tag)
    # 插入代码到头部 </head> 之前 和 底部 </body> 之前
    inject:
      head:
        # - <link rel="stylesheet" href="/xxx.css">
      bottom:
        # - <script src="xxxx"></script>
+       - <script defer src="/live2d-widget/autoload.js"></script>
- 保存所有文件的修改,然后照例执行
hexo clean
hexo g
hexo s
- 自定义修改
有一定前端基础的小伙伴可以通过修改[Blogroot]\themes\butterfly\source\live2d-widget路径下的样式资源文件:waifu-tips.js:包含了按钮和对话框的逻辑waifu-tips.json:定义了触发条件(selector,CSS 选择器)和触发时显示的文字(text);waifu.css:看板娘的样式表。可以对看板娘的位置布局等做自定义修改。
2.11 增加emoji支持
为博客新增对emoji表情的支持,使用到了 hexo-filter-github-emojis 的 Hexo 插件来支持 emoji表情的生成,把对应的markdown emoji语法(::,例如:😄 :smile:)转变成会跳跃的emoji表情,安装命令如下:
npm install hexo-filter-github-emojis --save
Bash
在 Hexo 根目录下的 _config.yml 文件中,新增以下的配置项:
githubEmojis:
  enable: true
  className: github-emoji
  inject: true
  styles:
  customEmojis:
执行 hexo clean && hexo g 重新生成博客文件,然后就可以在文章中对应位置看到你用emoji语法写的表情了。
如下图:
emoji支持
2.12 首页置顶轮播图
本项目是对冰卡诺老师写的教程:基于Butterfly主题的轮播手动置顶文章进行重构,精简了部分样式。适配pjax。
效果图:

- 安装插件,在博客根目录
[Blogroot]下打开终端,运行以下指令:
npm install hexo-butterfly-swiper --save
- 添加配置信息,以下为写法示例
在站点配置文件_config.yml或者主题配置文件_config.butterfly.yml中添加
# hexo-butterfly-swiper
# see https://akilar.top/posts/8e1264d1/
swiper:
  enable: true # 开关
  priority: 5 #过滤器优先权
  enable_page: all # 应用页面
  timemode: date #date/updated
  layout: # 挂载容器类型
    type: id
    name: recent-posts
    index: 0
  default_descr: 再怎么看我也不知道怎么描述它的啦!
  swiper_css: https://npm.elemecdn.com/hexo-butterfly-swiper/lib/swiper.min.css #swiper css依赖
  swiper_js: https://npm.elemecdn.com/hexo-butterfly-swiper/lib/swiper.min.js #swiper js依赖
  custom_css: https://npm.elemecdn.com/hexo-butterfly-swiper/lib/swiperstyle.css # 适配主题样式补丁
  custom_js: https://npm.elemecdn.com/hexo-butterfly-swiper/lib/swiper_init.js # swiper初始化方法
-
参数释义
使用方法
在文章的front_matter中添加swiper_index配置项即可。
---
title: 文章标题
date: 创建日期
updated: 更新日期
cover: 文章封面
description: 文章描述
swiper_index: 1 #置顶轮播图顺序,非负整数,数字越大越靠前
---
2.13 添加博客动态标签
原理就是给博客增加一个事件判断,如下图所示:

- 在
themes\butterfly\source\js文件夹新建title.js文件,文件内容如下:
// 浏览器搞笑标题
var OriginTitle = document.title;
var titleTime;
document.addEventListener('visibilitychange', function () {
    if (document.hidden) {
        document.querySelector('[rel="icon"]').setAttribute('href', "/img/funny.ico");
        document.title = '(っ °Д °;)っ 访问的页面不存在了';
        clearTimeout(titleTime);
    }
    else {
        document.querySelector('[rel="icon"]').setAttribute('href', "/img/favicon.ico");
        document.title = '(●\'◡\'●)噫又好啦 ~' + OriginTitle;
        titleTime = setTimeout(function () {
            document.title = OriginTitle;
        }, 2000);
    }
});
-
编辑
_config.butterfly.yml文件 在
inject->bottom下面添加如下内容:
- <script src="/js/title.js"></script>
然后 hexo clean && hexo g 即可。
2.14 添加鼠标点击烟花爆炸效果
在 /themes/matery/source/js 新建文件 fireworks.js,并添加如下代码
然后在 /themes/matery/layout/_partial/footer.ejs 中添加如下代码:
<% if (theme.fireworks.enable) { %>
<canvas class="fireworks" style="position: fixed; left: 0; top: 0; z-index: 1; pointer-events: none;" ></canvas>
<script type="text/javascript" src="//cdn.bootcss.com/animejs/2.2.0/anime.min.js"></script>
<script type="text/javascript" src="/js/fireworks.js"></script>
<% } %>
在主题配置文件 .yml中配置:
# 鼠标点击烟花爆炸动效
fireworks:
  enable: true
2.15 添加页面樱花飘落动效
在 /themes/matery/source/js 新建文件 sakura.js,并添加如下代码
然后在 /themes/matery/layout/_partial/head.ejs 中添加如下代码:
<% if (theme.sakura.enable) { %>
    <script type="text/javascript">
    //只在桌面版网页启用特效
    var windowWidth = $(window).width();
    if (windowWidth > 768) {
        document.write('<script type="text/javascript" src="/js/sakura.js"></script>');
    }
    </script>
<% } %>
在主题配置文件 .yml中配置:
# 页面樱花飘落动效
sakura:
  enable: true
2.16 添加鼠标点击文字特效
在 /themes/butterfly/source/js 新建文件 wenzi.js,并添加如下代码
然后在 /themes/butterfly/layout/_partial/head.ejs 中添加如下代码:
<% if (theme.wenzi.enable) { %>
    <script type="text/javascript">
    //只在桌面版网页启用特效
    var windowWidth = $(window).width();
    if (windowWidth > 768) {
        document.write('<script type="text/javascript" src="/js/wenzi.js"></script>');
    }
    </script>
<% } %>
Js
在主题配置文件 .yml中配置:
# 页面樱花飘落动效
wenzi:
  enable: true
2.17 添加页面雪花飘落动效
在 /themes/butterfly/source/js 新建文件 xuehuapiaoluo.js,并添加如下代码
然后在 /themes/matery/layout/_partial/head.ejs 中添加如下代码:
<% if (theme.xuehuapiaoluo.enable) { %>
    <script type="text/javascript">
    //只在桌面版网页启用特效
    var windowWidth = $(window).width();
    if (windowWidth > 768) {
        document.write('<script type="text/javascript" src="/js/xuehuapiaoluo.js"></script>');
    }
    </script>
<% } %>
在主题配置文件 .yml中配置:
# 页面樱花飘落动效
xuehuapiaoluo:
  enable: true
2.18 添加博客天气插件
在搜寻插件的过程中无意间用 google 搜到的一个网站,使用非常简单,在这里附上插件添加的方法
中国天气网:https://cj.weather.com.cn/plugin/pc
选择自定义插件—>自定义样式——>生成代码,然后会生成这样一段代码
<!-- Weather Widget -->
<script type="text/javascript"> WIDGET = {FID: 'your FID'}</script>
<script type="text/javascript" src="https://apip.weatherdt.com/float/static/js/r.js?v=1111"></script>
在 /themes/butterfly/source/layout/_widget 新建文件 weather.ejs,把上面生成的代码添加进入,可以设置只有桌面端显示,如下修改:
<!-- 天气接口  爱笑的Gao add 2022 05.08 -->
<script type="text/javascript">
  WIDGET = {FID: '1tFpFZ5Mtj'}
</script>
<!-- <script type="text/javascript" src="https://apip.weatherdt.com/float/static/js/r.js?v=1111"></script> -->

<script type="text/javascript">
  //只在桌面版网页启用特效
  var windowWidth = $(window).width();
  if (windowWidth > 768) {
      document.write('<script type="text/javascript" src="https://apip.weatherdt.com/float/static/js/r.js?v=1111"><\/script>');
  }
  </script>
然后在 /themes/butterfly/layout/_partial/layout.ejs 中添加如下代码:
<!-- 天气接口  爱笑的Gao add 2022 05.08 -->
<% if (theme.weather.enable) { %>
  <%- partial('_widget/weather') %>
<% } %>
在主题配置文件 .yml中配置:
# 天气接口插件
weather:
  enable: true
展示效果可以参考我的主页
当然,如果你不想搞这么复杂,可以直接将下面代码插入 /themes/butterfly/layout/_partial/layout.ejs 中即可使用:
<script type="text/javascript">
    WIDGET = {FID: '1tFpFZ5Mtj'}
</script>
<script type="text/javascript" src="https://apip.weatherdt.com/float/static/js/r.js?v=1111"></script>
2.19 修改滚动条
[外链图片转存失败,源站可能有防盗链机制,建议将图片保存下来直接上传(img-2DQYJXS3-1652006790688)(https://cdn.jsdelivr.net/gh/gaoziman/bed/img/Snipaste_2022-05-08_16-26-02.png)]
-
在
themes\Butterfly\source\css文件夹新建scrollbar.css文件,文件内容如下:颜色可以根据自己需求修改
/* 滚动条 */
::-webkit-scrollbar {
  width: 8px;
  height: 8px;
}

::-webkit-scrollbar-track {
  background-color: rgba(73, 177, 245, 0.2);
  border-radius: 2em;
}

::-webkit-scrollbar-thumb {
  background-color: #49b1f5 !important;
  background-image: -webkit-linear-gradient(
	45deg,
	rgba(255, 255, 255, 0.4) 25%,
	transparent 25%,
	transparent 50%,
	rgba(255, 255, 255, 0.4) 50%,
	rgba(255, 255, 255, 0.4) 75%,
	transparent 75%,
	transparent
  ) !important;
  border-radius: 2em;
}

::-webkit-scrollbar-corner {
  background-color: transparent;
}

::-moz-selection {
  color: #fff;
  background-color: #49b1f5;
}

[data-theme="dark"] ::-webkit-scrollbar-thumb {
  background-color: #1f1f1f !important;
}
-
编辑
_config.butterfly.yml文件在
inject->head下面添加如下内容:
- <link rel="stylesheet" href="/css/scrollbar.css">
2.20 增加Pixiv 日榜
效果图:
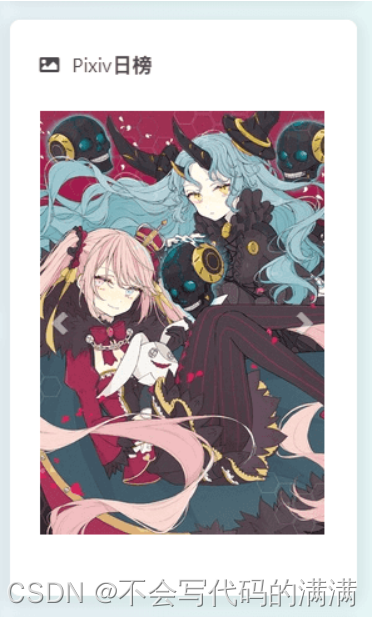
- 在
themes\Butterfly\layout\includes\widget文件夹新建card_pixiv.pug文件,文件内容如下:
.card-widget.card-pixiv
  .card-content
    .item-headline
      i.fa.fa-image(aria-hidden="true")
      span= _p('aside.card_pixiv')
    iframe(src="https://cloud.mokeyjay.com/pixiv" frameborder="0" style="width:99%;height:380px;margin:0;")
https://cloud.mokeyjay.com/pixiv 使用的是超能小紫提供的服务,也可以自行搭建
- 编辑
themes\Butterfly\layout\includes\widget\index.pug文件,在你想要显示的位置插入以下代码:
if theme.aside.card_pixiv
    include ./card_pixiv.pug
-
编辑
_config.butterfly.yml文件,在card_webinfo下面添加一行card_pixiv: true -
编辑
themes\Butterfly\languages\zh-CN.yml文件 (请根据你的网站语言选择),找到card_announcement: 公告, 在下面添加一行card_pixiv: Pixiv日榜Top50(后面的文本可自定义)如果不想显示,直接把
_config.butterfly.yml文件的card_pixiv: true改为card_pixiv: false即可
2.21 Github-bride
效果图:

- 在
themes\Butterfly\source\css文件夹新建badge.css文件,文件内容如下:
.github-badge {
    display:inline-block;
    border-radius:4px;
    text-shadow:none;
    font-size:13px;
    color:#fff;
    line-height:15px;
    margin-bottom:5px;
}
.github-badge a{
    display: inline-block;
    margin: 0 1px 5px;
}
.github-badge .badge-subject {
    display:inline-block;
    background-color:#4D4D4D;
    padding:4px 4px 4px 6px;
    border-top-left-radius:4px;
    border-bottom-left-radius:4px;
}
.github-badge .badge-value {
    display:inline-block;
    padding:4px 6px 4px 4px;
    border-top-right-radius:4px;
    border-bottom-right-radius:4px;
}
.github-badge .bg-brightgreen {
    background-color:#4DC820 !important;
}
.github-badge .bg-orange {
    background-color:#FFA500 !important;
}
.github-badge .bg-yellow {
    background-color:#D8B024 !important;
}
.github-badge .bg-blueviolet {
    background-color:#8833D7 !important;
}
.github-badge .bg-pink {
    background-color:#F26BAE !important;
}
.github-badge .bg-red {
    background-color:#e05d44 !important;
}
.github-badge .bg-blue {
    background-color:#007EC6 !important;
}
.github-badge .bg-lightgrey {
    background-color:#9F9F9F !important;
}
.github-badge .bg-grey, .github-badge .bg-gray {
    background-color:#555 !important;
}
.github-badge .bg-lightgrey, .github-badge .bg-lightgray {
    background-color:#9f9f9f !important;
}
- 编辑
_config.butterfly.yml文件、在inject->head下面添加如下内容:
- <link rel="stylesheet" href="/css/badge.css">
以下方法任选一种
方法1:
- 编辑
themes\Butterfly\layout\includes\footer.pug文件,插入以下代码:
if theme.githubBadge.enable
  .github-badge
    a(style="color: #fff" rel="license" href="https://hexo.io/" target="_blank" title="由 Hexo 强力驱动")
       span(class="badge-subject") Powered
       span(class="badge-value bg-blue") Hexo
    a(style="color: #fff" rel="license" href="https://gitee.com/" target="_blank" title="静态网页托管于 GitHub Pages 和 Coding Pages 和 Gitee Pages")
       span(class="badge-subject") Hosted
       span(class="badge-value bg-brightgreen") GitHub & Coding & Gitee
    a(style="color: #fff" rel="license" href="https://www.jsdelivr.com/" target="_blank" title="jsDelivr 提供 CDN 加速服务")
       span(class="badge-subject") CDN
       span(class="badge-value bg-orange") jsDelivr
    a(style="color: #fff" rel="license" href="https://jerryc.me" target="_blank" title="站点使用 Butterfly主题")
       span(class="badge-subject") Theme
       span(class="badge-value bg-blue") Butterfly
    a(style="color: #fff" rel="license" href="http://creativecommons.org/licenses/by-nc-sa/4.0/" target="_blank" title="本站点采用知识共享署名-非商业性使用-相同方式共享 4.0 国际许可协议进行许可")
      span(class="badge-subject")
         i(class="fa fa-copyright")
      span(class="badge-value bg-lightgrey") BY-NC-SA 4.0
- 编辑
_config.butterfly.yml文件、添加
# 是否开启 Badge
githubBadge:
  enable: true
2.22 tag 外挂标签
请注意:样式展示在 这里仅包括: 自定义标签、 文本段落、 复选框、 富文本按钮、 Folding、 密码样式的文本、 时间线 、 Link
- 找到
themes\Butterfly\source\css下创建tag.css文件、文件内容如下:
span.btn {
  display: inline;
}

span.btn > a {
  display: inline-block;
  background: #2196f3;
  color: #fff;
  padding: 4px 4px 2px 4px;
  margin: 2px;
  line-height: 1.1;
  border-radius: 2px;
  transition: all 0.28s ease;
  -moz-transition: all 0.28s ease;
  -webkit-transition: all 0.28s ease;
  -o-transition: all 0.28s ease;
}

span.btn > a i {
  margin-right: 2px;
}

span.btn > a:hover {
  color: #fff;
  background: #ff5722;
}

span.btn > a:not([href]) {
  opacity: 0.5;
}

span.btn > a:not([href]):hover {
  cursor: not-allowed;
}

span.btn.regular > a {
  padding: 8px 12px 6px 12px;
}

span.btn.regular > a i {
  margin-right: 4px;
}

span.btn.large > a {
  padding: 12px 36px 10px 36px;
}

span.btn.large > a i {
  margin-right: 8px;
}

span.btn.center {
  display: block;
  text-align: center;
}

[data-theme="dark"] div.btns {
  filter: brightness(0.7);
}

[data-theme="dark"] div.btns a {
  background: 0 0;
}

div.btns {
  margin: 0 -8px;
  display: flex;
  flex-wrap: wrap;
  align-items: flex-start;
  overflow: visible;
  line-height: 1.8;
}

div.btns,
div.btns p,
div.btns a {
  font-size: 0.8125rem;
  color: #555;
}

div.btns b {
  font-size: 0.875rem;
}

div.btns.wide > a {
  padding-left: 32px;
  padding-right: 32px;
}

div.btns.fill > a {
  flex-grow: 1;
  width: auto;
}

div.btns.around {
  justify-content: space-around;
}

div.btns.center {
  justify-content: center;
}

div.btns.grid2 > a {
  width: calc(100% / 2 - 16px);
}

@media screen and (max-width: 1024px) {
  div.btns.grid2 > a {
	width: calc(100% / 2 - 16px);
  }
}

@media screen and (max-width: 768px) {
  div.btns.grid2 > a {
	width: calc(100% / 2 - 16px);
  }
}

@media screen and (max-width: 500px) {
  div.btns.grid2 > a {
	width: calc(100% / 1 - 16px);
  }
}

div.btns.grid3 > a {
  width: calc(100% / 3 - 16px);
}

@media screen and (max-width: 1024px) {
  div.btns.grid3 > a {
	width: calc(100% / 3 - 16px);
  }
}

@media screen and (max-width: 768px) {
  div.btns.grid3 > a {
	width: calc(100% / 3 - 16px);
  }
}

@media screen and (max-width: 500px) {
  div.btns.grid3 > a {
	width: calc(100% / 1 - 16px);
  }
}

div.btns.grid4 > a {
  width: calc(100% / 4 - 16px);
}

@media screen and (max-width: 1024px) {
  div.btns.grid4 > a {
	width: calc(100% / 3 - 16px);
  }
}

@media screen and (max-width: 768px) {
  div.btns.grid4 > a {
	width: calc(100% / 3 - 16px);
  }
}

@media screen and (max-width: 500px) {
  div.btns.grid4 > a {
	width: calc(100% / 2 - 16px);
  }
}

div.btns.grid5 > a {
  width: calc(100% / 5 - 16px);
}

@media screen and (max-width: 1024px) {
  div.btns.grid5 > a {
	width: calc(100% / 4 - 16px);
  }
}

@media screen and (max-width: 768px) {
  div.btns.grid5 > a {
	width: calc(100% / 3 - 16px);
  }
}

@media screen and (max-width: 500px) {
  div.btns.grid5 > a {
	width: calc(100% / 2 - 16px);
  }
}

div.btns a {
  transition: all 0.28s ease;
  -moz-transition: all 0.28s ease;
  -webkit-transition: all 0.28s ease;
  -o-transition: all 0.28s ease;
  margin: 8px;
  margin-top: calc(1.25 * 16px + 32px);
  min-width: 120px;
  font-weight: bold;
  display: flex;
  justify-content: flex-start;
  align-content: center;
  align-items: center;
  flex-direction: column;
  padding: 8px;
  text-align: center;
  background: #f6f6f6;
  border-radius: 4px;
}

div.btns a > img:first-child,
div.btns a > i:first-child {
  transition: all 0.28s ease;
  -moz-transition: all 0.28s ease;
  -webkit-transition: all 0.28s ease;
  -o-transition: all 0.28s ease;
  height: 64px;
  width: 64px;
  box-shadow: 0 1px 2px 0 rgba(0, 0, 0, 0.1);
  margin: 16px 8px 4px 8px;
  margin-top: calc(-1.25 * 16px - 32px);
  border: 2px solid #fff;
  background: #fff;
  line-height: 60px;
  font-size: 28px;
}

div.btns a > img:first-child.auto,
div.btns a > i:first-child.auto {
  width: auto;
}

div.btns a > i:first-child {
  color: #fff;
  background: #2196f3;
}

div.btns a p,
div.btns a b {
  margin: 0.25em;
  font-weight: normal;
  line-height: 1.25;
  word-wrap: break-word;
}

div.btns a b {
  font-weight: bold;
  line-height: 1.3;
}

div.btns a img {
  margin: 0.4em auto;
}

div.btns a:not([href]) {
  cursor: default;
  color: inherit;
}

div.btns a[href]:hover {
  background: rgba(255, 87, 34, 0.15);
}

div.btns a[href]:hover,
div.btns a[href]:hover b {
  color: #ff5722;
}

div.btns a[href]:hover > img:first-child,
div.btns a[href]:hover > i:first-child {
  transform: scale(1.1) translateY(-8px);
  box-shadow: 0 4px 8px 0 rgba(0, 0, 0, 0.1);
}

div.btns a[href]:hover > i:first-child {
  background: #ff5722;
}

div.btns.circle a > img:first-child,
div.btns.circle a > i:first-child {
  border-radius: 32px;
}

div.btns.rounded a > img:first-child,
div.btns.rounded a > i:first-child {
  border-radius: 16px;
}

[data-theme="dark"] .checkbox {
  filter: brightness(0.7);
}

.checkbox {
  display: flex;
  align-items: center;
}

.checkbox input {
  -webkit-appearance: none;
  -moz-appearance: none;
  -ms-appearance: none;
  -o-appearance: none;
  appearance: none;
  position: relative;
  height: 16px;
  width: 16px;
  transition: all 0.15s ease-out 0s;
  cursor: pointer;
  display: inline-block;
  outline: none;
  border-radius: 2px;
  flex-shrink: 0;
  margin-right: 8px;
}

.checkbox input[type="checkbox"]:before,
.checkbox input[type="checkbox"]:after {
  position: absolute;
  content: "";
  background: #fff;
}

.checkbox input[type="checkbox"]:before {
  left: 1px;
  top: 5px;
  width: 0;
  height: 2px;
  transition: all 0.2s ease-in;
  transform: rotate(45deg);
  -webkit-transform: rotate(45deg);
  -moz-transform: rotate(45deg);
  -ms-transform: rotate(45deg);
  -o-transform: rotate(45deg);
}

.checkbox input[type="checkbox"]:after {
  right: 7px;
  bottom: 3px;
  width: 2px;
  height: 0;
  transition: all 0.2s ease-out;
  transform: rotate(40deg);
  -webkit-transform: rotate(40deg);
  -moz-transform: rotate(40deg);
  -ms-transform: rotate(40deg);
  -o-transform: rotate(40deg);
  transition-delay: 0.25s;
}

.checkbox input[type="checkbox"]:checked:before {
  left: 0;
  top: 7px;
  width: 6px;
  height: 2px;
}

.checkbox input[type="checkbox"]:checked:after {
  right: 3px;
  bottom: 1px;
  width: 2px;
  height: 10px;
}

.checkbox.minus input[type="checkbox"]:before {
  transform: rotate(0);
  left: 1px;
  top: 5px;
  width: 0;
  height: 2px;
}

.checkbox.minus input[type="checkbox"]:after {
  transform: rotate(0);
  left: 1px;
  top: 5px;
  width: 0;
  height: 2px;
}

.checkbox.minus input[type="checkbox"]:checked:before {
  left: 1px;
  top: 5px;
  width: 10px;
  height: 2px;
}

.checkbox.minus input[type="checkbox"]:checked:after {
  left: 1px;
  top: 5px;
  width: 10px;
  height: 2px;
}

.checkbox.plus input[type="checkbox"]:before {
  transform: rotate(0);
  left: 1px;
  top: 5px;
  width: 0;
  height: 2px;
}

.checkbox.plus input[type="checkbox"]:after {
  transform: rotate(0);
  left: 5px;
  top: 1px;
  width: 2px;
  height: 0;
}

.checkbox.plus input[type="checkbox"]:checked:before {
  left: 1px;
  top: 5px;
  width: 10px;
  height: 2px;
}

.checkbox.plus input[type="checkbox"]:checked:after {
  left: 5px;
  top: 1px;
  width: 2px;
  height: 10px;
}

.checkbox.times input[type="checkbox"]:before {
  transform: rotate(45deg);
  left: 3px;
  top: 1px;
  width: 0;
  height: 2px;
}

.checkbox.times input[type="checkbox"]:after {
  transform: rotate(135deg);
  right: 3px;
  top: 1px;
  width: 0;
  height: 2px;
}

.checkbox.times input[type="checkbox"]:checked:before {
  left: 1px;
  top: 5px;
  width: 10px;
  height: 2px;
}

.checkbox.times input[type="checkbox"]:checked:after {
  right: 1px;
  top: 5px;
  width: 10px;
  height: 2px;
}

.checkbox input[type="radio"] {
  border-radius: 50%;
}

.checkbox input[type="radio"]:before {
  content: "";
  display: block;
  width: 8px;
  height: 8px;
  border-radius: 50%;
  margin: 2px;
  transform: scale(0);
  transition: all 0.25s ease-out;
}

.checkbox input[type="radio"]:checked:before {
  transform: scale(1);
}

.checkbox input {
  border: 2px solid #2196f3;
}

.checkbox input[type="checkbox"]:checked {
  background: #2196f3;
}

.checkbox input[type="radio"]:checked:before {
  background: #2196f3;
}

.checkbox.red input {
  border-color: #fe5f58;
}

.checkbox.red input[type="checkbox"]:checked {
  background: #fe5f58;
}

.checkbox.red input[type="radio"]:checked:before {
  background: #fe5f58;
}

.checkbox.green input {
  border-color: #3dc550;
}

.checkbox.green input[type="checkbox"]:checked {
  background: #3dc550;
}

.checkbox.green input[type="radio"]:checked:before {
  background: #3dc550;
}

.checkbox.yellow input {
  border-color: #ffbd2b;
}

.checkbox.yellow input[type="checkbox"]:checked {
  background: #ffbd2b;
}

.checkbox.yellow input[type="radio"]:checked:before {
  background: #ffbd2b;
}

.checkbox.cyan input {
  border-color: #1bcdfc;
}

.checkbox.cyan input[type="checkbox"]:checked {
  background: #1bcdfc;
}

.checkbox.cyan input[type="radio"]:checked:before {
  background: #1bcdfc;
}

.checkbox.blue input {
  border-color: #2196f3;
}

.checkbox.blue input[type="checkbox"]:checked {
  background: #2196f3;
}

.checkbox.blue input[type="radio"]:checked:before {
  background: #2196f3;
}

.checkbox p {
  display: inline-block;
  margin-top: 2px !important;
  margin-bottom: 0 !important;
}

[data-theme="dark"] details {
  filter: brightness(0.7);
}

details {
  display: block;
  padding: 16px;
  margin: 0.5rem 0;
  border-radius: 4px;
  font-size: 0.7375rem;
  transition: all 0.28s ease;
  -moz-transition: all 0.28s ease;
  -webkit-transition: all 0.28s ease;
  -o-transition: all 0.28s ease;
  border: 1px solid #f6f6f6;
}

details summary {
  cursor: pointer;
  padding: 16px;
  margin: -16px;
  border-radius: 4px;
  color: rgba(85, 85, 85, 0.7);
  font-size: 0.7375rem;
  font-weight: bold;
  position: relative;
  line-height: normal;
}

details summary > p,
details summary > h1,
details summary > h2,
details summary > h3,
details summary > h4,
details summary > h5,
details summary > h6 {
  display: inline;
  border-bottom: none !important;
}

details summary:hover {
  color: #555;
}

details summary:hover:after {
  position: absolute;
  content: "+";
  text-align: center;
  top: 50%;
  transform: translateY(-50%);
  right: 16px;
}

details > summary {
  background: #f6f6f6;
}

details[blue] {
  border-color: #e8f4fd;
}

details[blue] > summary {
  background: #e8f4fd;
}

details[cyan] {
  border-color: #e8fafe;
}

details[cyan] > summary {
  background: #e8fafe;
}

details[green] {
  border-color: #ebf9ed;
}

details[green] > summary {
  background: #ebf9ed;
}

details[yellow] {
  border-color: #fff8e9;
}

details[yellow] > summary {
  background: #fff8e9;
}

details[red] {
  border-color: #feefee;
}

details[red] > summary {
  background: #feefee;
}

details[open] {
  border-color: rgba(85, 85, 85, 0.2);
}

details[open] > summary {
  border-bottom: 1px solid rgba(85, 85, 85, 0.2);
  border-bottom-left-radius: 0;
  border-bottom-right-radius: 0;
}

details[open][blue] {
  border-color: rgba(33, 150, 243, 0.3);
}

details[open][blue] > summary {
  border-bottom-color: rgba(33, 150, 243, 0.3);
}

details[open][cyan] {
  border-color: rgba(27, 205, 252, 0.3);
}

details[open][cyan] > summary {
  border-bottom-color: rgba(27, 205, 252, 0.3);
}

details[open][green] {
  border-color: rgba(61, 197, 80, 0.3);
}

details[open][green] > summary {
  border-bottom-color: rgba(61, 197, 80, 0.3);
}

details[open][yellow] {
  border-color: rgba(255, 189, 43, 0.3);
}

details[open][yellow] > summary {
  border-bottom-color: rgba(255, 189, 43, 0.3);
}

details[open][red] {
  border-color: rgba(254, 95, 88, 0.3);
}

details[open][red] > summary {
  border-bottom-color: rgba(254, 95, 88, 0.3);
}

details[open] > summary {
  color: #555;
  margin-bottom: 0;
}

details[open] > summary:hover:after {
  content: "-";
}

details[open] > div.content {
  padding: 16px;
  margin: -16px;
  margin-top: 0;
}

details[open] > div.content p > a:hover {
  text-decoration: underline;
}

[data-theme="dark"] span.p {
  filter: brightness(0.7);
}

p.p.subtitle {
  font-weight: bold;
  color: #2196f3;
  padding-top: 1rem;
}

p.p.subtitle:first-child {
  padding-top: 0.5rem;
}

span.p.code,
p.p.code {
  font-family: Menlo, Monaco, monospace, courier, sans-serif;
}

span.p.left,
p.p.left {
  display: block;
  text-align: left;
}

span.p.center,
p.p.center {
  display: block;
  text-align: center;
}

span.p.right,
p.p.right {
  display: block;
  text-align: right;
}

span.p.small,
p.p.small {
  font-size: 0.575rem;
}

span.p.large,
p.p.large {
  font-size: 2rem;
  line-height: 1.4;
}

span.p.huge,
p.p.huge {
  font-size: 4rem;
  line-height: 1.4;
}

span.p.ultra,
p.p.ultra {
  font-size: 6rem;
  line-height: 1.4;
}

span.p.small,
p.p.small,
span.p.large,
p.p.large,
span.p.huge,
p.p.huge,
span.p.ultra,
p.p.ultra {
  font-family: UbuntuMono, "PingFang SC", "Microsoft YaHei", Helvetica, Arial,
	Menlo, Monaco, monospace, sans-serif;
  margin: 0;
  padding: 0;
}

span.p.bold,
p.p.bold {
  font-weight: bold;
}

span.p.h1,
p.p.h1 {
  font-size: 1.625rem;
  color: #555;
  padding-top: 1rem;
}

span.p.h2,
p.p.h2 {
  font-size: 1.375rem;
  color: var(--font-color);
  padding-top: 1rem;
  border-bottom: 1px solid var(--hr-border);
}

span.p.h3,
p.p.h3 {
  font-size: 1.25rem;
  color: #2196f3;
  padding-top: 1rem;
}

span.p.h4,
p.p.h4 {
  font-size: 1.125rem;
  color: #555;
  padding-top: 1rem;
}

span.p.red,
p.p.red {
  color: #fe5f58;
}

span.p.yellow,
p.p.yellow {
  color: #ffbd2b;
}

span.p.green,
p.p.green {
  color: #3dc550;
}

span.p.cyan,
p.p.cyan {
  color: #1bcdfc;
}

span.p.blue,
p.p.blue {
  color: #2196f3;
}

span.p.gray,
p.p.gray {
  color: #666;
}
/*tag end*/

/*note标签 https://lovelijunyi.gitee.io/posts/c898.html*/
div.note.red::before {
  content: "\f054";
}

div.note.quote {
  background: #e8f4fd;
  border-color: #2196f3;
}

div.note.quote::before {
  color: #2196f3;
  content: "\f10d";
}

div.note.radiation::before {
  content: "\f7b9";
}

div.note.bug::before {
  content: "\f188";
}

div.note.idea::before {
  content: "\f0eb";
}

div.note.link::before {
  content: "\f0c1";
}

div.note.paperclip::before {
  content: "\f0c6";
}

div.note.todo::before {
  content: "\f0ae";
}

div.note.message::before {
  content: "\f4ad";
}

div.note.guide::before {
  content: "\f277";
}

div.note.download::before {
  content: "\f019";
}

div.note.up::before {
  content: "\f102";
}

div.note.undo::before {
  content: "\f2ea";
}

div.note.play::before {
  content: "\f144";
}

div.note.message::before {
  content: '\f4ad';
}

div.note.clear {
  background: none;
  border-color: none;
}

div.note.light {
  background: #f6f6f6;
  border-color: #aaa;
}

div.note.light::before {
  color: #aaa;
}

div.note.gray {
  background: #f6f6f6;
  border-color: #767676;
}

div.note.gray::before {
  color: #767676;
}

div.note.red {
  background: #feefee;
  border-color: #fe5f58;
}

div.note.red::before {
  color: #fe5f58;
}

div.note.yellow {
  background: #fff8e9;
  border-color: #ffbd2b;
}

div.note.yellow::before {
  color: #ffbd2b;
}

div.note.green {
  background: #ebf9ed;
  border-color: #3dc550;
}

div.note.green::before {
  color: #3dc550;
}

div.note.cyan::before {
  color: #1bcdfc;
}

div.note.blue::before {
  color: #2196f3;
}

div.note.blue {
  background: #e8f4fd;
  border-color: #2196f3;
}

[data-theme="dark"] .note p{
  color: #000;
}
/*note标签结束*/

/* 标签显影 */
#article-container psw:hover {
  color: #333;
  background: none;
}

#article-container psw {
  color: transparent;
  background: #666;
  border-radius: 2px;
  transition: all 0.28s ease;
  -moz-transition: all 0.28s ease;
  -webkit-transition: all 0.28s ease;
  -o-transition: all 0.28s ease;
}

[data-theme="dark"] #article-container psw:hover {
  color: #fff;
  filter: brightness(0.7);
}
/* 标签显影END */

/* 时间线 */
div.timenode {
  position: relative;
}
div.timenode:before,
div.timenode:after {
  content: "";
  z-index: 1;
  position: absolute;
  background: rgba(68, 215, 182, 0.5);
  width: 2px;
  left: 7px;
}
div.timenode:before {
  top: 0;
  height: 6px;
}
div.timenode:after {
  top: 26px;
  height: calc(100% - 26px);
}
div.timenode:last-child:after {
  height: calc(100% - 26px - 16px);
  border-bottom-left-radius: 2px;
  border-bottom-right-radius: 2px;
}
div.timenode .meta,
div.timenode .body {
  max-width: calc(100% - 24px);
}
div.timenode .meta {
  position: relative;
  color: var(--tab-botton-color);
  font-size: 0.375rem;
  line-height: 32px;
  height: 32px;
}
div.timenode .meta:before,
div.timenode .meta:after {
  content: "";
  position: absolute;
  top: 8px;
  z-index: 2;
}
div.timenode .meta:before {
  background: rgba(68, 215, 182, 0.5);
  width: 16px;
  height: 16px;
  border-radius: 8px;
}
div.timenode .meta:after {
  background: #44d7b6;
  margin-left: 2px;
  margin-top: 2px;
  width: 12px;
  height: 12px;
  border-radius: 6px;
  transform: scale(0.5);
}
div.timenode .meta p {
  font-weight: bold !important;
  margin: 0 0 0 24px !important;
}
div.timenode .body {
  margin: 4px 0 10px 24px;
  padding: 10px;
  border-radius: 12px;
  background: #efeded;
  display: inline-block;
}
div.timenode .body p:first-child {
  margin-top: 0 !important;
}
div.timenode .body p:last-child {
  margin-bottom: 0 !important;
}
div.timenode .body .highlight {
  background: #fff7ea;
  filter: grayscale(0%);
}
div.timenode .body .highlight figcaption {
  background: #ffeed2;
}
div.timenode .body .highlight .gutter {
  background: #ffedd0;
}
div.timenode:hover .meta {
  color: #444;
}
div.timenode:hover .meta:before {
  background: rgba(255, 87, 34, 0.5);
}
div.timenode:hover .meta:after {
  background: #ff5722;
  transform: scale(1);
}

[data-theme="dark"] div.timenode .body {
  background: #2c2c2c;
}

[data-theme="dark"] div.timenode:hover .meta {
  color: #ccd0d7;
}

[data-theme="dark"] div.timenode .meta {
  color: rgba(255, 255, 255, 0.6);
}

[data-theme="dark"] div.timeline p.p.h2 {
  color: rgba(255, 255, 255, 0.6);
}

/* link */
#article-container a.link-card {
  margin: 0.25rem auto;
  background: #f6f6f6;
  display: inline-flex;
  align-items: center;
  cursor: pointer;
  text-align: center;
  min-width: 200px;
  max-width: 361px;
  color: #444;
  border-radius: 12px;
  text-decoration: none;
}
@media screen and (max-width: 425px) {
  #article-container a.link-card {
	max-width: 100%;
  }
}
@media screen and (max-width: 375px) {
  #article-container a.link-card {
	width: 100%;
  }
}
#article-container a.link-card:hover {
  box-shadow: 0 4px 8px 0 rgba(0, 0, 0, 0.1);
}
#article-container a.link-card div.left,
#article-container a.link-card div.right {
  pointer-events: none;
}
#article-container a.link-card div.left {
  width: 48px;
  height: 48px;
  margin: 12px;
  overflow: hidden;
  flex-shrink: 0;
  position: relative;
}
#article-container a.link-card div.left i {
  font-size: 32px;
  line-height: 48px;
  margin-left: 4px;
}
#article-container a.link-card div.left img {
  display: block;
  position: absolute;
  border-radius: 8px / 4;
  top: 50%;
  left: 50%;
  transform: translate(-50%, -50%);
}
#article-container a.link-card div.right {
  overflow: hidden;
  margin-right: 12px;
}
#article-container a.link-card p {
  margin: 0;
}
#article-container a.link-card p.text {
  font-weight: bold;
}
#article-container a.link-card p.url {
  flex-shrink: 0;
  color: rgba(68, 68, 68, 0.65);
  font-size: 13px;
}

[data-theme="dark"] #article-container a.link-card img {
  filter: brightness(1);
}

[data-theme="dark"] #article-container a.link-card {
  filter: brightness(0.7);
}
-
编辑
_config.butterfly.yml文件在
inject->head下面添加如下内容:
- <link rel="stylesheet" href="/css/tag.css">
- 下载 hexo-theme-volantis 主题、复制
scripts\tags下的主题到themes\Butterfly\scripts\tag中、复制以下文件即可
btns.js
checkbox.js
folding.js
link.js
span.js
timeline.js
- 使用参考 Volantis 专用标签 或者 基于 Butterfly 主题魔改的样式查阅
2.23 当前访问用户
效果图:
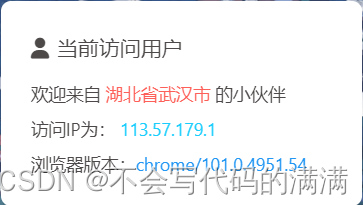
使用前须知:确保使用了上面 tag 外挂标签 span 的样式 、否则没有彩色样式
- 在
themes\Butterfly\layout\includes\widget\下创建card_ip.pug文件
.card-widget.card-ip
  .card-content
  .item-headline
    i.fa.fa-user(aria-hidden="true")
    span= _p('aside.card_ip')
  .ip_content
   = _p('欢迎来自 ')
   span(class="p red")= _p('未知区域')
   = _p(' 的小伙伴')
   br
   = _p('访问IP为: ')
   span(class="p cyan")= _p('未知IP')
   br
   = _p('浏览器版本:')
   span(class="p blue")= _p('未知浏览器')
- 编辑
index.pug、 在合适位置添加
if theme.aside.card_ip
    !=partial('includes/widget/card_ip', {}, {cache: theme.fragment_cache})
- 编辑
themes\Butterfly\languages\zh-CN.yml文件、在aside下添加
card_ip: true
- 在
themes\Butterfly\source\js下创建ip_content.js
//获取当前IP地址和浏览器标识
function getBrowserInfo() {
    var agent = navigator.userAgent.toLowerCase();

    var regStr_ie = /msie [\d.]+;/gi;
    var regStr_ff = /firefox\/[\d.]+/gi
    var regStr_chrome = /chrome\/[\d.]+/gi;
    var regStr_saf = /safari\/[\d.]+/gi;

    //IE
    if (agent.indexOf("msie") > 0) {
        return agent.match(regStr_ie);
    }

    //firefox
    if (agent.indexOf("firefox") > 0) {
        return agent.match(regStr_ff);
    }

    //Chrome
    if (agent.indexOf("chrome") > 0) {
        return agent.match(regStr_chrome);
    }

    //Safari
    if (agent.indexOf("safari") > 0 && agent.indexOf("chrome") < 0) {
        return agent.match(regStr_saf);
    }
}

var ip_content = document.querySelector(".ip_content");

if (ip_content != null && typeof (returnCitySN) != undefined) {
    ip_content.innerHTML = '欢迎来自 <span class="p red">' + returnCitySN["cname"] + "</span> 的小伙伴<br>" + "访问IP为: <span class='p cyan'>" + returnCitySN["cip"] + "</span><br>浏览器版本:<span class='p blue'>" + getBrowserInfo() + '</span>';
}
- 编辑
_config.butterfly.yml文件、在inject->bottom下面添加如下内容:
- <script src="https://pv.sohu.com/cityjson?ie=utf-8"></script>
- <script src="/js/ip_content.js"></script>
使用的是搜狐的获取 ip 和位置、显示的并不是很准确,但是目前体验来看还是很不错的!!!
2.24 移动端默认折叠
方法 1:
- 在
themes\Butterfly\source\js文件夹新建Mobile_folding.js文件,文件内容如下:
//手机侧边栏默认不展开
var mobile_sidebar_menus = document.getElementById("mobile-sidebar-menus");
if (mobile_sidebar_menus != null) {
    var menus_item_child = mobile_sidebar_menus.getElementsByClassName("menus_item_child");
    var menus_expand = mobile_sidebar_menus.getElementsByClassName("expand");
    for (var i = 0; i < menus_item_child.length; i++) {
        menus_item_child[i].style.display = "none";
        menus_expand[i].className += " closed";
    }
}
-
编辑
_config.butterfly.yml文件在
inject->bottom下面添加如下内容:
- <script src="/js/Mobile_folding.js"></script>
方法 2:
最新版主题配置、 编辑_config.butterfly.yml
# Hide the child menu items in mobile sidebar
hide_sidebar_menu_child: true
2.25 Aplayer 播放器自动收缩
注意:此方法只针对左下角开启了 Aplayer
- 找到
themes\Butterfly\source\css下创建aplayerdiy.css文件、输入以下内容:
.aplayer.aplayer-fixed.aplayer-narrow .aplayer-body {
    left: -66px !important;
}

.aplayer.aplayer-fixed.aplayer-narrow .aplayer-body:hover {
    left: 0 !important;
}
- 编辑
_config.butterfly.yml文件、在inject->head下面添加如下内容:
- <link rel="stylesheet" href="/css/aplayerdiy.css">
2.26 鼠标指针样式
看我博客的鼠标指针
-
找到
themes\Butterfly\source\css下创建mouse.css文件、输入以下内容:url里的图片链接可以自行替换成自己的
/*鼠标样式*/
body,
html {
  cursor: url(https://cdn.jsdelivr.net/gh/zykjofficial/zykjresource@master/img/Arrow.cur),
	auto !important;
}

a,
img {
  cursor: url(https://cdn.jsdelivr.net/gh/zykjofficial/zykjresource@master/img/link.cur),
	auto !important;
}

/*a标签*/
a:hover {
  cursor: url(https://cdn.jsdelivr.net/gh/zykjofficial/zykjresource@master/img/link.cur),
	auto !important;
}

/*按钮*/
button:hover {
  cursor: url(https://cdn.jsdelivr.net/gh/zykjofficial/zykjresource@master/img/link.cur),
	auto !important;
}

/*i标签*/
i:hover {
  cursor: url(https://cdn.jsdelivr.net/gh/zykjofficial/zykjresource@master/img/link.cur),
	auto !important;
}

/*页脚a标签*/
#footer-wrap a:hover {
  cursor: url(https://cdn.jsdelivr.net/gh/zykjofficial/zykjresource@master/img/link.cur),
	auto !important;
}

/*分页器*/
#pagination .page-number:hover {
  cursor: url(https://cdn.jsdelivr.net/gh/zykjofficial/zykjresource@master/img/link.cur),
	auto !important;
}

/*头部的导航栏*/
#nav .site-page:hover {
  cursor: url(https://cdn.jsdelivr.net/gh/zykjofficial/zykjresource@master/img/link.cur),
	auto !important;
}
/*鼠标样式END*/
- 编辑
_config.butterfly.yml文件、在inject->head下面添加如下内容:
- <link rel="stylesheet" href="/css/mousediy.css">
2.27 渐变背景
- 编辑
_config.butterfly.yml文件、找到background修改里面的内容
background: 'linear-gradient(0deg,rgba(247,149,51,0.1) 0,rgba(243,112,85,0.1) 15%,rgba(239,78,123,0.1) 30%,rgba(161,102,171,0.1) 44%,rgba(80,115,184,0.1) 58%,rgba(16,152,173,0.1) 72%,rgba(7,179,155,0.1) 86%,rgba(109,186,130,0.1) 100%);'
🌈第三部分 优化 Hexo
1. 网站SEO优化
网站推广是一个比较烦人的事情,特别是对于专心搞技术的来说,可能就不是很擅长,那么怎么才能让别人知道我们网站呢?也就是说我们需要想办法让别人通过搜索就可以搜索到博客的内容,给我们带来自然流量,这就需要seo优化,让我们的站点变得对搜索引擎友好
SEO是由英文Search Engine Optimization缩写而来, 中文意译为“搜索引擎优化”。SEO是指通过站内优化比如网站结构调整、网站内容建设、网站代码优化等以及站外优化。
1.1 让百度收录你的站点
首先要做的就是让各大搜索引擎收录你的站点,我们在刚建站的时候各个搜索引擎是没有收录我们网站的,在搜索引擎中输入site:<域名>,如果如下图所示就是说明我们的网站并没有被百度收录。我们可以直接点击下面的“网址提交”来提交我们的网站

查看站点是否被百度收录
1.1.1 验证网站所有权
登录百度站长搜索资源平台:http://zhanzhang.baidu.com, 只要有百度旗下的账号就可以登录,登录成功之后在站点管理中点击添加网站然后输入你的站点地址。
注意,这里需要输入我们自己购买的域名,不能使用
xxx.github.io之类域名.因为github是不允许百度的spider(蜘蛛)爬取github上的内容的,所以如果想让你的站点被百度收录,只能使用自己购买的域名
向百度站长添加网站
在填完网址选择完网站的类型之后需要验证网站的所有权,验证网站所有权的方式有三种:
- 文件验证。
html标签验证CNAME解析验证(推荐使用)
验证网站所有权
其实使用哪一种方式都可以,都是比较简单的。
但是一定要注意,使用文件验证文件存放的位置需要放在
sourc文件夹下,如果是html文件那么hexo就会将其编译,所以必须要在html头部加上的layout:false,这样就不会被hexo编译。(如果验证文件是txt格式的就不需要)
其他两种方式也是很简单的,个人推荐文件验证和CNAME验证,CNAME验证最为简单,只需加一条解析就好~
添加云解析
验证通过
1.1.2 生成网站地图
我们需要使用npm自动生成网站的sitemap,然后将生成的sitemap提交到百度和其他搜索引擎
1.1.2.1 安装sitemap插件
npm install hexo-generator-sitemap --save
npm install hexo-generator-baidu-sitemap --save
1.1.2.2 修改博客配置文件
在根目录配置文件.yml中修改url为你的站点地址
# URL
## If your site is put in a subdirectory, set url as 'http://yoursite.com/child' and root as '/child/'
# url: https://shw2018.github.io/
url: https://sunhwee.com
root: /
permalink: :year/:month/:day/:title/
permalink_defaults:
Yml
执行完hexo g命令之后就会在网站根目录生成sitemap.xml文件和baidusitemap.xml文件,可以通过:https://sunhwee.com/baidusitemap.xml, 查看该文件是否生成,其中sitemap.xml文件是搜索引擎通用的文件,baidusitemap.xml是百度专用的sitemap文件。
1.1.3 向百度提交链接
然后我们就可以将我们生成的sitemap文件提交给百度,还是在百度站长平台,找到链接提交,这里我们可以看到有两种提交方式,自动提交和手动提交,自动提交又分为主动推送、自动推送和sitemap
如何选择链接提交方式
- 主动推送:最为快速的提交方式,推荐您将站点当天新产出链接立即通过此方式推送给百度,以保证新链接可以及时被百度收录。
- 自动推送:最为便捷的提交方式,请将自动推送的
JS代码部署在站点的每一个页面源代码中,部署代码的页面在每次被浏览时,链接会被自动推送给百度。可以与主动推送配合使用。sitemap:您可以定期将网站链接放到sitemap中,然后将sitemap提交给百度。百度会周期性的抓取检查您提交的sitemap,对其中的链接进行处理,但收录速度慢于主动推送。- 手动提交:一次性提交链接给百度,可以使用此种方式。
一般主动提交比手动提交效果好,这里介绍主动提交的三种方法
从效率上来说:
主动推送>自动推送>sitemap
[
连接提交
1.1.3.1 设置主动推送
安装插件hexo-baidu-url-submit
npm install hexo-baidu-url-submit --save
然后再根目录的配置文件中新增字段
baidu_url_submit:
  count: 80             # 提交最新的一个链接
  host: www.sunhwee.com # 在百度站长平台中注册的域名
  token: xxxxxxxxxxxxxx # 请注意这是您的秘钥, 所以请不要把博客源代码发布在公众仓库里!
  path: baidu_urls.txt  # 文本文档的地址, 新链接会保存在此文本文档里
再加入新的deploy:
deploy:
- type: baidu_url_submitter
**注意,这里多个
type的写法应该这么写,前面那个type是我推送到Github与Coding的page页面的配置,后面再讲这个。
主动推送成功提示
各种不同的推送反馈字段说明在这里查看,一般来说,推送失败基本都是地址不相符造成的,我们只需对比
baidu_url_submit在public中生成的baidu_urls.txt的地址,与自己填写在host字段中的地址对比看是否一样即可。
1.1.3.2 设置自动推送
在主题配置文件下设置,将baidu_push设置为true:
# Enable baidu push so that the blog will push the url to baidu automatically which is very helpful for SEO
baidu_push: true
然后主题文件目录加入下面代码,一般在目录/themes/matery/layout/_partial中的head.ejs中加入下面JS代码(有可能你的目录不是这样,原理类似),这样全站都有了:
<% if (theme.baidu_push) { %>
    <script>
        (function(){
            var bp = document.createElement('script');
            var curProtocol = window.location.protocol.split(':')[0];
            if (curProtocol === 'https') {
                bp.src = 'https://zz.bdstatic.com/linksubmit/push.js';
            }
            else {
                bp.src = 'http://push.zhanzhang.baidu.com/push.js';
            }
            var s = document.getElementsByTagName("script")[0];
            s.parentNode.insertBefore(bp, s);
        })();
    </script>
<% } %>
Js
这样每次访问博客中的页面就会自动向百度提交sitemap
1.1.3.3 sitemap方式
将我们上一步生成的sitemap文件提交到百度就可以了~
将sitemap提交到百度
我记得被百度收录过程还是蛮久的,一度让我以为我的方法有问题,提交链接在站长工具中有显示大概是有两天的时候,站点被百度收录大概花了半个月= =,让大家看一下现在的成果
在百度搜索site:sunhwee.com已经可以搜索到结果

站点已被百度收录
站点已被百度收录
1.2 让google收录你的站点
1.2.1 操作步骤
相比于百度,google的效率实在不能更快,貌似十分钟左右站点就被收录了,其实方法是和百度是一样的。
google站点平台:https://www.google.com/webmasters/
- 注册账号
- 验证站点
- 提交
sitemap
向
sitemap后: 进入Google Search Console- 抓取 - 站点地图,点击「添加/测试站点地图」,输入你的博客网址. 若无报错则站点地图提交成功
sitemap提交成功
一步一步来就好,过不了过久就可以被google收录了
站点已被google收录
1.2.2 提交 robots.txt:
robots.txt 是一种存放于网站根目录下的 ASCII 编码的文本文件,它的作用是告诉搜索引擎此网站中哪些内容是可以被爬取的,哪些是禁止爬取的。robots.txt 放在博客目录下的 source 文件夹中,博客生成后在站点目录 /public/ 下。
我的 robots.txt 文件内容如下:
User-agent: *
Allow: /
Allow: /archives/
Allow: /categories/
Allow: /about/
Disallow: /js/
Disallow: /css/
Disallow: /fonts/
Disallow: /vendors/
Yml
robots.txt 文件更新至网站后可进入 Google Search Console - 抓取 - robots.txt 测试工具进行测试。
这里部分参考自Hexo博客搜索 SEO优化-谷歌篇
1.3 让其他搜索引擎收录你的站点
除了百度和google两大搜索引擎,还有搜狗、360等其他的搜索引擎,流程都是一样的,大家就自行选择添加哈,这里就不再赘述了~
1.4 优化你的url
seo`搜索引擎优化认为,网站的最佳结构是**用户从首页点击三次就可以到达任何一个页面**,但是我们使用`hexo`编译的站点打开文章的`url`是:`sitename/year/mounth/day/title`四层的结构,这样的`url`结构很不利于`seo`,爬虫就会经常爬不到我们的文章,于是,我们需要优化一下网站文章`url
方案一:
我们可以将url直接改成sitename/title的形式,并且title最好是用英文,在根目录的配置文件下修改permalink如下:
url: https://sunhwee.com
root: /
permalink: :title.html
permalink_defaults:
方案二:
使用插件优化url
插件hexo-abbrlink实现了这个功能,它将原来的URL地址重新进行了进制转换和再编码。
安装hexo-abbrlink。
npm install hexo-abbrlink --save
Bash
配置博客根目录下的_config.yml文件。
# permalink: :title/
permalink: archives/:abbrlink.html
abbrlink:
  alg: crc32  # 算法:crc16(default) and crc32
  rep: hex    # 进制:dec(default) and hex
运行hexo clean和hexo g命令来重新生成文件看看,可以清楚的看到,URL结构成功变为了3层。
1.5 其他seo优化
seo优化应该说是一个收益延迟的行为,可能你做的优化短期内看不到什么效果,但是一定要坚持,seo优化也是有很深的可以研究的东西,从我们最初的网站设计,和最基础的标签的选择都有很大的关系,网站设计就如我们刚刚说的,要让用户点击三次可以到达网站的任何一个页面,要增加高质量的外链,增加相关推荐(比如说我们经常见到右侧本站的最高阅读的排名列表),然后就是给每一个页面加上keyword和描述
在代码中,我们应该写出能让浏览器识别的语义化HTML,这样有助于爬虫抓取更多的有效信息:爬虫依赖于标签来确定上下文和各个关键字的权重;并且对外链设置nofollow标签,避免spider爬着爬着就爬出去了(减少网站的跳出率),并且我们要尽量在一些比较大的网站增加我们站点的曝光率,因为spider会经常访问大站,比如我们在掘金等技术社区发表文章中带有我们的站点,这样spider是很有可能爬到我们中的站点的,so….
- 网站外链的推广度、数量和质量
- 网站的内链足够强大
- 网站的原创质量
- 网站的年龄时间
- 网站的更新频率(更新次数越多越好)
- 网站的服务器
- 网站的流量:流量越高网站的权重越高
- 网站的关键词排名:关键词排名越靠前,网站的权重越高
- 网站的收录数量:网站百度收录数量越多,网站百度权重越高
- 网站的浏览量及深度:用户体验越好,网站的百度权重越高
2. 优化代码块样式
由于代码高亮插件prism_plugin的样式没有行号显示和代码块整体复制功能,不是很方便,为了优化观感和易用性,我们可以对其进行修改:
待续……
2.1 给代码块开启行号
我们在配置文件.yml中找到prism_plugin配置项line_number: false(# default false)改为true,开启行号,但是在我们这个matery主题中中是无效的,有bug需要改一下matery.css样式参数,在第95行位置将:
pre {
    padding: 1.5rem !important;
    margin: 1rem 0 !important;
    background: #272822;
    overflow: auto;
    border-radius: 0.35rem;
    tab-size: 4;
}
Css
改为:
pre {
    padding: 1.5rem 1.5rem 1.5rem 3.3rem !important;
    margin: 1rem 0 !important;
    background: #272822;
    overflow: auto;
    border-radius: 0.35rem;
    tab-size: 4;
}
Css
注释掉紧接着的code代码块里面的font-size项,如下:
code {
    padding: 1px 5px;
    font-family: Inconsolata, Monaco, Consolas, 'Courier New', Courier, monospace;
    /*font-size: 0.91rem;*/
    color: #e96900;
    background-color: #f8f8f8;
    border-radius: 2px;
}
代码块显示行号
2.2 添加代码块复制功能
3. 优化网站加载速度
3.1 优化图片加载
issue问题:
优化网站加载逻辑问题:图片最后加载,加入图片懒加载方法
hexo-lazyload-image的作用原理是讲你博客里面img标签的src属性替换为一个loading image,把真实的图片地址放在data-origin属性下面。然后当你的网页翻到那张图片时(也就是图片在窗口中完全可见时),他会有一段js用data-origin的内容替换src,打到懒加载的目的。
一般情况下懒加载和gallery插件会发生冲突,比如按照我上面所说,最终结果就会变成,可能只有第一张图片在gallery中打开是原图,右翻左翻都会是那张loading image,需要你掌握js,可以修改matery.js里面的内容,甚至可能换一个gallery,比如photosiwpe之类的
解决方法:修改/themes/matery/source/js中的matery.js文件
第103行:
$('#articleContent, #myGallery').lightGallery({
    selector: '.img-item',
    // 启用字幕
    subHtmlSelectorRelative: true,
    showThumbByDefault: false   //这句加上
});
后面加上:
$(document).find('img[data-original]').each(function(){
    $(this).parent().attr("href", $(this).attr("data-original"));
});
再装个插件,https://github.com/Troy-Yang/hexo-lazyload-image
在博客根目录配置.yml文件加入对应字段,如下:
# lazyload configuration  2019.08.23
lazyload:
  enable: true
  onlypost: false
  loadingImg:     # eg ./images/loading.gif
好了,这样实现了博客网站的图片懒加载。
3.2 Gulp实现代码压缩
Gulp实现代码压缩,以提升网页加载速度。
1 首先我们需要安装Gulp插件和5个功能模块,依次运行下面的两条命令。
npm install gulp --save  #安装gulp
# 安装功能模块
npm install gulp-htmlclean gulp-htmlmin gulp-minify-css gulp-uglify gulp-imagemin --save
# 额外的功能模块
npm install gulp-debug gulp-clean-css gulp-changed gulp-if gulp-plumber gulp-babel babel-preset-es2015 del --save
2 接下来在博客的根目录下新建gulpfile.js文件,并复制下面的内容到文件中。
var gulp = require("gulp");
var debug = require("gulp-debug");
var cleancss = require("gulp-clean-css"); //css压缩组件
var uglify = require("gulp-uglify"); //js压缩组件
var htmlmin = require("gulp-htmlmin"); //html压缩组件
var htmlclean = require("gulp-htmlclean"); //html清理组件
var imagemin = require("gulp-imagemin"); //图片压缩组件
var changed = require("gulp-changed"); //文件更改校验组件
var gulpif = require("gulp-if"); //任务 帮助调用组件
var plumber = require("gulp-plumber"); //容错组件(发生错误不跳出任务,并报出错误内容)
var isScriptAll = true; //是否处理所有文件,(true|处理所有文件)(false|只处理有更改的文件)
var isDebug = true; //是否调试显示 编译通过的文件
var gulpBabel = require("gulp-babel");
var es2015Preset = require("babel-preset-es2015");
var del = require("del");
var Hexo = require("hexo");
var hexo = new Hexo(process.cwd(), {}); // 初始化一个hexo对象

// 清除public文件夹
gulp.task("clean", function() {
  return del(["public/**/*"]);
});

// 下面几个跟hexo有关的操作,主要通过hexo.call()去执行,注意return
// 创建静态页面 (等同 hexo generate)
gulp.task("generate", function() {
  return hexo.init().then(function() {
    return hexo
      .call("generate", {
        watch: false
      })
      .then(function() {
        return hexo.exit();
      })
      .catch(function(err) {
        return hexo.exit(err);
      });
  });
});

// 启动Hexo服务器
gulp.task("server", function() {
  return hexo
    .init()
    .then(function() {
      return hexo.call("server", {});
    })
    .catch(function(err) {
      console.log(err);
    });
});

// 部署到服务器
gulp.task("deploy", function() {
  return hexo.init().then(function() {
    return hexo
      .call("deploy", {
        watch: false
      })
      .then(function() {
        return hexo.exit();
      })
      .catch(function(err) {
        return hexo.exit(err);
      });
  });
});

// 压缩public目录下的js文件
gulp.task("compressJs", function() {
  return gulp
    .src(["./public/**/*.js", "!./public/libs/**"]) //排除的js
    .pipe(gulpif(!isScriptAll, changed("./public")))
    .pipe(gulpif(isDebug, debug({ title: "Compress JS:" })))
    .pipe(plumber())
    .pipe(
      gulpBabel({
        presets: [es2015Preset] // es5检查机制
      })
    )
    .pipe(uglify()) //调用压缩组件方法uglify(),对合并的文件进行压缩
    .pipe(gulp.dest("./public")); //输出到目标目录
});

// 压缩public目录下的css文件
gulp.task("compressCss", function() {
  var option = {
    rebase: false,
    //advanced: true,               //类型:Boolean 默认:true [是否开启高级优化(合并选择器等)]
    compatibility: "ie7" //保留ie7及以下兼容写法 类型:String 默认:''or'*' [启用兼容模式; 'ie7':IE7兼容模式,'ie8':IE8兼容模式,'*':IE9+兼容模式]
    //keepBreaks: true,             //类型:Boolean 默认:false [是否保留换行]
    //keepSpecialComments: '*'      //保留所有特殊前缀 当你用autoprefixer生成的浏览器前缀,如果不加这个参数,有可能将会删除你的部分前缀
  };
  return gulp
    .src(["./public/**/*.css", "!./public/**/*.min.css"]) //排除的css
    .pipe(gulpif(!isScriptAll, changed("./public")))
    .pipe(gulpif(isDebug, debug({ title: "Compress CSS:" })))
    .pipe(plumber())
    .pipe(cleancss(option))
    .pipe(gulp.dest("./public"));
});

// 压缩public目录下的html文件
gulp.task("compressHtml", function() {
  var cleanOptions = {
    protect: /<\!--%fooTemplate\b.*?%-->/g, //忽略处理
    unprotect: /<script [^>]*\btype="text\/x-handlebars-template"[\s\S]+?<\/script>/gi //特殊处理
  };
  var minOption = {
    collapseWhitespace: true, //压缩HTML
    collapseBooleanAttributes: true, //省略布尔属性的值  <input checked="true"/> ==> <input />
    removeEmptyAttributes: true, //删除所有空格作属性值    <input id="" /> ==> <input />
    removeScriptTypeAttributes: true, //删除<script>的type="text/javascript"
    removeStyleLinkTypeAttributes: true, //删除<style>和<link>的type="text/css"
    removeComments: true, //清除HTML注释
    minifyJS: true, //压缩页面JS
    minifyCSS: true, //压缩页面CSS
    minifyURLs: true //替换页面URL
  };
  return gulp
    .src("./public/**/*.html")
    .pipe(gulpif(isDebug, debug({ title: "Compress HTML:" })))
    .pipe(plumber())
    .pipe(htmlclean(cleanOptions))
    .pipe(htmlmin(minOption))
    .pipe(gulp.dest("./public"));
});

// 压缩 public/uploads 目录内图片
gulp.task("compressImage", function() {
  var option = {
    optimizationLevel: 5, //类型:Number  默认:3  取值范围:0-7(优化等级)
    progressive: true, //类型:Boolean 默认:false 无损压缩jpg图片
    interlaced: false, //类型:Boolean 默认:false 隔行扫描gif进行渲染
    multipass: false //类型:Boolean 默认:false 多次优化svg直到完全优化
  };
  return gulp
    .src("./public/medias/**/*.*")
    .pipe(gulpif(!isScriptAll, changed("./public/medias")))
    .pipe(gulpif(isDebug, debug({ title: "Compress Images:" })))
    .pipe(plumber())
    .pipe(imagemin(option))
    .pipe(gulp.dest("./public"));
});
// 执行顺序: 清除public目录 -> 产生原始博客内容 -> 执行压缩混淆 -> 部署到服务器
gulp.task(
  "build",
  gulp.series(
    "clean",
    "generate",
    "compressHtml",
    "compressCss",
    "compressJs",
    "compressImage",
    gulp.parallel("deploy")
  )
);

// 默认任务
gulp.task(
  "default",
  gulp.series(
    "clean",
    "generate",
    gulp.parallel("compressHtml", "compressCss", "compressImage", "compressJs")
  )
);
//Gulp4最大的一个改变就是gulp.task函数现在只支持两个参数,分别是任务名和运行任务的函数
3 最后 hexo clean && hexo g && gulp && hexo d 就可以了。
注意,很可能你会运行到第三步,也就是运行
gulp压缩命令时会报错
gulp运行错误
那是因为gulp安装的本地版本和hexo自带的版本不对应导致,第三步gulp压缩可以用下面命令强制使用本地版本:
node ./node_modules/gulp/bin/gulp.js
3.3 Github & Coding Pages 双部署
Github & Coding Pages 双部署,对国内,国外用户进行分流访问,以提升网站的访问速度.
Github Pages 的部署前面已经说了,这里就讲一讲 Coding Pages 如何部署.其实与 Github Pages 也类似,先到coding官网注册,创建一个与用户名同名的仓库,添加仓库地址到配置文件中,在根目录_config.yml对应地方添加如下:
# Deployment
## Docs: https://hexo.io/docs/deployment.html
deploy:
- type: git
  repo:
    github: https://github.com/shw2018/shw2018.github.io.git  # github 仓库地址
    coding: https://git.dev.tencent.com/sunhwee/sunhwee.git   # coding 仓库地址
  branch: master
- type: baidu_url_submitter
把本地生成 SSH 公匙添加到 Coding 这一步看我前面的教程,原理类似.
然后 hexo clean && hexo g && hexo d 部署上去就是了.
当然,部署上去后,你需要开启 page 服务.
你可以在 pages 设置里面自定义域名,区域名解析控制台,添加两条 CNAME 记录,将域名指向RepoName.coding.me就可以的,申请 ssl 证书,强制开启https
可能遇到的问题:
[coding pages 申请ssl 证书总是提示:错误!]
这里提一句,如果你是github pages 和 coding pages双部署,用同一个域名的话,可以将xxx.github.io 解析成 境外, xxx.coding.me 解析成 默认,这个时候如果你之前就申请过 ssl 证书的话,再在 coding 里面申请 ssl证书会一直提示 失败,解决办法:
先去域名解析控制台,将境外解析的两条 CNAME 记录 暂停,过个五六分钟,回到 coding 点击申请 ssl,很快就会提示,申请成功!
刚好我过程中遇到了这个问题,所以把它记下来,方便后面的小伙伴看到.
到这里整个Hexo博客部署美化教程就完结啦,大家快行动起来,开始自己的Hexo之旅吧!!


 1721
1721

 被折叠的 条评论
为什么被折叠?
被折叠的 条评论
为什么被折叠?
 到【灌水乐园】发言


