


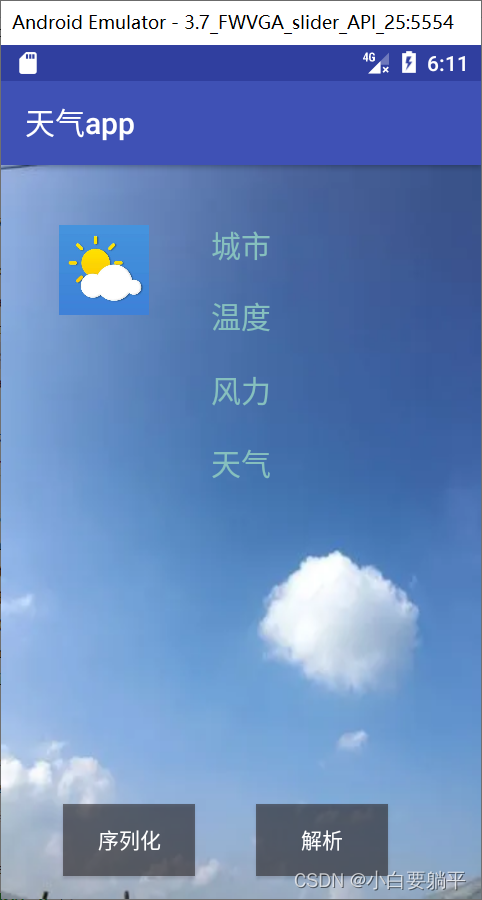
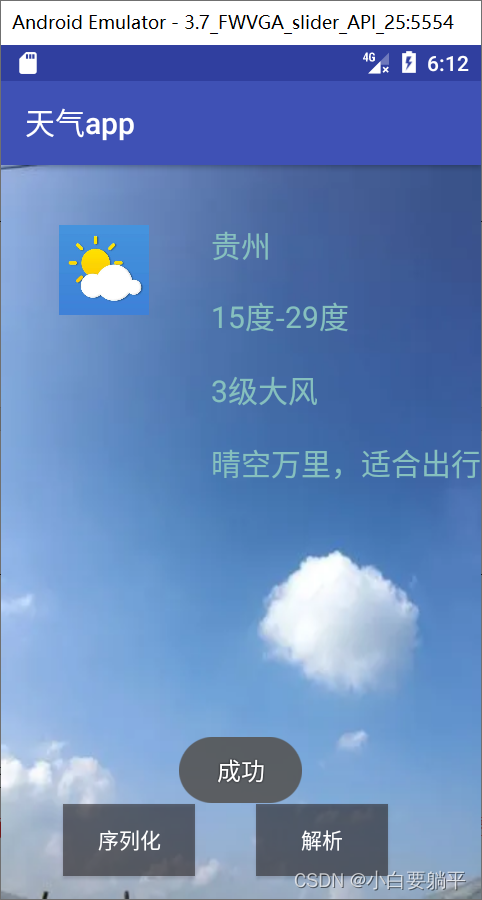
 该文讲述了如何在Android环境中,通过XML文件进行序列化和解析操作,以实现天气预报应用的功能。具体包括创建XML文件来存储城市天气信息,如城市名、风力和温度,并在布局文件layout.xml中设计用户界面。接着,通过MainActivity.java中的read和write方法,实现XML文件的读取和写入,动态更新UI展示天气数据。
1、掌握XML文件的序列化操作;
2、掌握XML文件的解析操作。
3、掌握UI设计的基本方法。
大多数人会在手机中安装一个天气预报的软件,如墨迹天气、懒人天气等。这些软件在获取天气信息时,都是通过解析XML文件得到的。查阅资料,写一个出生地当天的天气文档,包括城市名称,风力,温度等信息。将信息保存成xml文件,并通过解析按钮,将xml文件中的信息进行解析,并在当前界面展示出来。
4、编写layout.xml布局文件代码
 <?xml version="1.0" encoding="utf-8"?>
<android.support.constraint.ConstraintLayout
    xmlns:android="http://schemas.android.com/apk/res/android"
    xmlns:app="http://schemas.android.com/apk/res-auto"
    xmlns:tools="http://schemas.android.com/tools"
    android:layout_width="match_parent"
    android:layout_height="match_parent"
    android:orientation="vertical"
    android:background="@drawable/whether"
    tools:context=".MainActivity"
    tools:layout_editor_absoluteY="81dp"
    tools:layout_editor_absoluteX="0dp">


    <TextView
        android:id="@+id/tvname"
        android:layout_width="wrap_content"
        android:layout_height="wrap_content"
        android:layout_gravity="center"
        android:text="城市"
        android:textColor="#86c0be"
        android:textSize="20dp"

        app:layout_constraintTop_toTopOf="@+id/guideline"
        android:layout_marginTop="8dp"
        android:layout_marginLeft="0dp"
        app:layout_constraintLeft_toLeftOf="@+id/guideline5" />

    <TextView
        android:id="@+id/tvweather"
        android:layout_width="wrap_content"
        android:layout_height="wrap_content"
        android:text="天气"
        android:textColor="#86c0be"
        android:textSize="20dp"
        android:layout_marginBottom="8dp"
        app:layout_constraintBottom_toTopOf="@+id/guideline3"
        android:layout_marginTop="8dp"
        app:layout_constraintTop_toBottomOf="@+id/tvwind"
        app:layout_constraintVertical_bias="0.222"
        android:layout_marginLeft="0dp"
        app:layout_constraintLeft_toLeftOf="@+id/guideline5" />

    <TextView
        android:id="@+id/tvtempt"
        android:layout_width="wrap_content"
        android:layout_height="wrap_content"
        android:text="温度"
        android:textColor="#86c0be"
        android:textSize="20dp"
        android:layout_marginLeft="0dp"
        app:layout_constraintLeft_toLeftOf="@+id/tvname"
        android:layout_marginTop="20dp"
        app:layout_constraintTop_toBottomOf="@+id/tvname" />

    <TextView
        android:id="@+id/tvwind"
        android:layout_width="wrap_content"
        android:layout_height="wrap_content"
        android:text="风力"
        android:textColor="#86c0be"
        android:textSize="20dp"
        android:layout_marginLeft="0dp"
        app:layout_constraintLeft_toLeftOf="@+id/tvtempt"
        android:layout_marginTop="22dp"
        app:layout_constraintTop_toBottomOf="@+id/tvtempt" />
    <Button
        android:id="@+id/button2"
        android:layout_width="wrap_content"
        android:layout_height="wrap_content"
        android:layout_weight="1"
        android:background="#992f2c2f"
        android:onClick="write"
        android:text="序列化"
        android:layout_marginStart="8dp"
        android:layout_marginEnd="8dp"
        android:layout_marginLeft="8dp"
        app:layout_constraintLeft_toLeftOf="parent"
        app:layout_constraintRight_toLeftOf="@+id/button3"
        android:layout_marginRight="8dp"
        android:layout_marginBottom="8dp"
        app:layout_constraintBottom_toTopOf="@+id/guideline2" />

    <Button
        android:id="@+id/button3"
        android:layout_width="wrap_content"
        android:layout_height="wrap_content"
        android:layout_weight="1"
        android:background="#992f2c2f"
        android:onClick="read"
        android:text="解析"
        android:layout_marginRight="62dp"
        app:layout_constraintRight_toRightOf="parent"
        android:layout_marginBottom="8dp"
        app:layout_constraintBottom_toTopOf="@+id/guideline2" />

    <ImageView
        android:id="@+id/imageView"
        android:layout_width="60dp"
        android:layout_height="60dp"
        app:srcCompat="@drawable/sun"
        android:layout_marginStart="8dp"
        android:layout_marginEnd="8dp"
        app:layout_constraintTop_toTopOf="@+id/guideline"
        android:layout_marginTop="8dp"
        android:layout_marginLeft="8dp"
        app:layout_constraintLeft_toLeftOf="@+id/guideline4" />
</android.support.constraint.ConstraintLayout>
5、编写MainActivity程序代码
package com.example.myapplication;
import android.support.v7.app.AppCompatActivity;

import android.os.Bundle;
import android.util.Log;
import android.util.Xml;
import android.view.View;
import android.widget.TextView;
import android.widget.Toast;
import org.xmlpull.v1.XmlPullParser;
import org.xmlpull.v1.XmlSerializer;
import java.io.FileInputStream;
import java.io.FileNotFoundException;
import java.io.FileOutputStream;

public class MainActivity extends AppCompatActivity {
    TextView tvname,tvweather,tvwind,tvtempt;
    @Override
    protected void onCreate(Bundle savedInstanceState) {
        super.onCreate(savedInstanceState);
        setContentView(R.layout.layout);
        tvname=(TextView) findViewById(R.id.tvname);
        tvweather = (TextView)findViewById(R.id.tvweather);
        tvwind = (TextView)findViewById(R.id.tvwind);
        tvtempt = (TextView)findViewById(R.id.tvtempt);
    }
    public void read(View v){
        //1.调用Xml.newPullParser();
        XmlPullParser par=Xml.newPullParser();
        //2.初始化设置输入流和编码方式
        try {
            FileInputStream fis = openFileInput("weather.xml");
            par.setInput(fis,"utf-8");
            //3.par.getEventType()获取当前事件类型
            int type=par.getEventType();
            //4.通过while循环判断当前操作是否为文档结束
            while (type!=XmlPullParser.END_DOCUMENT){
                //Log.e("aaaa",""+type);
                //5.while循环中通过switch判断当前事件类型是否为开始标签
                //6.使用par.next()获得下一个节点
                if(type==2){
                    if("city".equals(par.getName()))
                        tvname.setText(par.nextText());
                    if("weather".equals(par.getName()))
                        tvweather.setText(par.nextText());
                    if("wind".equals(par.getName()))
                        tvwind.setText(par.nextText());
                    if("tempt".equals(par.getName()))
                        tvtempt.setText(par.nextText());
                }
                type=par.next();
                Toast.makeText(this,"成功",Toast.LENGTH_LONG).show();
            }
        } catch (Exception e) {
            e.printStackTrace();
        }
    }
    public void write(View v){
        //1.创建XMLSerializer对象
        XmlSerializer ser=Xml.newSerializer();
        //2.初始化,设置输出流和编码方式
        try{
            FileOutputStream fos = openFileOutput("weather.xml",MODE_PRIVATE);
            ser.setOutput(fos,"utf-8");
            //3.写xml文件头Document
            ser.startDocument("utf-8",true);

            //5.写xml开始节点StartTag
            ser.startTag(null,"city");
            //7.写xml节点内容
            ser.text("贵州");
            //6.写xml结束节点
            ser.endTag(null,"city");

            ser.startTag(null,"weather");
            ser.text("晴空万里,适合出行");
            ser.endTag(null,"weather");

            ser.startTag(null,"wind");
            ser.text("3级大风");
            ser.endTag(null,"wind");

            ser.startTag(null,"tempt");
            ser.text("15度-29度");
            ser.endTag(null,"tempt");

            Toast.makeText(this,"成功",Toast.LENGTH_LONG).show();
            //4.写xml文件结束
            ser.endDocument();
            fos.close();
        }catch(Exception e){
            e.printStackTrace();
        }
    }
}
天气预报软件界面 天气解析展示效果


 5万+
5万+

 被折叠的 条评论
为什么被折叠?
被折叠的 条评论
为什么被折叠?
 到【灌水乐园】发言


