


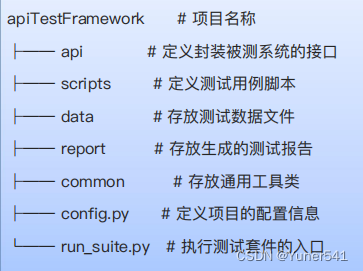
接口测试项目记录
普通实现
首先一个普通方式实现的登陆接口测试案例,包括发送请求和断言两部分:
import pymysql
import unittest
import requests

class TestTPshopTest(unittest.TestCase):
    def test_01(self):
        resp=requests.post("http://ihrm-test.itheima.net/api/sys/login",
                           json={"mobile":"13800000002","password":"123456"},
                           headers={"Content-Type":"application/json"})
        print("登陆成功",resp.json())
        #断言
        self.assertEqual(200,resp.status_code)
        self.assertEqual(True,resp.json().get("success"))
        self.assertEqual(10000,resp.json().get("code"))
        self.assertEqual("操作成功",resp.json().get("message"))
开始封装
第二步编写登陆接口封装代码,放入api文件中
接口对象:输入是api文档上要求的数据以及令牌等等,输出是http返回的结果
这里使用classmethod的原因在于我们可以在撰写的此文件中运行用例,确认代码的正确性
import requests

class IhrmLoginApi:
    @classmethod
    def login(cls,jsondata):
        urldata="http://ihrm-test.itheima.net/api/sys/login"
        headersdata={"Content-Type":"application/json"}
        resp=requests.post(url=urldata,json=jsondata,headers=headersdata)
        return resp

if __name__=='__main__':
    data={"mobile":"13800000002","password":"123456"}
    resp=IhrmLoginApi.login(data)
    print(resp.json())
写完接口对象以后可以普通执行以下一个用例,检查代码有效性
第三步在script中撰写基于 login接口的用例,并执行
import unittest
from ihrm_login import IhrmLoginApi

class TestIhrmLogin(unittest.TestCase):
    #01-正向用例
    def test01_ihrm_login(self):
        json={"mobile":"13800000002","password":"123456"}
        resp=IhrmLoginApi.login(json)

        self.assertEqual(200,resp.status_code)
        self.assertEqual(True,resp.json().get("success"))
        self.assertEqual(10000,resp.json().get("code"))
        self.assertIn("操作成功",resp.json().get("message"))

    #02-手机号为空
    def test02_ihrm_login(self):
        json={"mobile":None,"password":"123456"}
        resp=IhrmLoginApi.login(json)

        self.assertEqual(200,resp.status_code)
        self.assertEqual(False,resp.json().get("success"))
        self.assertEqual(20001,resp.json().get("code"))
        self.assertIn("用户名或密码错误",resp.json().get("message"))

    #03-密码错误
    def test02_ihrm_login(self):
        json={"mobile":"13800000002","password":"654321"}
        resp=IhrmLoginApi.login(json)

        self.assertEqual(200,resp.status_code)
        self.assertEqual(False,resp.json().get("success"))
        self.assertEqual(20001,resp.json().get("code"))
        self.assertIn("用户名或密码错误",resp.json().get("message"))
封装断言方法,放入common(可以在封装之后使用正向参数或者逆向参数去测一下)
def assert_util(self, resp, status_code, success, code, message):
    self.assertEqual(status_code, resp.status_code)
    self.assertEqual(success, resp.json().get("success"))
    self.assertEqual(code, resp.json().get("code"))
    self.assertIn(message, resp.json().get("message"))
参数化
参数化的核心是使用数据驱动测试用例执行,也就是设计能够自动调用数据到测试软件执行用例子并进行断言的过程。首先给出参数化的简单例子:
import unittest
from parameterized import parameterized

#定义待计算的程序
def add(a,b):
    return a+b

data=[
    {"x":100,"y":200,"except":300},
    {"x":100,"y":200,"except":300},
    {"x":10,"y":20,"except":30}
]
#读入数据
#也就是转换数据为: {{},{},{}}  -----  [[],[],[]]
def load_data(data):
    list_data=[]
    for i in data:
        a=tuple(i.values())
        list_data.append(a)
    return list_data

class TestAdd(unittest.TestCase):
    #parameterized.expand(load_data(data))
    @parameterized.expand(load_data(data))
    def test_add(self,x,y,except_data):
        self.assertEqual(except_data,add(x,y))
参数化往往需要将json文件转化为元组数据
方法同上,下面给出常用json表达数据的格式:
[{
  "desc":"登录成功",
  "data": {
    "mobile": "1843049001",
    "password": "123456"
  },
  "status_code": 200,
  "success": true,
  "code": 10000,
  "message": "操作成功"
},
  {
  "desc":"登录成功",
  "data": {
    "mobile": "1843049001",
    "password": "123456"
  },
  "status_code": 200,
  "success": true,
  "code": 10000,
  "message": "操作成功"
}
]
读取json文件代码如下,注意导包以及json.load()函数。
import json

def load_jsondata(filename):
    with open(filename,'r',encoding='utf-8') as f:
        json_data=json.load(f)
        list_data=[]
        for i in json_data:
            a=tuple(i.values())
            list_data.append(a)
    return list_data

if __name__=='__main__':
    filename='./data/data.json'
    print(load_jsondata(filename))
编写员工管理接口对象
对比上面登陆代码多了增删改查,分别对应request中put,delete,update,get请求
这一块也是对照api文档来写的,但是新手比较容易出bug
import requests
import parameterized
class Ihrm_Manipulate:

    @classmethod
    def add_person(cls,jsondata,header):
        url="http://ihrm-test.itheima.net/api/sys/user"
        resp=requests.post(url=url,headers=header,json=jsondata)
        return resp

    @classmethod
    def query_person(cls,target,headers):
        #url前缀的"http://ihrm-test.itheima.net/api/sys/user/"最后一个斜杠"/"一定要加
        url="http://ihrm-test.itheima.net/api/sys/user/"+str(target)
        resp=requests.get(url=url,headers=headers)
        return resp

    @classmethod
    def delte_person(cls,target,header):
        url="http://ihrm-test.itheima.net/api/sys/user/"+str(target)
        resp=requests.delete(url=url,headers=header)
        return resp


    @classmethod
    def update_person(cls,headers,target,json_data):
        url="http://ihrm-test.itheima.net/api/sys/user/"+str(target)
        resp=requests.put(url=url,json=json_data, headers=header)
        return resp

if __name__=='__main__':
    #添加员工
    header={"Content-Type":"application/json",
            "Authorization":"Bearer Bearer ba28b801-00c6-44ad-8c16-f0f47955c16c"}
    # # 注意在json文件中有【】,但是在py文件中json数据就写在{}中
    data={
        "mobile":"18390235619",
        "username":"martu",
        "workNumber":"1211295222"
    }
    resp=Ihrm_Manipulate.add_person(data,header);
    print(resp.json())
    #得到结果:{'success': True, 'code': 10000, 'message': '操作成功!', 'data': {'departmentId': '1066239913642561536', 'id': '1539237447693533184'}}

    # ##查询员工
    id=1539237447693533184
    resp2=Ihrm_Manipulate.query_person(target=id,headers=header)
    print("查询",resp2.json())
    # #得到结果:查询 {'success': True, 'code': 10000, 'message': '操作成功!', 'data': {'id': '1539237447693533184', 'mobile': '18390235619', 'username': 'martu', 'enableState': 1, 'departmentId': '1066239913642561536', 'timeOfEntry': None, 'formOfEmployment': None, 'workNumber': '1211295222', 'departmentName': '人力资源部', 'roleIds': [], 'staffPhoto': None}}
    #

    #修改员工
    id=1539237447693533184
    data={
        "mobile":"18390230619",
        "username":"martu",
        "workNumber":"1211295222"
    }
    resp=Ihrm_Manipulate.update_person(headers=header,target=id,json_data=data)
    print(resp.json())
    #易出错的点:尽量在调用api的时候注明是什么等于”=“对应的数据,很容易出错,而且在编写的代码的时候输入要尽量设计得符合使用方便的原则
    #得到结果:{'success': True, 'code': 10000, 'message': '操作成功!', 'data': {'departmentName': '人力资源部', 'workNumber': '1211295222', 'departmentId': '1066239913642561536', 'mobile': '18390235619', 'id': '1539237447693533184', 'username': 'martu'}}


    #删除员工
    id=1539237447693533184
    resp=Ihrm_Manipulate.delte_person(target=id,header=header)
    print(resp.json())
    #得到结果{'success': True, 'code': 10000, 'message': '操作成功!', 'data': None}
接下来对数据库进行封装
import pymysql

class DBUtil(object):
    # 整个过程:建立连接,建立游标,发送信息,关闭游标,关闭连接
    conn=None
    @classmethod
    def __get_conn(cls):#python中cls代表的是类的本身,相对应的self则是类的一个实例对象。
        if cls.conn==None:#参数包括 ip地址,端口号,用户名,密码,数据库,编码等
            cls.conn=pymysql.connect(host="211.103.136.244", port=7061, user="student",
password="iHRM_student_2021", database="test_db",charset="utf8")
            return cls.conn
    #关闭连接
    def __close_conn(cls):
        if cls.conn!=None:
            cls.conn.close()
            cls.conn=None
    #查询
    def _select(cls,sql):
        res=None
        cursor=None
        try:
            cls.conn=cls.__get_conn()
            cursor=cls.conn.cursor()
            cursor.execute(sql)

            res=cursor.fetchone()
        except Exception as error:
            print("查询sql错误",error)
        finally:

            cursor.close()#关闭游标

            cls.__close_conn()

    @classmethod
    def __insert_update_delete(cls,sql):
        try:
            cls.conn=cls.__get_conn()
            cursor=cls.conn.cursor()

            cursor.execute(sql)
            print("语句影像的行数:",cls.conn.affected_rows())

            #提交事务
            cls.conn.commit()
        except Exception as error:
            print("增删改语句执行错误:",error)
        finally:
            cursor.close()
            cls.conn.close()


 2269
2269


 被折叠的 条评论
为什么被折叠?
被折叠的 条评论
为什么被折叠?
 到【灌水乐园】发言


