


1.圆形图像
CSS样式可以通过简单的代码实现圆形图像的效果。在CSS中,使用border-radius属性可以控制元素的圆角大小,当圆角大小等于元素的宽度和高度的一半时,元素就会呈现出圆形。此外,还可以使用background-color属性设置元素的背景颜色,从而实现不同颜色的圆形图像。圆形图像在网页设计中经常被用来作为头像、按钮等元素的展示效果,能够提升网页的美观度和用户体验。
<!DOCTYPE html>
<html lang="en">
<head>
    <meta charset="UTF-8">
    <title>头像设置</title>
    <style>
        body {
            margin: 0;
            padding: 0;
        }
        .c1{
            width: 200px;
            height: 200px;
            overflow: hidden;
            border: 1px solid red;
            border-radius: 50%;
        }
        img
        {
            width: 100%;
        }

    </style>
</head>
<body>

<div class="c1">
    <img src="https://tse2-mm.cn.bing.net/th/id/OIP-C.bhJWd9qm-jlCtBcPwsMh4gAAAA" alt="猪猪侠" title="猪猪侠">
</div>

</body>
</html>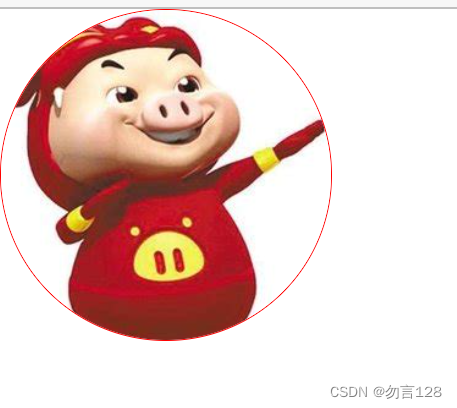
2.定位
CSS样式的位置定位是网页设计中非常重要的一部分。通过CSS的定位属性,我们可以控制元素在网页中的位置。常用的定位属性有四种:静态定位、相对定位、绝对定位和固定定位。
静态定位是元素默认的定位方式,元素按照文档流排列。相对定位是相对于元素原来的位置进行定位,可以通过top、bottom、left、right属性来调整元素的位置。绝对定位是相对于父元素进行定位,可以通过top、bottom、left、right属性来调整元素的位置。固定定位是相对于浏览器窗口进行定位,可以通过top、bottom、left、right属性来调整元素的位置。
在使用CSS样式时,我们需要根据实际需求选择不同的定位方式,以达到最佳的效果。同时,还需要注意不同浏览器对CSS样式的支持情况,以保证网页在不同浏览器中都能够正确显示。
<!DOCTYPE html>
<html lang="en">
<head>
    <meta charset="UTF-8">
    <title>定位</title>
    <style>
        body{
            margin: 0;
        }
        .c1{
            width: 100px;
            height: 100px;
            background-color: red;
        }
         .c2{
            width: 100px;
            height: 100px;
            background-color: green;
            /* position: relative; */   /* 相对定位--相对于自己原来的位置进行移动,原来的空间还占着 */
            /* top: 100px; */
            /* left: 100px; */

            position: absolute;
            /* 绝对定位--不占用原来的空间,移动的时候如果父级标签以及祖先辈标签没有设置相对定位,就会按照整个html文件进行移动 */
            top: 50px;
            left: 50px;
        }
        .c3{
            width: 100px;
            height: 100px;
            background-color: blue;
        }
    </style>
</head>

<body>

<div class="c1"></div>
<div class="c2"></div>
<div class="c3"></div>

</body>
</html> 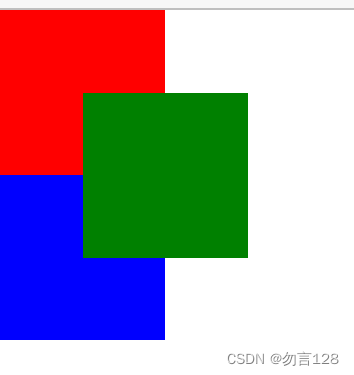
3.固定定位
CSS样式中的固定定位是一种常用的布局方式,它可以让元素相对于浏览器窗口进行定位,而不会随着页面滚动而移动。这种布局方式通常用于创建固定的导航栏、广告条、侧边栏等固定位置的元素。通过设置元素的position属性为fixed,再结合top、bottom、left、right等属性进行定位,就可以实现固定定位的效果。需要注意的是,固定定位会使元素脱离文档流,可能会影响其他元素的布局,因此需要谨慎使用。
<!DOCTYPE html>
<html lang="en">
<head>
    <meta charset="UTF-8">
    <title>回到顶部</title>
    <style>
        body {
            margin: 0;
            padding: 0;
        }
        .c1,.c3{
            width: 400px;
            height: 400px;
            background-color: red;
        }
        .c2{
           width: 400px;
           height: 400px;
           background-color: blue;
        }
        #back_top{
           background-color:yellow;
           text-decoration: none;
           text-color: black;
           position: fixed;
           right:20px;
           bottom:20px;
        }
    </style>
</head>
<body>
<a name="top"></a>
    <div class="c1"></div>
    <div class="c2"></div>
    <div class="c3"></div>

<a id="back_top" href="#top">回到顶部</a>
</body>
</html>
定位 -- 返回顶部
4.简单模拟对话框
CSS样式模拟对话框是一种常用的网页设计技巧,可以让页面更加生动、直观。通过CSS的样式设置,我们可以实现对话框的各种效果,例如弹出、关闭、拖拽等。在实现对话框的过程中,需要注意样式的细节和兼容性,以确保在不同浏览器和设备上都能正确显示。同时,可以结合JavaScript等技术,实现更加丰富的交互效果,提升用户体验。
<!DOCTYPE html>
<html lang="en">
<head>
<meta charset="UTF-8">
<title>模态对话框</title>
<style>
body {
margin: 0;
padding: 0;
}
h1 {color: blue;}
.c1{
text-indent: 32px;
}
div p{
text-indent: 32px;
}
#liu{
text-decoration: none;
}
#liu:hover{
color: deeppink;
}
.shadow{
background-color: rgba(0,0,0,0.8); /* rgba() 可以设置透明度,0~1之间的数字 */
position: fixed;
top: 0;
left: 0;
right: 0;
bottom: 0;
z-index:90;
}
.mode{
width: 400px;
height: 400px;
background-color: white;
position: fixed;
top: 50%;
left: 50%;
z-index:100;
margin-left: -200px;
margin-top: -200px;
}
.mode h2 {
font-size: 30px;
text-align: center;
}
.hide{
display: none;
}
#cancel{
float: right;
margin-right: 10px;
margin-top: 5px;
}
.error1,.error2{
color: red;
}
</style>
</head>
<body>
<h1 >养猪区</h1>
<div class="c1" >
<h3>猪猪区欢迎进入!   <button id="btn">登录</button></h3>
</div>
<div>
<p>
<a href="https://cn.bing.com/search?q=%E7%8C%AA%E7%8C%AA%E4%BE%A0" id="liu" target="_blank">猪猪侠</a>,猪猪侠是一部中国动画片,主要讲述了一群小动物为了保护世界而与恶势力作斗争的故事。
</p>
<img src="https://tse2-mm.cn.bing.net/th/id/OIP-C.bhJWd9qm-jlCtBcPwsMh4gAAAA" alt="" title="">
</div>
<div class="mode hide">
<div>
<span id="cancel">X</span>
</div>
<h2>登录页面</h2>
<hr>
<label>
用户名:<input type="text" name="username" id="user_input"> <span class="error1"></span>
</label>
<br>
<label>
密 码:<input type="password" name="pwd" id="pwd_input"> <span class="error2"></span>
</label>
<br>
<input type="submit" value="登录" id="log_in">
</div> <!-- 设置白色对话框 -->
<div class="shadow hide"></div> <!-- 设置黑色阴影遮罩层 -->
<script src="jquery.js"></script>
<script>
<!-- 绑定事件的方法 -->
$('#btn').click(function() {
// $('.mode')[0].classList.remove('hide');
// $('.shadow')[0].classList.remove('hide');
$('.mode,.shadow').removeClass('hide');
// $('.mode').removeClass('hide');
// $('.shadow').removeClass('hide');
})
$('#cancel').click(function() {
// $('.mode')[0].classList.add('hide');
// $('.shadow')[0].classList.add('hide');
$('.mode,.shadow').addClass('hide');
// $('.mode').addClass('hide');
// $('.shadow').addClass('hide');
})
$('#log_in').click(function() {
var user = $('#user_input').val()
var password = $('#pwd_input').val()
if (user.length === 0){
$('.error1').text('用户名不能为空!')
} else {
$('.error1').text('')
}
if(password.length===0){
$('.error2').text('密码不能为空!')
} else {
$('.error2').text('')
}
/* 点击登录输入用户名和密码后关闭对话框 */
if (user.length !== 0 && password.length !== 0) {
$('.mode,.shadow').addClass('hide');
}
})
</script>
</body>
</html>简单的登录对话框
5.透明度
CSS样式中的rgba和opacity透明度都是用来控制元素的透明度的属性。其中,rgba是一种颜色表示方式,可以在表示颜色的同时设置透明度,其取值范围为0~1,0表示完全透明,1表示完全不透明。
而opacity属性则是直接设置元素的不透明度,其取值范围也是0~1。
需要注意的是,使用opacity属性会使元素及其内部内容都变得不透明,而使用rgba则只会影响元素的背景色。在实际应用中,可以根据需要选择使用哪种方式来控制元素的透明度。
<!DOCTYPE html>
<html lang="en">
<head>
    <meta charset="UTF-8">
    <title>Title</title>
    <style>
        .c1{
            width: 100px;
            height: 100px;
            background-color: rgba(255, 0, 0, 0.5);
        }
        .c2{
           width: 100px;
           height: 100px;
           background-color: red;
           opacity: 0.5;    /* 透明度在 0~1之间 */
        }
    </style>
</head>
<body>
<div class="c1">div1</div>
<hr>
<div class="c2">div2</div>
</body>
</html>


 1万+
1万+


 被折叠的 条评论
为什么被折叠?
被折叠的 条评论
为什么被折叠?
 到【灌水乐园】发言


