


目录
2、生成二维码用户扫码同意授权获取code并携带code重定向到指定的回调路由做进一步处理
一、微信登录原理

具体可查看官网文档,后续会在代码实现详细提及微信网页开发 / 网页授权 (qq.com)![]() https://developers.weixin.qq.com/doc/offiaccount/OA_Web_Apps/Wechat_webpage_authorization.html
https://developers.weixin.qq.com/doc/offiaccount/OA_Web_Apps/Wechat_webpage_authorization.html
二、实现前准备
1、登录微信公众平台测试号
微信公众平台 (qq.com)![]() http://mp.weixin.qq.com/debug/cgi-bin/sandbox?t=sandbox/login
http://mp.weixin.qq.com/debug/cgi-bin/sandbox?t=sandbox/login
访问后扫码登录即可
2、配置具体URL与token
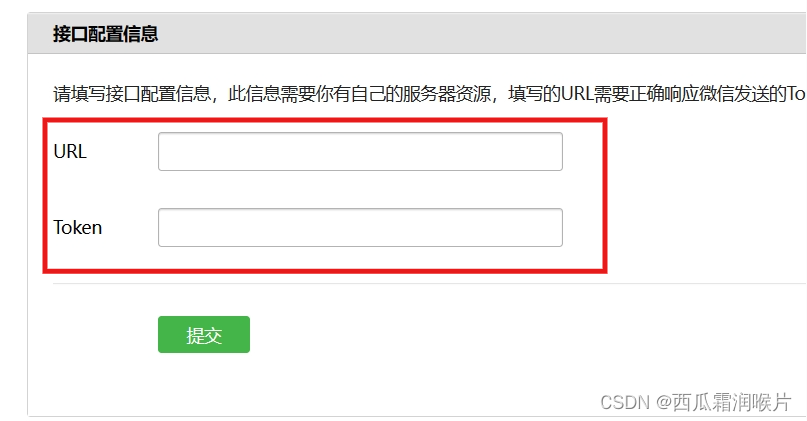
此处token可随便填写,但此处URL必须能在公网被访问到(在下一点会详细提及),因为当填写后,微信会给该URL发送一个GET请求,该请求携带以下参数。开发者对该请求进行处理后,如果确认无误则将参数中的ehostr返回,则接入成功。请求处理规则如下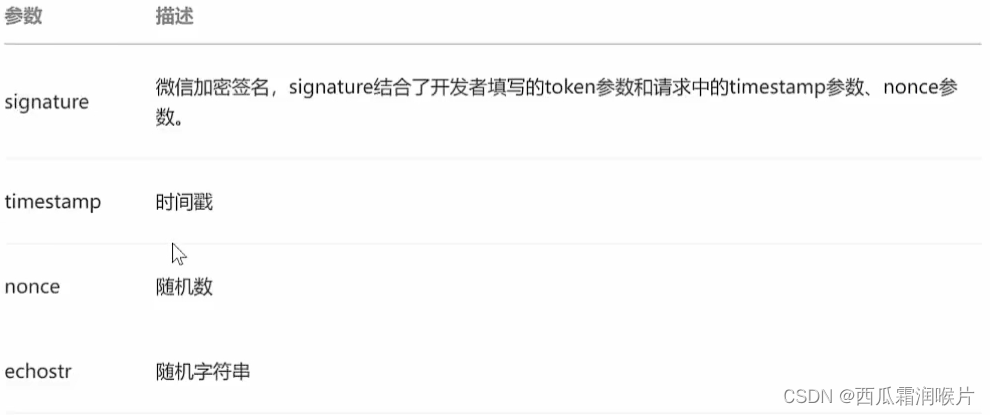

3、实现连接
这里我们需要实现上述填写的URL对应的接口,如http://48.r9.cpolar.top/wx/check
此时我们需要做的就是在项目controller层定义该接口并按照上述规则检查后返回结果
@Slf4j
@Controller
@ResponseBody
@RequestMapping("/wx")
public class WxController {

    @GetMapping("/check")
    public String check(@RequestParam("signature")String signature,
                        @RequestParam("timestamp") String timestamp,
                        @RequestParam("nonce") String nonce,
                        @RequestParam("echostr") String echostr) {
        log.error(echostr);
// 为了方便此处我直接返回
        return echostr;
    }
}
4、内网穿透

在上述代码实现后,我们启动项目可用访问127.0.0.1:port/wx/check?queryString就可用在本地访问,但是在第2步中我们提交了URL后是微信服务器会访问该接口,但是该接口却不能被外网访问,我们可用通过内网穿透来让微信访问到我们项目端口下的/wx/check接口,具体如下【计网】傻瓜式安装cpolar内网穿透_西瓜霜润喉片的博客-CSDN博客![]() https://blog.csdn.net/qq_61903414/article/details/133819946?spm=1001.2014.3001.5501在进行配置后,我们即可获得对应的域名+/wx/check填写到第2步对应的URL中
https://blog.csdn.net/qq_61903414/article/details/133819946?spm=1001.2014.3001.5501在进行配置后,我们即可获得对应的域名+/wx/check填写到第2步对应的URL中
5、OAuth2.0网页授权
此时我们还需要将页面往下滑动找到如下行

并将不带http://的域名填写进去,最后启动项目,在上述第2步URL配置中配置后提交准备工作即可完成即可,要注意上述第二步需要加http://
三、代码实现
1、准备依赖
在后续的实现中我们需要生成二维码,所以我们需要用到二维码生成的工具,此处使用hutool
<dependency>
  <groupId>com.google.zxing</groupId>
  <artifactId>core</artifactId>
  <version>3.3.3</version>
</dependency>

<dependency>
  <groupId>cn.hutool</groupId>
  <artifactId>hutool-all</artifactId>
  <version>5.7.10</version>
</dependency>
2、生成二维码用户扫码同意授权获取code并携带code重定向到指定的回调路由做进一步处理
此处我们需要先生成二维码,该二维码需要跳转到https://open.weixin.qq.com/connect/oauth2/authorize?appid=appid&redirect_uri=uri&response_type=code&scope=scope&state=STATE#wechat_redirect
所以我们将该url存入二维码中,用户扫码二维码即可进行授权。但是我们不能直接使用上述url,我们需要进行参数的修改 如图可知上述url中需要进行修改的参数有appid、redirect_uri与scope,其中APPID、scope都是固定scope一般使用snsapi_userinfo ,所以我们可用直接对路由进行封装。后续对应的url也在如下类中,后续会详细提及
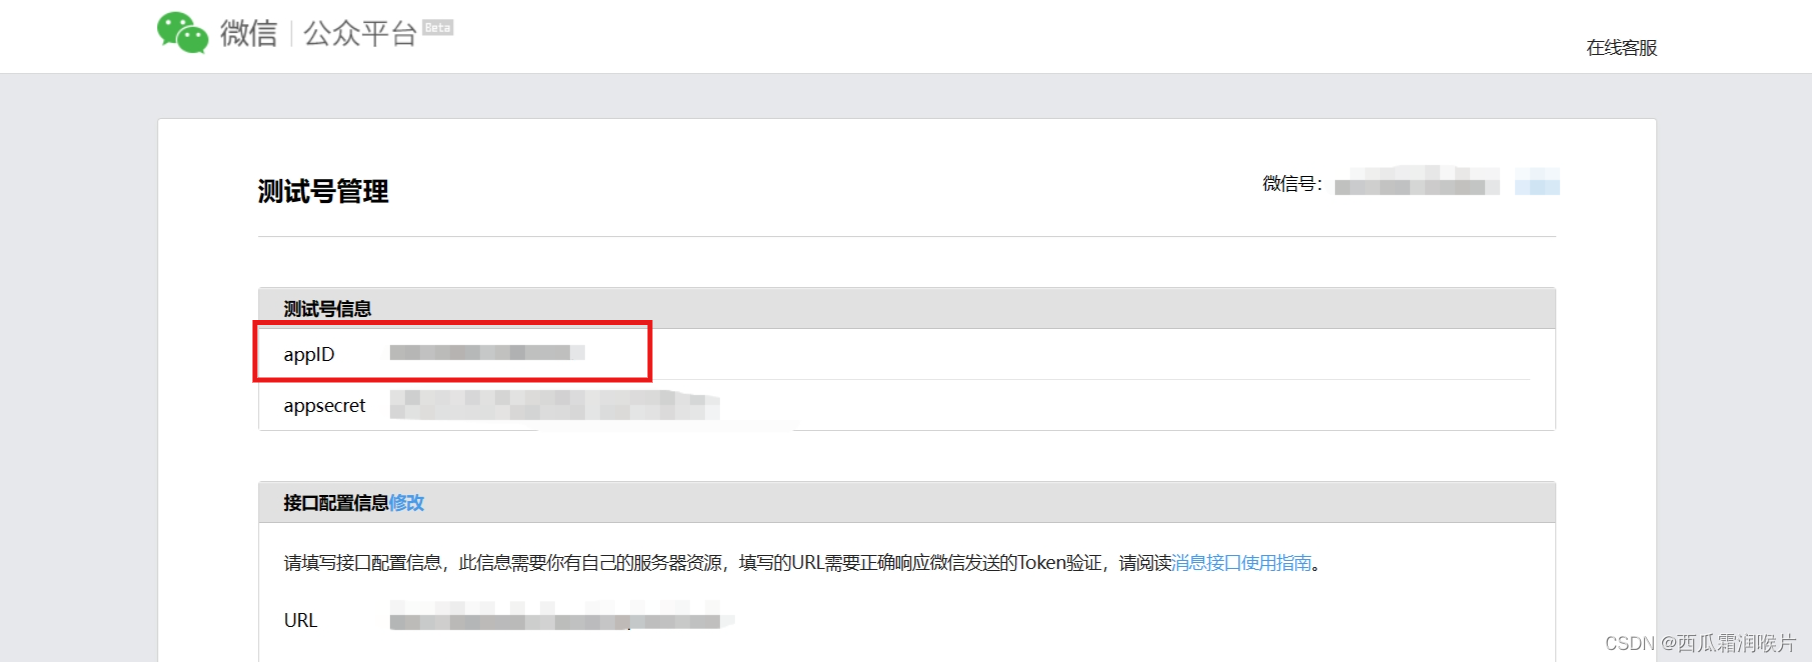
@Slf4j
    public class WxUtil {
        public static final String APP_ID = "";
        public static final String APP_SECRET = "";
        public static final String ROOT_URL = "http://www.ii.com";  // 域名

        /**
        * 二维码中包含的url获取code并携带code重定向到redirectUrl
        * @param redirectUrl
        * @return
        */
        public static String CODE_URL(String redirectUrl) {
            return "https://open.weixin.qq.com/connect/oauth2/authorize?appid="
                + WxUtil.APP_ID
                + "&redirect_uri="
                + redirectUrl
                + "&response_type=code&scope=snsapi_userinfo&state=STATE#wechat_redirect";
        }

        /**
        * 根据code获取token的url与参数
        * @param code
        * @return
        */
        public static final String TOKEN_URL(String code) {
            return "https://api.weixin.qq.com/sns/oauth2/access_token?appid="
                + WxUtil.APP_ID + "&secret=" + WxUtil.APP_SECRET
                + "&code=" + code + "&grant_type=authorization_code";
        }

        /**
        * 跟去token获取用户信息的url
        * @param token
        * @param openid
        * @return
        */
        public static String USERINFO_URL(String token, String openid) {
            return "https://api.weixin.qq.com/sns/userinfo?access_token="
                + token + "&openid="
                + openid + "&lang=zh_CN";
        }
    }
此时我们可用通过上述CODE_URL方法获取url并存于二维码中让用户扫码进行授权,所以我们需要生成二维码并传给前端
@GetMapping("/code")
    public void code(HttpServletRequest request, HttpServletResponse response) throws IOException {
        // 1. 重定向url 回调地址
        String redirectUrl = URLEncoder.encode(WxUtil.ROOT_URL + "/wx/callback","UTF-8");

        // 2. 生成接口url
        String url = WxUtil.CODE_URL(redirectUrl);

        // 3. 生成二维码
        response.setContentType("image/png");
        QrCodeUtil.generate(url,300,300,"jpg", response.getOutputStream());
    }
这个时候当用户点击微信登录时就会请求该接口获取到二维码,用户扫码授权后,就会携带code调用回调接口,所以我们需要实现上述定义的回调接口redirectUrl
3、定义回调接口
在该回调接口里面我们需要做的是首先根据参数code去获取access_token
@RequestMapping("/callback")
    public String callback(String code, String state, HttpServletResponse response, HttpServletRequest request, HttpSession session) throws IOException {
         // 1. 根据code获取token,根据token获取微信用户数据
        UserInfo user = WxUtil.getUser(code);

    }
4、根据code获取access_token
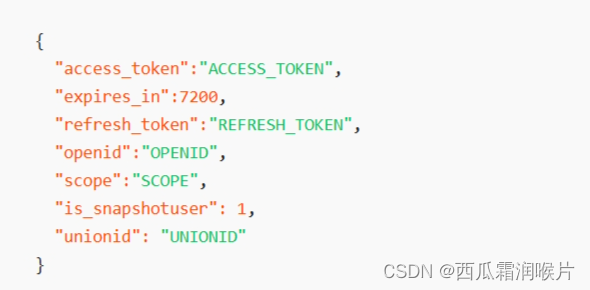
该接口去获取access_token,所以我们需要发起http请求,具体的URL在上述WxUtil中进行了封装,只需要传入code即可获取最终的URL。由于该URL返回的是这样的数据,我们可用定义一个对应的Java类去接收他
@Data
public class TokenInfo {
    // 网页授权接口调用凭证,注意:此access_token与基础支持的access_token不同
    private String access_token;
    // access_token接口调用凭证超时时间,单位(秒)
    private String expires_in;
    // 用户刷新access_token
    private String refresh_token;
    // 用户唯一标识符
    private String openid;
    // 用户授权的作用域,使用逗号(,)分隔
    private String scope;
}
public static UserInfo getUser(String code) throws IOException {
        // 1. 构造Http请求获取access_token
        CloseableHttpClient httpClient = HttpClients.createDefault();
        HttpGet httpGet = new HttpGet(TOKEN_URL(code));
        HttpResponse response = httpClient.execute(httpGet);
        String result = "";
        if (response.getStatusLine().getStatusCode() == 200) {
            result = EntityUtils.toString(response.getEntity(),"UTF-8");
        }
        log.info("获取到token:{}",result);

        // 2. 解析获取到的token
        ObjectMapper objectMapper = new ObjectMapper();
        TokenInfo tokenInfo = objectMapper.readValue(result,TokenInfo.class);
    }
5、根据access_token获取用户信息
此时我们就可以拿着access_token中的信息去访问https://api.weixin.qq.com/sns/oauth2/refresh_token?appid=APPID&grant_type=refresh_token&refresh_token=REFRESH_TOKEN
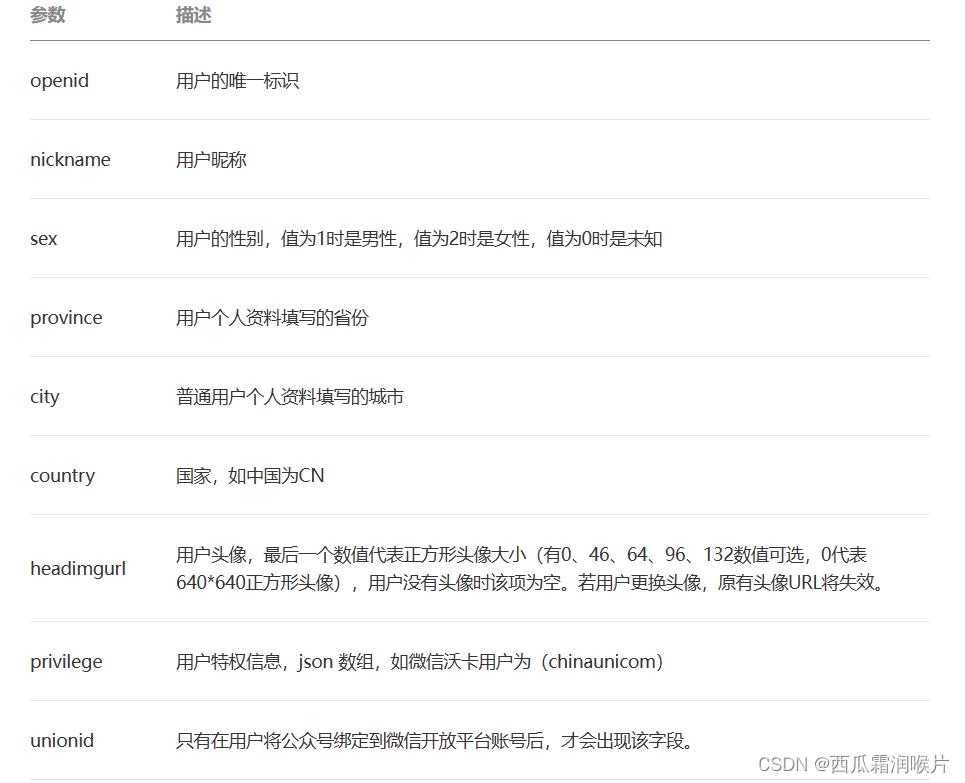
来获取对应的用户信息,在上述WxUtil中也对该URL进行了封装,我们只需要传入所需的参数token与openid即可。访问该URL如果响应正确则会返回对应的用户数据,我们也可用定义一个Java类来接收他
@Data
public class UserInfo {
    private String openid;
    private String nickname;
    private int sex;
    private String language;
    private String city;
    private String headimgurl;
    private String province;
    private String country;
    private String[] privilege;
    @JsonIgnore
    private String unionid;
}
public static UserInfo getUser(String code) throws IOException {
// 1. 构造Http请求获取access_token
CloseableHttpClient httpClient = HttpClients.createDefault();
HttpGet httpGet = new HttpGet(TOKEN_URL(code));
HttpResponse response = httpClient.execute(httpGet);
String result = "";
if (response.getStatusLine().getStatusCode() == 200) {
result = EntityUtils.toString(response.getEntity(),"UTF-8");
}
log.info("获取到token:{}",result);
// 2. 解析获取到的token
ObjectMapper objectMapper = new ObjectMapper();
TokenInfo tokenInfo = objectMapper.readValue(result,TokenInfo.class);
// 3. 根据access_token中的token与openid获取用户信息
HttpGet httpGet1 = new HttpGet(USERINFO_URL(tokenInfo.getAccess_token(),tokenInfo.getOpenid()));
HttpResponse response1 = httpClient.execute(httpGet1);
if (response.getStatusLine().getStatusCode() == 200) {
result = EntityUtils.toString(response1.getEntity(),"UTF-8");
}
log.info("获取到userinfo:{}",result);
// 4. 解析用户信息
UserInfo userInfo = objectMapper.readValue(result,UserInfo.class);
return userInfo;
}6、登录成功后存储会话信息
此时我们就获取到了用户的信息
获取到信息后我们可用通过redis或者session或者JWT存储会话信息
@RequestMapping("/callback")
    public String callback(String code, String state, HttpServletResponse response, HttpServletRequest request, HttpSession session) throws IOException {
        // 1. 获取微信用户数据
        UserInfo user = WxUtil.getUser(code);

        // 2. 存储会话信息 token
        System.out.println("登录成功" + user.toString());

        // 3. 返回
        return objectMapper.writeValueAsString(user);
    }
四、结果演示
最后我们只需要简单的前端代码:只有一张二维码
<!DOCTYPE html>
<html>
<head>
    <title>Generate QR Code</title>
</head>
<body>
<img id="qrcode" src="/wx/code" alt="QR Code">
<script src="https://cdn.jsdelivr.net/npm/axios/dist/axios.min.js"></script>
<script>
</script>
</body>
</html>


 1万+
1万+


 被折叠的 条评论
为什么被折叠?
被折叠的 条评论
为什么被折叠?
 到【灌水乐园】发言


