


操作系统的引导
3.1 实验目的
- 熟悉实验环境;
- 建立对操作系统引导过程的深入认识;
- 掌握操作系统的基本开发过程;
- 能对操作系统代码进行简单的控制,揭开操作系统的神秘面v。
3.2 实验内容
3.2.1 改写bootsect.s主要完成如下功能
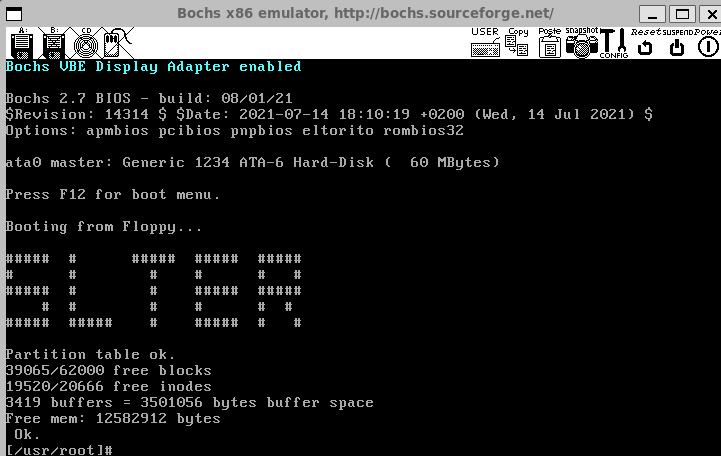
- bootsec.s能在屏幕打印信息
此时使用了个人的英文名字的表达,修改这个msg1的显示文字如下所示:
msg1: # 共有2*5 + 33 * 5+4=179个字节
	.byte 13,10
	.ascii "#####  #      #####  #####  #####"
	.byte 13,10
	.ascii "#      #        #    #      #   #"
	.byte 13,10
	.ascii "#####  #        #    #####  #####"
	.byte 13,10
	.ascii "    #  #        #    #      #  # "
	.byte 13,10
	.ascii "#####  #####    #    #####  #   #"
	.byte 13,10,13,10
还需要修改前面的调用该结构的函数ok_load_setup来更换这个显示数据的大小,13和10代表的是换行符,用两个字节来表示。修改的方案如下所示:
	mov	$179, %cx # 修改了这个位置的立即值,此时的立即值的计算参考上面的代码行
	mov	$0x0007, %bx		# page 0, attribute 7 (normal)
	#lea	msg1, %bp
	mov     $msg1, %bp
	mov	$0x1301, %ax		# write string, move cursor
	int	$0x10
3.2.2 改写setup.s完成如下功能
bootsect.s 能完成 setup.s 的载入,并跳转到 setup.s 开始地址执行。而 setup.s 向屏幕输出一行
Now we are in SETUP
改写setup并显示上方的信息的思想是:和在bootsect.s中完成的一样,操作打印函数
# print MESSAGE:
  mov $SETUPSEG,%ax
	mov %ax,%es
	mov	$25, %cx
	mov	$0x0007, %bx		# page 0, attribute 7 (normal)
	#lea	in_setup, %bp
	mov $in_setup, %bp
	mov	$0x1301, %ax		# write string, move cursor
	int $0x10
此时完成的是setup的加载成功,加载成功的时候会成功输出内容
setup.s 能获取至少一个基本的硬件参数(如内存参数、显卡参数、硬盘参数等), 将其存放在内存的特定地址,并输出到屏幕上。
首先获取光标的位置,扩展内存的大小和部分代码已经在setup和实验提示中给出,然后下面需要完成的是完成打印16位数的汇编过程,使用call来调用
print_hex:
mov    $4,%cx         # 4个十六进制数字
mov    (%bp),%dx       # 将(bp)所指的值放入dx中,如果bp是指向栈顶的话
print_digit:
rol    $4,%dx         # 循环以使低4比特用上 !! 取dx的高4比特移到低4比特处。
mov    $0xe0f,%ax     # ah = 请求的功能值,al = 半字节(4个比特)掩码。
and    %dl,%al         # 取dl的低4比特值。
add    $0x30,%al      # 给al数字加上十六进制0x30
cmp    $0x3a,%al
jl     outp          # 是一个不大于十的数字
add    $0x07,%al      # 是a~f,要多加7
outp:
int    $0x10
loop   print_digit
在每一次调用显示的打印函数的时候应该首先获取光标的位置,通过这一段代码来进行:
    mov    $0x03, %ah    # read cursor pos
    xor    %bh, %bh
    int    $0x10        # save it in known place, con_init fetches
这段代码执行之后能够获取当前光标的位置,然后通过这个光标的位置来打印信息。
3.2.3 setup.s 获取基本硬件参数
setup.s 将获得硬件参数放在内存的 0x90000 处。原版 setup.s 中已经完成了光标位置、内存大小、显存大小、显卡参数、第一和第二硬盘参数的保存。
其余的setup代码没有进行修改,只修改了对应的打印模块,在每一次存入的时候都将硬件信息打印出来使用:
和上一题结合之后的代码如下所示:
.code16

# NOTE! These had better be the same as in bootsect.s!

	.equ INITSEG, 0x9000	# we move boot here - out of the way
	.equ SYSSEG, 0x1000	# system loaded at 0x10000 (65536).
	.equ SETUPSEG, 0x9020	# this is the current segment

	.global _start, begtext, begdata, begbss, endtext, enddata, endbss
	.text
	begtext:
	.data
	begdata:
	.bss
	begbss:
	.text

	ljmp $SETUPSEG, $_start
_start:

# ok, the read went well so we get current cursor position and save it for
# posterity.
	mov	$INITSEG, %ax	# this is done in bootsect already, but...
	mov	%ax, %ds
	mov	$0x03, %ah	# read cursor pos
	xor	%bh, %bh
	int	$0x10		# save it in known place, con_init fetches
	mov	%dx, %ds:0	# it from 0x90000.光标位置写入0x90000

# 打印进入setup的消息
  mov $SETUPSEG,%ax
	mov %ax,%es
	mov	$25, %cx
	mov	$0x0007, %bx		# page 0, attribute 7 (normal)
	#lea	in_setup, %bp
	mov $in_setup, %bp
	mov	$0x1301, %ax		# write string, move cursor
	int $0x10

# 打印光标信息
	mov	$20, %cx
	mov	$0x0007, %bx		# page 0, attribute 7 (normal)
	#lea	cursor_msg, %bp
	mov $cursor_msg, %bp
	mov	$0x1301, %ax		# write string, move cursor
	int	$0x10

	mov  $0x0,%bp
	call print_hex
	call print_nl

# 得到内存的大小
	mov	$0x88, %ah
	int	$0x15
	mov	%ax, %ds:2

	mov	$23, %cx
	mov	$0x0007, %bx		# page 0, attribute 7 (normal)
	#lea	memory_msg, %bp
	mov $memory_msg, %bp
	mov	$0x1301, %ax		# write string, move cursor
	int	$0x10

	# 记录了内存的大小并打印出来
	mov  $0x2,%bp
	call print_hex
	call print_nl
#
# Get video-card data:
	mov	$0x0f, %ah
	int	$0x10
	mov	%bx, %ds:4	# bh = display page
	mov	%ax, %ds:6	# al = video mode, ah = window width

# check for EGA/VGA and some config parameters
	mov	$0x12, %ah
	mov	$0x10, %bl
	int	$0x10
	mov	%ax, %ds:8
	mov	%bx, %ds:10
	mov	%cx, %ds:12

# Get hd0 data
	mov	$0x0000, %ax
	mov	%ax, %ds
	lds	%ds:4*0x41, %si
	mov	$INITSEG, %ax
	mov	%ax, %es
	mov	$0x0080, %di
	mov	$0x10, %cx
	rep
	movsb

# print HARD:
    mov    $INITSEG, %ax    # this is done in bootsect already, but...
    mov    %ax, %ds
    mov    $SETUPSEG, %ax
    mov    %ax, %es

    mov    $0x03, %ah    # read cursor pos
    xor    %bh, %bh
    int    $0x10        # save it in known place, con_init fetches

    mov    $13, %cx
    mov    $0x0007, %bx        # page 0, attribute 7 (normal)
    #lea    cyles_msg, %bp
    mov     $cyles_msg, %bp
    mov    $0x1301, %ax        # write string, move cursor
    int    $0x10

	# 打印对应的硬件信息
    mov  $0x80,%bp
    call print_hex
    call print_nl

    mov    $0x03, %ah    # read cursor pos
    xor    %bh, %bh
    int    $0x10        # save it in known place, con_init fetches

    mov    $13, %cx
    mov    $0x0007, %bx        # page 0, attribute 7 (normal)
    #lea    headers_msg, %bp
    mov     $headers_msg, %bp
    mov    $0x1301, %ax        # write string, move cursor
    int    $0x10

    mov  $0x82,%bp
    call print_hex
    call print_nl

    mov    $0x03, %ah    # read cursor pos
    xor    %bh, %bh
    int    $0x10        # save it in known place, con_init fetches

    mov    $11, %cx
    mov    $0x0007, %bx        # page 0, attribute 7 (normal)
    #lea    sectors_msg %bp
    mov     $sectors_msg, %bp
    mov    $0x1301, %ax        # write string, move cursor
    int    $0x10

    mov  $0x8e,%bp
    call print_hex
    call print_nl

# ......
# 中间是没有改动的原版代码

print_hex:
    mov    $4,%cx         # 4个十六进制数字
    mov    (%bp),%dx       # 将(bp)所指的值放入dx中,如果bp是指向栈顶的话
print_digit:
    rol    $4,%dx         # 循环以使低4比特用上 !! 取dx的高4比特移到低4比特处。
    mov    $0xe0f,%ax     # ah = 请求的功能值,al = 半字节(4个比特)掩码。
    and    %dl,%al         # 取dl的低4比特值。
    add    $0x30,%al      # 给al数字加上十六进制0x30
    cmp    $0x3a,%al
    jl     outp          # 是一个不大于十的数字
    add    $0x07,%al      # 是a~f,要多加7
outp:
    int    $0x10
    loop   print_digit
    ret

print_nl:
    mov    $0xe0d,%ax
    int    $0x10
    mov    $0xa,%al
    int    $0x10
    ret

empty_8042:
	.word	0x00eb,0x00eb
	in	$0x64, %al	# 8042 status port
	test	$2, %al		# is input buffer full?
	jnz	empty_8042	# yes - loop
	ret

gdt:
	.word	0,0,0,0		# dummy

	.word	0x07FF		# 8Mb - limit=2047 (2048*4096=8Mb)
	.word	0x0000		# base address=0
	.word	0x9A00		# code read/exec
	.word	0x00C0		# granularity=4096, 386

	.word	0x07FF		# 8Mb - limit=2047 (2048*4096=8Mb)
	.word	0x0000		# base address=0
	.word	0x9200		# data read/write
	.word	0x00C0		# granularity=4096, 386

idt_48:
	.word	0			# idt limit=0
	.word	0,0			# idt base=0L

gdt_48:
	.word	0x800			# gdt limit=2048, 256 GDT entries
	.word   512+gdt, 0x9		# gdt base = 0X9xxxx,
	# 512+gdt is the real gdt after setup is moved to 0x9020 * 0x10

in_setup:
	.byte 13,10
	.ascii "Now we are in SETUP"
    .byte 13,10,13,10

cursor_msg:
	.byte 13,10
	.ascii "cursor now is at: "

memory_msg:
	.byte 13,10
	.ascii "memory size is (kB): "

HD_msg:
	.byte 13,10
	.ascii "HD info"
    .byte 13,10,13,10

cyles_msg:
	.byte 13,10
	.ascii "cyles are: "

headers_msg:
	.byte 13,10
	.ascii "heads are: "

sectors_msg:
	.byte 13,10
	.ascii "sectors: "

KB:
	.byte 13,10
	.ascii "KB"

.text
endtext:
.data
enddata:
.bss
endbss:
最后打印的结果如下所示:
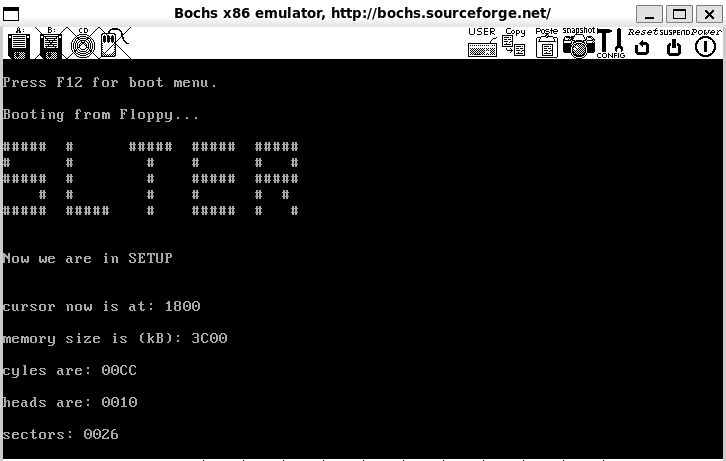
能够正确打印各种硬件参数的位置信息,大小信息等,达到了实验要求。
此时运行结束查看对应的.bxrc文件内容如下:
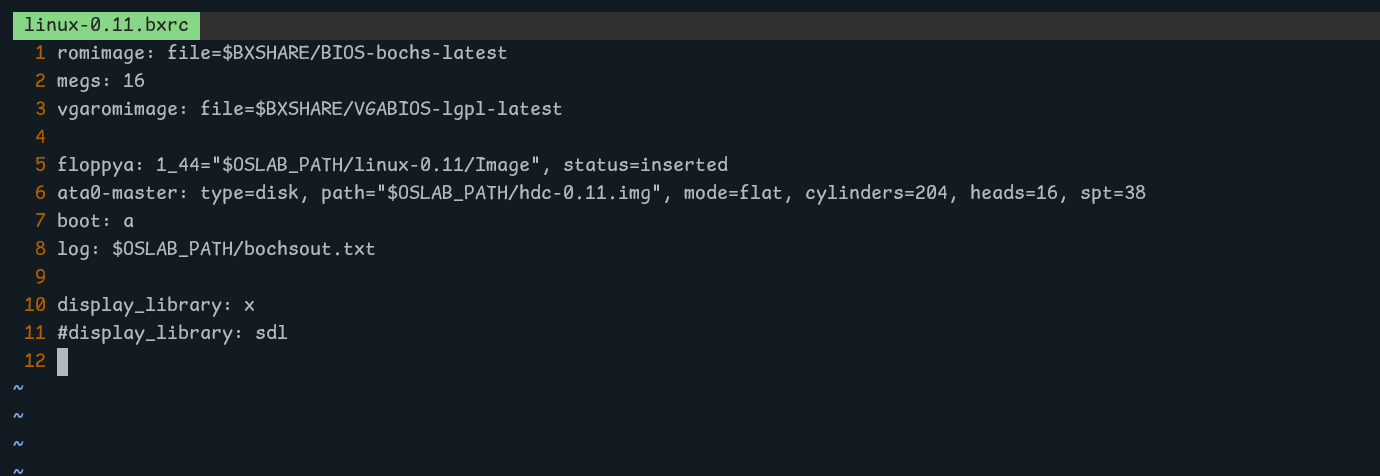
可以看到当前的参数是正确的,此时的参数符合:
ata0-master: type=disk, mode=flat, cylinders=204, heads=16, spt=38
并且可以看到此时是没有加载内核程序的,在执行死循环的操作
3.3. 实验报告
在实验报告中回答如下问题:
- 有时,继承传统意味着别手蹩脚。
x86计算机为了向下兼容,导致启动过程比较复杂。 请找出x86计算机启动过程中,被硬件强制,软件必须遵守的两个“多此一举”的步骤(多找几个也无妨),说说它们为什么多此一举,并设计更简洁的替代方案。
x86计算机启动过程中,被硬件强制,软件必须遵守的两个“多此一举”的步骤如下所示:
计算机上电后会将引导扇区读入0x7c00地址处,然后为了方便程序执行,要搬运到高地址例如0x90000;
更为简洁的替代方案:修改硬件,或者采用新方法例如UEFI(UEFI固件DXE阶段运行在64位模式,PEI阶段运行在32位模式)。
计算机上电后当中断向量表到了0x000-0x3ff地址处时,会导致载入操作系统时要先载入到其他位置,再移入0地址处;
更为简洁的替代方案:BIOS初始化中断向量时放置到较高地址位置,这样就能直接从0地址处载入操作系统,或者同上,采用UEFI方法。


 2040
2040


 被折叠的 条评论
为什么被折叠?
被折叠的 条评论
为什么被折叠?
 到【灌水乐园】发言


