


目录
9.nginx作为web服务器时使用的配置:http{}段的配置参数
一. nginx简介
Nginx是一个高性能的开源Web服务器和反向代理服务器。它由Igor Sysoev于2004年创建,并于2008 年首次发布。Nginx的设计目标是提供高性能、稳定性和低资源消耗的Web服务器解决方案。
Nginx的特点包括:
1. 高性能:Nginx采用异步、事件驱动的架构,能够处理大量并发连接,具有较低的内存消耗和更高 的吞吐量。它可以处理数以千计的并发连接,适用于高流量的网站和应用程序。
2. 反向代理和负载均衡:Nginx可以作为反向代理服务器,将客户端请求转发给后端服务器,并根据 负载均衡算法分配请求。这使得Nginx可以将流量分发到多个服务器上,提高系统的可靠性和性 能。
3. 静态文件服务:Nginx能够高效地提供静态文件的服务,通过使用磁盘缓存和发送文件的方式,减 轻了后端应用服务器的负担,提高了网站的响应速度。
4. 可扩展性:Nginx支持模块化的架构,可以通过加载不同的模块来扩展其功能。它有丰富的第三方 模块和插件,可以满足各种不同的需求,如安全性增强、SSL/TLS加密、缓存加速等。
5. 简单配置和易于使用:Nginx的配置文件采用简单的文本格式,易于理解和修改。它提供了丰富的 配置选项,可以灵活地进行定制和调整。
二. 代理模式
1.正向代理
正向代理(Forward Proxy): 正向代理是一种代理服务器,作为客户端和目标服务器之间的中间人, 代表客户端发送请求并获取响应。当客户端发送请求时,请求首先发送到正向代理服务器,然后由代理 服务器转发请求到目标服务器,并将目标服务器的响应返回给客户端。客户端对目标服务器的存在是不 可见的,只知道与正向代理服务器进行通信。
正向代理的主要作用包括:
1. 访问限制:正向代理可以绕过网络访问限制,例如访问被封锁的网站或绕过防火墙。
2. 匿名性:正向代理可以隐藏客户端的真实IP地址,提供匿名性。
3. 缓存:代理服务器可以缓存目标服务器的响应,提高访问速度和减轻目标服务器的负载。
4. 安全性:正向代理可以提供额外的安全性,例如过滤恶意内容或加密通信
2.反向代理
反向代理(Reverse Proxy): 反向代理是一种代理服务器,作为目标服务器和客户端之间的中间人, 代表目标服务器接收请求并返回响应。当客户端发送请求时,请求首先发送到反向代理服务器,然后由 代理服务器根据配置将请求转发到相应的目标服务器,并将目标服务器的响应返回给客户端。客户端对 目标服务器的存在是不可见的,只知道与反向代理服务器进行通信。
反向代理的主要作用包括:
1. 负载均衡:反向代理可以根据负载情况将请求分发到多个目标服务器,以实现负载均衡,提高系统 的性能和可靠性。
2. 安全性:反向代理可以提供额外的安全性,例如过滤恶意请求、防止DDoS攻击或提供SSL加密。
3. 缓存:代理服务器可以缓存目标服务器的响应,提高访问速度和减轻目标服务器的负载。
4. 简化架构:反向代理可以隐藏后端服务器的细节,简化系统架构和管理
3.透明代理
透明代理(Transparent Proxy): 透明代理是一种代理服务器,对客户端和目标服务器之间的通信是 透明的,客户端和目标服务器都不知道代理服务器的存在。透明代理通常是在网络中的路由器或防火墙 上实现的,它可以在不需要客户端进行任何配置的情况下截获和转发网络流量。
透明代理的主要作用包括:
1. 缓存和访问控制:透明代理可以缓存常用的内容,提高访问速度,并可以通过访问控制策略限制特 定网站或内容的访问。
2. 安全性:透明代理可以监测和过滤网络流量,提供额外的安全性,例如防止恶意内容或攻击的传 播。
3. 流量控制:透明代理可以控制网络流量的传输速率,以避免网络拥塞或滥用。
三.nginx的模块与工作原理
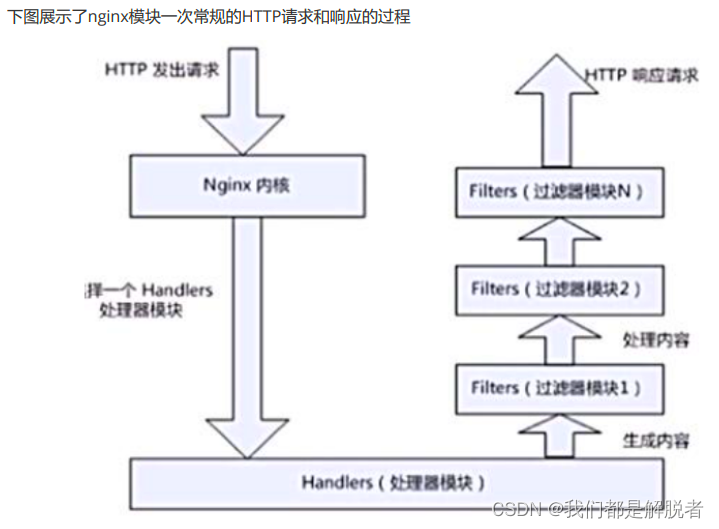
nginx由内核和模块组成。其中,内核的设计非常微小和简洁,完成的工作也非常简单,仅仅通过查找 配置文件将客户端请求映射到一个location block(location是nginx配置中的一个指令,用于URL匹 配),而在这个location中所配置的每个指令将会启动不同的模块去完成相应的工作。
nginx的模块从结构上分为核心模块、基础模块和第三方模块
HTTP模块、EVENT模块和MAIL模块等属于核心模块 HTTP Access模块、HTTP FastCGI模块、HTTP Proxy模块和HTTP Rewrite模块属于基本模块 HTTP Upstream模块、Request Hash模块、Notice模块和HTTP Access Key模块属于第三方模块 用户根据自己的需要开发的模块都属于第三方模块。正是有了如此多模块的支撑,nginx的功能才会如此强大
nginx模块从功能上分为三类,分别是:
Handlers(处理器模块)。此类模块直接处理请求,并进行输出内容和修改headers信息等操作。 handlers处理器模块一般只能有一个
Filters(过滤器模块)。此类模块主要对其他处理器模块输出的内容进行修改操作,最后由nginx输出
Proxies(代理器模块)。就是nginx的HTTP Upstream之类的模块,这些模块主要与后端一些服务比如 fastcgi等操作交互,实现服务代理和负载均衡等功能 nginx模块分为:核心模块、事件模块、标准Http模块、可选Http模块、邮件模块、第三方模块和补丁等
nginx基本模块:所谓基本模块,指的是nginx默认的功能模块,它们提供的指令,允许你使用定义
nginx基本功能的变量,在编译时不能被禁用,包括: 核心模块:基本功能和指令,如进程管理和安全。常见的核心模块指令,大部分是放置在配置文件的顶 部
事件模块:在Nginx内配置网络使用的能力。常见的events(事件)模块指令,大部分是放置在配置文 件的顶部
配置模块:提供包含机制 具体的指令,请参考nginx的官方文档
四.nginx工作原理
nginx的模块直接被编译进nginx,因此属于静态编译方式。
启动nginx后,nginx的模块被自动加载,与Apache不一样,首先将模块编译为一个so文件,然后在配 置文件中指定是否进行加载。
在解析配置文件时,nginx的每个模块都有可能去处理某个请求,但是同一个处理请求只能由一个模块 来完成。
nginx的进程架构: 启动nginx时,会启动一个Master进程,这个进程不处理任何客户端的请求,主要用来产生worker线 程,一个worker线程用来处理n个request。


五.nginx安装与配置
# 1.nginx安装
# 创建用户
[root@server ~]# useradd -r -M -s /sbin/nologin nginx

# 安装依赖环境
[root@server ~]# yum -y install pcre-devel openssl openssl-devel gd-devel gcc
gcc-c++

# 创建日志存放目录
[root@server ~]# mkdir -p /var/log/nginx
[root@server ~]# chown -R nginx.nginx /var/log/nginx

# 下载nginx源码包
[root@server ~]# wget https://nginx.org/download/nginx-1.22.1.tar.gz
[root@server ~]# tar xf nginx-1.22.1.tar.gz
[root@server ~]# ls
anaconda-ks.cfg  nginx-1.22.1
nginx-1.22.1.tar.gz
[root@server ~]# cd nginx-1.22.1
[root@server nginx-1.22.1]# ls
auto CHANGES CHANGES.ru conf configure contrib html LICENSE man README
src

# 编译安装
[root@server nginx-1.22.1]# ./configure \
--prefix=/usr/local/nginx \
--user=nginx \
--group=nginx \
--with-debug \
--with-http_ssl_module \
--with-http_realip_module \
--with-http_image_filter_module \
--with-http_gunzip_module \
--with-http_gzip_static_module \
--with-http_stub_status_module \
--http-log-path=/var/log/nginx/access.log \
--error-log-path=/var/log/nginx/error.log
[root@server nginx-1.22.1]# make -j $(grep 'processor' /proc/cpuinfo | wc -l) &&
make install


# 2.nginx安装后配置
//配置环境变量
[root@server nginx-1.22.1]# echo 'export PATH=/usr/local/nginx/sbin:$PATH' >
/etc/profile.d/nginx.sh
[root@server  nginx-1.22.1]# . /etc/profile.d/nginx.sh
//服务控制方式,使用nginx命令
-t //检查配置文件语法
-v //输出nginx的版本
-c //指定配置文件的路径
-s //发送服务控制信号,可选值有{stop|quit|reopen|reload}
//启动nginx
[root@server nginx-1.22.1]# nginx
[root@server nginx-1.22.1]# cd
[root@server ~]#
[root@server ~]# ss -antl
State Recv-Q Send-Q Local Address:Port Peer
Address:Port Process
LISTEN 0 511 0.0.0.0:80
0.0.0.0:*
LISTEN 0 128 0.0.0.0:22
0.0.0.0:*
LISTEN 0 128 [::]:22
[::]:*
[root@server ~]# nginx -s stop
[root@server ~]# ss -antl
State Recv-Q Send-Q Local Address:Port Peer
Address:Port Process
LISTEN 0 128 0.0.0.0:22
0.0.0.0:*
LISTEN 0 128 [::]:22
[::]:*

# 3.提供网站服务
[root@server ~]# cd /usr/local/nginx/html
[root@server html]# echo "hello world" > index.html
[root@server html]# systemctl disable --now firewalld
[root@server html]# setenforce 0
[root@server html]# nginx
[root@server html]# ss -antl
State Recv-Q Send-Q Local Address:Port Peer
Address:Port Process
LISTEN 0 511 0.0.0.0:80
0.0.0.0:*
LISTEN 0 128 0.0.0.0:22
0.0.0.0:*
LISTEN 0 128 [::]:22
[::]:*
# 4.编写service文件
[root@server ~]# cd /usr/lib/systemd/system
[root@server system]# cp sshd.service nginx.service
[root@server system]# vi nginx.service
[root@server system]# cat nginx.service
[Unit]
Description=nginx server daemon
After=network.target
[Service]
Type=forking
ExecStart=/usr/local/nginx/sbin/nginx
ExecStop=/usr/local/nginx/sbin/nginx -s stop
ExecReload=/usr/local/nginx/sbin/nginx -s reload
KillMode=process
Restart=on-failure
RestartSec=42s
[Install]
WantedBy=multi-user.target
[root@server system]# systemctl daemon-reload
[root@server system]# ss -antl
State Recv-Q Send-Q Local Address:Port Peer
Address:Port Process
LISTEN 0 128 0.0.0.0:22
0.0.0.0:*
LISTEN 0 128 [::]:22
[::]:*
[root@server system]# systemctl start nginx
[root@server system]# ss -antl
State Recv-Q Send-Q Local Address:Port Peer
Address:Port Process
LISTEN 0 511 0.0.0.0:80
0.0.0.0:*
LISTEN 0 128 0.0.0.0:22
0.0.0.0:*
LISTEN 0 128 [::]:22
[::]:*
六.nginx的配置文件详解
主配置文件:/usr/local/nginx/conf/nginx.conf
1.默认启动nginx时,使用的配置文件是:安装路径/conf/nginx.conf文件
2.可以在启动nginx时通过-c选项来指定要读取的配置文件
nginx常见的配置文件及其作用
| 配置文件 | 作用 |
| nginx.conf | nginx的基本配置文件 |
| mime.types | MIME类型关联的扩展文件 |
| fastcgi.conf | 与fastcgi相关的配置 |
| proxy.conf | 与proxy相关的配置,编译proxy或者yum装的时候有 |
| sites.conf | 配置nginx提供的网站,包括虚拟主机,编译proxy或者yum装的时候有 |
1.nginx.conf配置详解
nginx.conf的内容分为以下几段:
main配置段:全局配置段。其中main配置段中可能包含
event配置段 event {}:定义event模型工作特性
http {}:定义http协议相关的配置
配置指令:要以分号结尾,语法格式如下:
derective value1 [value2 ...];
支持使用变量:
内置变量:模块会提供内建变量定义
$remote_addr 远程地址
$remote_user 远程用户
$time_local 本地时间
$request 请求资源
$status 状态
$body_bytes_sent 发送主体的字节数
$http_referer 从哪里跳转过来的
$http_user_agent 是什么浏览器
$http_x_forwarded_for 从哪里转发过来的
自定义变量: set var_name value
2.用于调试、定位问题的配置参数
daemon {on/off};         # daemon选项可以打开或关闭守护进程模式,调试时应关闭,默认开启
master_process {on|off}; # 是否以master/worker模型来运行nginx,调试时可以设置为off,默认打开
error_log 位置 级别;      # 配置错误日志

[root@server ~]# vim /usr/local/nginx/conf/nginx.conf
[root@server ~]# head /usr/local/nginx/conf/nginx.conf

#user nobody;
worker_processes 1;
daemon off;

[root@server conf]# nginx # 会卡在这里不动,其实nginx已经开启了,我们开启一个新的终端

[root@server ~]# ss -antl
State Recv-Q Send-Q Local Address:Port Peer
Address:Port Process
LISTEN 0 511 0.0.0.0:80
0.0.0.0:*
LISTEN 0 128 0.0.0.0:22
0.0.0.0:*
LISTEN 0 128 [::]:22
[::]:*
[root@server ~]# ps -ef |grep nginx
root     83881 79021 0 16:29 pts/0 00:00:00 nginx: master process nginx
nginx    83882 83881 0 16:29 pts/0 00:00:00 nginx: worker process
root     84319 82060 0 16:31 pts/1 00:00:00 grep --color=auto nginx
# 如果你希望将nginx放到前台运行可以将daemon参数设置为off

# 将master_process设置为off
[root@server conf]# vim nginx.conf
master_process off;
[root@server conf]# nginx -s stop
[root@server conf]# nginx
[root@server conf]# ss -antl
State Recv-Q Send-Q Local Address:Port Peer
Address:Port Process
LISTEN 0 511 0.0.0.0:80
0.0.0.0:*
LISTEN 0 128 0.0.0.0:22
0.0.0.0:*
LISTEN 0 128 [::]:22
[::]:*

[root@server conf]# ps -ef |grep nginx   # 这里nginx就不会分master进程和worker进程了
root 85454 1 0 16:35 ? 00:00:00 nginx
root 85541 79021 0 16:35 pts/0 00:00:00 grep --color=auto nginx

# 设置错误日志
[root@server conf]# vim nginx.conf      # 这三个日志选项只能开启一个
#error_log logs/error.log;
#error_log logs/error.log notice;
#error_log logs/error.log info;
[root@server conf]# cd ../logs/
[root@server logs]# ls     # 开启之后就会在nginx目录的logs目录生成日志文件
error.log nginx.pid
3.正常运行必备的配置参数
# 指定用户开启nginx进程,默认为nginx用户
[root@server conf]# head nginx.conf //指定student用户开启进程
user student;
worker_processes 1;
[root@server conf]# nginx -s stop
[root@server conf]# nginx
[root@server conf]# ps -ef |grep nginx
root 92014 1 0 17:00 ? 00:00:00 nginx: master process nginx
student 92015 92014 0 17:00 ? 00:00:00 nginx: worker process
root 92039 79021 0 17:00 pts/0 00:00:00 grep --color=auto nginx
4.优化性能的配置参数
worker_processes n; //启动n个worker进程,这里的n为了避免上下文切换,通常设置为cpu总核
心数-1或等于总核心数
worker_cpu_affinity cpumask ...; //将进程绑定到某cpu中,避免频繁刷新缓存
# cpumask:使用8位二进制表示cpu核心,如:
0000 0001 //第一颗cpu核心
0000 0010 //第二颗cpu核心
0000 0100 //第三颗cpu核心
0000 1000 //第四颗cpu核心
0001 0000 //第五颗cpu核心
0010 0000 //第六颗cpu核心
0100 0000 //第七颗cpu核心
1000 0000 //第八颗cpu核心
timer_resolution interval; //计时器解析度。降低此值,可减少gettimeofday()系统调用的
次数
worker_priority number; //指明worker进程的nice值

示例
# 启动四个进程,绑定四个核心
[root@server conf]# head nginx.conf
user nginx;
worker_processes 4;
worker_cpu_affinity 0001 0010 0100 1000;

[root@server conf]# nginx -s stop
[root@server conf]# nginx
[root@server conf]# ps -ef |grep nginx
root 93379 1 0 17:05 ? 00:00:00 nginx: master process nginx
nginx 93380 93379 0 17:05 ? 00:00:00 nginx: worker process
nginx 93381 93379 0 17:05 ? 00:00:00 nginx: worker process
nginx 93382 93379 0 17:05 ? 00:00:00 nginx: worker process
nginx 93383 93379 0 17:05 ? 00:00:00 nginx: worker process
root 93445 79021 0 17:05 pts/0 00:00:00 grep --color=auto nginx
5.事件相关的配置:event{}段中的配置参数
# accept_mutex {off|on};    ---master调度用户请求至各worker进程时使用的负载均衡锁;on表示能让多个worker轮流地、序列化地去响应新请求
# lock_file file;    ---accept_mutex用到的互斥锁锁文件路径
# use [epoll | rtsig | select | poll];  ---指明使用的事件模型,建议让nginx自行选择
# worker_connections #;    ---每个进程能够接受的最大连接数
6.网络连接相关的配置参数
# keepalive_timeout number;    ---长连接的超时时长,默认为65s
# keepalive_requests number;   ---在一个长连接上所能够允许请求的最大资源数
# keepalive_disable [msie6|safari|none];    ---为指定类型的UserAgent禁用长连接
# tcp_nodelay on|off;      ---是否对长连接使用TCP_NODELAY选项,为了提升用户体验,通常设为on
# client_header_timeout number;    ---读取http请求报文首部的超时时长
# client_body_timeout number;    ---读取http请求报文body部分的超时时长
# send_timeout number;    ---发送响应报文的超时时长
7.fastcgi的相关配置参数
LNMP:php要启用fpm模型
配置示例如下:
location ~ \.php$ {
  root html;
  fastcgi_pass 127.0.0.1:9000;      //定义反向代理
  fastcgi_index index.php;
  fastcgi_param SCRIPT_FILENAME /scripts$fastcgi_script_name;
  include fastcgi_params;
}
8.常需要进行调整的参数
# worker_processes
# worker_connections
# worker_cpu_affinity
# worker_priority
9.nginx作为web服务器时使用的配置:http{}段的配置参数
# 1.http{...}:配置http相关,由ngx_http_core_module模块引入。nginx的HTTP配置主要包括四个区块,结构如下:
http {//协议级别
  include mime.types;
  default_type application/octet-stream;
  keepalive_timeout 65;
  gzip on;
  upstream {//负载均衡配置
    ...
  }
  server {//服务器级别,每个server类似于httpd中的一个<VirtualHost>
    listen 80;
    server_name localhost;
    location / {//请求级别,类似于httpd中的<Location>,用于定义URL与本地文件系统的映射关系
      root html;
      index index.html index.htm;
    }
  }
}

# 2.http{}段配置指令:
server {}:定义一个虚拟主机,示例如下:
server {
  listen 80;
  server_name www.idfsoft.com;
  root "/vhosts/web";
}

# 3.listen:指定监听的地址和端口
listen address[:port];
listen port;
server_name NAME [...]; 后面可跟多个主机,名称可使用正则表达式或通配符

# 4.当有多个server时,匹配顺序如下:
      1.先做精确匹配检查
      2.左侧通配符匹配检查,如*.idfsoft.com
      3.右侧通配符匹配检查,如mail.*
      4.正则表达式匹配检查,如~ ^.*\.idfsoft\.com$
      5.default_server
# 5.各种参数说明
# root path; 设置资源路径映射,用于指明请求的URL所对应的资源所在的文件系统上的起始路径

# alias path; 用于location配置段,定义路径别名

# index file; 默认主页面

# index index.php index.html;

# error_page code [...] [=code] URI | @name 根据http响应状态码来指明特用的错误页面,例如 error_page 404 /404_customed.html
  将error_page  404              /404.html; 取消注释,/404.html这个文件名可以自定义
在html目录下创建一个名为404.html的文件,里面写入自己想展示的html界面

# [=code]:以指定的响应码进行响应,而不是默认的原来的响应,默认表示以新资源的响应码为其响应码,例如 error_page 404 =200 /404_customed.html

# log_format 定义日志格式
# log_format  main  '$remote_addr - $remote_user [$time_local] "$request" '
                       远程地址   -  远程用户         本地时间    请求的资源
                    '$status $body_bytes_sent "$http_referer" '
                       状态码   主体发送的字节数     是否跳转
                    '"$http_user_agent" "$http_x_forwarded_for"';
                          http的用户代理  记录链路中所有代理服务器的请求
  access_log  logs/access.log  main;
找到server下access_log  logs/host.access.log  main;这一行,取消注释
然后在http中找到下面这三行,全部取消注释
log_format  main  '$remote_addr - $remote_user [$time_local] "$request" '
                    '$status $body_bytes_sent "$http_referer" '
                    '"$http_user_agent" "$http_x_forwarded_for"';
重启ngixn服务,然后进入logs
[root@server nginx]# cd logs/
[root@server logs]# ls
error.log  host.access.log  nginx.pid
# 发现多了一个host.access.log文件
# 用tail命令实时查看日志
# 用ip访问出页面,然后就会看到这些日志
[root@server logs]# tail -f host.access.log
192.168.187.1 - - [18/Oct/2023:02:43:54 -0400] "GET / HTTP/1.1" 200 12 "-" "Mozilla/5.0 (Windows NT 10.0; Win64; x64) AppleWebKit/537.36 (KHTML, like Gecko) Chrome/115.0.0.0 Safari/537.36 Edg/115.0.1901.203" "-"
192.168.187.1 - - [18/Oct/2023:02:43:55 -0400] "GET /favicon.ico HTTP/1.1" 404 657135 "http://192.168.187.150/" "Mozilla/5.0 (Windows NT 10.0; Win64; x64) AppleWebKit/537.36 (KHTML, like Gecko) Chrome/115.0.0.0 Safari/537.36 Edg/115.0.1901.203" "-"

# 自定义日志格式
# 将上面三行复制一份,直接粘贴在原来的下面,并修改如下:
log_format  pupu  '$remote_addr - [$time_local] "$request" '
                  '$status "$http_referer" "$http_user_agent"'

修改server下access_log  logs/host.access.log  main;
          为access_log  logs/host.access.log  pupu;
# 然后重启nginx服务,访问页面并查看日志如下
192.168.187.1 - - [18/Oct/2023:02:57:40 -0400] "GET / HTTP/1.1" 304 "-" "Mozilla/5.0 (Windows NT 10.0; Win64; x64) AppleWebKit/537.36 (KHTML, like Gecko) Chrome/115.0.0.0 Safari/537.36 Edg/115.0.1901.203" sendfileon

# 注意:此处可用变量为nginx各模块内建变量

# 5.location区段,通过指定模式来与客户端请求的URI相匹配
//功能:允许根据用户请求的URI来匹配定义的各location,匹配到时,此请求将被相应的location配置块中的配置所处理,例如做访问控制等功能

//语法:location [ 修饰符 ] pattern {......}
10.访问控制
# 1.用于location段
allow:设定允许哪台或哪些主机访问,多个参数间用空格隔开
deny:设定禁止哪台或哪些主机访问,多个参数间用空格隔开
示例:
allow 192.168.1.1/32 172.16.0.0/16;
deny all;

在配置文件中的server一项下面添加
        location / {
            allow 192.168.187.0/24;   ----- 允许187这一网段的所有ip访问
            deny 192.168.187.100;     ----- 禁止187网段的100禁止访问
            root   html;
            index  index.html index.htm;
        }
11.基于用户认证
# 1.配置说明
auth_basic "欢迎信息";
auth_basic_user_file "/path/to/user_auth_file"

# 2.user_auth_file内容格式为:
username:password
# 这里的密码为加密后的密码串,建议用htpasswd来创建此文件:
htpasswd -c -m /path/to/.user_auth_file USERNAME

修改页面如下
[root@server html]# cat index.html
hello world
<a href="/auth_page/auth_page.html">dian ji wo</a>
# 1.我们要实现点击跳转页面之后,需要身份验证
# 在html目录下创建一个验证目录名为auth_page
[root@server html]# mkdir auth_page
[root@server html]# ls
404.html  auth_page 50x.html  index.html
# 在该目录中自定义编写一个html文件作为我们跳转的页面
[root@server html]# ls auth_page/
auth_page.html

# 2.编辑配置文件
# 在server下新建一项,如下
        location /auth_page {
            auth_basic "qwerqwer";    ---- 这里随便写
            auth_basic_user_file "/usr/local/nginx/conf/pass";  # pass文件要创建
            root html;
            index auth_page.html;
        }
# 重启nginx服务

# 下载命令依赖包
[root@server conf]# yum -y install httpd-tools  # 不要装成httpd服务了

# 这里我直接在conf目录下生成
[root@server conf]# htpasswd -c -m pass pupu    --- pupu是自定义用户名
New password:
Re-type new password:                 ----- 输入两次自定义密码
Adding password for user pupu
[root@server conf]# ls
fastcgi.conf            mime.types          scgi_params.default
fastcgi.conf.default    mime.types.default  uwsgi_params
fastcgi_params          nginx.conf          uwsgi_params.default
fastcgi_params.default  nginx.conf.default  win-utf
koi-utf                 pass        --------- 看到这里新增了一个pass文件
koi-win                 scgi_params
# 查看pass文件发现是加密的
[root@server conf]# cat pass
pupu:$apr1$Bqapeyn3$jOvozF58GzTnQVehZEWQQ1

# 用ip访问页面测试 

需要输入正确的用户和密码才能继续访问
12.https配置
# 1.生成私钥,生成证书签署请求并获得证书,然后在nginx.conf中配置如下内容
server {
  listen       443 ssl;
  server_name  www.idfsoft.com;
  ssl_certificate      /etc/nginx/ssl/nginx.crt;
  ssl_certificate_key  /etc/nginx/ssl/nginx.key;
  ssl_session_cache    shared:SSL:1m;
  ssl_session_timeout  5m;
  ssl_ciphers  HIGH:!aNULL:!MD5;
  ssl_prefer_server_ciphers  on;
  location / {
    root   html;
    index  index.html index.htm;
  }
}
13.开启状态界面
# 1.开启status
location /status {
  stub_status {on | off};
  allow 172.16.0.0/16;
  deny all;
}

# 在配置文件的server项中新建一项
        location /status {
            stub_status on;
        }
# 重启nginx服务
# 用ip访问status页面
# 访问状态页面的方式:http://server_ip/status
状态页面信息详解:
| 状态码 | 表示的意义 |
| Active connections 2 | 当前所有处于打开状态的连接数 |
| accepts | 总共处理了多少个连接 |
| handled | 成功创建多少握手 |
| requests | 总共处理了多少个请求 |
| Reading | nginx读取到客户端的Header信息数,表示正处于接收请求状态的连接数 |
| Writing | nginx返回给客户端的Header信息数,表示请求已经接收完成, 且正处于处理请求或发送响应的过程中的连接数 |
| Waiting | 开启keep-alive的情况下,这个值等于active - (reading + writing), 意思就是Nginx已处理完正在等候下一次请求指令的驻留连接 |
14.rewrite
# 1.语法:rewrite regex replacement flag;
举例:
rewrite ^/images/(.*\.jpg)$ /imgs/$1 break;
此处的$1用于引用(.*.jpg)匹配到的内容,又如
rewrite ^/bbs/(.*)$ http://www.idfsoft.com/index.html redirect;

# 2.如上例所示,replacement可以是某个路径,也可以是某个URL
常见的flag
| flag | 作用 |
| last | 基本上都用这个flag,表示当前的匹配结束,继续下一个匹配,最多匹配10个到20个 一旦此rewrite规则重写完成后,就不再被后面其它的rewrite规则进行处理 而是由UserAgent重新对重写后的URL再一次发起请求,并从头开始执行类似的过程 |
| break | 中止Rewrite,不再继续匹配 一旦此rewrite规则重写完成后,由UserAgent对新的URL重新发起请求, 且不再会被当前location内的任何rewrite规则所检查 |
| redirect | 以临时重定向的HTTP状态302返回新的URL |
| permanent | 以永久重定向的HTTP状态301返回新的URL |
rewrite模块的作用是用来执行URL重定向。这个机制有利于去掉恶意访问的url,也有利于搜索引擎优化(SEO)
nginx使用的语法源于Perl兼容正则表达式(PCRE)库,基本语法如下:
| 标识符 | 意义 |
| ^ | 必须以^后的实体开头 |
| $ | 必须以$前的实体结尾 |
| . | 匹配任意字符 |
| [] | 匹配指定字符集内的任意字符 |
| [^] | 匹配任何不包括在指定字符集内的任意字符串 |
| | | 匹配 | 之前或之后的实体 |
| () | 分组,组成一组用于匹配的实体,通常会有 | 来协助 |
捕获子表达式,可以捕获放在()之间的任何文本,比如:
^(hello|sir)$       //字符串为“hi sir”捕获的结果:$1=hi$2=sir

//这些被捕获的数据,在后面就可以当变量一样使用了
rewrite使用示例
# 1.优先级
= 开头表示精确匹配; 如: A 中只匹配根目录结尾的请求,后面不能带任何字符串.
^~ 开头表示uri以某个常规字符串开头,不是正则匹配;
~ 开头表示区分大小写的正则匹配;
~* 开头表示不区分大小写的正则匹配;
/ 通用匹配, 如果没有其它匹配,任何请求都会匹配到;

# 2.编辑配置文件如下
        location /qwer {
           echo "this is nothing";
        }

        location ~ ^/qwer$ {
           echo "this is ~";
        }

        location ~* /qwer {
           echo "this is ~*";
        }

        location = /qwer {
           echo "this is =";
        }

# 重启服务

C:\Windows\system32>curl http://192.168.187.150/qwerd
this is ~*

C:\Windows\system32>curl http://192.168.187.150/qwer
this is =

C:\Windows\system32>curl http://192.168.187.150/qwerd
this is ~*

C:\Windows\system32>curl http://192.168.187.150/qweR
this is ~*

# 3.重定向
# 当我访问一个旧页面时给我跳转到新的链接
# 如下/html目录下的index.html文件内容如下
[root@server html]# ls
404.html  auth_page   中国共产党万岁!中国人民万岁!-新华网_files
50x.html  index.html
[root@server html]# cat index.html
hello world
<a href="/auth_page/auth_page.html">dian ji wo</a>

# 现在我要将这个页面跳转为我的/auth_page目录下的/auth_page.html页面
# 编辑配置文件
        location /index.html {
           rewrite /index.html /auth_page/auth_page.html;
        }
# 重启nginx服务
# ip接上页面后缀访问网页,效果如下
# 检查网页状态码是否为200
14.1 rewrite实例:部署Discuz论坛
环境要求:
- PHP 版本: 5.6 ~ 8.2
- MySQL 版本:5.5 ~ 8.0,MariaDB 10.2+
# 1.环境部署完成后配置数据库
# 创建bbs数据库
# 授权用户访问数据库
MariaDB [(none)]> create database bbs;
Query OK, 1 row affected (0.000 sec)

MariaDB [(none)]> grant all on bbs.* to 'repl'@'%' identified by '2664218545Z';
Query OK, 0 rows affected (0.001 sec)

MariaDB [(none)]> grant all on bbs.* to 'repl'@'localhost' identified by '2664218545Z';
Query OK, 0 rows affected (0.001 sec)

MariaDB [(none)]> flush privileges;
Query OK, 0 rows affected (0.000 sec)

MariaDB [(none)]> exit
Bye

# 2.下载Disucz压缩包至本地,然后导入虚拟机
# 在/usr/local/nginx/html目录下创建一个bbs目录,将解压缩后的upload目录放到bbs下
[root@server html]# mkdir bbs
[root@server ~]# unzip Discuz_X3.5_SC_UTF8_20231001.zip -C /usr/local/nginx/html/bbs/
[root@server html]# cd bbs/
[root@server bbs]# ls
LICENSE  qqqun.png  readme  readme.html  upload  utility.html

# 配置upload目录下的文件权限
[root@server upload]# ls
admin.php  connect.php      group.php   misc.php    source
api        crossdomain.xml  home.php    plugin.php  static
api.php    data             index.php   portal.php  template
archiver   favicon.ico      install     robots.txt  uc_client
config     forum.php        member.php  search.php  uc_server

[root@server upload]# chown -R root:nginx ./config/
[root@server upload]# chown -R root:nginx ./data/
[root@server upload]# chown -R root:nginx ./uc_client/
[root@server upload]# chown -R root:nginx ./uc_server/
[root@server upload]# chmod -R 777 ./config/
[root@server upload]# chmod -R 777 ./data/
[root@server upload]# chmod -R 777 ./uc_client/
[root@server upload]# chmod -R 777 ./uc_server/

# 用ip跟上路径访问网页

按照要求填入信息


14.2 设置旧域名访问跳转至新域名
# 1.配置域名如下,作为旧域名
    server {
        listen       80;
        server_name  www.niubi.com;

        location / {
            rewrite ^(.*)$ http://www.pupu.com$1 break;
        }
        location ~ \.php$ {
            root           /usr/local/nginx/html/bbs/upload;
            fastcgi_pass   127.0.0.1:9000;
            fastcgi_index  index.php;
            fastcgi_param  SCRIPT_FILENAME  $document_root$fastcgi_script_name;
            include        fastcgi_params;
        }

# 2.创建一个新的server列,作为新的域名配置项
    server {
       listen 80;
       server_name www.pupu.com;
       root     html;
        location / {
            root   /usr/local/nginx/html/bbs/upload;
            index index.php index.php index.html index.htm;
        }
        location ~ \.php$ {
            root           /usr/local/nginx/html/bbs/upload;
            fastcgi_pass   127.0.0.1:9000;
            fastcgi_index  index.php;
            fastcgi_param  SCRIPT_FILENAME  $document_root$fastcgi_script_name;
            include        fastcgi_params;
        }
    }

# 这样就可以实现访问旧域名跳转至新的域名

15.if
语法:
if (condition) {...}应用场景:
- server段
- location段
常见的condition
- 变量名(变量值为空串,或者以“0”开始,则为false,其它的均为true)
- 以变量为操作数构成的比较表达式(可使用=,!=类似的比较操作符进行测试)
- 正则表达式的模式匹配操作
- ~:区分大小写的模式匹配检查
- ~*:不区分大小写的模式匹配检查
- !~和!~*:对上面两种测试取反
- 测试指定路径为文件的可能性(-f,!-f)
- 测试指定路径为目录的可能性(-d,!-d)
- 测试文件的存在性(-e,!-e)
- 检查文件是否有执行权限(-x,!-x)
15.1.基于浏览器实现分离案例
if ($http_user_agent ~ Firefox) {
  rewrite ^(.*)$ /firefox/$1 break;
}

if ($http_user_agent ~ MSIE) {
  rewrite ^(.*)$ /msie/$1 break;
}

if ($http_user_agent ~ Chrome) {
  rewrite ^(.*)$ /chrome/$1 break;
}
15.2.防盗链案例
location ~* \.(jpg|gif|jpeg|png)$ {
  valid_referers none blocked www.idfsoft.com;
  if ($invalid_referer) {
    rewrite ^/ http://www.idfsoft.com/403.html;
  }
}
七.nginx版本平滑升级
# 1.通过nginx -V 命令查看nginx编译过程
[root@server ~]# nginx -V
nginx version: nginx/1.22.1
built by gcc 8.5.0 20210514 (Red Hat 8.5.0-21) (GCC)
built with OpenSSL 1.1.1k  FIPS 25 Mar 2021
TLS SNI support enabled
configure arguments: --prefix=/usr/local/nginx --user=nginx --group=nginx --with-debug --with-http_ssl_module --with-http_realip_module --with-http_image_filter_module --with-http_gunzip_module --with-http_gzip_static_module --with-http_stub_status_module --http-log-path=/var/log/nginx/access.log --error-log-path=/var/log/nginx/error.log

# 2.官网下载1.24.1版本软件包用于升级
[root@server ~]# wget https://nginx.org/download/nginx-1.24.0.tar.gz
[root@server ~]# ls
anaconda-ks.cfg                   nginx-1.22.1.tar.gz  php-8.2.10.tar.xz
Discuz_X3.5_SC_UTF8_20231001.zip  nginx-1.24.0.tar.gz
nginx-1.22.1                      php-8.2.10

# 下载echo-nginx模块包
[root@server ~]# git clone https://github.com/openresty/echo-nginx-module.git

# 3.将旧版本移走做备份
[root@server ~]# mv /usr/local/nginx/sbin/nginx /opt/nginx-20231019

# 4.解压缩nginx1.24.1
[root@server ~]# tar xf nginx-1.24.0.tar.gz
[root@server ~]# cd nginx-1.24.0
[root@server nginx-1.24.0]# ls
auto     CHANGES.ru  configure  html     man     src
CHANGES  conf        contrib    LICENSE  README

# 5.过滤add-module模块
[root@server nginx-1.24.0]# ./configure --help | grep add-module
  --add-module=PATH                  enable external module

# 6.编译nginx1.24.1
# 编译的参数就是上一次编译的参数加上这一次的模块
[root@server nginx-1.24.0]# ./configure --prefix=/usr/local/nginx --user=nginx --group=nginx --with-debug --with-http_ssl_module --with-http_realip_module --with-http_image_filter_module --with-http_gunzip_module --with-http_gzip_static_module --with-http_stub_status_module --http-log-path=/var/log/nginx/access.log --error-log-path=/var/log/nginx/error.log --add-module=../echo-nginx-module

# make开始编译,不能执行make install
[root@server nginx-1.24.0]# make

# 开始升级,进入objs目录
[root@server nginx-1.24.0]# cd objs/
[root@server objs]# ls
addon         Makefile  nginx.8            ngx_auto_headers.h  ngx_modules.o
autoconf.err  nginx     ngx_auto_config.h  ngx_modules.c       src

# 将objs目录中的nginx目录移动到/usr/local/nginx/sbin/下
# 平滑升级步骤,停止nginx服务,将目录文件复制到配置文件路径下,然后启动服务
[root@server objs]# systemctl nginx stop;\cp nginx /usr/local/nginx/sbin/nginx;nginx
# 过程很快,几乎感受不到,不会影响使用,所以叫做平滑升级
# 查看版本,现在是1.24.0了
[root@server objs]# nginx -V
nginx version: nginx/1.24.0
built by gcc 8.5.0 20210514 (Red Hat 8.5.0-21) (GCC)
built with OpenSSL 1.1.1k  FIPS 25 Mar 2021
TLS SNI support enabled
configure arguments: --prefix=/usr/local/nginx --user=nginx --group=nginx --with-debug --with-http_ssl_module --with-http_realip_module --with-http_image_filter_module --with-http_gunzip_module --with-http_gzip_static_module --with-http_stub_status_module --http-log-path=/var/log/nginx/access.log --error-log-path=/var/log/nginx/error.log --add-module=../echo-nginx-module
八.zabbix监控nginx服务状态界面
准备工作
| zabbix服务端 | 192.168.187.134 | centos8 |
# 1.安装zabbix_agentd端
# 安装zabbix6.4.6版本
[root@server ~]# wget https://cdn.zabbix.com/zabbix/sources/stable/6.4/zabbix-6.4.6.tar.gz
[root@server ~]# ls
anaconda-ks.cfg  nginx-1.22.1  nginx-1.22.1.tar.gz  zabbix-6.4.6.tar.gz
[root@server ~]# tar xf zabbix-6.4.6.tar.gz
[root@server ~]# ls
anaconda-ks.cfg  nginx-1.22.1.tar.gz  zabbix-6.4.6.tar.gz
nginx-1.22.1     zabbix-6.4.6

# 创建zabbix用户与组
[root@server ~]# groupadd --system zabbix
[root@server ~]# useradd --system -g zabbix -d /usr/lib/zabbix -s /sbin/nologin -c "Zabbix Monitoring System" zabbix

# 安装zabbix依赖
[root@server ~]# yum -y install gcc gcc-c++ make pcre-devel

# 2.编译zabbix
[root@server ~]# cd zabbix-6.4.6
[root@server zabbix-6.4.6]# ./configure --enable-agent
.....省略
***********************************************************
*            Now run 'make install'                       *
*                                                         *
*            Thank you for using Zabbix!                  *
*              <http://www.zabbix.com>                    *
***********************************************************
# 立刻 make install

# 3.编辑agent主配置文件
[root@server zabbix-6.4.6]# vim /usr/local/etc/zabbix_agentd.conf
# 编写配置文件中的这三行
Server=192.168.187.134               # 指定zabbix服务端的ip
ServerActive=192.168.187.134         # 指定zabbix服务端的ip
Hostname=nginx            # 自定义命名,以后在服务端用这个名字来连接这台主机

# 4.启动zabbix_agentd服务,并查看10050端口
[root@server zabbix-6.4.6]# zabbix_agentd
[root@server zabbix-6.4.6]# ss -antl
State    Recv-Q   Send-Q     Local Address:Port       Peer Address:Port   Process
LISTEN   0        128              0.0.0.0:10050           0.0.0.0:*
LISTEN   0        511              0.0.0.0:80              0.0.0.0:*

# 5.在zabbix服务端添加该主机
# 6.编写查看状态页面的脚本
[root@server ~]# mkdir /scripts
[root@server ~]# cd /scripts/
[root@server scripts]# vim nginx.sh
[root@server scripts]# cat nginx.sh
#! /bin/bash

case $1 in
    "reading")
        curl -s http://192.168.187.150/status | awk 'NR==4{print $2}'
        ;;
    "writing")
        curl -s http://192.168.187.150/status | awk 'NR==4{print $4}'
        ;;
    "waiting")
        curl -s http://192.168.187.150/status | awk 'NR==4{print $6}'
        ;;
esac

# 7.编辑zabbix_agentd配置文件
[root@server scripts]# vim /usr/local/etc/zabbix_agentd.conf
[root@server scripts]# tail -n1 /usr/local/etc/zabbix_agentd.conf
UserParameter=nginx_agentd[*],/bin/bash /scripts/nginx.sh $1
[root@server scripts]# pkill zabbix
[root@server scripts]# zabbix_agentd

# 8.在zabbix服务端测试
[root@zabbix_server ~]# zabbix_get -s 192.168.187.150 -k nginx_status[reading]
0
zabbix服务端配置监控项
key名是在配置文件中自定义的名称
括号中分别监控不同的数据来实现监控
触发项根据实际情况写,这里随意写了一下触发项


报警效果图


 53万+
53万+


 被折叠的 条评论
为什么被折叠?
被折叠的 条评论
为什么被折叠?
 到【灌水乐园】发言


