


插入新字段
例:在“a b c d”中b的后面插入“e f g”
echo "a b c d" | awk '{$2=$2" e f g";print}'
格式化空白
移除每行的前缀、后缀空白,并将各部分左对齐
[root@localhost ~]# cat 1.txt
aaaa         bbb      ccccc
bbbb      eeee      gggg
aa   dddd   ee gg cc hh
[root@localhost ~]# awk '{$1=$1;print}' 1.txt
aaaa bbb ccccc
bbbb eeee gggg
aa dddd ee gg cc hh
[root@localhost ~]# awk 'BEGIN{OFS="\t"}{$1=$1;print}' 1.txt
aaaa    bbb ccccc
bbbb    eeee    gggg
aa  dddd    ee  gg  cc  hh
筛选IPVv4地址
从ifconfig命令的结果中筛选出除了lo网卡的所有IPv4地址
---方法一:
ifconfig | awk '/inet/ && !($2~/^127/){print $2}'
---方法二:(按段落读取)
ifconfig | awk 'BEGIN{RS=""}/lo/{print $6}'
---方法三:
ifconfig | awk 'BEGIN{RS="";FS="\n"}!/lo/{$0=$2;FS=" ";$0=$0;print $2}'
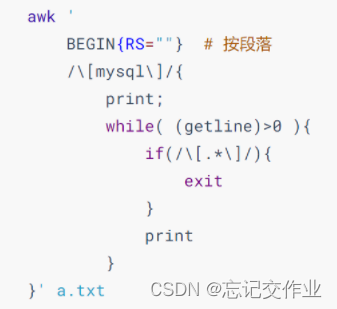
读取.ini配置文件中的某段
[base] name=os_repo baseurl=https://xxx/centos/$releasever/os/$basearch gpgcheck=0 enable=1 [mysql] name=mysql_repo baseurl=https://xxx/mysql-repo/yum/mysql-5.7-community/el/$releasever/$basearch gpgcheck=0 enable=1 [epel] name=epel_repo baseurl=https://xxx/epel/$releasever/$basearch gpgcheck=0 enable=1 [percona] name=percona_repo baseurl = https://xxx/percona/release/$releasever/RPMS/$basearch enabled = 1 gpgcheck = 0
根据某字段去重
例:去掉uid=xxx重复的行。
[root@localhost ~]# cat 2.txt
2019-01-13_12:00_index?uid=123
2019-01-13_13:00_index?uid=123
2019-01-13_14:00_index?uid=333
2019-01-13_15:00_index?uid=9710
2019-01-14_12:00_index?uid=123
2019-01-14_13:00_index?uid=123
2019-01-15_14:00_index?uid=333
2019-01-16_15:00_index?uid=9710
[root@localhost ~]# awk -F"?" '!arr[$2]++{print}' 2.txt
2019-01-13_12:00_index?uid=123
2019-01-13_14:00_index?uid=333
2019-01-13_15:00_index?uid=9710
次数统计
[root@localhost ~]# cat 3.txt
portmapper
portmapper
portmapper
portmapper
portmapper
portmapper
status
status
mountd
mountd
mountd
mountd
mountd
mountd
nfs
nfs
nfs_acl
nfs
nfs
nfs_acl
nlockmgr
nlockmgr
nlockmgr
nlockmgr
nlockmgr
[root@localhost ~]# awk '{arr[$1]++}END{OFS="\t";for(idx in arr){printf arr[idx],idx}}' 3.txt
425626
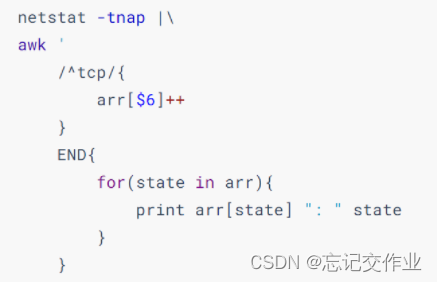
统计TCP连接状态数量
$ netstat -tnap
Proto Recv-Q Send-Q Local Address   Foreign Address  State       PID/Program name
tcp        0      0 0.0.0.0:22      0.0.0.0:*        LISTEN      1139/sshd
tcp        0      0 127.0.0.1:25    0.0.0.0:*        LISTEN      2285/master
tcp        0     96 192.168.2.17:22 192.168.2.1:2468 ESTABLISHED 87463/sshd: root@pt
tcp        0      0 192.168.2017:22 192.168.201:5821 ESTABLISHED 89359/sshd: root@no
tcp6       0      0 :::3306         :::*             LISTEN      2289/mysqld
tcp6       0      0 :::22           :::*             LISTEN      1139/sshd
tcp6       0      0 ::1:25          :::*             LISTEN      2285/master
统计得到的结果:
5: LISTEN
2: ESTABLISHED
一行式:
netstat -tna | awk '/^tcp/{arr[$6]++}END{for(state in arr){print arr[state] ": " state}}'
netstat -tna | /usr/bin/grep 'tcp' | awk '{print $6}' | sort | uniq -c
统计日志中各IP访问非200状态码的次数
日志示例数据:
111.202.100.141 - - [2019-11-07T03:11:02+08:00] "GET /robots.txt HTTP/1.1" 301 169
统计非200状态码的IP,并取次数最多的前10个IP:
# 法一
awk '$8!=200{arr[$1]++}END{for(i in arr){print arr[i],i}}' access.log | sort -k1nr | head -n 10
# 法二:
awk '
$8!=200{arr[$1]++}
END{
PROCINFO["sorted_in"]="@val_num_desc";
for(i in arr){
if(cnt++==10){exit}
print arr[i],i
}
}' access.log
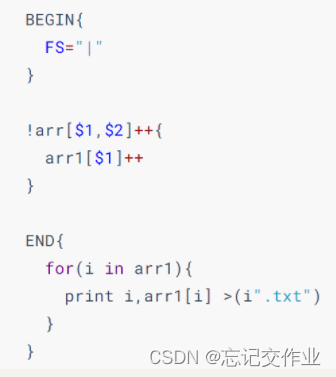
统计独立IP
? url 访问IP 访问时间 访问人
a.com.cn|202.109.134.23|2015-11-20 20:34:43|guest
b.com.cn|202.109.134.23|2015-11-20 20:34:48|guest
c.com.cn|202.109.134.24|2015-11-20 20:34:48|guest
a.com.cn|202.109.134.23|2015-11-20 20:34:43|guest
a.com.cn|202.109.134.24|2015-11-20 20:34:43|guest
b.com.cn|202.109.134.25|2015-11-20 20:34:48|guest
需求:统计每个URL的独立访问IP有多少个(去重),并且要为每个URL保存一个对应的文件,得到的结果类似:
a.com.cn  2
b.com.cn  2
c.com.cn  1
并且有三个对应的文件:
a.com.cn.txt
b.com.cn.txt
c.com.cn.txt
代码:
处理字段缺失的数据
ID  name    gender  age  email          phone
1   Bob     male    28   abc@qq.com     18023394012
2   Alice   female  24   def@gmail.com  18084925203
3   Tony    male    21                  17048792503
4   Kevin   male    21   bbb@189.com    17023929033
5   Alex    male    18   ccc@xyz.com    18185904230
6   Andy    female       ddd@139.com    18923902352
7   Jerry   female  25   exdsa@189.com  18785234906
8   Peter   male    20   bax@qq.com     17729348758
9   Steven          23   bc@sohu.com    15947893212
10  Bruce   female  27   bcbd@139.com   13942943905
gawk提供了FIELDWIDTHS变量。
awk '{print $4}' FIELDWIDTHS="2 2:6 2:6 2:3 2:13 2:11" a.txt
处理字段中包含了字段分隔符的数据
下面是CSV文件中的一行,该CSV文件以逗号分隔各个字段。
Robbins,Arnold,"1234 A Pretty Street, NE",MyTown,MyState,12345-6789,USA
需求:取得第三个字段"1234 A Pretty Street, NE"。
当字段中包含了字段分隔符时,直接使用FS划分字段来处理会非常棘手。gawk为了解决这种特殊需求,提供了FPAT变量。
FPAT可以收集正则匹配的结果,并将它们保存在各个字段中。(就像grep匹配成功的部分会加颜色显示,而使用FPAT划分字段,则是将匹配成功的部分保存在字段$1 $2 $3...中)。
echo 'Robbins,Arnold,"1234 A Pretty Street, NE",MyTown,MyState,12345-6789,USA' |\
awk 'BEGIN{FPAT="[^,]+|\".*\""}{print $1,$3}'
取字段中指定字符数量
16  001agdcdafasd
16  002agdcxxxxxx
23  001adfadfahoh
23  001fsdadggggg
得到:
16  001
16  002
23  001
23  002
awk '{print $1,substr($2,1,3)}'
awk 'BEGIN{FIELDWIDTH="2 2:3"}{print $1,$2}' a.txt
行列转换
[root@localhost ~]# cat 8.awk
name age
alice 21
ryan 30
转换得到:
name alice ryan
age 21 30
awk '
    {
      for(i=1;i<=NF;i++){
        if(!(i in arr)){
          arr[i]=$i
        } else {
            arr[i]=arr[i]" "$i
        }
      }
    }
    END{
        for(i=1;i<=NF;i++){
            print arr[i]
        }
    }
' a.txt
筛选给定时间范围内的日志
grep/sed/awk用正则去筛选日志时,如果要精确到小时、分钟、秒,则非常难以实现。
但是awk提供了mktime()函数,它可以将时间转换成epoch时间值。
# 2019-11-10 03:42:40转换成epoch
$ awk 'BEGIN{print mktime("2019 11 10 03 42 40")}'
1573328560
借此,可以取得日志中的时间字符串部分,再将它们的年、月、日、时、分、秒都取出来,然后放入mktime()构建成对应的epoch值。因为epoch值是数值,所以可以比较大小,从而决定时间的大小。
下面strptime1()实现的是将2019-11-10T03:42:40+08:00格式的字符串转换成epoch值,然后和which_time比较大小即可筛选出精确到秒的日志。
BEGIN{
# 要筛选上面时间的日志,将其时间构建成epoch值
which_time = mktime("2019 11 10 03 42 40")
}
{
# 取出日志中的日期时间字符串部分
match($0,"^.*\\[(.*)\\].*",arr)
# 将日期时间字符串转换为epoch值
tmp_time = strptime1(arr[1])
#通过比较epoch值来比较时间大小
if(tmp_time > which_time){print}
}
# 构建的时间字符串格式为:“2019-11-10T03:42:40+08:00”
function strptime1(str ,arr,Y,M,D,H,m,S) {
patsplit(str,arr,"[0-9]{1,4}")
Y=arr[1]
M=arr[2]
D=arr[3]
H=arr[4]
m=arr[5]
S=arr[6]
return mktime(sprintf("%s %s %s %s %s %s",Y,M,D,H,m,S))
}
下面strptime2()实现的是将10/Nov/2019:23:53:44+08:00格式的字符串转换成epoch值,然后和which_time比较大小即可筛选出精确到秒的日志。
BEGIN{
# 要筛选什么时间的日志,将其时间构建成epoch值
which_time = mktime("2019 11 10 03 42 40")
}
{
# 取出日志中的日期时间字符串部分
match($0,"^.*\\[(.*)\\].*",arr)
# 将日期时间字符串转换为epoch值
tmp_time = strptime2(arr[1])
# 通过比较epoch值来比较时间大小
if(tmp_time > which_time){
print
}
}
# 构建的时间字符串格式为:"10/Nov/2019:23:53:44+08:00"
function strptime2(str ,dt_str,arr,Y,M,D,H,m,S) {
dt_str = gensub("[/:+]"," ","g",str)
# dt_sr = "10 Nov 2019 23 53 44 08 00"
split(dt_str,arr," ")
Y=arr[3]
M=mon_map(arr[2])
D=arr[1]
H=arr[4]
m=arr[5]
S=arr[6]
return mktime(sprintf("%s %s %s %s %s %s",Y,M,D,H,m,S))
}
function mon_map(str ,mons){
mons["Jan"]=1
mons["Feb"]=2
mons["Mar"]=3
mons["Apr"]=4
mons["May"]=5
mons["Jun"]=6
mons["Jul"]=7
mons["Aug"]=8
mons["Sep"]=9
mons["Oct"]=10
mons["Nov"]=11
mons["Dec"]=12
return mons[str]
}


 399
399


 被折叠的 条评论
为什么被折叠?
被折叠的 条评论
为什么被折叠?
 到【灌水乐园】发言


