


目录
ref 引用
1. 什么是 ref 引用
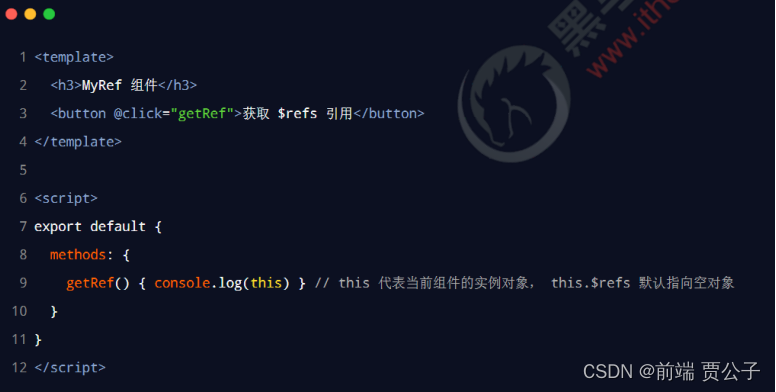
2. 使用 ref 引用 DOM 元素
如果想要使用 ref 引用页面上的 DOM 元素,则可以按照如下的方式进行操作:

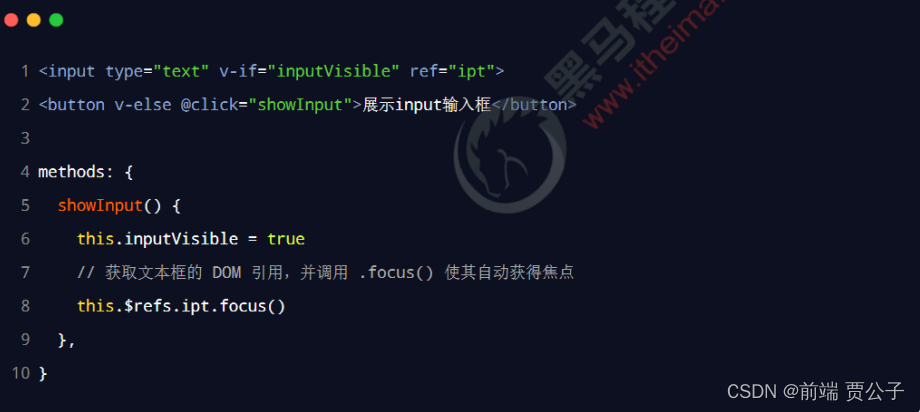
4. 控制文本框和按钮的按需切换
通过布尔值 inputVisible 来控制组件中的文本框与按钮的按需切换。示例代码如下:

5. 让文本框自动获得焦点
6. this.$nextTick(cb) 方法

动态组件
- ① <component> 是组件的占位符
- ② 通过 is 属性动态指定要渲染的组件名称
- ③ <component is="要渲染的组件的名称"></comp
2. 如何实现动态组件渲染

3. 使用 keep-alive 保持状态

插槽
1. 什么是插槽

2. 体验插槽的基础用法
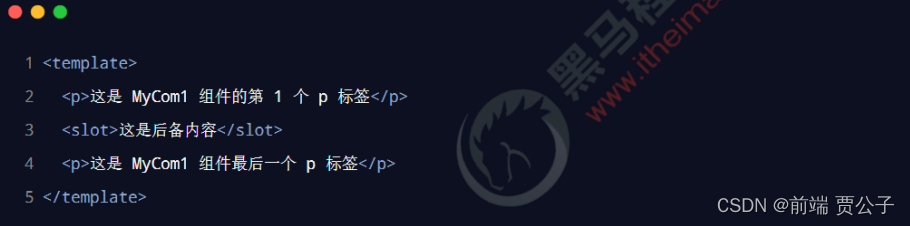
在封装组件时,可以通过 <slot> 元素定义插槽,从而为用户预留内容占位符。示例代码如下:

如果在封装组件时没有预留任何 <slot> 插槽,则用户提供的任何自定义内容都会被丢弃。

2.2 后备内容
3. 具名插槽
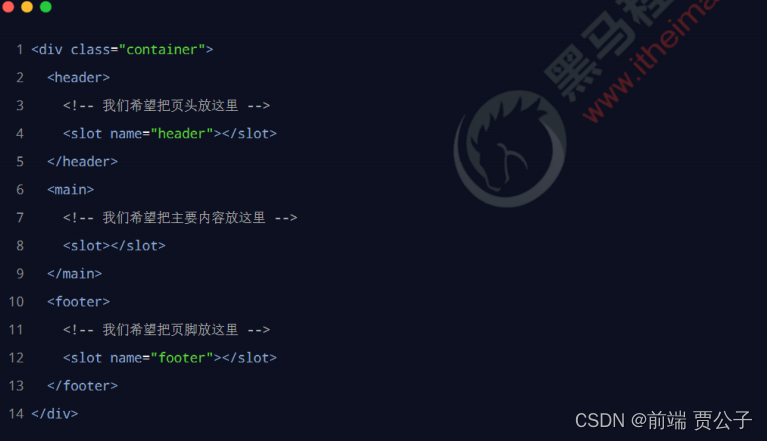
3.1 为具名插槽提供内容
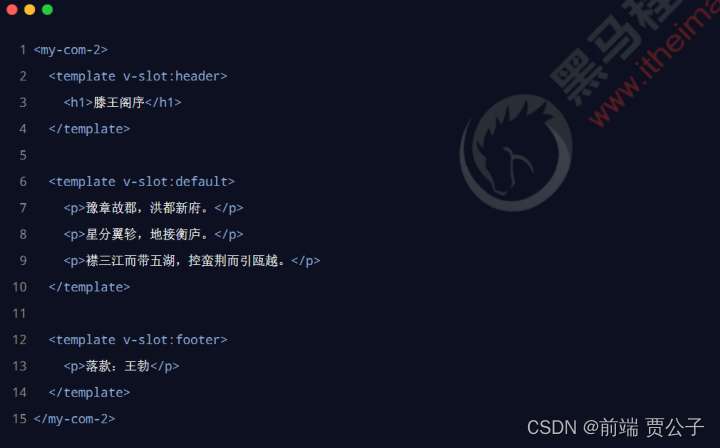
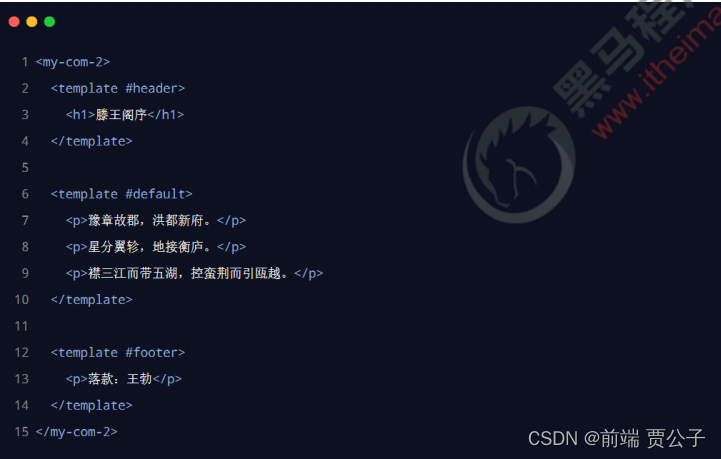
3.2 具名插槽的简写形式
4. 作用域插槽

4.1 解构作用域插槽的 Prop
作用域插槽对外提供的数据对象,可以使用解构赋值简化数据的接收过程。示例代码如下:

4.2 声明作用域插槽
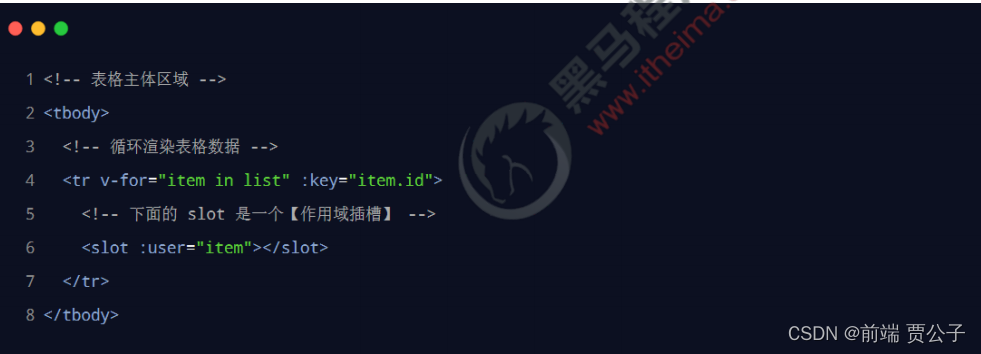
4.3 使用作用域插槽
在使用 MyTable 组件时,自定义单元格的渲染方式,并接收作用域插槽对外提供的数据

自定义指令
1. 什么是自定义指令
vue 官方提供了 v-for、v-model、v-if 等常用的内置指令。除此之外 vue 还允许开发者自定义指令
vue 中的自定义指令分为两类,分别是:私有自定义指令 ,全局自定义指令
2. 声明私有自定义指令的语法
在每个 vue 组件中,可以在 directives 节点下声明私有自定义指令。示例代码如下:

3. 使用自定义指令
在使用自定义指令时,需要加上 v- 前缀。示例代码如下:

4. 声明全局自定义指令的语法
全局共享的自定义指令需要通过“单页面应用程序的实例对象”进行声明,示例代码如下:

5. updated 函数
mounted 函数只在元素第一次插入 DOM 时被调用,当 DOM 更新时 mounted 函数不会被触发。 updated 函数会在每次 DOM 更新完成后被调用。示例代码如下:
注意:在 vue2 的项目中使用自定义指令时,【 mounted -> bind 】【 updated -> update 】

6. 函数简写
如果 mounted 和updated 函数中的逻辑完全相同,则可以简写成如下格式:

7. 指令的参数值
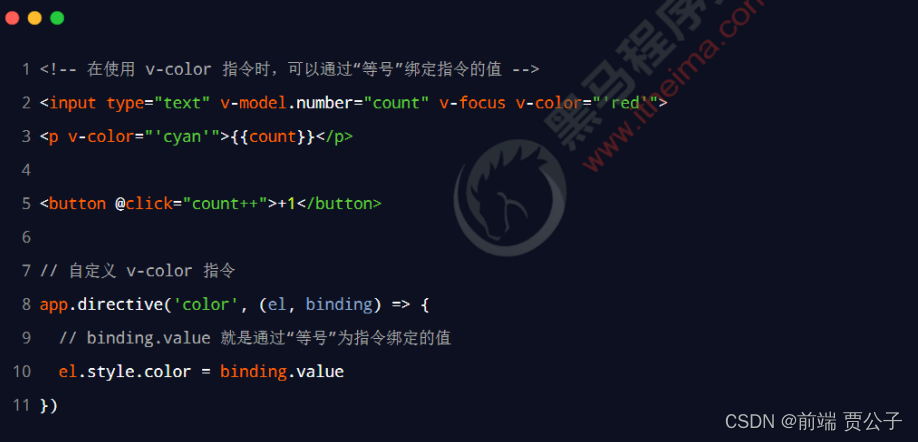
Table 案例
1. 案例效果

2. 用到的知识点
- 组件封装
- 具名插槽
- 作用域插槽
- 自定义指令
3. 实现步骤
1. 搭建项目基本结构
1.1 初始化项目
1. 在终端运行如下的命令,初始化 vite 项目:
2. cd 到项目根目录,安装依赖项:
3. 安装 less 依赖包:
4. 使用 vscode 打开项目,并在 vscode 集成的终端下运行如下的命令,把项目运行起来:
npm init vite-app table-demo
npm install
npm i less -D
npm run dev <template>
<div>
<h1>App 根组件</h1>
</div>
</template> <script>
export default {
name: 'MyApp', }
</script> <style lang="less" scoped></style>:root {
font-size: 12px; }
body {
padding: 8px; } 1234567import { createApp } from 'vue'
import App from './App.vue'
// 导入 bootstrap 样式表
import './assets/css/bootstrap.css'
import './index.css'
createApp(App).mount('#app')npm install axios@0.21.0 -S/ 1. 导入 axios
import axios from 'axios'
const app = createApp(App)
// 2. 将 axios 挂载到全局,今后,每个组件中,都可以直接通过
this.$http 代替 axios 发起 Ajax 请求
app.config.globalProperties.$http = axios
// 3. 配置请求的根路径
axios.defaults.baseURL = 'https://www.escook.cn'
app.mount('#app')data() {
return {
// 商品列表数据
goodslist: []
}
} methods: {
// 初始化商品列表的数据
async getGoodsList() {
// 发起 Ajax 请求
const { data: res } = await this.$http.get('/api/goods')
// 请求失败
if (res.status !== 0) return console.log('获取商品列表失
败!')
// 请求成功
this.goodslist = res.data
}
}created() {
this.getGoodsList()
} - 1. 用户通过名为 data 的 prop 属性,为 MyTable.vue 组件指定数据源
- 2. 在 MyTable.vue 组件中,预留名称为 header 的具名插槽
- 3. 在 MyTable.vue 组件中,预留名称为 body 的作用域插槽
3.1 创建并使用 MyTable 组件
<template>
 <div>MyTable 组件</div>
</template> <script>
export default {
 name: 'MyTable',
}
</script> <style lang="less" scoped></style>/ 导入 MyTable 组件
import MyTable from './components/my-table/MyTable.vue'
export default {
name: 'MyApp',
// ... 省略其它代码
// 注册 MyTable 组件
components: {
MyTable
}
} <template>
<div>
<h1>App 根组件</h1>
<hr />
<!-- 使用表格组件 -->
<my-table></my-table>
</div>
</template> export default {
name: 'MyTable',
props: {
// 表格的数据源
data: {
type: Array,
required: true,
default: [],
},
},
} <!-- 使用表格组件 -->
<my-table :data="goodslist"></my-table> <template>
<table class="table table-bordered table-striped">
<!-- 表格的标题区域 -->
<thead>
<tr>
<th>#</th>
<th>商品名称</th>
<th>价格</th>
<th>标签</th>
<th>操作</th>
</tr>
</thead>
<!-- 表格的主体区域 -->
<tbody></tbody>
</table>
</template><template>
<table class="table table-bordered table-striped">
<!-- 表格的标题区域 -->
<thead>
<tr>
<!-- 命名插槽 -->
<slot name="header"></slot>
</tr>
</thead>
<!-- 表格的主体区域 -->
<tbody></tbody>
</table>
</template> <!-- 使用表格组件 -->
<my-table :data="goodslist">
<!-- 表格的标题 -->
<template v-slot:header>
<th>#</th>
<th>商品名称</th>
<th>价格</th>
<th>标签</th>
<th>操作</th>
</template>
</my-table><template>
<table class="table table-bordered table-striped">
<thead>
<tr>
<slot name="header"></slot>
</tr>
</thead>
<!-- 表格的主体区域 -->
<tbody>
<!-- 使用 v-for 指令,循环渲染表格的数据行 -->
<tr v-for="(item, index) in data" :key="item.id"></tr>
</tbody>
</table>
</template>
<template>
 <table class="table table-bordered table-striped">
 <thead>
 <tr>
 <slot name="header"></slot>
 </tr>
 </thead>
 <!-- 表格的主体区域 -->
 <tbody>
 <!-- 使用 v-for 指令,循环渲染表格的数据行 -->
 <tr v-for="(item, index) in data" :key="item.id">
 <!-- 为数据行的 td 预留的插槽 -->
 <slot name="body"></slot>
 </tr>
 </tbody>
 </table>
</template> <template>
<table class="table table-bordered table-striped">
<thead>
<tr>
<slot name="header"></slot>
</tr>
</thead>
<!-- 表格的主体区域 -->
<tbody>
<!-- 使用 v-for 指令,循环渲染表格的数据行 -->
<tr v-for="(item, index) in data" :key="item.id">
<!-- 为数据行的 td 预留的“作用域插槽” -->
<slot name="body" :row="item" :index="index"></slot>
</tr>
</tbody>
</table>
</template><!-- 使用表格组件 -->
<my-table :data="goodslist">
<!-- 表格的标题 -->
<template v-slot:header>
<th>#</th>
<th>商品名称</th>
<th>价格</th>
<th>标签</th>
<th>操作</th>
</template>
<!-- 表格每行的单元格 -->
<template v-slot:body="{ row, index }">
<td>{{ index + 1 }}</td>
<td>{{ row.goods_name }}</td>
<td>¥{{ row.goods_price }}</td>
<td>{{ row.tags }}</td>
<td>
<button type="button" class="btn btn-danger btn-sm">删除
</button>
</td>
</template>
</my-table> <td>
<button type="button" class="btn btn-danger btn-sm"
@click="onRemove(row.id)">删除</button>
</td> 123methods: {
// 根据 Id 删除商品信息
onRemove(id) {
this.goodslist = this.goodslist.filter(x => x.id !== id)
},
}<td>
<span class="badge badge-warning ml-2" v-for="item in row.tags"
:key="item">{{tag}}</span>
</td> <td>
<!-- 基于当前行的 inputVisible,来控制 input 和 button 的按需展
示-->
<input type="text" class="form-control form-control-sm ipt-tag"
v-if="row.inputVisible">
<button type="button" class="btn btn-primary btn-sm" velse>+Tag</button>
<span class="badge badge-warning ml-2" v-for="item in row.tags"
:key="item">{{item}}</span>
</td> <td>
<!-- 基于当前行的 inputVisible,来控制 input 和 button 的按需展
示-->
<input type="text" class="form-control form-control-sm ipt-tag"
v-if="row.inputVisible" />
<button type="button" class="btn btn-primary btn-sm" v-else
@click="row.inputVisible = true">+Tag</button>
<span class="badge badge-warning ml-2" v-for="item in row.tags"
:key="item">{{item}}</span>
</td> directives: {
// 封装自动获得焦点的指令
focus(el) {
el.focus()
},
}<input type="text" class="form-control ipt-tag form-control-sm" vif="row.inputVisible" v-focus />
<input
 type="text"
 class="form-control ipt-tag form-control-sm"
 v-if="row.inputVisible"
 v-focus
 v-model.trim="row.inputValue"
/>
<input
 type="text"
 class="form-control ipt-tag form-control-sm"
 v-if="row.inputVisible"
 v-focus
 v-model.trim="row.inputValue"
 @blur="onInputConfirm(row)"
/>
onInputConfirm(row) {
 // 1. 把用户在文本框中输入的值,预先转存到常量 val 中
 const val = row.inputValue
 // 2. 清空文本框的值
 row.inputValue = ''
 // 3. 隐藏文本框
 row.inputVisible = false
} onInputConfirm(row) {
// 把用户在文本框中输入的值,预先转存到常量 val 中
const val = row.inputValue
// 清空文本框的值
row.inputValue = ''
// 隐藏文本框
row.inputVisible = false
// 1.1 判断 val 的值是否为空,如果为空,则不进行添加
// 1.2 判断 val 的值是否已存在于 tags 数组中,防止重复添加
if (!val || row.tags.indexOf(val) !== -1) return
// 2. 将用户输入的内容,作为新标签 push 到当前行的 tags 数组中
row.tags.push(val) }<input
type="text"
class="form-control ipt-tag form-control-sm"
v-if="row.inputVisible"
v-focus
v-model.trim="row.inputValue"
@blur="onInputConfirm(row)"
@keyup.enter="onInputConfirm(row)"
/>
<input
 type="text"
 class="form-control ipt-tag form-control-sm"
 v-if="row.inputVisible"
 v-focus
 v-model.trim="row.inputValue"
 @blur="onInputConfirm(row)"
 @keyup.enter="onInputConfirm(row)"
 @keyup.esc="row.inputValue = ''"
/>
总结
①能够知道如何使用 ref 引用 DOM 和组件实例
通过 ref 属性指定引用的名称、使用 this.$refs 访问引用实例
② 能够知道 $nextTick 的调用时机
组件的 DOM 更新之后,才执行 $nextTick 中的回调
③ 能够说出 keep-alive 元素的作用
持动态组件的状态
④ 能够掌握插槽的基本用法
<slot> 标签、具名插槽、作用域插槽、v-slot: 简写为 #
⑤ 能够知道如何自定义指令
私有自定义指令、全局自定义指令


 2697
2697

 被折叠的 条评论
为什么被折叠?
被折叠的 条评论
为什么被折叠?
 到【灌水乐园】发言


