现有两种方式实现Spring事务管理操作,一种是编程式事务管理和声明式事务管理,由于编程式事务管理的操作较为繁琐,故一般选择声明式事务管理。而声明式事务管理又有基于注解方式和基于XML配置文件方式。
注解声明式管理
首先,需要再配置文件中配置事务管理器,引入名称空间tx和开启事务注解:
<?xml version="1.0" encoding="UTF-8"?>
<beans xmlns="http://www.springframework.org/schema/beans"
       xmlns:xsi="http://www.w3.org/2001/XMLSchema-instance"
       xmlns:context="http://www.springframework.org/schema/context"
       xmlns:aop="http://www.springframework.org/schema/aop"
       xmlns:tx="http://www.springframework.org/schema/tx"
       xsi:schemaLocation="http://www.springframework.org/schema/beans http://www.springframework.org/schema/beans/spring-beans.xsd
http://www.springframework.org/schema/context http://www.springframework.org/schema/context/spring-context.xsd
http://www.springframework.org/schema/aop http://www.springframework.org/schema/aop/spring-aop.xsd
http://www.springframework.org/schema/tx http://www.springframework.org/schema/tx/spring-tx.xsd">

    <!--开启扫描-->
    <context:component-scan base-package="com.spring.sql"></context:component-scan>

    <!-- 开启Aspect生成代理对象-->
   <!-- <aop:aspectj-autoproxy></aop:aspectj-autoproxy> -->

    <bean id="dataSource" class="com.alibaba.druid.pool.DruidDataSource"
          destroy-method="close">
        <property name="url" value="jdbc:mysql://localhost:3306/test?serverTimezone=Asia/Shanghai" />
        <property name="username" value="root" />
        <property name="password" value="86110101" />
        <property name="driverClassName" value="com.mysql.cj.jdbc.Driver" />
    </bean>
    <!-- JdbcTemplate 对象 -->
    <bean id="jdbcTemplate" class="org.springframework.jdbc.core.JdbcTemplate">
        <!--注入 dataSource-->
        <property name="dataSource" ref="dataSource"></property>
    </bean>

    <!--创建事务管理器-->
    <bean id="transactionManager" class="org.springframework.jdbc.datasource.DataSourceTransactionManager">
        <property name="dataSource" ref="dataSource"></property>
    </bean>

    <!--开启事务注解-->
    <tx:annotation-driven transaction-manager="transactionManager"></tx:annotation-driven>
</beans>
然后在 service 类上面(或者 service 类里面方法上面)添加事务注解:
(1)@Transactional,这个注解添加到类上面,也可以添加方法上面
(2)如果把这个注解添加类上面,这个类里面所有的方法都添加事务
(3)如果把这个注解添加方法上面,为这个方法添加事务
一个简单的案例:
@Component
public class Usermy {
    private String user;
    private String password;

    private int balance;

    public int getBalance() {
        return balance;
    }

    public void setBalance(int balance) {
        this.balance = balance;
    }

    public void setUser(String user) {
        this.user = user;
    }

    public void setPassword(String password) {
        this.password = password;
    }

    public String getUser() {
        return user;
    }

    public String getPassword() {
        return password;
    }
}
@Component
public class Usermyimpl{
@Autowired
private JdbcTemplate jdbcTemplate;
public void add(Usermy um) {
//1 创建 sql 语句
String sql = "insert into user_table values(?,?,?)";
//2 调用方法实现
Object[] args = { um.getUser(),um.getPassword(),um.getBalance()};
int update = jdbcTemplate.update(sql,args);
System.out.println(update);
}
public void addbalance(){
String sql="update user_table set balance=balance+? where user=?";
jdbcTemplate.update(sql,500,"AA");
}
public void delebalance(){
String sql="update user_table set balance=balance-? where user=?";
jdbcTemplate.update(sql,500,"BB");
}
}@Component
@Transactional
public class UserService {
@Autowired
private Usermyimpl usermyimpl;
public void addUS(Usermy um){
usermyimpl.add(um);
}
public void Bal(){ usermyimpl.addbalance();
int i=10/0;//这是手动模拟异常,正常测试可以将这行注释掉
usermyimpl.delebalance();}
}就有测试代码:
ApplicationContext context=new ClassPathXmlApplicationContext("bean1.xml");
        UserService us = context.getBean("userService", UserService.class);
        us.Bal();
在添加注解@Transactional可以在注解中配置注解相关参数.
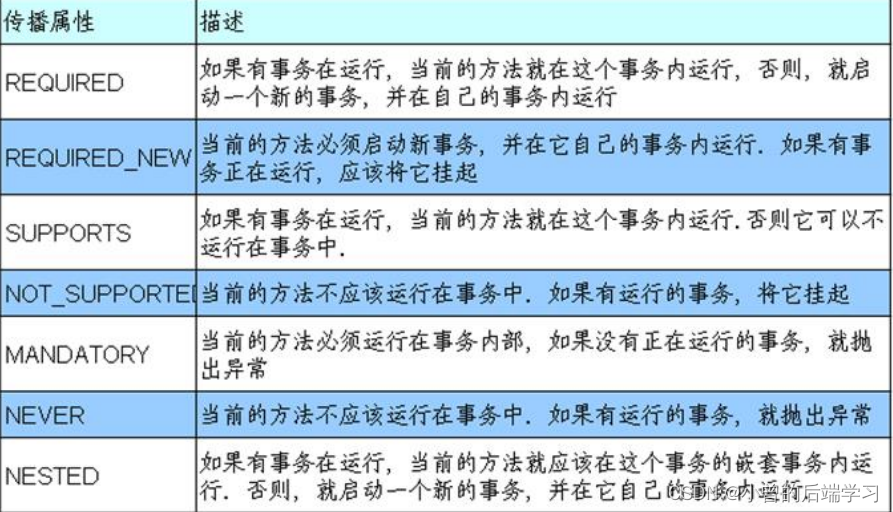
参数propagation:事务传播行为
事务传播行为由传播属性决定,而传播属性分为七类:
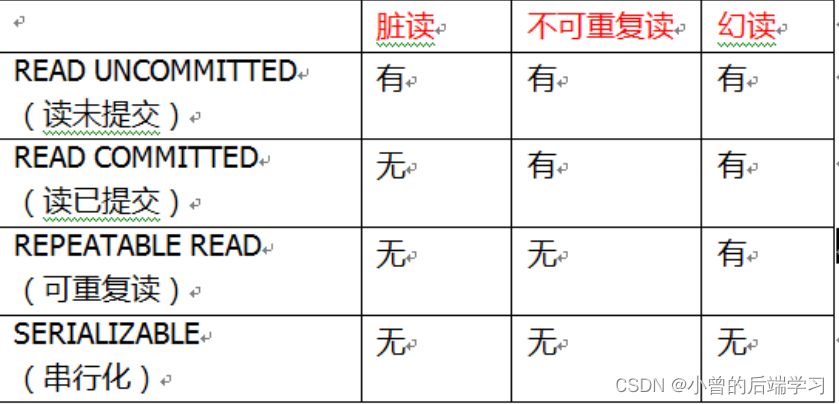
参数ioslation:事务隔离级别
我曾专门写了一篇来介绍事务的隔离级别,我就在这再重复一遍。
(1)事务有特性成为隔离性,多事务操作之间不会产生影响。不考虑隔离性产生很多问题
(2)有三个读问题:脏读、不可重复读、虚(幻)读
(3)脏读:一个未提交事务读取到另一个未提交事务的数据
(4)不可重复读:一个未提交事务读取到另一提交事务修改数据
(5)幻读:一个未提交事务读取到另一提交事务添加数据
不可重复读和幻读的区别在于一个对于一行数据,一个是对应一个范围内的数据。
我们可以通过设立事务隔离级别解决读问题:
参数timeout:超时时间
(1)事务需要在一定时间内进行提交,如果不提交进行回滚。
(2)默认值是 -1 ,设置时间以秒单位进行计算。
参数readOnly:是否只读
(1)读:查询操作,写:添加修改删除操作。
(2)readOnly 默认值 false,表示可以查询,可以添加修改删除操作。
(3)设置 readOnly 值是 true,设置成 true 之后,只能查询。
参数rollbackFor:回滚
(1)设置出现哪些异常进行事务回滚。
参数noRollbackFor:不回滚
(1)设置出现哪些异常不进行事务回滚 。
XML式事务管理
在 spring 配置文件中进行配置:
第一步 配置事务管理器
第二步 配置通知
第三步 配置切入点和切面
接下来就是配置文件:
<?xml version="1.0" encoding="UTF-8"?>
<beans xmlns="http://www.springframework.org/schema/beans"
       xmlns:xsi="http://www.w3.org/2001/XMLSchema-instance"
       xmlns:context="http://www.springframework.org/schema/context"
       xmlns:aop="http://www.springframework.org/schema/aop"
       xmlns:tx="http://www.springframework.org/schema/tx"
       xsi:schemaLocation="http://www.springframework.org/schema/beans http://www.springframework.org/schema/beans/spring-beans.xsd
http://www.springframework.org/schema/context http://www.springframework.org/schema/context/spring-context.xsd
http://www.springframework.org/schema/aop http://www.springframework.org/schema/aop/spring-aop.xsd
http://www.springframework.org/schema/tx http://www.springframework.org/schema/tx/spring-tx.xsd">

    <!--开启扫描-->
    <context:component-scan base-package="com.spring.sql"></context:component-scan>

    <!-- 开启Aspect生成代理对象-->
    <!-- <aop:aspectj-autoproxy></aop:aspectj-autoproxy> -->

    <bean id="dataSource" class="com.alibaba.druid.pool.DruidDataSource"
          destroy-method="close">
        <property name="url" value="jdbc:mysql://localhost:3306/test?serverTimezone=Asia/Shanghai" />
        <property name="username" value="root" />
        <property name="password" value="86110101" />
        <property name="driverClassName" value="com.mysql.cj.jdbc.Driver" />
    </bean>
    <!-- JdbcTemplate 对象 -->
    <bean id="jdbcTemplate" class="org.springframework.jdbc.core.JdbcTemplate">
        <!--注入 dataSource-->
        <property name="dataSource" ref="dataSource"></property>
    </bean>

    <!--创建事务管理器-->
    <bean id="transactionManager" class="org.springframework.jdbc.datasource.DataSourceTransactionManager">
        <property name="dataSource" ref="dataSource"></property>
    </bean>

    <!--2 配置通知-->
    <tx:advice id="txadvice">
        <!--配置事务参数-->
        <tx:attributes>
            <!--指定哪种规则的方法上面添加事务-->
            <tx:method name="Bal" propagation="REQUIRED"/>
            <!--<tx:method name="account*"/>-->
        </tx:attributes>
    </tx:advice>

    <!--3 配置切入点和切面-->
    <aop:config>
        <!--配置切入点-->
        <aop:pointcut id="pt" expression="execution(*
com.spring.sql.UserService.*(..))"/>
        <!--配置切面-->
        <aop:advisor advice-ref="txadvice" pointcut-ref="pt"/>
    </aop:config>

</beans>
就有测试代码:
        ApplicationContext context=new ClassPathXmlApplicationContext("bean2.xml");
        UserService us = context.getBean("userService", UserService.class);
        us.Bal();


 1万+
1万+


 被折叠的 条评论
为什么被折叠?


