


VC++实现若干种图像滤波技术
获取源工程可访问gitee可在此工程的基础上进行学习。
文章目录
实验内容
实验要求:
A部分:
(1)使用VC++设计程序:对一幅256级灰度图像,使用邻域平均平滑算法进行滤波。
(2)使用VC++设计程序:对一幅256级灰度图像,使用中值滤波算法进行滤波。
(3)使用VC++设计程序:对一幅256级灰度图像,使用K近邻均值滤波器(KNNF)进行滤波。
邻域平均平滑算法
1. 原理
邻域平均平滑算法是一种简单的图像平滑处理方法,它通过将每个像素的灰度值替换为其邻域内像素灰度值的平均值来实现。对于256级灰度图像,以下是一种简单的邻域平均平滑算法的步骤:
1.选择滤波器的大小: 确定邻域的大小,例如选择3x3或5x5的滤波器。
2.遍历图像像素: 对于图像中的每个像素,将其与邻域内的像素进行平均。
3.计算邻域平均值: 对于每个像素,计算邻域内像素的平均值。邻域可以是以该像素为中心的正方形区域,根据滤波器大小确定。
4.更新像素值: 将该像素的值替换为邻域平均值。
2. 实验代码
void CImageProcessingView::OnEnhanceDenoiseAverage()
{
 // 实验 图像平滑 256级灰度图像 邻域平均滤波

 // 获得当前文档对象
    CImageProcessingDoc* pDoc = GetDocument();
 if( pDoc->m_pDibInit->IsEmpty() )
 {
  MessageBox("图像未加载");
  return;
 }

 // 获得图像的基本信息
 int width = pDoc->m_pDibInit->GetWidth();
 int height = pDoc->m_pDibInit->GetHeight();
 int bitCount = pDoc->m_pDibInit->GetBitCount();
 // 程序只支持处理灰度图像
 if( bitCount!=8 )
 {
  MessageBox("目前只支持256级灰度图像");
  return;
 }
 // 将图像信息复制至 m_pDibTest
 pDoc->m_pDibTest->CloneDib(pDoc->m_pDibInit);
 // 设置去噪模板,这里使用一个3×3的去噪模板
 double templateDenoise[100] =
  {1, 1, 1,
   1, 2, 1,
   1, 1, 1};
 int templateWidth = 3;
 int templateHeight = 3;
 int templateElementCnt = templateWidth*templateHeight;
 double sum1 = 0;

 // 归一化模板元素的值
 int i;
 for(i=0; i<templateElementCnt; i++)
  sum1 += templateDenoise[i];
 for(i=0; i<templateElementCnt; i++)
  templateDenoise[i] = templateDenoise[i]/sum1;

 // 定义临时变量
 int j,m,n;
 BYTE gray;
 double value1;

 // 对图像里面的每一个像素进行 邻域
 // 为了方便,这里没有处理边界点
 for(i=templateWidth/2; i<pDoc->m_pDibInit->m_lpBMIH->biWidth-templateWidth/2; i++)
 {
  for(j=templateHeight/2; j<pDoc->m_pDibInit->m_lpBMIH->biWidth-templateHeight/2; j++)
  {
   // 当前的像素点是 (i, j) 。
   // 计算以 (i, j) 为中心,templateWidth为宽度,templateHeight为高度的矩形区域内,个个像素点颜色值的加权和。
   // 因为现在处理的是256色灰度图像,所以在 RGBQUAD结构中,Red、Green、Blue三个分量的值都肯定是相等的,
   // 所以只要处理Red分量,算出的结果也适用于Green分量和Blue分量
   value1 = 0;

   for(m=0; m<templateWidth; m++)
   {
    for(n=0; n<templateHeight; n++)
    {
     gray = pDoc->m_pDibInit->GetPixelGray(i-templateWidth/2+m, j-templateHeight/2+n);

     value1 += gray * templateDenoise[n*templateWidth+m];
    }
   }
   pDoc->m_pDibTest->SetPixelGray(i, j, value1);
  }
 }
 // 交换指针
 CDib* pTmpDib = pDoc->m_pDibTest;
 pDoc->m_pDibTest = pDoc->m_pDibInit;
 pDoc->m_pDibInit = pTmpDib;
 // 设置脏标记
 pDoc->SetModifiedFlag(TRUE);
 // 更新视图
 pDoc->UpdateAllViews(NULL);
}
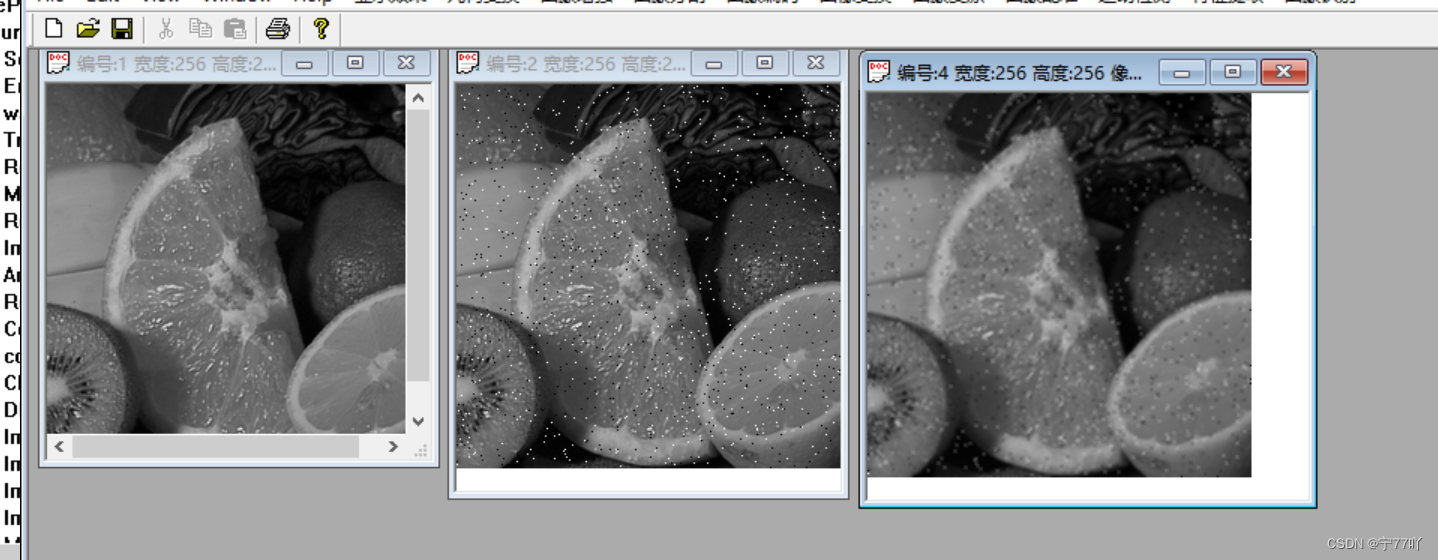
3. 实验现象
左:灰度图原图
中:图片加入椒盐噪声
右:邻域平均平滑
中值滤波算法
1. 原理
中值滤波是一种非线性滤波算法,其原理是用窗口中像素的中值替代窗口中心像素的灰度值。这种方法对去除椒盐噪声(Salt-and-Pepper Noise)等脉冲性噪声效果较好。
中值滤波的基本步骤如下:
-
选择滤波器大小: 定义一个窗口,通常是正方形,大小为 n × n n \times n n×n,其中 n n n 为奇数,例如 3x3 或 5x5。
-
遍历图像像素: 对于图像中的每个像素,以其为中心取一个 n × n n \times n n×n的窗口。
-
排序窗口内像素值: 将窗口内的像素值按灰度值进行排序,找到中间值。
-
更新像素值: 将该像素的值替换为窗口内像素值的中值。
这样,通过用窗口内像素的中值替代中心像素,可以有效地去除椒盐噪声等离群值,同时保留图像的边缘信息。
中值滤波相对于线性滤波,尤其是在存在脉冲性噪声的情况下,具有更好的去噪效果。然而,中值滤波也会导致图像细节的模糊,因此在应用中需要权衡滤波效果和细节保留。
2. 实验代码
void CImageProcessingView::OnEnhanceDenoiseMedian()
{
 // 实验 图像平滑 256级灰度图像 中值滤波
 // 参考 CImageProcessingView::OnEnhanceDenoiseAverage()
 //MessageBox("请在这里设计 256级灰度图像 中值滤波 算法");

 // 获得当前文档对象
    CImageProcessingDoc* pDoc = GetDocument();
 if( pDoc->m_pDibInit->IsEmpty() )
 {
  MessageBox("图像未加载");
  return;
 }

 // 获得图像的基本信息
 int width = pDoc->m_pDibInit->GetWidth();
 int height = pDoc->m_pDibInit->GetHeight();
 int bitCount = pDoc->m_pDibInit->GetBitCount();

 // 程序只支持处理灰度图像
 if( bitCount!=8 )
 {
  MessageBox("目前只支持256级灰度图像");
  return;
 }

 // 将图像信息复制至 m_pDibTest
 pDoc->m_pDibTest->CloneDib(pDoc->m_pDibInit);

 int i,j,m,n;
 BYTE grays[100];
 int graysSize = 100;
 int templateWidth = 3;
 int templateHeight = 3;
 int templateElementCnt = templateWidth*templateHeight;
 BYTE tempByte1;


 for(i=templateWidth/2; i<pDoc->m_pDibInit->m_lpBMIH->biWidth-templateWidth/2; i++)
 {
  for(j=templateHeight/2; j<pDoc->m_pDibInit->m_lpBMIH->biWidth-templateHeight/2; j++)
  {
   memset(grays, 0, graysSize*sizeof(BYTE));

   for(n=0; n<templateHeight; n++)
   {
    for(m=0; m<templateWidth; m++)
    {
     grays[n*templateWidth+m] = pDoc->m_pDibInit->GetPixelGray(i-templateWidth/2+m, j-templateHeight/2+n);
    }
   }

   for(m=0; m<templateElementCnt-1; m++)
   {
    for(n=m+1; n<templateElementCnt; n++)
    {
     if( grays[m]>grays[n] )
     {
      tempByte1 = grays[m];
      grays[m] = grays[n];
      grays[n] = tempByte1;
     }
    }
   }

   pDoc->m_pDibTest->SetPixelGray(i, j, grays[templateElementCnt/2]);
  }
 }

 // 交换指针
 CDib* pTmpDib = pDoc->m_pDibTest;
 pDoc->m_pDibTest = pDoc->m_pDibInit;
 pDoc->m_pDibInit = pTmpDib;

 // 设置脏标记
 pDoc->SetModifiedFlag(TRUE);

 // 更新视图
 pDoc->UpdateAllViews(NULL);
}
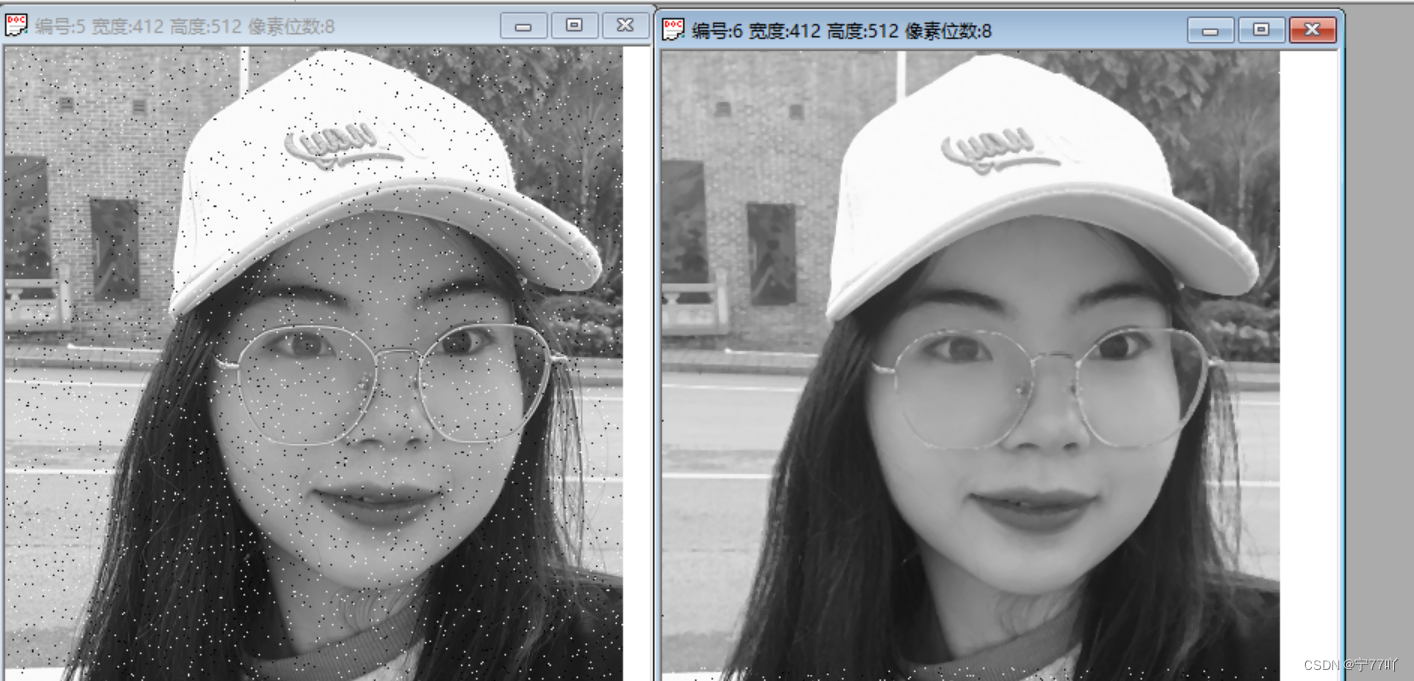
3.实验现象
左:添加椒盐噪声的灰度图像
右:使用中值滤波后
K近邻均值滤波算法(KNNF)
1. 原理
K近邻均值滤波(KNNF)是一种非线性滤波算法,它通过计算像素点周围的K个邻居的平均值来实现图像平滑。相比于传统的平均滤波,KNNF更加灵活,能够在一定程度上保留图像的边缘信息。
KNNF的基本步骤如下:
-
选择邻居数量 K K K 和滤波器大小: 确定每个像素点周围邻居的数量 K K K,同时选择一个滤波器的大小,通常是一个 n × n n \times n n×n 的窗口,其中 n n n 为奇数。
-
遍历图像像素: 对于图像中的每个像素,以其为中心取一个 n × n n \times n n×n 的窗口。
-
计算邻居的平均值: 计算窗口内邻居的平均值。
-
更新像素值: 将该像素的值替换为邻居的平均值。
这种滤波方法能够在一定程度上去除图像中的噪声,同时保留图像的整体结构和边缘信息。
在实现中,可以通过计算像素点间的距离来确定邻居,选择距离最近的K个像素进行平均。这个方法在一定程度上能够提高滤波的效果。
2. 实验代码
int i,j,m,n;
 BYTE grays[100];
 int graysSize = 100;
 int templateWidth = 3;
 int templateHeight = 3;
 int templateElementCnt = templateWidth*templateHeight;
 BYTE tempByte1;
 int kNN = 3;

 for(i=templateWidth/2; i<pDoc->m_pDibInit->m_lpBMIH->biWidth-templateWidth/2; i++)
 {
  for(j=templateHeight/2; j<pDoc->m_pDibInit->m_lpBMIH->biWidth-templateHeight/2; j++)
  {
   memset(grays, 0, graysSize*sizeof(BYTE));

   for(n=0; n<templateHeight; n++)
   {
    for(m=0; m<templateWidth; m++)
    {
     grays[n*templateWidth+m] = pDoc->m_pDibInit->GetPixelGray(i-templateWidth/2+m, j-templateHeight/2+n);
    }
   }

   BYTE centerGray = pDoc->m_pDibInit->GetPixelGray(i, j);

   for(m=0; m<templateElementCnt-1; m++)
   {
    for(n=m+1; n<templateElementCnt; n++)
    {
     if( abs(grays[m]-centerGray) > abs(grays[n]-centerGray) )
     {
      tempByte1 = grays[m];
      grays[m] = grays[n];
      grays[n] = tempByte1;
     }
    }
   }

   double avgGray = 0;
   for(m=0; m<kNN; m++)
   {
    avgGray += grays[m];
   }
   avgGray /= kNN;

   pDoc->m_pDibTest->SetPixelGray(i, j, avgGray);
  }
 }
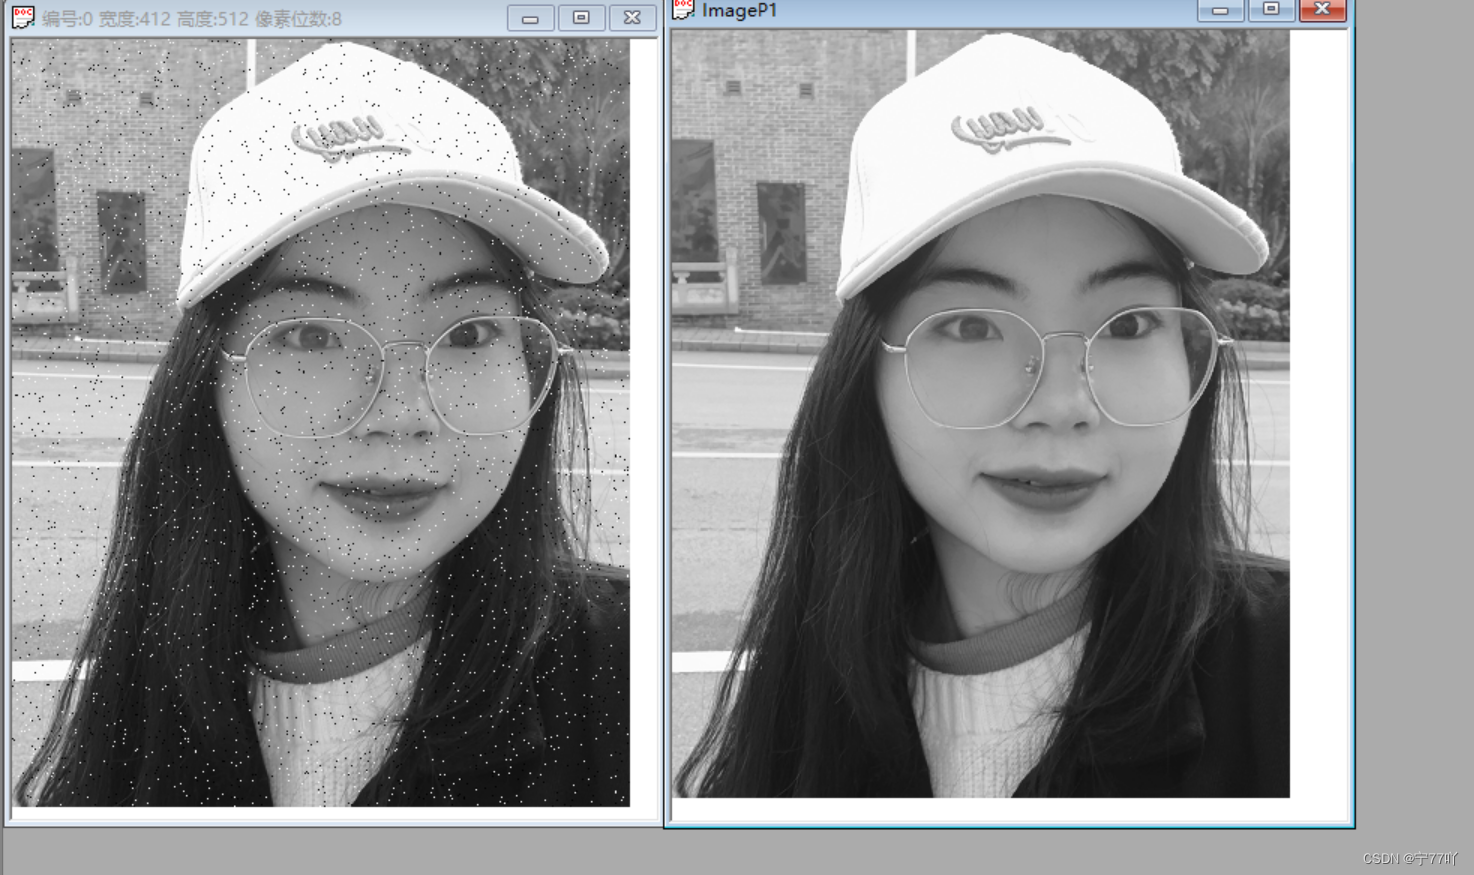
实验现象


 6040
6040


 被折叠的 条评论
为什么被折叠?
被折叠的 条评论
为什么被折叠?
 到【灌水乐园】发言


