


Java中常用的框架:
- SSM三大框架:Spring + SpringMVC + MyBatis
- SpringBoot
- SpringCloud等
框架其实就是对通用代码的封装,提前写好的一些接口和类,我们可以再做项目的时候直接引入这些接口和类(引入框架),基于这些现有的接口和类进行开发,可以提高我们的开发效率
MyBatis框架特点:
- ⽀持定制化 SQL、存储过程、基本映射以及⾼级映射
- 避免了⼏乎所有的 JDBC 代码中⼿动设置参数以及获取结果集
- ⽀持XML开发,也⽀持注解式开发。【为了保证sql语句的灵活,所以mybatis⼤部分是采⽤XML⽅式开发。】
- 将接⼝和 Java 的 POJOs(Plain Ordinary Java Object,简单普通的Java对象)映射成数据库中的记录
一、MyBatis概述
Mybatis是一款优秀的半自动的ORM持久层框架(用于简化JDBC开发),它几乎避免了所有的 JDBC 代码手动设置参数以及手动获取结果集的操作,并对JDBC中的接口(Connection)做的轻量级的封装,对外提供了操作(本质上就是对JDBC的封装,通过MyBatis完成CRUD)
ORM(Object Relation Mapping):对象关系映射。它支持动态 SQL(可以在sql中进行逻辑处理) 以及数据缓存。其中对象指的是Java对象,关系指的是数据库中的关系模型,对象关系映射,指的就是在Java对象和数据库的关系模型之间建立一种对应关系
半自动:因为MyBatis需要手动编写SQL语句,而全自动的ORM框架,如Hibernate,它不需要手动编写SQL语句,SQL语句可以自动生成。但是由于MyBatis需要手写SQL语句,所以它有较高的灵活性进行多表操作,可以根据需要,自由地对SQL进行定制,也因为要手写SQL,当要切换数据库时,SQL语句可能就要重写,因为不同的数据库有不同的语言,所以MyBatis的数据库无关性低。虽然MyBatis需要手写SQL,但相比JDBC,它提供了输入映射和输出映射,可以方便地进行SQL参数设置,以及结果集封装。并且还提供了关联查询和动态SQL等功能,极大地提升了开发的效率。
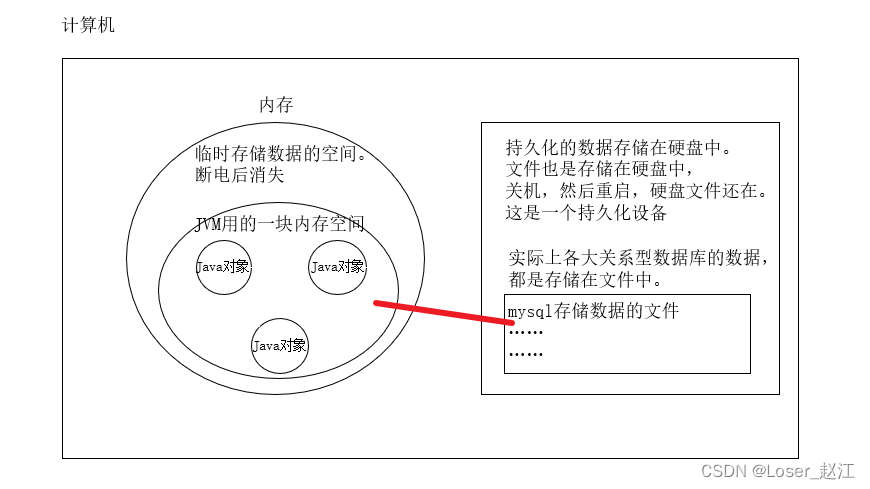
MyBatis架构模型

二、MyBatis环境搭建
这里只粗略写出主要的局部
2.1、创建mybatis项目
2.2、添加相关依赖
<?xml version="1.0" encoding="UTF-8"?>
<project xmlns="http://maven.apache.org/POM/4.0.0"
         xmlns:xsi="http://www.w3.org/2001/XMLSchema-instance"
         xsi:schemaLocation="http://maven.apache.org/POM/4.0.0 http://maven.apache.org/xsd/maven-4.0.0.xsd">
    <modelVersion>4.0.0</modelVersion>

    <groupId>org.example</groupId>
    <artifactId>mybatis_02</artifactId>
    <version>1.0-SNAPSHOT</version>
    <dependencies>
        <!--mybatis依赖-->
        <dependency>
            <groupId>org.mybatis</groupId>
            <artifactId>mybatis</artifactId>
            <version>3.5.10</version>
        </dependency>
        <!--引入logback的依赖,这个日子框架实现了slf4j规范-->
        <dependency>
            <groupId>ch.qos.logback</groupId>
            <artifactId>logback-classic</artifactId>
            <version>1.2.11</version>
            <scope>test</scope>
        </dependency>
        <!--mysql-->
        <dependency>
            <groupId>mysql</groupId>
            <artifactId>mysql-connector-java</artifactId>
            <version>8.0.30</version>
        </dependency>
        <!--junit-->
        <dependency>
            <groupId>junit</groupId>
            <artifactId>junit</artifactId>
            <version>4.13.2</version>
            <scope>compile</scope>
        </dependency>
    </dependencies>

    <properties>
        <maven.compiler.source>17</maven.compiler.source>
        <maven.compiler.target>17</maven.compiler.target>
        <project.build.sourceEncoding>UTF-8</project.build.sourceEncoding>
    </properties>

</project>
2,3。创建pojo、util、test测试类、mapper接口类
-
pojo包:普通的java类
数据库表当中的字段和pojo类的属性一 一对应(建议使用包装类,这样可以避免放置null的问题) -
mapper包:相当于dao
一般使用mybatis的话,一般不叫DAO了,一般都是XxxMapper
其中主要创建的是在Mapper映射的接口类 -
util包:工具包,其中主要创建的是一些工具类性质的java封装类
主要编程的是一些静态方法
2.4、创建MyBatis全局配置文件
<?xml version="1.0" encoding="UTF-8" ?>
<!DOCTYPE configuration
        PUBLIC "-//mybatis.org//DTD Config 3.0//EN"
        "https://mybatis.org/dtd/mybatis-3-config.dtd">

<configuration>
    <environments default="development">
        <environment id="development">
            <transactionManager type="JDBC"/>
            <dataSource type="POOLED">
                <property name="driver" value=""/>
                <property name="url" value=""/>
                <property name="username" value=""/>
                <property name="password" value=""/>
            </dataSource>
        </environment>
    </environments>
</configuration>
2.5、创建sql映射
<?xml version="1.0" encoding="UTF-8" ?>
<!DOCTYPE mapper
        PUBLIC "-//mybatis.org//DTD Mapper 3.0//EN"
        "https://mybatis.org/dtd/mybatis-3-mapper.dtd">

<mapper namespace="接口地址">
    定义sql语句
</mapper>
2.6、定义接口
2.7、测试MyBatis
(1) 读取配置文件
Reader reader = Resources.getResourceAsReader(“mybatis-config.xml”);
(2)创建SqlSessionFactory
SqlSessionFactory sessionFactory = new SqlSessionFactoryBuilder().build(reader);
(3)创建SqlSession
SqlSession sqlSession = sessionFactory.openSession();
(4)获得接口代理对象
sqlSession.getMapper(接口.class);
sqlSession .close();关闭
2.8、API接口说明
三、 配置解析

3.1、事务管理器(transactionManager)
MyBatis中提供了两种事务管理机制:
- 第一种:JDBC业务管理器(MyBatis框架自己管理事务,自己采用原生的JDBC代码去管理事务)
“<transactionManager type="JDBC"/>”
- 第二种:MANAGED事务管理器(MyBatis不再负责事务的管理了,事务管理交给其他容器来负责管理。例如:Spring)
“<transactionManager type="MANAGED"/>”
3.2、环境配置(environments)
MyBatis 可以配置成适应多种环境,这种机制有助于将 SQL 映射应用于多种数据库之中, 现实情况下有多种理由需要这么做。例如,开发、测试和生产环境需要有不同的配置;或者想在具有相同 Schema 的多个生产数据库中使用相同的 SQL 映射。但是:尽管可以配置多个环境,但每个 SqlSessionFactory 实例只能选择一种环境。所以,若想连接两个数据库,就需要创建两个 SqlSessionFactory 实例,每个数据库对应一个。而如果是三个数据库,就需要三个实例,依此类推
// 官网文档给出
SqlSessionFactory factory = new SqlSessionFactoryBuilder().build(reader, environment);
SqlSessionFactory factory = new SqlSessionFactoryBuilder().build(reader, environment, properties);
// 实例
SqlSessionFactory factory = sqlSessionFactoryBuilder.build(Resources.getResourceAsReader("路径.xml"));
SqlSessionFactory factory1 = sqlSessionFactoryBuilder.build(Resources.getResourceAsReader("路径.xml"),"powernodeDB");
<environments default="developmentDB">
  <!--mybatis的一个环境 mybatis-->
  <environment id="developmentDB">
    <transactionManager type="JDBC"/>
    <dataSource type="POOLED">
      <property name="driver" value="${driver}"/>
      <property name="url" value="${url}"/>
      <property name="username" value="${username}"/>
      <property name="password" value="${password}"/>
    </dataSource>
  </environment>

  <!--mybatis的另外一个环境 mybatis-->
  <environment id="mybatisDB">
    <transactionManager type="JDBC"/>
    <dataSource type="POOLED">
       <property name="driver" value="${driver}"/>
       <property name="url" value="${url}"/>
       <property name="username" value="${username}"/>
       <property name="password" value="${password"/>
       </dataSource>
   </environment>
</environments>
注意一些关键点:
- 默认使用的环境 ID(比如:default=“development”)。
default标识默认使用的环境
默认环境:就是使用mybatis创建SqlsessionFctory对象的时候,没有指定环境的时候,默认使用的环境 - 每个 environment 元素定义的环境 ID(比如:id=“development”)。
一般一个数据库对应一个 SqlsessionFactory
一个环境environment 会对应一个SqlsessionFactory对象 - 默认环境和环境 ID 顾名思义。 环境可以随意命名,但务必保证默认的环境 ID 要匹配其中一个环境 ID。
3.3、属性(properties)
properties属性可以在外部进行配置,并可以进行动态替换
(1)、第一种写法:
<!--java.util.Properties类,是一个Map集合,key和value都是String类型-->
    <!--在properties标签中,可以配置很多属性-->
    <properties>
        <!--这是其中的一个属性-->
        <!--<property name="属性名" value="value"/>-->
        <property name="jdbc.driver" value="com.mysql.cj.jdbc.Driver"/>
        <property name="jdbc.url" value="jdbc:mysql://127.0.0.1:3306/powernode?serverTimezone=Asia/Shanghai"/>
        <property name="jdbc.username" value="root"/>
        <property name="jdbc.password" value="root"/>
    </properties>
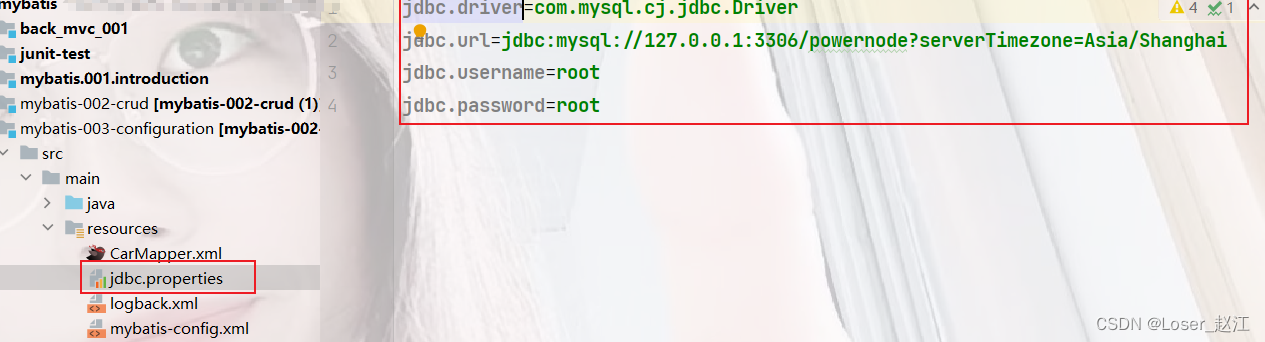
(2)、第二种写法:
<configuration>
    <properties resource="jdbc.properties"/>

    <properties url="file:///路径"/>  <!--从绝对路径当中获取资源:file:///路径,可移植性较差-->

    <environments default="powernodeDB">
        <environment id="powernodeDB">
            <transactionManager type="JDBC"/>
            <dataSource type="POOLED">
                <property name="driver" value="${jdbc.driver}"/>
                <property name="url" value="${jdbc.url}"/>
                <property name="username" value="${jdbc.username}"/>
                <property name="password" value="${jdbc.password}"/>
            </dataSource>
        </environment>
    </environments>
</configuration>
3.4、数据源(dataSource)
<dataSource type="POOLED">
      <property name="driver" value="com.mysql.cj.jdbc.Driver"/>
      <property name="url" value="jdbc:mysql://127.0.0.1:3306/mybatis?serverTimezone=Asia/Shanghai"/>
      <property name="username" value="root"/>
      <property name="password" value="root"/>
</dataSource>

<!-- driver – 这是 JDBC 驱动的 Java 类全限定名(并不是 JDBC 驱动中可能包含的数据源类)。
     url – 这是数据库的 JDBC URL 地址。
     username – 登录数据库的用户名。
     password – 登录数据库的密码  -->
- dataSource的作用是:为程序员提供Connection对象。(但凡为程序员提供Connection对象的,都叫做数据源)
- 数据源实际上是一套该规范。JDK中有这套规范:javax.sql.DataSource(数据源的规范,JDK提交的)
dataSource 元素使用标准的 JDBC 数据源接口来配置 JDBC 连接对象的资源 - 大多数 MyBatis 应用程序会按示例中的例子来配置数据源。虽然数据源配置是可选的,但如果要启用延迟加载特性,就必须配置数据源。
- 有三种内建的数据源类型(也就是 type=“[ UNPOOLED | POOLED | JNDI ]”):
UNPOOLRD:不能使用数据库连接池技术。每一次请求过来之后,都创建新的Connection对象
POOLRD:使用mybatis自己的数据库连接池
JNDI:使用其他第三方数据库连接池。
四、接口化开发
Mapper接口开发方式只需要我们编写Mapper接口,由Mybatis框架创建接口的动态代理对象,使用sqlsession.getMapper(接口.class),获得代理对象。
4.1、属性解释
| 属性 | 解释 |
|---|---|
| id | 在命名空间中唯一的标识符 |
| resultType | 指定sql输出结果类型 |
| parameterType | 主要针对于 将信息存入到数据库中 |
| resultMap | 从数据库结果集中加载对象 |
注:resultType是sql语句查询结果集的封装类型,也就是说把sql查询的结果封装在bean里返回回去,是存数据用的。
paramType是从传过来的Bean中取数据放进例如insert语句的values中当实参用,是取数据用的。
4.2、查询(select)
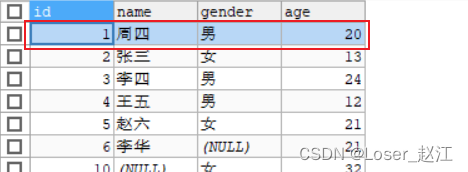
数据库中的student表 :

查询单条
mapper.xml:
<select id="selectId" resultType="pojo.Student">
        select id, name, gender, age from student where id = #{id};
</select>
javaTest:
@Test
    public void selectByid(){
        SqlSession sqlSession = SqlSessionUtil.openSession();
        StudentMapper mapper = sqlSession.getMapper(StudentMapper.class);
        Student student = mapper.selectId(1L);
        System.out.println(student);
    }
结果:

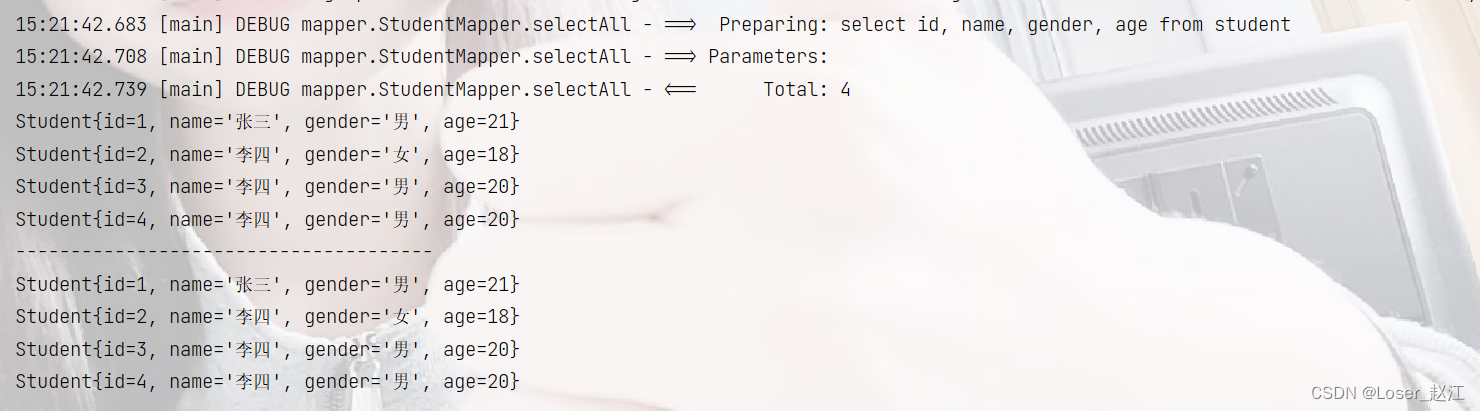
查询多条
mapper.xml:
<select id="selectAll" resultType="pojo.Student">
        select id, name, gender, age from student
</select>
javaTest:
    @Test
    public void selectAll(){
        SqlSession sqlSession = SqlSessionUtil.openSession();
        StudentMapper mapper = sqlSession.getMapper(StudentMapper.class);
        List<Student> students = mapper.selectAll();
        students.forEach(student -> System.out.println(student));
        System.out.println("--------------------------------------");
        for (Student student : students ) {
            System.out.println(student);
        }
    }
结果:
4.3、插入(insert)
mapper.xml :
<insert id="insert">
     insert into student values(null,#{name},#{gender},#{age})
</insert>
javaTest :
    @Test
    public void insert(){
        SqlSession sqlSession = SqlSessionUtil.openSession();
        StudentMapper mapper = sqlSession.getMapper(StudentMapper.class);
        Student student = new Student(null,"周三","男",22);
        int count = mapper.insert(student);
        System.out.println(count);
    }
结果 :

4.4、修改(update)
mapper.xml:
    <update id="update">
        update student set name = #{name}, gender= #{gender}, age = #{age} where id = #{id}
    </update>
javaTest:
    @Test
    public void update(){
        SqlSession sqlSession = SqlSessionUtil.openSession();
        StudentMapper mapper = sqlSession.getMapper(StudentMapper.class);
        Student student = new Student(1L,"李华","男",22);
        int count = mapper.update(student);
        System.out.println(count);
        sqlSession.commit();
        sqlSession.close();
    }
结果:

4.5、删除(delete)
删除单条:
mapper.xml :
    <delete id="delete">
        delete from student where id = #{id}
    </delete>
javaTest :
    @Test
    public void delete(){
        SqlSession sqlSession = SqlSessionUtil.openSession();
        StudentMapper mapper = sqlSession.getMapper(StudentMapper.class);
        int count = mapper.delete(1L);
        System.out.println(count);
        sqlSession.commit();
        sqlSession.close();
    }
结果 :

删除多条
批量删除SQL语句有两种方法:
- 第一种 or :delete from student where id = 1 or id = 2 or id = 3;
- 第二种 in :delete from student where id = in(1,2,3);
例:
mapper.xml :
    <delete id="deleteAll">
        delete from student where id in(${id})
    </delete>
javaTest :
    @Test
    public void deleteAll(){
        SqlSession sqlSession = SqlSessionUtil.openSession();
        StudentMapper mapper = sqlSession.getMapper(StudentMapper.class);
        int count = mapper.deleteAll("1,2,3");
        System.out.println(count);
        sqlSession.commit();
        sqlSession.close();
    }
结果:

五、${ } 与 #{ } 的区别
-
#{ } :先编译sql语句,在给占位符传值,底层是PreparedStatement实现,可以防止sql注入,比较常用
-
${ } :先进行sql语句拼接,在进行sql语句编译,底层是Statement实现,存在sql注入现象。只有在存在SQL语句进行拼接的时候,才会用到
-
如果需要 SQL语句的 关键字 放到 SQL语句中,只能使用 ${ },因为 #{ } 是以值得形式传给SQL语句中当中的
-
优先使用#{},这是原则,避免SQL注入的风险
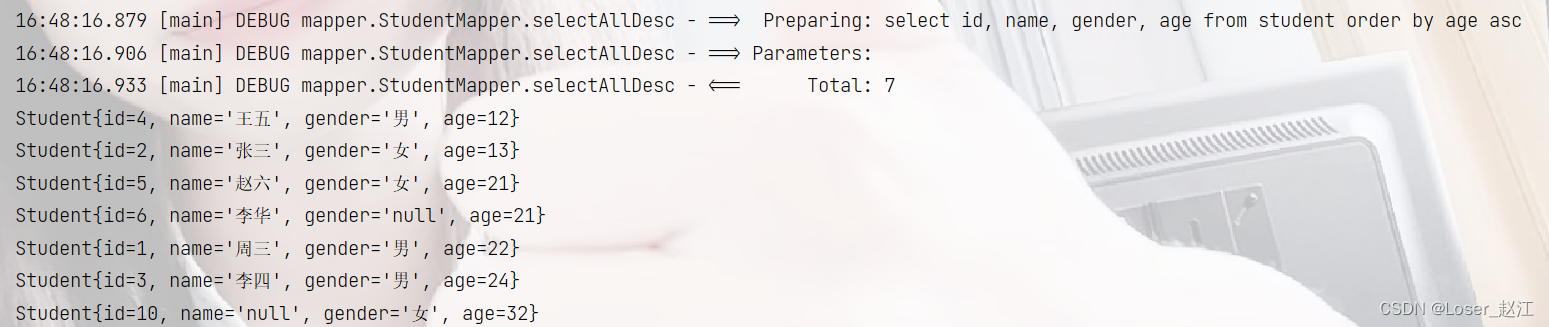
例如、查询student表中的所有学生,并且按照年龄进行排序,就需要使用 ${ },进行SQL语句拼接
    @Test
    public void selectAllDesc(){
        SqlSession sqlSession = SqlSessionUtil.openSession();
        StudentMapper mapper = sqlSession.getMapper(StudentMapper.class);
        List<Student> strings = mapper.selectAllDesc("asc");
        strings.forEach(string -> System.out.println(string));
        sqlSession.close();
    }
    -----------------------------------------------------------------------------------------
    <select id="selectAllDesc" resultType="pojo.Student">
        select id, name, gender, age from student
               order by age ${ascOrDesc}
    </select>
结果:
如果使用 #{ } 就会报错:
    <select id="selectAllDesc" resultType="pojo.Student">
        select id, name, gender, age from student
               order by age #{ascOrDesc}
    </select>
报错了:

原因是如果使用 #{ } , 会先进行编译,在进行拼接,底层先出现
select id, name, gender, age from student order by age ‘asc’
这种情况,所以报错!!
六、模糊查询
例如:根据姓名进行模糊查询,有三种方法:
-
第一种 :‘%${name}%’
-
第二种 :concat(‘%’,#{name},‘%’)
concat函数,是mysql数据库当中的:专门用于拼接字符串 -
第三种 :concat(‘%’,‘${name}’,‘%’)
-
附带另外一种 :“%”#{name}“%”
主要是让JDBC识别出 " % ? % ” 中的 问号 ?
mapper.xml :
    <select id="selectLike" resultType="pojo.Student">
        select id, name, gender, age from student
             where
        name
            like
        <!--'%${name}%'-->
        <!--concat('%',#{name},'%')-->
        <!--concat('%','${name}','%')-->
        "%"#{name}"%"
    </select>
七、@Param()

八、查询结果处理
第一种方法:使用as起别名方式
<select id="selectByAs" resultType="com.powernode.mybatis.pojo.Car">
        select
            id,
            car_num as carNum,
            brand,
            guide_price as guidePrice,
            produce_time as produceTime,
            car_type as carType
        from
            t_car
    </select>
第二种方法:使用resultMap结果映射
    <resultMap id="studentMap" type="pojo.Student">
        <id property="id" column="id"></id>
        <result property="gender" column="gender"></result>
        <result property="name" column="name"></result>
        <result property="age" column="age"></result>
    </resultMap>

    <select id="selectAs" resultMap="studentMap">
        select * from student
    </select>

- resultMap:指定数据库表当中的字段名与Java类当中的属性名的对应关系
- id标签:如果数据库表中有主键,建议配置一个id标签,可以不用写,但是建议配置,有利于提高效率
- 如果 column 和 property 是一样的,可以沈略
- type属性,用来指定pojo类的类名
- id属性,指定resultMap的唯一标识,这个id将来要在select标签中使用
第三种方法:开启驼峰命名自动映射(配置settings)
    <!--启用驼峰命名-->
    <!--mapUnderscoreToCamelCase:官方API文档-->
    <settings>
        <setting name="mapUnderscoreToCamelCase" value="true"/>
    </settings>
九、动态SQL
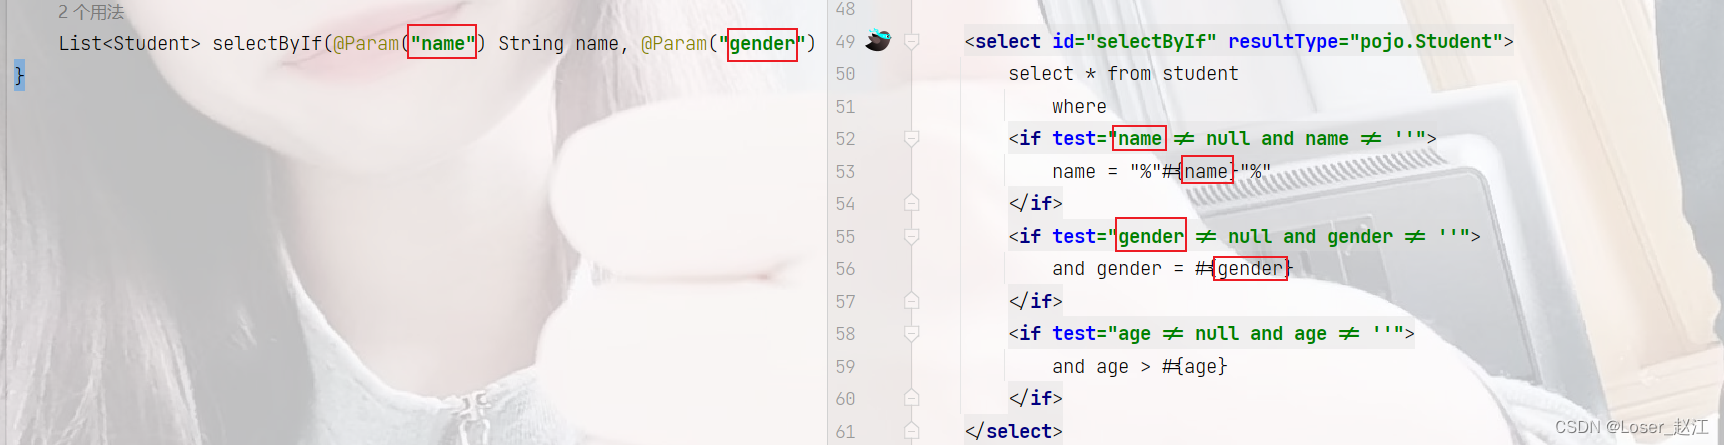
9.1、if
    <select id="selectByIf" resultType="pojo.Student">
        select * from student
            where 1 = 1  <!--防止条件为空-->
        <if test="name != null and name != ''">
            and name = "%"#{name}"%"
        </if>
        <if test="gender != null and gender != ''">
            and gender = #{gender}
        </if>
        <if test="age != null and age != ''">
            and age > #{age}
        </if>
    </select>
注意:
- if 标签中的test属性是必须的,if = false / true
- 如果test是true,则if标签中的sql语句就会拼接,反之,则不会拼接
- test属性中当使用@Param注解时,tset 中出现的就是@Param注解指定的参数名,若没有使用注解,则test中要出现的是:param1,param2,arg0,arg1…
- 如果接口使用的是POJO类的话,那么 test 出现的是POJO类中的属性名
9.2、where
where标签可以让SQL语句更加动态智能:
- 当所有条件为空时,where标签可以保证不会生成where子句;
- 自动除去某些条件前面多余的 and 或者 or(不能去除后面的 and)
    <select id="selectByWhere" resultType="pojo.Student">
        select * from student
        <!--where标签专门负责where子句动态生成-->
        <where>
            <if test="name != null and name != ''">
                and name = "%"#{name}"%"
            </if>
            <if test="gender != null and gender != ''">
                or gender = #{gender}
            </if>
            <if test="age != null and age != ''">
                and age > #{age}
            </if>
        </where>
    </select>
9.3、trim
    <select id="selectByTrem" resultType="pojo.Student">
        select * from student
        <!--
            prefix  加前缀
            suffix   加后缀
            prefixOverrides   删除前缀
            suffixOverrides   删除后缀
        -->
        <trim prefix="where" suffixOverrides="and | or">
            <if test="name != null and name != ''">
                 name = "%"#{name}"%" and
            </if>
            <if test="gender != null and gender != ''">
               gender = #{gender} or
            </if>
            <if test="age != null and age != ''">
                age > #{age}
            </if>
        </trim>
    </select>
9.4、set
主要用在update语句当中,用来生成 set 关键字,同时去掉最后多余的逗号 “,”!
比如我们只更新提交的不为空的字段,如果提交的数据是空或者“ ”,那么这个字段降不更新
未使用 set 标签:
Student student = new Student(1L,"周四",null,15);
-----------------------------------------------------------
    <update id="setUpdate" >
        update student set
            name = #{name},
            gender = #{gender},
            age = #{age}
        where
            id = #{id}
    </update>
<!--会将数据全部提交-->

使用 set 标签之后:
Student student = new Student(1L,null,"男",20);
---------------------------------------------------------
    <update id="setUpdate2">
        update student
        <set>
            <if test="name != null and name != ''">name = #{name},</if>
            <if test="gender != null and gender != ''">gender = #{gender},</if>
            <if test="age != null and age != ''">age = #{age},</if>
        </set>
        where
            id = #{id}
    </update>
只会提交更改之后的数据
9.5、choose、when、otherwish
这三个标签是一起使用的
    <select id="choose" resultType="pojo.Student">
        select * from student
        <where>
            <choose>
                <when test="name != null and name != ''">
                    name like "%"#{name}"%",
                </when>
                <when test="gender != null and gender != ''">
                    gender = #{gender}
                </when>
                <otherwise>
                    age > #{age}
                </otherwise>
            </choose>
        </where>
    </select>
<!--
   如果第一个条件为空,则执行第二个条件,
   以此类推,如果都不为空,则执行最后一个
   若全部为空,则otherwish中的sql语句传值为null,进行拼接
-->
9.5、foreach批量删除
方法一:使用 in
    int deleteByForeach(@Param("ids") Long[] ids);
-----------------------------------------------------------
    <delete id="deleteByForeach">
        <!--
             collection  指定数组或者集合
             item   代表数组或集合中的元素
             separator   循环之间的分隔符(自动添加)
             open   foreach循环拼接的所有SQL语句的最前面以什么开始
             close  foreach循环拼接的所有SQL语句的最后面以什么结束
        -->
        delete from student where id in(
        <!-- <foreach collection="array" item="id" separator=",">-->
        <foreach collection="ids" item="id" separator=",">
            #{id}
        </foreach>
        )
    </delete>
--------------------------------------------------------
    <!--沈略括号写法-->
    <delete id="deleteByForeach">
        delete from student where id in
        <foreach collection="" item="" separator="" open="(" close=")"></foreach>
    </delete>
方法二: 使用 or
    int insertForeach(@Param("students") List<Student> students);
---------------------------------------------------
    @Test
    public void deleteByOr() {
        SqlSession sqlSession = SqlSessionUtil.openSession();
        StudentMapper mapper = sqlSession.getMapper(StudentMapper.class);
        Long[] ids = {4l,5l,6l};
        int count = mapper.deleteByOr(ids);
        System.out.println(count);
        sqlSession.commit();
        sqlSession.close();
    }
------------------------------------------------
结果:
[main] DEBUG mapper.StudentMapper.deleteByOr - ==>  Preparing: delete from student where id = ? or id = ? or id = ?
[main] DEBUG mapper.StudentMapper.deleteByOr - ==> Parameters: 4(Long), 5(Long), 6(Long)
[main] DEBUG mapper.StudentMapper.deleteByOr - <==    Updates: 3
9.6、foreach批量插入
    int insertForeach(@Param("students") List<Student> students);
---------------------------------------------------------
    <insert id="insertForeach">
        insert into student values
        <foreach collection="students" item="student" separator=",">
            <!--循环体-->
            (null,#{student.name},#{student.gender},#{student.age})
        </foreach>
        <!-- 相当于
            (1,''),
            (1,''),
            (1,''),
            (1,''),
        -->
    </insert>
--------------------------------------------------------
    @Test
    public void insertForeach() {
        SqlSession sqlSession = SqlSessionUtil.openSession();
        StudentMapper mapper = sqlSession.getMapper(StudentMapper.class);
        Student students1 = new Student(null,"tom","男",20);
        Student students2 = new Student(null,"com","男",20);
        Student students3 = new Student(null,"jim","男",20);
        List<Student> students = new ArrayList<>();
        students.add(students1);
        students.add(students2);
        students.add(students3);
        mapper.insertForeach(students);
        sqlSession.commit();
        sqlSession.close();
    }
-----------------------------------------------------------
结果:
[main] DEBUG mapper.StudentMapper.insertForeach - ==>  Preparing: insert into student values (null,?,?,?) , (null,?,?,?) , (null,?,?,?)
[main] DEBUG mapper.StudentMapper.insertForeach - ==> Parameters: tom(String), 男(String), 20(Integer), com(String), 男(String), 20(Integer), jim(String), 男(String), 20(Integer)
[main] DEBUG mapper.StudentMapper.insertForeach - <==    Updates: 3
十、MyBatis高级映射及延迟加载
10.1、“多对一”映射,有三种常见的方法:
首先需要分清楚“谁是主表、谁是副表”
- 多对一:多在前,那么多就是主表
- 一对多:一在前,那么一就是主表
10.1.1、第一种方式:一条SQL语句,级联属性映射
    Student select2ById(Integer id); // 接口中的方法
-----------------------------------------------------
    clazz类中的属性:
       private Integer cid;
       private String cname;
    student类中的属性:
       private Long id;
       private String name;
       private String gender;
       private Integer age;
       private Clazz clazz;   // 多对一体现,班级clazz是一的乙方,student是多的乙方
-----------------------------------------------------
    @Test
    public void select2ById() {
        SqlSession sqlSession = SqlSessionUtil.openSession();
        StudentMapper mapper = sqlSession.getMapper(StudentMapper.class);
        Student student = mapper.select2ById(1);
        /*System.out.print(student.getName() + " ");
        System.out.print(student.getGender() + " ");
        System.out.print(student.getAge() + " ");
        System.out.print(student.getClazz().getCid() + " ");
        System.out.println(student.getClazz().getCname());*/
        System.out.println(student);
        sqlSession.close();
    }
-----------------------------------------------------
    <resultMap id="studentResultMap" type="pojo.Student">
        <id property="id" column="id"></id>
        <result property="name" column="name"></result>
        <result property="gender" column="gender"></result>
        <result property="age" column="age"></result>
        <result property="clazz.cid" column="cid"></result>
        <result property="clazz.cname" column="cname"></result>
    </resultMap>
    <select id="select2ById" resultMap="studentResultMap">
        select
            s.id, s.name, s.gender, s.age, c.cid,c.cname
        from
            student s left join clazz c on s.cid = c.cid
        where
            s.id = #{id}
    </select>
----------------------------------------------------
结果:
[main] DEBUG mapper.StudentMapper.select2ById - ==>  Preparing: select s.id, s.name, s.gender, s.age, c.cid,c.cname from student s left join clazz c on s.cid = c.cid where s.id = ?
[main] DEBUG mapper.StudentMapper.select2ById - ==> Parameters: 1(Integer)
[main] DEBUG mapper.StudentMapper.select2ById - <==      Total: 1
Student{id=1, name='jik', gender='女', age=32, clazz=Class{cid=1, cname='高一'}}
10.1.2、第二种方式:一条SQL语句,association
    @Test
    public void select2Assocation() {
        SqlSession sqlSession = SqlSessionUtil.openSession();
        StudentMapper mapper = sqlSession.getMapper(StudentMapper.class);
        Student student = mapper.select2Assocation(1);
        System.out.println(student);
        sqlSession.close();
    }
-------------------------------------------------
    <resultMap id="studentResultAssocation" type="pojo.Student">
        <id property="id" column="id"></id>
        <result property="name" column="name"></result>
        <result property="gender" column="gender"></result>
        <result property="age" column="age"></result>
        <!--
            association  翻译为 关联,一个student对象关联一个Clazz对象
            property 提供映射的pojo类的属性名
            javaType  用来指定要映射的java类型
        -->
        <association property="clazz" javaType="pojo.Clazz">
            <id property="cid" column="cid"></id>
            <result property="cname" column="cname"></result>
        </association>
    </resultMap>
    <select id="select2Assocation" resultMap="studentResultAssocation">
        select
            s.id, s.name, s.gender, s.age, c.cid,c.cname
        from
            student s left join clazz c on s.cid = c.cid
        where
            s.id = #{id}
    </select>
----------------------------------------------------
结果:
[main] DEBUG mapper.StudentMapper.select2Assocation - ==>  Preparing: select s.id, s.name, s.gender, s.age, c.cid,c.cname from student s left join clazz c on s.cid = c.cid where s.id = ?
[main] DEBUG mapper.StudentMapper.select2Assocation - ==> Parameters: 1(Integer)
[main] DEBUG mapper.StudentMapper.select2Assocation - <==      Total: 1
Student{id=1, name='jik', gender='女', age=32, clazz=Class{cid=1, cname='高一'}}
10.1.3、第三种方式:两条SQL语句,分布查询
(比较常用)
分布查询的优点:
- 可复用性强(将一个大份,拆成许多小份,每一个小份可重复利用)
- 延迟加载(懒加载机制)
延迟加载(懒加载机制)作用:
- 延迟加载机制:用的时候执行语句,不是用的时候不查询
- 提高性能,尽可能不查,或者说尽可能的少查,来提高效率
在mybatis中开启延迟加载机制:
- association 标签中添加 fetchType = “lazy”
- 默认情况下是没有开启延迟加载的,需要设置 fetchType = “lazy” ,这种设置是局部的,只针对当前的 association
在实际开发模式当中,大部分都是需要开启延迟加载的,所以建议开启全部的延迟加载机制:
- 在 mybatis 核心配置文件中添加全局配置:“ lazyLoadingEnabled = true ”
- 谁不需要开启全局延迟加载,只需配置 " fetchType = “eager” "
    @Test
    public void select2ByIdStep1() {
        SqlSession sqlSession = SqlSessionUtil.openSession();
        StudentMapper mapper = sqlSession.getMapper(StudentMapper.class);
        Student student = mapper.select2ByIdStep1(1);
        System.out.println(student);
        sqlSession.close();
    }
---------------------------------------------------------------------------------------------------------------------
    <!--两条SQL语句,完成多对一的分布查询-->
    <!--这里是第一步:根据学生的id查询学生的所有信息,这些信息里含有班级id(cid)-->
    <resultMap id="studentResultMapByStep" type="pojo.Student">
        <id property="id" column="id"></id>
        <result property="name" column="name"></result>
        <result property="gender" column="gender"></result>
        <result property="age" column="age"></result>
        <association property="clazz"
                     select="mapper.ClazzMapper.selecByIdstep2"
                     column="cid"
                     fetchType="lazy">
        </association>
    </resultMap>
    <select id="select2ByIdStep1" resultMap="studentResultMapByStep">
        select
            s.id, s.name, s.gender, s.age, s.cid
        from
            student s
        where
            s.id = #{id}
    </select>


    <!-- == clazzMapper.xml 中的 SQL 语句 ========================== -->
    <!-- 分布查询第二步:根据cid查询班级信息-->
    <select id="selecByIdstep2" resultType="pojo.Clazz">
        select cid, cname from clazz where cid = #{cid}
    </select>
------------------------------------------------------------------------------------------------------------
结果:(存在懒加载机制)
[main] DEBUG mapper.StudentMapper.select2ByIdStep1 - ==>  Preparing: select s.id, s.name, s.gender, s.age, s.cid from student s where s.id = ?
[main] DEBUG mapper.StudentMapper.select2ByIdStep1 - ==> Parameters: 1(Integer)
[main] DEBUG mapper.ClazzMapper.selecByIdstep2 - ====>  Preparing: select cid, cname from clazz where cid = ?
[main] DEBUG mapper.ClazzMapper.selecByIdstep2 - ====> Parameters: 1(Integer)
[main] DEBUG mapper.ClazzMapper.selecByIdstep2 - <====      Total: 1
[main] DEBUG mapper.StudentMapper.select2ByIdStep1 - <==      Total: 1
Student{id=1, name='jik', gender='女', age=32, clazz=Class{cid=1, cname='高一'}}
10.2、“一对多”映射
“一对多”的实现通常有两种实现方式:
10.2.1、collection
    @Test
    public void selectCollection() {
        SqlSession sqlSession = SqlSessionUtil.openSession();
        ClazzMapper mapper = sqlSession.getMapper(ClazzMapper.class);
        Clazz clazz = mapper.selectCollection(1);
        System.out.println(clazz);
        sqlSession.close();
    }
-----------------------------------------------------------------
    <!--关系映射-->
    <resultMap id="clazzResultMap" type="pojo.Clazz">
        <id property="cid" column="cid"></id>
        <result property="cname" column="cname"></result>

        <!-- 一对多,多->即是集合!这里的connection是集合的意思-->
        <!-- ofType 是用来指定集合当中的元素类型-->

        <collection property="studentList" ofType="pojo.Student">
            <id property="id" column="id"></id>
            <result property="name" column="name"></result>
            <result property="gender" column="gender"></result>
            <result property="age" column="age"></result>
        </collection>
    </resultMap>
    <select id="selectCollection" resultMap="clazzResultMap">
        select c.cid, c.cname, s.id, s.name, s.gender, s.age from clazz c left join student s on c.cid = s.cid where c.cid = #{cid}
    </select>
----------------------------------------------------------------------
结果:
[main] DEBUG mapper.ClazzMapper.selectCollection - ==>  Preparing: select c.cid, c.cname, s.id, s.name, s.gender, s.age from clazz c left join student s on c.cid = s.cid where c.cid = ?
[main] DEBUG mapper.ClazzMapper.selectCollection - ==> Parameters: 1(Integer)
[main] DEBUG mapper.ClazzMapper.selectCollection - <==      Total: 2
Clazz{cid=1, cname='高一', studentList=[Student{id=1, name='jik', gender='女', age=32, clazz=null},
                                       Student{id=2, name='tom', gender='男', age=20, clazz=null}]}
10.2.2、分布查询
    <!--ClazzMapper接口中,抽象方法! 分布查询第一步-->
    Clazz selectClazzResultStep1(Integer cid);

    <!--StudentMapper接口中,抽象方法! 根据班级查询学生信息,分布查询第二步-->
    List<Student> selectByCidStep2(Integer cid);
-------------------------------------------------------------------------
    @Test
    public void selectClazzResultStep1() {
        SqlSession sqlSession = SqlSessionUtil.openSession();
        ClazzMapper mapper = sqlSession.getMapper(ClazzMapper.class);
        Clazz clazz = mapper.selectClazzResultStep1(1);
        System.out.println(clazz);
        sqlSession.close();
    }
-----------------------------------------------------------------------------------------

    <!--ClazzMapper.xml中 分布查询第一步:根据cid获取班级信息-->
    <resultMap id="clazzResultMapStep1" type="pojo.Clazz">
        <id property="cid" column="cid"></id>
        <result property="cname" column="cname"></result>
        <collection property="studentList"
                    select="mapper.StudentMapper.selectByCidStep2"
                    column="cid">
        </collection>
    </resultMap>
    <select id="selectClazzResultStep1" resultMap="clazzResultMapStep1">
        select c.cid, c.cname from clazz c where c.cid = #{cid}
    </select>

    <!--StudentMapper.xml中 :分布查询第二步-->
    <select id="selectByCidStep2" resultType="pojo.Student">
        select * from student where cid = #{cid}
    </select>
-----------------------------------------------------------------
结果:(包含懒加载机制)
[main] DEBUG mapper.ClazzMapper.selectClazzResultStep1 - ==>  Preparing: select c.cid, c.cname from clazz c where c.cid = ?
[main] DEBUG mapper.ClazzMapper.selectClazzResultStep1 - ==> Parameters: 1(Integer)
[main] DEBUG mapper.StudentMapper.selectByCidStep2 - ====>  Preparing: select * from student where cid = ?
[main] DEBUG mapper.StudentMapper.selectByCidStep2 - ====> Parameters: 1(Integer)
[main] DEBUG mapper.StudentMapper.selectByCidStep2 - <====      Total: 2
[main] DEBUG mapper.ClazzMapper.selectClazzResultStep1 - <==      Total: 1
Clazz{cid=1, cname='高一', studentList=[Student{id=1, name='jik', gender='女', age=32, clazz=null},
                                       Student{id=2, name='tom', gender='男', age=20, clazz=null}]}
十一、MyBatis的缓存
缓存:cache
缓存的作⽤:通过减少 I/O (读/写)的⽅式,来提⾼程序的执⾏效率。
mybatis的缓存机制:执行DQL(select)语句的时候,将查询结果放到缓存(内存)当中,下⼀次还是这条语句的话,直接从缓存中取,不再查数据库。⼀⽅⾯是减少了IO,另⼀⽅⾯不再执⾏繁琐的查找算法,效率⼤⼤提升。
目的:提高执行效率
缓存是程序开发过程中优化程序的重要手段,常见的缓存有:
- 字符串常量池
- 整数型常量池
- 线程池
- 链接池
…
11.1、mybatis缓存包括:
- ⼀级缓存:将查询到的数据存储到SqlSession中。
- ⼆级缓存:将查询到的数据存储到SqlSessionFactory中。
- 或者集成其它第三⽅的缓存:⽐如EhCache【Java语⾔开发的】、Memcache【C语⾔开发的】等。
(缓存只针对于DQL语句,也就是说缓存机制只对应select语句)
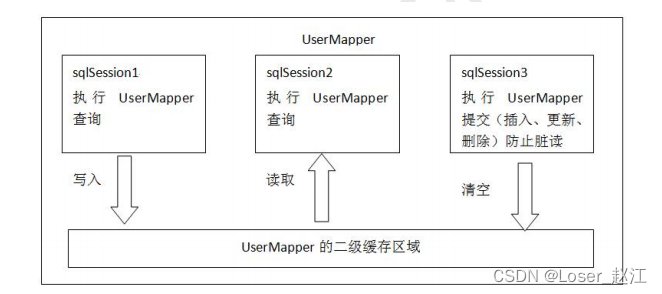
MyBatis 的缓存机制整体设计以及二级缓存的工作模式图:
11.2、一级缓存
⼀级缓存默认是开启的。不需要做任何配置。
原理:只要使⽤同⼀个 SqlSession对象 执⾏同⼀条SQL语句,就会⾛缓存。
默认开启缓存
    @Test
    public void selectCatch1ById2() throws IOException {
        SqlSession sqlSession = SqlSessionUtil.openSession();
        StudentMapper mapper1 = sqlSession.getMapper(StudentMapper.class);
        Student student = mapper1.selectCatch1ById(1L);
        System.out.println(student);
        StudentMapper mapper2 = sqlSession.getMapper(StudentMapper.class);
        Student student2 = mapper2.selectCatch1ById(1L);
        System.out.println(student2);
        sqlSession.commit();
        sqlSession.close();
    }
结果:两次查询,只进行了一次查询

不走缓存:
- 第一种:不同的SqlSession对象
- 第二种:查询条件变化了
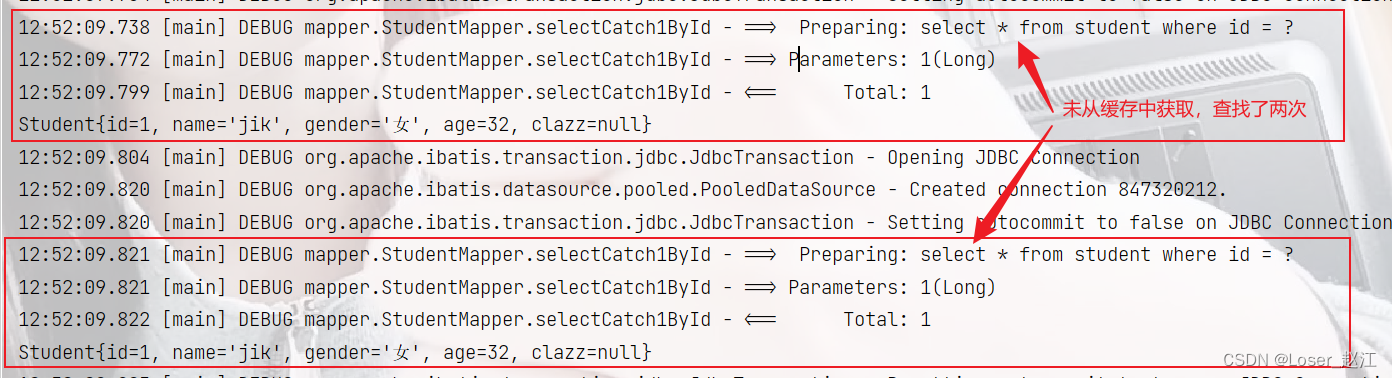
使⽤不同的 SqlSession对象 执⾏同⼀条SQL语句,不会⾛缓存
    @Test
    public void selectCatch1ById() throws IOException {
        // 获取不同的SqlSession
        SqlSessionFactory sqlSessionFactory = new SqlSessionFactoryBuilder().build(Resources.getResourceAsReader("myBatis-config.xml"));

        SqlSession sqlSession1 = sqlSessionFactory.openSession();
        SqlSession sqlSession2 = sqlSessionFactory.openSession();

        StudentMapper mapper1 = sqlSession1.getMapper(StudentMapper.class);
        StudentMapper mapper2 = sqlSession2.getMapper(StudentMapper.class);
        Student student = mapper1.selectCatch1ById(1L);
        System.out.println(student);

        Student student2 = mapper2.selectCatch1ById(1L);
        System.out.println(student2);

        sqlSession1.close();
        sqlSession2.close();
    }
结果:执行了两次sql语句
一级缓存失效的情况包含两种情况:
- 第一种:第⼀次查询和第⼆次查询之间,⼿动清空了⼀级缓存。
sqlSession.clearCache();
- 第⼆种:第⼀次查询和第⼆次查询之间,执⾏了增删改操作。【这个增删改和哪张表没有关系,只要有insert delete update操作,⼀级缓存就失效。】
    @Test
    public void selectCatch1ById2() throws IOException {
        SqlSession sqlSession = SqlSessionUtil.openSession();
        StudentMapper mapper1 = sqlSession.getMapper(StudentMapper.class);
        Student student = mapper1.selectCatch1ById(1L);
        System.out.println(student);

        // 手动清空一级缓存
        sqlSession.clearCache();

        // 执行insert delete update
        // StudentMapper mapper3 = sqlSession.getMapper(StudentMapper.class);
        // Student students = new Student(null, "周三", "男", 22);
        // mapper3.insert(students);

        StudentMapper mapper2 = sqlSession.getMapper(StudentMapper.class);
        Student student2 = mapper2.selectCatch1ById(1L);
        System.out.println(student2);
        sqlSession.commit();
        sqlSession.close();
    }
结果:显然缓存失效

11.3、二级缓存
⼆级缓存的范围是 SqlSessionFactory(默认是开启的)
使⽤⼆级缓存需要具备以下⼏个条件:
- < serring name = “cacheEnabled” value = true >全局性地开启或关闭所有映射器配置⽂件中已配置的任何缓存。默认就是true,⽆需设置
- 在需要使⽤⼆级缓存的SqlMapper.xml⽂件中添加配置:< cache />
- 使⽤⼆级缓存的实体类对象必须是可序列化的,也就是必须实现java.io.Serializable接⼝
- SqlSession对象关闭或提交之后,⼀级缓存中的数据才会被写⼊到⼆级缓存当中。此时⼆级缓存才可⽤。
未使用二级缓存:
    @Test
    public void selectById2() throws IOException {
        // 只有一个SqlSessionFactory对象,对应二级缓存
        SqlSessionFactory sqlSessionFactory = new SqlSessionFactoryBuilder().build(Resources.getResourceAsReader("myBatis-config.xml"));
        SqlSession sqlSession1 = sqlSessionFactory.openSession();
        SqlSession sqlSession2 = sqlSessionFactory.openSession();
        ClazzMapper mapper1 = sqlSession1.getMapper(ClazzMapper.class);
        ClazzMapper mapper2 = sqlSession2.getMapper(ClazzMapper.class);
        // 这行代码执行完成之后,实际上数据是缓存到一级缓存当中了(sqlSession1是一级缓存)
        Clazz student1 = mapper1.selectById2(1);
        System.out.println(student1);

        // 如果这里不关闭sqlSession1对象的话,二级缓存是没有数据的
        // 程序执行到这里,会将sqlSession1这个一级缓存的数据写入到二级缓存
        // sqlSession1.close();

        // 这行代码执行完成之后,实际上数据是缓存到一级缓存当中了(sqlSession2是一级缓存)
        Clazz student2 = mapper2.selectById2(1);
        System.out.println(student2);

        // 程序执行到这里的时候,会将sqlSession1这个一级缓存的数据写入到二级缓存
        sqlSession1.close();
        // 同样,程序执行到这里的时候,会将sqlSession2这个一级缓存的数据写入到二级缓存
        sqlSession2.close();
    }
结果:sql语句执行了两次,缓存集中率为0

使用二级缓存之后(注销上述例子中末尾的sqlSession1.close(); ,并开启中间的处的 sqlSession1.close();):
结果:sql语句执行一次,缓存命中率为 0.5
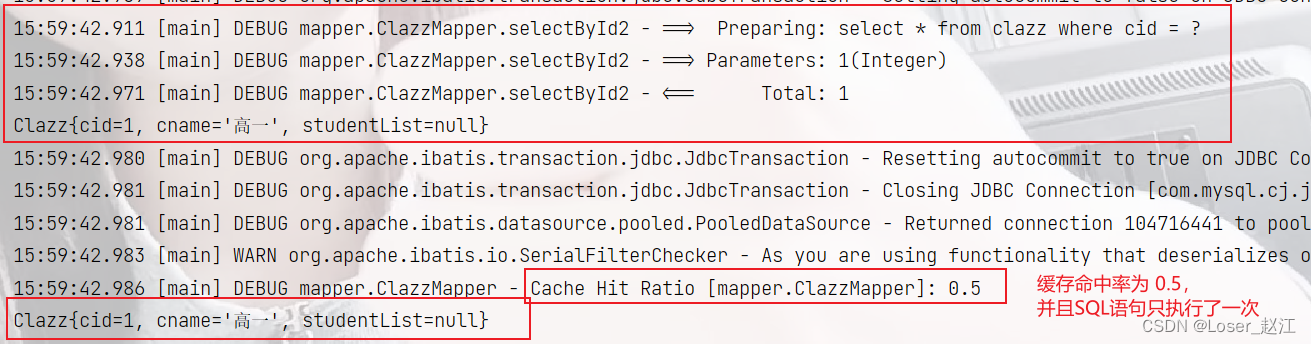
⼆级缓存的失效:只要两次查询之间出现了增删改操作。⼆级缓存就会失效。【⼀级缓存也会失效】
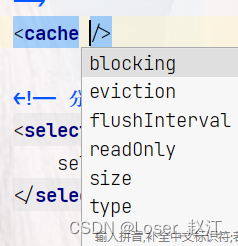
11.4、⼆级缓存的相关配置:
-
flushInterval:
⼆级缓存的刷新时间间隔。单位毫秒。如果没有设置,就代表不刷新缓存,只要内存⾜够⼤,⼀直会向⼆级缓存中缓存数据。除⾮执⾏了增删改 -
readOnly:
a. true:多条相同的sql语句执⾏之后返回的对象是共享的同⼀个。性能好。但是多线程并发可能会存在安全问题。
b. false:多条相同的sql语句执⾏之后返回的对象是副本,调⽤了clone⽅法。性能⼀般。但安全。 -
size:
设置⼆级缓存中最多可存储的Java对象数量。默认值1024。
十二、MyBatis注解式开发
mybatis中也提供了注解式开发⽅式,采⽤注解可以减少Sql映射⽂件的配置。
当然,使⽤注解式开发的话,sql语句是写在java程序中的,这种⽅式也会给sql语句的维护带来成本。
官方:
使⽤注解来映射简单语句会使代码显得更加简洁,但对于稍微复杂⼀点的语句,Java 注解不仅⼒不从⼼,还会
让你本就复杂的 SQL 语句更加混乱不堪。 因此,如果你需要做⼀些很复杂的操作,最好⽤ XML 来映射语句
12.1、@Insert()
    @Insert("insert into student (id,name,gender,age) values(null,#{name},#{gender},#{age})")
    int insertRes(Student student);
12.2、@Delete()
    @Delete("delete from student where id = #{id}")
    int deleteRes(Long id);
12.3、@Update()
    @Update("update student set name = #{name}, gender = #{gender}, age = #{age} where id = #{id}")
    int updateRes(Student student);
12.4、@Select()
    @Select("select * from student where id = #{id};")
    Student studentRes(Long id);
13.5、@Result()
    @Select("select * from student where id = #{id};")
    @Results({
            @Result(property = "name",column = "name"),
            @Result(property = "gennder",column = "gender"),
            @Result(property = "age",column = "age")
    })
    Student studentRes(Long id);


 273
273


 被折叠的 条评论
为什么被折叠?
被折叠的 条评论
为什么被折叠?
 到【灌水乐园】发言


