


一、轮播图方法一
<!DOCTYPE html>
<html>
	<head>
		<meta charset="utf-8">
		<title></title>
	</head>
	<body>
		<img id="img" src="img/1.png" width="120px" height="180px"/>
	</body>
	<script>
		//定时器 2秒
		setInterval(fun,2000);
		//定义一个变量记录当前图片
		var imge = 1;
		function fun(){
			//切换到下张图片
			imge++;
			//如果图片大于4就重修赋值为1
			if(imge > 4){
				imge = 1;
			}
			document.getElementById("img").src = "img/"+imge+".png";
		}
	</script>
</html>
注意这种方法:需要把图片名称修改为数字必须是连贯的。(不方便)
二、轮播图二
1、html页面
<!DOCTYPE html>
<html>
	<head>
		<meta charset="utf-8">
		<title></title>
		<link rel="stylesheet" href="css/lunbo2.css"/>
	</head>
	<body>
		<img src="img/1.png" />
		<img src="img/2.jpg" />
		<img src="img/3.jpg"/>
		<img src="img/刀剑5.jpg"/>
		<img src="img/苏沐橙.jpeg"/>
	</body>

</html>
2、css
*{
	/* 元素的内边距和外边距都设置为 0%。 */
	padding: 0%;
	margin: 0%;
}
body{
	/*弹性盒子 (Flex 容器)*/
	display: flex;
	/* 将使其中的项目在主轴上居中对齐 */
	justify-content: center;
	/* 使项目在交叉轴上居中对齐 */
	align-items: center;
	/* 高度为视口高度的 100% */
	height: 100vh;
}
img{
	background-color: aqua;
	/* height: 60rem;
	width: 10rem; */
	height: 11.25rem;
	width: 7.5rem;
	margin: 1rem;
	object-fit: cover;
	/* 扩大 */
	--expand-width: 60rem;
	/* shrink:收缩 */
	--shrink-width: 10rem;
	--expand-radius: 2.6rem;
	--shrink-radius: 20rem;
}
/* 伪类选择器  */
img:nth-child(1){
	animation: swiper 10s infinite;
}
img:nth-child(2){
	animation: swiper 10s 2s infinite;
}
img:nth-child(3){
	animation: swiper 10s 4s infinite;
}
img:nth-child(4){
	animation: swiper 10s 6s infinite;
}
img:nth-child(5){
	animation: swiper 10s 8s infinite;
}
@keyframes swiper{
	0%{
		width: var(--shrink-width);
		border-radius: var(--shrink-radius);
	}
	1%{
		width: var(--expand-width);
		border-radius: var(--expand-radius);
	}
	20%{
		width: var(--expand-width);
		border-radius: var(--expand-radius);
	}
	25%{
		width: var(--shrink-width);
		border-radius: var(--shrink-radius);
	}
	100%{
		width: var(--shrink-width);
		border-radius: var(--shrink-radius);
	}

}
3、成品展示

三、轮播图方法三
1、代码展示
<!DOCTYPE html>
<html lang="en">
<head>
<meta charset="utf-8" />
<title></title>
<script src="js/vue.js"></script>
</head>
<style type="text/css">
#app {
width: 640px;
height: 610px;
background-color: rgba(69, 220, 231, 0.5);
margin: 40px auto;
position: relative;
box-shadow: 10px 10px 20px 10px rgba(236, 20, 20, 0.5);
}
.son {
width: 630px;
height: 600px;
position: absolute;
left: 50%;
margin-left: -280px;
top: 50%;
margin-top: -305px;
}
/* focus 鼠标点击事件. */
.jk:focus{
height: 32px;
width: 100px;
margin-left: 10px;
/* font-size: 24px; */
color: aqua;
}
.jk {
height: 32px;
width: 100px;
margin-left: 10px;
/* font-size: 24px; */
}
img {
width: 100%;
height: 100%;
}
button {
border: 1px solid cornflowerblue;
border-radius: 3px;
margin-left: 14px;
}
</style>
<body>
<div id="app">
<div class="son">
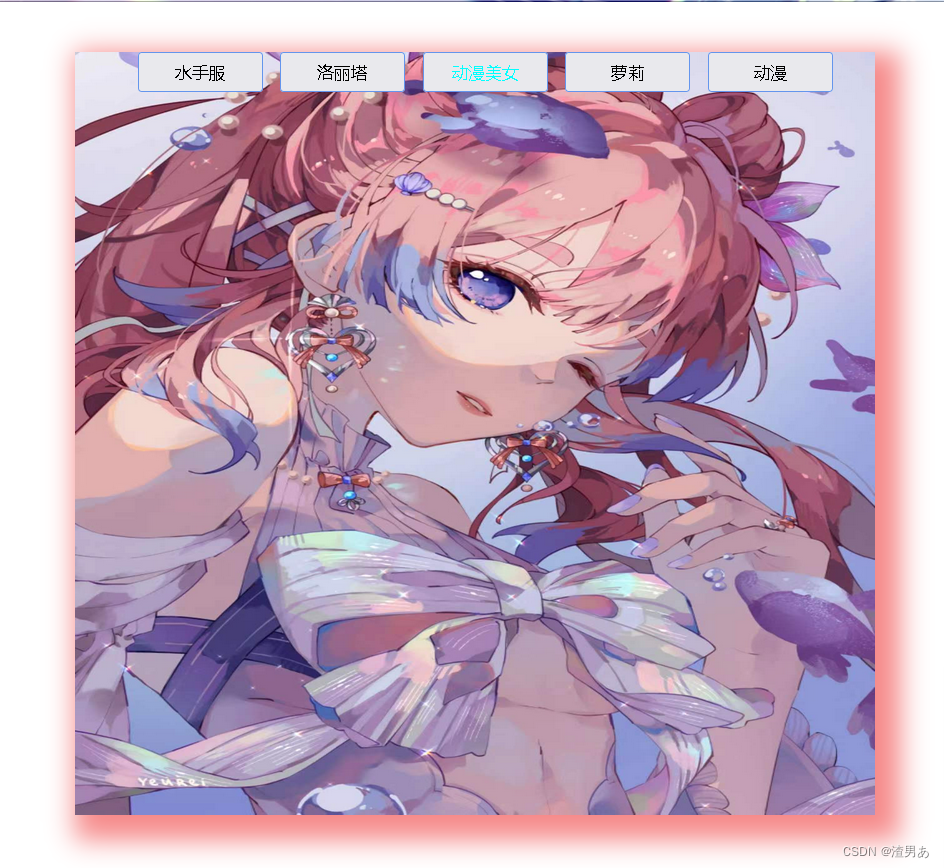
<button type="button" class="jk" @click="pref()">水手服</button>
<button type="button" class="jk" @click="next()">洛丽塔</button>
<button type="button" class="jk" @click="rightupper()">动漫美女</button>
<button type="button" class="jk" @click="si()">萝莉</button>
<button type="button" class="jk" @click="comi()">动漫</button>
</div>
<img id="pic" :src="imgArr[index]">
</div>
<script type="text/javascript">
window.onload = function() {
var app = new Vue({
el: "#app",
data: {
imgArr: [
"img/水手服美女.jpg",
"img/洛丽塔美女.jpg",
"img/动漫美女.jpg",
"img/萝莉.jpg",
"img/动漫.jpg"
],
index: 0,
},
methods: {
pref() {
var msg = document.getElementById("pic");
msg.src = "img/水手服美女.jpg";
},
next() {
var msg = document.getElementById("pic");
msg.src = "img/洛丽塔美女.jpg";
},
rightupper() {
var msg = document.getElementById("pic");
msg.src = "img/动漫美女.jpg";
},
si() {
var msg = document.getElementById("pic");
msg.src = "img/萝莉.jpg";
},
comi() {
var msg = document.getElementById("pic");
msg.src = "img/动漫.jpg";
}
}
})
}
</script>
</body>
</html>
2、成品展示

四、轮播图方法四
1、代码展示
<!DOCTYPE html>
<html lang="en">
<head>
<meta charset="UTF-8">
<title>轮播图</title>
<script src="js/vue.js"></script>
</head>
<style type="text/css">
#app {
width: 320px;
height: 220px;
background-color: rgba(69, 220, 231, 0.5);
margin: 40px auto;
position: relative;
box-shadow: 10px 10px 20px 10px rgba(236, 20, 20, 0.5)
}
.son {
width: 300px;
height: 200px;
position: absolute;
/* 加了绝对定位的magin auto就无效了 */
/* left: 350px;
top: 180px; */
left: 50%;
margin-left: -150px;
top: 50%;
margin-top: -100px;
}
.btnleft,
.btnright {
height: 100px;
width: 30px;
border-style: none;
background-color: rgba(128, 128, 128, 0.5);
font-size: 24px;
}
.son .btnleft {
position: absolute;
top: 50%;
margin-top: -50px;
}
.son .btnright {
position: absolute;
top: 50%;
margin-top: -50px;
right: 0px;
}
img {
width: 100%;
height: 100%;
}
</style>
<body>
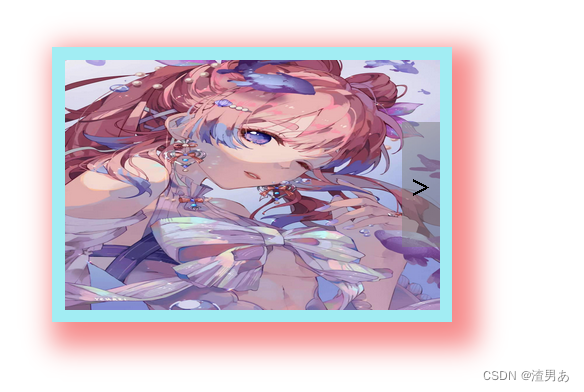
<div id="app">
<div class="son">
<button type="button" class="btnleft" @click="pref" v-show="index!=0"> < </button>
<button type="button" class="btnright" @click="next" v-show="index<imgArr.length-1"> ></button>
<img :src="imgArr[index]">
</div>
</div>
<script type="text/javascript">
window.onload = function() {
var app = new Vue({
el: "#app",
data: {
imgArr: [
"img/动漫美女.jpg",
"img/萝莉.jpg",
"img/动漫.jpg"
],
index: 0,
},
methods: {
pref: function() { //上一张
this.index--;
},
next: function() { //下一张
this.index++;
}
}
})
}
</script>
</body>
</html>
2、成品展示


 8463
8463

 被折叠的 条评论
为什么被折叠?
被折叠的 条评论
为什么被折叠?
 到【灌水乐园】发言


