


一.爬虫--requests
1.常见的爬虫
-通用爬虫:
抓取系统重要组成部分。抓取的是一整张页面数据。
-聚焦爬虫:
是建立在通用爬虫的基础之上。抓取的是页面中特定的局部内容。
-增量式爬虫:
检测网站中数据更新的情况。只会抓取网站中最新更新出来的数据。
2.requests模块
requests模块:python中原生的一款基于网络请求的模块,功能非常强大,简单便捷,效率极高。
如何使用:(requests模块的编码流程)
- 指定url
- 发起请求
- 获取响应数据
- 持久化存储
环境安装:
pip install requests
下面是一个基础的爬虫
import requests
if __name__ == '__main__':
    url="https://www.baidu.com/"
    head = {
        "User-Agent": "Mozilla/5.0 (Windows NT 10.0; Win64; x64) AppleWebKit/537.36 (KHTML, like Gecko) Chrome/120.0.0.0 Safari/537.36"
    }
    response=requests.get(url=url,headers=head)
    page_text=response.text
    with open("./内容",'w',encoding='utf-8') as file:
        file.write(page_text)
获取的response对象的对应内容 :text(字符串) content(二进制) json()(对象)
3.简单实践和UA伪装
UA伪装
门户网站的服务器会检测对应请求的载体身份标识,如果检测到请求的载体身份标识为某一款浏览器,说明该请求是一个正常的请求,但如果没有检测到,说明是一个不正常的请求(爬虫),则服务端很有可能会拒绝这次请求
import requests
if __name__ == '__main__':
    url="https://www.sogou.com/web"
    head = {
        "User-Agent": "Mozilla/5.0 (Windows NT 10.0; Win64; x64) AppleWebKit/537.36 (KHTML, like Gecko) Chrome/120.0.0.0 Safari/537.36"
    }
    param={
        'query':'ip'
    }
    response=requests.get(url=url,headers=head,params=param)
    page_text=response.text
    with open("./content.html",'w',encoding='utf-8') as file:
        file.write(page_text)
4.破解百度翻译
当我们进行百度翻译输入英文的时候,我们需要获取关于dog的翻译内容,此时该如何拿取呢?
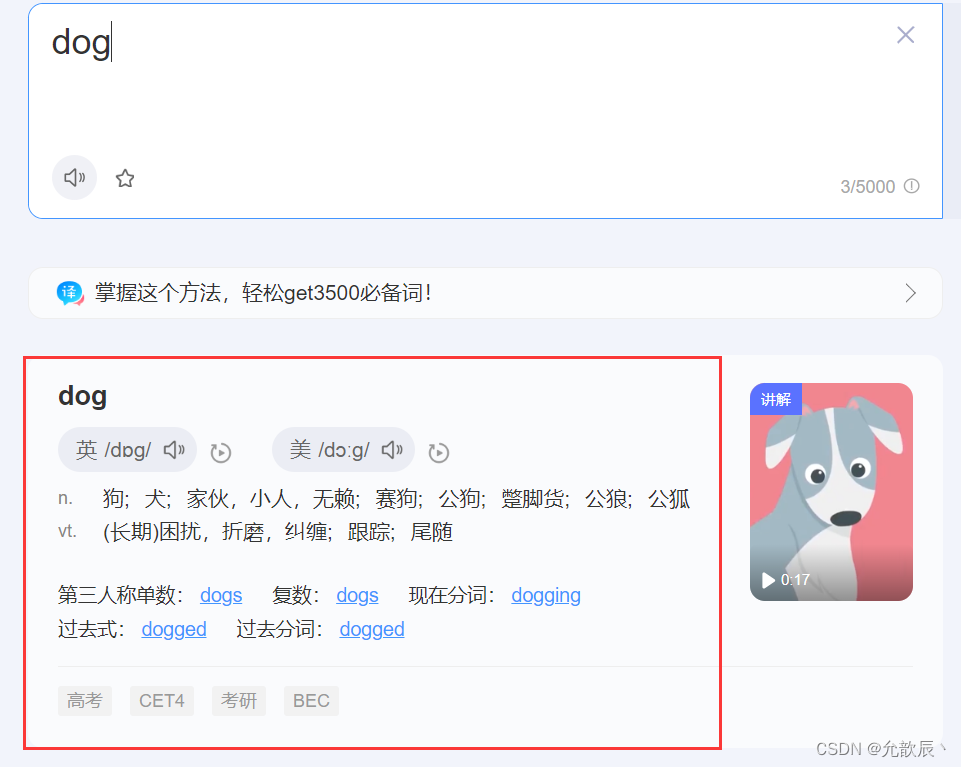
输入不同的英文时候,会有不同的结果展示,而网页的其他内容是不发生改变的,因此我们可以推测使用的ajax的局部刷新技术.
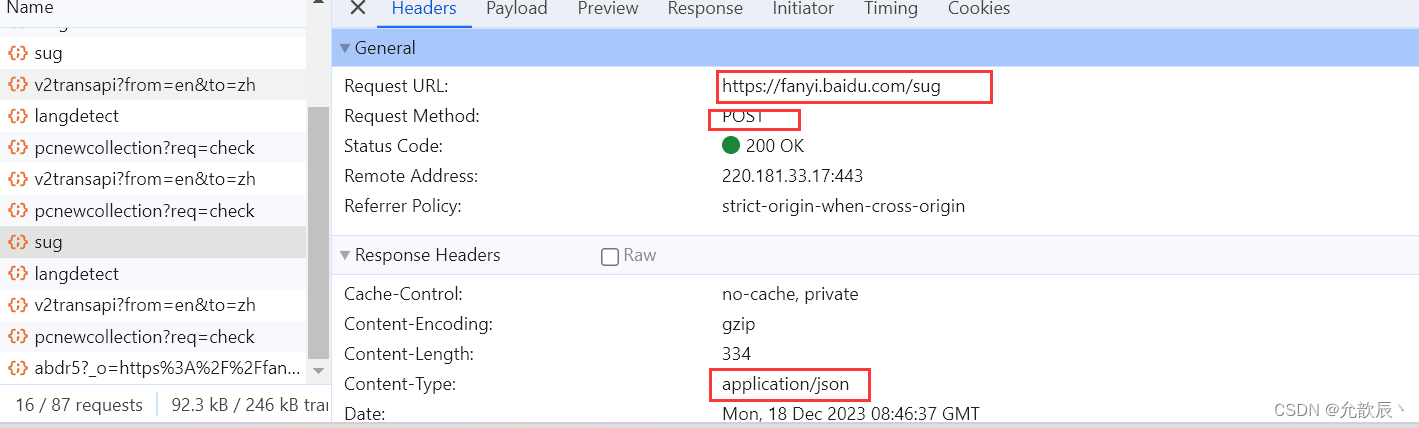
按f12到network的Fetch/XHR页面,可以观察到就是根据下面的url返回的数据

 接下来就是代码的编写:
import requests
if __name__ == '__main__':
    url="https://fanyi.baidu.com/sug"
    # 定义请求头,把程序伪装成用户
    head = {
        "User-Agent": "Mozilla/5.0 (Windows NT 10.0; Win64; x64) AppleWebKit/537.36 (KHTML, like Gecko) Chrome/120.0.0.0 Safari/537.36"
    }
    word=input("请输入你要查询的数据:")
    data={'kw':word}
    res = requests.post(url=url,data=data,headers=head)
    dic_obj=res.json()  #确保响应的数据
    print(dic_obj)
5.破解豆瓣电影
我们爬取豆瓣电影剧情片分类的电影名称,当然我们可以使用数据解析直接爬取html页面上电影名称的数据,在这个页面上用滚轮向下滑动的时候可以发现,页面的数据是慢慢加载的,按F12可以发现有ajax请求进行页面的局部刷新
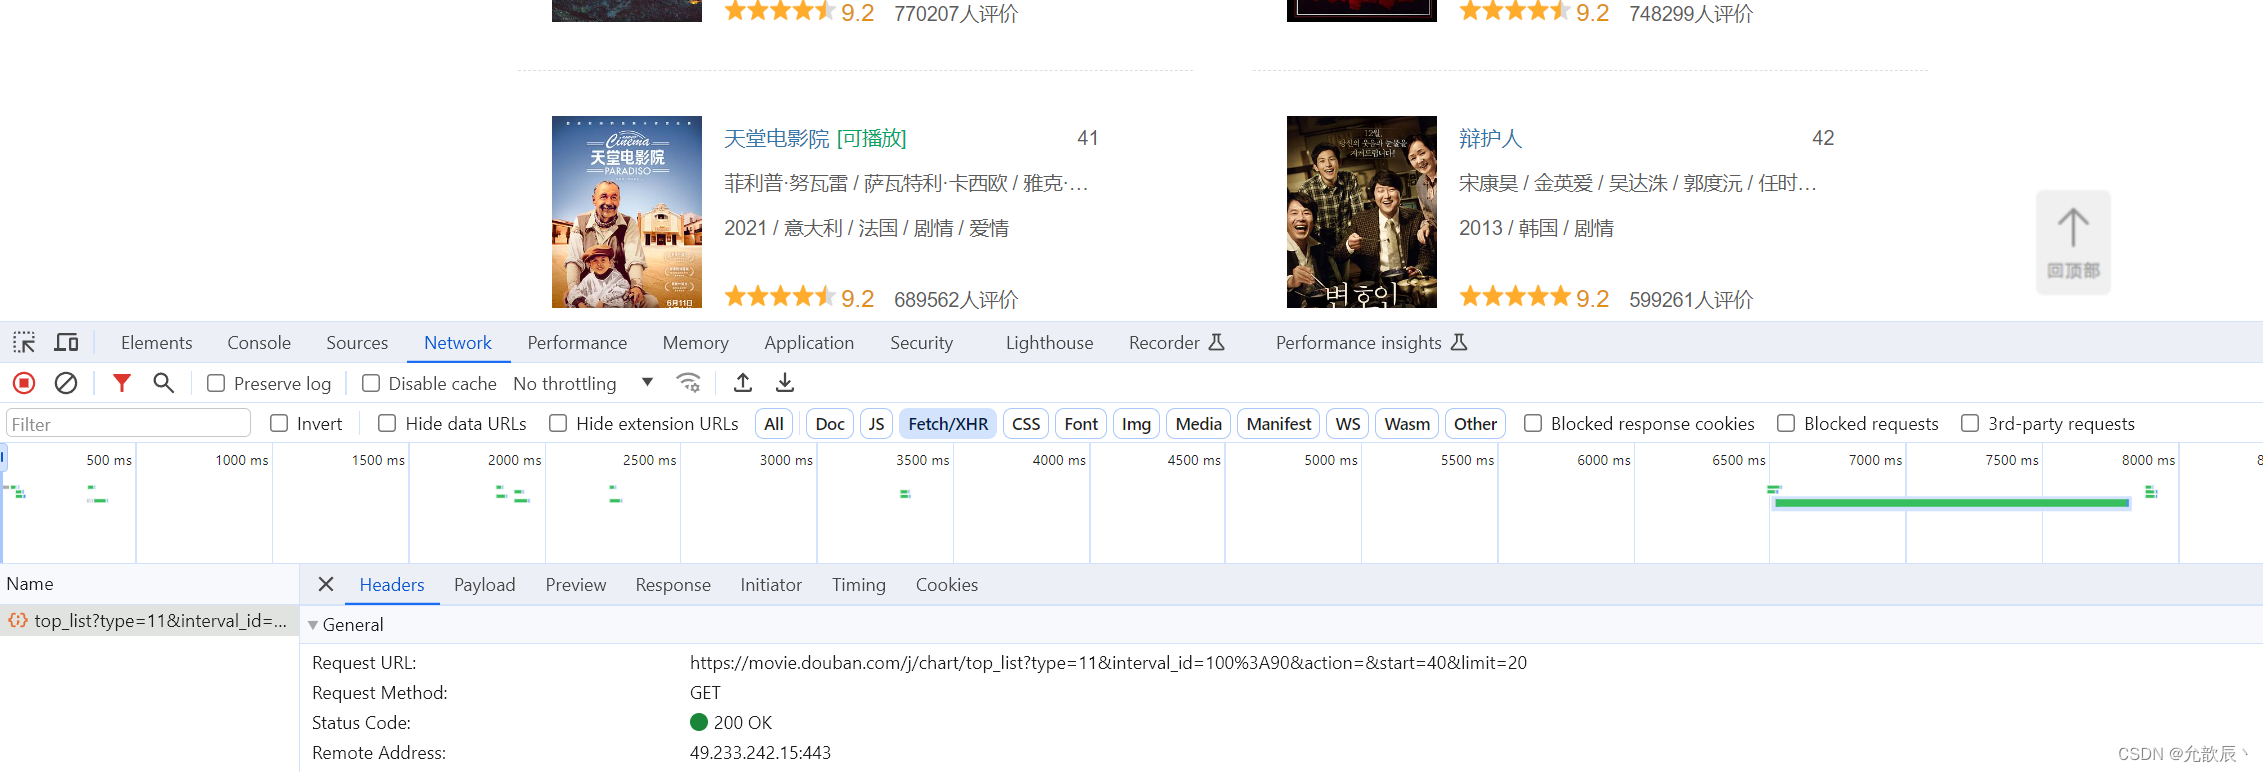
返回值是json的数据
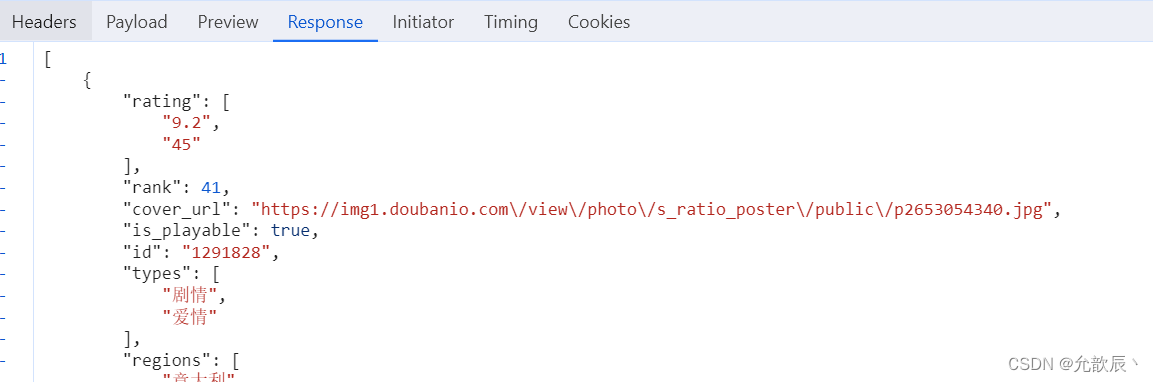
继续分析我们可以发现发起的是get请求,其中query string参数可以猜测得到的start为开始位置,limit为获取的电影个数,这样我们就很容易写出以下的代码:
import json
import requests

if __name__ == '__main__':
    url = "https://movie.douban.com/j/chart/top_list"
    params = {
        'type': '11',
        'interval_id': '100:90',
        'action': '',
        'start': '0',
        'limit': '40'
    }
    # 定义请求头,把程序伪装成用户
    head = {
        "User-Agent": "Mozilla/5.0 (Windows NT 10.0; Win64; x64) AppleWebKit/537.36 (KHTML, like Gecko) Chrome/120.0.0.0 Safari/537.36"
    }
    res = requests.get(url=url, params=params, headers=head)
    dic_obj = res.json()  # 确保响应的数据,此时返回的是字典类型
    with open('豆瓣.txt','w',encoding='utf-8') as file:
        json.dump(dic_obj,file,ensure_ascii=False)

    print(dic_obj)
无限Debug的解决方案:
当我们进入一个网站按F12的时候,此时我们刷新页面,会出现一下的情况:
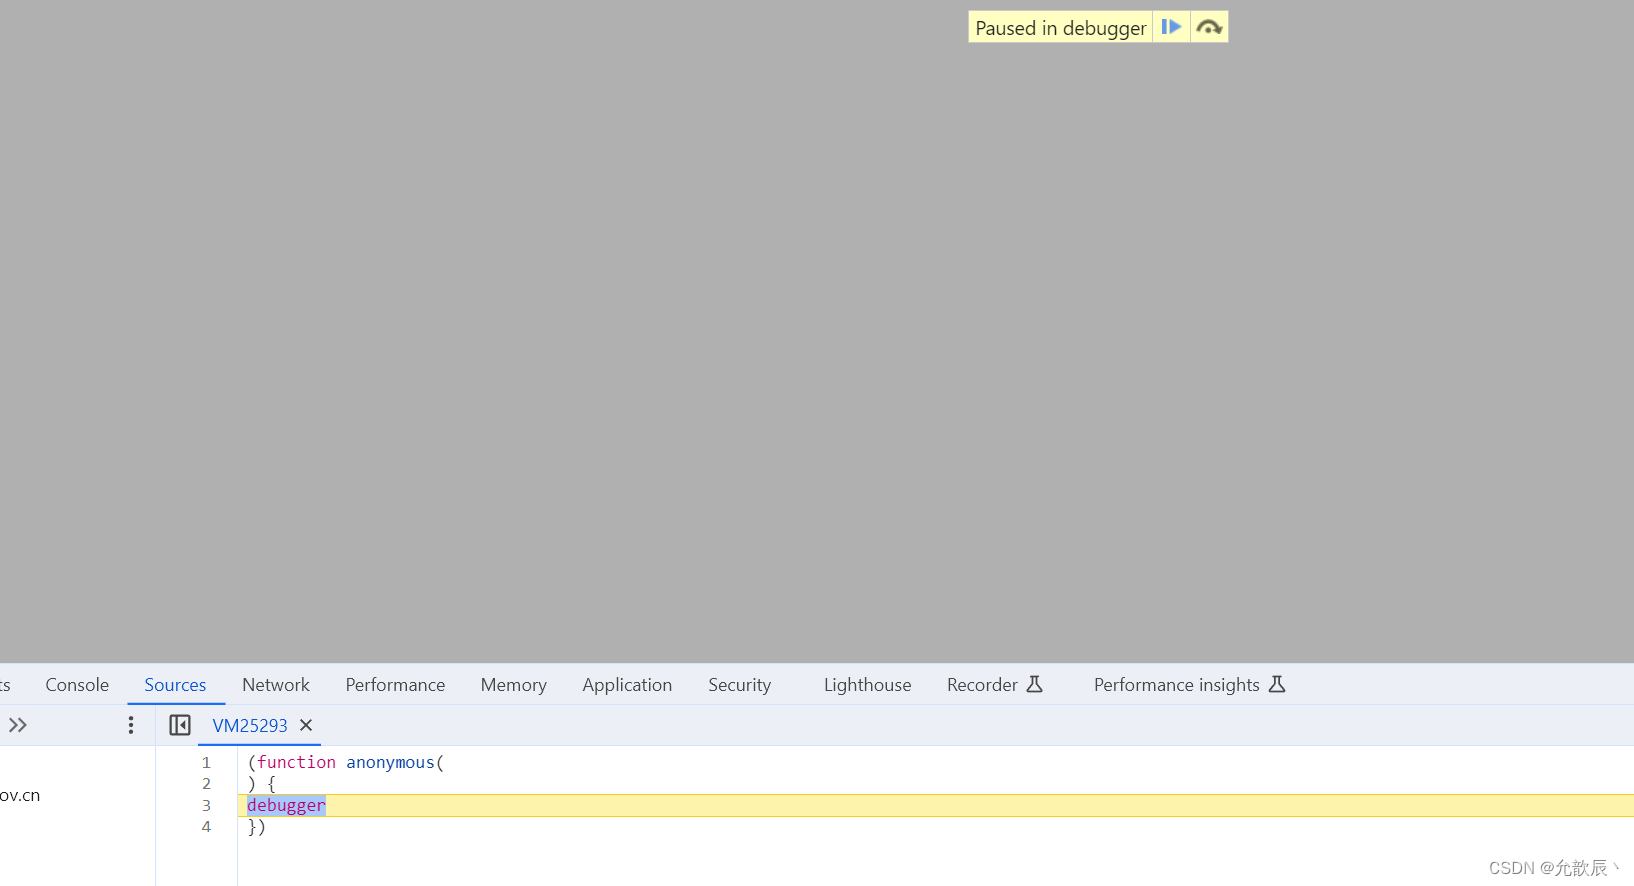
此时我们可以进入到Sources页面,将图示的内容点亮,此时再刷新页面,就可以捕捉到页面的请求了

二.数据解析
聚焦爬虫:爬取页面中的指定内容
数据解析原理概述:
-解析的局部的文本内容都会在标签之间或者标签对应的属性中进行存储
1.进行指定标签的定位
2.标签或者标签对应的属性中存储的数据值进行提取(解析)
1.正则表达式
1.常见的正则表达式
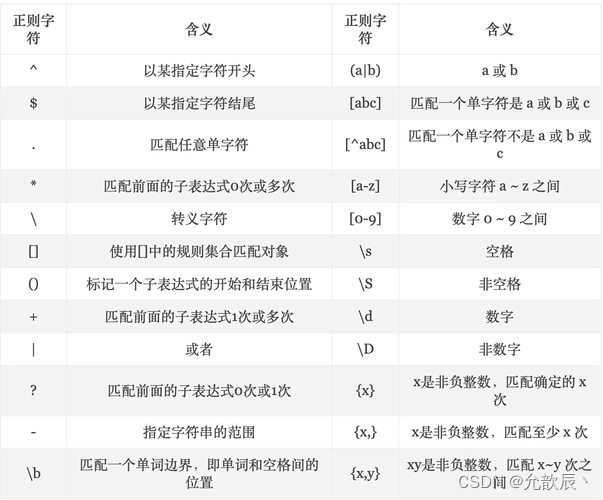
建议看这篇博客:最常用的正则表达式 (转) - 知乎
2.提取图片
在线进入到实战之前,我们首先来提取图片
对网页上的任意一张图片右键我们可以看到复制图片地址,接着我们打开新网页,将复制的地址进行打开,就可以看到这个图片的信息
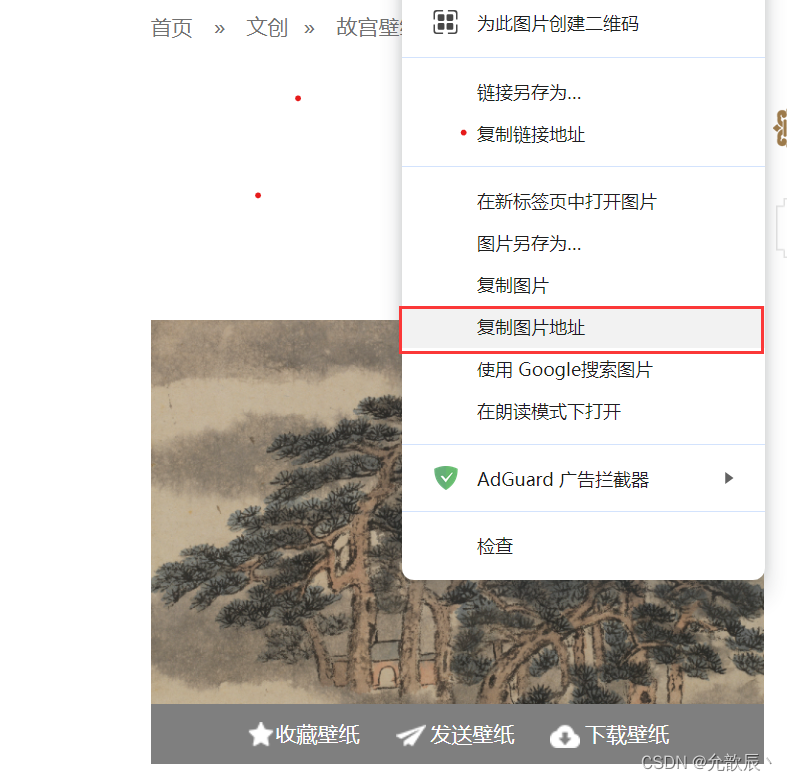
翻译到代码中就是,当我们得到图片的url,我们通过 requests.get(url).content,就可以获取图片的二进制数据,然后通过with open(地址,'wb'),就可以将图片存储到本地,
import requests
if __name__ == '__main__':
    url="https://pics7.baidu.com/feed/a686c9177f3e67090147352fb790bb37f9dc5578.jpeg@f_auto?token=36ecaf8dff86e64a96a01ed91ceaa3d2"
    #content是获取二进制
    pic=requests.get(url=url).content
    with open('美图.jpg','wb') as file:
        file.write(pic)
3.实战
对这个网站(https://www.dpm.org.cn/lights/royal.html)进行爬虫,爬取网站上1-5页的图片信息并存储到本地

通过按F12观察html代码可以发现,每张图片都是位于<a target="_blank" href="/light/.*?"><img alt=".*?" title="(.*?)" src="(.*?)"></a>标签的src位置的,图片的名称位于title位置,因此我们只需要提取到title和src的内容,然后通过requests请求获取到src的网址的内容,即可以提取到图片的内容

import requests,os,re
if __name__ == '__main__':
    if not os.path.exists("./meituLibs"):
        os.mkdir('./meituLibs')
    # 定义请求头,把程序伪装成用户
    head = {
        "User-Agent": "Mozilla/5.0 (Windows NT 10.0; Win64; x64) AppleWebKit/537.36 (KHTML, like Gecko) Chrome/120.0.0.0 Safari/537.36"
    }
    #现在只提取1-5页的图片
    for page in range(1,6):
        url = "https://www.dpm.org.cn/lights/royal/p/" + str(page) + ".html"
        res = requests.get(url=url, headers=head)
        #设置编码格式
        res.encoding = 'utf-8'
        ex = '<a target="_blank" href="/light/.*?"><img alt=".*?" title="(.*?)" src="(.*?)"></a>'
        img_src_list = re.findall(ex, res.text, re.S)
        for item in img_src_list:
            pic = requests.get(url=item[1], headers=head).content
            img_name = item[0]+".jpg"
            img_path = "./meituLibs/" + img_name
            with open(img_path, "wb") as file:
                file.write(pic)
print("成功存储:" + img_name) 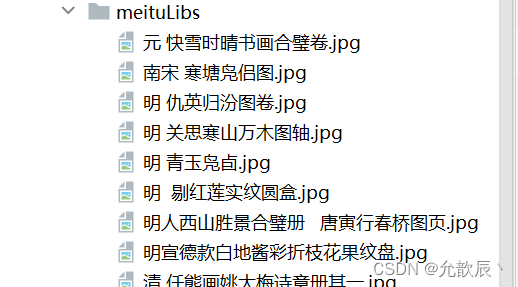
可以观察到我们所有的数据都是存储成功的了
2.bs4
1.bs4进行数据解析
bs4进行数据解析
数据解析的原理:
- 标签定位
- 提取标签、标签属性中存储的数据值
bs4数据解析的原理:
- 实例化一个BeautifulSoup对象,并且将页面源码数据加载到该对象中
- 通过调用BeautifulSoup对象中相关的属性或者方法进行标签定位和数据提取
-环境安装:
- pip install bs4
- pip install lxml
2.实例化BeautifulSoup对象
一from bs4 import BeautifulSoup
一对象的实例化:
1.将本地的html文档中的数据加载到该对象中
fp = open( './test.html' ,'r' ,encoding='utf-8')
soup =BeautifulSoup(fp,'lxml')
2.将互联网上获取的页面源码加载到该对象中
page_text =response.text
soup =BeatifulSoup(page_text ,'lxml')
3.BeatifulSoup中用于数据解析的方法和属性
先来导入我们需要测试的页面
<!DOCTYPE html>
<html>
<head>
    <meta charset="UTF-8"/>
    <title>测试页面</title>
</head>
<body>
    <div>
        <p>张三</p>
    </div>
    <div class="song">
        <p>李清照</p>
        <p>辛弃疾</p>
        <p>苏轼</p>
        <p>柳宗元</p>
        <a href="www.song.com" title="赵匡胤" target="_self">
            <span>this is span</span>
            宋朝是最强大的王朝,不是军队的强大,而是经济很强大,国民都很有钱
            <a href=" " class="du">总为浮云能蔽日,长安不见使人愁</a>
            <img src="http://www.baidu.com/meinv.jpg" alt=""/>

        </a>


    </div>

    <div class="tang">
        <ul>
            <li><a href= " http://www.baidu.com" title="qing">清明时节雨纷纷,路上行人欲断魂,借问酒家何处有,牧童遥指杏花村</a></li>
            <li><a href= "http://ww.163.com" title="qin">秦时明月汉时关,万里长征人未还,但使龙城飞将在,不教胡马度阴山</a></li>
            <li><a href= " http://ww.126.com" alt="qi">岐王宅里寻常见\n,崔九堂前几度闻,正是江南好风景,落花时节又逢君</a></li>
            <li><a href="http: // www.sina.com" class="du">杜甫</a></li>
            <li><a href="http: //www.dudu.com" class="du">杜牧</a></li>
            <li><b>杜小月</b></li>
            <li><i>度蜜月</i></li>
            <li><a href="http://www.haha.com" id="feng">凤凰台上凤凰游,凤去台空江自流,吴宫花草埋幽径,晋代衣冠成古丘</a></li>
        </ul>


    </div>

</body>
</html>
- soup.tagName:返回的是文档中第一次出现的tagName对应的标签
from bs4 import BeautifulSoup
if __name__ == '__main__':
    #对象实例化
    with open("./test.html",'r',encoding='utf-8') as file:
        soup=BeautifulSoup(file,'lxml')
    print(soup.a)
之后的a标签都不会出现,到下一个a标签出现之前结束
-soup.find( ):
-find ( 'tagName '):等同于soup.div一属性定位:
print(soup.find('a'))和之前的结果一样
-soup.find( 'div',class_/id/attr={'class',:'song',...})
print(soup.find('div',class_='tang'))
- soup.find_all( 'tagName '):返回符合要求的所有标签(列表)
print(soup.findAll('a')) 返回的是所有a标签的列表
- select:
- select('某种选择器(id,class,标签...选择器'),返回的是一个列表。
print(soup.select(".song"))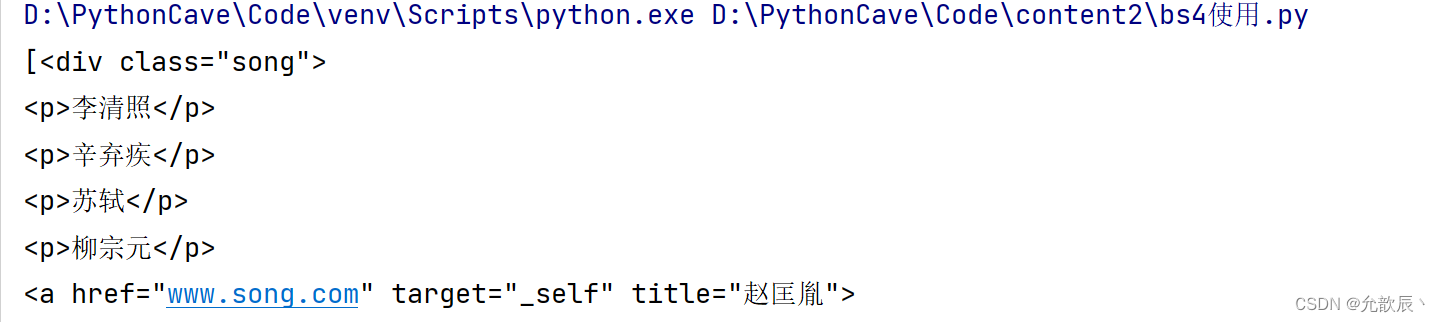
-层级选择器:
- soup.select( '.tang > ul > li > a'):
>表示的是一个层级- soup.select( '.tang li > a'):空格表示的多个层级
print(soup.select(".tang > ul > li > a")[2])print(soup.select(".tang li > a")[2])也可以直接在网页上进行复制

print(soup.select('body > div.tang > ul > li:nth-child(3) > a'))一获取标签之间的文本数据:
- soup.a.text/string/get_text()
print(soup.select('body > div.tang > ul > li:nth-child(3) > a')[0].string)
- text/get_text():可以获取某一个标签中所有的文本内容
print(soup.select('body > div.tang')[0].get_text())
- string:只可以获取该标签下面直系的文本内容
print(soup.select('body > div.tang')[0].string)
一获取标签中属性值:
print(soup.select('body > div.tang > ul > li:nth-child(3) > a')[0]['href'])
3.实战
遗留问题:如何爬取换行符<br/>
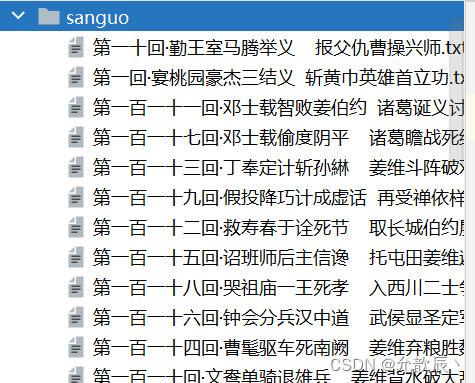
需求:爬取三国演义小说所有的章节标题和章节内容
import requests,os
from bs4 import BeautifulSoup
if __name__ == '__main__':
    if not os.path.exists('./sanguo'):
        os.mkdir('./sanguo')
    # 定义请求头,把程序伪装成用户
    head = {
        "User-Agent": "Mozilla/5.0 (Windows NT 10.0; Win64; x64) AppleWebKit/537.36 (KHTML, like Gecko) Chrome/120.0.0.0 Safari/537.36"
    }
    url="https://www.shicimingju.com/book/sanguoyanyi.html"
    response=requests.get(url=url,headers=head)
    response.encoding='utf-8'
    page_text=response.text
    #在首页解析出章节的标题和详情页的url
    #实例化BeautifulSoup,将页面的详情数据加载到BeautifulSoup内
    soup=BeautifulSoup(page_text,'lxml')
    info_lst=soup.select('#main_left > div > div.book-mulu > ul > li > a')
    info_lst=info_lst[:1]

    for item in info_lst:
        title=item.string
        content_url="https://www.shicimingju.com"+item['href']
        response2=requests.get(url=content_url,headers=head)
        response2.encoding = 'utf-8'
        soup = BeautifulSoup(response2.text, 'lxml')
        content=soup.find('div',class_='chapter_content').text
        with open('./sanguo/'+title+'.txt','w',encoding='utf-8') as file:
            file.write(content)
        print(title+"爬取成功!")
3.xpath
1.xpath数据解析
是最常用且最便捷高效的一种解析方式
xpath解析原理:
-1.实例化一个ctree的对象,且需要将被解析的页面源码数据加载到该对象中。
-2.调用etree对象中的xpath方法结合着xpath表达式实现标签的定位和内容的捕获。环境的安装:
- pip install lxml
2. 实例化一个etree对象
from lxml import etree
- 1.将本地的html文档中的源码数据加载到etree对象中:
etree.parse(filePath)
-2.可以将从互联网上获取的源码数据加载到该对象中
etree.HTML('page _text')
- xpath( 'xpath表达式')
3.xpath表达式的使用
1.基本使用
- xpath表达式:
- -/:表示的是从根节点开始定位。表示的是一个层级。
- -//:表示的是多个层级。可以表示从任意位置开始定位。
from lxml import etree
if __name__ == '__main__':
    tree=etree.parse('test.html')
    r=tree.xpath("/html/body/div")
    print(r)
r=tree.xpath("//div")这两种返回的结果是一样的,这次表达的意思是从任意位置寻找div标签
2.属性定位
以上//div定位返回的结果是多个div标签,当我们需要返回class属性为song的标签时,我们可以进行如下的操作
    r=tree.xpath('//div[@class="song"]')
    print(r)
3.索引定位
当我们定位div,标签下第2个p标签的时候,我们可以进行如下操作
    #索引是从1开始的
    r=tree.xpath('//div[@class="song"]/p[2]')
    print(r)
4.取文本
当我们需要取得杜甫的文本时:/text():获取的标签中直系的文本内容
    #索引是从1开始的
    r=tree.xpath('//div[@class="tang"]//li[4]/a/text()')[0]
    print(r)
当我们需要获取<li>标签内度蜜月的信息时://text():获取的标签中非直系的所有的文本内容
    r=tree.xpath('//li[7]//text()')[0]
    print(r)
5.取属性
当我们需要获取div,song标签下img的src值的时候:/@attrName
    r=tree.xpath('//div[@class="song"]//img/@src')[0]
    print(r)
注意:局部解析需要以./开头
4.实战1
需求:爬爬取58二手房的房源信息
import requests
from lxml import etree
if __name__ == '__main__':
    url="https://bj.58.com/ershoufang/"
    head = {
        "User-Agent": "Mozilla/5.0 (Windows NT 10.0; Win64; x64) AppleWebKit/537.36 (KHTML, like Gecko) Chrome/120.0.0.0 Safari/537.36"
    }
    response=requests.get(url=url,headers=head)
    response.encoding='utf-8'
    tree=etree.HTML(response.text)
    r=tree.xpath('//div[@class="property-content-title"]/h3/text()')
    fp=open("./58二手房.text",'w',encoding='utf-8')
    for item in r:
        fp.write(item+"\n")
        print("存储成功:"+item)
    fp.close()
5.实战2
需求:解析下载图片数据
import requests,os
from lxml import etree

if __name__ == '__main__':
    if not os.path.exists('./美女'):
        os.mkdir('./美女')
    url = "https://pic.netbian.com/4kmeinv/"
    head = {
        "User-Agent": "Mozilla/5.0 (Windows NT 10.0; Win64; x64) AppleWebKit/537.36 (KHTML, like Gecko) Chrome/120.0.0.0 Safari/537.36"
    }
    response = requests.get(url=url, headers=head)
    #可以手动设置相应数据的编码,但有时可能不生效
    # response.encoding='utf-8'
    tree=etree.HTML(response.text)
    lis=tree.xpath('//div[@class="slist"]/ul/li')
    for li in lis:
        pic_src='https://pic.netbian.com'+li.xpath('./a/img/@src')[0]
        pic_name=li.xpath('./a/img/@alt')[0]+'.jpg'
        #通用处理中文乱码的解决方案
        pic_name=pic_name.encode('iso-8859-1').decode('gbk')
        #请求图片进行持久化存储
        pic_info=requests.get(url=pic_src, headers=head).content
        with open('./美女/'+pic_name,'wb') as file:
            file.write(pic_info)
            print("存储成功:"+pic_name)
如果发生中文乱码方式,有以下两种解决方案:(通常是哪种方式生效采用哪种方式)
方案一:
    response = requests.get(url=url, headers=head)
    #可以手动设置相应数据的编码,但有时可能不生效
    response.encoding='utf-8'
方案二:
        #通用处理中文乱码的解决方案
        pic_name=pic_name.encode('iso-8859-1').decode('gbk')
注意:但是不要一起使用
6.实战3
需求:解析出所有城市的名称
import requests
from lxml import etree
if __name__ == '__main__':
    url = "https://www.aqistudy.cn/historydata/"
    head = {
        "User-Agent": "Mozilla/5.0 (Windows NT 10.0; Win64; x64) AppleWebKit/537.36 (KHTML, like Gecko) Chrome/120.0.0.0 Safari/537.36"
    }
    response = requests.get(url=url, headers=head)
    response.encoding='utf-8'
    tree=etree.HTML(response.text)
    a_lists=tree.xpath('//div[@class="bottom"]/ul/li/a | //div[@class="bottom"]/ul/div[2]/li/a')
    all_city=[]
    for item in a_lists:
        city=item.xpath('./text()')[0]
        all_city.append(city)
        print(city)
    print(len(all_city))
这个案例要学会的是xpath的里面的表达方式可以用|,更加通用的表达方式
7.实战4
需求:爬取站长素材中的免费简历模板
import requests,os
from lxml import etree
if __name__ == '__main__':
    if not os.path.exists("./简历模版"):
        os.mkdir("./简历模版")
    for page in range(1,951):
        if page != 1:
            url = "https://sc.chinaz.com/jianli/free_"+str(page)+".html"
        else:
            url= "https://sc.chinaz.com/jianli/free.html"
        head = {
            "User-Agent": "Mozilla/5.0 (Windows NT 10.0; Win64; x64) AppleWebKit/537.36 (KHTML, like Gecko) Chrome/120.0.0.0 Safari/537.36"
        }
        response = requests.get(url=url, headers=head)
        # 可以手动设置相应数据的编码,但有时可能不生效
        response.encoding = 'utf-8'
        tree = etree.HTML(response.text)
        href_lists = tree.xpath('//div[@id="main"]/div/div/a/@href')
        for href in href_lists:
            response2 = requests.get(url=href, headers=head)
            # 可以手动设置相应数据的编码,但有时可能不生效
            response2.encoding = 'utf-8'
            tree2 = etree.HTML(response2.text)
            title = tree2.xpath('//div[@class="ppt_tit clearfix"]/h1/text()')[0] + ".rar"
            down_url = tree2.xpath('//div[@id="down"]/div[2]/ul/li[4]/a/@href')[0]
            info = requests.get(url=down_url, headers=head).content
            with open('./简历模版/' + title, 'wb') as file:
                file.write(info)
                print("存储成功:" + title)
三.验证码识别
反爬机制:验证码.识别验证码图片中的数据,用于模拟登陆操作。
识别验证码的操作:
-人工肉眼识别。(不推荐)-第三方自动识别(推荐)
1.超级鹰平台的使用
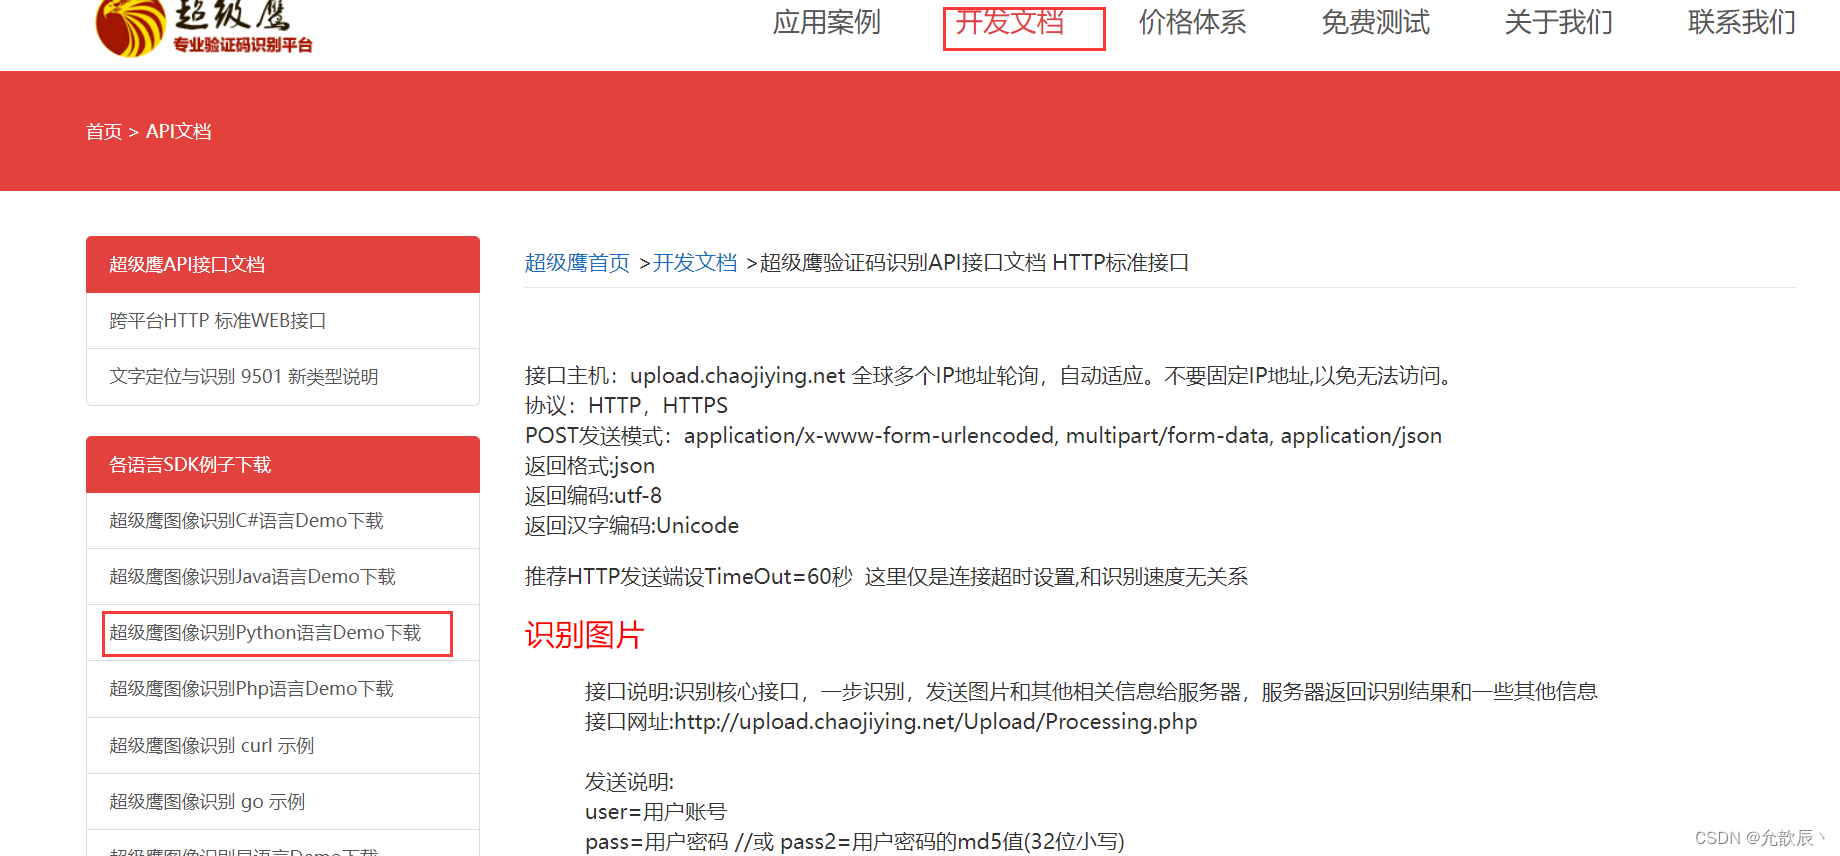
进入到超级鹰平台:超级鹰验证码识别-专业的验证码云端识别服务,让验证码识别更快速、更准确、更强大
首先我们点击注册,然后注册完账号密码之后,我们可以进入个人中心,扫描右下角的微信公众号二维码进行账户的绑定,这样免费送1000点的账户题分,
之后点击开发文档,下载python的代码示例,导入到pycharm中进行操作

#!/usr/bin/env python
# coding:utf-8

import requests
from hashlib import md5

class Chaojiying_Client(object):

    def __init__(self, username, password, soft_id):
        self.username = username
        password =  password.encode('utf8')
        self.password = md5(password).hexdigest()
        self.soft_id = soft_id
        self.base_params = {
            'user': self.username,
            'pass2': self.password,
            'softid': self.soft_id,
        }
        self.headers = {
            'Connection': 'Keep-Alive',
            'User-Agent': 'Mozilla/4.0 (compatible; MSIE 8.0; Windows NT 5.1; Trident/4.0)',
        }

    def PostPic(self, im, codetype):
        """
        im: 图片字节
        codetype: 题目类型 参考 http://www.chaojiying.com/price.html
        """
        params = {
            'codetype': codetype,
        }
        params.update(self.base_params)
        files = {'userfile': ('ccc.jpg', im)}
        r = requests.post('http://upload.chaojiying.net/Upload/Processing.php', data=params, files=files, headers=self.headers)
        return r.json()

    def PostPic_base64(self, base64_str, codetype):
        """
        im: 图片字节
        codetype: 题目类型 参考 http://www.chaojiying.com/price.html
        """
        params = {
            'codetype': codetype,
            'file_base64':base64_str
        }
        params.update(self.base_params)
        r = requests.post('http://upload.chaojiying.net/Upload/Processing.php', data=params, headers=self.headers)
        return r.json()

    def ReportError(self, im_id):
        """
        im_id:报错题目的图片ID
        """
        params = {
            'id': im_id,
        }
        params.update(self.base_params)
        r = requests.post('http://upload.chaojiying.net/Upload/ReportError.php', data=params, headers=self.headers)
        return r.json()


if __name__ == '__main__':
    chaojiying = Chaojiying_Client('超级鹰的账号', '超级鹰的密码', '96001')	#用户中心>>软件ID 生成一个替换 96001
    im = open('a.jpg', 'rb').read()													#本地图片文件路径 来替换 a.jpg 有时WIN系统须要//
    print(chaojiying.PostPic(im, 4004))												#1902 验证码类型  官方网站>>价格体系 3.4+版 print 后要加()
    #print chaojiying.PostPic(base64_str, 1902)  #此处为传入 base64代码
替换自己的账号和密码之后,根据验证码的类型,进行验证码的解析
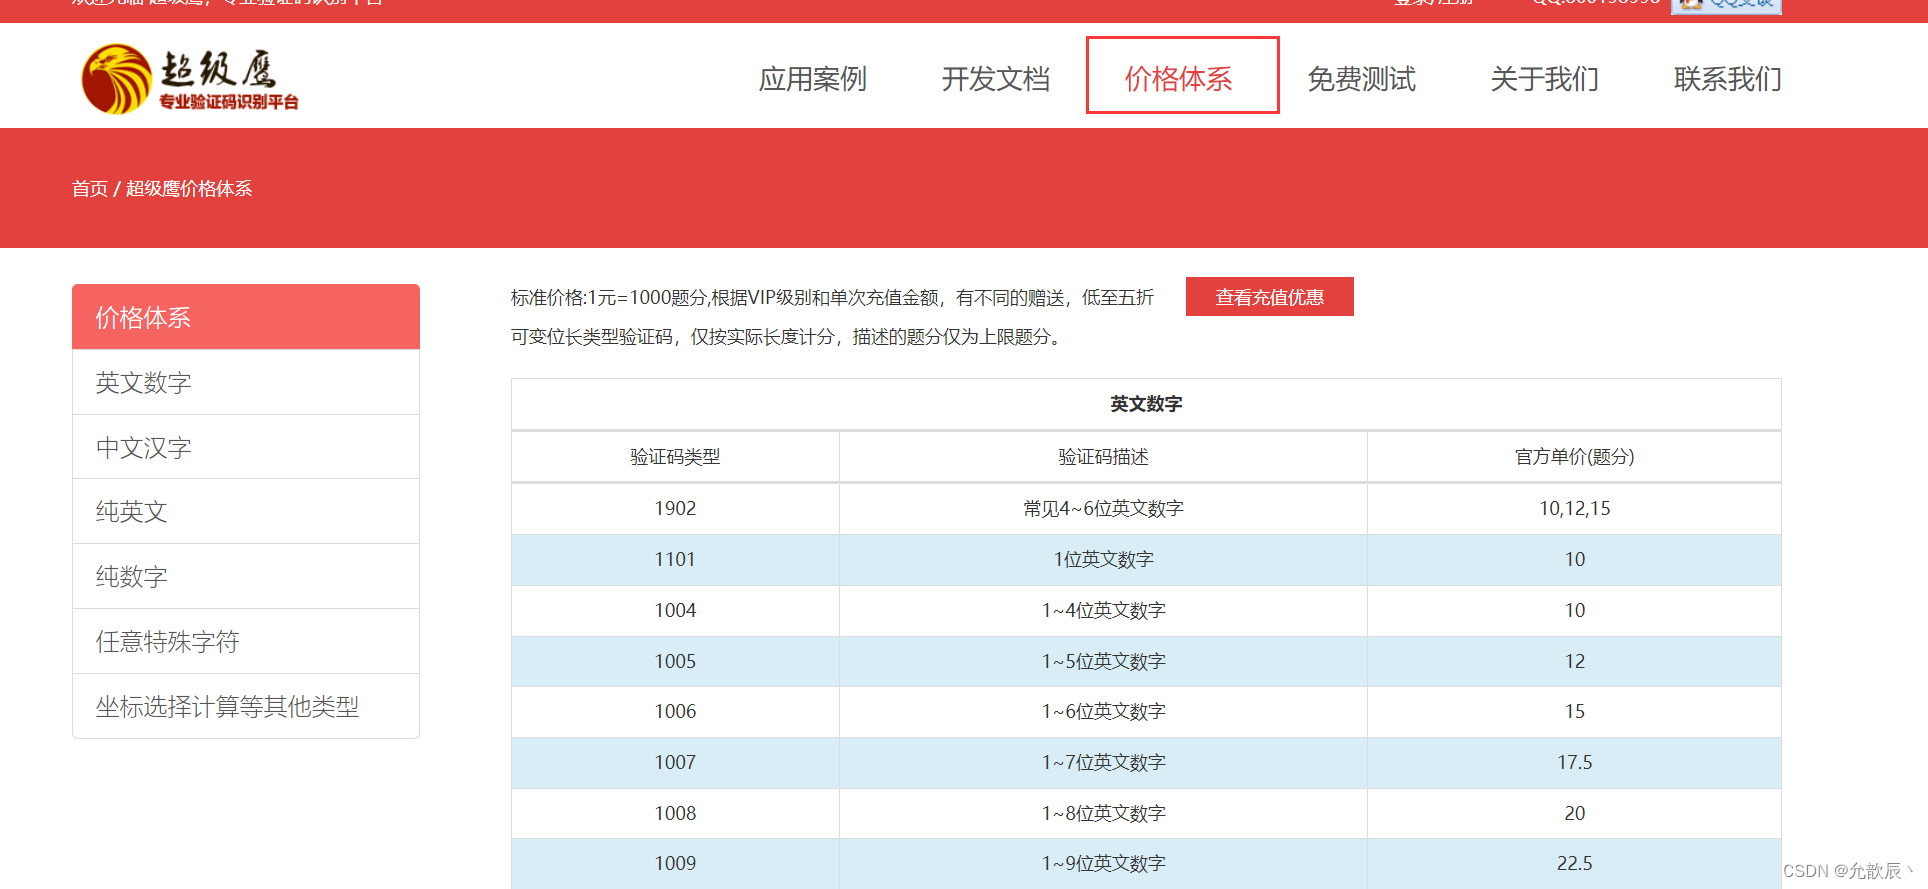
验证码的类型可以到价格体系中进行查询
下面是识别示例的结果

2.识别古诗文网验证码
验证码识别的步骤:
1.将验证码进行本地下载
2.调用平台提供的示例代码进行图片数据识别
import requests
from chaojiying import Chaojiying_Client
from lxml import etree
def getCodeText(pic_src,codeType):
    chaojiying = Chaojiying_Client('chooker', 'woaini520', '96001')	#用户中心>>软件ID 生成一个替换 96001
    im = open(pic_src, 'rb').read()													#本地图片文件路径 来替换 a.jpg 有时WIN系统须要//
    return chaojiying.PostPic(im, codeType)

if __name__ == '__main__':
    url="https://so.gushiwen.cn/user/login.aspx?from=http://so.gushiwen.cn/user/collect.aspx"
    head = {
        "User-Agent": "Mozilla/5.0 (Windows NT 10.0; Win64; x64) AppleWebKit/537.36 (KHTML, like Gecko) Chrome/120.0.0.0 Safari/537.36"
    }
    page_text=requests.get(url=url,headers=head).text
    tree=etree.HTML(page_text)
    code_url='https://so.gushiwen.cn'+tree.xpath('//*[@id="imgCode"]/@src')[0]
    img_data=requests.get(url=code_url, headers=head).content
    with open('./code.jpg','wb') as file:
        file.write(img_data)
    result=getCodeText('./code.jpg',1004)
    print(result)
可以观察到识别是成功的了


3.登录cookie操作
http/ https协议特性:无状态。没有请求到对应页面数据的原因:
发起的第二次基于个人主页页面请求的时候,服务器端并不知道该此请求是基于登录状态下的请求
cookie:用来让服务器端记录客户端的相关状态。
-手动处理:通过抓包工具获取cookie值,将该值封装到headers中。(不建议)一自动处理:
- cookie值的来源是哪里?
一模拟登录post请求后,由服务器端创建。session会话对象:
-作用:
1.可以进行请求的发送。
2.如果请求过程中产生了cookie,则该cookie会被自动存储/携带在该session
-创建一个session对象: session = requests.Session()
-使用session对象进行模拟登录post请求的发送(cookie就会被存储在session中)- session对象对个人主页对应的get请求进行发送(携带了cookie)
import requests
from chaojiying import Chaojiying_Client
from lxml import etree
def getCodeText(pic_src,codeType):
    chaojiying = Chaojiying_Client('chooker', 'woaini520', '96001')	#用户中心>>软件ID 生成一个替换 96001
    im = open(pic_src, 'rb').read()													#本地图片文件路径 来替换 a.jpg 有时WIN系统须要//
    return chaojiying.PostPic(im, codeType)

if __name__ == '__main__':
    session=requests.Session()
    url="https://so.gushiwen.cn/user/login.aspx?from=http://so.gushiwen.cn/user/collect.aspx"
    head = {
        "User-Agent": "Mozilla/5.0 (Windows NT 10.0; Win64; x64) AppleWebKit/537.36 (KHTML, like Gecko) Chrome/120.0.0.0 Safari/537.36"
    }
    page_text=requests.get(url=url,headers=head).text
    tree=etree.HTML(page_text)
    code_url='https://so.gushiwen.cn'+tree.xpath('//*[@id="imgCode"]/@src')[0]
    img_data=requests.get(url=code_url, headers=head).content
    with open('./code.jpg','wb') as file:
        file.write(img_data)
    result=getCodeText('./code.jpg',1004)

    data:{
        '__VIEWSTATE': r'wMcEk/8V75kFay7WrzbIB1fro701euD8Gc + DWJBov5lg + e3 + 5TfRLJCelzDBQuv02dDidBw5LHiK5mv6pu51WZTlhqrlDdZRh10xkCTY + gimGbgbe0VVR5pXfDScLOH3Fuymlwf5nyrapLBkrHmwKoX / zws =',
    '__VIEWSTATEGENERATOR': 'C93BE1AE',
    'from': 'http://so.gushiwen.cn / user / collect.aspx?type = d',
    'email': r"1474502128@qq.com",
    'pwd': 'woaini520',
    'code': result,
    'denglu': '登录',
    }
    #登录使用session进行
    session.get('https://so.gushiwen.cn/user/login.aspx?from=http%3a%2f%2fso.gushiwen.cn%2fuser%2fcollect.aspx%3ftype%3dd',data=data,headers=head)
    #后面的session都包含cookie,不需要登录
    session.get('www.gushiwen.cn',headers=head)
四.代理
1.代理理论
当我们使用同一个ip对一个网站短时间进行多次请求的时候,这个网站对此ip就会进行封禁,使用代理可以解决这个问题
代理的作用:
- 突破自身IP访问的限制
- 隐藏自身真实IP
代理ip的类型:
- http:应用到http协议对应的url中- https:应用到https协议对应的url中
代理ip的匿名度:
- 透明:服务器知道该次请求使用了代理,也知道请求对应的真实ip
- 匿名:知道使用了代理,不知道真实ip
- 高匿:不知道使用了代理,更不知道真实的ip
2.实战
使用代理ip爬取百度搜索结果是ip的html内容
import requests

if __name__ == '__main__':
    session = requests.Session()
    url = "https://www.baidu.com/wd=ip"
    head = {
        "User-Agent": "Mozilla/5.0 (Windows NT 10.0; Win64; x64) AppleWebKit/537.36 (KHTML, like Gecko) Chrome/120.0.0.0 Safari/537.36"
    }
    page_info=requests.get(url=url,headers=head,proxies={'https':'代理ip'}).text
    with open("./a.html",'w',encoding='utf-8') as file:
        file.write(page_info)


 671
671


 被折叠的 条评论
为什么被折叠?
被折叠的 条评论
为什么被折叠?
 到【灌水乐园】发言


